Our current interface Version 2.0 is available directly from the standard application.
How to switch to the V2 interface:
1. Click the “V2.0” button: In the top left corner of the screen, you’ll see a button labeled “V2.0”.
2. A new window will open: The V2 interface will load in a new browser window. You can continue using both interfaces in parallel if needed.
Tip: If you’re still using the legacy Version 1 interface, it’s a great time to switch. V2.0 offers a cleaner design, better performance, and full access to all new features and updates. Give it a try switching is just one click away!
Correctly defining and maintaining country information in details is essential, as royalties may differ depending on where products and tracks are sold.
Always ensure that the country data is accurate when creating orders or importing statements. Incorrect or missing country information can lead to inaccurate royalty calculations.
Note: Only use valid countries or ISO2 codes. Do not enter region names such as Benelux or North America these are not accepted as countries in details.
Orders
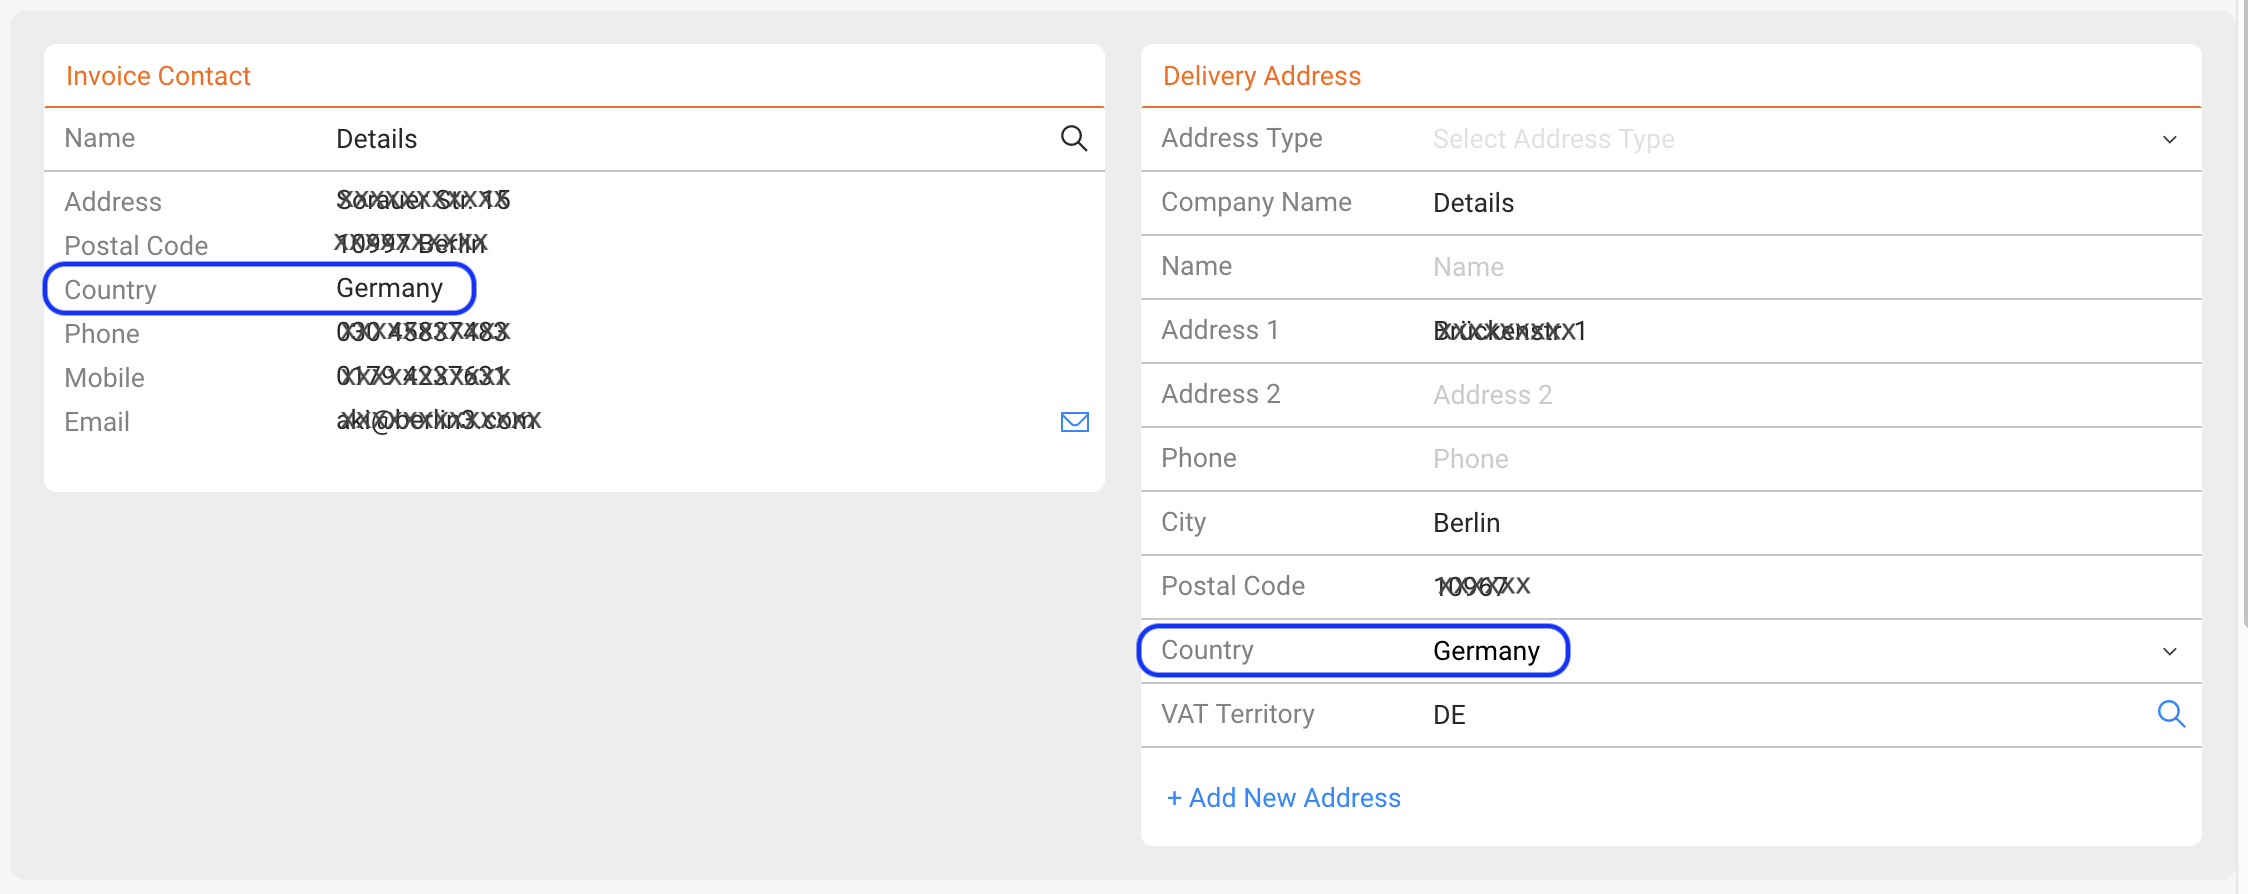
For orders, the delivery address defines the country of sale. If no delivery address is available, the invoice recipient’s country will be used instead.
Therefore, when creating new customers, always include billing and delivery contact information with valid country data.
Imported Sales Statements
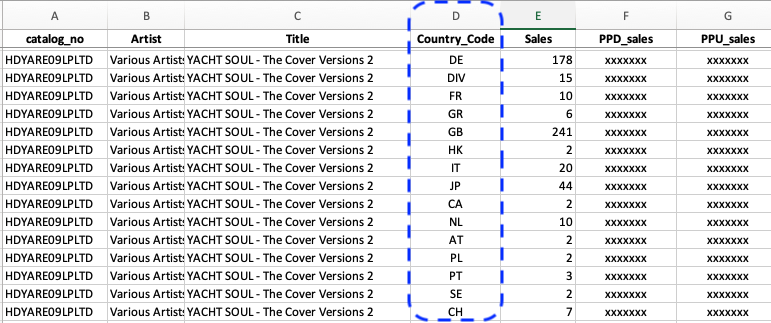
When importing sales statements, the country of sale is often included in each line of the file. Tag the corresponding column with the “Country” import tag to import this information per line.
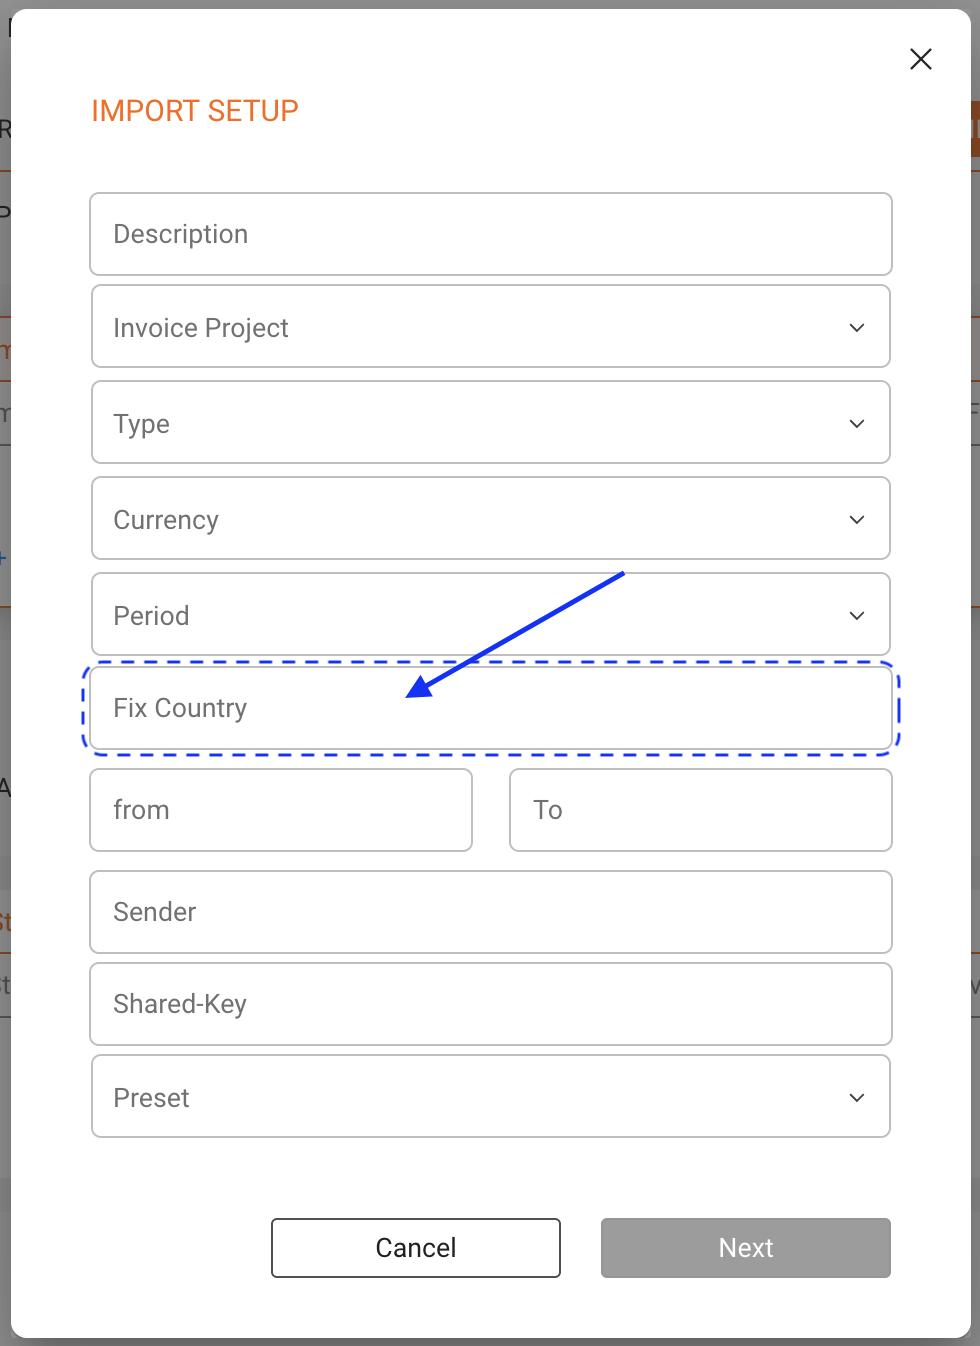
If no country information is available in the statement, you can assign a fixed country to the import. To do this, go to DISTRIBUTION / ACCOUNTS select the account IMPORT SETUP select the Import Setup and enter the country name or ISO2 code in the Fix Country field.
The TASKS feature helps you structure complex processes in details by breaking them down into manageable steps. Assign tasks to specific team members, track progress in real time, and keep everyone aligned whether for bookings, licensing, or product logistics.
Where to Find TASKS
TASKS is part of the main menu and integrated into the following modules: BOOKING, CATALOG (RELEASES & PRODUCTS), LICENSING, and ROYALTY (CONTRACTS).
Use TASKS to plan releases, manage product supply, structure licensing procedures, or coordinate bookings. Every module allows custom sequences, status updates, and team collaboration in real time.
Key Benefits
TASKS helps you stay on top of projects, distribute responsibilities, and make internal workflows more reliable.
1. Ensuring Transparency and Structured Processes
Real-Time Project Monitoring: Everyone can track what’s completed, in progress, or pending.
Collaborative Workflow: Team members can adjust and support each other in real time.
2. Customizing Task Sequences
Workflow documentation: Build reusable templates for recurring processes.
Scalability: Add or adjust steps as needed.
Inspirational TASK Lists for a Release Campaign
Here’s a sample breakdown for a campaign involving singles, an album, and a tour:
If you’re experiencing issues with logging in or staying logged in to details, there could be different causes. Follow this checklist to troubleshoot common problems.
► 1. You’re being logged out automatically
If you’re idle for some time after logging in, your session may expire and you ll be logged out automatically.
If the same username and password are used to log in on a different device or browser, the original session will be logged out.
Third-party cookie settings in your browser may also cause unexpected logouts.
A. Check the privacy settings
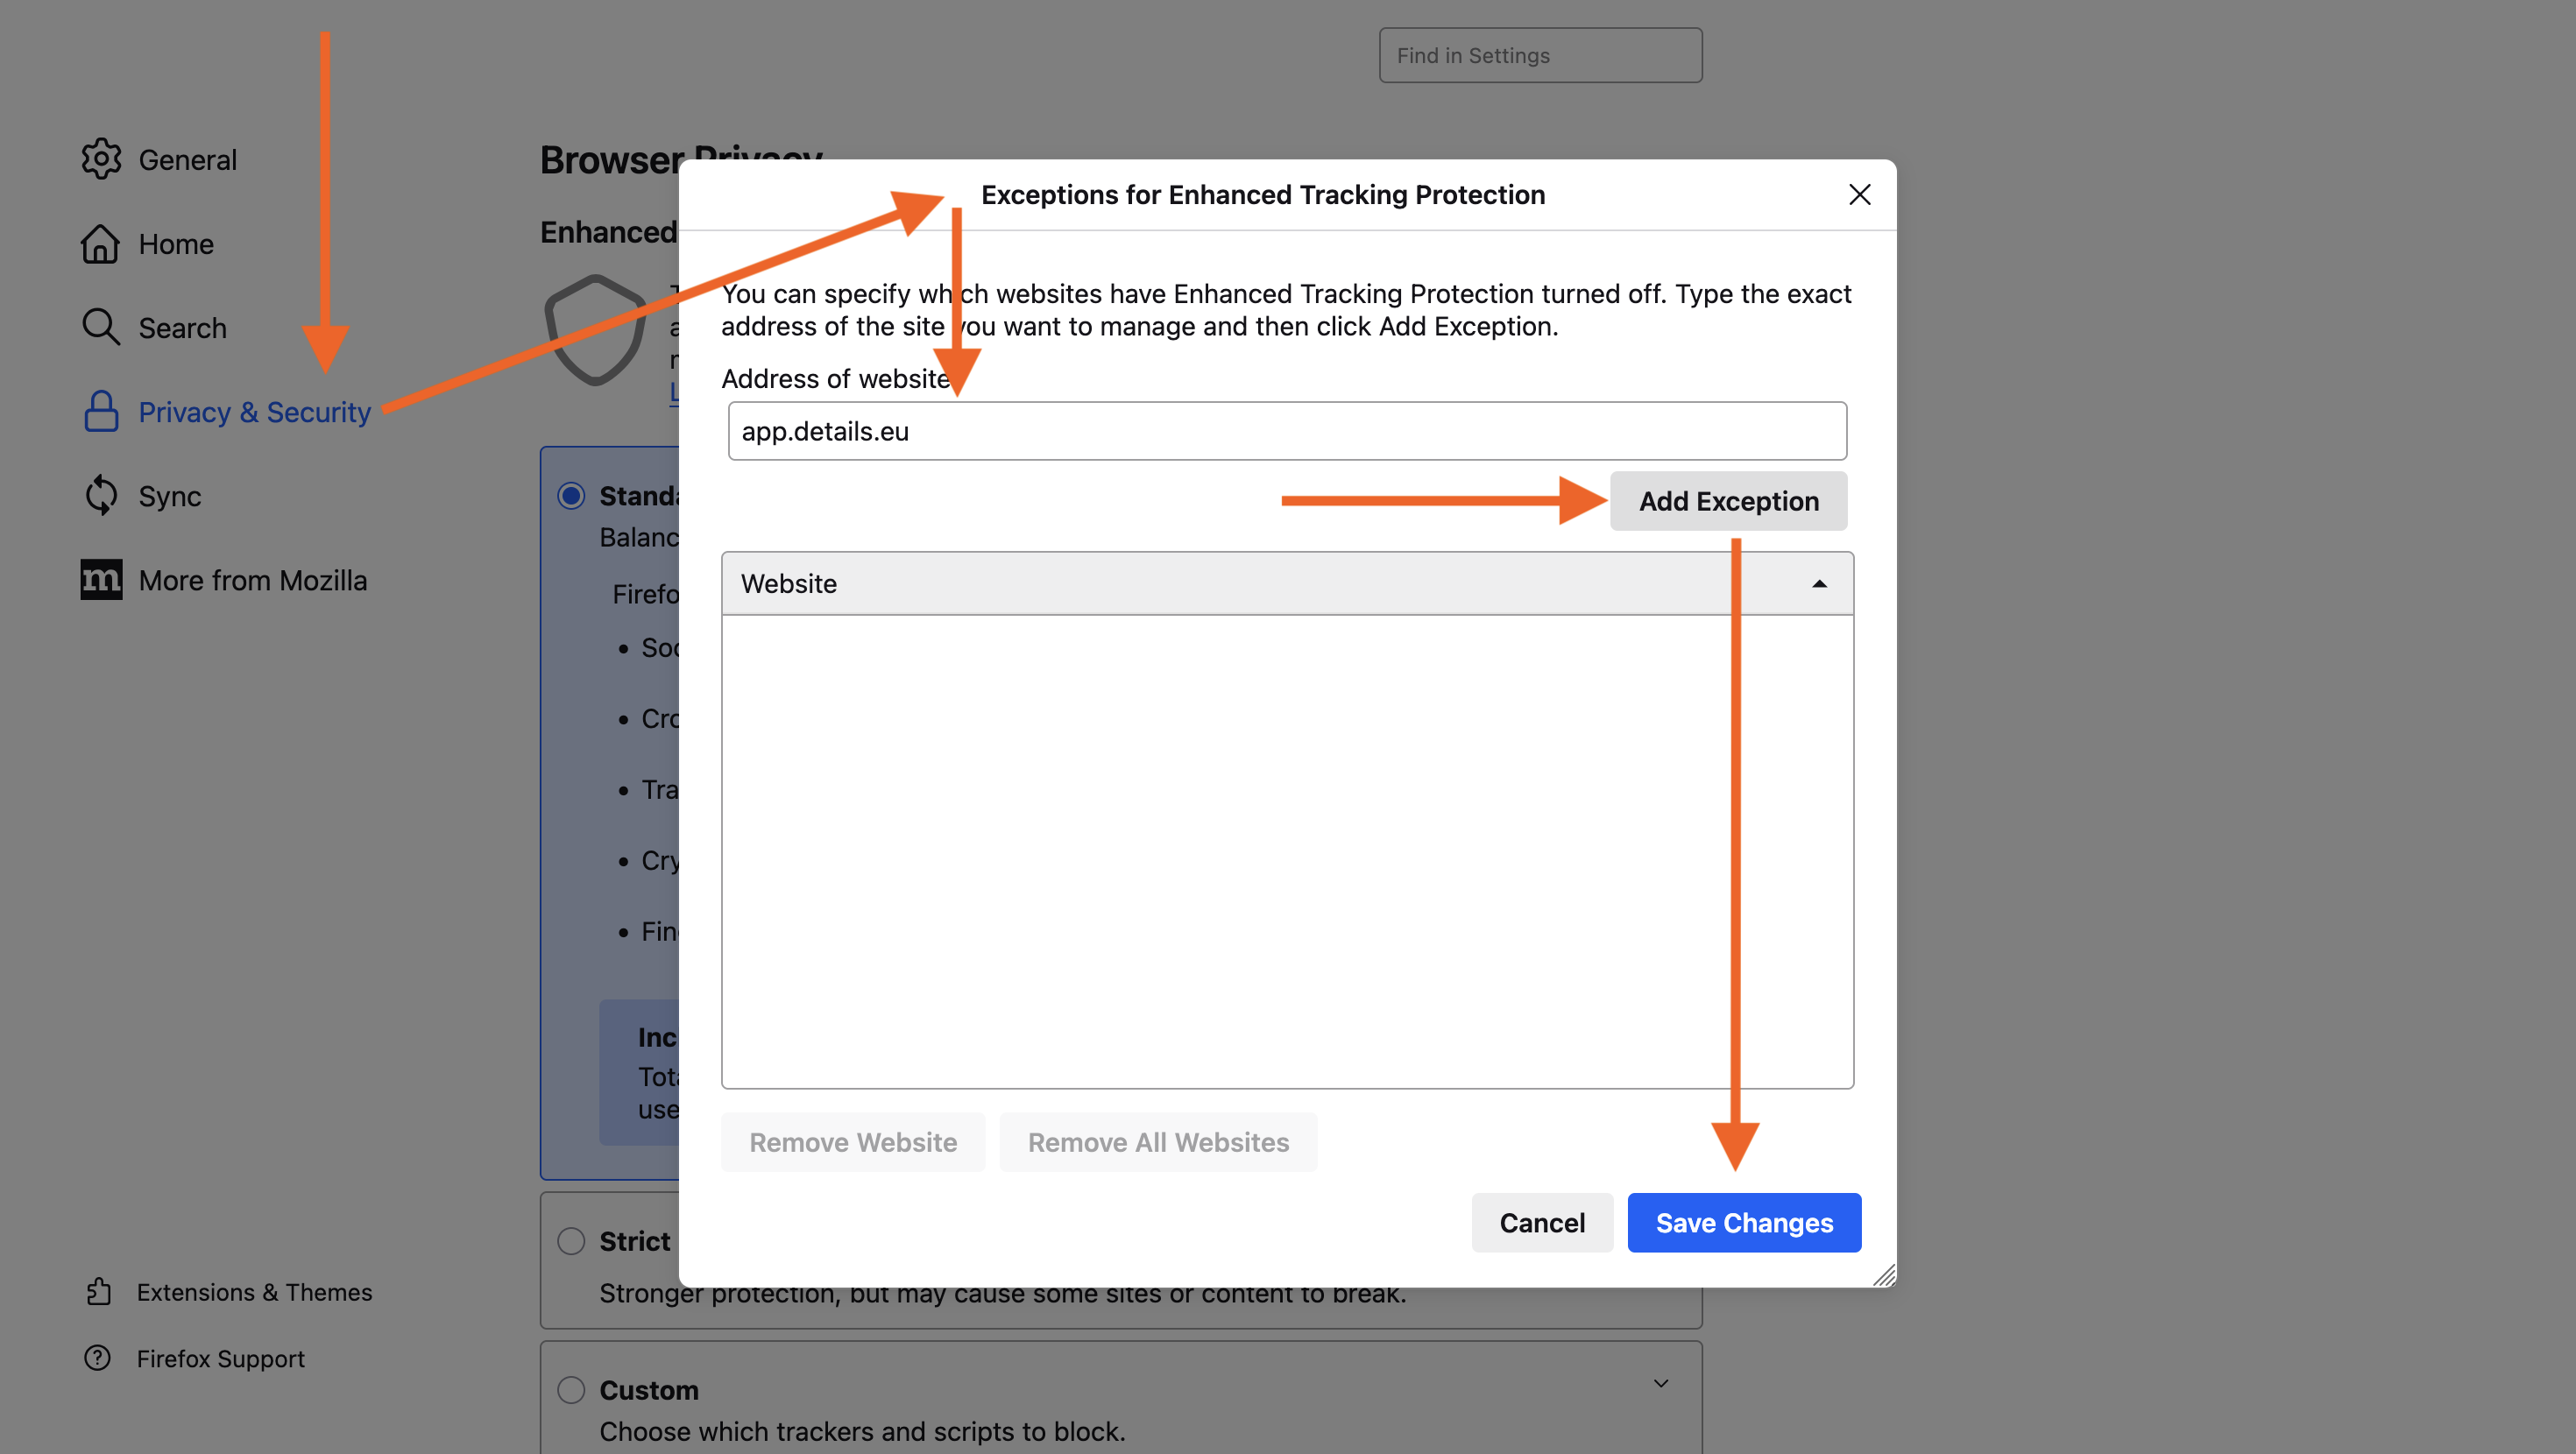
Make sure tracking protection is not blocked for details: Firefox ► Preferences/Settings ► Privacy & Security ► Enhanced Tracking Protection ► Exceptions ► Type “app.details.eu” ► Add Exception ► Save changes
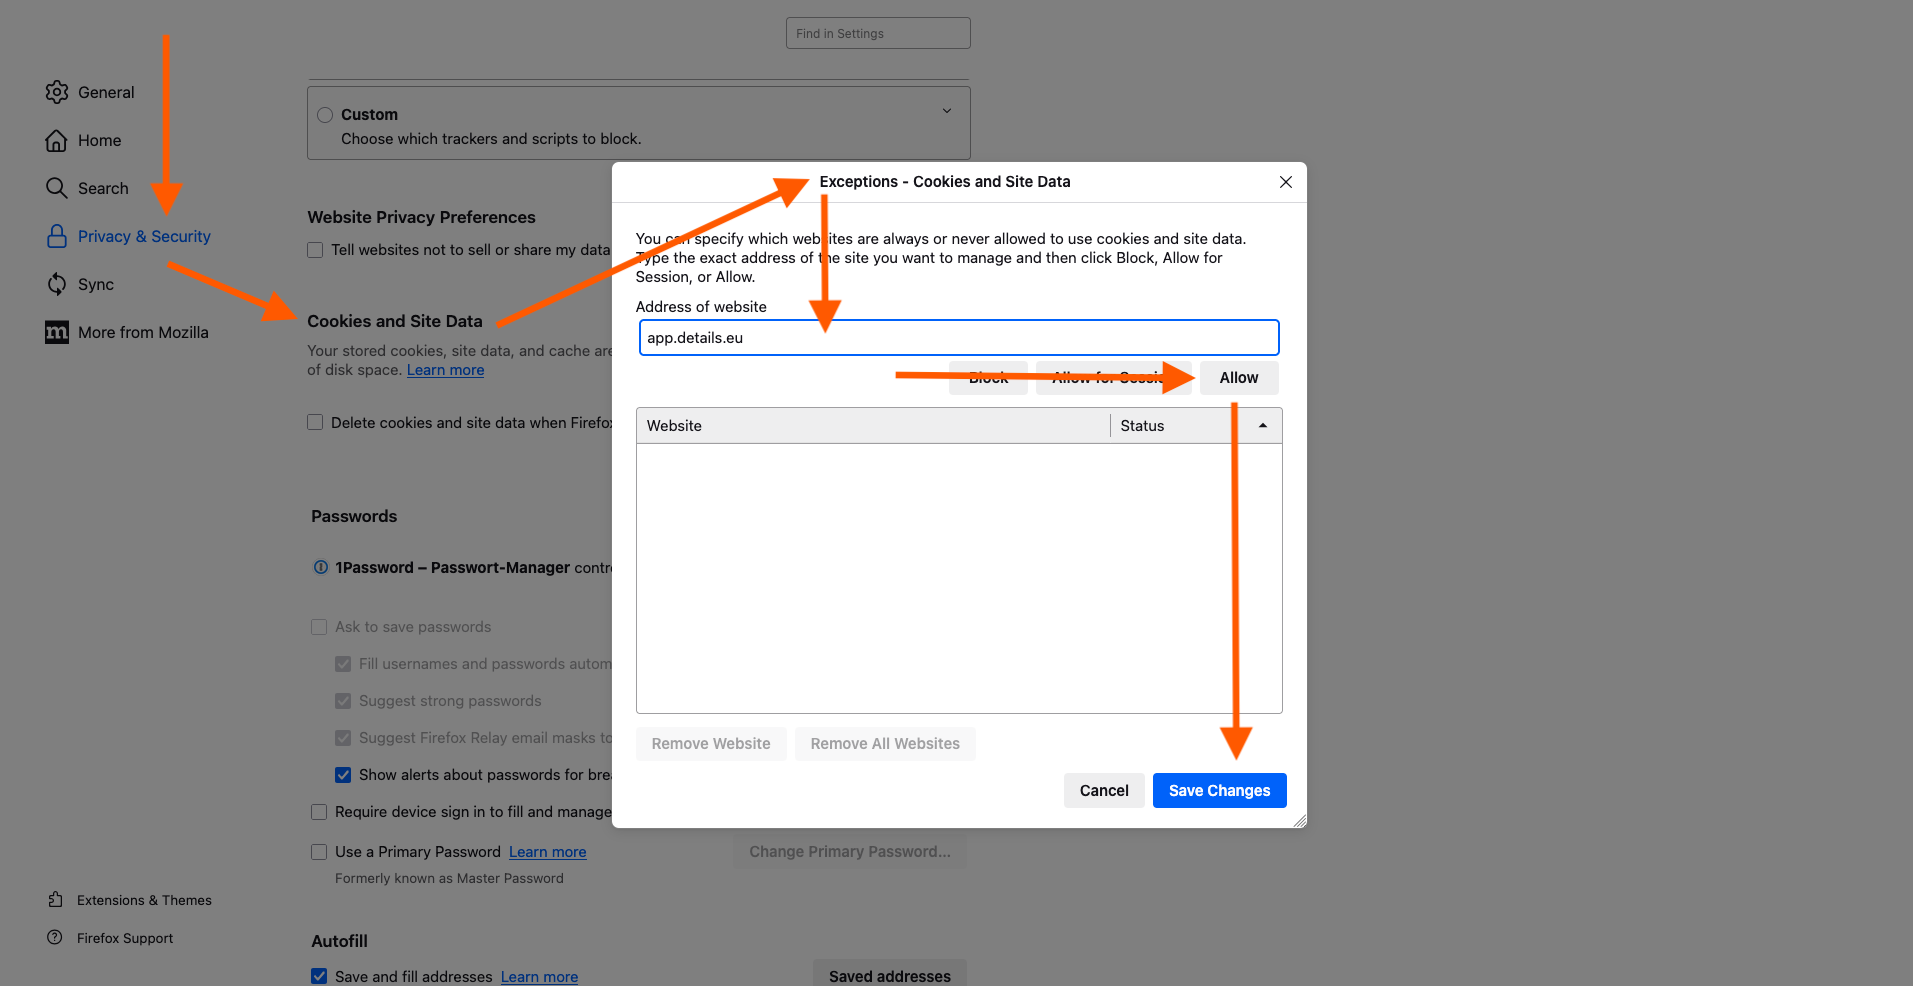
Make sure cookies are always accepted for details. Firefox ► Preferences/Settings ► Privacy & Security ► Cookies and Site Data ► Manage Data ► Type “app.details.eu” ► Allow ► Save changes
► 2. You can’t log in to your account
Check the following possible causes and fixes:
You’re using the correct login link: https://app.details.eu/your_client_name/ (Replace your_client_name with the name of your database)
You’re using the latest version of Firefox and Google Chrome.
Your password has fewer than 32 characters and does not include special characters like * or ►.
You’re using a stable internet connection.
You entered your username and password correctly check upper/lowercase letters.
A. Clean your cookies and cache
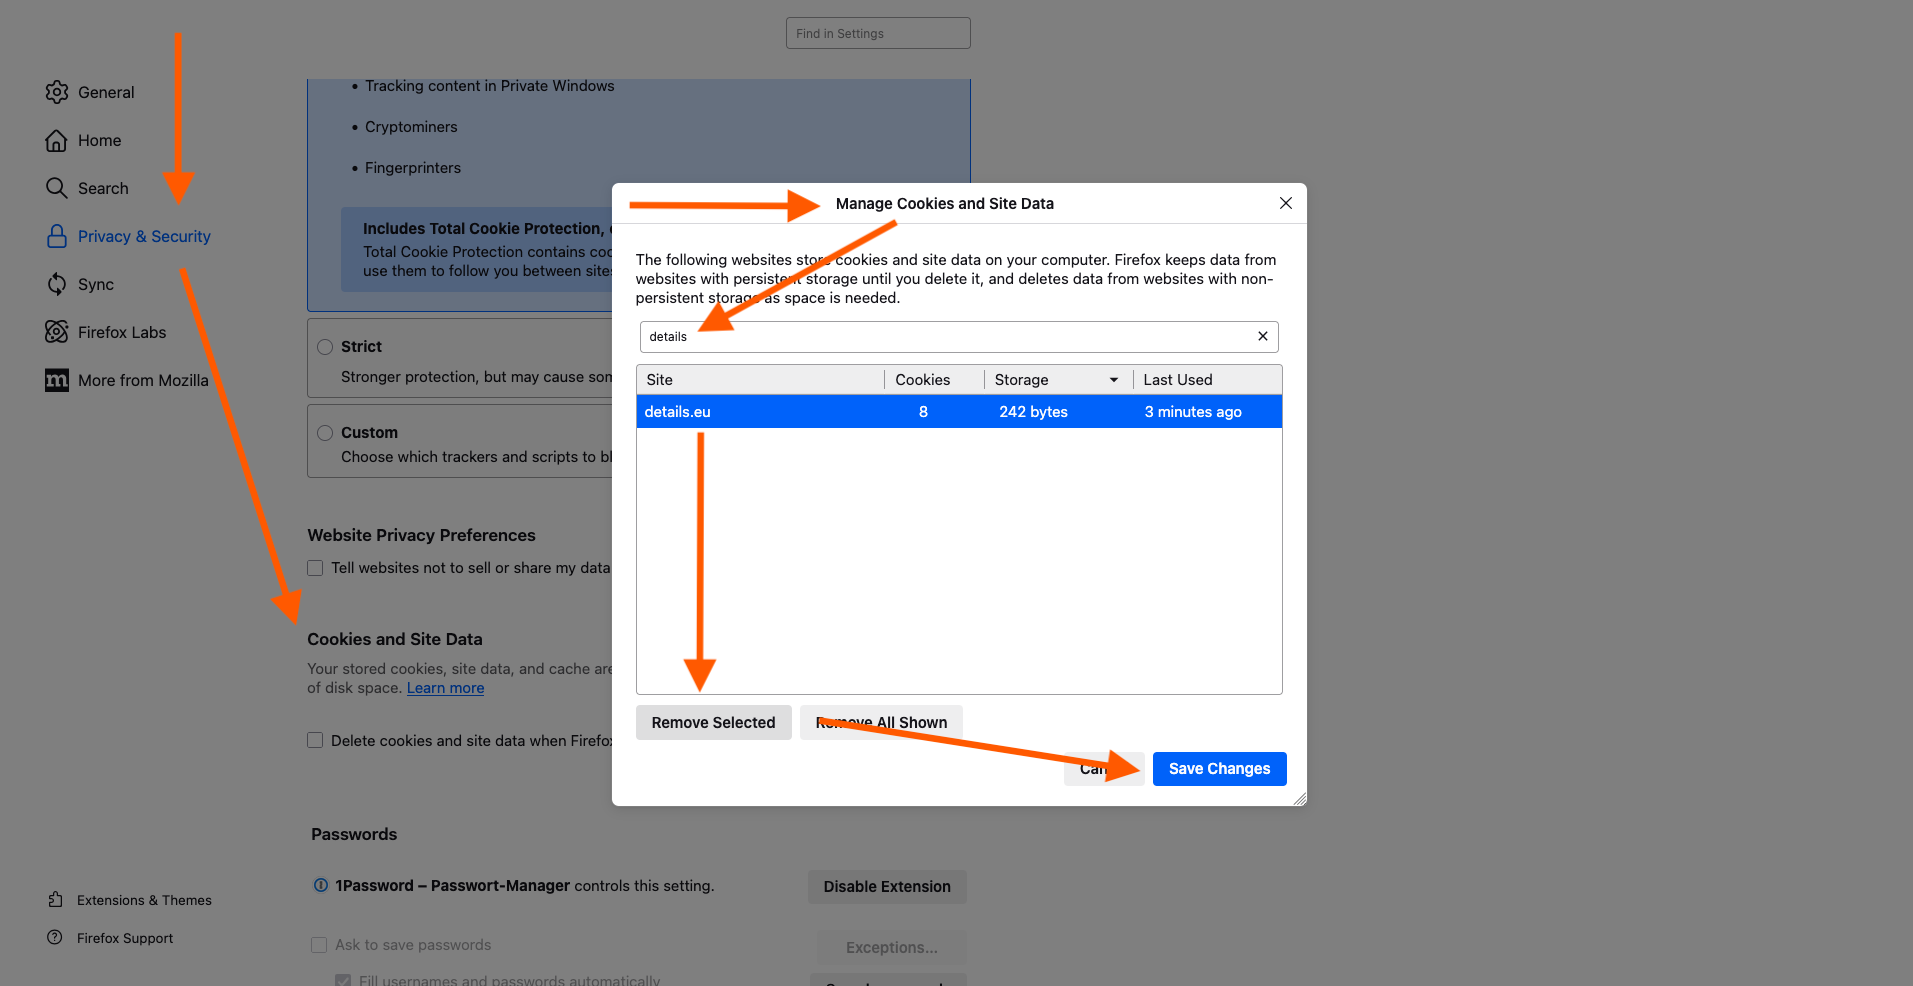
Remove old cookies for details: Firefox ► Preferences ► Privacy & Security ► Cookies and Site Data ► Manage Data ► Type “details” ► Select details.eu ► Remove selected
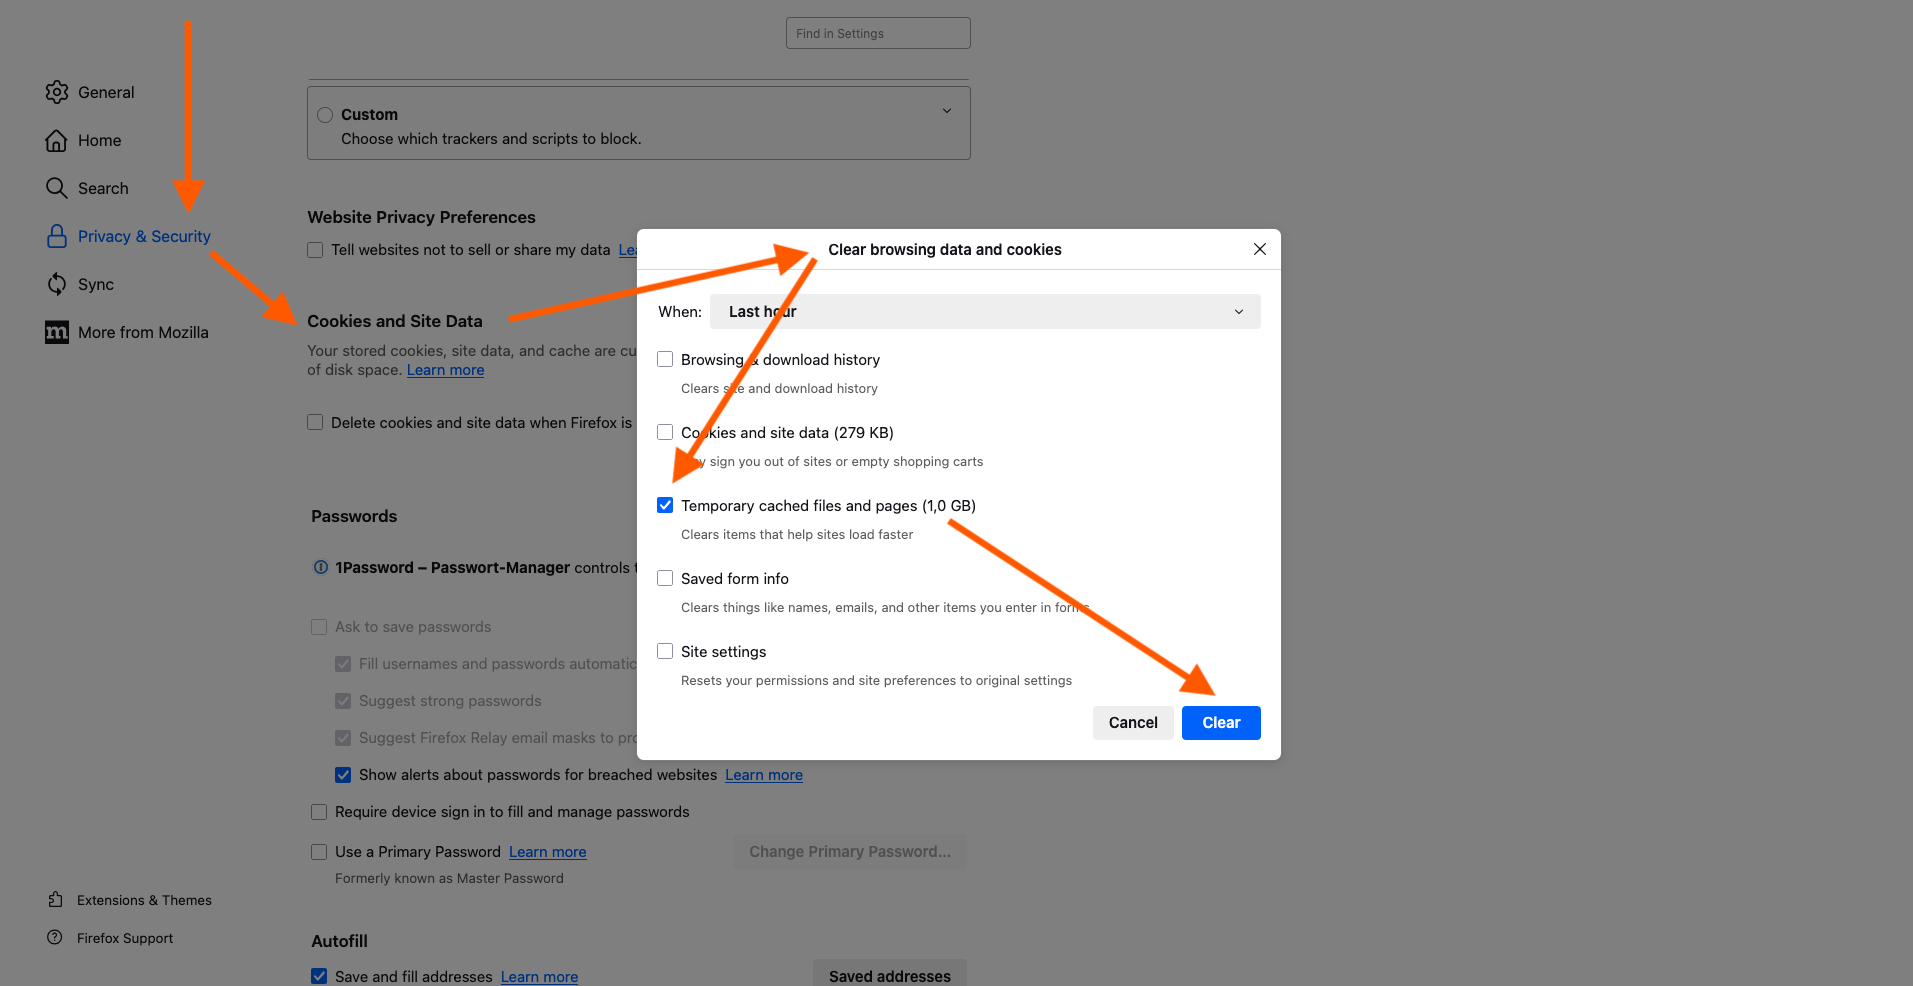
Clear your browser cache: Firefox ► Preferences ► Privacy & Security ► Cookies and Site Data ► Clear Data ► Choose “temporary cached files and pages” ► Clear
You can also press SHIFT + APPLE + R to reload the page and bypass the cache.
B. Check browser settings and extensions
Make sure cookies are not being blocked: Firefox ► Preferences ► Privacy & Security ► Cookies and Site Data ► Manage Data ► Type “app.details.eu” ► Allow ► Save Changes
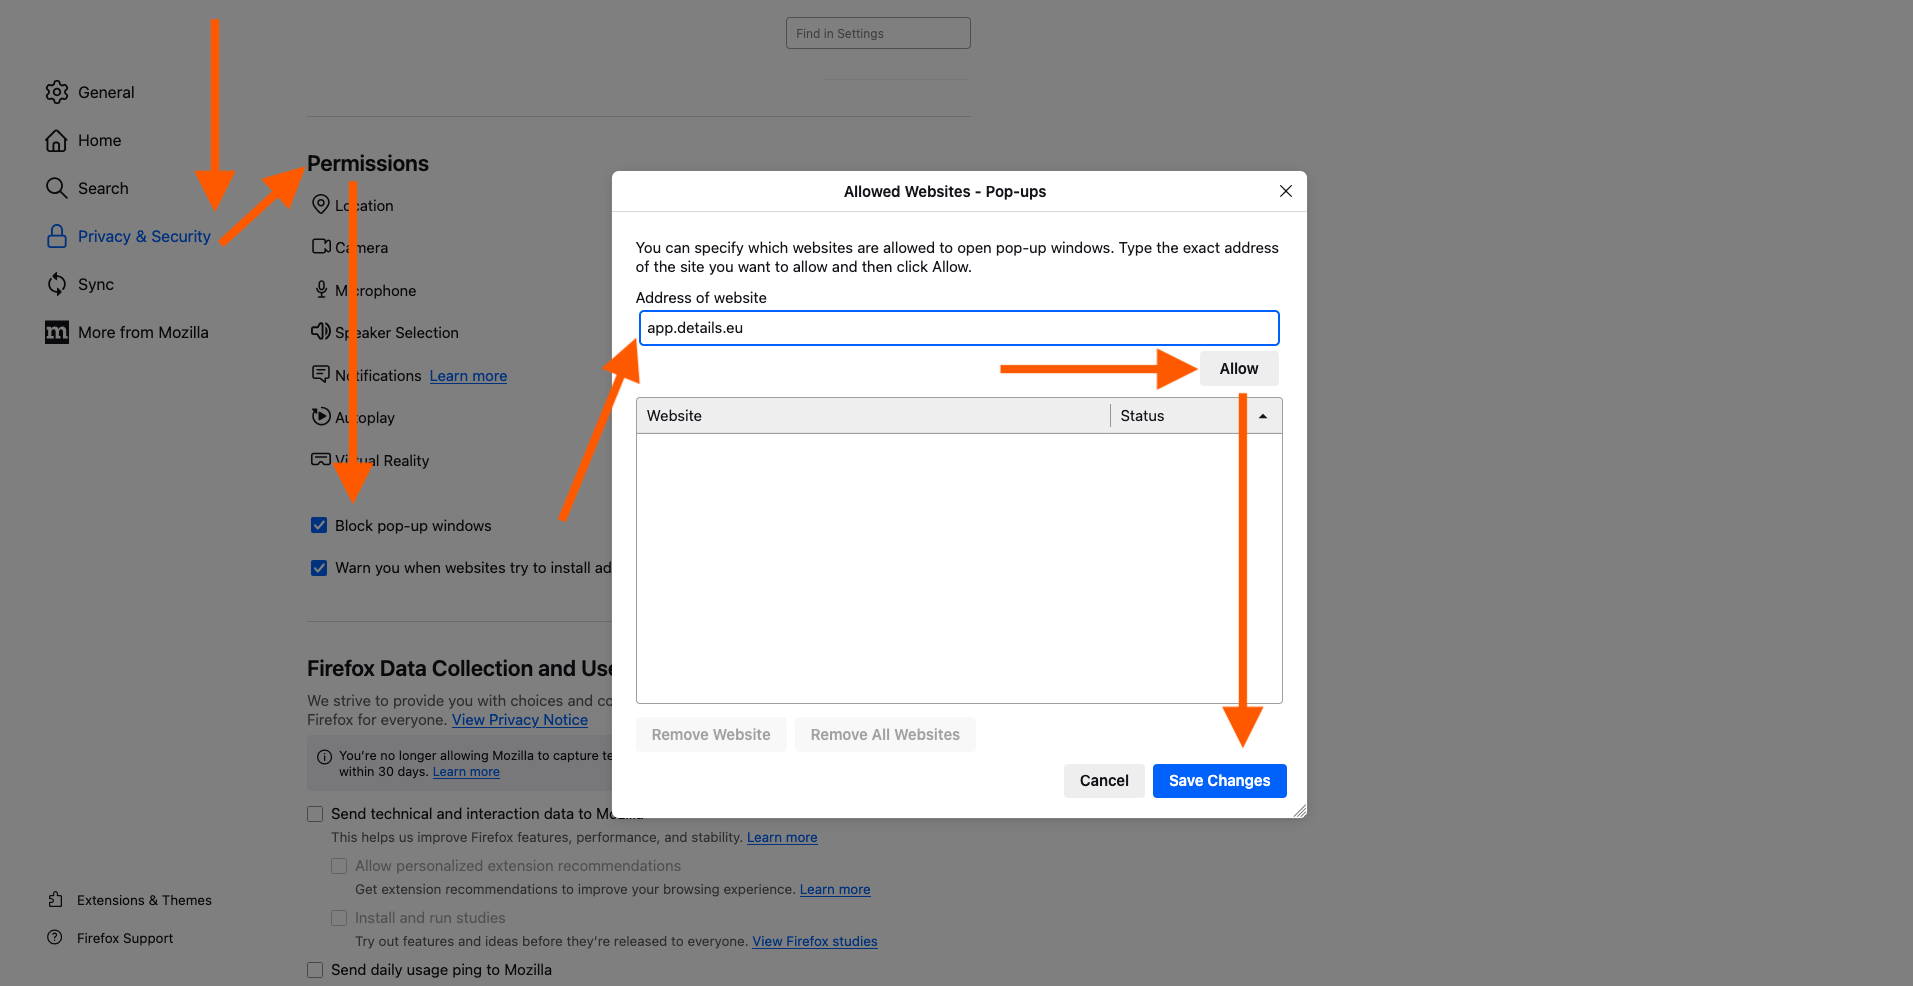
Allow pop-ups for our website: Firefox ► Preferences / Settings ► Privacy & Security ► Permissions ► Block Pop-Up Windows ► Exceptions ► Type “app.details.eu” ► Allow ► Save Changes
Disable browser extensions that might interfere with login: Press SHIFT + APPLE + A or go to Firefox ► Tools ► Extensions
Still stuck? After completing the checklist above, try logging in again. If the issue persists, reach out to our support team with screenshots and a description of your setup.
This article explains the basic actions you can perform when working with contacts in details. It covers how to edit, delete, filter and navigate your contact data.
► Creating a new Contact
To create a new contact in CONTACTS / CONTACTS, follow these steps:
Click on the CONTACTS module or go to the CONTACTS tab.
Click the [+] button to start a new contact entry.
Choose whether you are creating a Person or a Company.
Fill in all the required fields.
If you are creating a company contact, make sure to add the Legal Suffix to the company name.
Select a Group if one already exists and is relevant for this contact.
A detail subpage will open.
Here you can add any additional information as needed.
► Editing a Contact
In CONTACTS / CONTACTS, click on any contact entry to open its detail page.
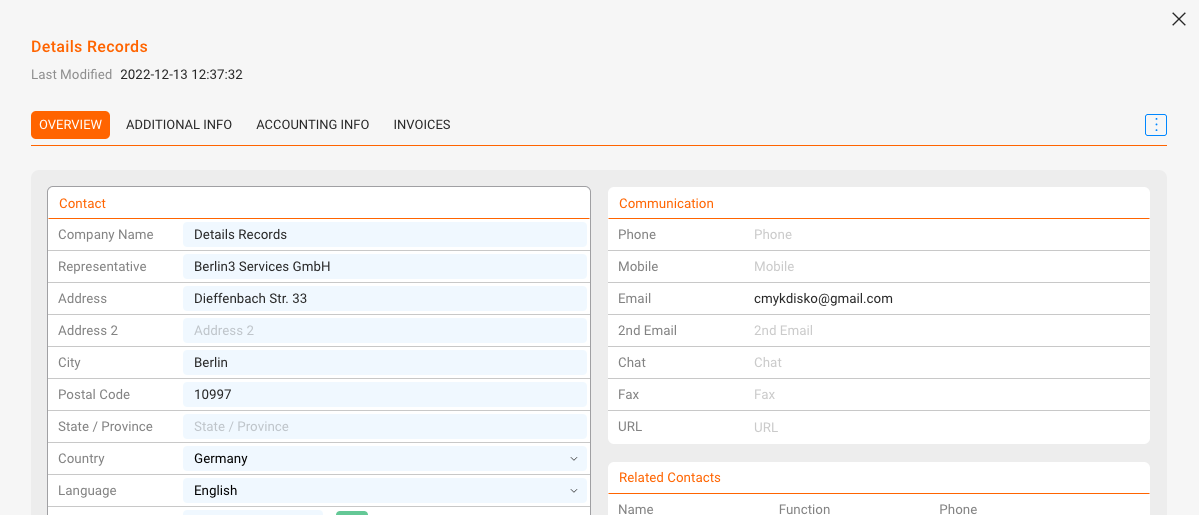
Use the individual tabs like OVERVIEW, ADDITIONAL INFO, or ACCOUNTING INFO to make edits. All changes are saved automatically.
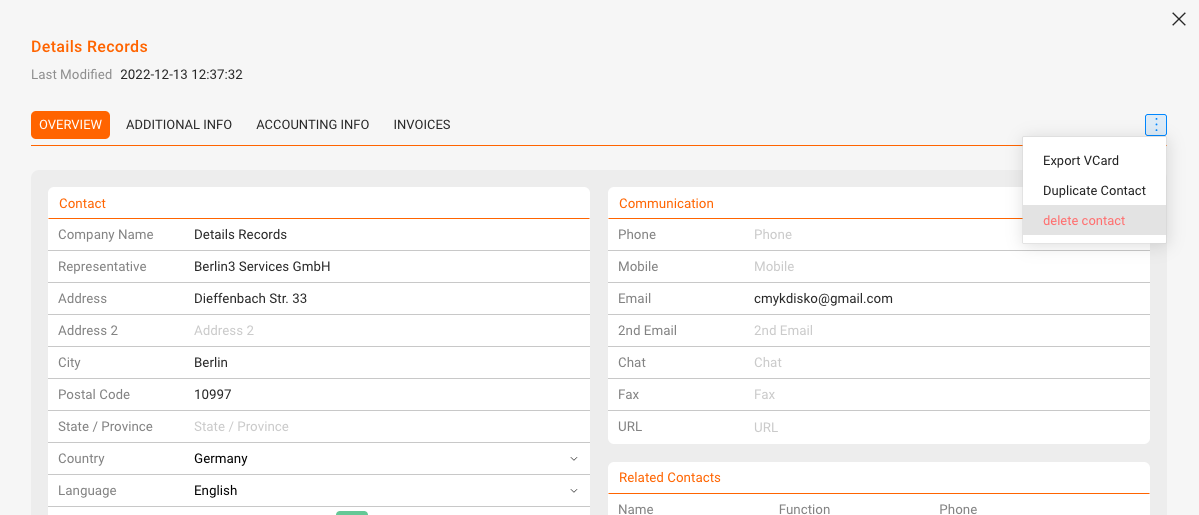
► Deleting a Contact
Open the contact you want to delete and scroll to the bottom of the OVERVIEW tab.
Click on [DELETE] to remove the contact from your database. You will need to confirm this action.
► Filtering and Searching Contacts
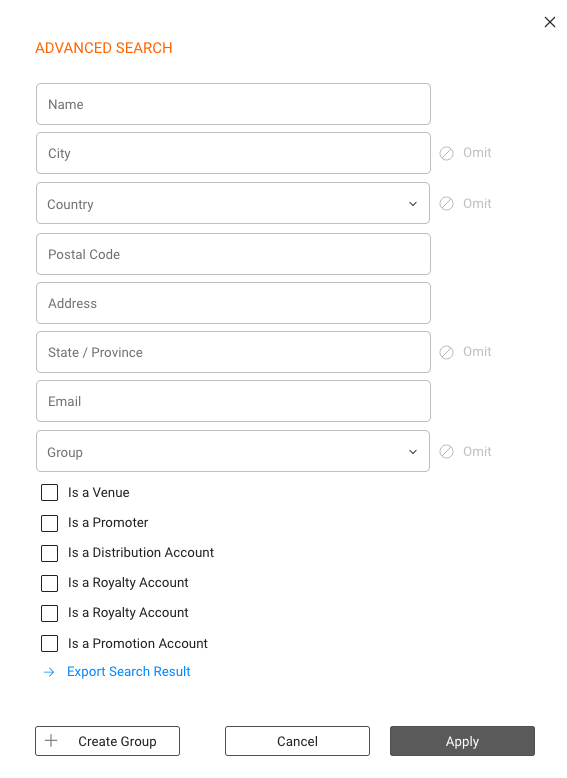
In CONTACTS / CONTACTS you can use the advanced filter panel at the top:
Use the search field at the top to quickly look up names, cities or companies.
Here’s how you can create and manage a Release in details, step by step. This guide shows you what to click and where to enter data.
Use these instructions whenever you’re setting up a new release or updating an existing one. Every step below corresponds to a specific tab or function in the interface.
Option A: Import via Releases List
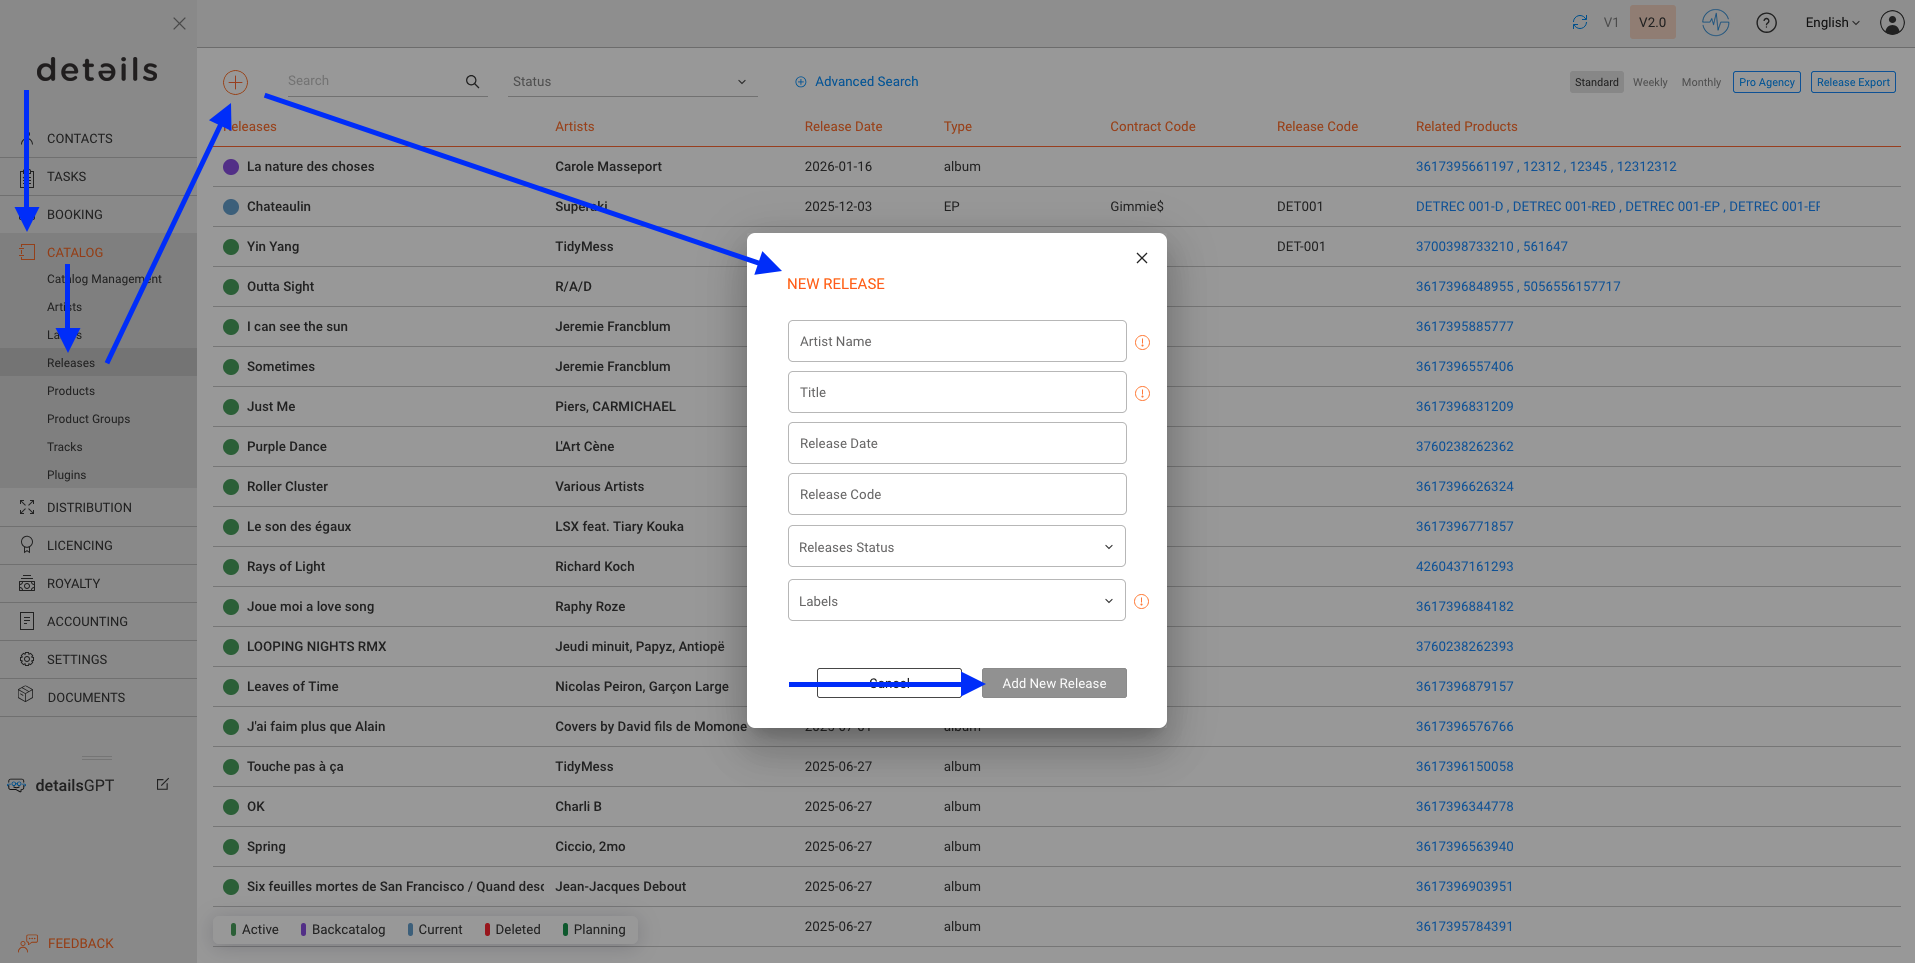
Go to CATALOG / RELEASES.
Click the [+] icon to add a new Release.
Fill in the following fields:
Artist
Title
Label
Then click [ADD NEW RELEASE].
Option B: Import via CATALOG MANAGEMENT
Best for adding several releases (and products) at once.
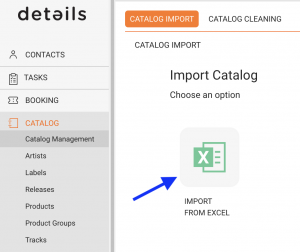
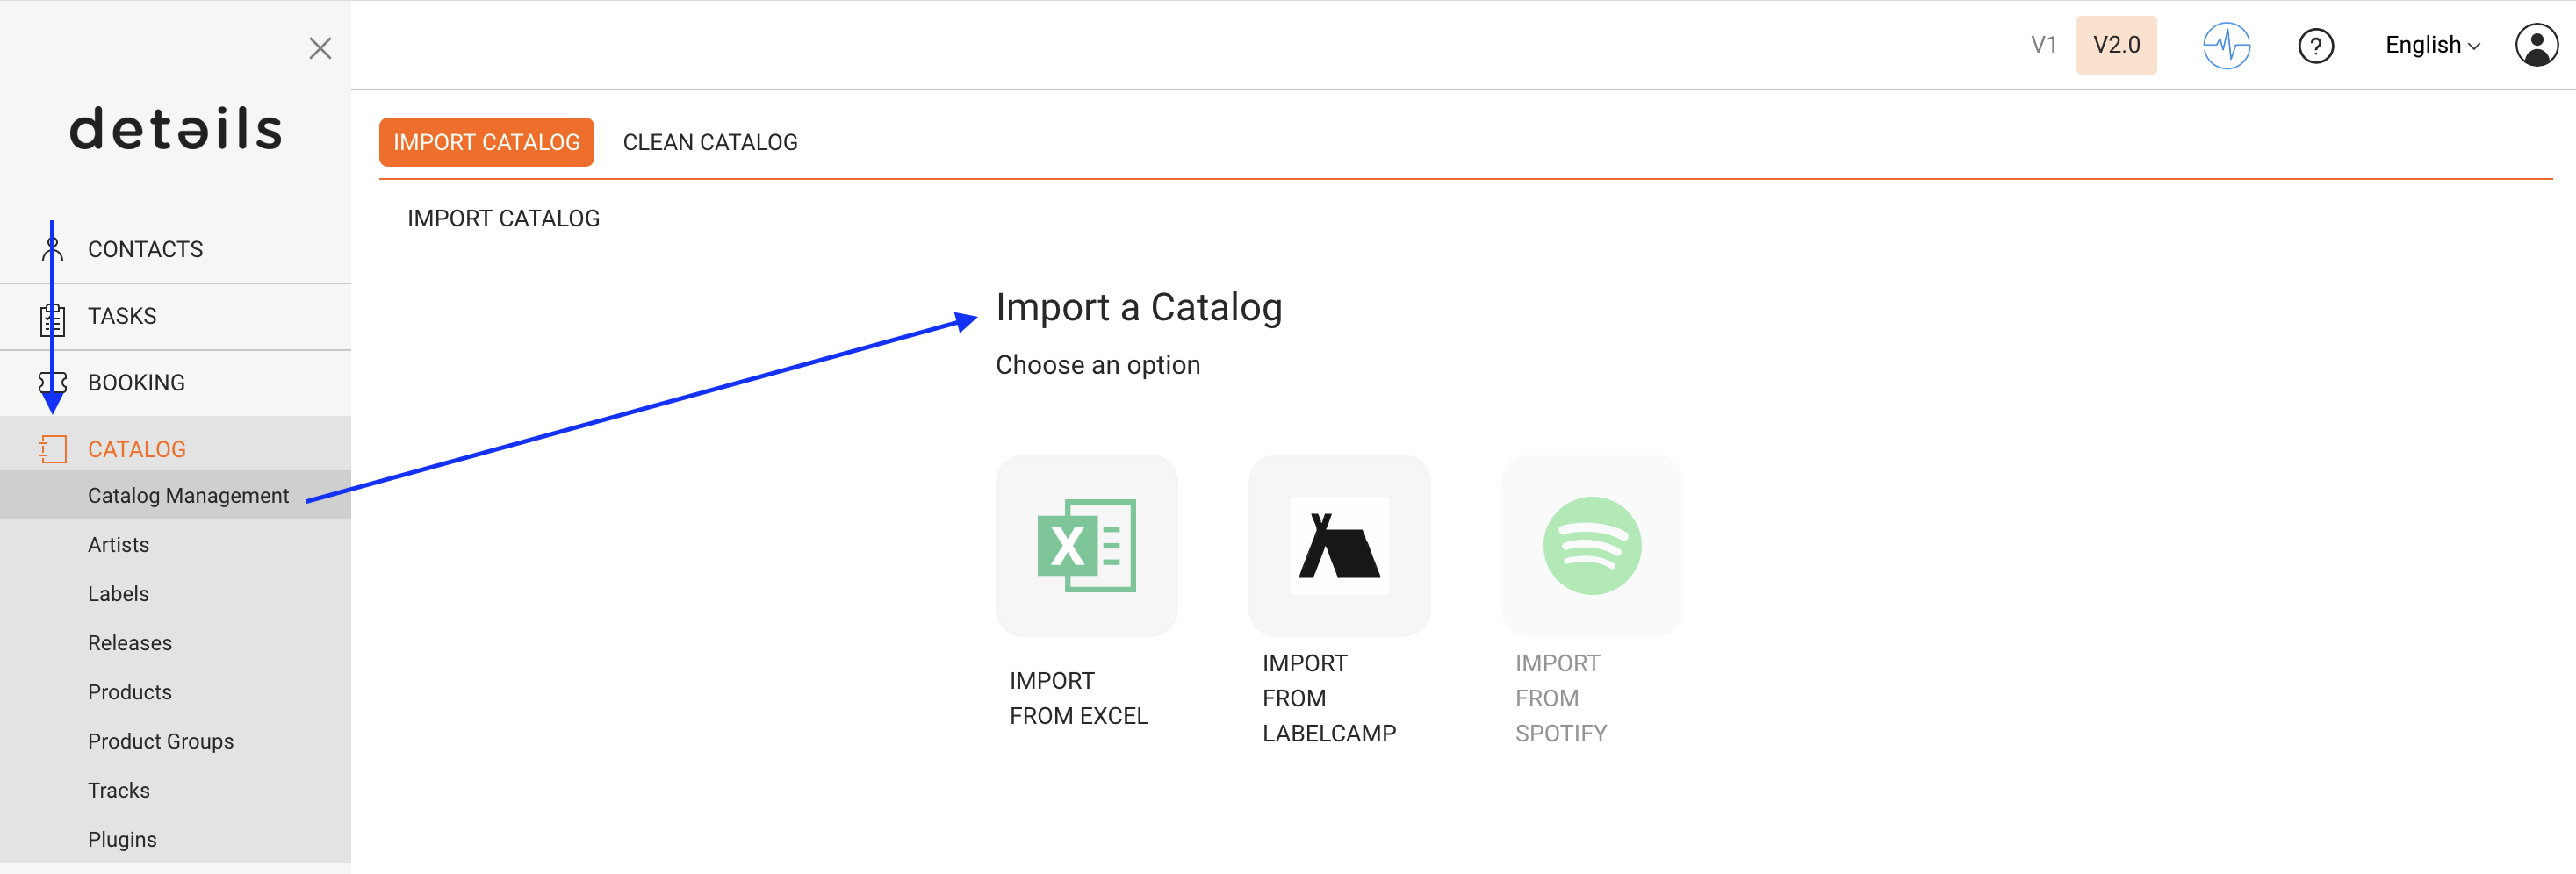
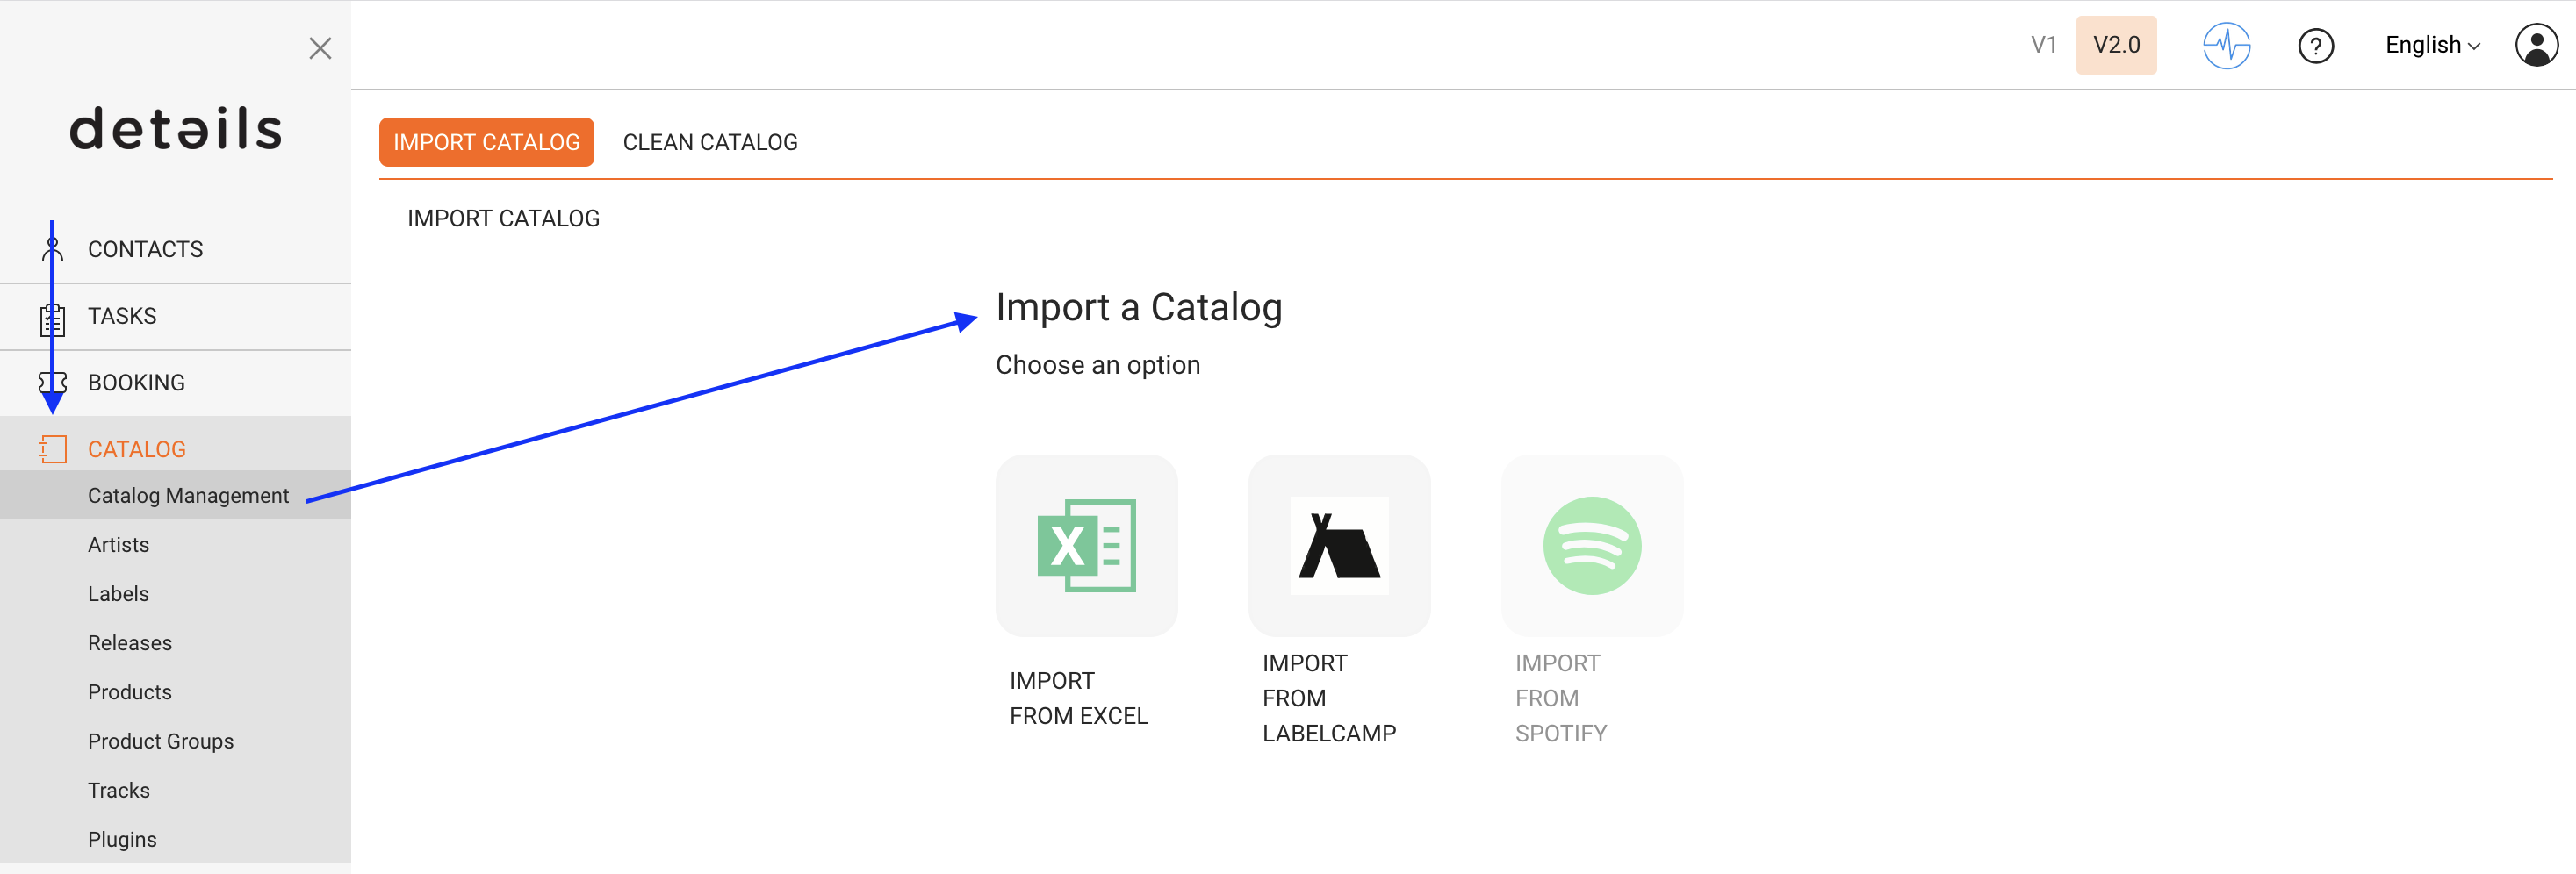
To add Releases in bulk you can use several import tools you can find in CATALOG / CATALOG MANAGEMENT:
Soon there will be a Spotify API and an AudioSalad API as well.
Edit the Release Setup
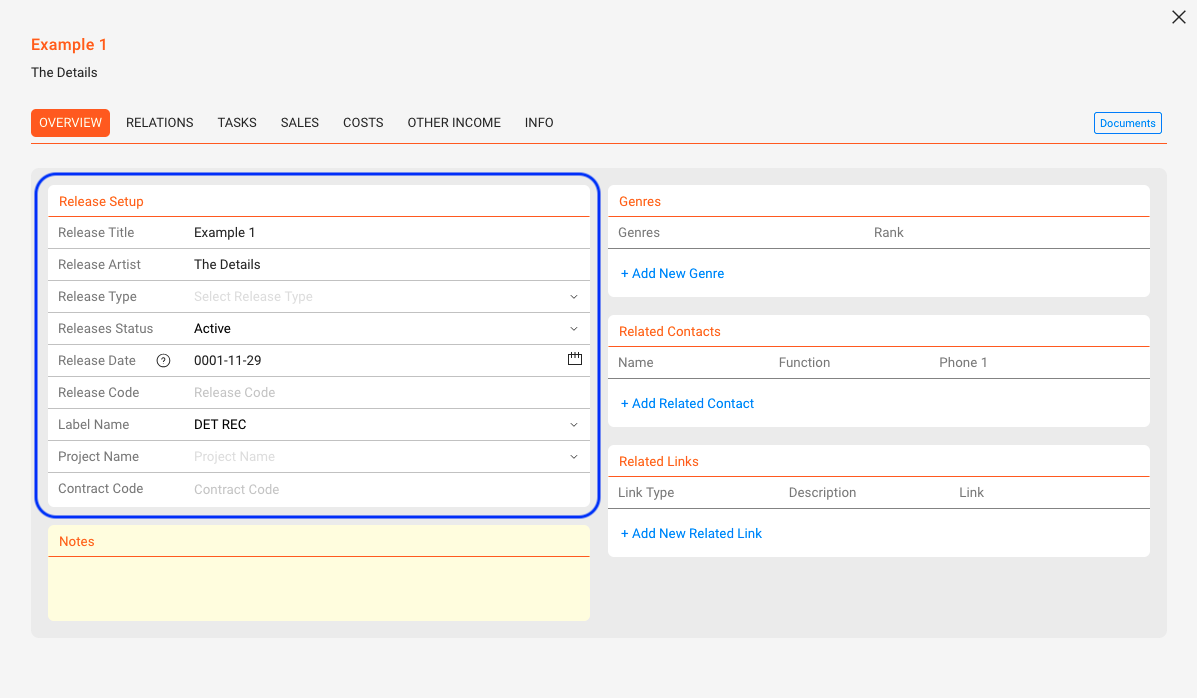
Once the Release is created, you’ll land on the OVERVIEW tab.
You can configure the following fields:
Release Title
Release Artist(s)
Release Type (e.g. Album, EP, Single, Compilation, Promo, Merchandise, Audiobook, Book, Movie)
Status (custom: e.g. Active, Back Catalogue, Promo; color-coded if needed)
Release Date (plus optional product-specific street dates)
Release Code (e.g. DET010, often used as prefix for product codes)
Label
Add genres, links & notes
Still in the OVERVIEW tab, you can also:
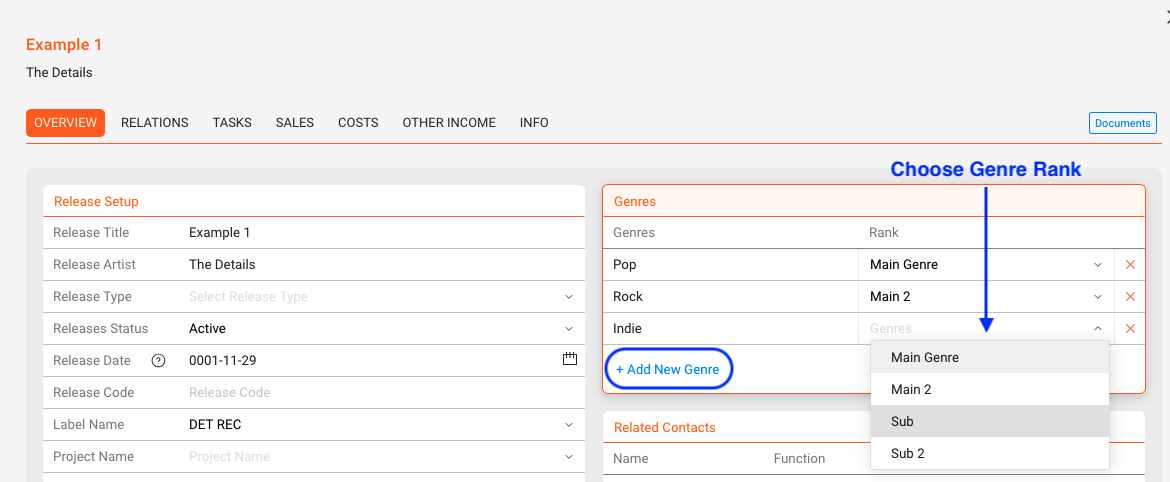
Click [+ Add New Genre] to assign genres: Choose from the list or create new ones by typing and clicking [OK]. Set main/sub genre from the dropdown.
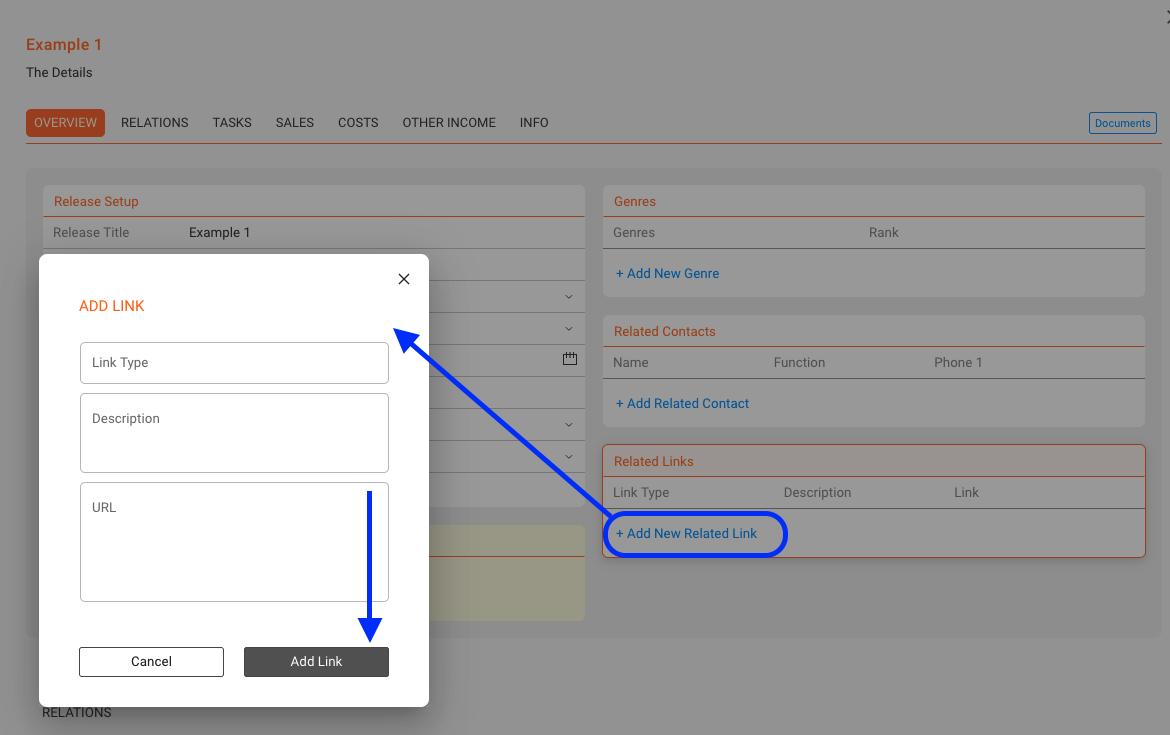
Click [+ Add New Related Link] to add URLs like Spotify, Apple Music, Dropbox or Fire: Define link type and description for clarity.
Use the [Notes] field to write comments or internal notes.
Relate contacts
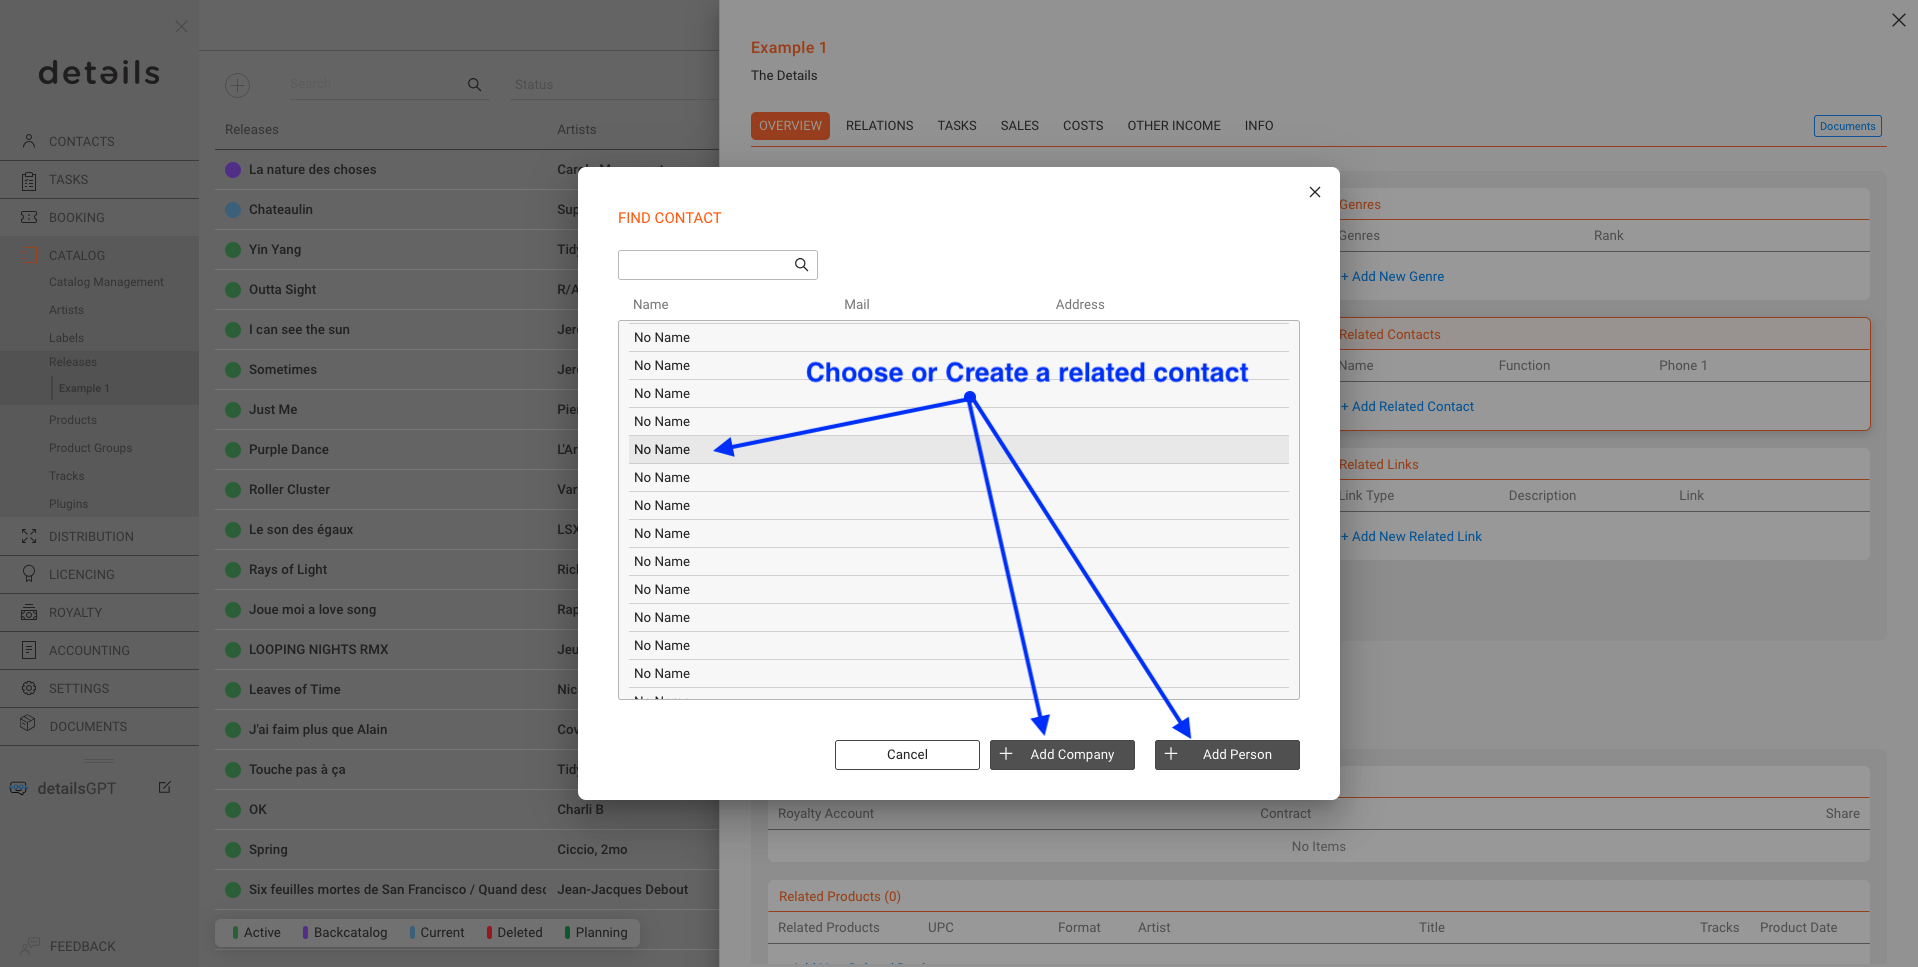
Click [+ Add Related Contacts] in the OVERVIEW tab. Search for existing contacts and assign them to this Release, for example:
Artist
Management
Mastering studio
Designer
Product manager
Relate products & artists
Go to the RELATIONS tab.
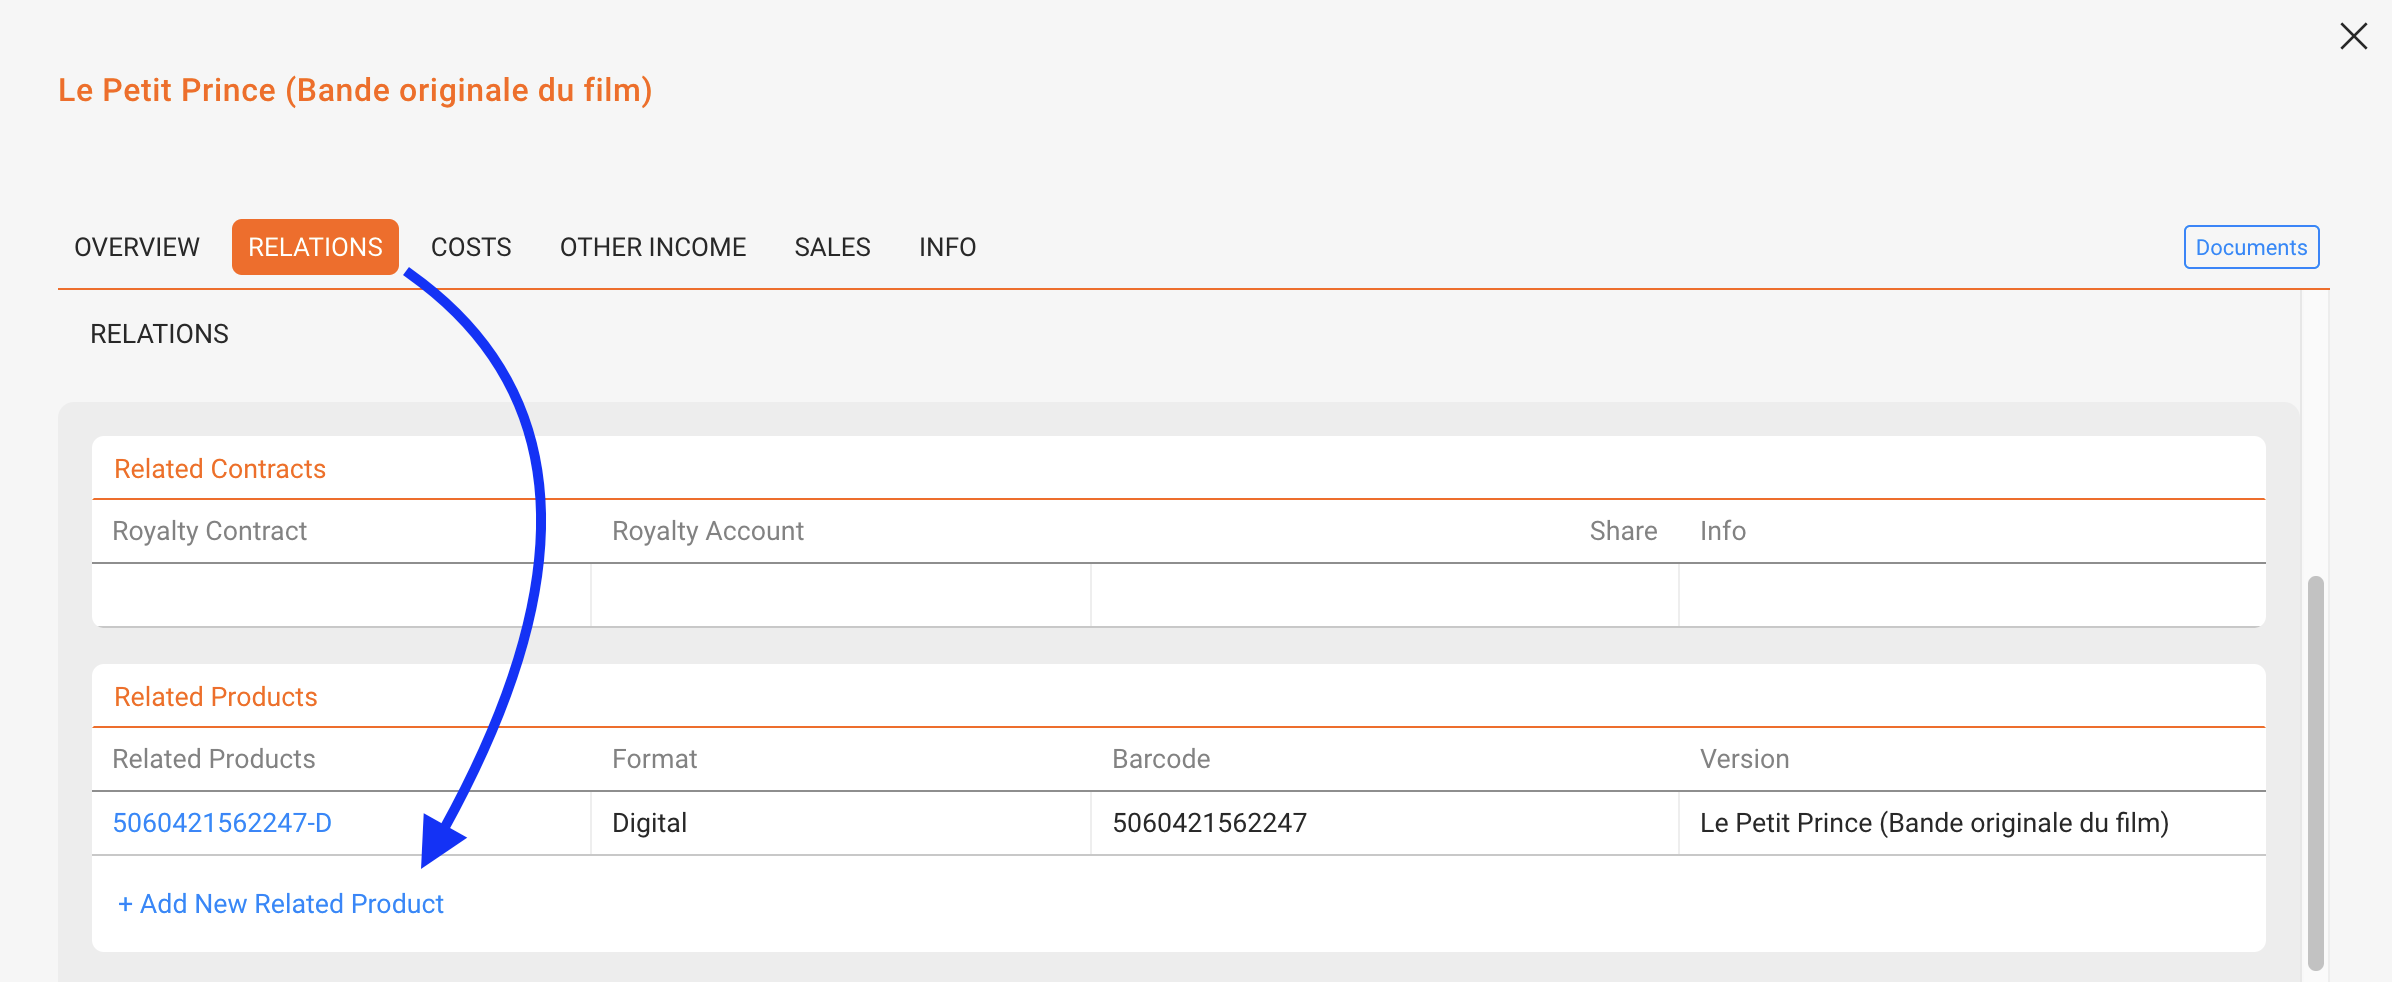
Products: each product belongs to only one Release. Use [+ Add New Related Product] to create a new product.
If you have existing products in the same release you are able to copy Tracks in the new product automatically.
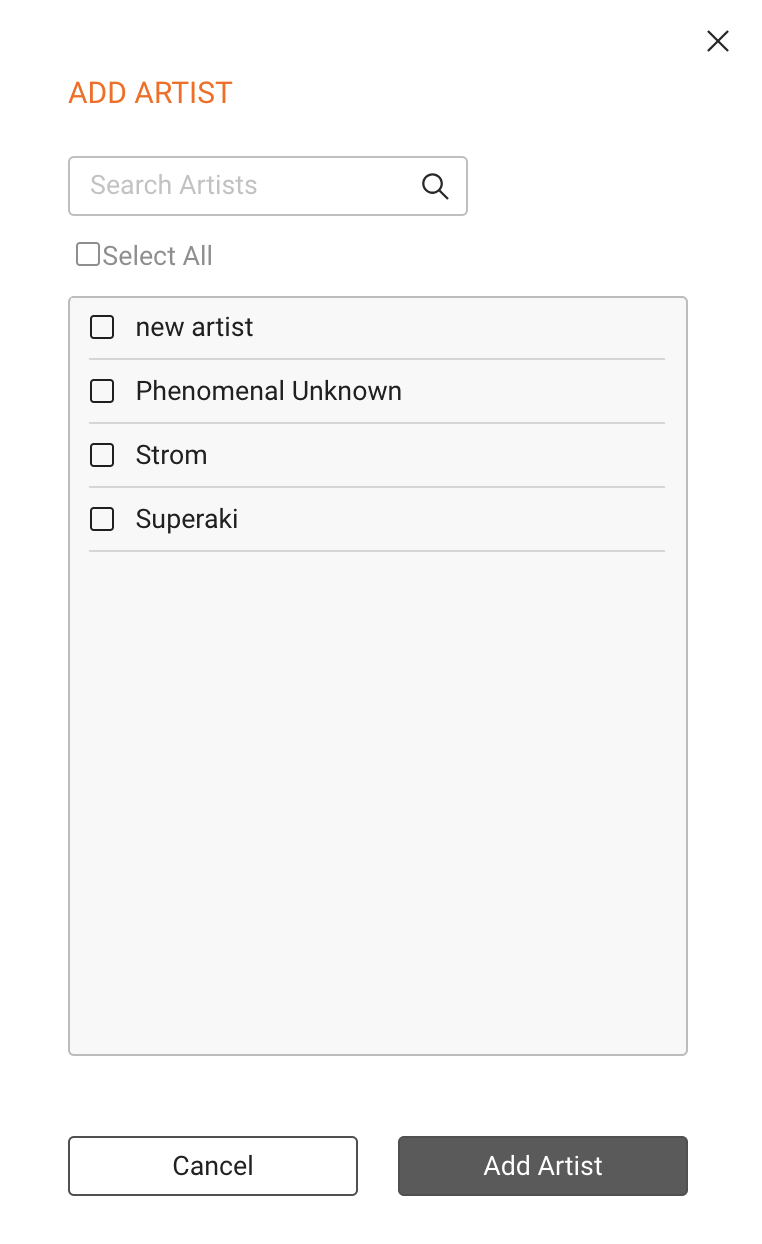
Artists: Use [+ Add New Artist] to keep track of collaborations and enrich Artist Accounts.
Relate contracts, tracks, and licenses
Related Contracts / Royalty Accounts, Tracks and Licences appear in the RELATIONS tab in the side window of Releases. They are clickable and can be used for navigation. But they are not editable.
To relate…
CONTRACTS (& Royalty Accounts): Contracts are created on the ROYALTY level. You therefore have to create a ROYALTY ACCOUNT, where you can then create a contract. In the CONTRACT subpage you can then relate products. The contracts then appear automatically in the RELEASE.
TRACKS: Tracks are created on the CATALOG / PRODUCT level. So if you connected a product and a track (or multiple) are missing, even after refreshing the page, you need to add them to the related product. They will then appear automatically in the RELEASE.
LICENCES: Licences are created on the LICENCING level. You therefore have to create a LICENCE ACCOUNT, where you can then create a licence and relate it to a product. In the LICENCE subpage you can then relate products. The licences then appear automatically in the RELEASE.
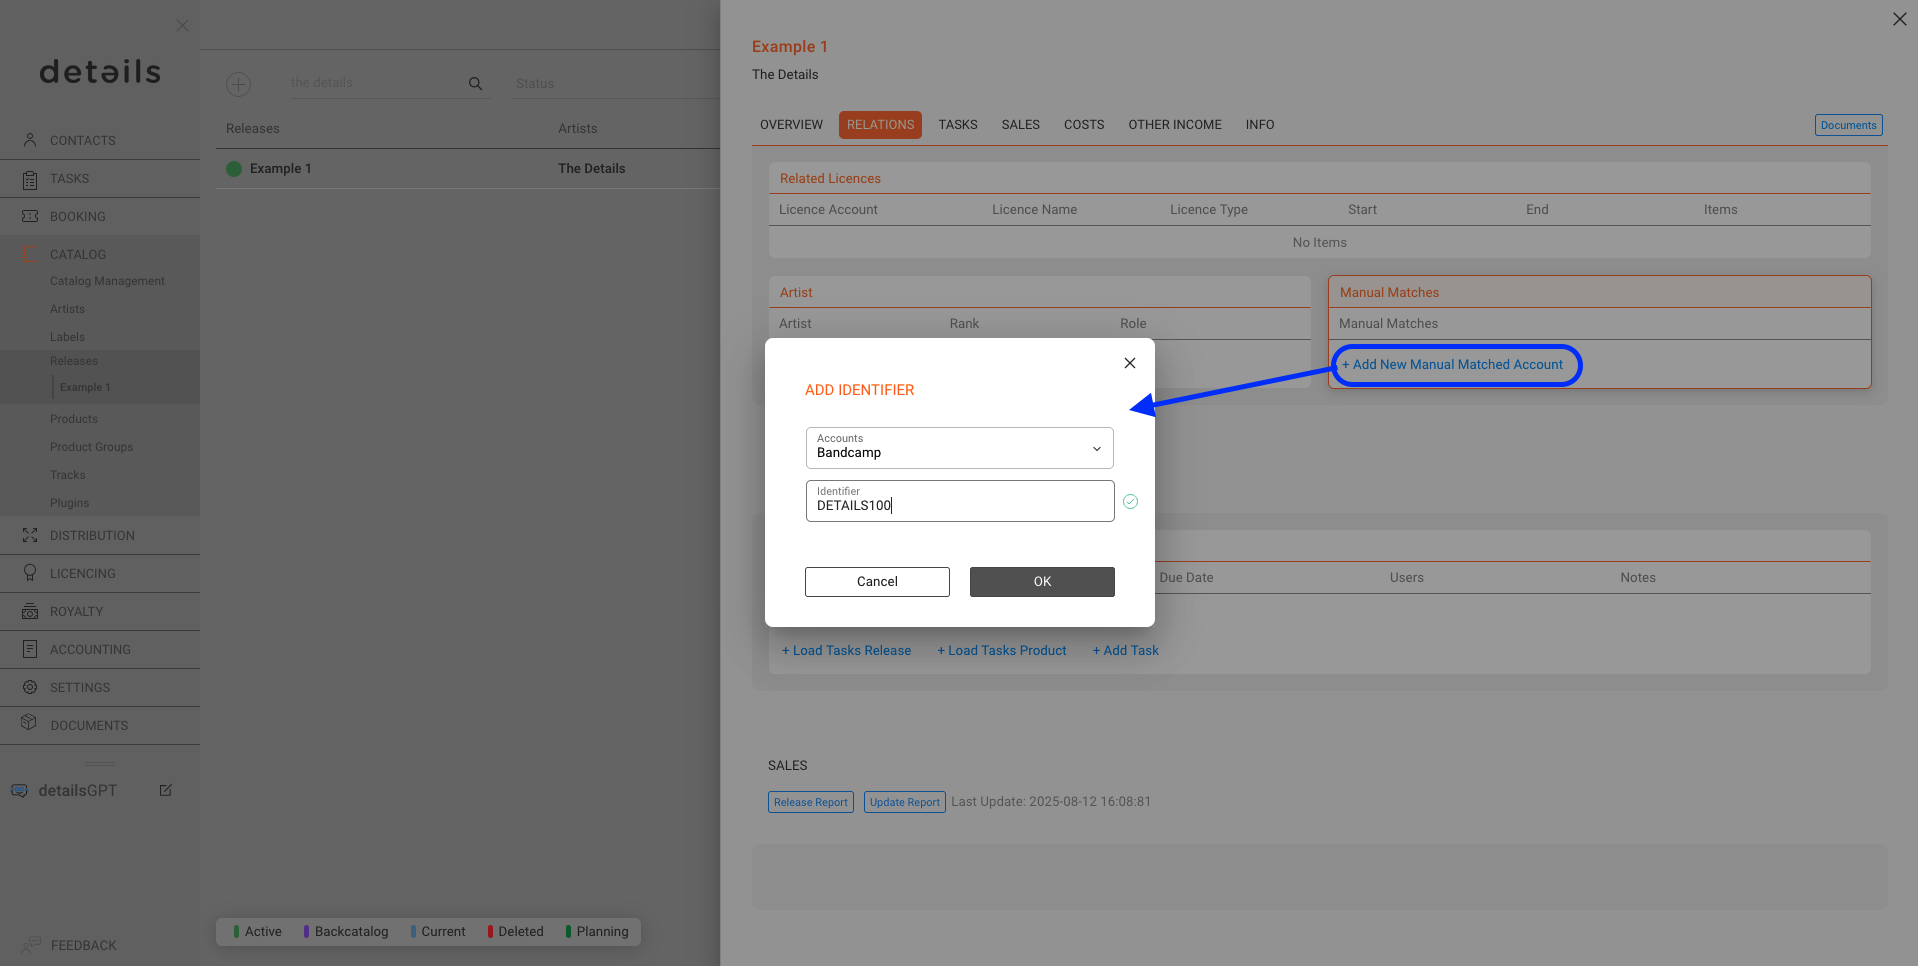
Manual Match Accounts
If your release has a different name or code on external platforms (e.g. Bandcamp), you can store that mapping.
Go to RELATIONS tab
Click [+ Add New Manual Matched Account]
Enter the platform and alternate identifier (e.g. “DETAILS100”)
This helps ensure correct assignment when importing costs or revenues from external sources.
Add files & artwork
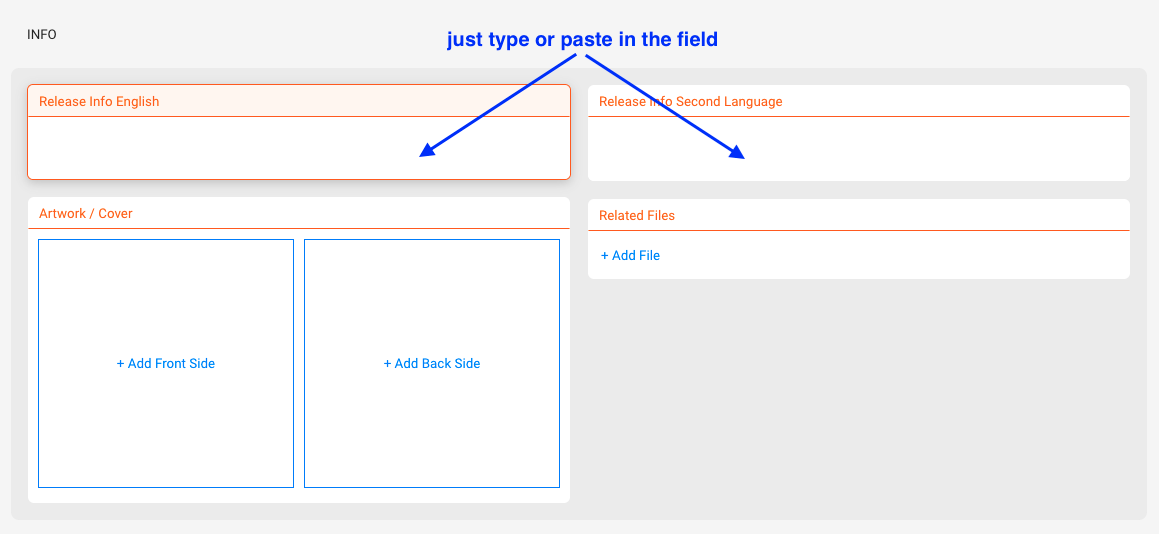
Go to the INFOS tab.
Add texts in English and one additional language
Upload artwork or cover images
Attach files like contracts, info sheets, MP3s, WAVs via [+ Add New File]. If you choose Internal Use Only the file will be inaccessible for people without access to details.
These files can be used to auto-generate info sheets for your project.
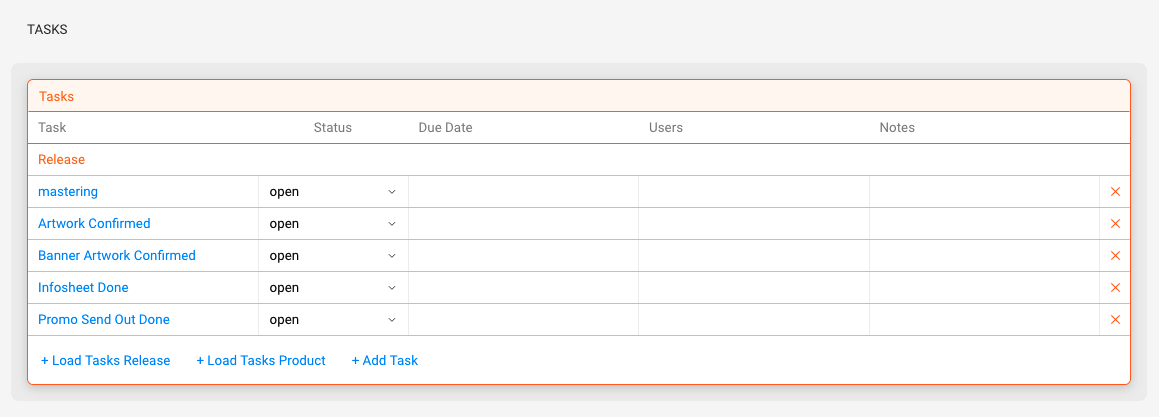
Create Tasks
You can create and assign tasks manually by clicking on [+ Add Tasks].
It’s also possible to apply pre-defined task template groups by choosing [+ Load Tasks Release] or [+ Load Tasks Product] and then using one existing template group.
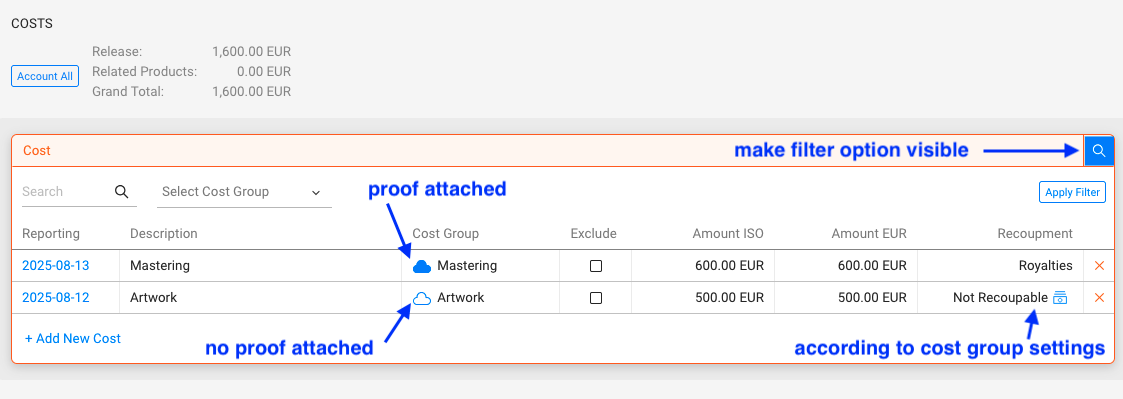
Enter costs & other income
You can record costs and additional income directly in the Release:
Manually, including uploading PDF invoices or receipts
Via Distribution Imports as spreadsheet
Every cost entry can be linked to a contract for recoupment tracking. Supporting documents can be included in royalty statements (e.g. as proof for advances).
Additional income (e.g. grants, awards, or subsidies) can also be registered and will be factored into the Release Report.
Delete a Release
If needed, you can delete a Release from the list view:
This article explains the most common actions for managing tracks in CATALOG / TRACKS. It covers how to create, edit and delete tracks, how to maintain metadata and credits, and how to manage all relations and error handling.
ADDING A NEW TRACK
You can create new tracks directly in the track list or as part of a product setup.
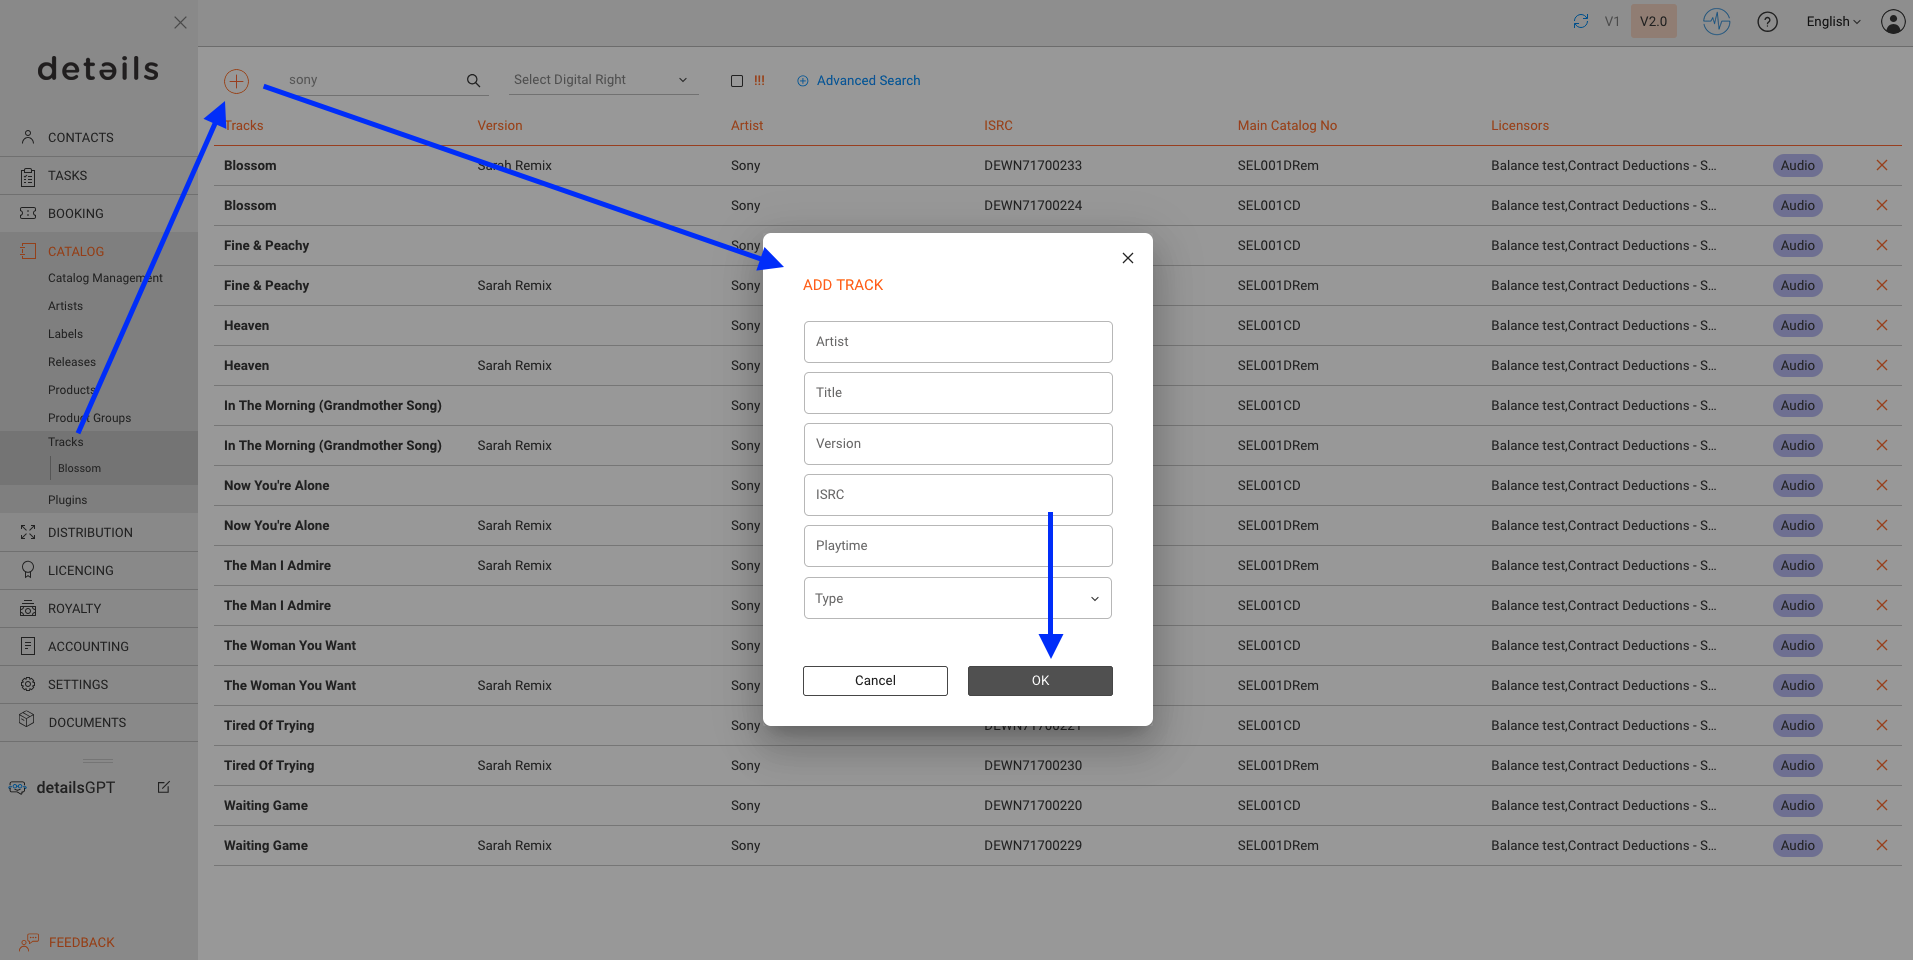
Directly in the TRACK LIST
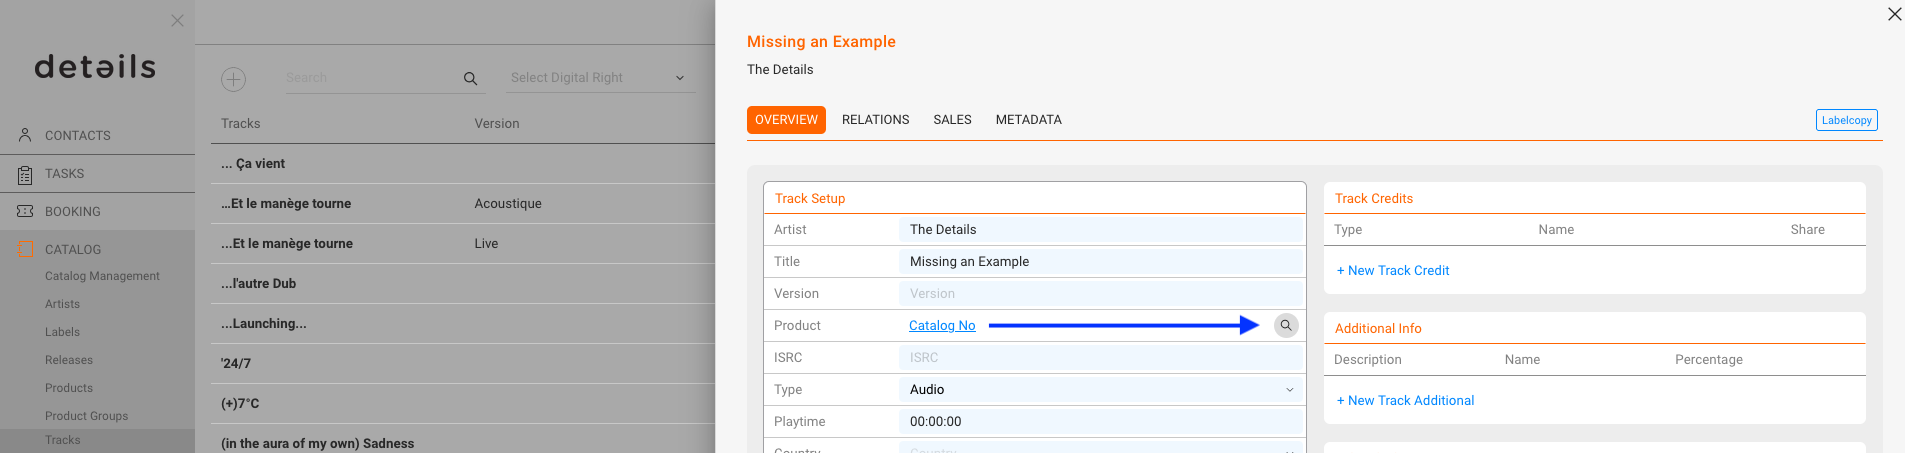
Click the [+] icon in the top-right corner of the track list.
Enter Artist, Title and Version.
Assign a valid ISRC. Without ISRC, the track cannot be matched in statements.
Optionally, create tracks from inside a product. In this case, the product relation is already pre-filled.
Tip: You can generate ISRC codes automatically during track creation in a PRODUCT. See the article Creating ISRCs automatically.
OPENING & EDITING A TRACK
To update track information:
Click on the track line in the list view to open the Detail View.
All fields can be edited across the tabs: Overview, Relations, Sales, Metadata.
Changes are saved automatically.
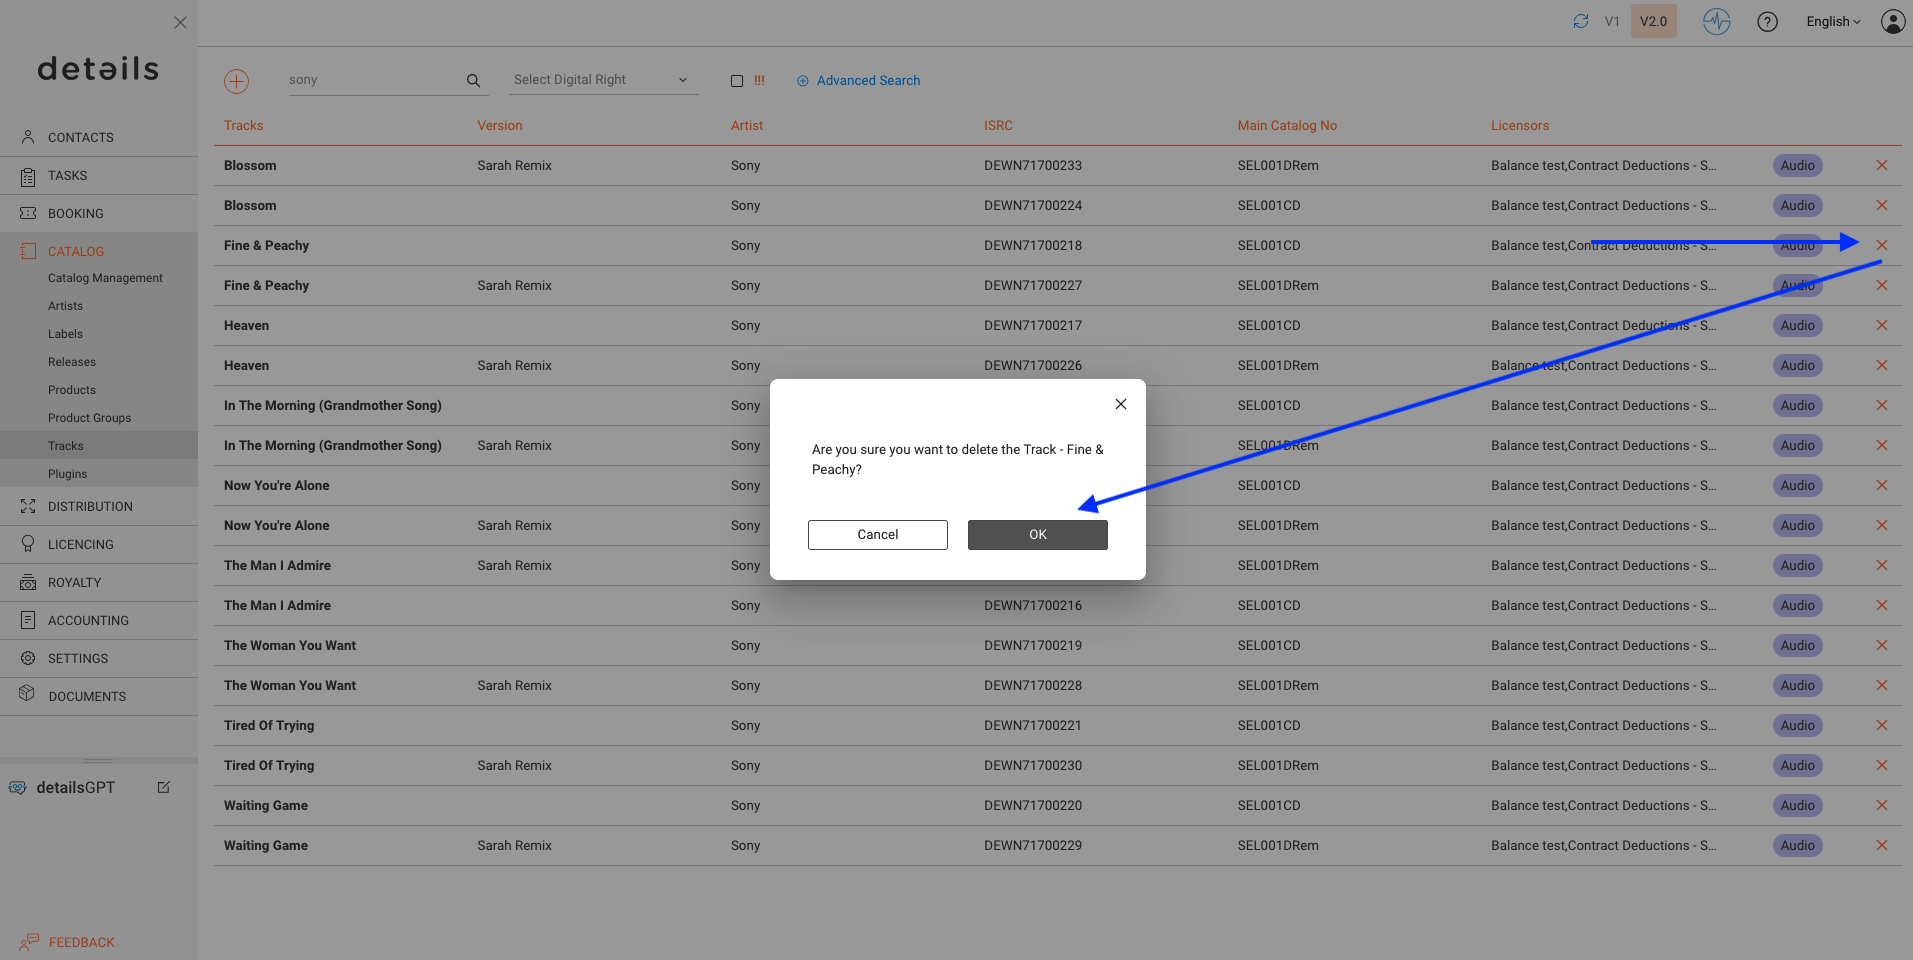
DELETING A TRACK
Tracks can be deleted by clicking the [x] icon in the list.
Note: Tracks that already have sales or royalty relations cannot be deleted. Instead, use the merge process or update metadata.
CONNECT TO MAIN PRODUCT
Complete the basic fields for a track in the OVERVIEW tab and make sure it is connected to a Main Product. Only tracks with a Main Product relation are royalty-billable.
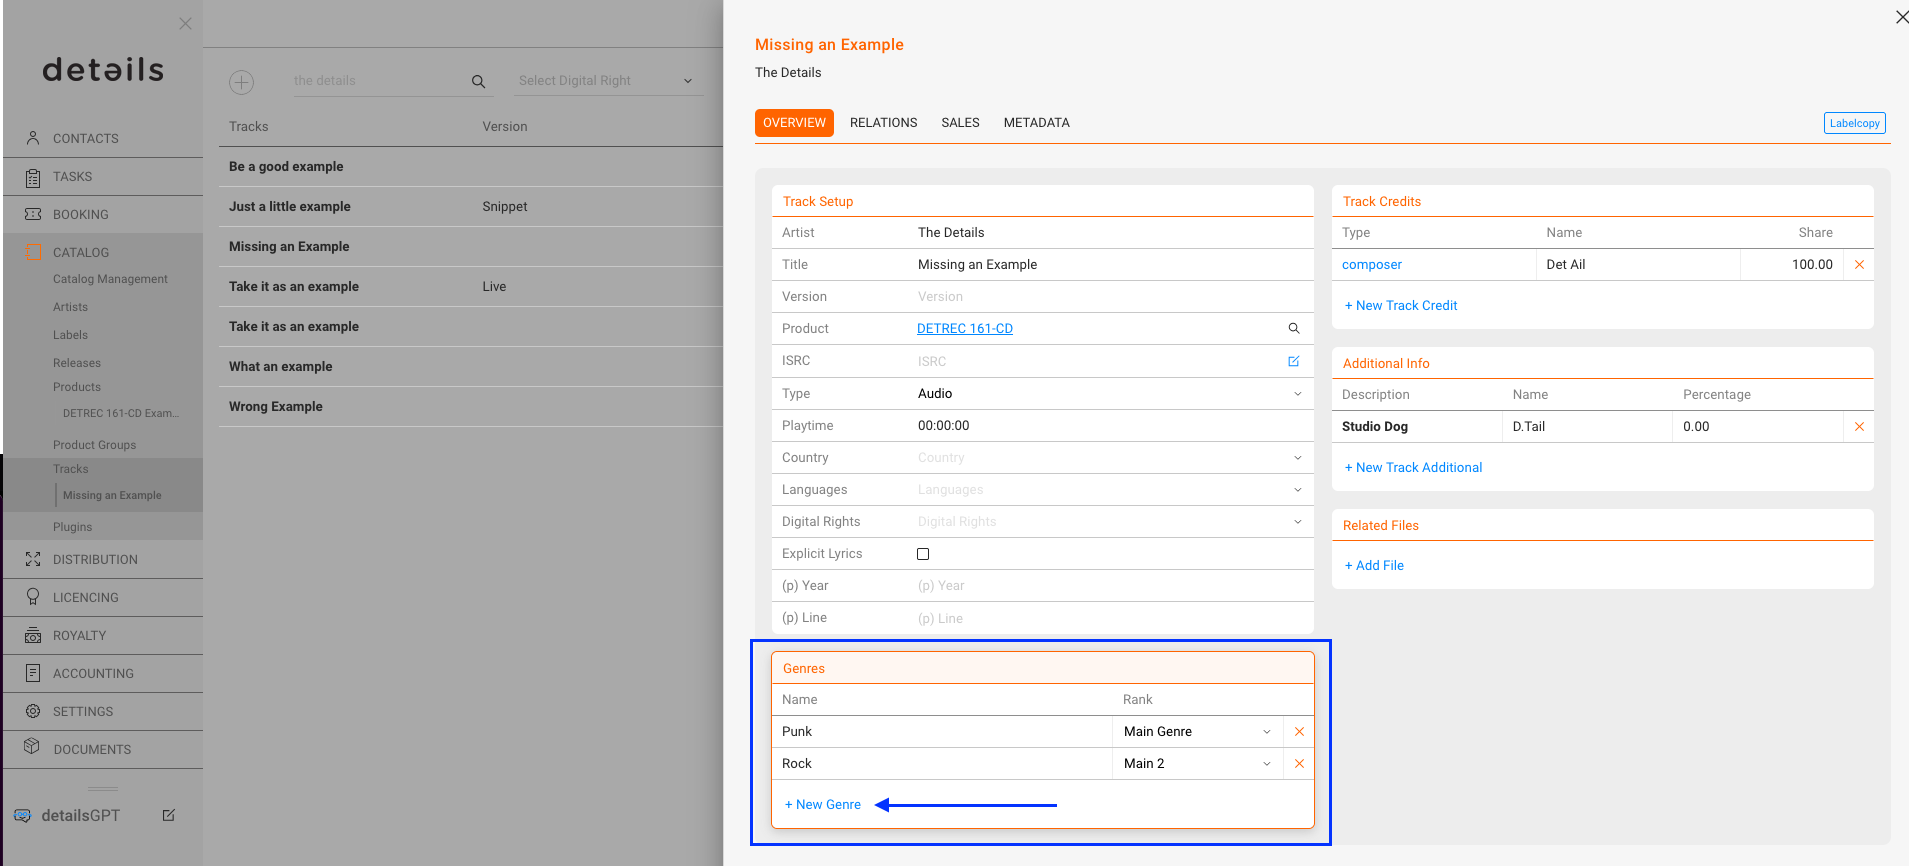
ADD GENRES
Assign up to four genres to a track:
Click [+ New Genre]
Choose a Genre from the list
Or enter the genre name and confirm with [New Genre]
You can define two main genres and two sub genres. Use this structure to keep reporting consistent.
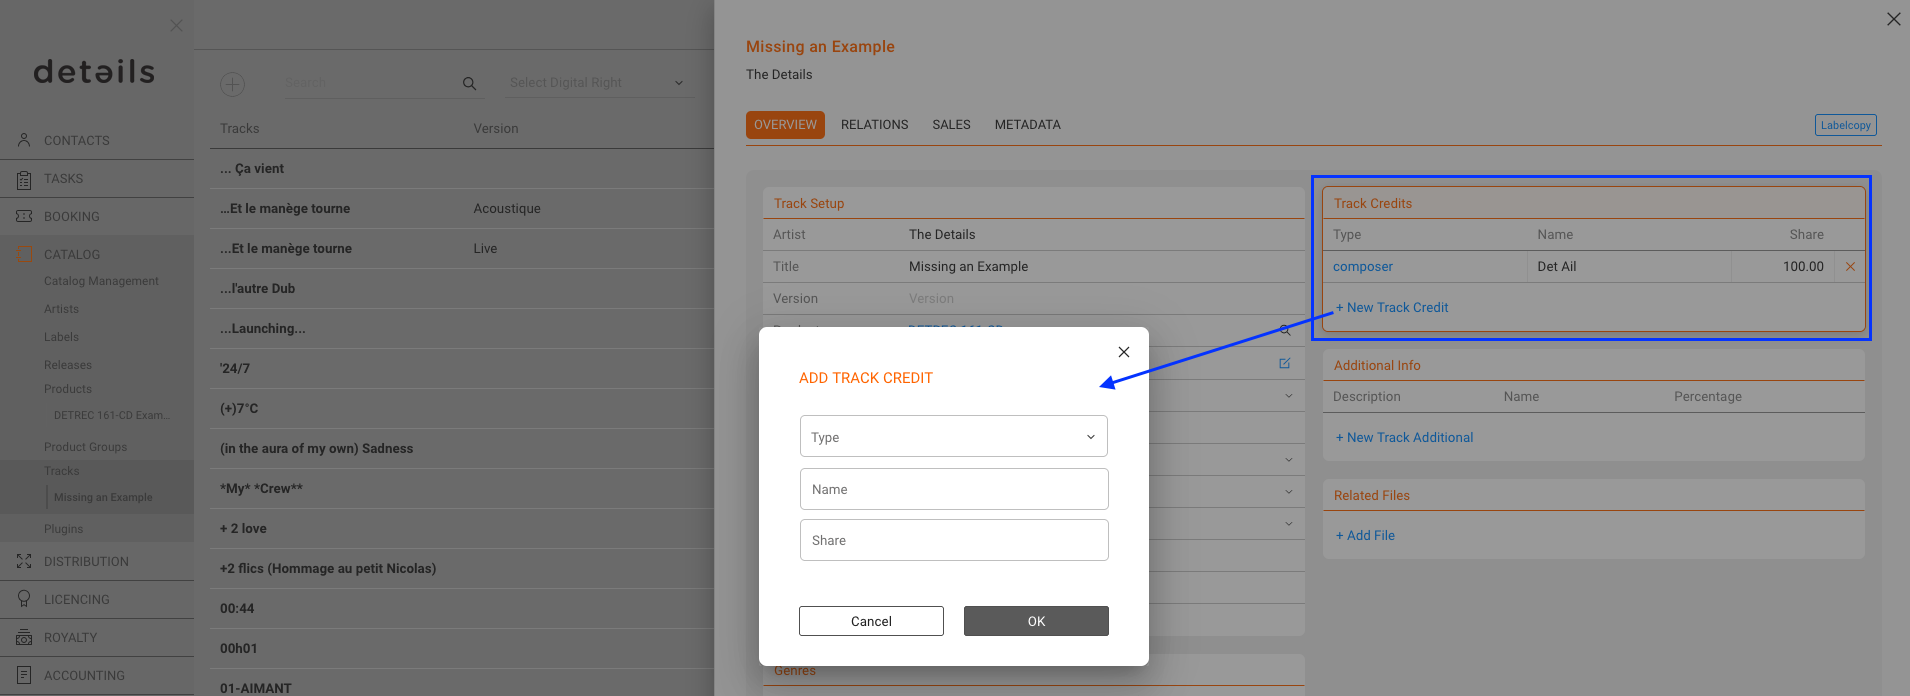
ADD TRACK CREDITS
Add official credits such as Composer, Writer or Publisher:
Click [+ New Track Credit]
Select the role
Enter the name and share if applicable
These credits are part of the official Label Copy. If the RELEASE is connected to an ARTIST, the credits are automatically filled in by default when creating a new track.
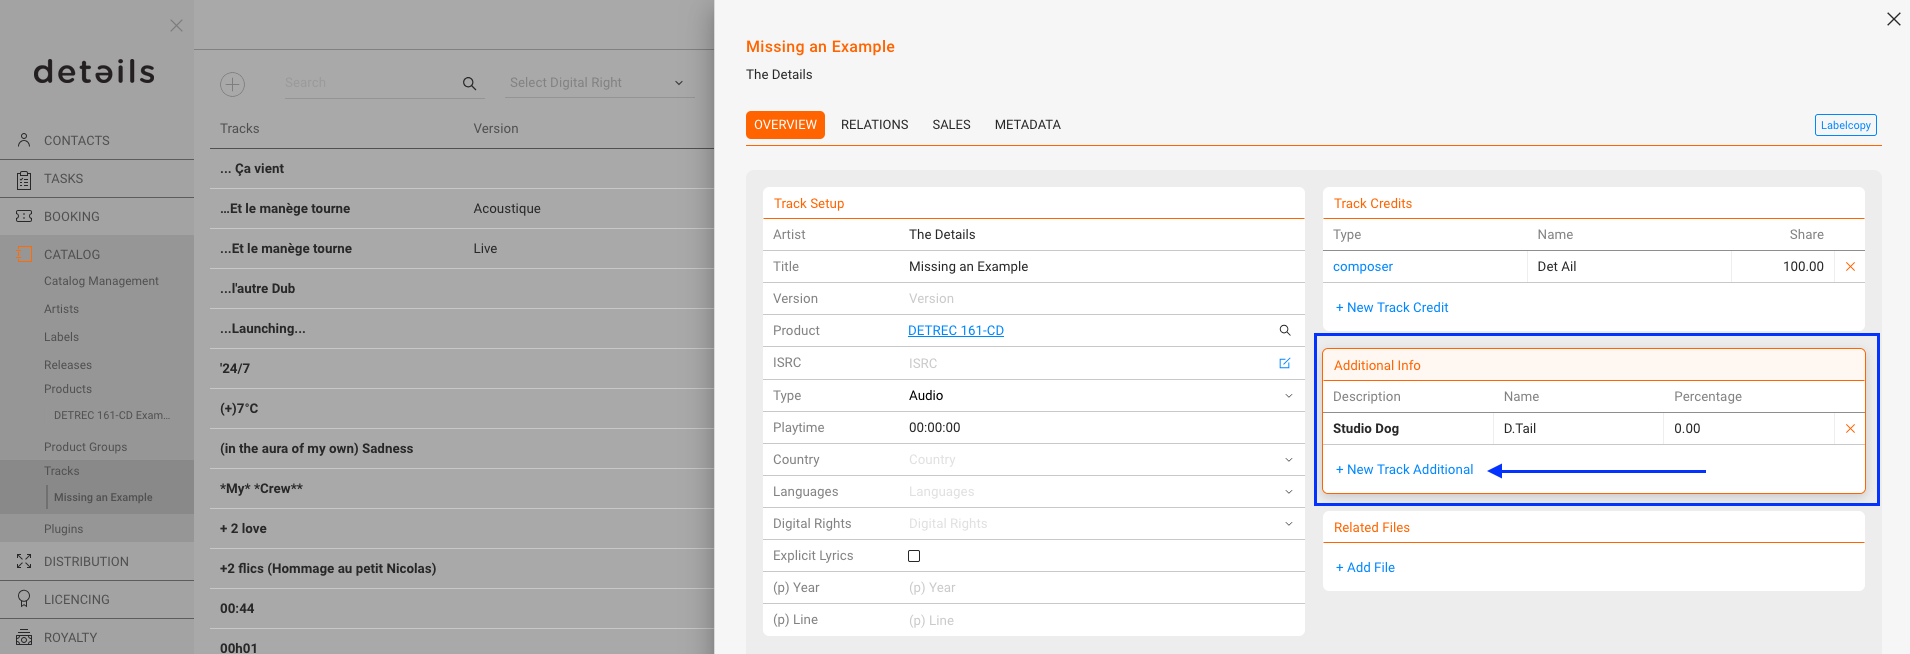
ADD ADDITIONAL CREDITS
Use the [+ New Track Additional] function to add non-official credits such as remixer, instrumentalist, or arranger. These fields are for internal reference and do not appear in the official Label Copy.
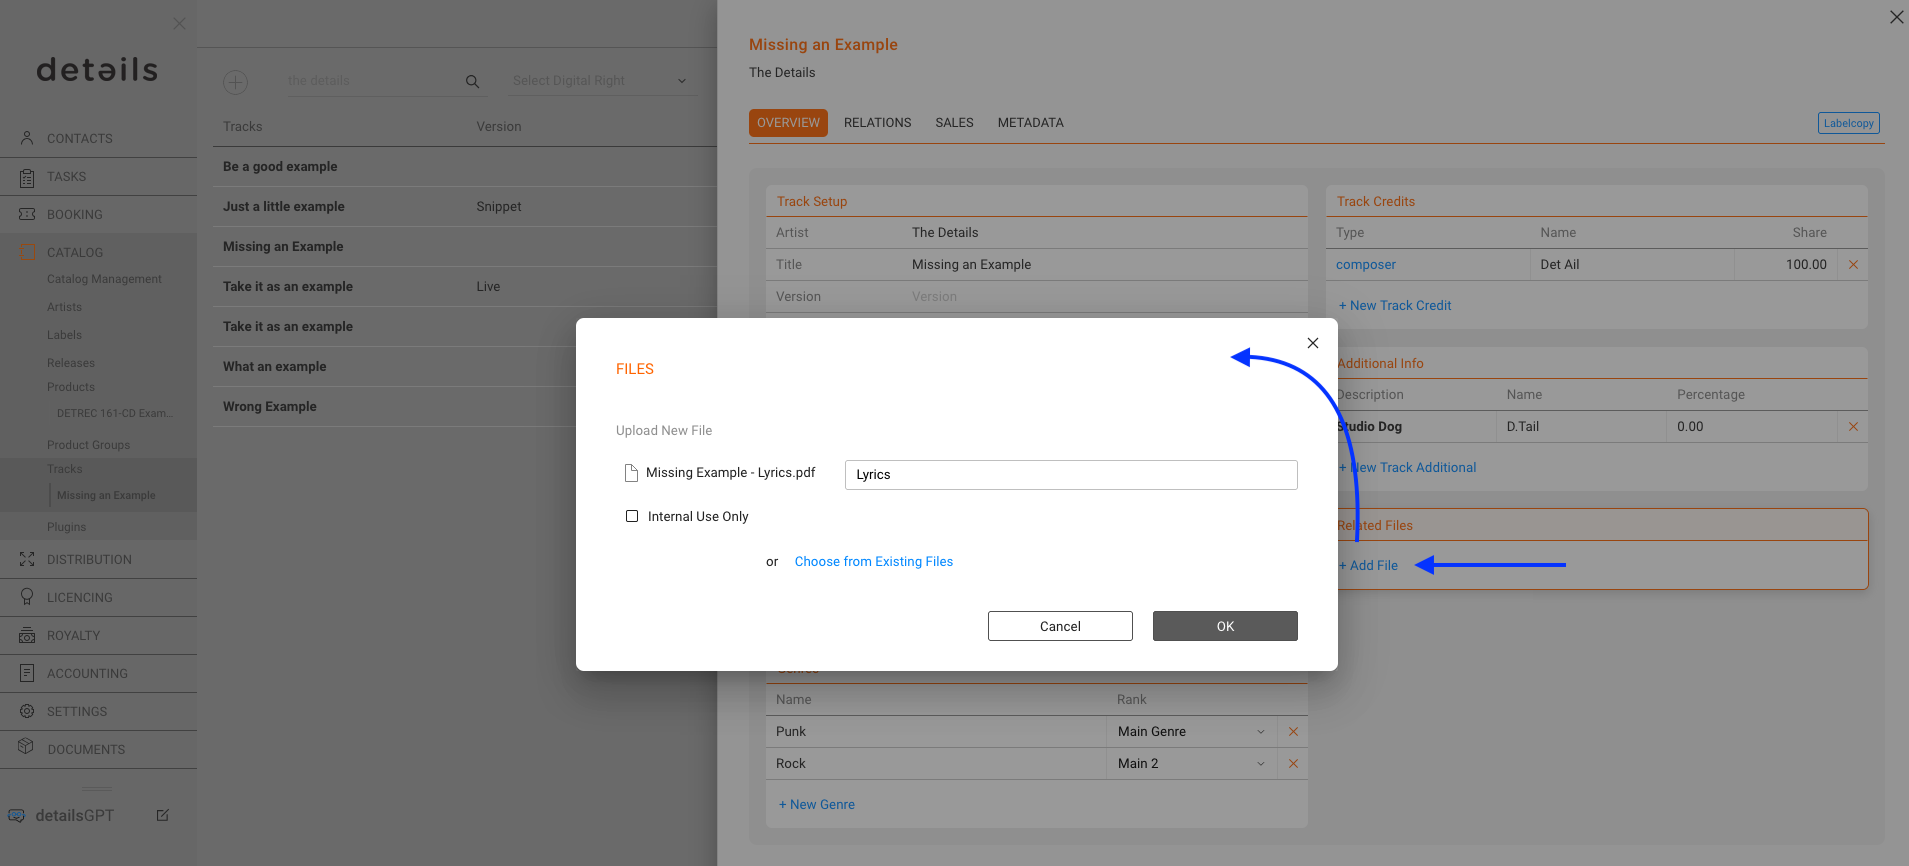
ADD RELATED FILES
Upload audio or video files to the track in the RELATED FILES section:
Click [+ Add File]
Select the file to upload
Files can include masters, previews, or videos. Storage limits may apply for very large catalogs.
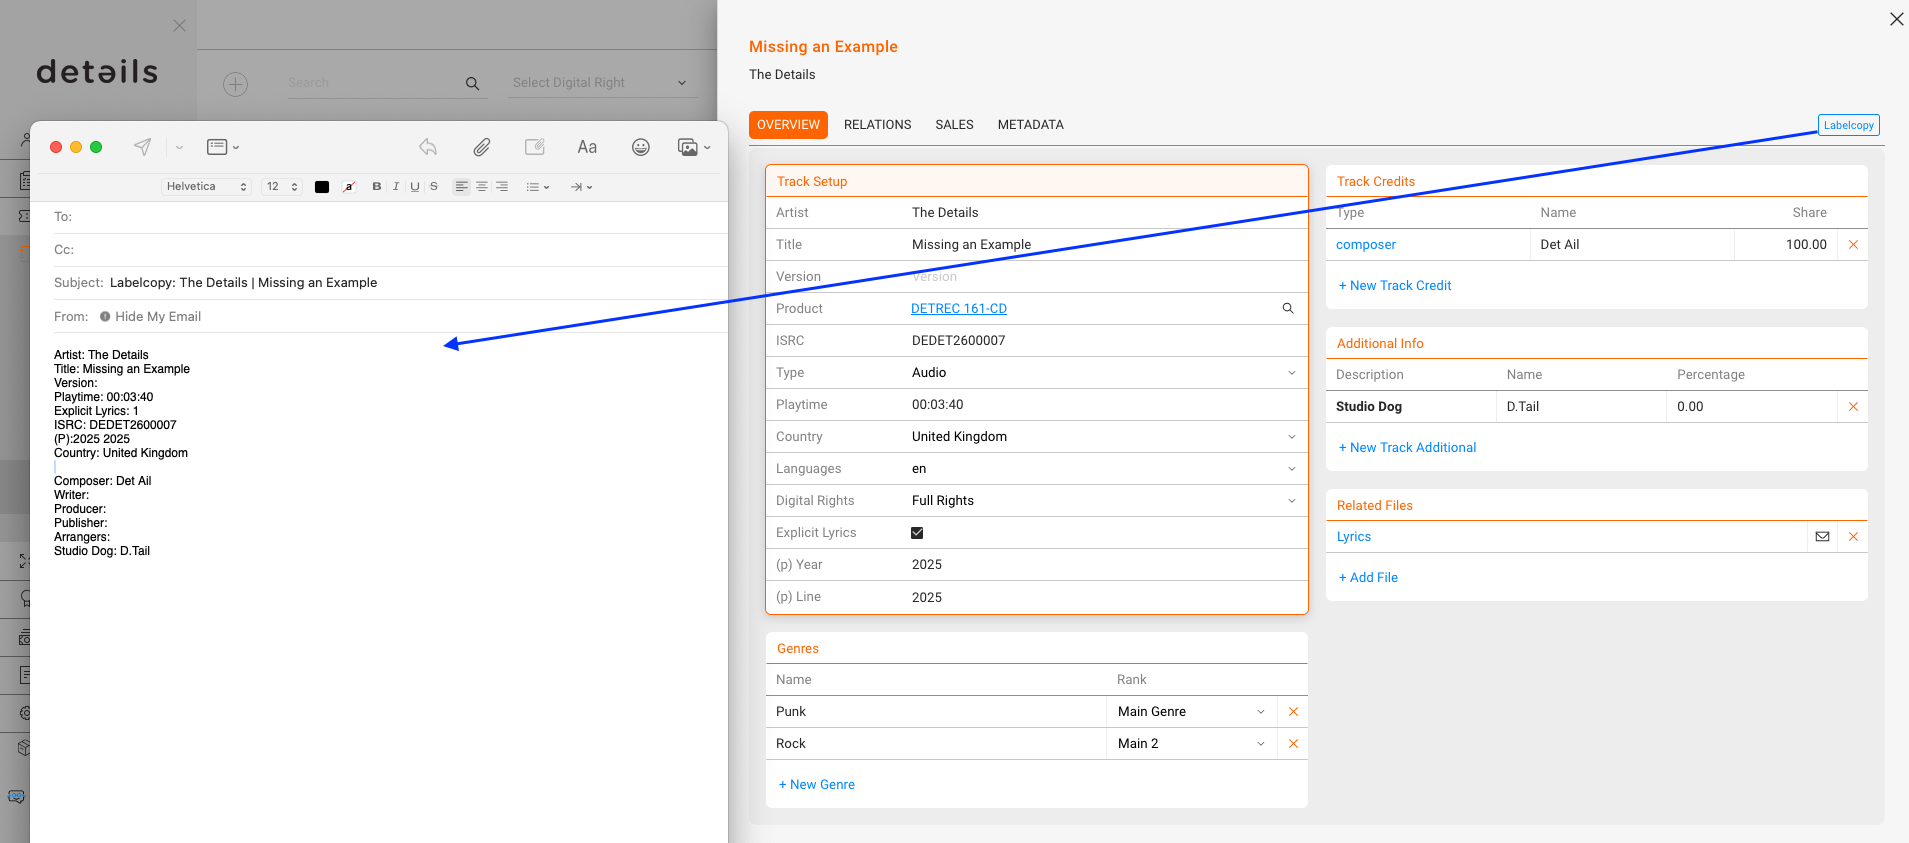
CREATE LABEL COPY
The [Label Copy] gadget lets you quickly send an email with the track’s Overview and Credits. This is useful for providing complete metadata to partners or distributors.
EDIT RELATIONS
The RELATIONS tab provides an overview of all links between the track and other catalog elements. It is mainly used for control and transparency, since most relations are created through the connected Products.
Releases & Products: Display all releases and products where the track is included. These links are defined on the product side and shown here for reference.
Licensors & Contracts: Show the licensors and contracts connected to the track through its products. This allows you to verify that contract shares are correct.
Manual Matches: Display manual matches that were created during import or mapping processes. They cannot be edited here but are visible for review.
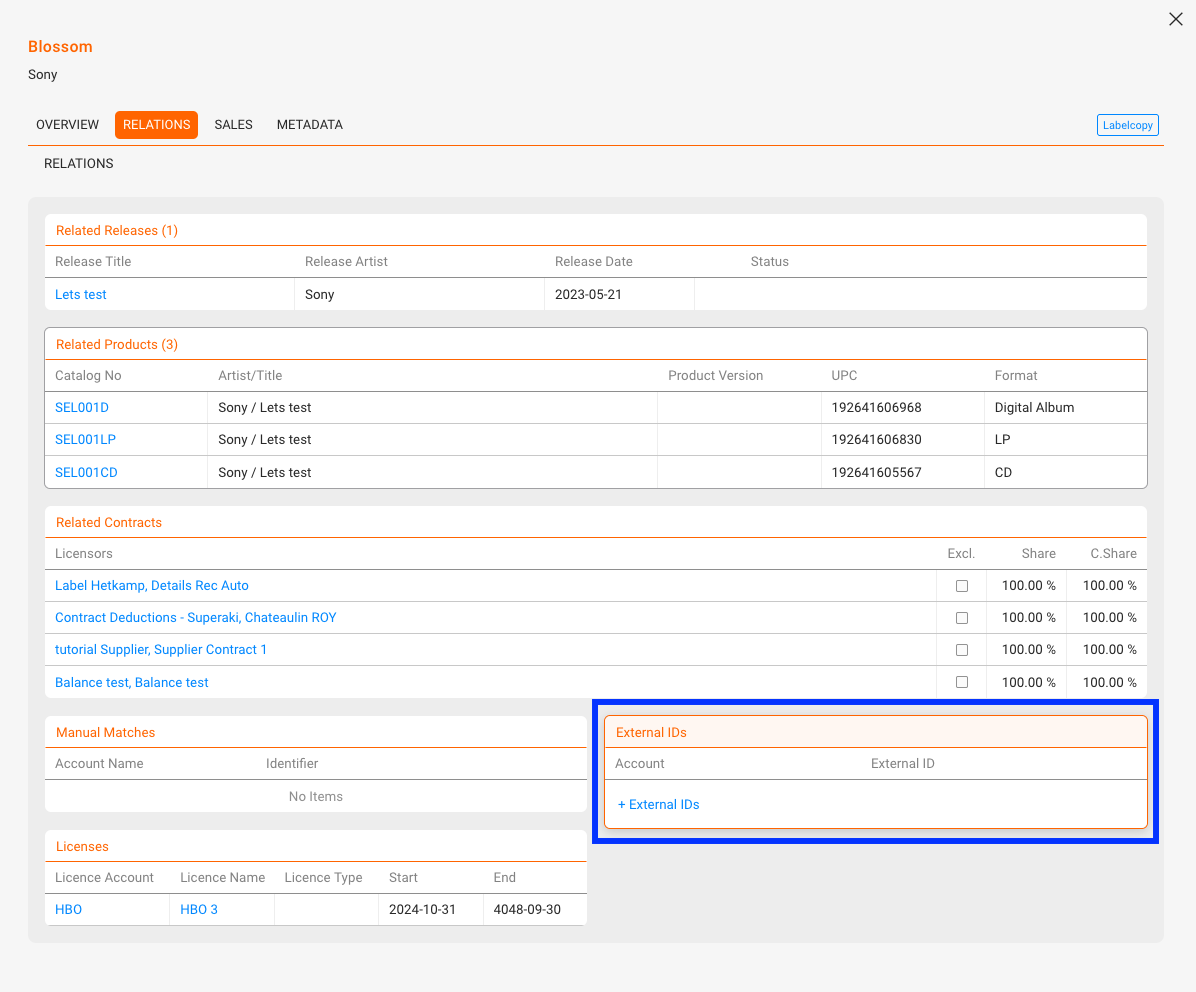
External IDs: The only field you can actively add or edit in the Relations tab. Use the [+] icon to enter identifiers such as Apple ID, YouTube ID, or other external codes.
Licences: Overview of third-party licences (e.g. sync licences) that include this track.
Always ensure that one Main Product is linked to the track. Without this relation, the track cannot be billed in royalty statements.
REVIEW SALES
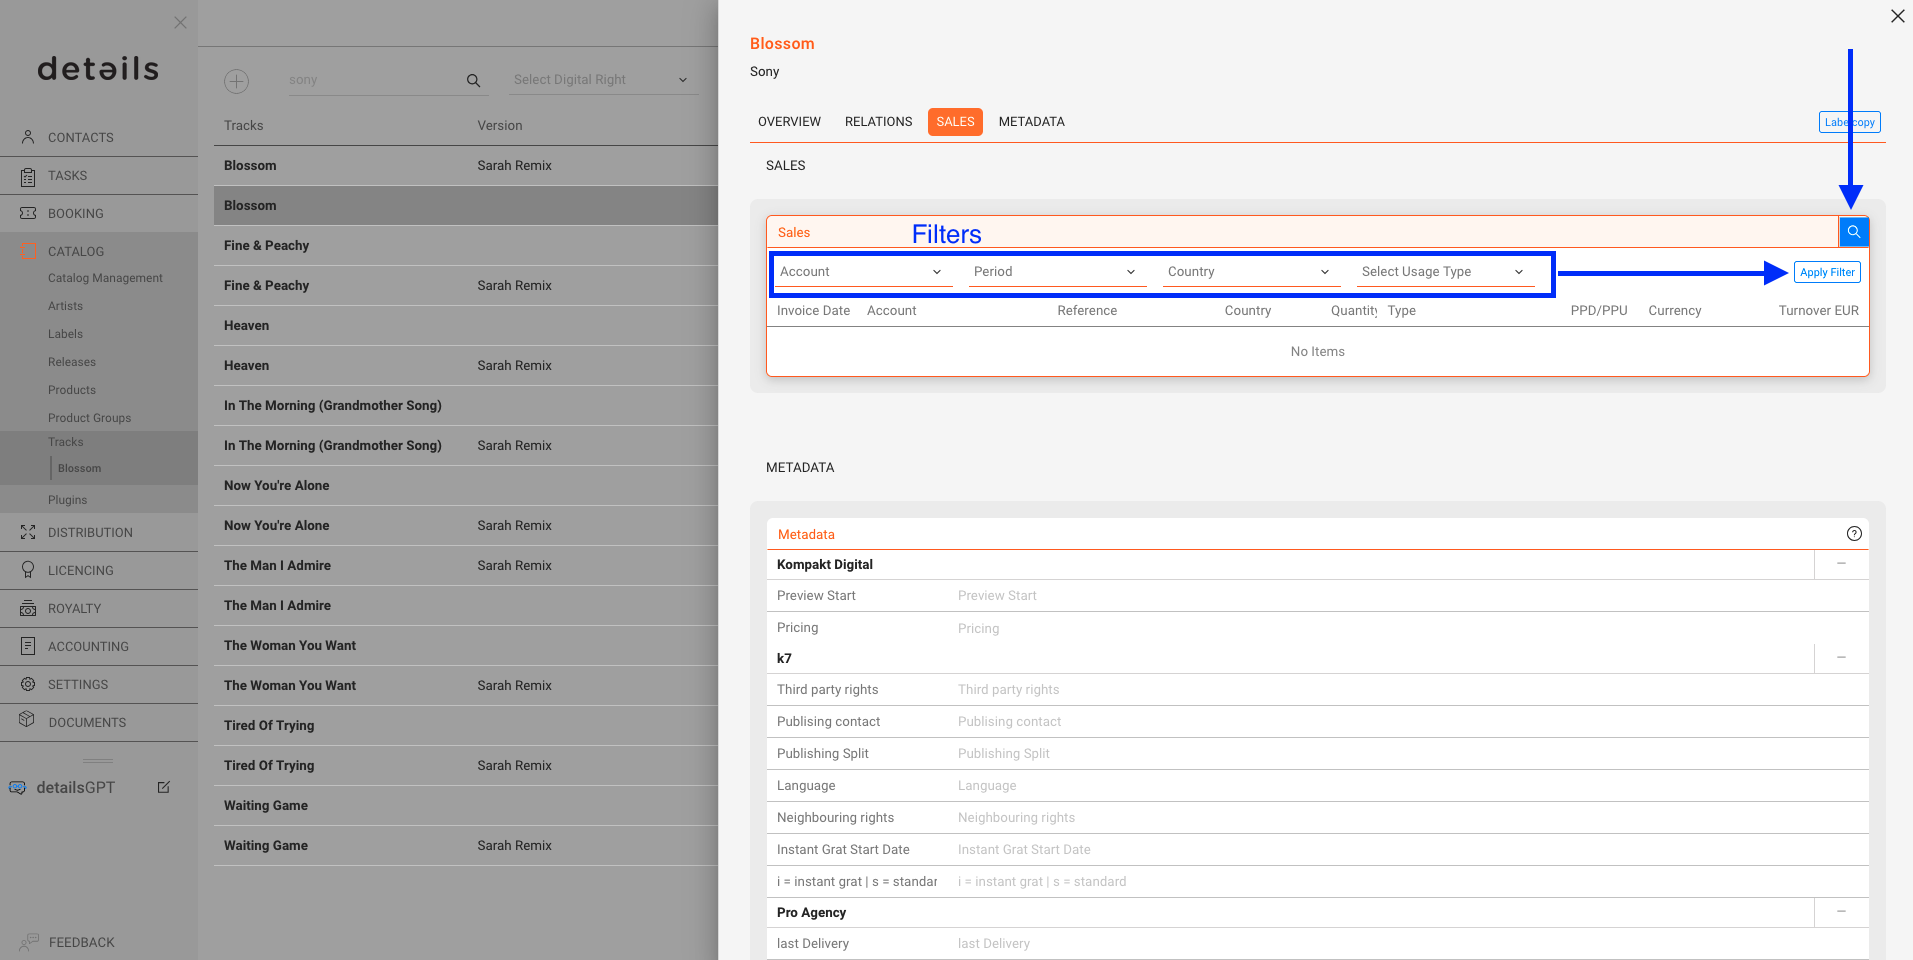
Use the SALES tab to review all sales entries linked to the track. Each entry shows account, statement reference, country, quantity, transaction type, prices, currency and turnover.
Filters are available by period, account, country or transaction type.
ERROR HANDLING (!!!)
Tracks marked with !!! cannot be billed until the error is fixed. Typical issues:
Missing Main Catalog Number
Missing or invalid ISRC
Practice: Always resolve !!! errors immediately. Without correction, the track cannot be included in royalty statements.
In this article, you’ll find the everyday actions you need to manage products quickly and safely. Each action is grouped by function and expands for simple, step-by-step guidance. If you’re just getting started, make sure you know the basics from the PRODUCTS Interface article first.
In details, every product must belong to a Release. Products cannot exist independently. A release may represent a musical project, a merch drop, or even a container for services.
Tip: Choose the correct Channel (Digital or Physical) via the Format. Once a product has transactions, avoid switching channels.
Option A: From a Release (recommended)
Open the release the product should belong to.
Go to RELATIONS ► PRODUCTS.
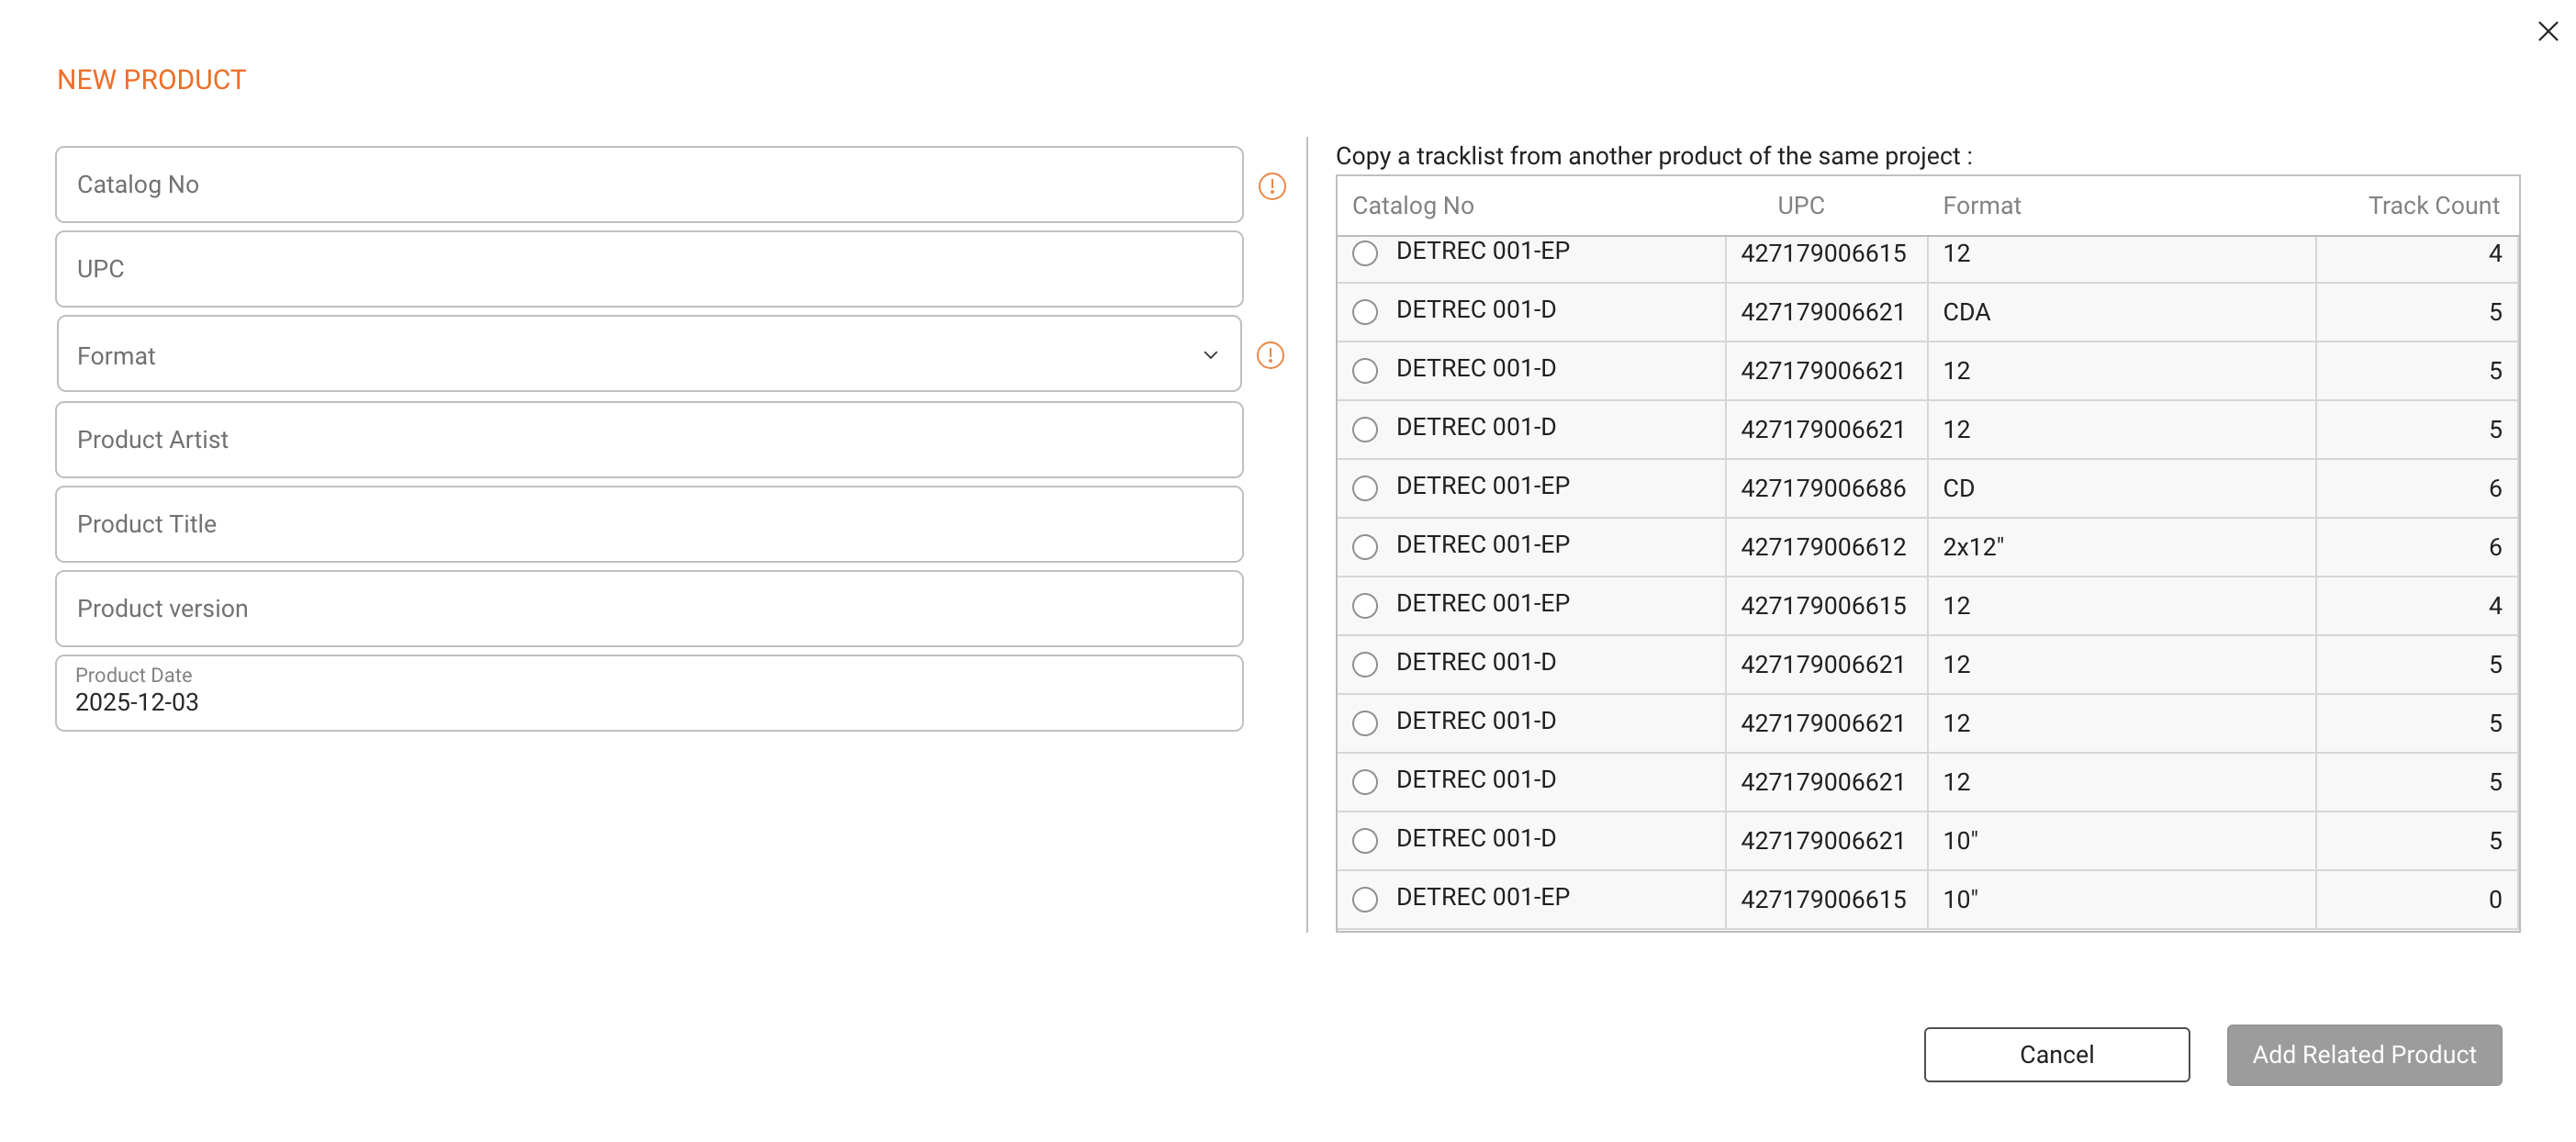
Click [ADD NEW RELATED PRODUCT].
Enter Catalog No (required), Format (required), and Barcode (optional).
If the format is missing, create it in LABEL / SETTINGS.
You can also copy the tracklist from another product in the release using the radio button in the modal.
Soon there will be a Spotify API and an AudioSalad API as well.
Edit a Product
Go to CATALOG / PRODUCTS.
Click the bold Catalog No or Title to open the product.
Edit fields on the relevant tabs (Overview, Relations, Info, etc.).
Save your changes.
Check Barcodes: Duplicate UPCs and Catalog Nos are flagged with [!!!]. Use filters to find and fix conflicts before export or distribution.
Delete a Product
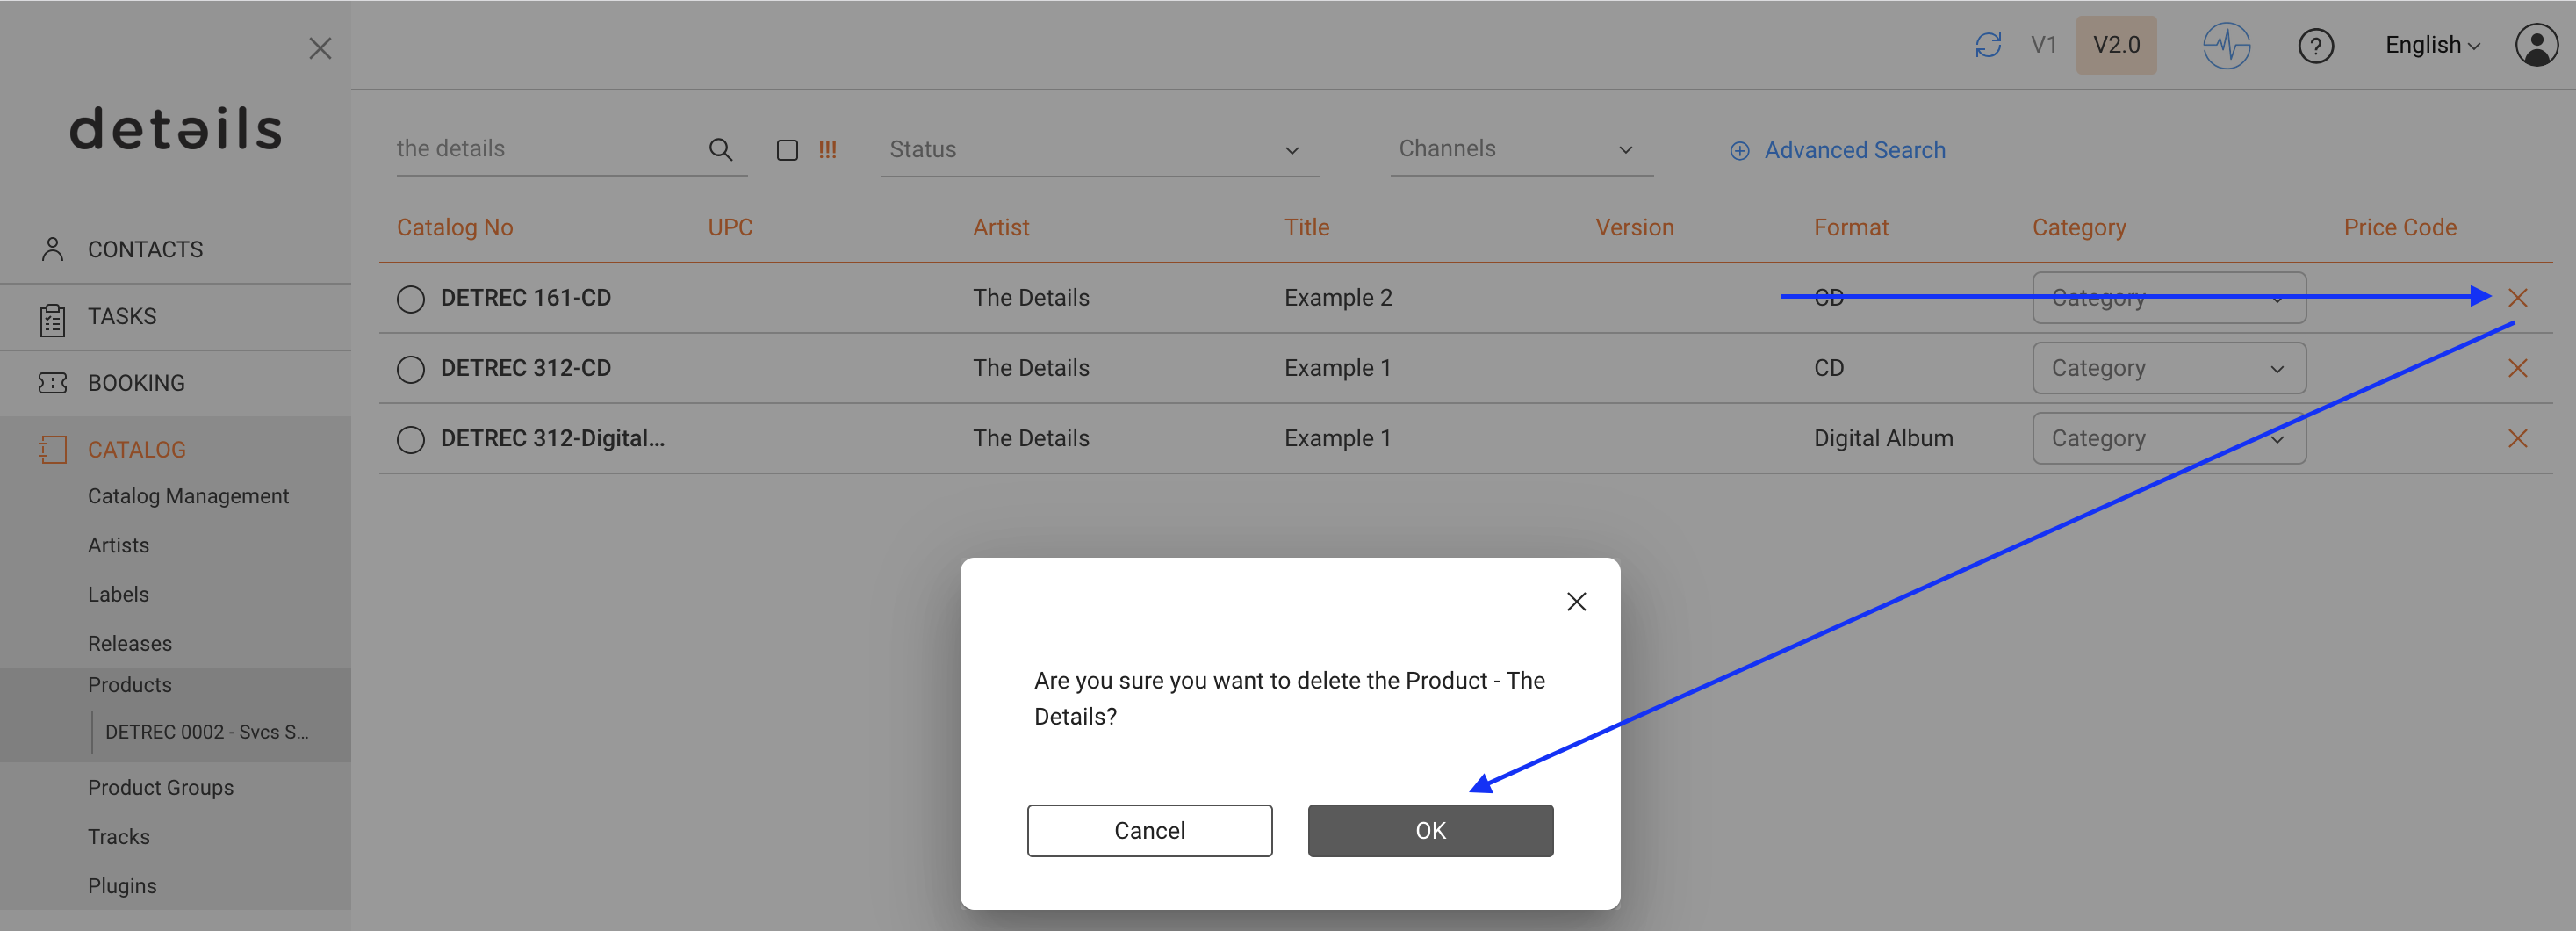
Deletion works only if there are no blocking links. You can delete from the list with the [x] icon.
Deletion is blocked if linked to:
Sales statements
Cost imports
Royalty contracts
If blocked, do this:
Remove or reassign the linked sales/costs, or unlink relevant contracts.
If you cannot, contact support to reassign sales/cost data to another product.
If no links exist, deletion is instant and irreversible.
Fix a Product in the Wrong Release
You can’t move a product to a different release directly. Use this workaround:
Open the correct release and click [ADD NEW RELATED PRODUCT].
Copy the tracklist from the old product if needed.
Verify data and links on all tabs.
Delete the wrongly assigned product (see deletion rules above).
Note: Copy tracklists via [COPY TRACKS FROM CATALOG NO] in PRODUCTS / TRACKS. Removing a track from a product only unlinks it; the track remains in your catalog.
Manage Tracks (Add, Select, Copy)
Go to PRODUCTS / TRACKS to manage the tracklist.
[+ ADD NEW TRACK(S)] – create new tracks; fill Artist, Title, Version; then click [NEW TRACK].
To add existing tracks, search or scroll, tick the box, then click [OK].
[COPY TRACKS FROM CATALOG NO] to duplicate a tracklist from another product.
[UPDATE PLAYTIME] after bulk changes to sync durations.
Tip: Always check if a track already exists before creating a new one. Duplicate tracks with the same ISRC can lead to reporting errors.
Bonus tracks & prorata: If a track is marked as bonus, it is excluded from prorata pools. Unflag it to include it again.
Note on Track Lists
Tracklists are product-specific. Changing a tracklist in one product does not affect others. Removing a track only unlinks it from the product; the track remains in your catalog. A step-by-step guide on Moving a Track to a Different Product can be found here.
Upload Files & Artwork
Go to PRODUCTS / INFO to manage files and descriptions.
Upload files (as required by your workflow). If you choose Internal Use Only, the file will be inaccessible for people without access to details.
Add images or artwork (cover, packshot, banners).
Enter product descriptions in multiple languages.
Tip: Product-level texts override release-level texts in exports and downstream deliveries.
Enter Prices
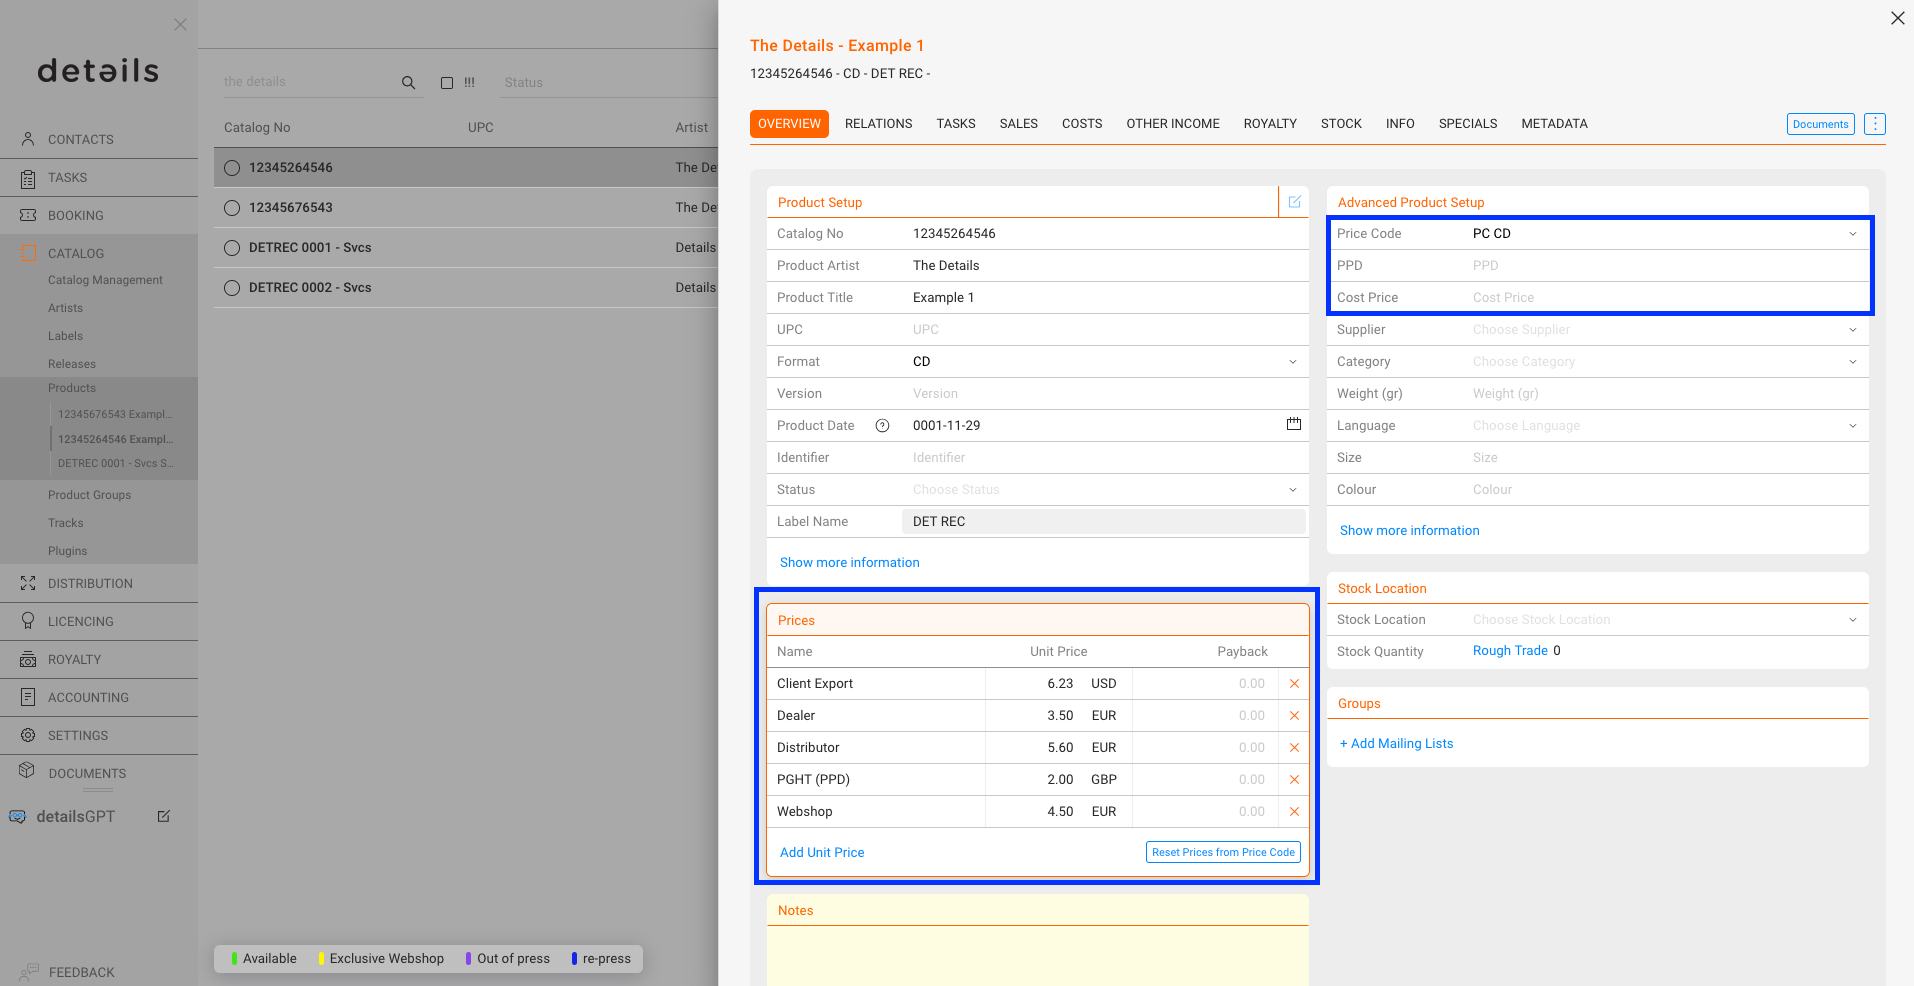
Open the product’s OVERVIEW tab.
Actions in ADVANCED PRODUCT SETUP section:
PPD (physical only): Your dealer price (basis for many royalty rules).
Cost Price (physical only): Your buying/manufacturing price.
Price Code: Apply predefined price logic for auto-filled prices.
Actions in PRICE section:
[ADD UNIT PRICE] – insert prices from the selected Price Code.
[RESET PRICES FROM PRICE CODE] – overwrite manual changes with code defaults.
Heads-up:PPD (Overview) differs from PPU shown in SALES (net after distribution fee).
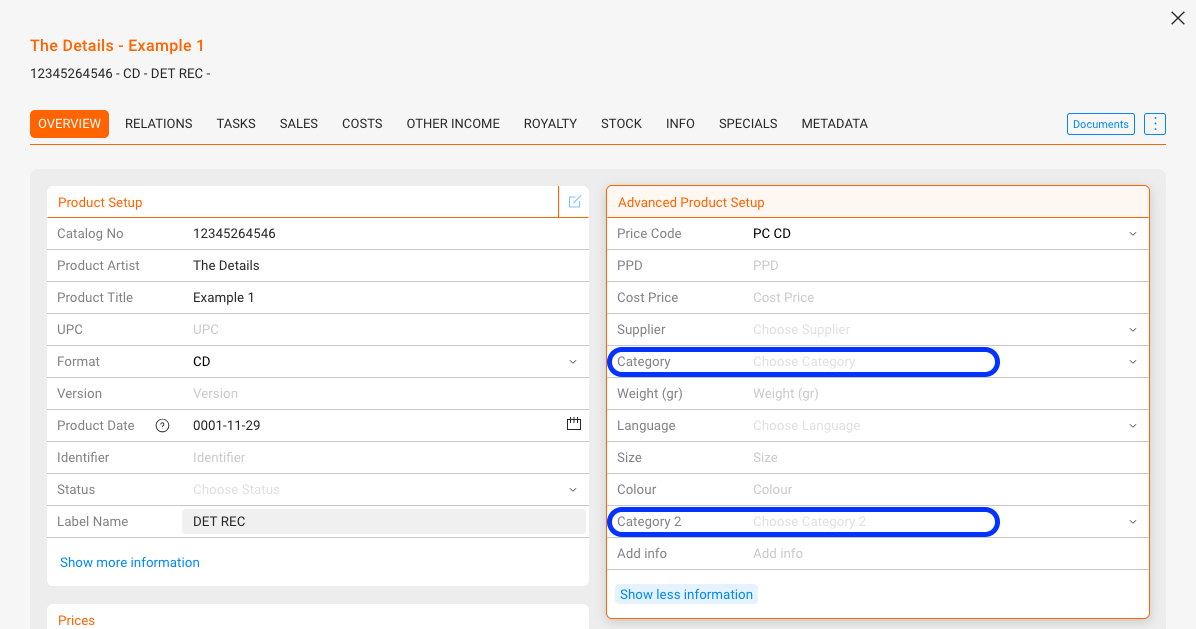
Assign Categories
Use categories for filtering, reporting, and (for physical products) royalty conditions.
Edit CATEGORY and CATEGORY 2 in the product’s OVERVIEW.
Manage the global lists under SETTINGS / LABEL / Label Settings: Categories (tick the 2nd checkbox to enable Category 2).
In the product list, CATEGORY is editable in place; CATEGORY 2 is hidden (use it for static/internal grouping).
Royalty use:CATEGORY can be used as a condition in royalty contracts for physical products. Keep values consistent to avoid calculation errors. Read more about using categories.
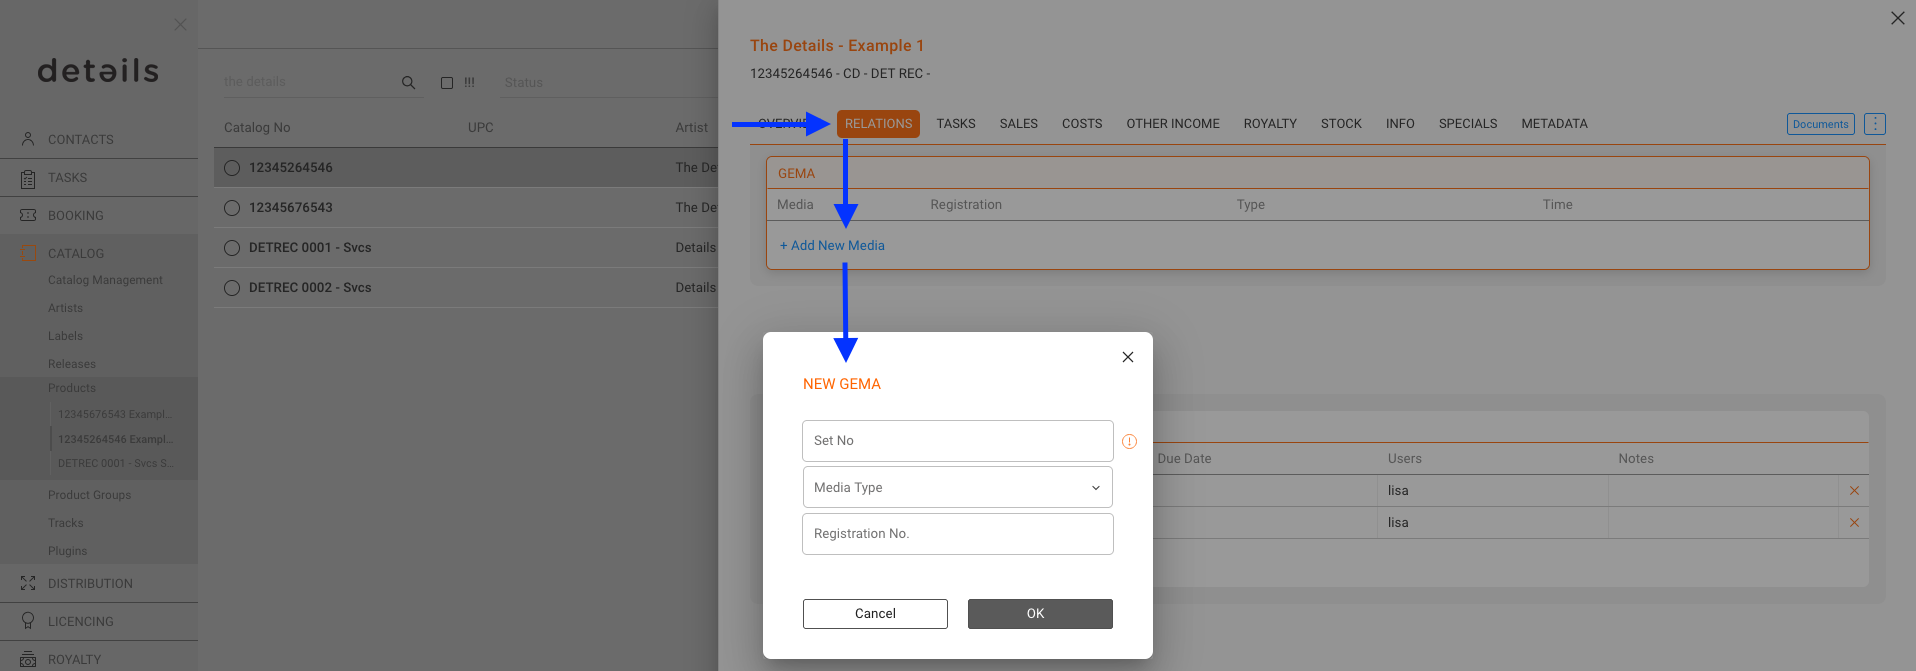
GEMA Registrations (physical only)
For physical products, you can manage GEMA registrations directly in the product’s RELATIONS tab.
Register products with GEMA where required by law.
Provide accurate format, tracklist, and playtime data to ensure proper reporting.
Keep GEMA registrations updated when product versions change.
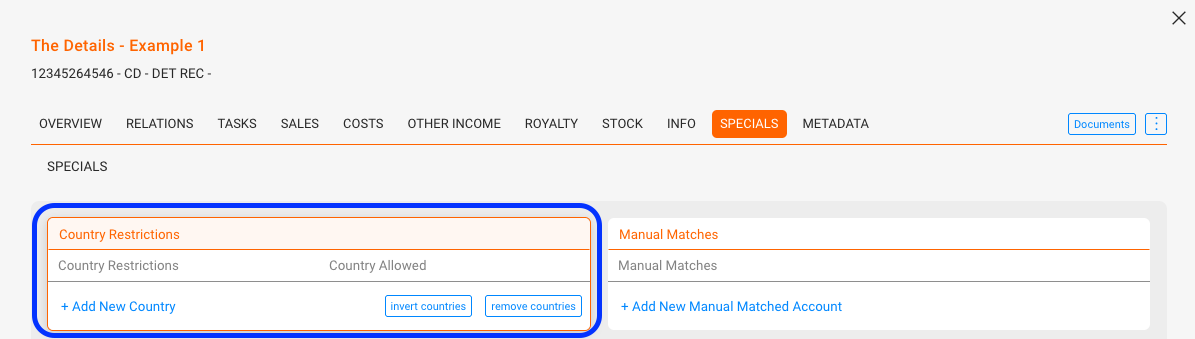
Set Country Restrictions
Open the product’s SPECIALS tab.
Click [+ ADD NEW COUNTRY] and select entries.
Use [INVERT COUNTRIES] to switch restricted ↔ allowed.
[REMOVE COUNTRIES] clears the list.
Manage country groups under SETTINGS / GENERAL SETTINGS.
Tip: Keep territory logic simple (few groups) for easier maintenance and clearer exports.
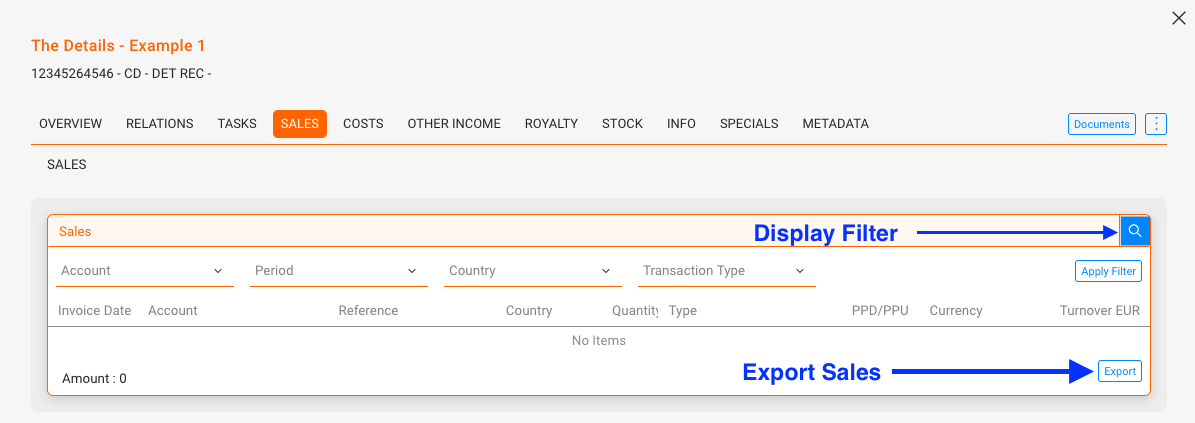
Export Product Sales
Go to PRODUCTS / SALES, set filters, then click [EXPORT] at the bottom of the page.
Filter by period, account, format, country, or channel to target the data you need.
Use exports for statements, stock planning, and price reviews.
Basic Stock Tasks (physical)
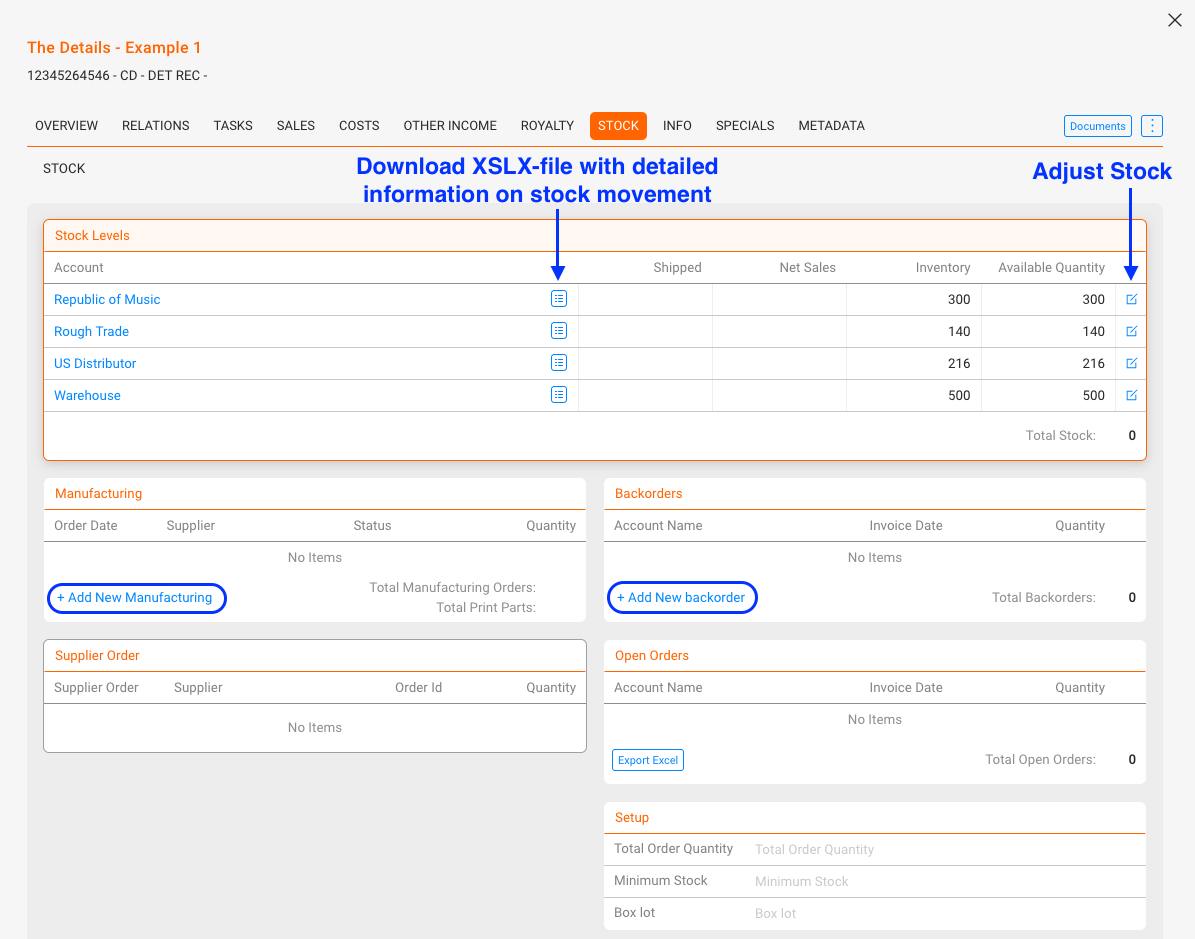
Open the STOCK tab to review availability and orders.
Stock Levels: See Inventory (physical units) and Available (unreserved).
Manufacturing: Add new batches with [ADD NEW MANUFACTURING].
Supplier Orders: Open orders are shown until accounted; then they become inventory.
Backorders & Open Orders: Track pending customer demand; export as needed.
Note: Stock and orders are synchronized with DISTRIBUTION. Use Minimum Stock and Box Lot in Setup to plan replenishment.
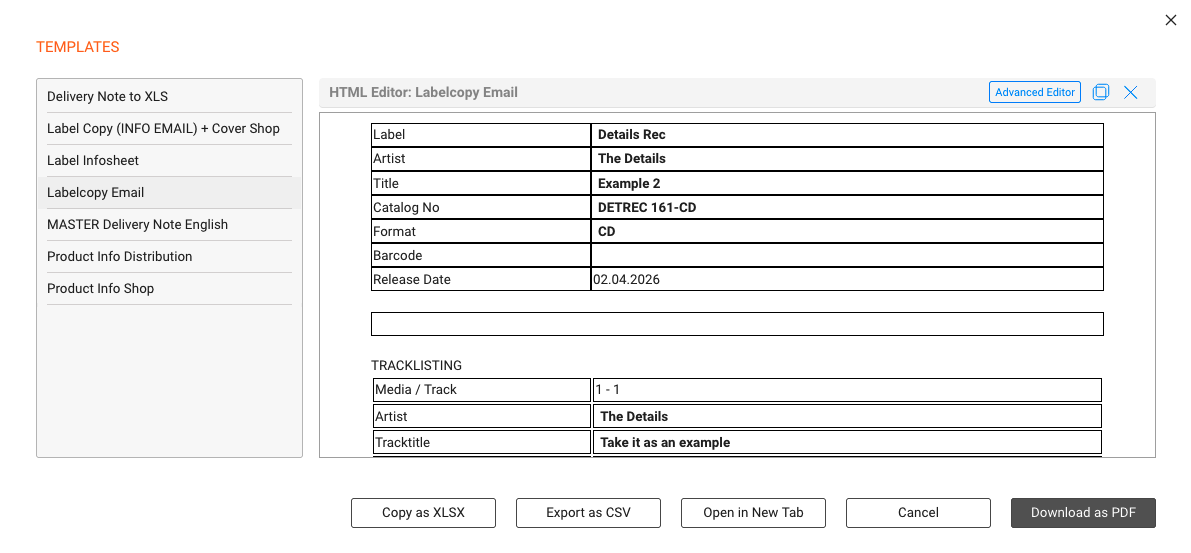
Create a Document
Click [DOCUMENTS] in the top bar to generate an HTML document from provided templates (for example one-sheets, product info sheets, or manufacturing orders).
Select the appropriate template provided by details.
Preview the result, then Export (PDF/CSV/Excel) or Copy it.
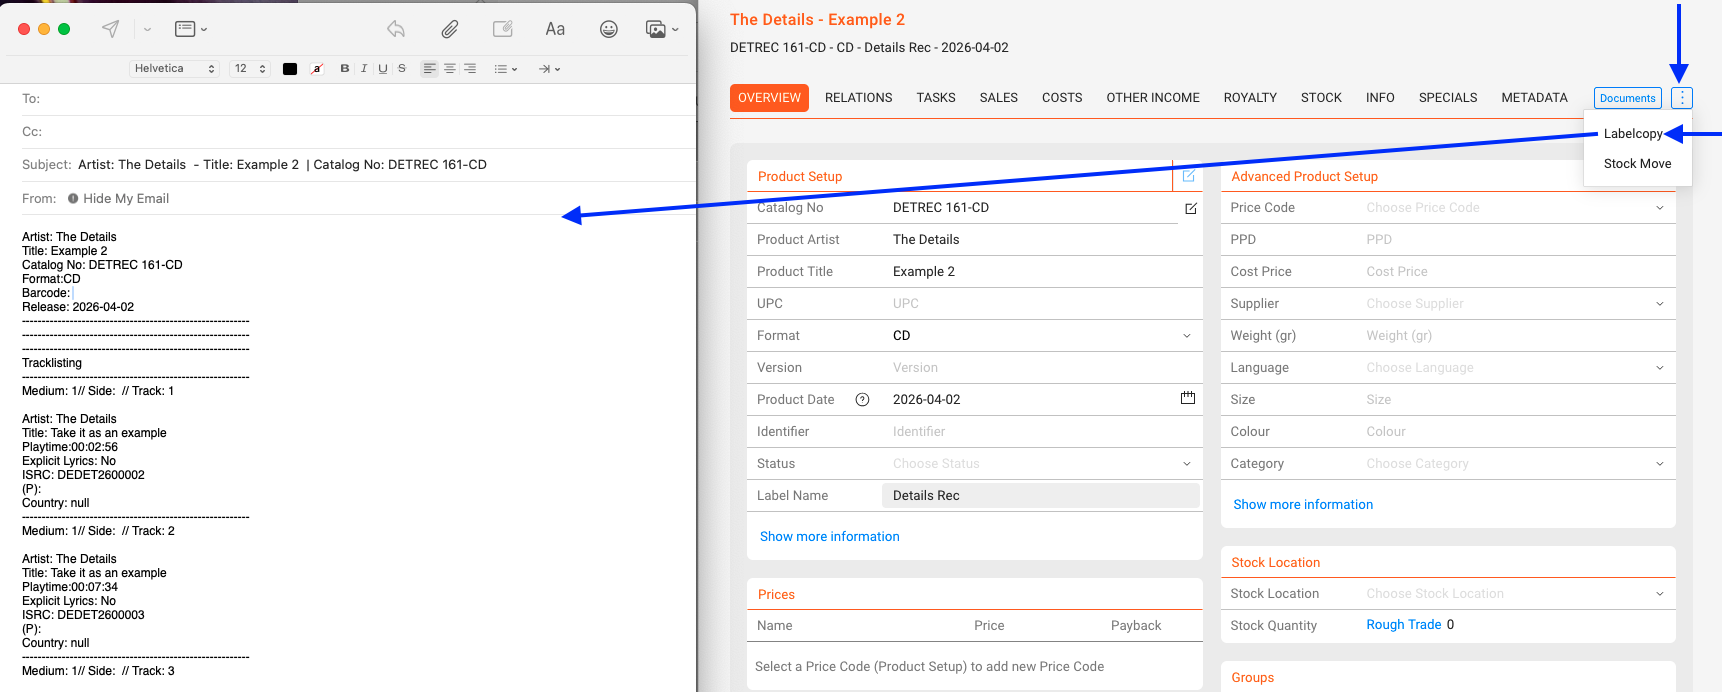
Generate Label Copy
Use the top bar option and select Label Copy. This opens a new email in your local mail client with a static label copy: product metadata plus the complete track list.
Prerequisite: A configured desktop email program.
Scope: Fast, standardized email output (not customizable; no Excel export).
Tip: For brandable or changeable documents, use [DOCUMENTS] instead.
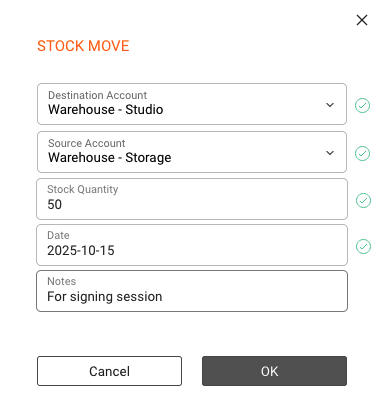
Make a Stock Move
Use Stock Move to reallocate on-hand units between stock accounts or warehouses for a physical product.
Steps
Open the product page and choose Stock Move.
Select From [Source Account] and To [Destination Account] stock accounts.
Enter the Quantity and confirm.
The quantity decreases in the source and increases in the destination. No order, shipping document, price, or invoice is created. Use a Distribution Order instead if you need shipping paperwork or an auditable transfer.
This article explains the core actions you can perform with labels in details. Use the sections below for step-by-step instructions.
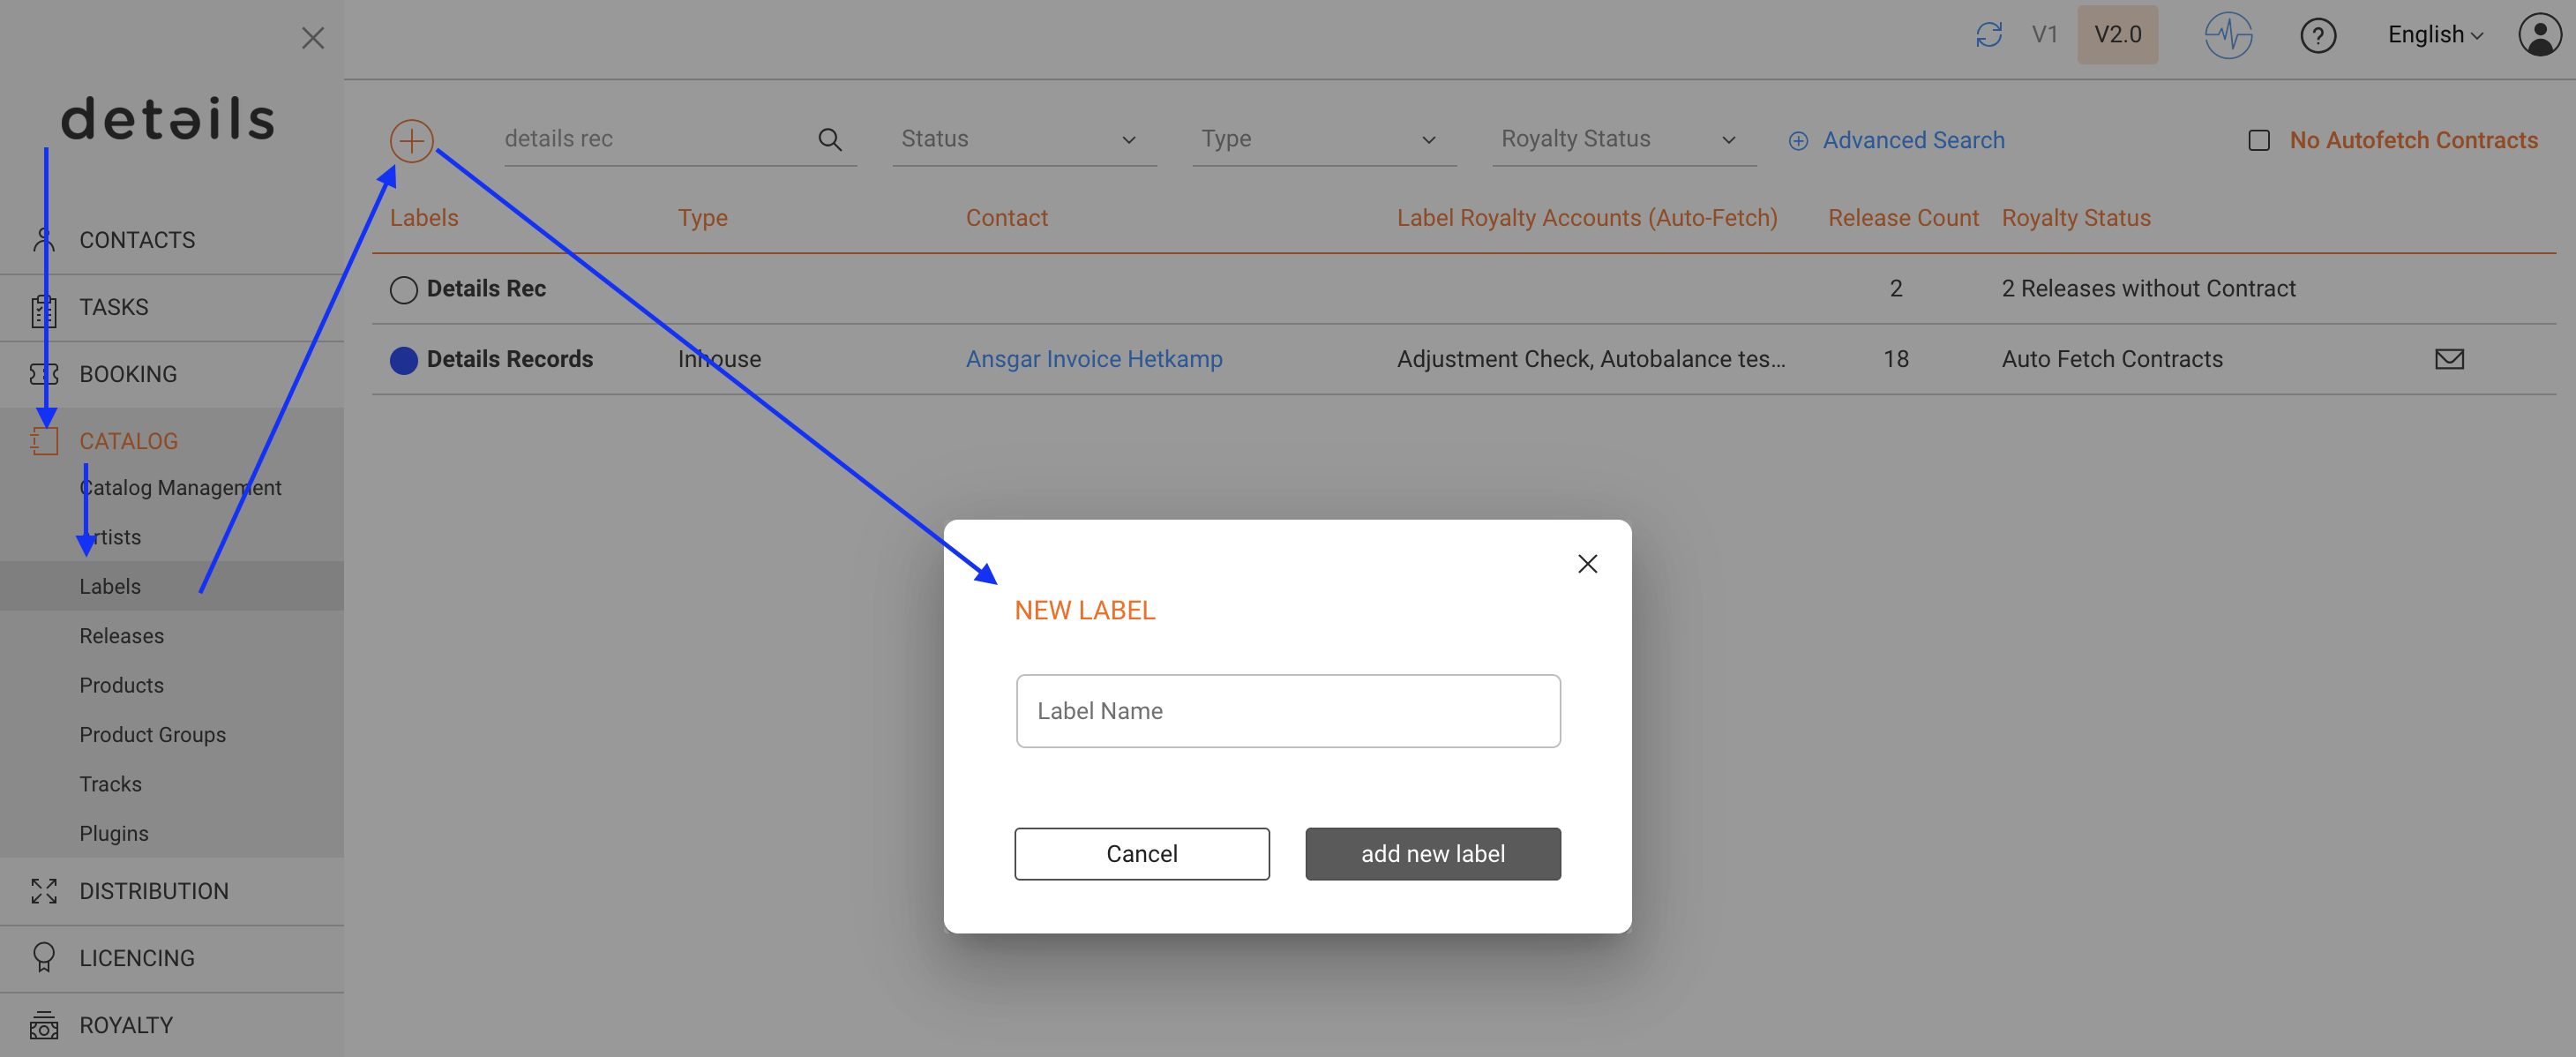
► Create a Label
Go to CATALOG / LABEL.
Click [+] to add a new label.
Save to create the label and open its detail tabs.
► Edit a Label
In CATALOG / LABEL, click the label name.
Adjust fields in any tab (OVERVIEW, INFO, SETUP, METADATA).
Changes are saved automatically.
► Delete a Label
Open the label and check RELATIONS for linked releases or products.
Remove any linked items first.
Back in CATALOG / LABEL, click [x] to delete the label.
Note: You can only delete a label if there are no releases or products linked to it.
► Configure Autofetch
Autofetch automatically links all new releases of a label to a royalty contract. Setup is done in the ROYALTY / CONTRACTS module.
For step-by-step instructions, see the dedicated Autofetch.
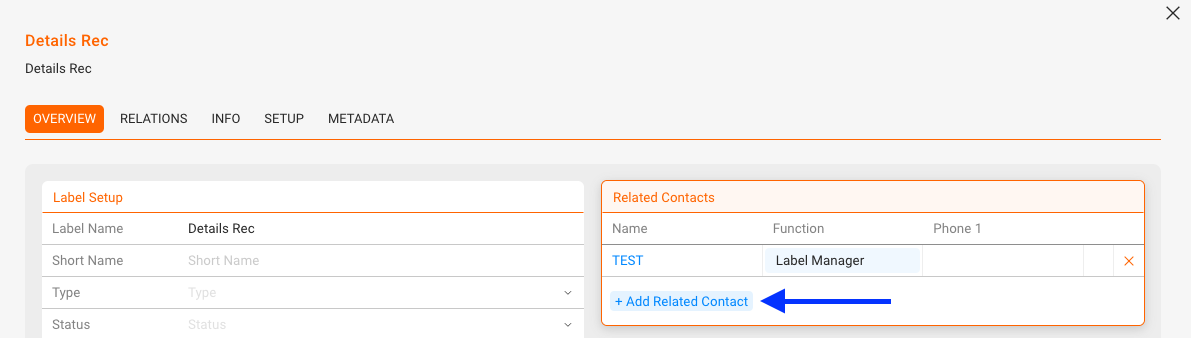
► Link Contacts
Open the label and go to OVERVIEW.
In Related Contacts, click [+] and select roles such as Label Manager, Accounting, or Promotion.
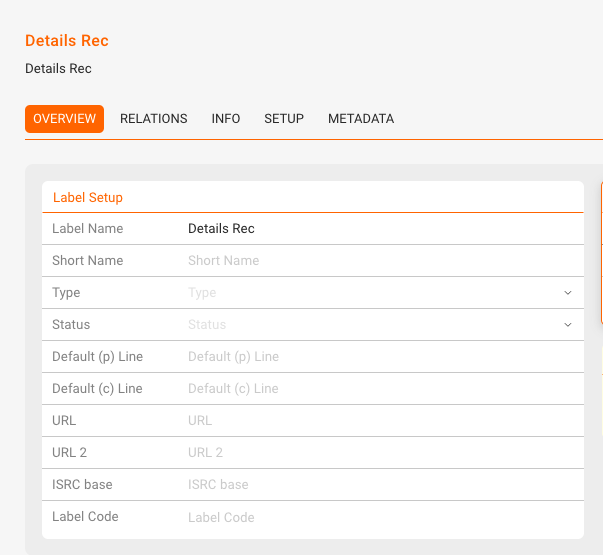
► Edit the Label Setup
Change Label Name or Short Name.
Adjust Type (In-House, Distributed, External) and Status.
Enter Default P-Line and C-Line.
Add URLs (two link fields available).
Set ISRC Base and (if needed) Label Code.
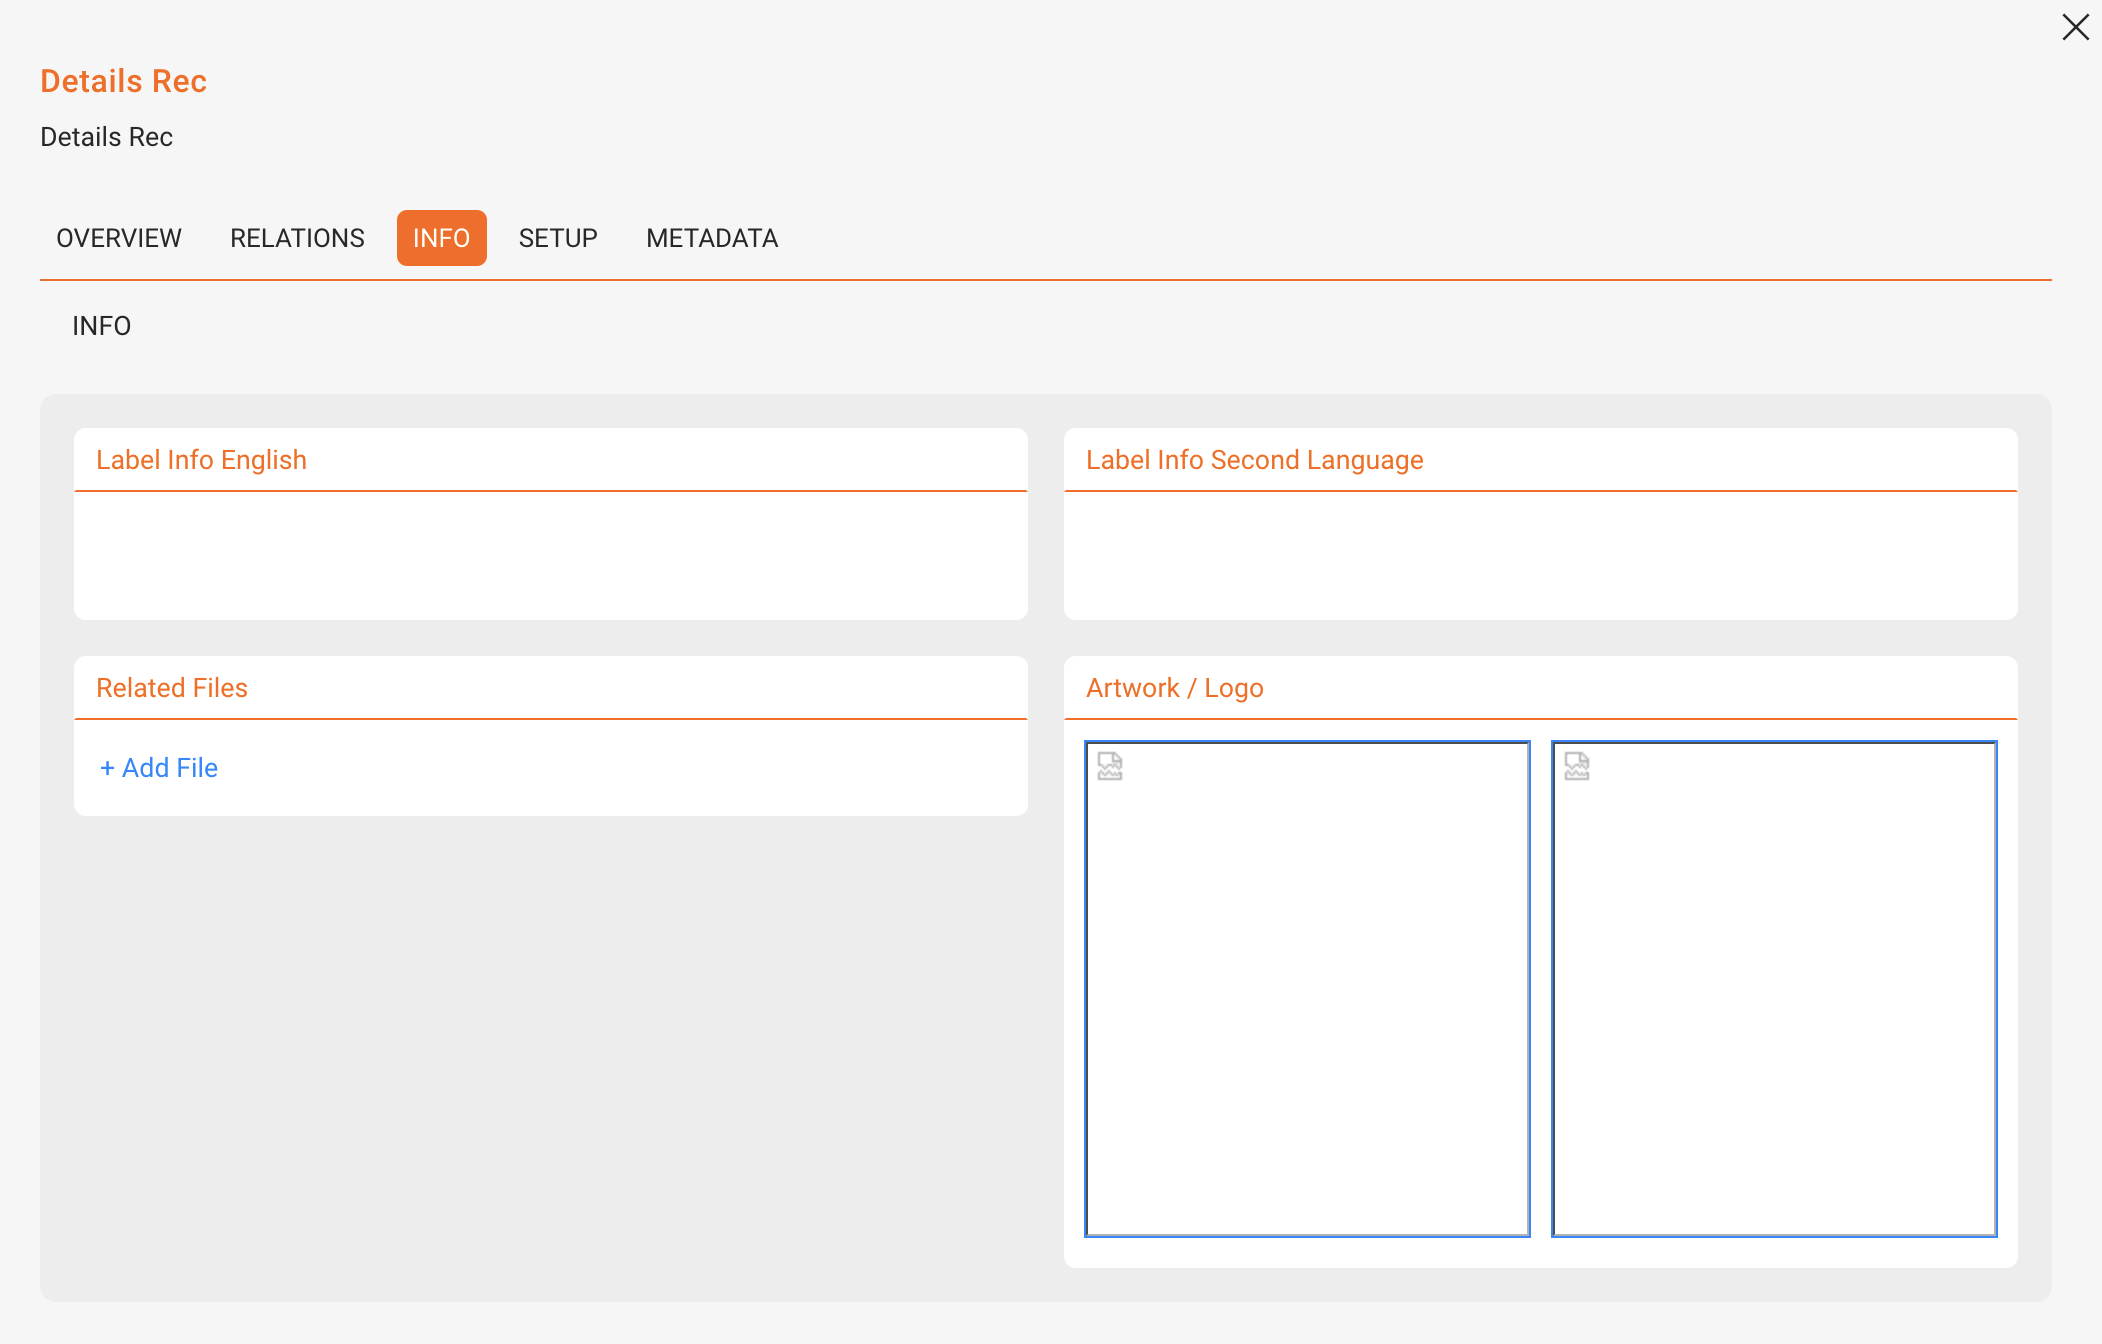
► Add Bios, Logos and other files
In INFO, enter label biographies in different languages.
Upload and select an Artwork / Logo.
Attach Related Files as needed.
► Add Relations and Products
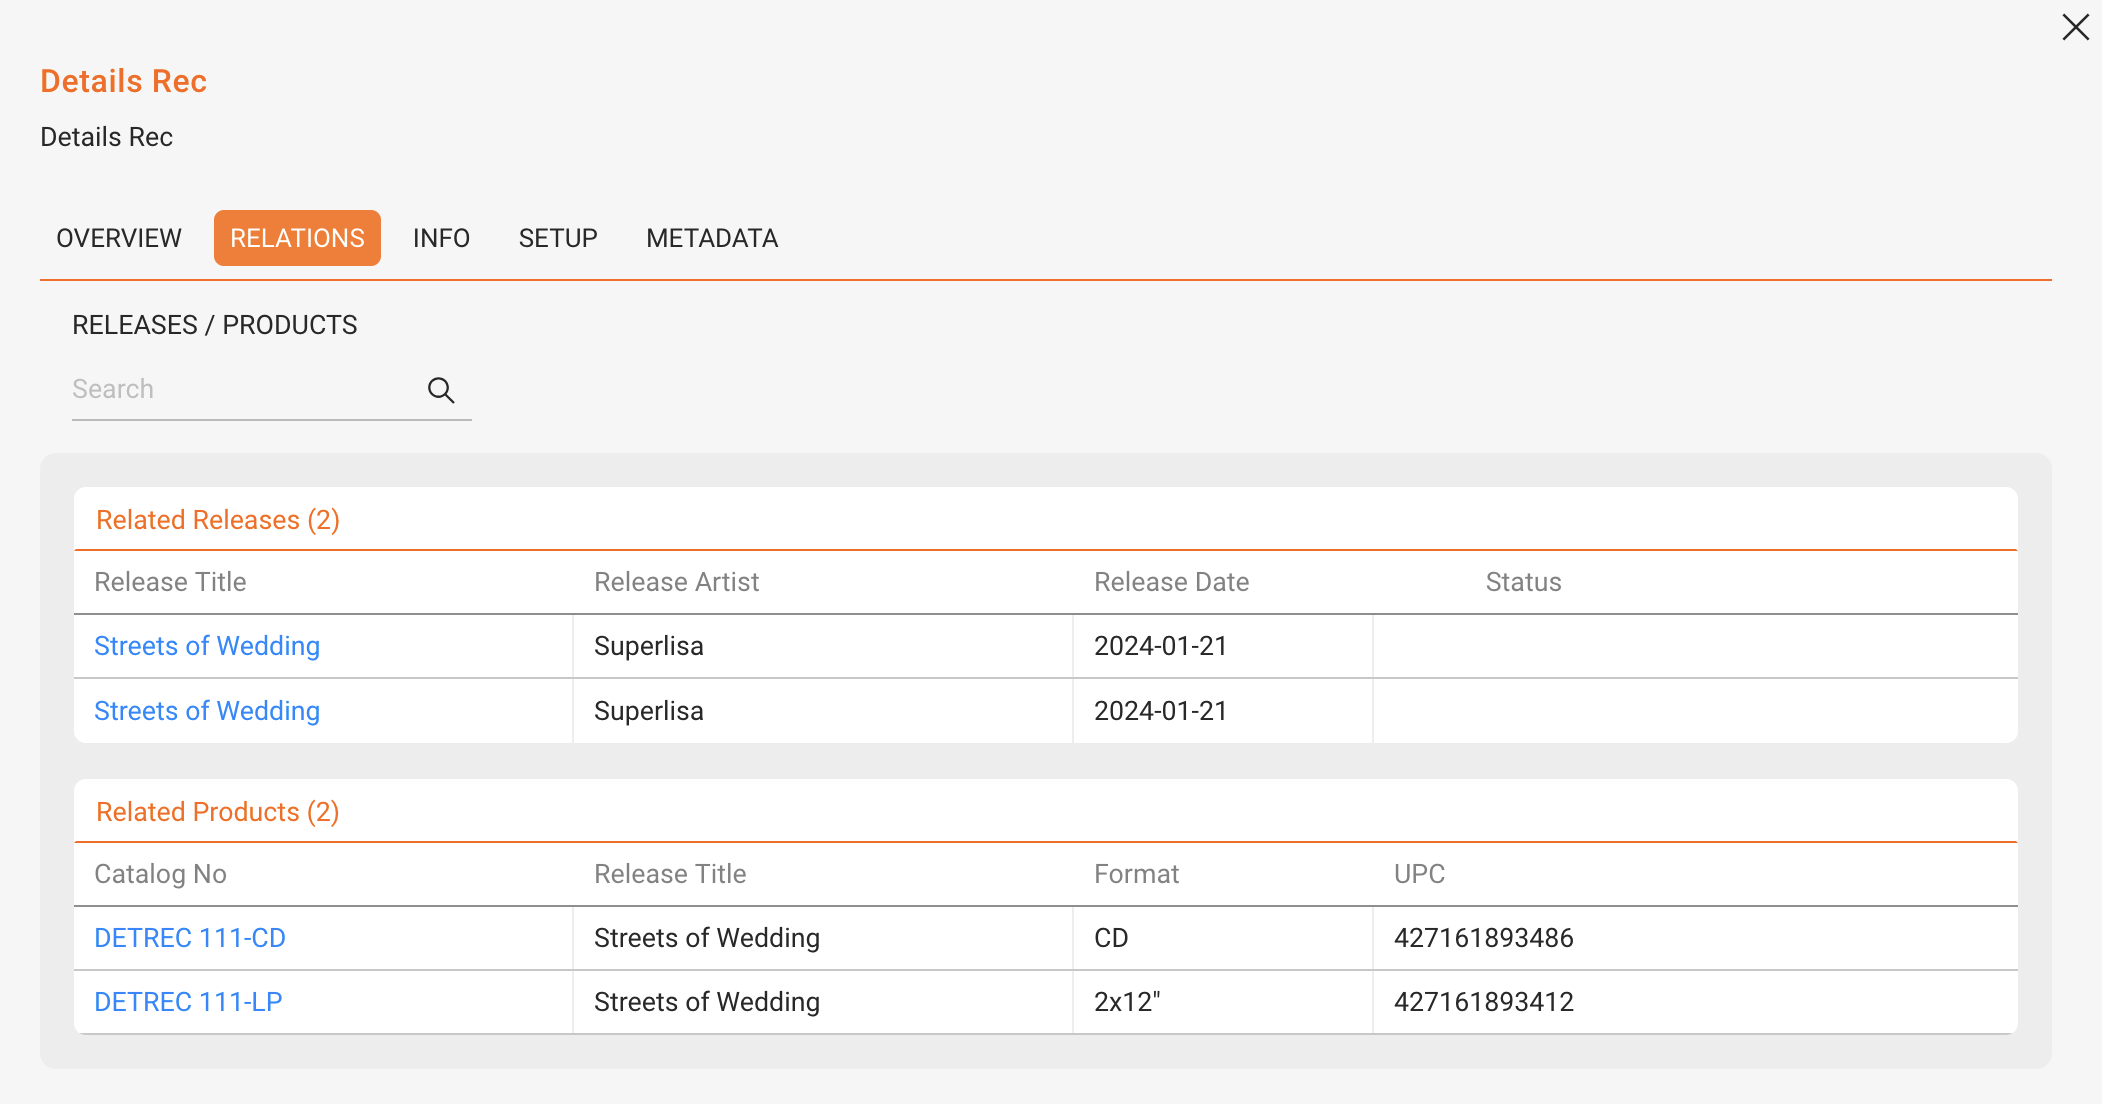
In the RELATIONS tab, you see all releases and products linked to the label. Use the search to filter, and click any entry to open the RELEASE or PRODUCT page. To add Releases (and therefore products) you have to connect a release in its inital creation process (data import or manually). A later change of label-release connection can be executed by the details team. Please contact us if needed.
► Add Territory Restrictions
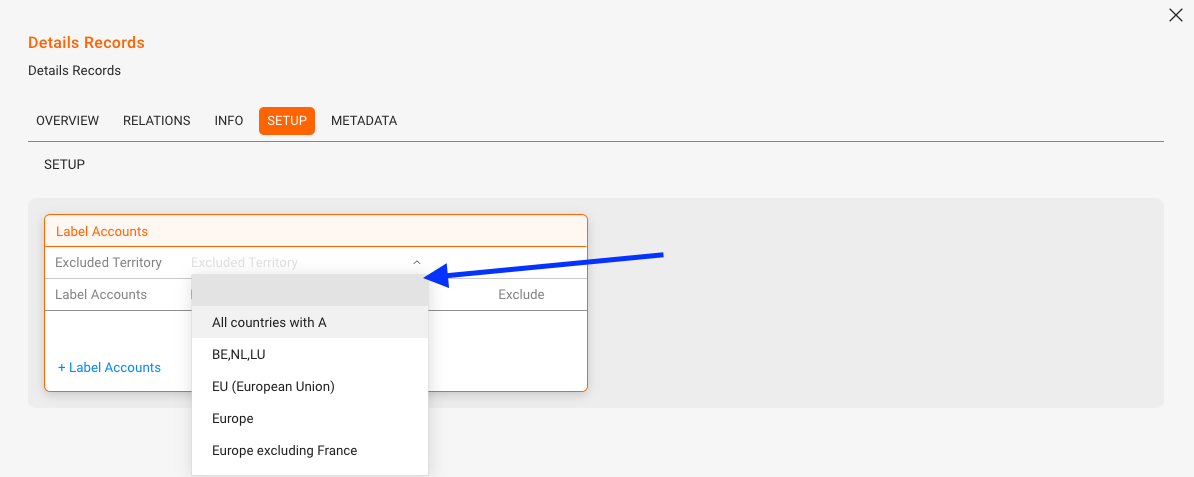
In the SETUP tab, define excluded territories where the label should not deliver. If a territory is missing you can add it in SETTINGS / GENERAL / Territory via [+ Add New Territory].
► Set up Label Account Specifics
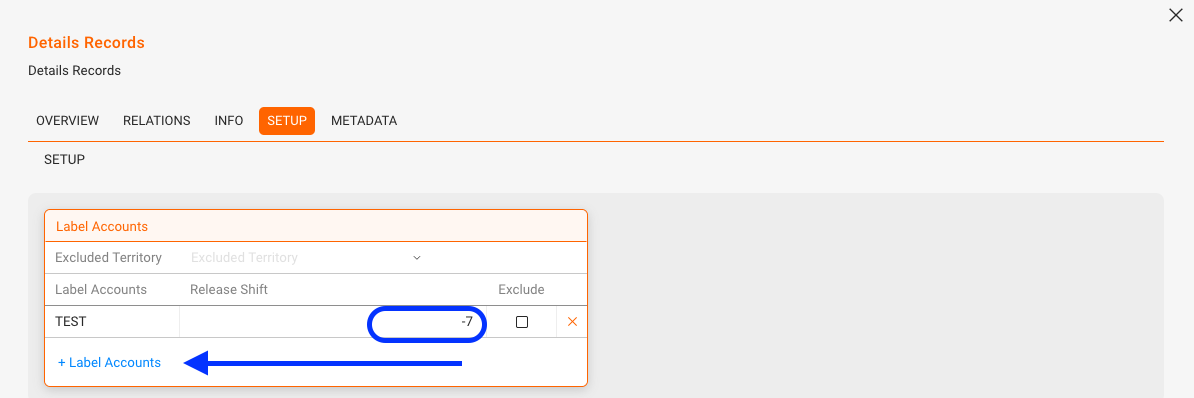
In the SETUP tab, configure label accounts. You can set Release Shifts per account or mark accounts as excluded.
Note: Release shifts are counted in days, and an early release is shown with a negative number.
► Add Metadata
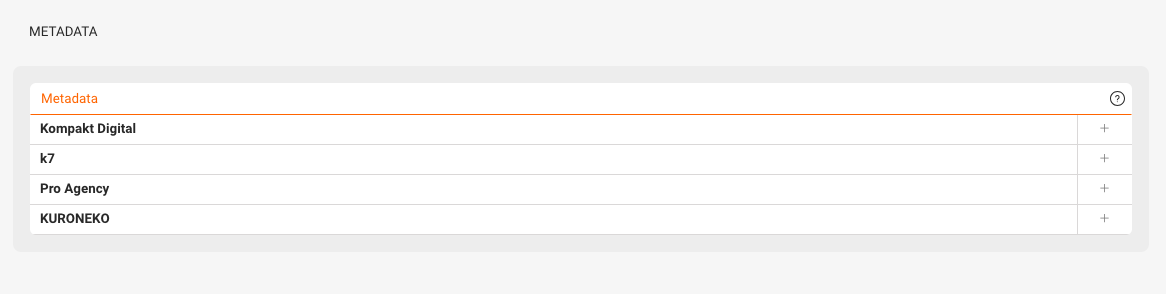
In the METADATA tab, attach predefined sets. If you want to enable or add metadata tabs, please contacting us.