How to use the p.r.o agency plugin

This article explains how to connect details with p.r.o. agency, prepare your metadata, send your catalog, interpret responses, and handle the bilingual consent.

Why this integration matters

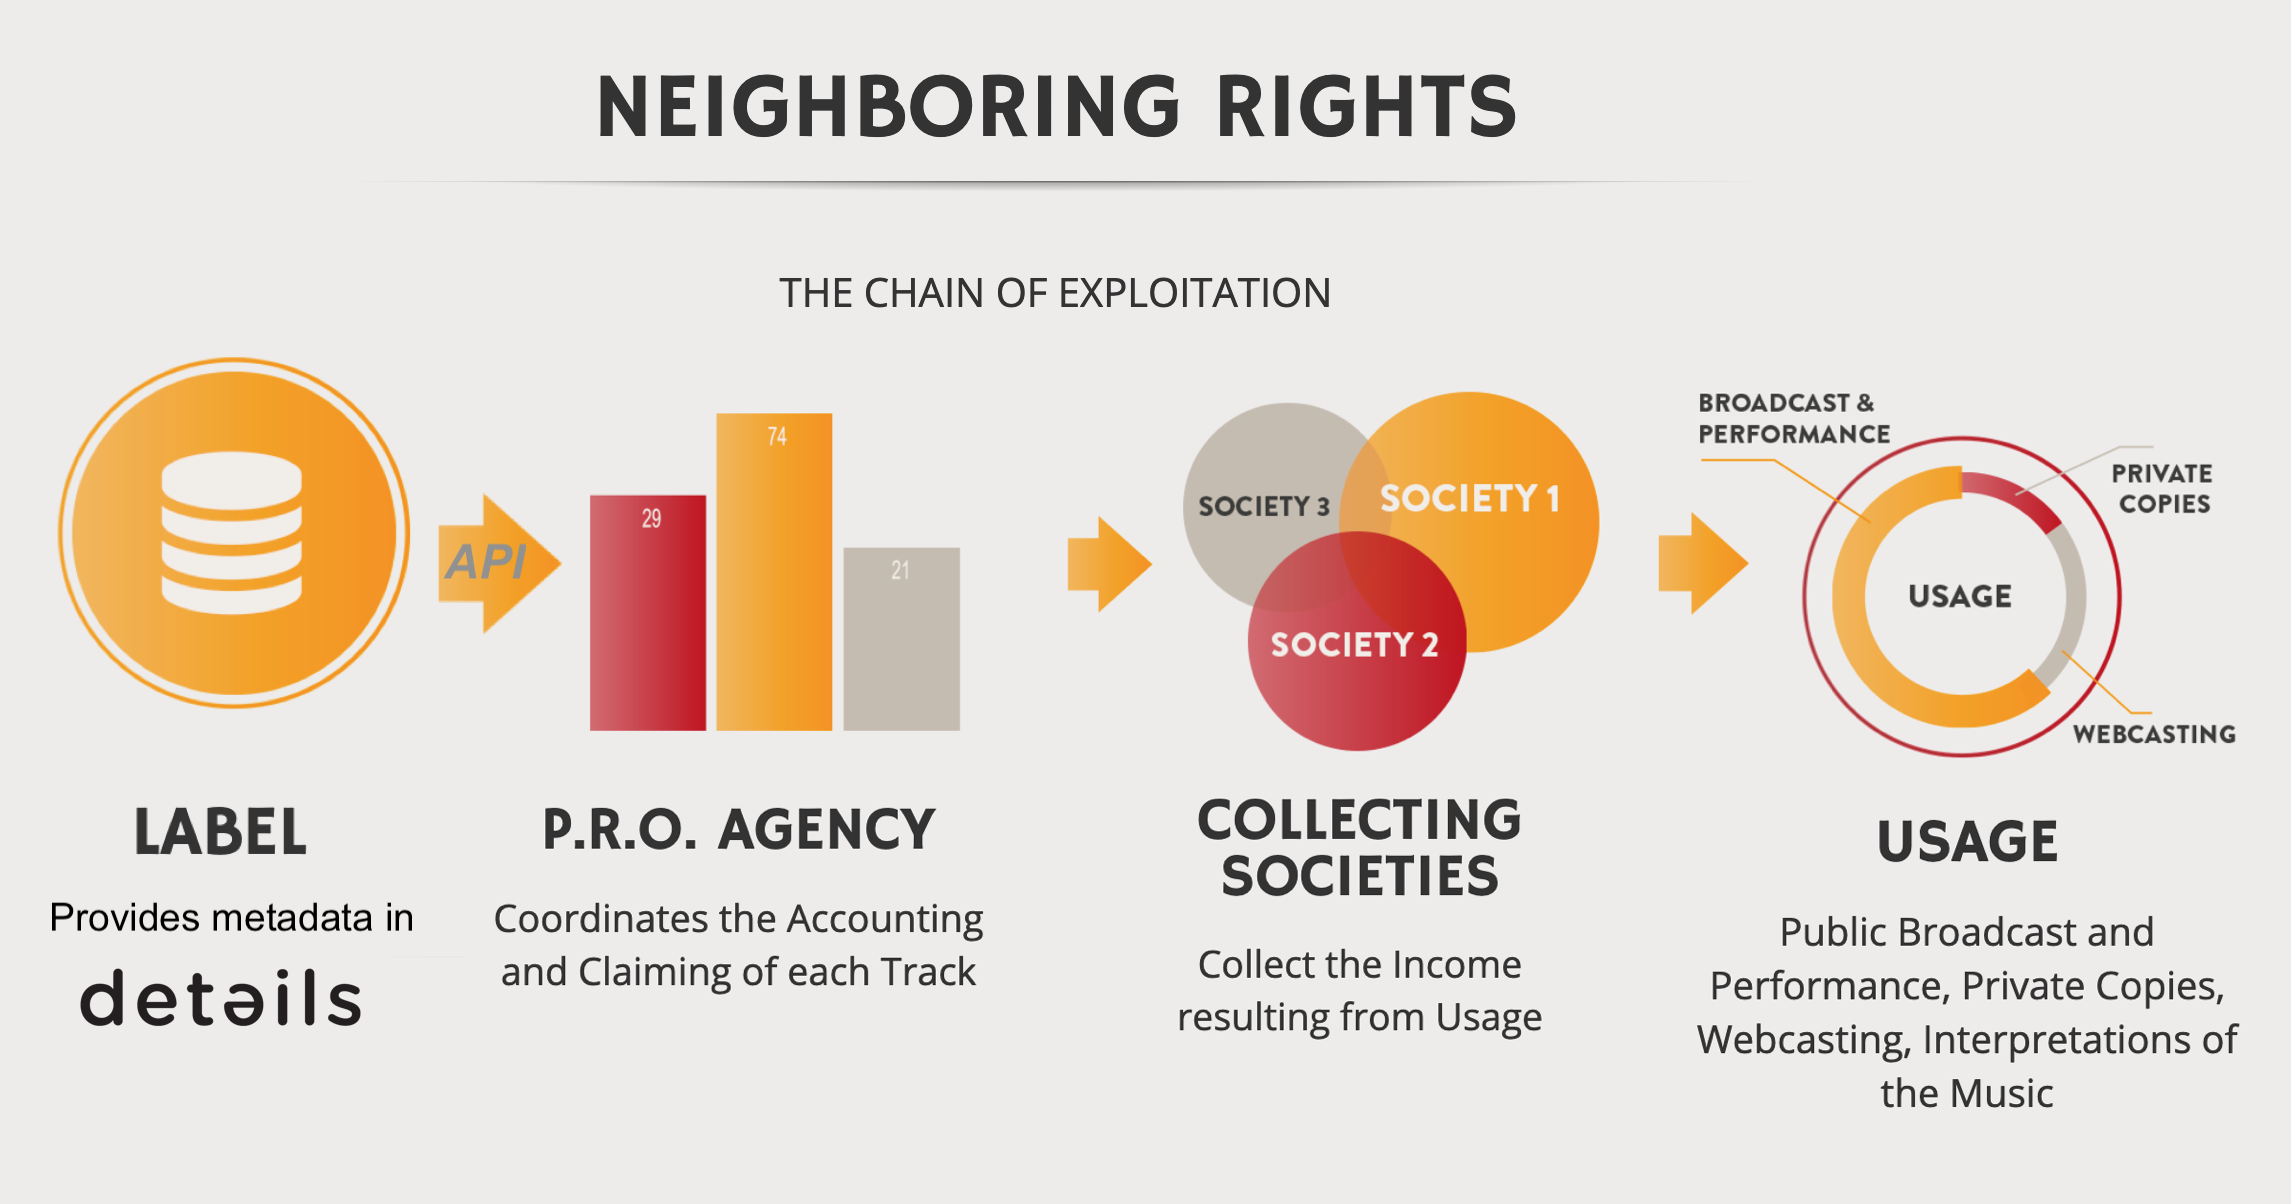
Neighbouring Rights revenues (e.g., public performance and broadcasting) are collected by societies such as GVL, PPL, SPPF, SENA, and others. The integration with p.r.o. agency helps automate data delivery and reduce duplicate data entry.
The aim of the partnership is to simplify the data flow for labels and label services and to avoid multiple data entries. In 2019, details, p.r.o. agency, and WeConvert launched the Connecting the Tools initiative (EU’s Music Moves Europe), aiming to simplify data flows for labels and label services.
Prerequisites

  • Credentials from p.r.o. agency: account name and token (API key).
  • Your labels activated by p.r.o. agency for data transfer.

Activate the plugin

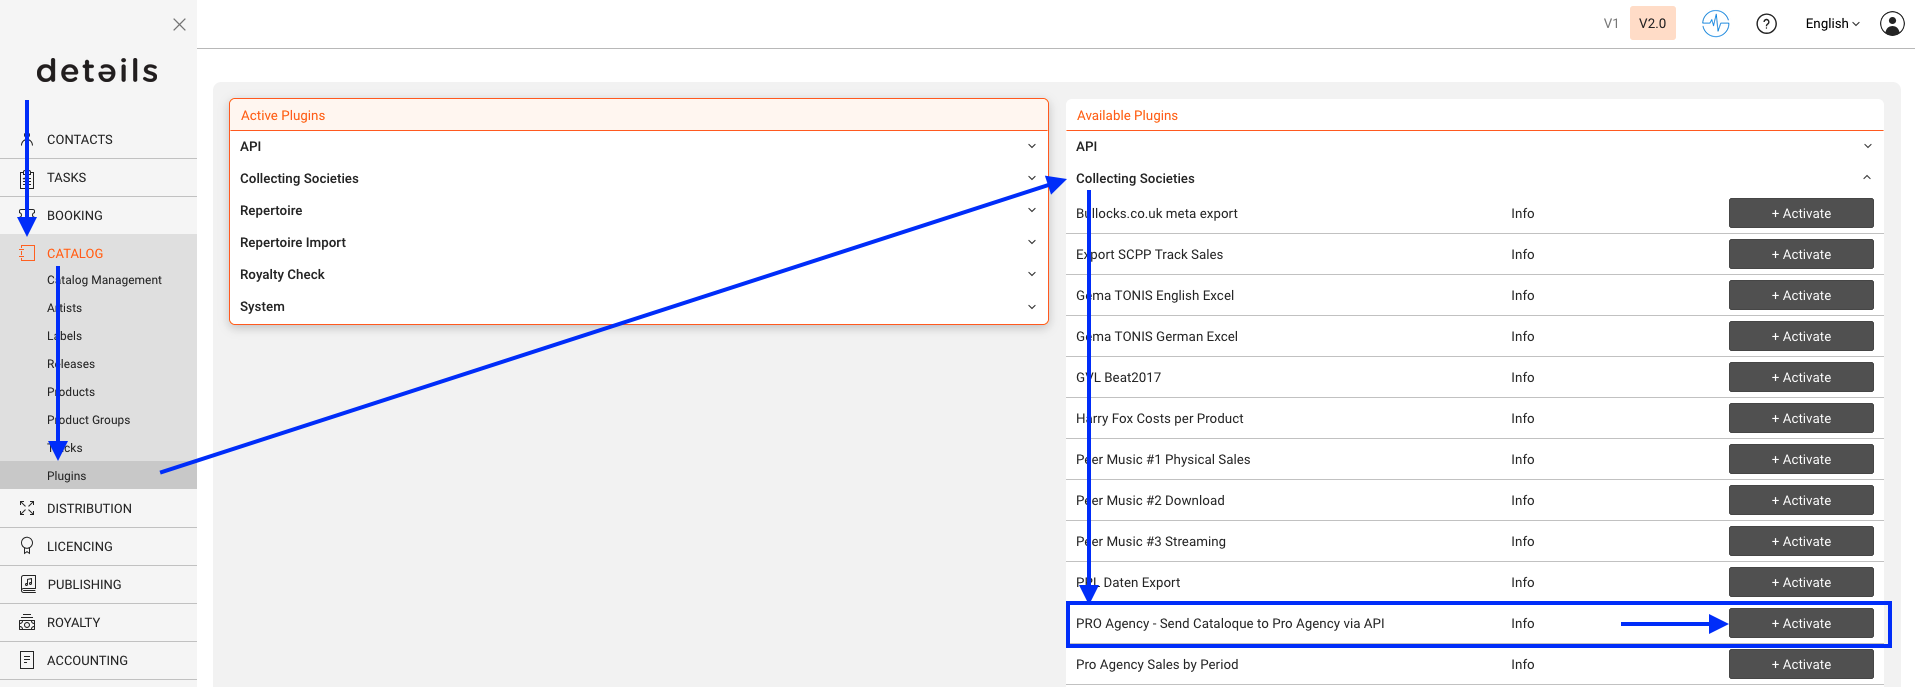
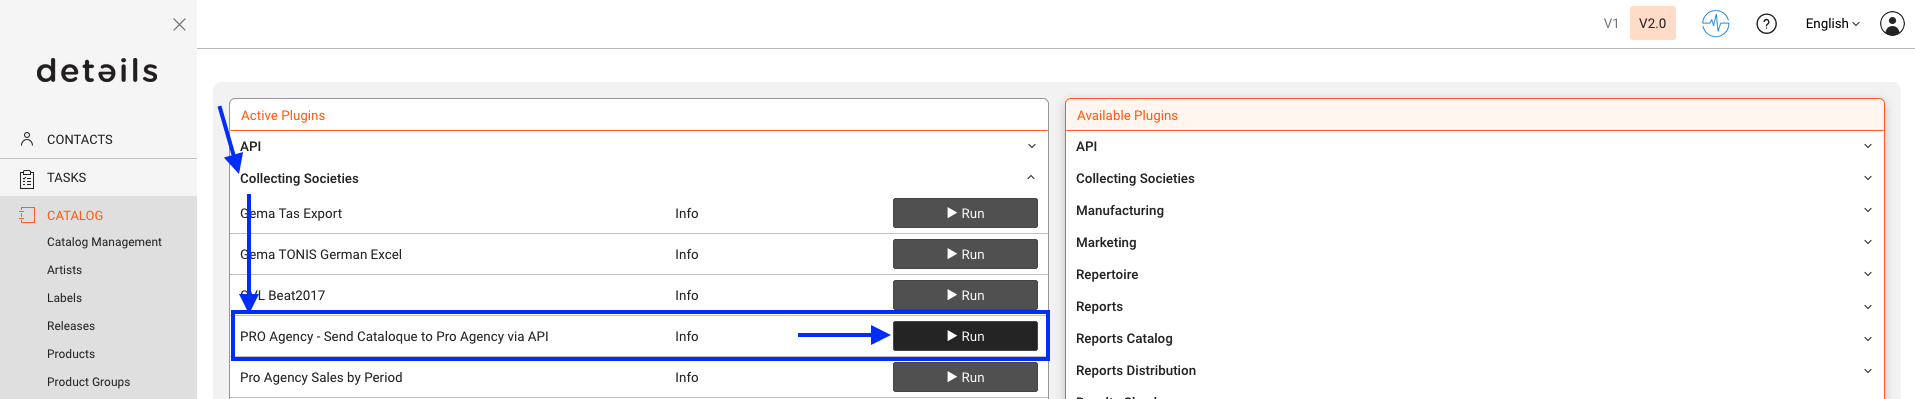
Go to CATALOG / PLUGINS / COLLECTING SOCIETIES and activate Pro Agency Send Catalogue to Pro Agency via API. Then click [RUN] to initialize.
Enter API credentials

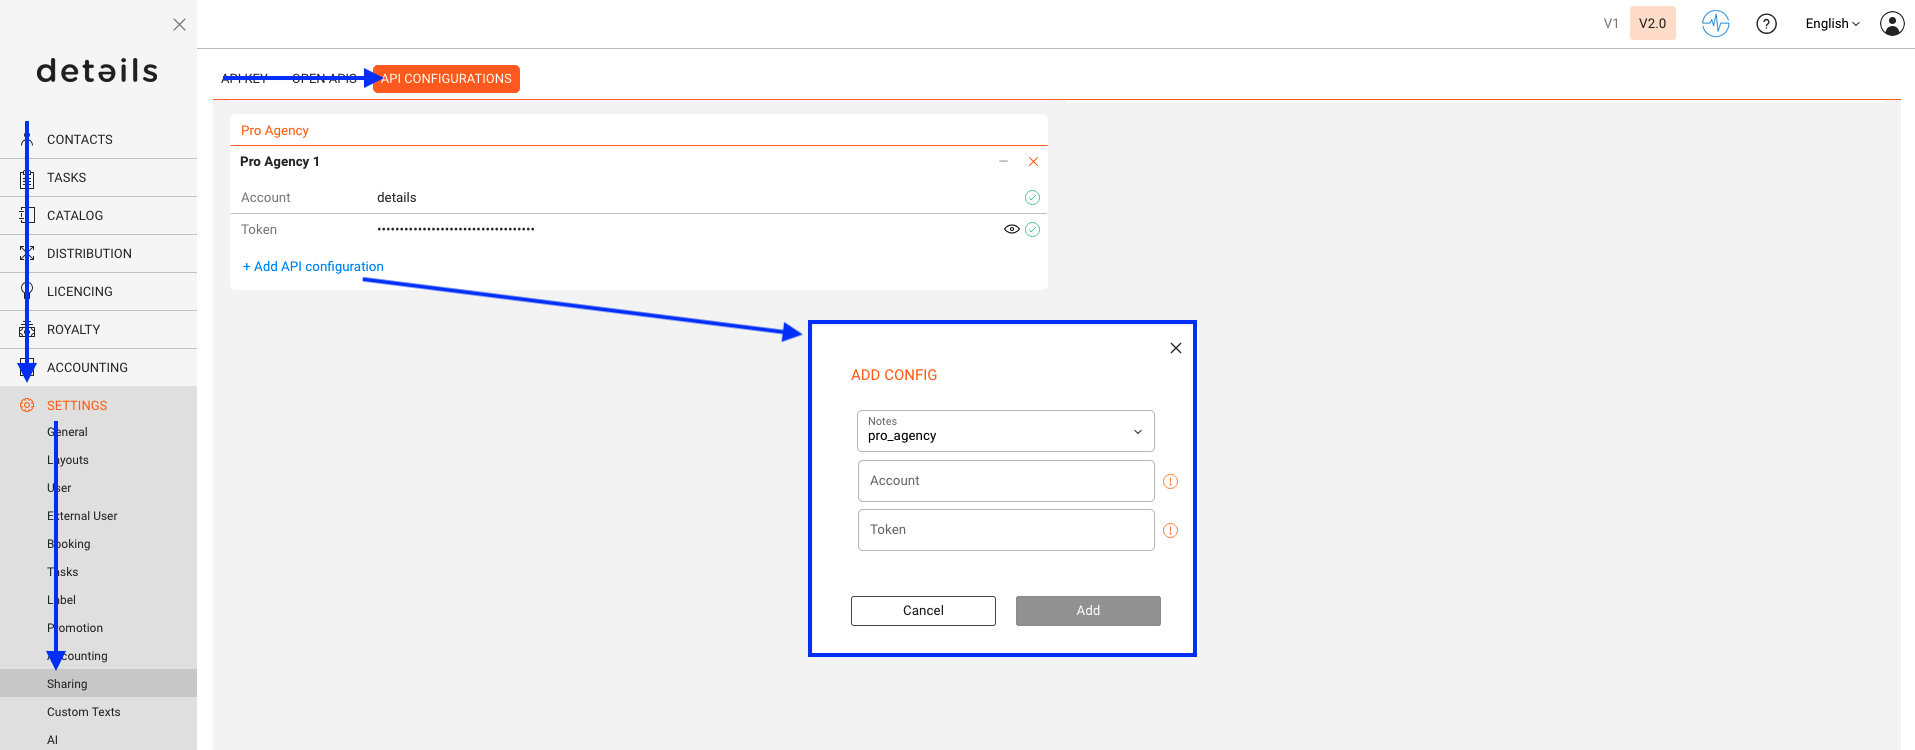
Go to SETTINGS / SHARING / API CONFIGS. After clicking SHARING, you will be asked to log in again. Only users with admin rights, or those explicitly authorized by an admin, can proceed. When logged in, click [+ Add API configuration], select pro_agency, and enter account name and token. Confirm with [Add].
Set label defaults

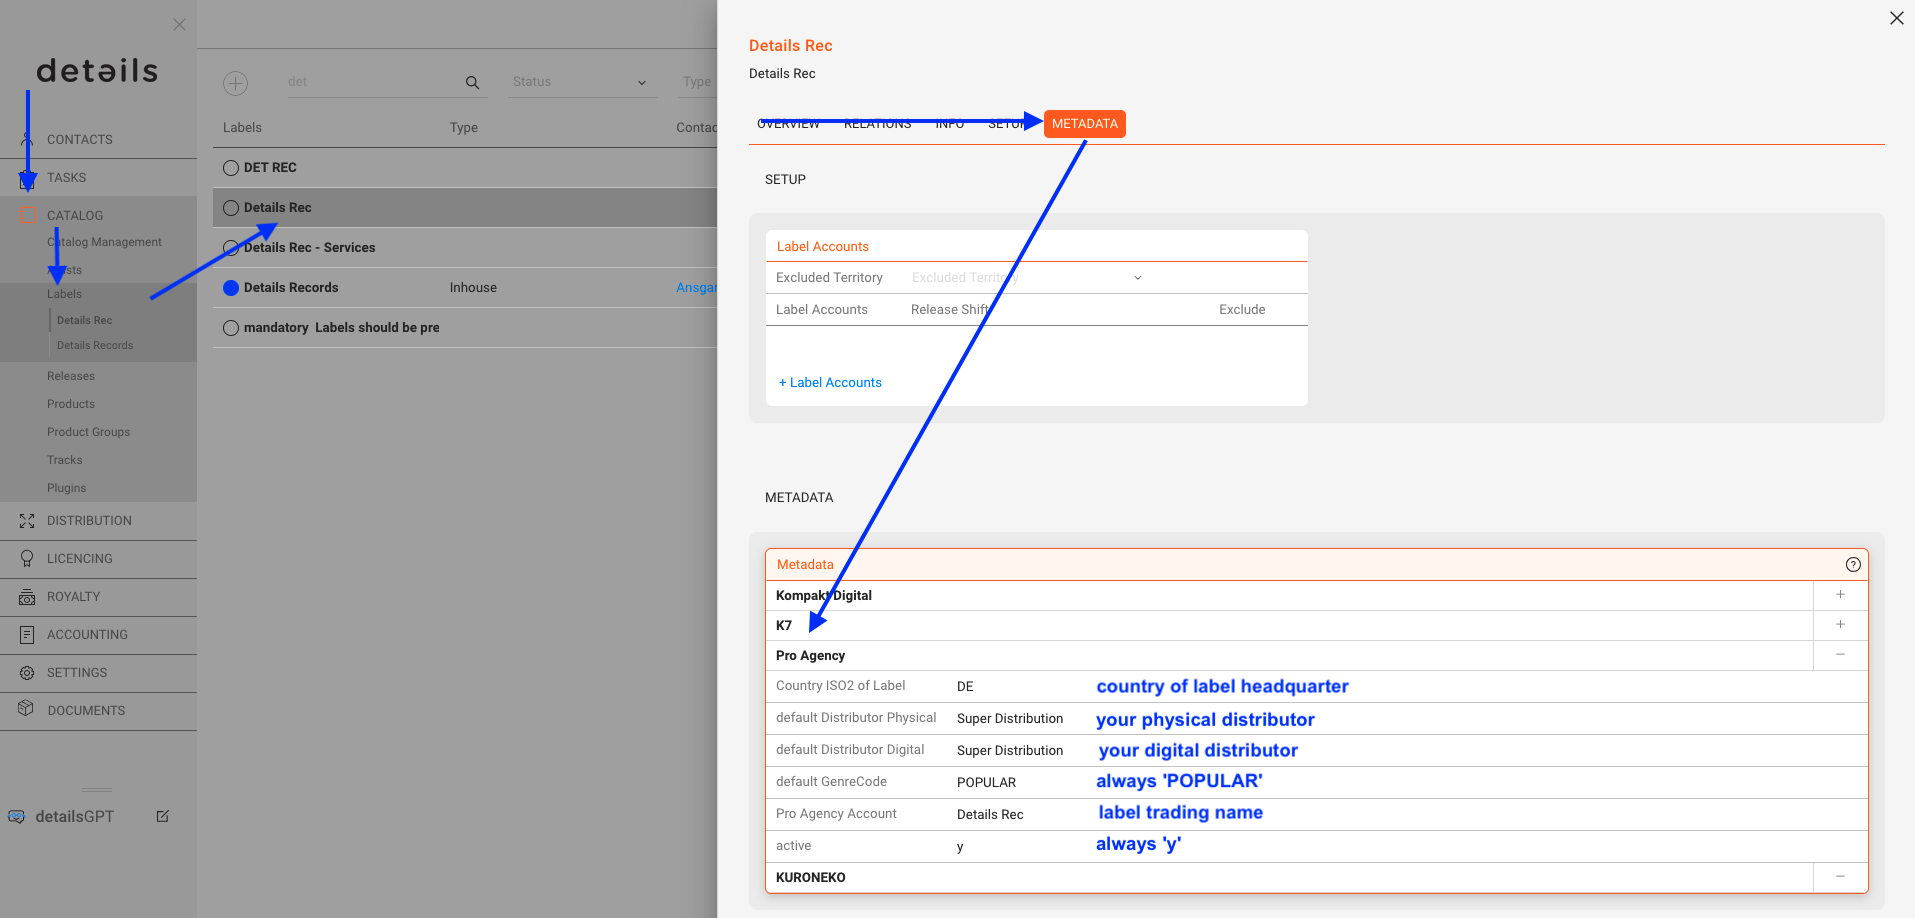
For each label in CATALOG / LABELS, open the METADATA subtab and fill in the defaults required by p.r.o. agency (e.g., GenreCode = POPULAR, active = y).
Set format defaults

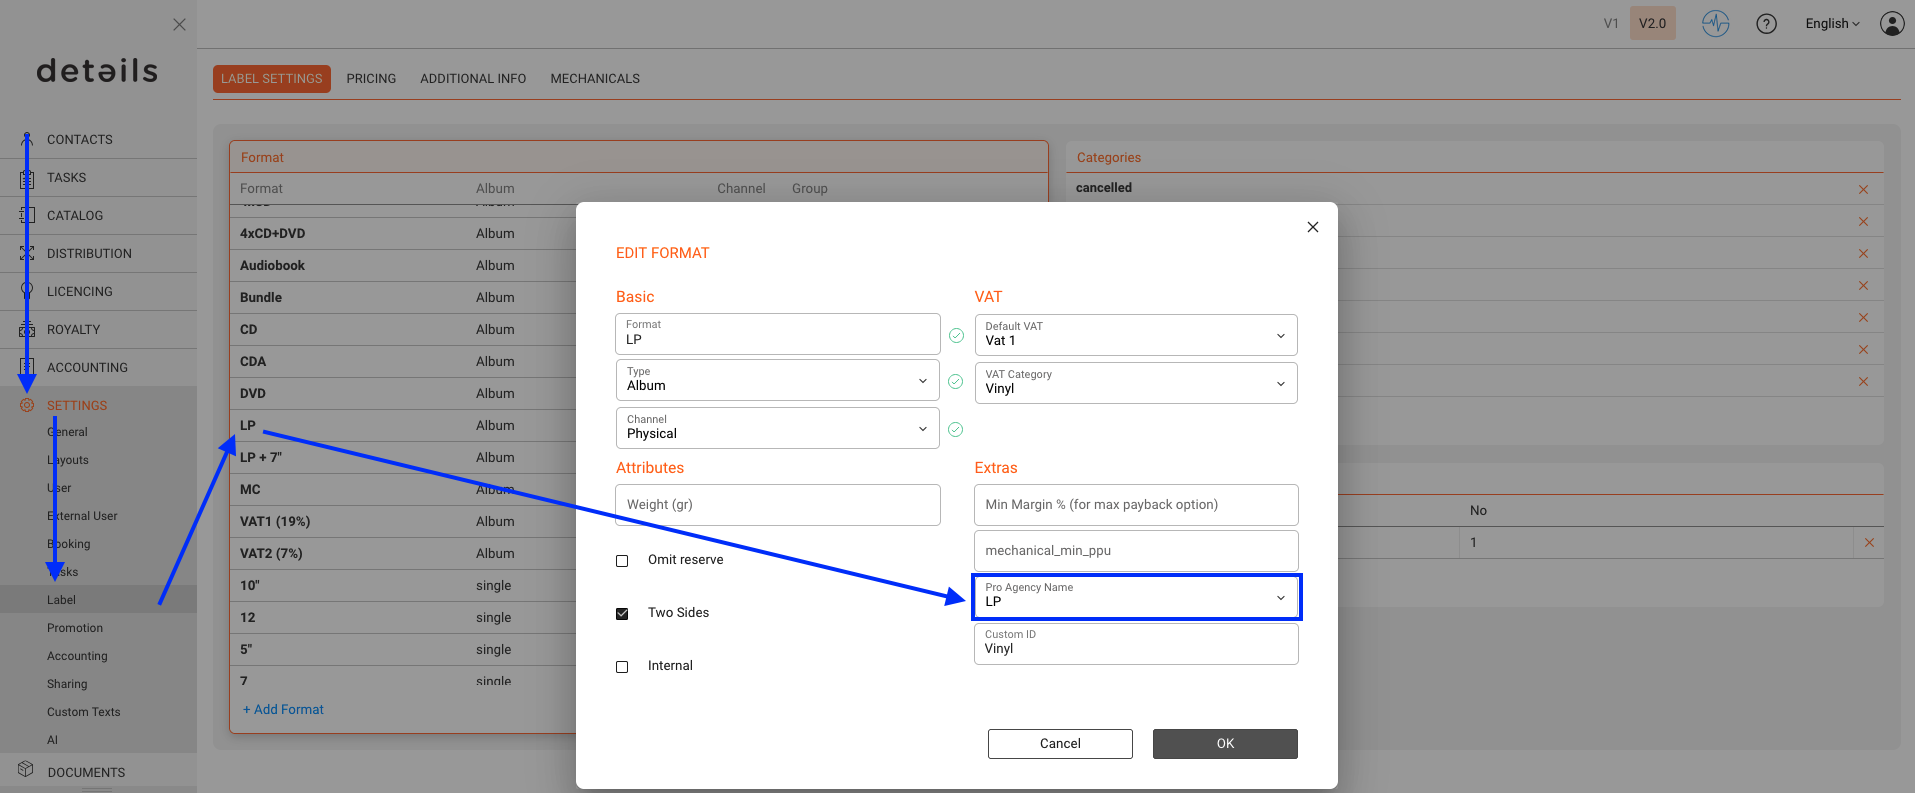
In SETTINGS / LABEL / LABEL SETTINGS, map your formats to p.r.o. agency reference formats (CD, LP, MP3).
Mandatory

To deliver via API, tracks must meet the mandatory metadata requirements below. If required data is missing, affected lines cannot be delivered.

Field Description Example Format
Label Namemarketing label nameXXX RecordsText
Release Artistname of the release artistVarious ArtistsText
Track Artistartist name of the individual trackArtist XXXText
Release Titletitle of the album, single or EPXXX AlbumText
Track Titletitle of the trackXXX TrackText
Track Durationtrack duration00:03:30HH:MM:SS
Formattype of carrierCD, LP, MP3Text
ISRCInternational Standard Recording CodeDEXXXXXXXXXXText
UPC / EANPlease provide only one code per track.4024572687960Text
Release Daterelease date of the track18.06.2007DD.MM.YYYY
Composername of the composer (first and last name)Christian XXX, Christian YYYYText
Authorname of the author (first and last name)Christian XXX, Christian YYYYText
Year of Recordingthe year in which the recording took place2007YYYY
Country Code of the Recordingcountry in which the recording took place. Please use the ISO 3166 Code Alpha2DEText
Name of 1st Ownername of the original rights ownerYYY RecordsText
Country Code Of The 1st Ownercountry code of the original rights owner. Please use the ISO 3166 Code Alpha2USText
Type of Contentaudio or videoAudioText
Territory of Rightsterritory/territories of rights ownership. Please use the ISO 3166 Code Alpha2WW, -AU, -USText
Percentage of RightsThe percentage of rights that you own of a certain recording100%Text
Genre CodePlease choose only POPULAR or CLASSICAL.CLASSICALText

Optional

The following additional information is optional; to add multiple entries please separate by comma.

Field Description Example Format
Catalogue Numberinternal number of each release on the label releaseXXX001Number
Additional Track Contributors
– Artist
additional artists to the TrackArtistArtist YXXText
Additional Track Contributors
– Featuring
additional artists to the TrackArtistArtist YYXText
Additional Track Contributors
– With
additional artists to the TrackArtistArtist YYYText
Additional Track Contributors
– Accompanist
additional artists to the TrackArtistArtist ZZZText
Track Numbertrack position on the sound carrier3Number
Track Versionversion of the track (remix, original, cover)Radio EditText
Start Datestart date of rights ownership (usually January 1st of the year of recording)01.01.2007DD.MM.YYYY
End Dateend date of rights ownership31.12.2056DD.MM.YYYY
PublisherName of Publishing CompanyXY PublishingText
Name of the Distributorname of your main distributorXXX DistributionText

Where to start

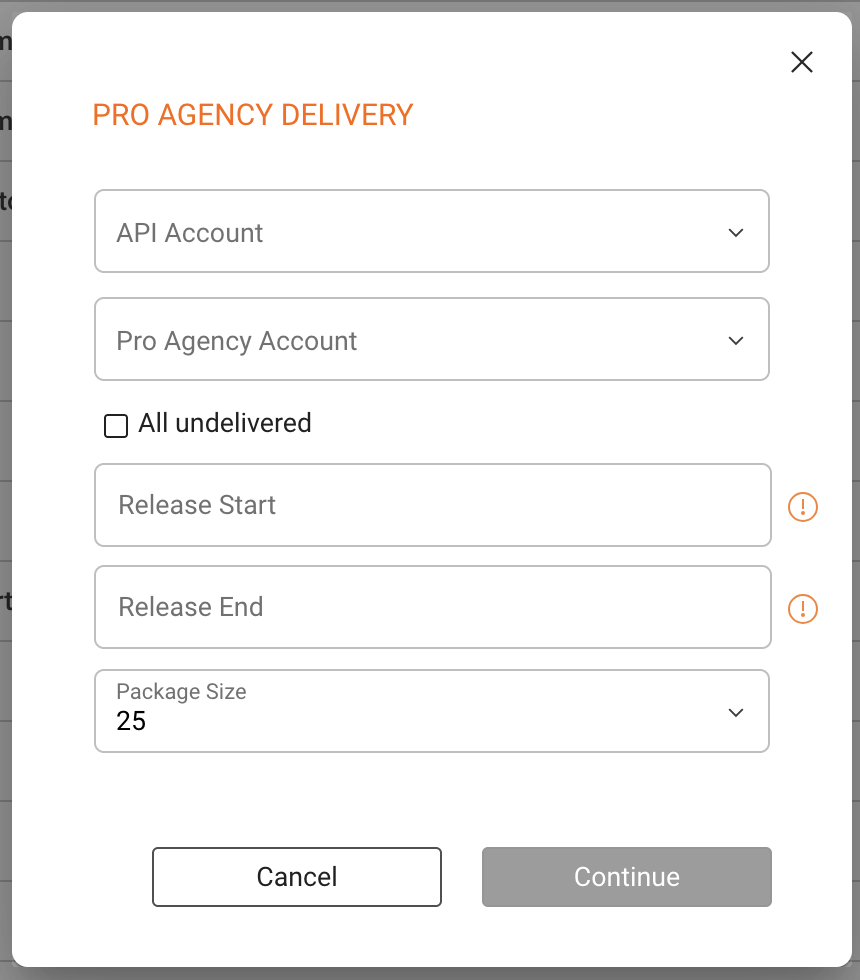
Go to CATALOG / RELEASES. After activation, use the Pro Agency button (top right on V2; bottom right on V1) to open the delivery window.

Filter & review

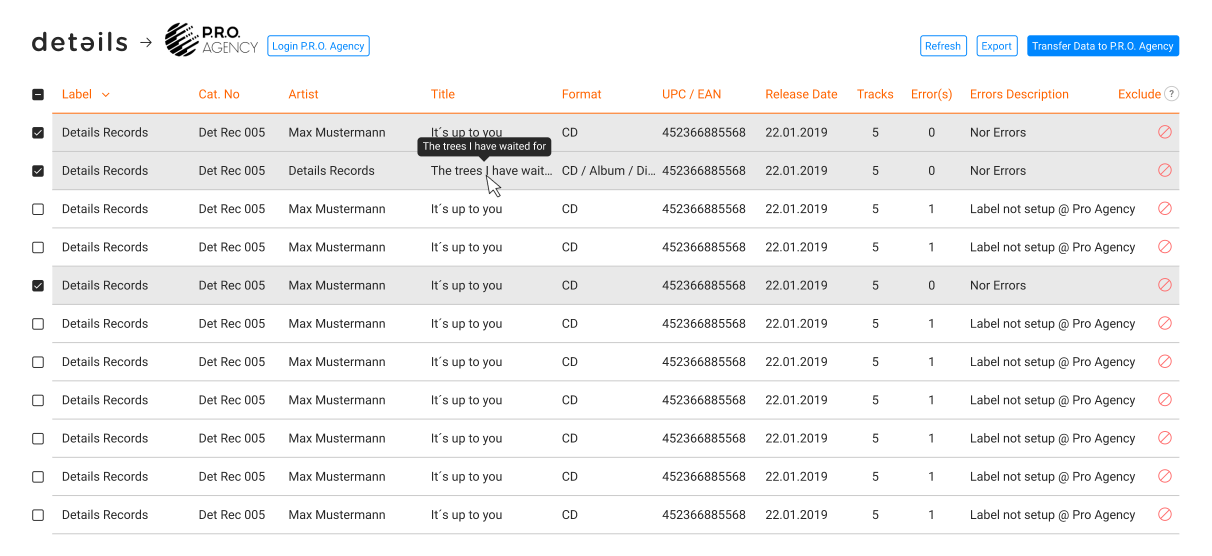
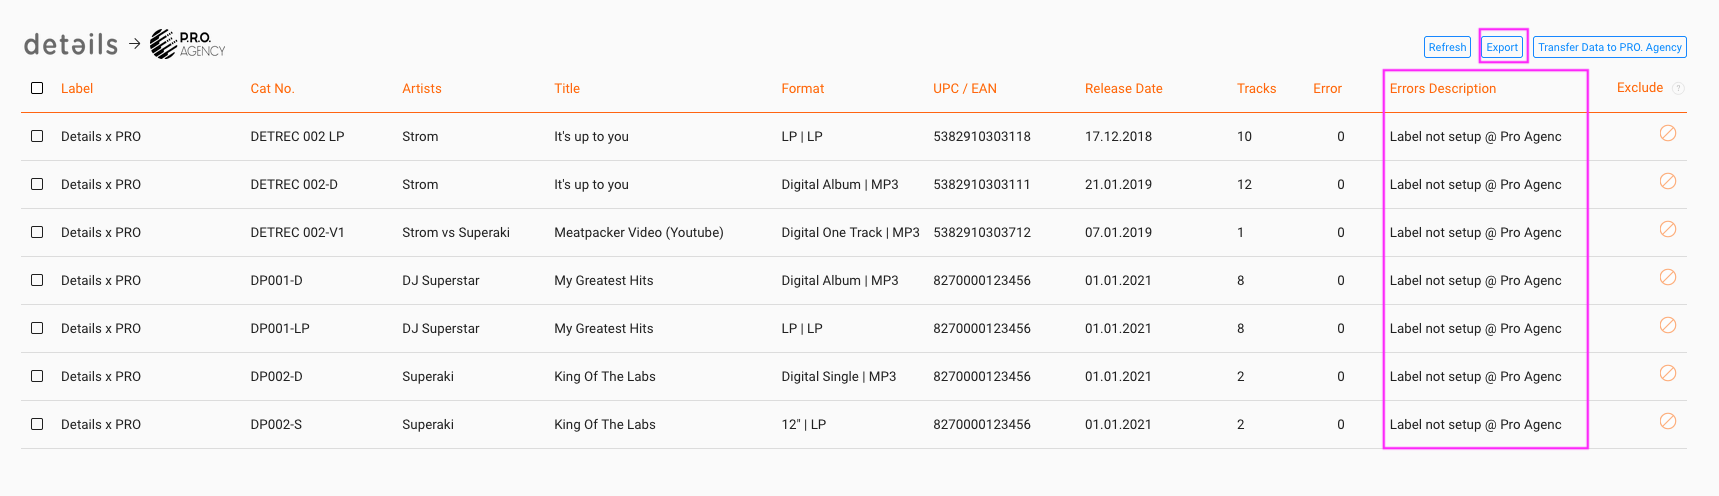
Choose account, label, release date, and delivery status filters. The validation view highlights errors per line. Fix all issues before transfer when possible.
Common errors

  • Label not set up at p.r.o. agency – contact p.r.o. agency to enable it.
  • composer missing – add the composer(s) on the affected tracks.
  • track duration missing – enter duration on the affected tracks.

Export edit refresh loop

Use [EXPORT] on the validation page to download an editable list. Update data in details, then refresh the API tab to re-validate.

Transfer & responses

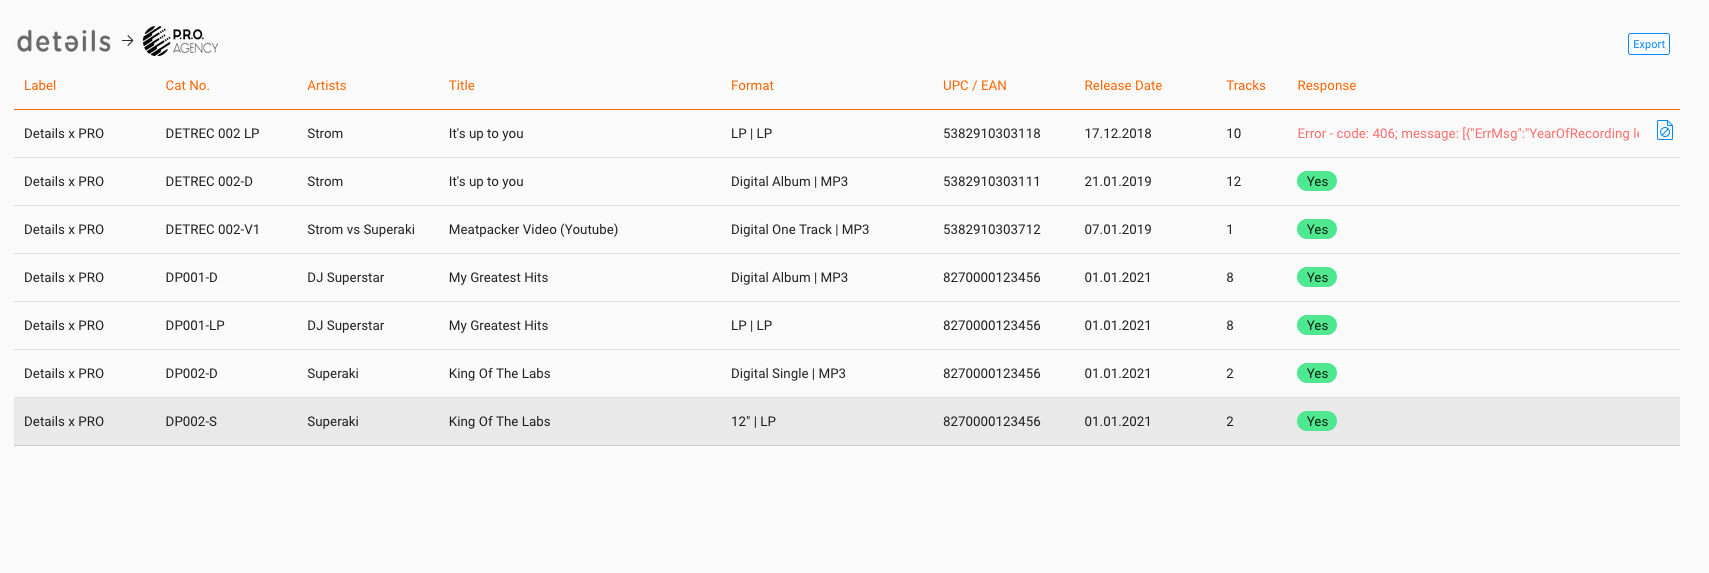
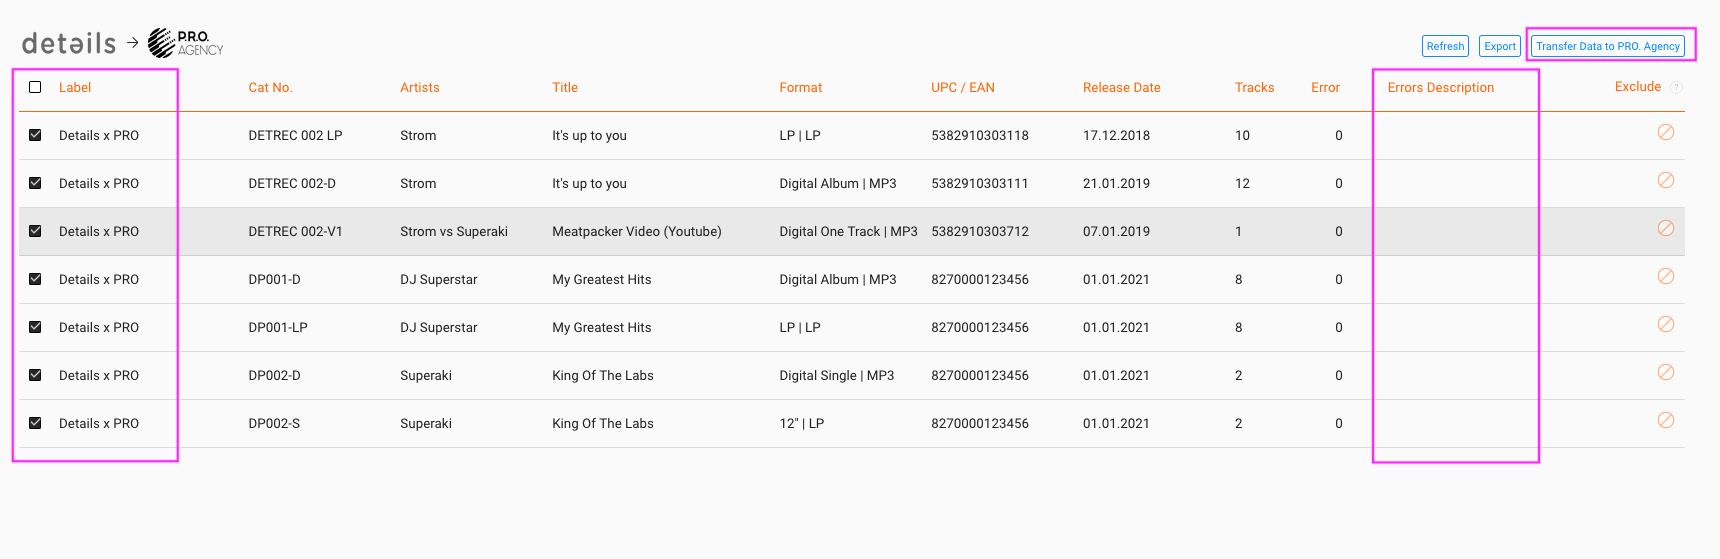
When the Error Description column is empty, click [TRANSFER DATA TO PRO AGENCY]. The response screen confirms success or provides codes:

  • 200 OK – delivery succeeded.
  • 400 – bad request, contact us or p.r.o. agency.
  • 401 – credentials incorrect, double-check account/token.
  • 406 – required metadata missing, complete data and retry.
By activating and using the API for the transmission of repertoire data to p.r.o. agency, the user agrees to the declaration below. The activation of the plugin must be carried out by authorised employees.

Declaration of consent

I agree that details c/o Berlin 3 Services GmbH (SENDER) may transmit the following product and personal data electronically to Pro Agency GmbH (RECIPIENT) for the purpose of track-based repertoire registration with international collecting societies:

Label NameISRCsName of first owner
Catalogue numbersUPC / EAN CodesCountry of first owners
Artist NamesRelease DatesType of Recordings (Audio/Video)
Release TitlesTermName of Distributors
Track TitlesComposersTerritorial rights
Track NumbersAuthorsRights Ownership in %
Track VersionsPublishersGenre Details
Track runtimesYear of recording 
FormatsCountry of recording 

If personal data of third parties (artist, composer, lyricist) are affected by the transmission, I guarantee and warrant that a suitable legal basis exists for me to transmit this third-party data to the RECIPIENT via the SENDER.

If consultation between the SENDER and the RECIPIENT is necessary for further processing of the data, I agree to obtain information.

I am aware that I can revoke this consent at any time without giving reasons for the future by informing Berlin 3 Services GmbH, Urbanstr. 137A, 10967 Berlin or by e-mail contact@details.eu of my revocation against the processing of my data.

Berlin 3 Services GmbH would like to point out that you have the right to information, correction, deletion, restriction of processing, data portability (Art. 15–21 GDPR), as well as the right to complain to a supervisory authority (Art. 77 GDPR).

The data protection officer of Berlin 3 Services GmbH can be reached at contact@details.eu.
Further information on data protection can be found at
https://www.details.eu/privacy/

If you need any support, please contact label_team@details.eu
Distribution Accounts – Basic Actions

This guide explains everyday actions inside DISTRIBUTION / ACCOUNTS: creating and maintaining accounts, configuring setup, managing catalogue scope, handling orders, and checking statements. Use it when you onboard a new shop or partner, set up a warehouse or artist tour account, or adjust pricing and defaults.

► Create Account

To create a new distribution account:

  • Go to DISTRIBUTION / ACCOUNTS and click [+].
  • Enter Name, optional Short Name, and select the Sales Channel (Physical, Digital, or Both).
  • Choose a default Currency and optionally assign an Account Manager and Status/Color.
  • Confirm with [OK].
  • Assign Invoice Contact and Delivery Address (these may differ).
  • Upload Files such as agreements, terms, or logos.

► Edit Account

To modify an existing account:

  • Click the account name to open its details.
  • Adjust basic information like Name, Sales Channel, or Currency.
  • Update Setup Options, Contacts, or Catalogue Assignments as needed.
  • Save all changes with [OK].

► Delete Account

To remove an account:

  • Click [x] next to the account entry.
  • Confirm the deletion. Note: Deleting is not recommended if any related sales or imports exist.

► Configure Setup Options

The SETUP tab defines how the account behaves within distribution and accounting.

  • Stock Account: Track stock movements for this partner or warehouse.
  • Own Stock: Include this stock in your total available stock.
  • Main Account: Highlight this account in PRODUCT / STOCK views.
  • No Backorders: Prevent automatic creation of backorders.
  • Ignore Payment Period (advanced): Uses sales date instead of payment date in statements.
  • Exclude Mechanical (advanced): Excludes account sales from mechanicals reporting.
  • Defaults: Define Order Type, Stock Account, and Shipping preferences.

Tip: The SETUP tab controls how an account behaves in ordering, stock tracking, and reporting from logistics settings to pricing defaults.

► Pricelist

The Pricelist defines the base pricing for this account.

  • Select a pricelist to apply default rates and discounts.
  • Individual product prices can still be adjusted in the CATALOGUE tab.

► Customer Discount

You can apply a general discount for this account.

  • Enter a percentage discount valid across all applicable price codes.
  • Use specific price-code discounts or product prices for exceptions.

► Manual Matches

Manual Matches store external identifiers for imported statement lines.

  • Add or edit identifiers like shop or distributor codes.
  • Delete outdated matches to maintain accurate mappings.

► Manage Catalogue Labels

Manage which labels are connected to the account.

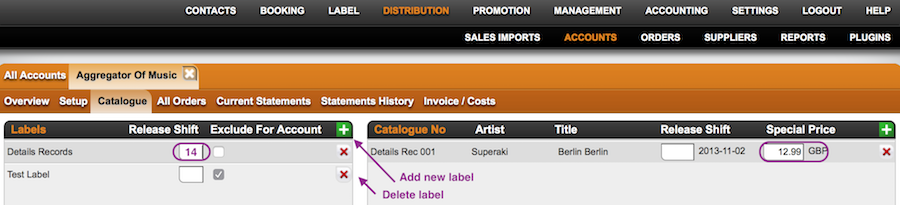
  • Click [+] to add a label to the account.
  • Set a Release Shift (in days, use negative values for early delivery) or choose Exclude to block a label from supply.
  • Remove entries using [x].

► Manage Catalogue Products

Add or edit products that are distributed through this account.

  • Click [+] in the Catalogue No box to add a product.
  • Define Special Prices or Release Shifts (in days, negative = earlier, positive = later) for individual products.
  • Remove entries using [x].

► Orders & Backorders

Manage all physical orders and backorders linked to the account.

  • Create new orders using [+ New Order].
  • Review current and completed orders.
  • Export the order list as Excel via [EXPORT].
  • If No Backorders is enabled, missing quantities will not carry over automatically.

Note: This section applies mainly to physical distribution. Digital accounts usually don t require order management.

Distribution Orders – Basic Actions

In DISTRIBUTION / ORDERS you can create, edit, and account physical orders. Each order connects a Distribution Account (recipient) with a Stock Account (warehouse or source). Once created, an order guides you step-by-step through the process from setup to shipment and invoicing.

► Create a New Order

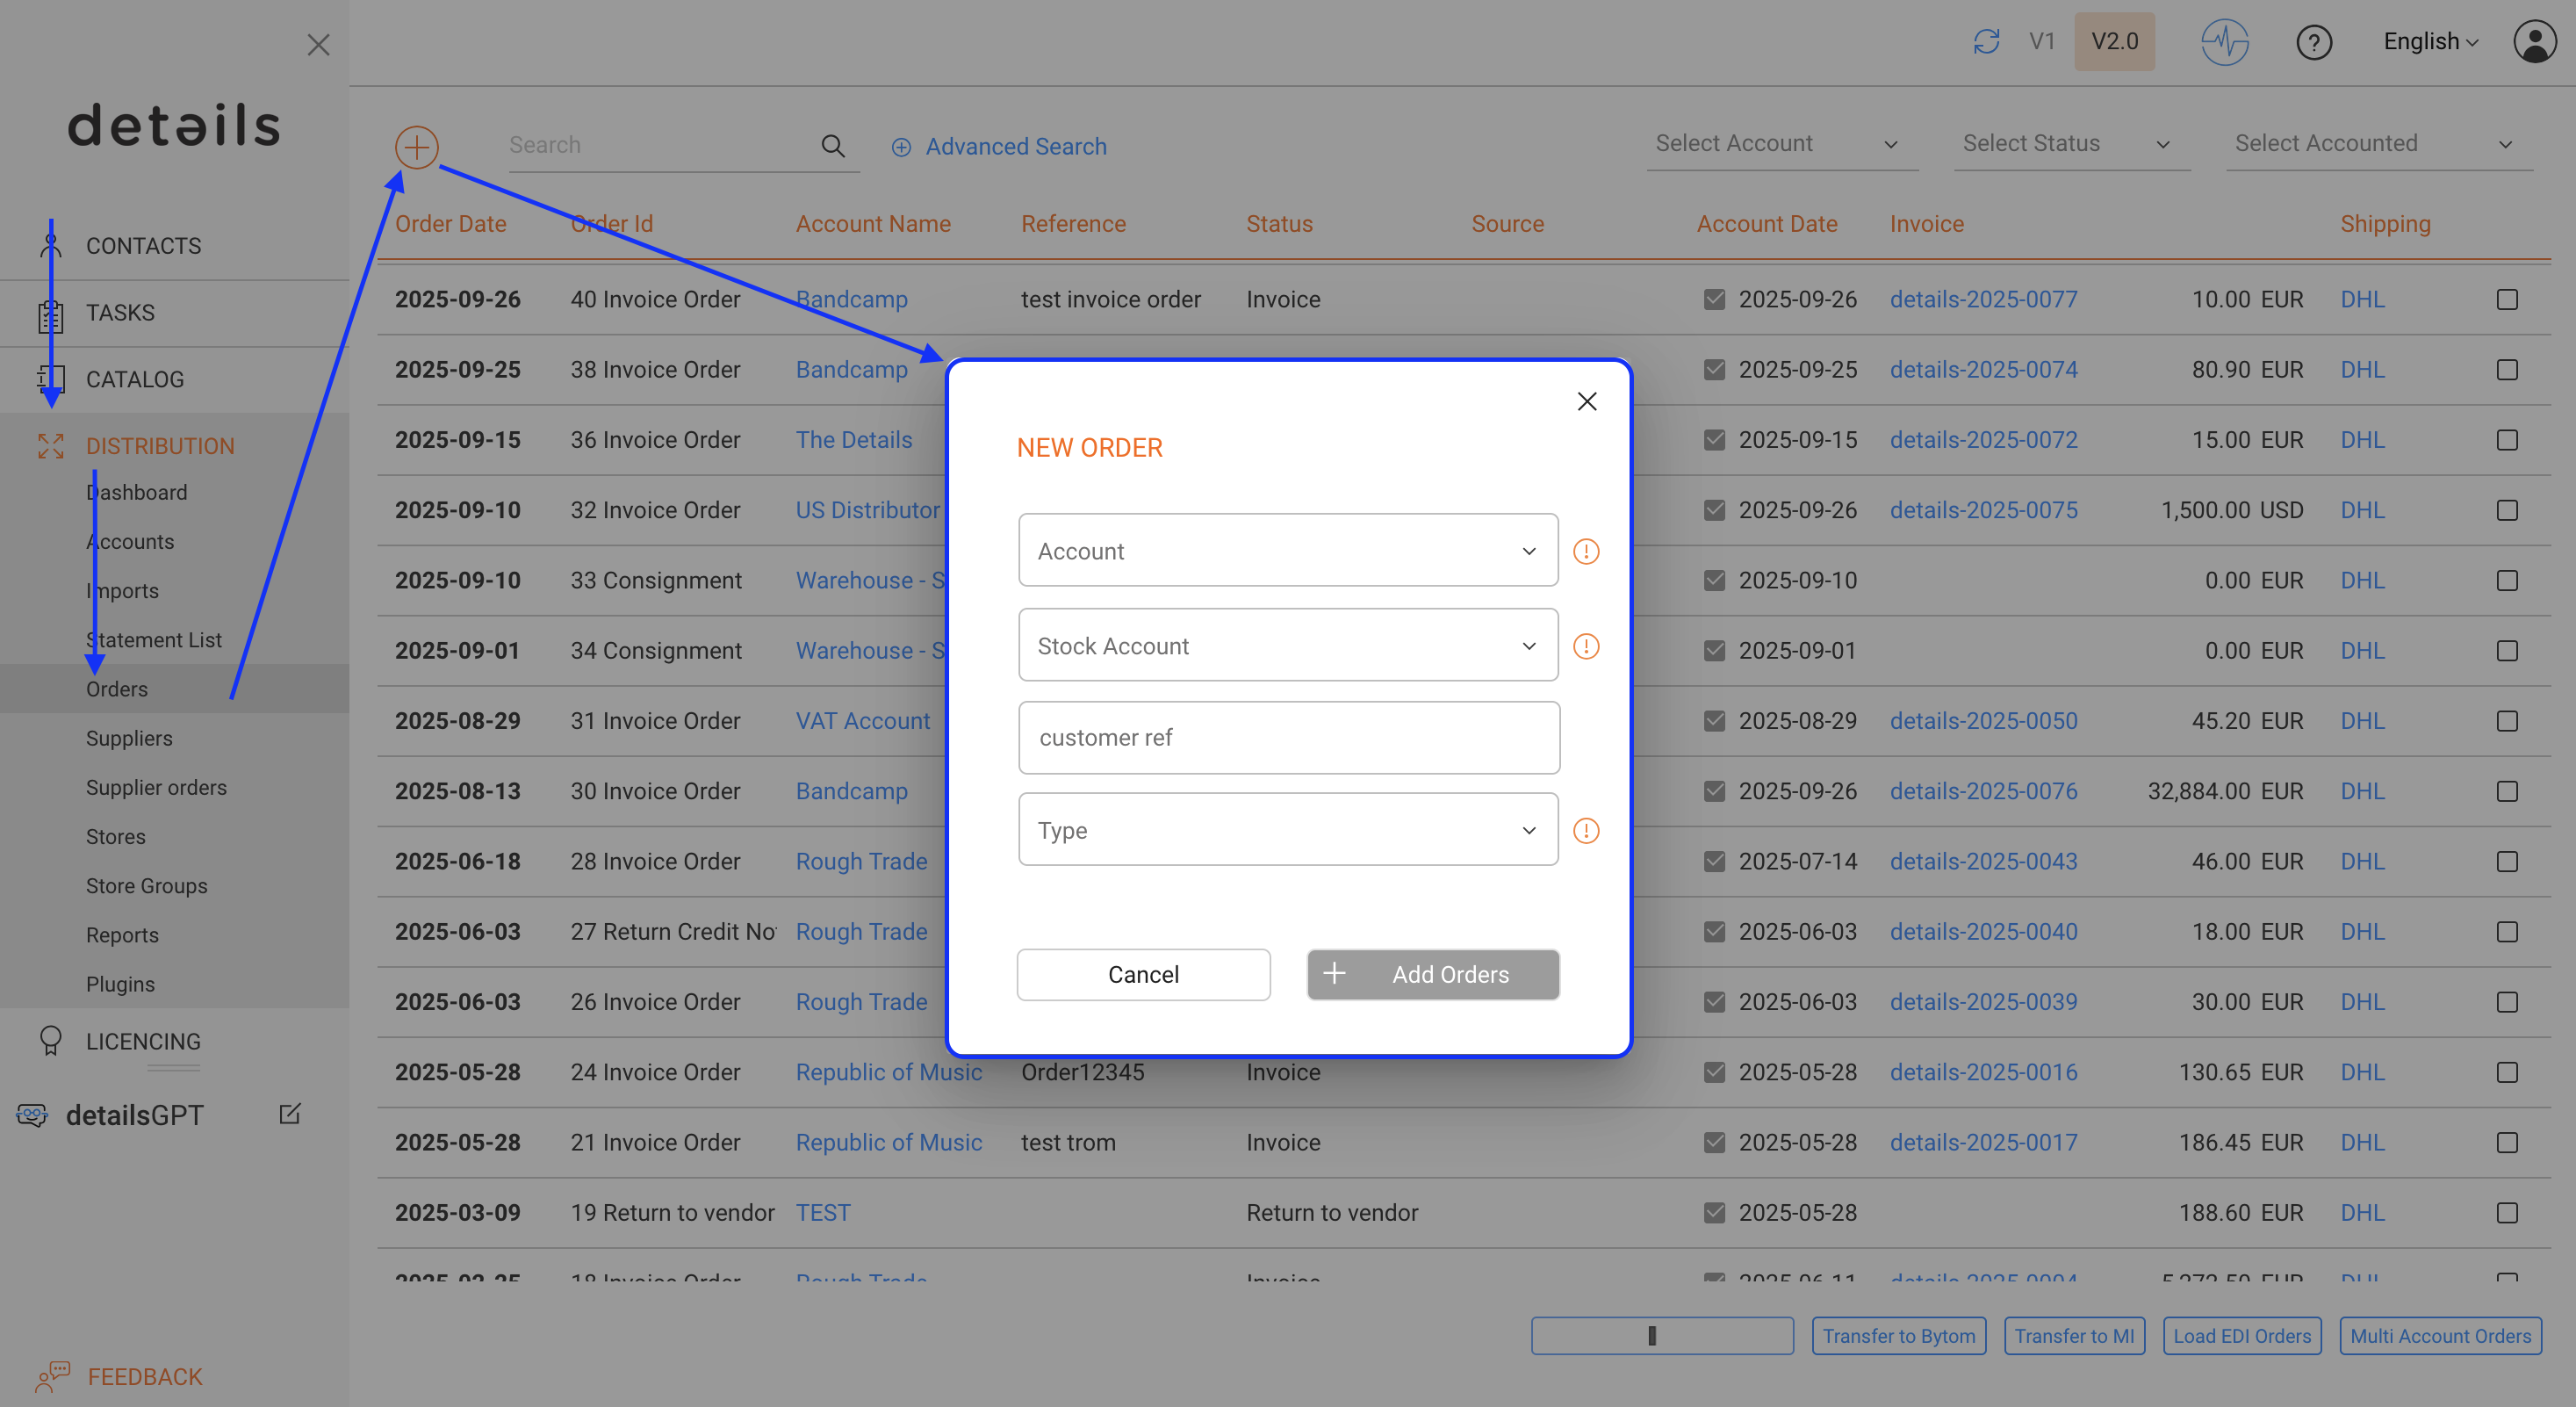
To start, click the [+] icon on the top left of DISTRIBUTION / ORDERS or open a Distribution Account and go to the ALL ORDERS subtab. Then click [+] to create a new order for this account.

In the modal window, choose:

  • Distribution Account (recipient)
  • Stock Account (source warehouse)
  • Order Type (e.g. Invoice Order, Consignment, Return, etc.)

Confirm your selection with [OK] to create the order.

► Backorders

On the BACKORDERS subtab you ll find all open backorders of the selected account along with available stock. Click [AUTO SELECT] to automatically add all shippable items to the order. Any quantities that cannot be shipped now will be kept as backorders for the next delivery.

If a Distribution Account is not supposed to handle backorders, go to its SETUP tab and enable No Backorders. In this case, all shortfalls will be skipped automatically.

Backorders are updated as soon as an order is ACCOUNTED meaning that details checks all ordered quantities, compares them with current stock, and puts the shortfall automatically on hold for the next fulfillment.

► Order Lines

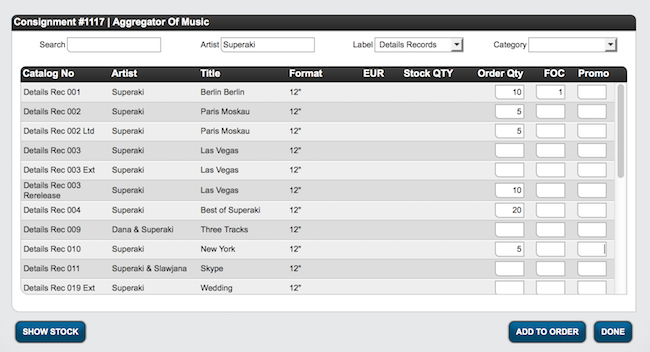
On the ORDER LINES subtab, you can add items to the order. Click [+] to open the product selection window, search and select the product(s), then define quantities and confirm with [OK].

Prices will load automatically from your configured price lists. You can adjust individual prices or apply discounts directly in the list.

► Discounts on Orders

Discounts can be applied at different levels:

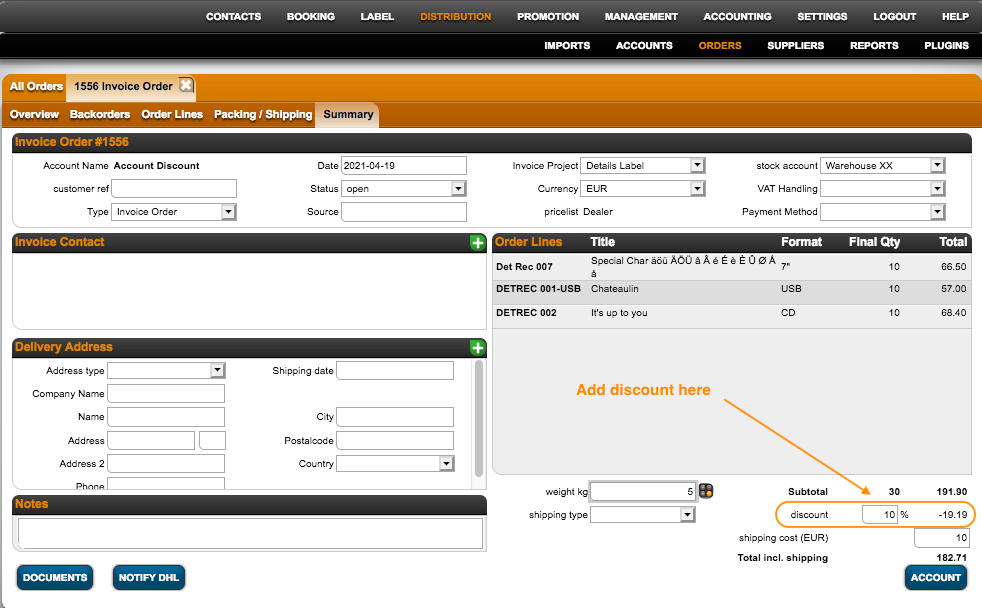
  • Full Order Discount: Enter a percentage in the Discount field to apply it to the subtotal of the current order (shipping excluded).
  • Default Account Discount: Set a default discount in the Distribution Account / SETUP tab. This will be applied automatically to all order lines of this account.
  • Discounts by Price Code: Add custom rates by price code via the [+] icon. These overwrite the general discount rate for this account.

You can document special discount agreements in the Deal Memo field of the account s setup. These notes are displayed automatically during the order process.

► Packing / Shipping

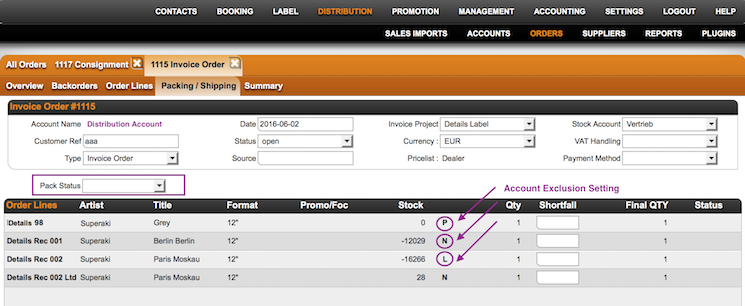
The PACKING / SHIPPING subtab shows all items of the order with ordered quantity, final shipped quantity, and shortfall. If shortfalls occur and the account allows backorders, these are saved automatically.

Next to each product, you might see letters such as P, N, or L:

  • P = Product excluded for this Distribution Account
  • N = Not available for this price list
  • L = Label excluded for this Distribution Account

Enter the total order weight, choose a shipping type, and add shipping costs if necessary. Proceed with [NEXT].

► Summary and Accounting

The final subtab SUMMARY provides an overview of all order details. Review quantities, discounts, and shipping data carefully.

When everything is correct, click [ACCOUNT] to finalize the order. Stock movements are processed automatically, and an invoice is generated if the order type is set to Invoice Order.

Order Type Stock (Account) Stock (Stock Account) Invoice
Invoice Order Neutral Decreased Yes
Consignment Increased Decreased No
Return Credit Note Neutral Increased Yes
Promo Order Neutral Decreased No

For a detailed explanation of all order types, see Explained: Order Types in Distribution.

Tip: After you [ACCOUNT] an order, it can no longer be edited. To make corrections, use [CREDIT NOTE] or create a new order.

Once accounted, all orders remain archived and searchable under DISTRIBUTION / ORDERS.


Sales Imports Basic Actions

This guide shows the essential actions for importing sales statements in details. The Overview below is always visible in this article; all other sections are collapsible.

You typically move through these phases: prepare your file(s), upload and (if needed) map headers, resolve matches, review results, and account the statement.

Quick phases

  1. Prepare file(s) (format, sheets, country settings).
  2. Import file on DISTRIBUTION / IMPORTS.
  3. Map headers only if not saved yet  otherwise mapping is prefilled.
  4. Resolve Import Matches (if any).
  5. Review Import Result totals  [ACCOUNT STATEMENT].

► Preparation (file formats, tips & fixed country)

Supported files: .xlsx, .xls, .csv, .tab, .txt (tab-separated). For other formats, contact label_team@details.eu.

  • Standardise formatting (Excel): Select all  set neutral Standard/Number formats. Remove thousand separators if needed.
  • Multiple sheets: Only combine if structure is identical and within the same import type; otherwise split into separate files.
  • Remove extras: Delete pre-headers and grand totals (or use Delete when empty during import where offered).
  • Large workbooks: Save as CSV (UTF-8) or TAB-TXT for stability before uploading.

Fixed Country (when your file has no country)

  1. Open the Distribution Account  Import Setup.
  2. Edit or create the setup via [+ ADD NEW].
  3. Set [FIX COUNTRY] to the ISO2 code (e.g. US, FR) and [SAVE].

Note: Fixed Country affects future imports for this setup and overrides the file s country if present; past imports remain unchanged.

► Importing Sales Statements (digital & physical)

  1. Go to DISTRIBUTION / IMPORTS, pick the correct month, click the tile for the target Import Setup.
  2. Upload your file  preview appears.
  3. Header mapping:
    • If you previously saved a configuration, the mapping is prefilled review and proceed.
    • If not saved yet, map required fields (e.g., Identifier (ISRC/UPC), Artist, Title, Shop, Country, Usage Type, Qty/Sales, PPU/PPD, Sales Date/Period). Unused columns may stay blank.
  4. Click [SAVE CONFIGURATIONS] (recommended) and then [PROCEED].
  5. Watch status:
    • Pending / Processing calculation running (a temporary 0.00 is normal).
    • Matching Incomplete file in, some items may need matching.
    • Matching Complete everything matched.
  6. Resolve matches: open Import Matches, click the bold item, choose the correct product/track, confirm with [OK]. Saved per account for future imports.
  7. Open Import Result and verify totals (units & amount) against the source statement.

► Accounting & Verification

  1. If totals are correct, click [ACCOUNT STATEMENT].
  2. In DISTRIBUTION ACCOUNT / CURRENT STATEMENTS select one or multiple statements to create invoice(s).
  3. Invoices appear in ACCOUNTING / INVOICES.

Need to undo a confirmed (green) import?

  • Cancel/unlock the related invoice in Accounting, then delete the import (tile returns to orange). If already posted by accounting, use Cancelled instead of deleting.

► Troubleshooting & FAQ

Importer not visible on IMPORTS / OVERVIEW

  • Create an Import Setup first in Distribution Account / Import Setup; without it, no tile appears.

Amounts look wrong (too low/zero)

  • Refresh after a few minutes; re-check Import Result.
  • Verify mapping of Qty/Sales, PPU/PPD, and currency.
  • Try [RUN ID MATCHING], then resolve remaining manual matches.

Headers don t match

  • Map once and [SAVE CONFIGURATIONS] for next time.
  • Split sheets with different structures into separate files.

Need help? Contact label_team@details.eu.

Licence Accounts

This article explains how to manage Licence Accounts in details.

A Licence Account represents a licensee a company or partner who buys licences from you.
► CREATE A LICENCE ACCOUNT

Go to LABEL / LICENSING and click [+].

Enter:

  • Name
  • Business Status (customizable in Settings)
  • Optional keywords or notes

Click [OK] to create the account.

► OVERVIEW TAB

The OVERVIEW tab contains the main account information:

  • Company name and address
  • Business status
  • Related contacts
  • Internal notes

Relating the account to an Invoice Contact is necessary if you want invoices to auto-fill correctly.

A single Licence Account can contain multiple licences and multiple invoices.
► LICENCES TAB

The LICENCES tab lists all agreements linked to this Licence Account.

From here you can:

  • Create a new licence with [+]
  • Edit existing licences
  • Duplicate licences
  • Track statement activity

Each licence defines the specific assets, territory, term, and financial conditions agreed with this account.

► INVOICES TAB

The INVOICES tab displays all financial documents related to this Licence Account.

You can see:

  • Open invoices
  • Paid invoices
  • Invoice dates
  • Payment dates
  • Net amounts and currency

Only paid invoices become relevant for royalty accounting.

► LICENCE REMINDERS

From within a Licence Account, you can trigger reminder emails for overdue reporting periods.

The system uses the licence s Accounting Period and Due Days to determine whether a statement is overdue.

How to generate Invoice Reminders

This help will show you how to navigate through the “INVOICE REMINDER” section of the ACCOUNTING menu.

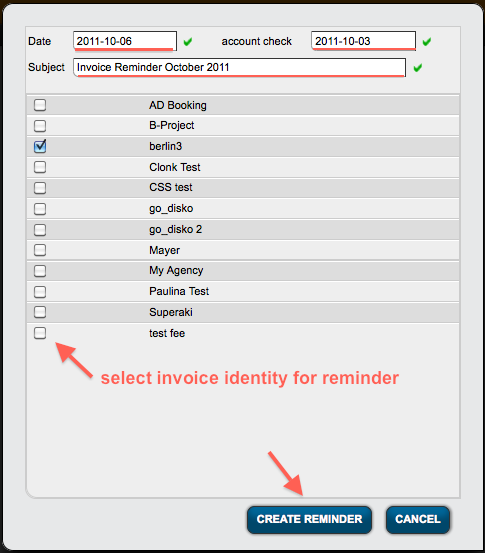
1) To create a new run of invoice reminders, click the PLUS icon in Accounting / Invoice Reminder

2) In the modal window select
a) date: the date of the reminder (default = today)
b) account check: the date when you last checked the bank account (default = today)
c) subject: an optional subject / title
d) select one or multiple invoice identities to include in your reminder To confirm your selection click CREATE REMINDER (or go back with CANCEL)

… a new invoice reminder will be displayed in the list!

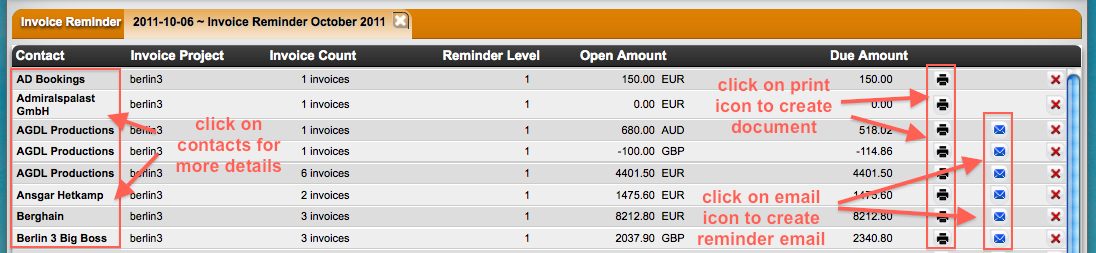
3) If you click on the bold date of the new invoice reminder you will open it and see the list of invoice recipients that have open invoices (as of last bank account check). Each invoice recipient with at least one open invoice will be displayed seperatly with the amount of open invoices and the total amount owed (one line per currency).
You can now either:
4a) dig deeper into each contact by clicking on their name (in bold)
4b) click on the print icon to create an document with the reminder info
4c) click on the email icon to create an email with the reminder info  

4) a) clicking on a contact will take you a a modal window where you see each invoice that seems open to details and their dunning level. If you want to exclude one or multiple invoices from the current reminder, just remove them from the list with the X icon.

b) clicking on the print icon will create a new document with the reminder info for the selected contact. A selection modal window will ask you to select a document template of your choice. Make sure you have a invoice reminder template: Check this Wiki about more info on creating a template for documents or contact us if you need help!

c) click on the email icon will open a new email with the reminder info already in .. ready to be sent with any greeting you wish to put in.

5) Each new invoice reminder will increase the dunning level of an open invoice.

Managing Booking Statuses

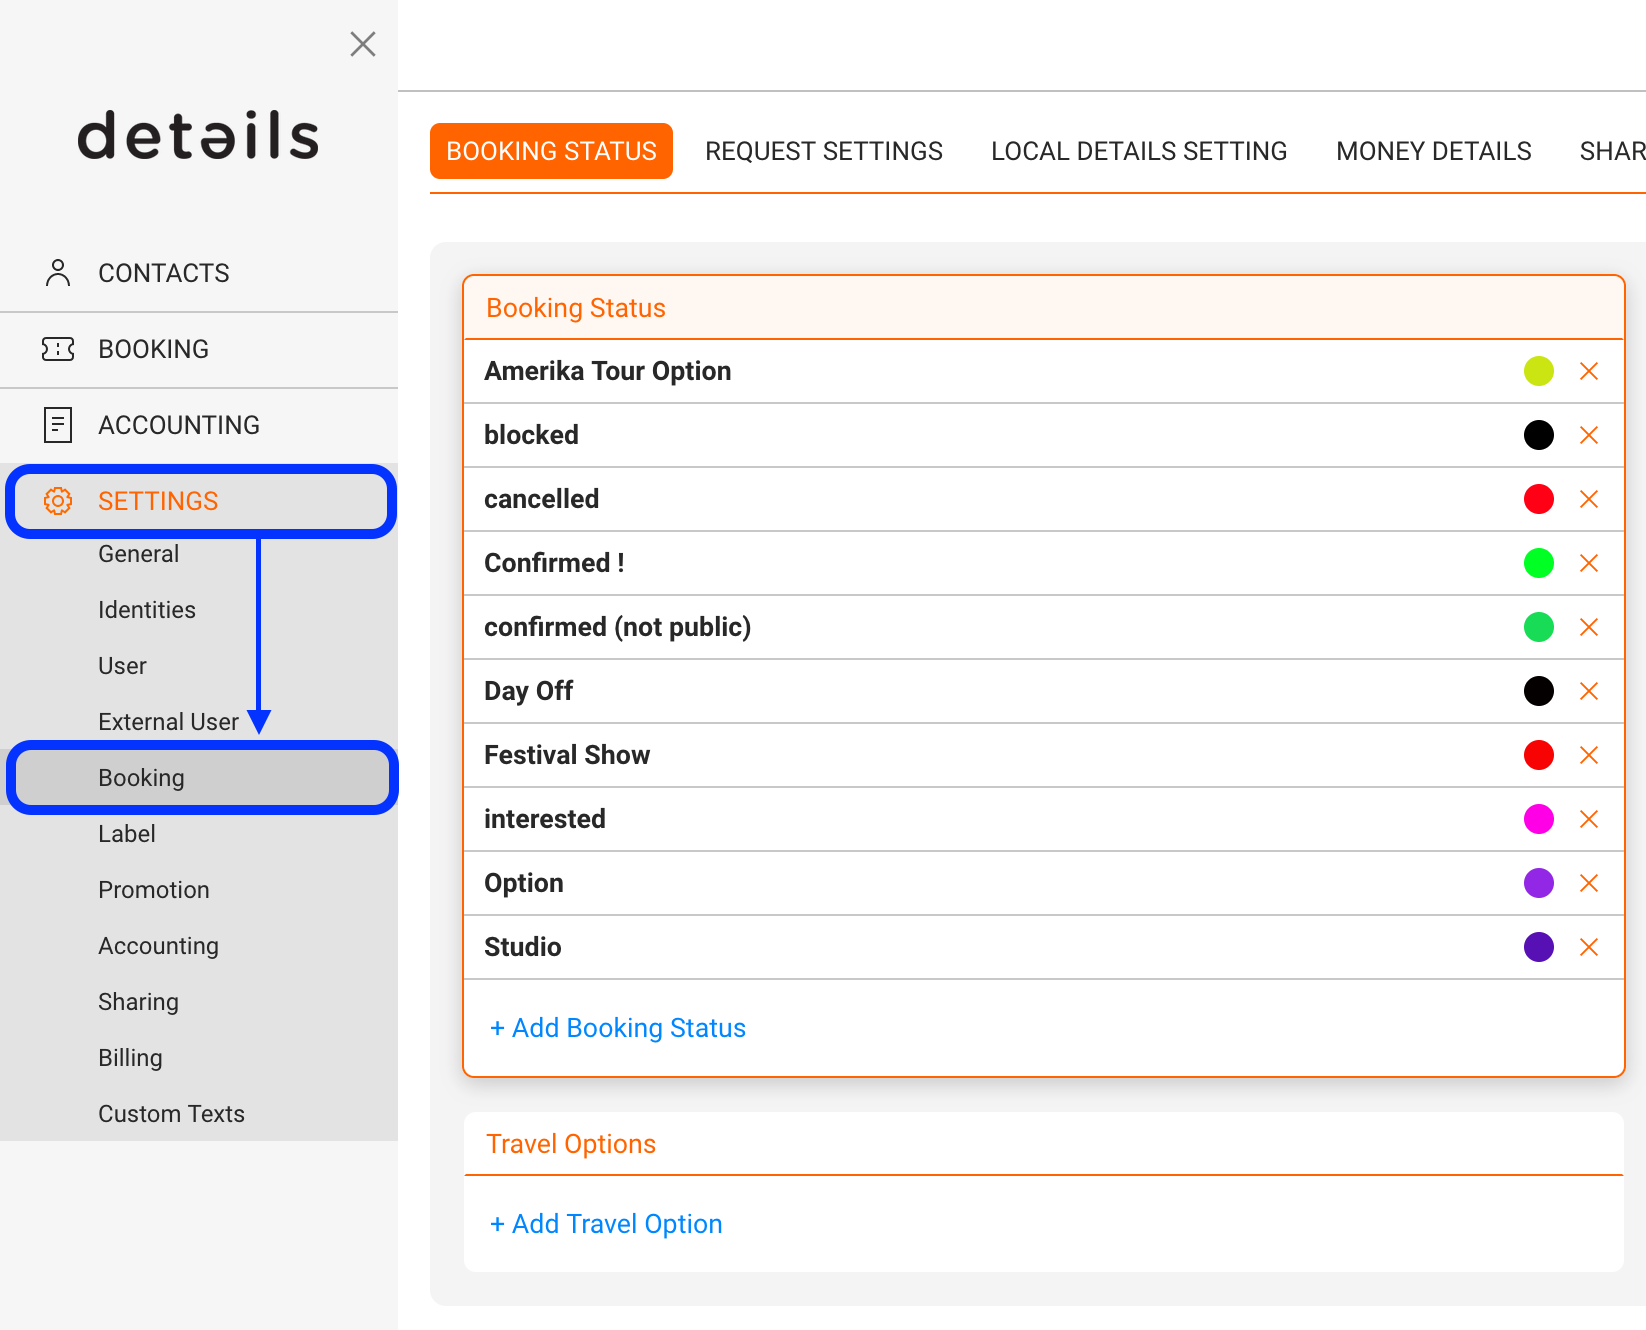
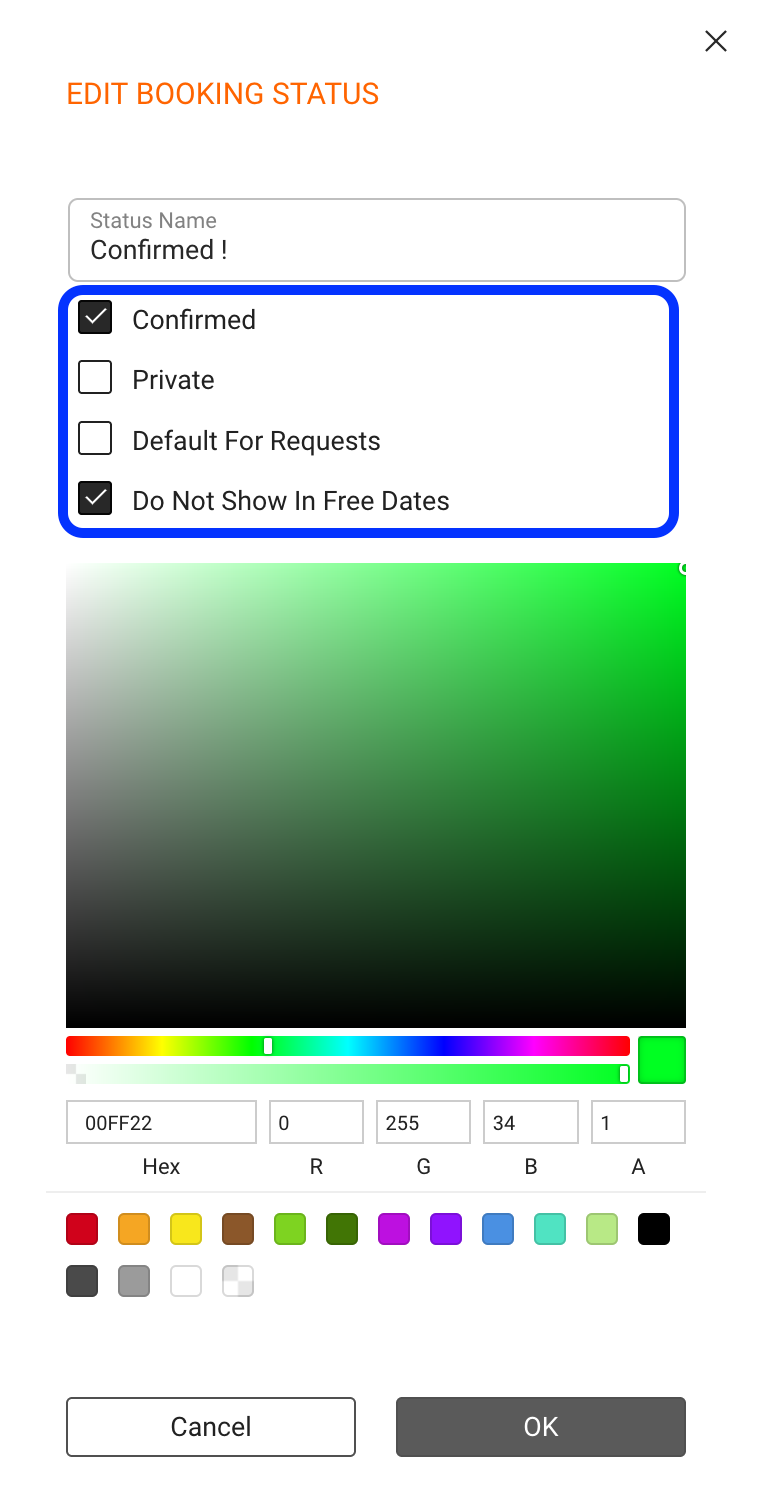
Any user may customize the client’s booking settings in SETTINGS / BOOKING / BOOKING SETTINGS.

You might ADD, EDIT or REMOVE any booking setting:
* to ADD a new status click the +Add Booking Status on the bottom of the display box.
* to EDIT an existing status click on the status name.
* to REMOVE an existing status click on the X icon on the right of the status.


A status can have the following states, where you can choose an individual color for each state:.

Confirmed dates will:

  • will BE published to the RSS feeds (to your websites etc.) and
  • will BE published to the Artist App.
  • will not be displayed in the available artist message (in the calendar)

Private

Any status clicked as private, will NOT be published to the RSS feeds. Some artists only want to have their next 1 or 2 months online in their streams. In that case, that private feature does exactly this but you still have the full control internally over the booking.


Default for Requests

When a new booking request is processed over the website or request form, a status can be set as your new booking requests. Our default for that is request – any bookingrequest coming in will be marked as

Do not show in Free Dates

To avoid display in our show free dates function in the calendar, click “Do Not Show In Free Dates”. Confirmed dates or holidays f.e. should be marked with this status.


Note:
To be published in the RSS feeds, a booking status must be set as “confirmed”, but NOT as “private”.
Any status clicked as private, will NOT be published to the RSS feeds.

Online Request Form (1/2)

The details Online Request Wizard goes beyond a classic webform to fill and send out – actually you might think of it more like your own B2B network of business contacts.

The Contact Requests section of the DASHBOARD displays all requests that have been submitted to you from our Online Request Form (1/2).

There’s 3 options to use the Online Request Wizard:
a) you can embed it in your websites customizable to ”your own design


b) you can link from facebook

c) you can send a link to any contact via email


For every new Contact Request you need to make a decision whether or not you want to include the sender in your B2B network of business contacts:
If you accept a contact request, the sender will be able to send you booking requests in the future.
If you don’t, the sender will not be able to access the booking form. He might make another “friend request” later.

If you do not wish to deal with a contact you can simply remove the Contact Request with the X icon on the right.


If you are not sure about the sender you might send him an email by clicking on the email address submitted.


If you agree to accept a new contact into your B2B network, you need to click on the date of the Contact Request.


details helps to keep your database clean! The next screen will allow you to check if the ”new contact” matches an ”existing contact” in your database. If there is none you can USE THE REQUEST CONTACT to continue.


You can decide to match the request contact to an existing Company or Person by clicking on the name of the matching contact. The application will then display the existing contact information next to the new contact for you to doublecheck. At this point you either USE THE EXISTING CONTACT or USE THE REQUEST CONTACT to continue.


details tries to match the request ”company” contact first and the request ”individual” contact after that. It also tries to match with existing ”promoters”. If there is no match continue with the button at the bottom.


No matter if you found a match or not, the contact is now accepted and will automatically receive a link to the ”Online Request Form (2/2).

You may continue with your work now and wait for the promoter to send you a booking request…

Booking Request: Online Request Form (2/2)

Once a ”Contact Request” has been accepted as business contact it will receive a link to your customizable Online Request Form (2/2):

Click HERE for more information about the customization of your request form!!

Click ”[http://help.detailsdetails.eu/tiki-read_article.php?articleId=8|here]” for more information about the adaptation of your request form to your website design!!

Once the promoters have entered all mandatory fields and necessary infos, tyhe will be able to SUBMIT the forms back to you.


You will be notified in the REQUESTS subtab of BOOKINGS tab immediately when a new Request Form gets submitted.

You can open a request with a Click on the ”date” or else remove it with a Click on the ”X icon” on the right side.

When you click on the ”date” to open a request date you will find yourself in our Online Request Wizard, which looks much alike the Booking Wizard you know from creating your own bookings. Only the Request Wizard includes the information which the promoter previously filled out in the Online form for you to doublecheck.

In the first step you will find the requested artists, the requested date and some additional infos to check. Click NEXT to continue …


The second step will match the request venue against your own database of venues: Click on existing venues to compare the infos.
If you want to create a new venue based on the information submitted with the request, click NEW VENUE. If you want to update and continue with the existing infos, click on NEXT.


The third step will let you update your promoter according to to the information submitted. Click NEXT to continue …


Finally the fourth step allows you to match the request contact against your own contact database: Click on existing contact to compare the infos.
If you want to create a new contact based on the information submitted with the request, click NEW CONTACT. If you want to update and continue with the existing infos, click on FINISH.


Once you clicked on FINISH, the booking request will be opened as a new booking from your calendar and you may continue to negotiate all necessary things from here …