How to Set a Fixed Country for Sales Imports


How to Set a Fixed Country for Sales Imports

For some sales imports, you may be missing the country information in the import files OR wish to ensure the sales are associated with a specific country.
In details, this is referred to as setting a “fix country.” This means you are assigning a specific country for sales regardless of the import data. This ensures that sales are accurately linked to the designated country.


Step 1: Open the Account Related to the Sales in DISTRIBUTION Accounts

  1. Navigate to DISTRIBUTION in the left-hand menu.
  2. Click on Accounts and select the relevant account

Step 2: Access IMPORT SETUP within the Account

  1. Click on the IMPORT SETUP tab in the account’s top navigation menu.
  2. If you need to create a new import setup, click on + Add New.
    If modifying an existing setup, select the relevant import setup.

Step 3: Configure the Import Setup

  1. A form will appear when adding a new setup or editing an existing one.
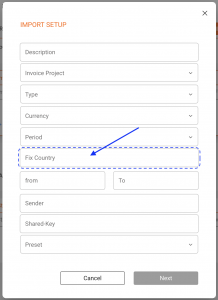
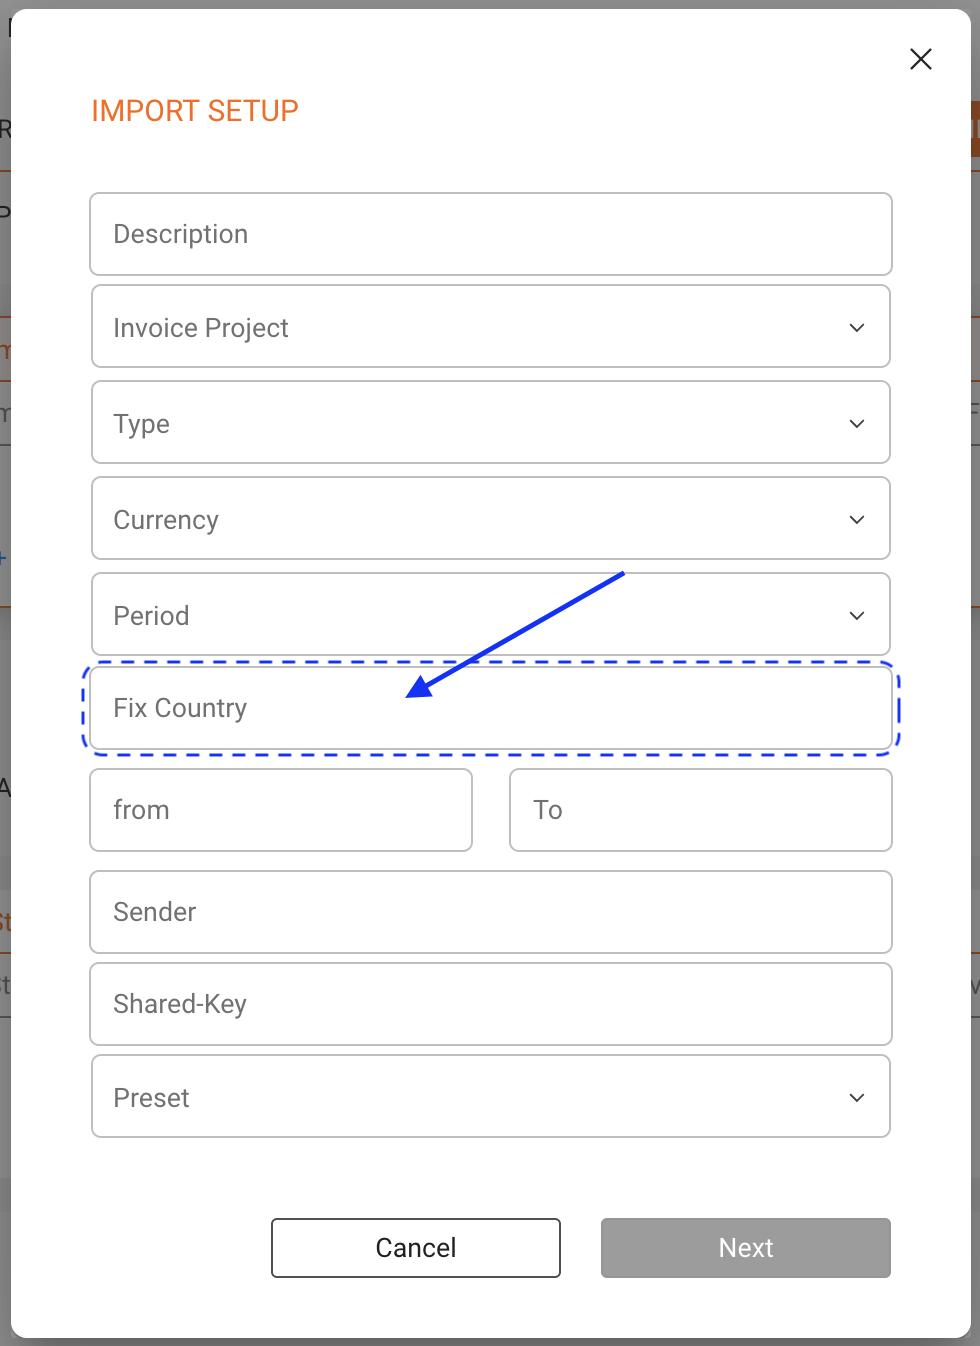
  2. In the Fix Country field, enter the desired country code (e.g., “US” for United States or “FR” for France).

Step 4: Save the Configuration

  1. After entering all necessary information, click Next or Save to confirm the changes.

These steps will ensure your sales are correctly associated with the specified country.
If you have any questions, feel free to ask!
How to set up the automated sales import from IDOL Labelcamp


Importing sales files manually can be a tedious and time-consuming process. We’re happy to partner with IDOLs Labelcamp to offer a fully automated sales ingestion solution.
This integration eliminates the need for manual uploads and automatically loads your monthly sales reports into details once set up. How convenient is that?

Setting up a sales import automation from Labelcamp is a straightforward process.
Follow the steps below to automate your sales statement delivery.

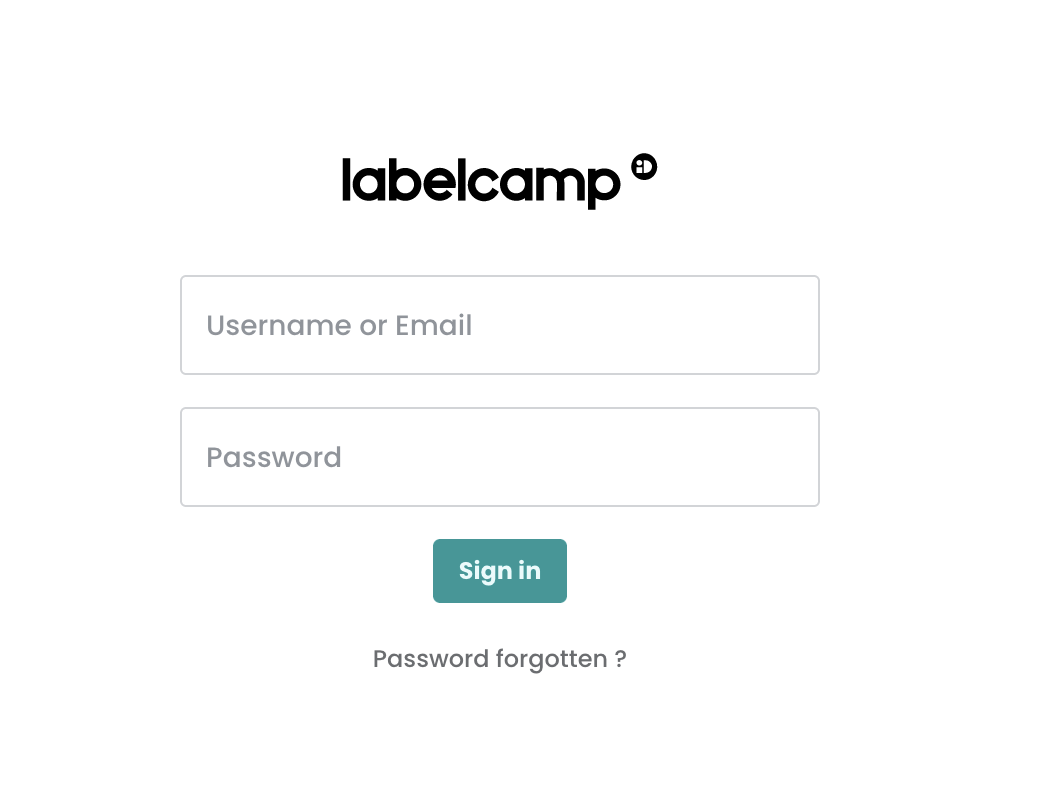
  1. Login to Your Labelcamp Account

    • Open your browser and navigate to the Labelcamp login page.
    • Enter your username or email and password.
    • Click on the “Sign in” button.

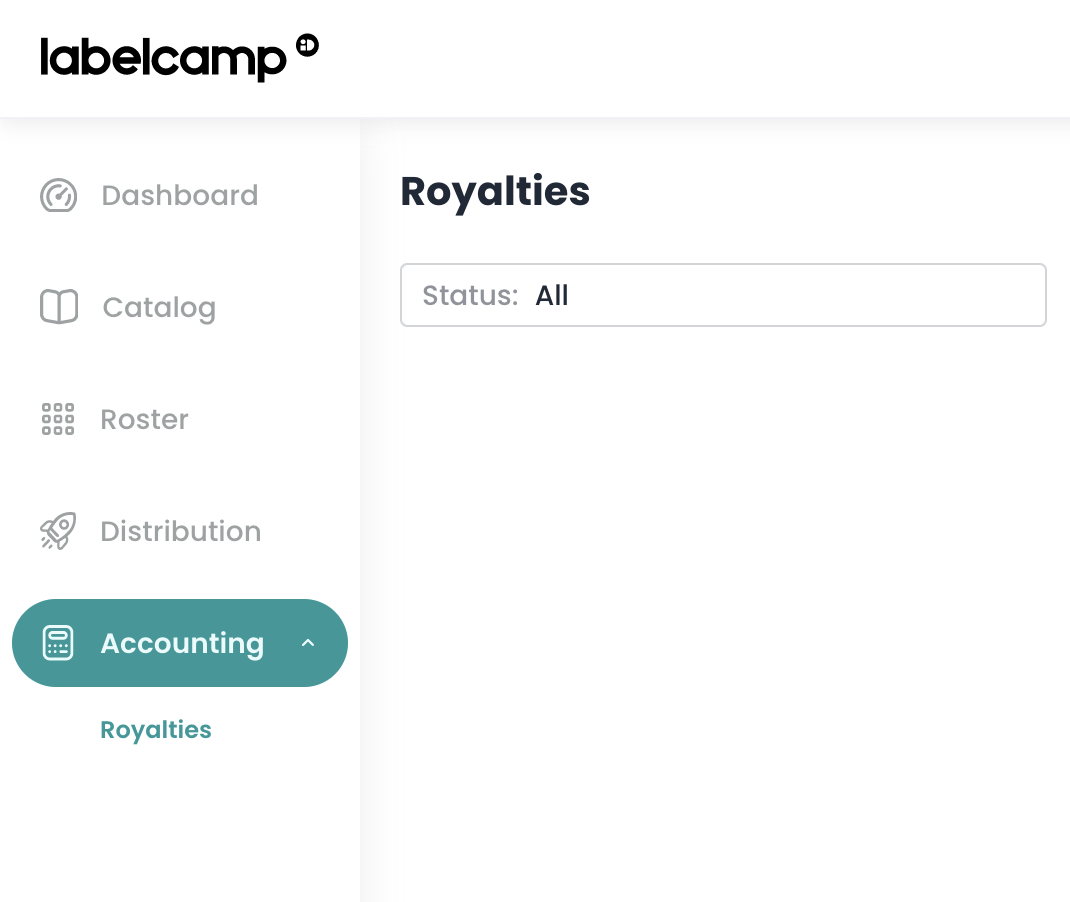
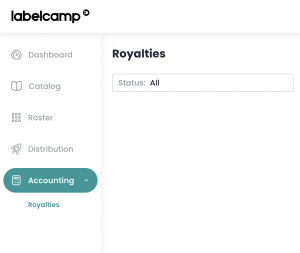
  2. Navigate to Royalties

    • On the main menu on the left side of the screen, select “Accounting.”
    • Then, select “Royalties” from the submenu.li

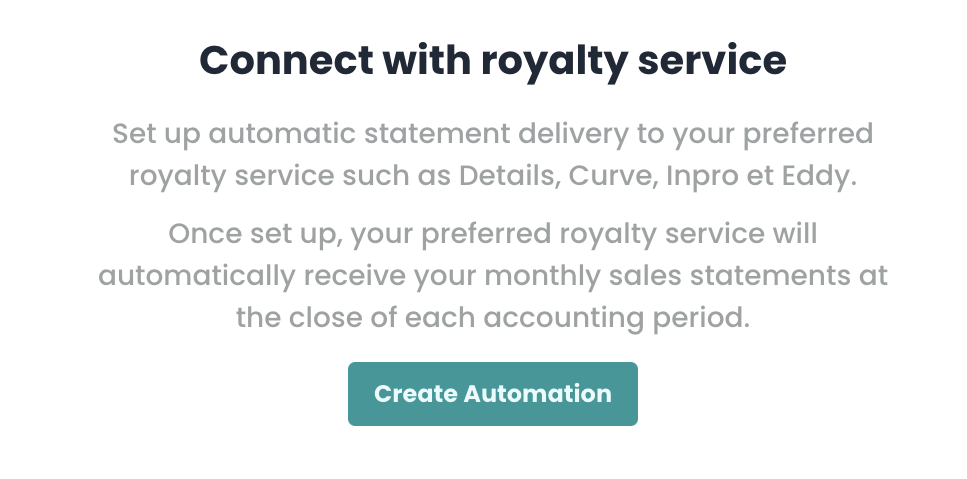
  3. Create a New Automation

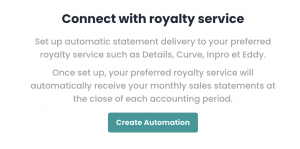
    • In the middle of the screen, click on “Create Automation.”
    • If you already have created other automations, select “New Automation.”

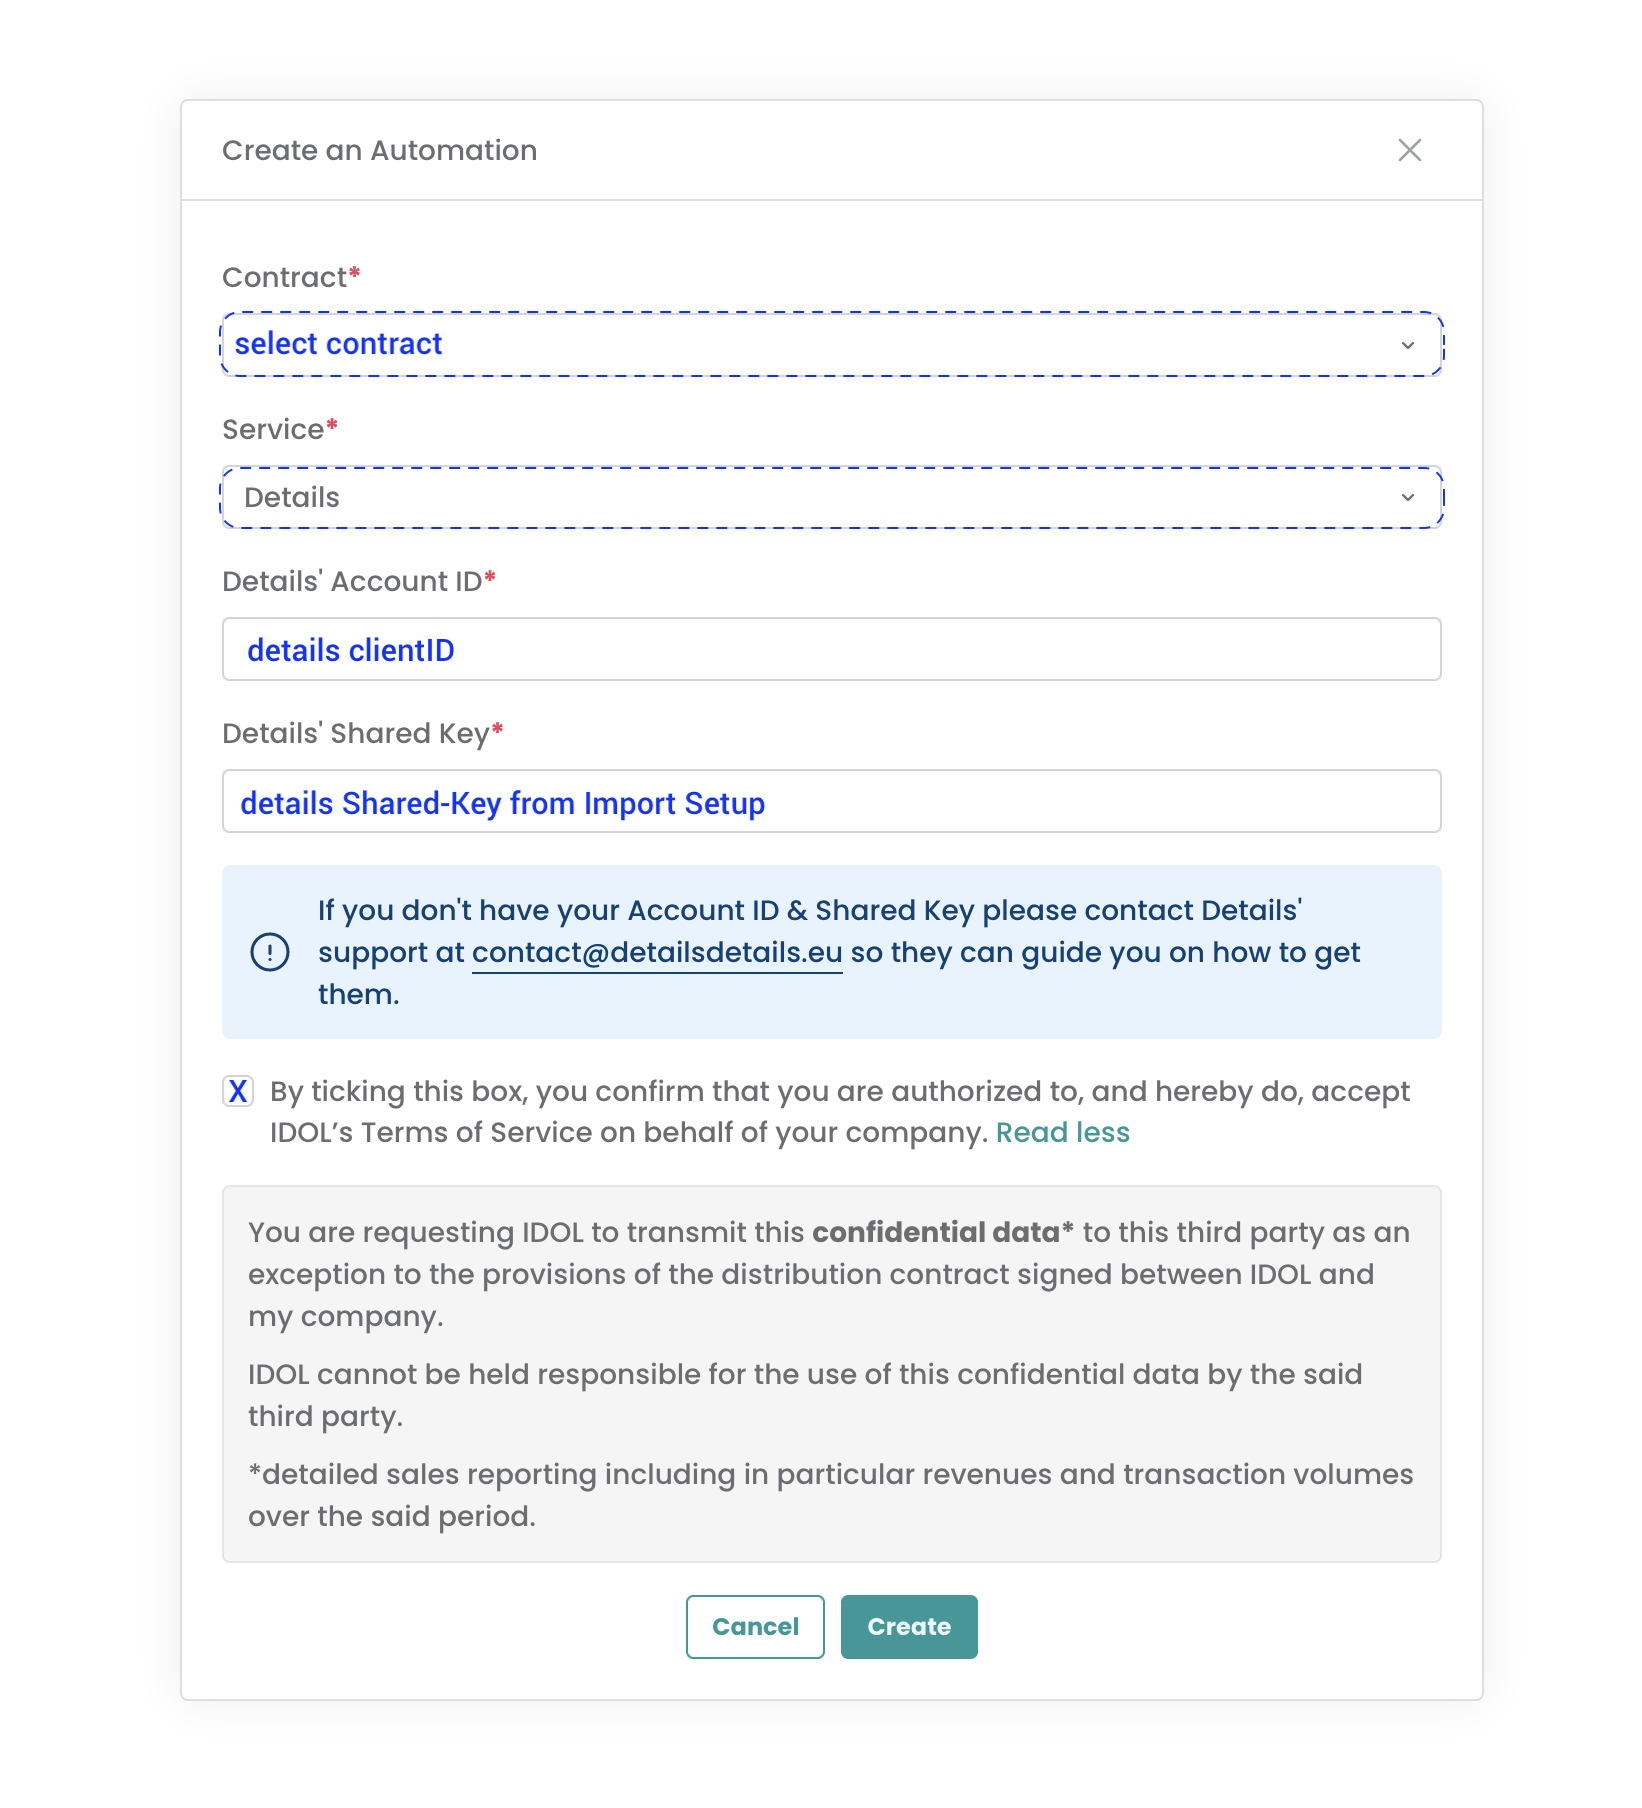
  4. Fill in the Automation Details
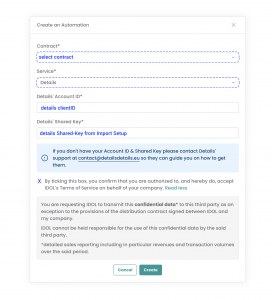
    • A modal window will appear to create your automation.
    • In the Contract dropdown, select your Labelcamp contract.
    • From the Service dropdown, select “Details.”
    • In the “Details’ Account ID” field, enter your Details client ID.
      This is what follows https://app.details.eu/ in your details login URL.
      For example, in https://app.details.eu/MyLabel/, the client ID is MyLabel.
    • In the “Details’ Shared Key” field, enter the shared key you ll find in your IDOL Import Setup in details under Distribution / Accounts / => Idol / Import Setup / open selected Import Setup => Shared-Key.

Note

  • You can create multiple import automations from Labelcamp to Details if you have multiple contracts in Labelcamp.

  • Each contract will have a dedicated import setup in Details and hence its unique shared key.

  • Sometimes, the automatic sales import transfer from LABELCAMP to details can be interrupted due to a disruption in the data flow. When this happens, the automatic sales ingestion may fail, leaving you with incomplete data. In that case read this article.


If you encounter any issues, please contact our label_team for assistance.

How to Remove a Confirmed Sales Import


If you need to remove a confirmed sales import (displayed in green), follow these steps:

Step 1: Navigate to the Sales Import

  1. Go to DISTRIBUTION > Imports.
  2. Locate and click on the green tile representing the sales import you want to remove.
  3. In the side window that opens, click on the statement.

Step 2: Open the Related Invoice

  1. In V2.0, at the top right of the side window, click on the button labeled Open Related Invoice.
  2. In V1, the button can be found at the bottom.

Step 3: Change Invoice Status

  1. If the invoice is still unlocked, click on Change Status. Otherwise make sure to unlock the Invoice first.
  2. Set the invoice status to Delete Invoice.

Note on deleting invoices:
Before you proceed, verify with your accounting department that you have permission to delete the related invoice. They may have already accounted the invoice!

Also , if a payment has already been made for this invoice, you must remove the payment before deleting the invoice.

In both cases, consider setting the invoice to Cancelled instead of deleting it. This keeps a trace of the transaction as a cancelled invoice, which can be more beneficial for record-keeping.

Note on deleting Digital Sales Statement Invoices

If the invoice is part of a digital sales statement, the deletion process might take longer due to the need to remove multiple data relations.

Step 4: Return to Distribution Imports

  1. After deleting the invoice, go back to DISTRIBUTION > IMPORTS.
  2. You will now see your import displayed in orange with the status matching complete.

Step 5: Delete the Sales Import

  • In V2.0: Click the x icon at the bottom left of the orange tile.
  • In V1.0: Navigate through the statement list, select the statement, and delete it from the list.

  • A prompt will appear asking, “Are you sure you want to delete the Statement?” Confirm by selecting Yes.

Focus : Country Information in Sales Processing


Correctly defining and maintaining country information in details is essential, as royalties may differ depending on where products and tracks are sold.

Always ensure that the country data is accurate when creating orders or importing statements. Incorrect or missing country information can lead to inaccurate royalty calculations.

Note: Only use valid countries or ISO2 codes. Do not enter region names such as Benelux or North America these are not accepted as countries in details.


Orders

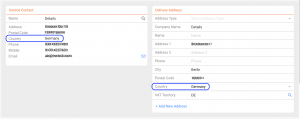
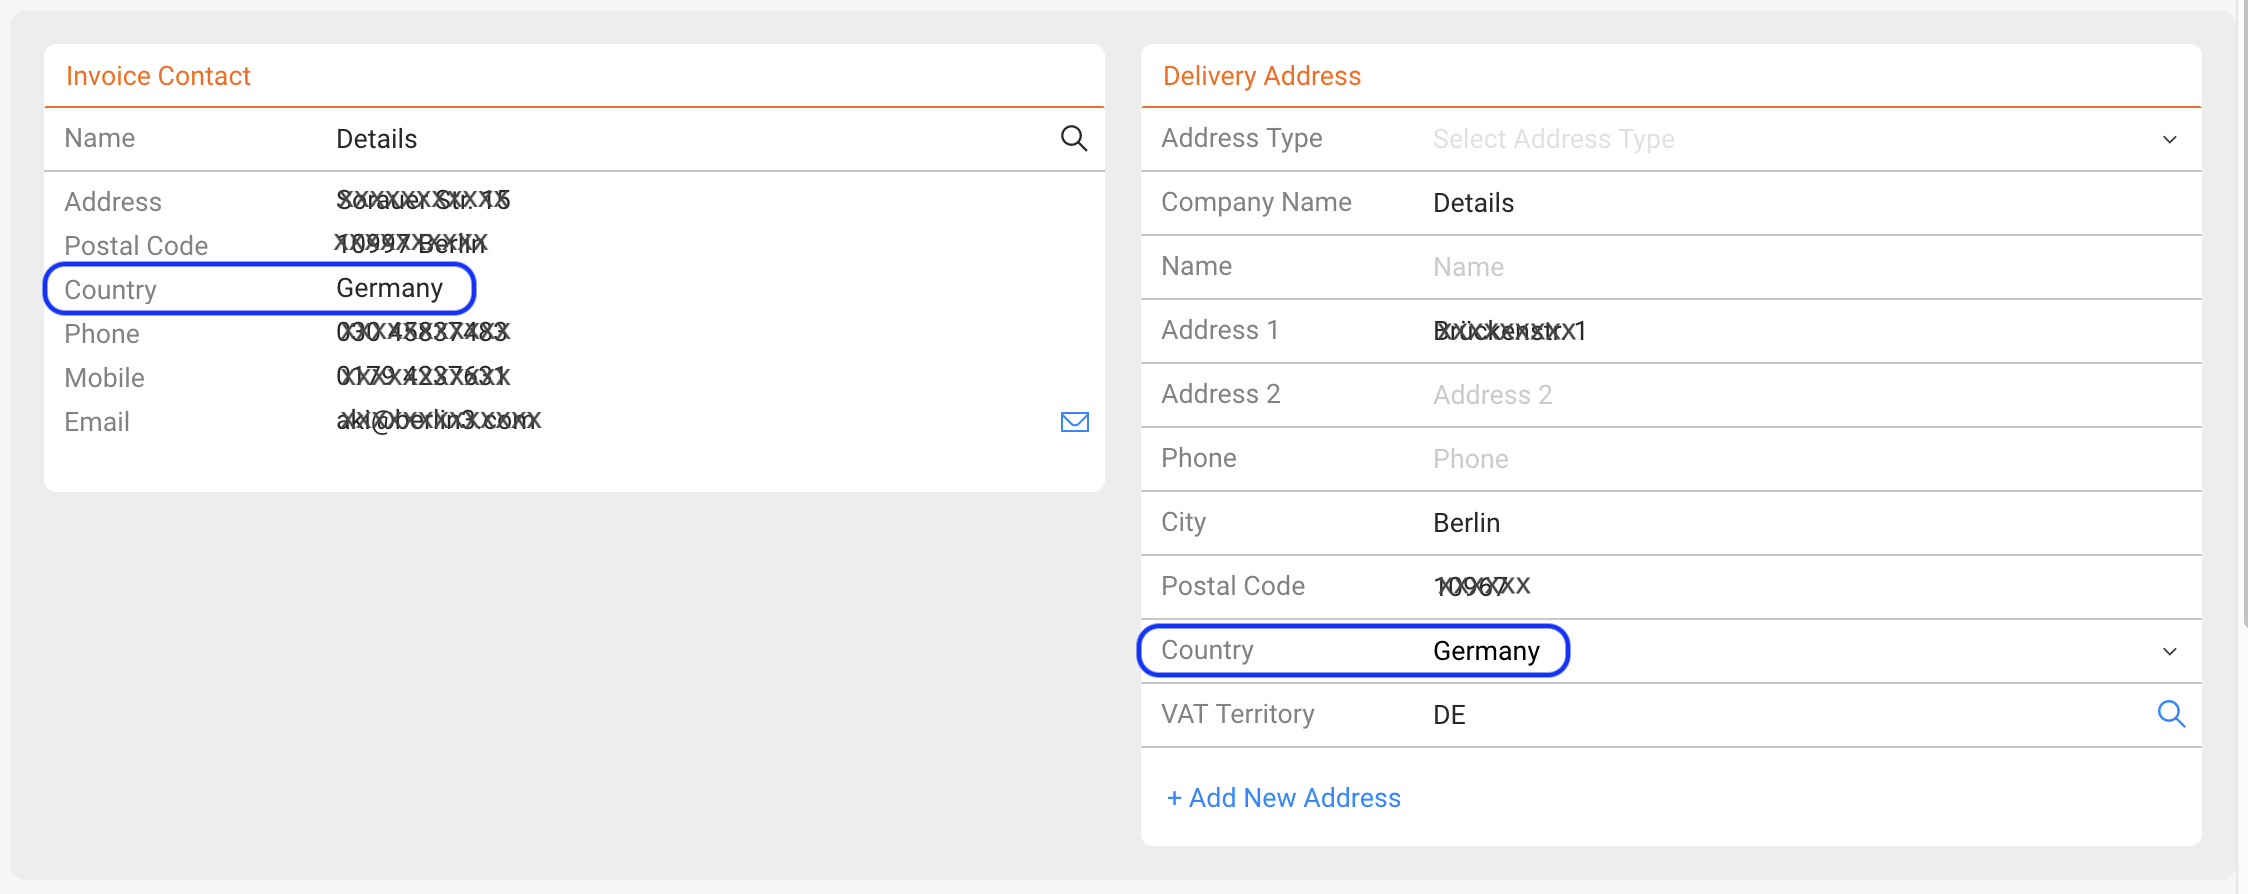
For orders, the delivery address defines the country of sale. If no delivery address is available, the invoice recipient’s country will be used instead.

Therefore, when creating new customers, always include billing and delivery contact information with valid country data.


Imported Sales Statements

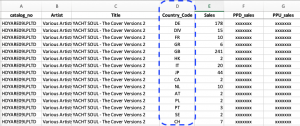
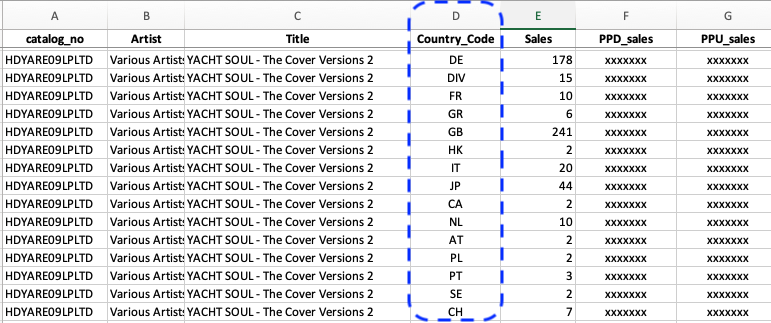
When importing sales statements, the country of sale is often included in each line of the file. Tag the corresponding column with the “Country” import tag to import this information per line.

If no country information is available in the statement, you can assign a fixed country to the import. To do this, go to DISTRIBUTION / ACCOUNTS ► select the account ► IMPORT SETUP ► select the Import Setup ► and enter the country name or ISO2 code in the Fix Country field.

How to Set a Fixed Country for Sales Imports


How to Set a Fixed Country for Sales Imports

For some sales imports, you may be missing the country information in the import files OR wish to ensure the sales are associated with a specific country.
In details, this is referred to as setting a “fix country.” This means you are assigning a specific country for sales regardless of the import data. This ensures that sales are accurately linked to the designated country.

Step 1: Open the Account Related to the Sales in DISTRIBUTION Accounts

  1. Navigate to DISTRIBUTION in the left-hand menu.
  2. Click on Accounts and select the relevant account

Step 2: Access IMPORT SETUP within the Account

  1. Click on the IMPORT SETUP tab in the account’s top navigation menu.
  2. If you need to create a new import setup, click on + Add New.
    If modifying an existing setup, select the relevant import setup.

Step 3: Configure the Import Setup

  1. A form will appear when adding a new setup or editing an existing one.
  2. In the Fix Country field, enter the desired country code (e.g., “US” for United States or “FR” for France).

Step 4: Save the Configuration

  1. After entering all necessary information, click Next or Save to confirm the changes.

These steps will ensure your sales are correctly associated with the specified country.
If you have any questions, feel free to ask!
How to set up the automated sales import from IDOL Labelcamp


Importing sales files manually can be a tedious and time-consuming process. We’re happy to partner with IDOL’s Labelcamp to offer a fully automated sales ingestion solution.
This integration eliminates the need for manual uploads and automatically loads your monthly sales reports into details once set up. How convenient is that?

Setting up a sales import automation from Labelcamp is a straightforward process.
Follow the steps below to automate your sales statement delivery.

  1. Login to Your Labelcamp Account

    • Open your browser and navigate to the Labelcamp login page.
    • Enter your username or email and password.
    • Click on the “Sign in” button.

  2. Navigate to Royalties

    • On the main menu on the left side of the screen, select “Accounting.”
    • Then, select “Royalties” from the submenu.li

  3. Create a New Automation

    • In the middle of the screen, click on “Create Automation.”
    • If you already have created other automations, select “New Automation.”

  4. Fill in the Automation Details
    • A modal window will appear to create your automation.
    • In the Contract dropdown, select your Labelcamp contract.
    • From the Service dropdown, select “Details.”
    • In the “Details’ Account ID” field, enter your Details client ID.
      This is what follows https://app.details.eu/ in your details login URL.
      For example, in https://app.details.eu/MyLabel/, the client ID is MyLabel.
    • In the “Details’ Shared Key” field, enter the shared key you ll find in your IDOL Import Setup in details under Distribution / Accounts / => Idol / Import Setup / open selected Import Setup => Shared-Key.

Note

  • You can create multiple import automations from Labelcamp to Details if you have multiple contracts in Labelcamp.
  • Each contract will have a dedicated import setup in Details and hence its unique shared key.
  • Sometimes, the automatic sales import transfer from LABELCAMP to details can be interrupted due to a disruption in the data flow. When this happens, the automatic sales ingestion may fail, leaving you with incomplete data. In that case read this article.


If you encounter any issues, please contact our label_team for assistance.

How to Remove a Confirmed Sales Import


If you need to remove a confirmed sales import (displayed in green), follow these steps:

Step 1: Navigate to the Sales Import

  1. Go to DISTRIBUTION > Imports.
  2. Locate and click on the green tile representing the sales import you want to remove.
  3. In the side window that opens, click on the statement.

Step 2: Open the Related Invoice

  1. In V2.0, at the top right of the side window, click on the button labeled Open Related Invoice.
  2. In V1, the button can be found at the bottom.

Step 3: Change Invoice Status

  1. If the invoice is still unlocked, click on Change Status. Otherwise make sure to unlock the Invoice first.
  2. Set the invoice status to Delete Invoice.

Note on deleting invoices:
Before you proceed, verify with your accounting department that you have permission to delete the related invoice. They may have already accounted the invoice!

Also , if a payment has already been made for this invoice, you must remove the payment before deleting the invoice.

In both cases, consider setting the invoice to Cancelled instead of deleting it. This keeps a trace of the transaction as a cancelled invoice, which can be more beneficial for record-keeping.

Note on deleting Digital Sales Statement Invoices

If the invoice is part of a digital sales statement, the deletion process might take longer due to the need to remove multiple data relations.

Step 4: Return to Distribution Imports

  1. After deleting the invoice, go back to DISTRIBUTION > IMPORTS.
  2. You will now see your import displayed in orange with the status matching complete.

Step 5: Delete the Sales Import

  • In V2.0: Click the x icon at the bottom left of the orange tile.
  • In V1.0: Navigate through the statement list, select the statement, and delete it from the list.

  • A prompt will appear asking, “Are you sure you want to delete the Statement?” Confirm by selecting Yes.

Focus : Country Information in Sales Processing

Table of contents

Correctly defining and maintaining country information in details is essential, as royalties may differ depending on where products and tracks are sold.

Always ensure that the country data is accurate when creating orders or importing statements. Incorrect or missing country information can lead to inaccurate royalty calculations.

Note: Only use valid countries or ISO2 codes. Do not enter region names such as Benelux or North America these are not accepted as countries in details.


Orders

For orders, the delivery address defines the country of sale. If no delivery address is available, the invoice recipient’s country will be used instead.

Therefore, when creating new customers, always include billing and delivery contact information with valid country data.


Imported Sales Statements

When importing sales statements, the country of sale is often included in each line of the file. Tag the corresponding column with the “Country” import tag to import this information per line.

If no country information is available in the statement, you can assign a fixed country to the import. To do this, go to DISTRIBUTION / ACCOUNTS  select the account  IMPORT SETUP  select the Import Setup  and enter the country name or ISO2 code in the Fix Country field.