Sales Imports – Distributor & Partner Workflows

This article explains how to import sales statements from external distributors and DSP partners into details. All partners follow the same logic: you need an Import Setup, then you work with tiles in DISTRIBUTION / IMPORTS.

Good to know

  • Always confirm the correct account, currency, and channel in the Import Setup before uploading.
  • After upload, details processes the file. Resolve any items under Import Matches, then verify totals in Import Result.
  • Some partners support automated ingestion (DSS). If a file is missing/outdated, re-trigger via Import Setup ► Perform ► Run Auto Import.
  • If your file format is not directly supported, contact label_team@details.eu a converter/toolkit may be available.
► Amazon

Amazon Imports

Amazon statements are fetched via sFTP at digital-music-ftp.amazonmp3.com (Port 22). Use an sFTP client such as FileZilla or Cyberduck, log in with your Amazon credentials, and download the monthly statement files.

  • Folder structure: organized by territory (ISO2) ► choose the monthly folder. Within each service folder, you ll find the respective sales files.
  • Services/tiers: separate files for tiers such as Prime and Unlimited. Summary files may contain per-item sales but often lack country information rename them with the country for clarity.
  • Currencies: each file includes one reporting currency (EUR, USD, GBP, or JPY). Set up one importer per currency for clean separation.
  • Zip archives: most files arrive as .zip; unzip before import.

Upload the corresponding files via DISTRIBUTION / IMPORTS. Consider creating separate importers by tier ► currency for more structured reporting.

Automated ingestion: Amazon supports DSS auto-ingestion. If a period appears incomplete or incorrect, open the related Distribution Account ► Import Setup, click Perform, select the Year/Period, then choose Run Auto Import.

Tip: If you receive multiple partial files for one reporting period (e.g., different Amazon services), import them sequentially within the same monthly tile to ensure correct aggregation.

Amazon importer overview
► Bandcamp

There are three ways to bring Bandcamp data into details.

1) Conversion Toolkit or Support

  • Use our external Conversion Toolkit to convert the RAW DATA REPORT into a pre-configured XLSX that you can import directly in DISTRIBUTION / IMPORTS.
  • If you want to run the toolkit yourself, we will provide a FileMaker-based runtime installer. Contact label_team@details.eu to receive it.
  • Prefer not to install software? Our team can perform the conversion for you at the regular support rate. Simply send the RAW DATA REPORT (or provide temporary access). We will return monthly digital/physical XLSX files ready for import.
Bandcamp Toolkit

Bandcamp Raw Data location

Raw Data Reports can be found in your Bandcamp account under Sales ► Reports.

2) Merch Orders API (optional)

If you want to ingest Bandcamp merchandise orders as individual DISTRIBUTION / ORDERS for picking/packing and fulfillment, we can enable an integration with the Merch Orders API.

  • All product orders are downloaded into DISTRIBUTION / ORDERS.
  • Each order can be processed end-to-end (receipt ► fulfillment) inside details.
  • For setup details, see the related Bandcamp Order Ingestion Plugin article.

Planned: DSS Auto-Import

For clients operating multiple labels via a Bandcamp Fulfillment Account, we plan an automatic ingestion using Bandcamp s Sales Report API.

Questions? Contact the Label Team: label_team@details.eu.

► FNAC

FNAC Imports

  1. Log in to your details account and go to DISTRIBUTION / IMPORTS.
    FNAC imports overview
  2. Select the relevant sales month and click the corresponding FNAC tile. Tiles are organized by week for FNAC sales.
    FNAC weekly tile setup
  3. Upload the FNAC weekly file. details automatically splits the file into daily imports and separates sales and returns.
  4. After processing, verify that all lines are correctly linked and the message Matching Complete appears. If not, manually link missing sales to products or add new products in details.
  5. Click the orange tile to review the import, then click [CONFIRM IMPORT] to finalize it.
  6. You ll be redirected to the FNAC Account Overview, showing all invoices ready for confirmation.
  7. Select all ready invoices and click [ACCOUNT ON MULTIPLE INVOICES].
  8. details automatically generates one invoice per day, using the FNAC sale date as the invoice date and including the FNAC reference in the subject line.
► IDOL (Labelcamp)

The IDOL Labelcamp integration enables a fully automated sales ingestion directly into details. Once set up, new monthly statements are fetched automatically. You can also manually re-trigger a transfer if needed.

► Automated Setup
  1. Log in to LabelcampAccounting ► Royalties.
    Login to your Labelcamp account
  2. In the main menu, go to Accounting ► Royalties.
    Navigate to Royalties
  3. Click [CREATE AUTOMATION] (or [NEW AUTOMATION] if others exist).
    Create new automation
  4. In the modal window, fill in the following details:
    • Contract: select your Labelcamp contract.
    • Service: choose details.
    • Details Client ID: the part of your app URL after https://app.details.eu/ (e.g., https://app.details.eu/MyLabel/MyLabel).
    • Shared Key: copy this from your detailsDistribution Account ► Import Setup.
    Labelcamp automation modal
  5. Click [SAVE]. Labelcamp will automatically push your monthly statements into your details Imports grid.

Multiple contracts? Create one automation per contract. Each will use its own Import Setup and Shared Key in details.

► Manual Re-Trigger (if automatic transfer fails)
  1. In details: go to DISTRIBUTION / IMPORTS and remove the interrupted import by clicking the ( ) icon on the tile. This clears the failed run so a fresh transfer can start.
  2. In Labelcamp: navigate to Accounting ► Royalties.
  3. Click [NEW EXPORT] (top-right).
    Labelcamp   New Export
  4. Configure the export:
    • Contract: choose the relevant contract
    • Service: details
    • Period: pick the period you want to re-transfer
    Labelcamp   Export configuration
  5. Click [CREATE] to trigger the transfer. In Labelcamp you ll see the status move to Waiting.
  6. Back in details: monitor the IDOL tile in DISTRIBUTION / IMPORTS. The status should move from Processing to Matching Complete when finished.
    details   processing to Matching Complete

If the automatic transfer repeatedly fails, contact the Label Team at label_team@details.eu.

► MERLIN

Set up automated sales ingestion from the MERLIN Network FTP into details. Once configured, new monthly files are pulled automatically and appear as tiles in DISTRIBUTION / IMPORTS.

Step 1 Open API Configuration

  1. Log in to your details account.
  2. Go to SETTINGS / SHARING (section: API CONFIGURATIONS) or open:
    https://app.details.eu/<yourClientID>/v2/#/main/settings/sharing
  3. Scroll to API CONFIGURATIONS.

Step 2 Add the MERLIN FTP Connection

Click [ADD API CONFIGURATION] and fill in the fields:

Field Example / Instruction
Notes merlin
Host ftp.merlinnetwork.org
Protocol FTP
Port leave empty
User your MERLIN FTP username
Password your MERLIN FTP password
Start Date optional month to start ingestion from

Then click [ADD].

Important: Credentials are client-specific and provided by MERLIN. details cannot supply or reset them for you.

Step 3 Create Distribution Account(s) for MERLIN Imports

After adding the API Configuration, create one or multiple DISTRIBUTION / ACCOUNTS to receive MERLIN sales.

  • Recommended: one account (e.g., MERLIN Network) to centralize all MERLIN-delivered DSPs. This lets you search for MERLIN and see all related DSPs in one view.
  • Alternative: separate accounts per DSP (e.g., MERLIN Spotify, MERLIN Deezer) if preferred for reporting.
  1. Ask the details Label Team to enable the relevant MERLIN DSS (Digital Statement Sources) for your client.
  2. Once permissions are set, activate the automated importer(s) under DISTRIBUTION / IMPORTS on the target account tiles.

Important: Using one shared account keeps MERLIN sales centralized; separate accounts help with DSP-specific reporting preferences.

Step 4 Scheduling and Updates

When active, the Auto Ingest Cron Job checks the MERLIN FTP regularly and imports new or changed files.

Typical MERLIN path structure: /sales/YYYYMM/<source>
Example: /sales/2025M07/spotify/&

Additional Notes

  • MERLIN may replace files under the same filename; details detects changes by comparing creation date and file size.
  • No manual uploads are required once automation is enabled.

Troubleshooting

  • If [ADD API CONFIGURATION] is disabled, ensure you have admin rights.
  • If MERLIN DSS options are not visible in DISTRIBUTION / IMPORTS, ask support to enable DSS ID 43 (MERLIN) for your client.
► PIAS (Physical)

Use the PIAS Toolkit to convert the file and deduct the PIAS return handling fee.

  1. Open the toolkit and upload the original PIAS file.
  2. Select sheet PHY and use the preset import (no manual mapping needed).
  3. Enter the return handling fee from the PIAS summary, choose a filename, export to desktop.
  4. Upload the exported file via DISTRIBUTION / IMPORTS.

Help: label_team@details.eu.

PIAS return handling fee field
► Republic of Music (ROM)

Republic of Music (ROM) statements may include both digital and physical sales. Each file can contain several tabs such as Sales, Summary, and Line Charges. To ensure correct imports, these tabs must be separated before uploading.

Step 1 Open the Original Statement File

Open the ROM statement file as provided by the distributor.

ROM original statement example

Step 2 Separate Tabs for Physical and Digital Sales

ROM statement files usually contain one tab per sales type. To prepare these files for import:

  1. Right-click the tab (e.g., Digital or Physical) ► select Move/Copy ► New Spreadsheet.
  2. Do not cut or delete data from the original file always copy to a new one.

Step 3 Save as XLSX

Save each new file with a clear name (e.g., ROM_Physical_2025-07.xlsx) in XLSX format.

Step 4 Prepare the File

  • Remove any auto-filters.
  • Select all cells (CMD+A) ► open Format ► Standard to ensure numbers are converted correctly.
  • Delete the last line (summary total) or remove it later inside details.
  • Save the cleaned file.

Step 5 Upload the File

Upload your new XLSX files to the correct month in DISTRIBUTION / IMPORTS.

Step 6 Check and Map Headers

Verify that headers match correctly in the import configuration.

Mandatory Fields: Artist, Title, Identifier (Cat#), Identifier2 (UPC), Net Units, Net Income, Net Payable, Country, Format, Shop.

Step 7 Proceed Import

Continue the import process and check the import preview in DISTRIBUTION / IMPORTS.

Step 8 Run Matching

Once the file is processed, use [RUN ID MATCHING] to match items. Check that all lines show Matching Complete.

Step 9 Verify Totals and Account

Compare the total in details against the original ROM statement (either Summary tab or bottom line in Sales tab). If values match, you can account the statement.
<summary style="font-size: 1.5em; font-weight:

How to login for the .shares Dashboard (as an Artist)

The .shares Dashboard gives artists, managements, and partners secure online access to their royalty statements. This article explains how to set your password and log in for the first time.

Note: Access to the .shares Dashboard is provided via an email invitation. If you haven’t received one, please contact your label or royalty administrator.

Step 1: Start Login

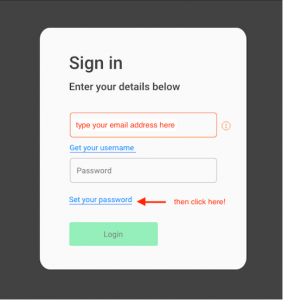
Go to the login page of the .shares Dashboard. Type your email address and click Set your password.

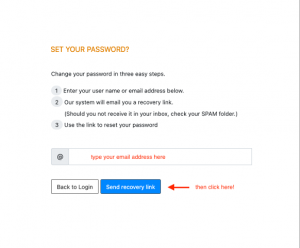
Enter your email again and click Send recovery link.

Step 3: Check Your Email

Look for an email from do-not-reply@details.eu and click Set Password.

Step 4: Set Your Password

Enter your new password and click Reset.

Step 5: Confirm the Password Reset

You’ll receive another email. Click Login.

Step 6: Log In to the Dashboard

Enter your email and password, then click Login.

Step 7: View Your Statements

Click a year to view your royalty statements.

Tip: Bookmark the login page for quick access.

Licences

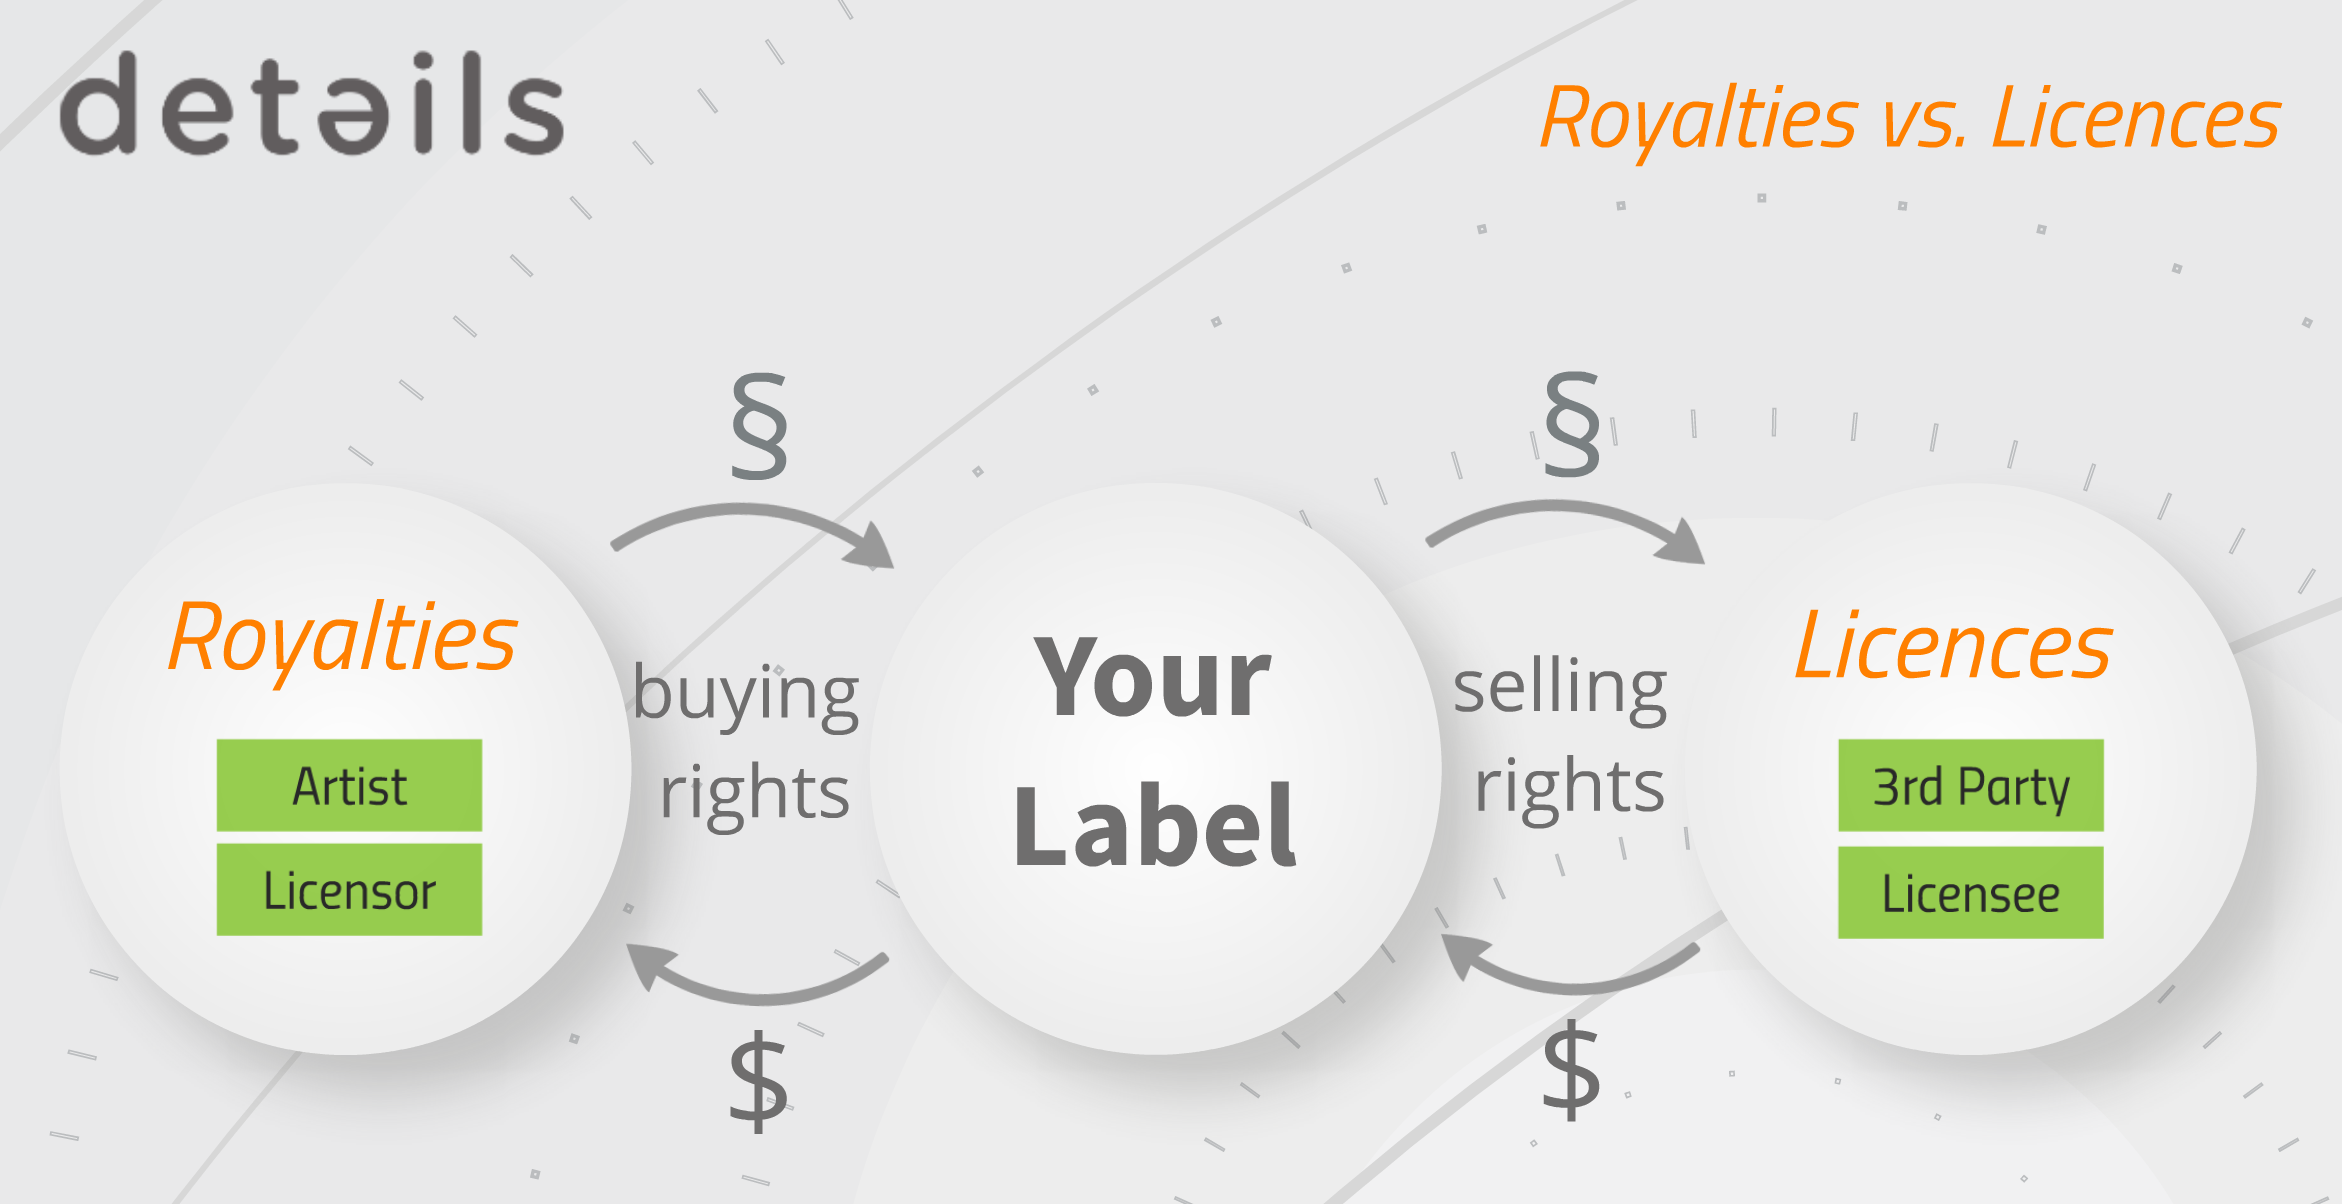
This article explains how to create and manage Licences in details.

A Licence defines the agreement with a Licence Account including the licensed assets, territory, term, and financial conditions.

In this context, you are selling usage rights to music you control or own. The Licence Account (the licensee) receives the right to use the selected assets under defined conditions.

Licensing therefore represents the outbound side of your business: you grant rights and receive income in return.

► CREATE A NEW LICENCE

You can create a licence either:

  • From LABEL / LICENSING / LICENCES using [+]
  • From within a selected Licence Account under the LICENCES tab using [+]

Fill in the required fields and click [OK].

The licence workspace will open automatically.

► OVERVIEW TAB

The OVERVIEW tab contains the core agreement data:

  • Licence Name
  • Licence Account
  • Territory
  • Exclusivity
  • Currency
  • Start Date and Contract Term
  • Accounting Period and Due Days

In the Royalty Info section, you can document:

  • Advances
  • Royalty rates
  • Deductions
  • Digital rights
  • Rata information

Use Related Files to upload contracts, scans, or additional documents.

Internal notes help you document negotiations and deal history.

► TASKS TAB

The TASKS tab allows you to manage the internal workflow of the licence.

You can:

  • Create tasks with [+]
  • Assign responsibilities
  • Set due dates
  • Track completion status

Use tasks to coordinate contract signatures, asset delivery, reporting follow-ups, approvals, or other deal-related steps.

► ASSETS TAB

The ASSETS tab defines what is being licensed.

Click [+] and select the asset type:

  • Track
  • Product
  • Release

This allows you to license:

  • Single tracks (e.g. sync deals)
  • Custom products
  • Entire releases (e.g. territory sub-licensing)

The selected assets are automatically connected to their related Royalty Accounts.

► NEXT STEP: INCOME & INVOICING

Once a licence is set up and assets are defined, you can add income and generate invoices.

The financial workflow is explained in the article: Licence Income & Invoicing & Inclusion of PAID Licences in Royalty Accounting & Reporting.

Merging Contacts

If your contact list includes duplicates, it’s best to merge them instead of deleting them. This way, you keep all useful information and make sure your contact database stays clean and consistent.

Deleting duplicates can lead to losing important details or CONTACT RELATIONS that are only linked to one of the contacts. Since CONTACT RELATIONS are used in many places in details, we recommend merging instead of deleting.

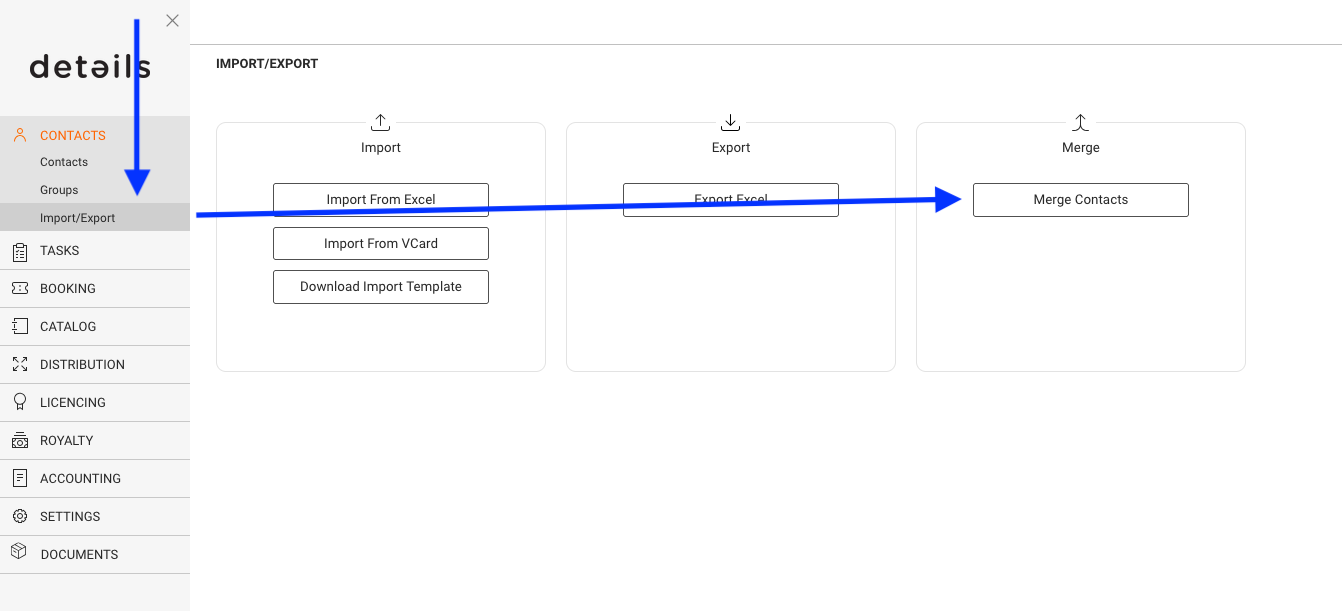
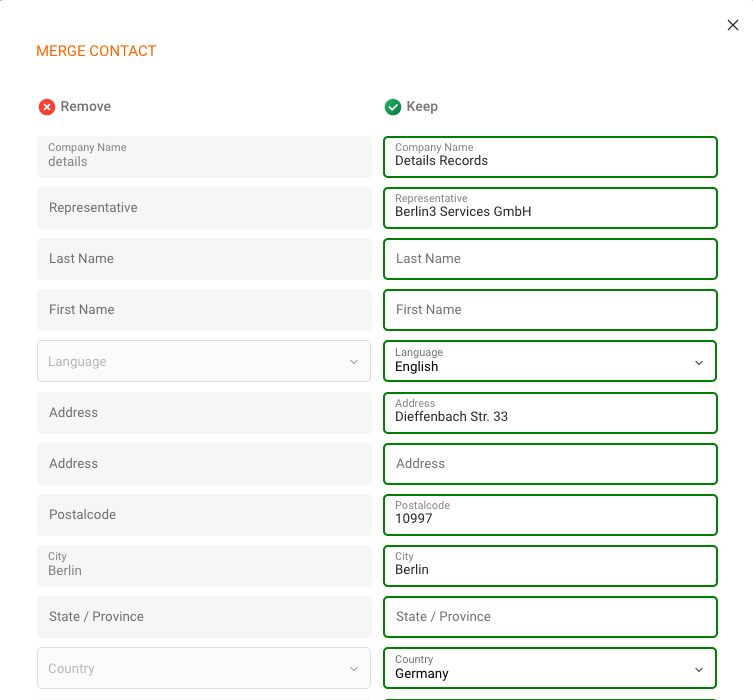
1. To start the process, choose IMPORT/EXPORT in the side menu of CONTACTS. Click there on the► [MERGE CONTACTS] button.

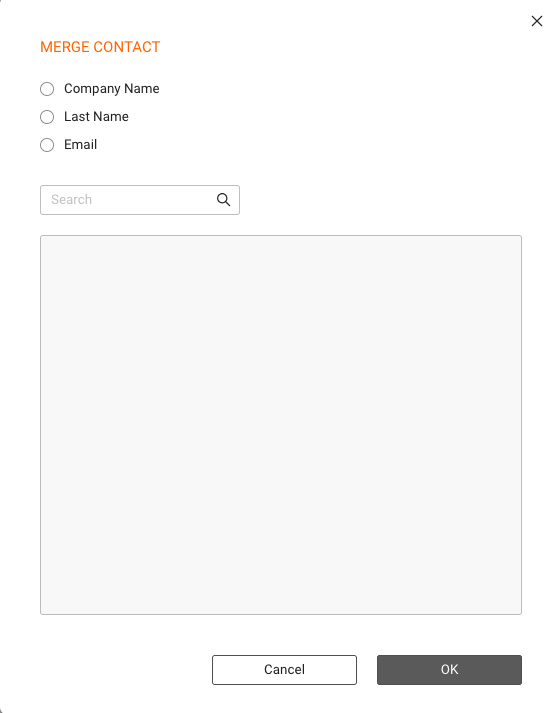
2. Find contacts to merge: A pop-up window will open. You can enter a name or keyword in the SEARCH field, or use the checkboxes to filter for duplicate entries:

  • [Company Name] shows contacts with the same company name
  • [Last Name] shows contacts with the same last name
  • [Email] shows contacts with the same email address

Note: Sometimes companies and individuals share the same email address. If you want to keep them separate, avoid using email as your only filter.

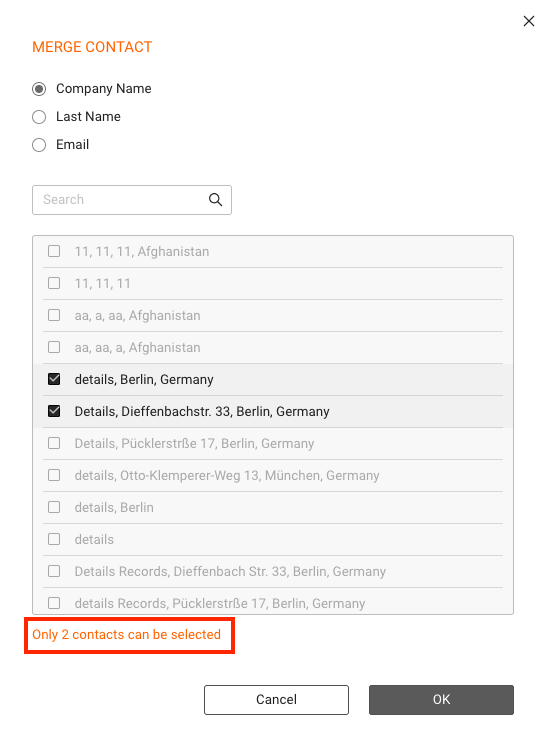
2. Select contacts to merge: From the filtered list, select exactly two contacts by ticking the checkboxes next to them. Then click [OK].

3. Choose which contact to keep: You ll now see both selected contacts side by side. Choose the one you want to keep usually the one with more complete or updated info. Click [SELECT].

Tip: If needed, you can then still copy individual details from the contact being removed before completing the merge.

4. Confirm the merge: Click [OK] to complete the process. All related data and links from the other contact will be moved to the one you keep. That second contact will then be removed.

How to account recoupables

Recoupables are costs which are paid against royalties. Typical recoupable costs are advance payments. Depending on your ROYALTY CONTRACTS also other costs such as video production costs or marketing expenses can be recoupable costs, mostly with a specific share e.g. 50% of costs are recoupable against royalties.

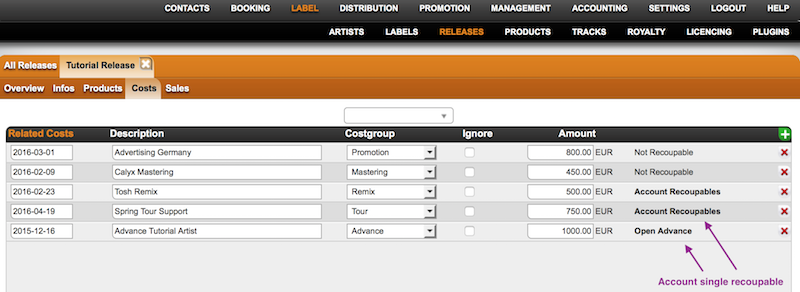
Your costs added in details are NOT automatically recoupable costs. Only once the relevant contract has a recoupable rate, your costs can be forwarded to your artists! If costs appear as NOT RECOUPABLE, the related contract has no recoupable settings enabled.


”Excursion”
WHERE AND HOW TO ADD COSTS in ”details”
How to upload cost documentation

So, to make costs recoupable you need to add costs in ”details” , set up the recoupable settings within the relevant contract and finally account current recoupables to the ROYALTY ACCOUNT before creating the ROYALTY STATEMENT so that royalties are set off against recoupable costs.

First you need to enter costs in ”details” , depending on where they occur.

On the RELEASES‘ subtab COSTS you can add all costs that occur for the release as a whole. Typical release costs are advance payments, marketing costs, artwork design etc.
On PRODUCTS‘s subtab COSTS you can now add all costs that occur for the particular product. Typical product costs can be CD manufacturing, LP manufacturing, etc.

To set up the RECOUPABLES setting of a ROYALTY CONTRACT go to LABEL / ROYALTY and choose the account and related contract.
On the contracts subtab RECOUPABLES you can choose a RECOUPABLE TYPE from the drop down menu.

There are the following options:

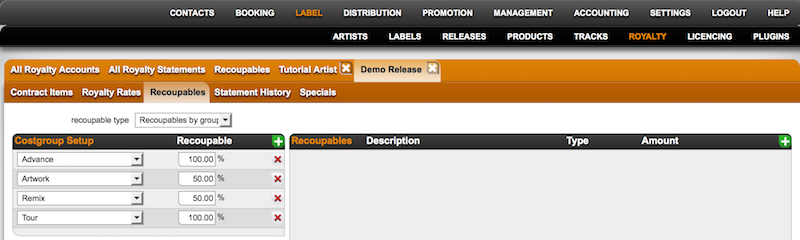
1) If advance payments and / or other particular recoupable costs are agreed on in your royalty contract, choose RECOUPABLE BY GROUPS.


Now click [+] on top right of the Costgroup Setup box and choose the cost group and the split e.g your contract includes an advance pament which is paid against royalties 100% you add the costgroup advance and give it a split of 100.
If your contract also includes a recoupable split of 50% on remix costs, just add the cost group Remix and give it a split of 50.
100% of the advance payment and 50% of the remix costs will now be paid against royalties.

It is essential that your costs have the correct COST GROUP. ”details” automatically identifies the costs by its cost group so that these will be accounted according to the above settings.

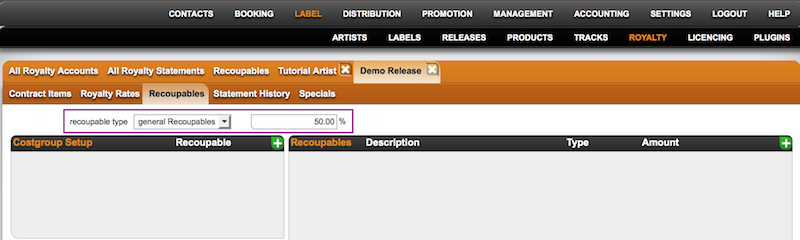
2) If all RELEASE RELATED COSTS and all PRODUCT RELATED COSTS are recoupable costs (e.g. 50/50 deal), choose GENERAL RECOUPABLES and type in the split.


Please note that advance payments have a default split of 100%. You can adjust the amount if necessary once it’s been accounted in the Recoupables Box right next to the Setup box or while you account the advance payment separately on RELEASE / COSTS.

3) If you do not have any RECOUPABLES included in your contract, choose NO RECOUPMENT.

Once you have entered the RECOUPABLES and set up / double checked the settings of the ROYALTY CONTRACT you can account them. ”details” will then automatically transfer all ACCOUNTED AMOUNTS to the related ROYALTY ACCOUNT.

There are multiple ways to account RECOUPABLES.

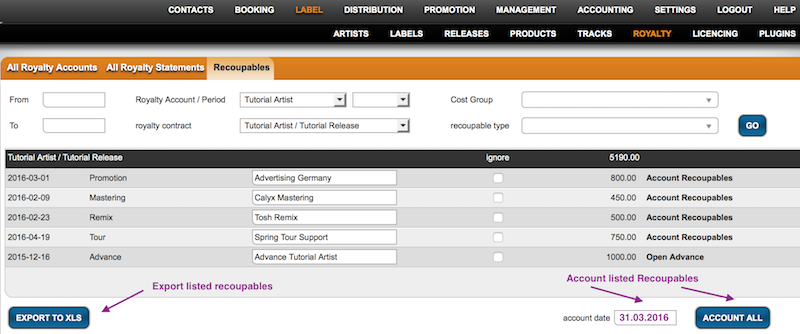
To account recoupables in a batch across all releases & products go to Royalty / Recoupables.
Select a start and end date of your current royalty period and add more filters if needed.
To account all, click the Account All Button at the bottom of the page.


To exclude single items of the compiled list, you can still tick IGNORE and these will not be accounted as recoupables.

Alternativley you can account single recoupable costs where you have previously set them up, e.g.
after you have added costs on the RELEASES subtab COSTS you can account them by clicking on the bold text ACCOUNT RECOUPABLES which will appear according to the royalty settings of the selected RELEASE. If it appears NOT RECOUPABLE instead, you will need to adjust the royalty settings.


It will be the same workflows for product related costs on the products subtab costs.

Once you have accounted the recoupables, they will be set off against royalties in your next royalty statement.
Can I change my templates on my own?

Yes, details allows you to change the HTML of your templates directly in the BOOKING / TEMPLATES section.

At this point we can only display the pure HTML here however and you will have to make any adjustments in there directly.


We have tried to include an HTML editor into this section, but unfortunately it seems that advanced HTML conditional coding is harmed when opened with an Editor.

For now you have two options:

1) let us know what changes you need in your templates at support & booking@detailsdetails.eu

2) copy the template HTML in any online HTML Editor of your choice, make adjustments and copy the adjusted HTML back into details.

We suggest you copy the new HTML in a NEW template, instead of replacing the existing, at least until tested.

thanks for your understanding!

GDPR: Technical and Organisational Measures

The documentation of data processing activities and “Technical and Organisational Measures” is a requirement under the GDPR (General Data Protection Regulation).

As many other organisations, at details we are required to maintain a record of our processing activities, covering areas such as processing purposes, data sharing and retention.

As an Application Service Provider we do this on the basis of the Shared Responsibility Model – as applied by other service providers.
For more information on this concept, please read the AWS resources about Shared Responsibility Model and The Shared Responsibility Model and GDPR.

As you might know the GDPR applies to both ‘controllers’ and ‘processors‘.

A controller determines the purposes and means of processing personal data.
In most workflows in the details application this will you, the customer, also referred to as the ‘Company’ in our Data Processing Agreement (DPA) which is an integral part of the Terms of Use / Subscription Agreement for the details which your company has agreed to.

A processor is responsible for securing the underlying infrastructure that supports the cloud and the services provided to process personal data on behalf of a controller.
In regards to most personal data processing within the details application incl. related links and Apps we would be the processor and the GDPR places specific legal obligations on us. And as you might guess – as a company trying to provide the best service possible to our clients – protecting the application infrastructure is our number one priority and we invest heavily and continuously in appropriate technical and organisational measures to make details safe and secure.

As however for most workflows you are a controller, it means you are not relieved of your obligations just because a processor like details is involved instead ”you remain responsible for any personal data you put into the cloud!
In other words it remains your responsibility what password you choose, what information you collect from business partners, artists and promoters and how you set data access restrictions for users within the settings of the details application.
So the GDPR places obligations on you, too, including your very own documentation obligations.

The GDPR applies to processing carried out by organisations operating within the EU.
It also applies to organisations outside the EU that offer goods or services to individuals in the EU.


Here is an overview of sections, we refer to as the

Technical and Organisational Measures at DETAILS

1. Confidentiality (Article 32 Paragraph 1 Point b GDPR)

Physical Access Control
No unauthorised access to Data Processing Facilities:
At details this is ensured by our hosting service AWS in section 1.2.1 Physical Access Controls of their AWS GDPR Data Processing Addendum.

Electronic Access Control
No unauthorised use of the Data Processing and Data Storage Systems:
At details this is ensured by our hosting service AWS in their Security Whitepaper. Within the Shared Responsibility Model AWS ensures that there is no unauthorised access to our Data Processing and Data Storage Systems other than our technical team.
AWS also provides full encryption of all data carriers and storage media.

Internal Access Control
No unauthorised Reading, Copying, Changes or Deletions of Data within the system:
details provides a need-based rights authorisation concept in the USER SETTINGS section of the application, accessible only by client users with administration rights and our support team. The USER SETTINGS section is secured with admin-log-in access control to avoid any unauthorised changes.
The permissions for user rights of access are however set by the client, i.e. the controller which make user access settings for individual users the responsibility of the client as well as the security of their passwords. In the light of the GDPR we want to highlight that our clients may also administer access control to contact data export options within the Module Settings of our USER SETTINGS.

In addition details provides permanent logging of system access events and user actions within the SETTINGS and the rest of the application.

Isolation Control
The isolated Processing of Data, which may be collected for differing purposes:
At details all clients are working on distinct and secured separate databases.
No client or third party will have access to our clients’ data – except on the clients prior explicit consent.
Examples for details features that involve shared data on prior and explicit consent are:
*iCal links shared by clients with artists and third parties for calendar subscriptions
*RSS feeds shared by clients with third parties for booking calendar information
*Booking OnlineApp links shared by clients with artists and third parties for Online Itineraries
*Booking Questionaires and Online Request Forms shared by clients with promoters for Online Communication
*Booking Agreements shared by clients with promoters for Online Agreement
*Transfer of sales and royalty information between details clients (“details-to-details”)
*Links to Royalty Statements shared by clients with artists and third parties for Online Reporting
*Transfer of shipping information send by clients from details to logistic companies

Note that details does process collective data of event locations across clients – such as location names, addresses, postal codes, cities and capacities, which are however not containing any personal information and therefore don’t fall under the regulations of the GDPR.

In regards to multiple client support details provides separate isolated accesses to our clients databases for our technical & support team, each secured with separate users and passwords.

Pseudonymization (Article 32 Paragraph 1 Point a GDPR; Article 25 Paragraph 1 GDPR)
The processing of personal data in such a method/way, that the data cannot be associated with a specific Data Subject without the assistance of additional Information, provided that this additional information is stored separately, and is subject to appropriate technical and organisational measures.
At details we relate data and tables with IDs, e.g.: user_ids, contact_ids, artist_ids. That way data cannot be associated with a person, unless client has granted user access to the respective contact information within the User Settings.


2. Integrity (Article 32 Paragraph 1 Point b GDPR)

Data Transfer Control
No unauthorised Reading, Copying, Changes or Deletions of Data with electronic transfer or transport:
Since 2017 all communication with the details service is encrypted with SSL (HTTPS).
For additional security we encourage the use of Virtual Private Networks (VPN) to access the details application.

Data Entry Control
Verification, whether and by whom personal data is entered into a Data Processing System, is changed or deleted:
At details all our clients’ and support team’s actions are logged permanently. To comply with the Data Entry Control requirement we specifically log data about the client and user identification, access time, authorizations, actions and IP addresses. In other words, we store metadata about which users are accessing which client database at what time, and what section of the application was worked on with which command.


3. Availability and Resilience (Article 32 Paragraph 1 Point b GDPR)

Availability Control
Prevention of accidental or wilful destruction or loss:
At details we implemented nightly snapshot backups provided by our hosting partner AWS

Uninterruptible Power Supply (UPS), virus protection, firewall, reporting procedures and contingency planning are also provided by AWS as part of the Shared Responsibility Model.

Rapid Recovery (Article 32 Paragraph 1 Point c GDPR) (Article 32 Paragraph 1 Point c GDPR);
Rapid Recovery is also provided by AWS as part of the Shared Responsibility Model.


4. Procedures for regular testing, assessment and evaluation (Article 32 Paragraph 1 Point d GDPR; Article 25 Paragraph 1 GDPR)


Data Protection Management
Incident Response Management
Data Protection by Design and Default (Article 25 Paragraph 2 GDPR)
As mentioned at the top of this article protecting the application and its infrastructure is our number one priority and we invest heavily and continuously to make details safe and secure as we go. To comply with GDPR we discuss Data Protection, Privacy and Incident Response matters with all new feature developments and continuous evaluations of existing workflows.

One example for Data Protection by design and default is how we create shared links for our Online App for Booking: First every new booking artists receives a random access key by default. Also by default we de-select all sensible personal information such as artist fees, promoter name or address.
Within this process the user, i.e. the controller selects what personal information he wants to share and selects options accordingly.

Order or Contract Control
No third party data processing as per Article 28 GDPR without corresponding instructions from the Client:
At details we have a very limited number of strictly controlled Service Providers.
While we integrate with those Service Providers, such as AWS, Google Maps, FlightStats, most of them do not process personal data and don’t fall under the regulations of the GDPR. Whenever they do, we make sure to have clear contractual data protection arrangements and follow-up checks.

The client billing at details is provided by service provider ADYEN, which is processing a full pseudonymized token with no personal information at all.

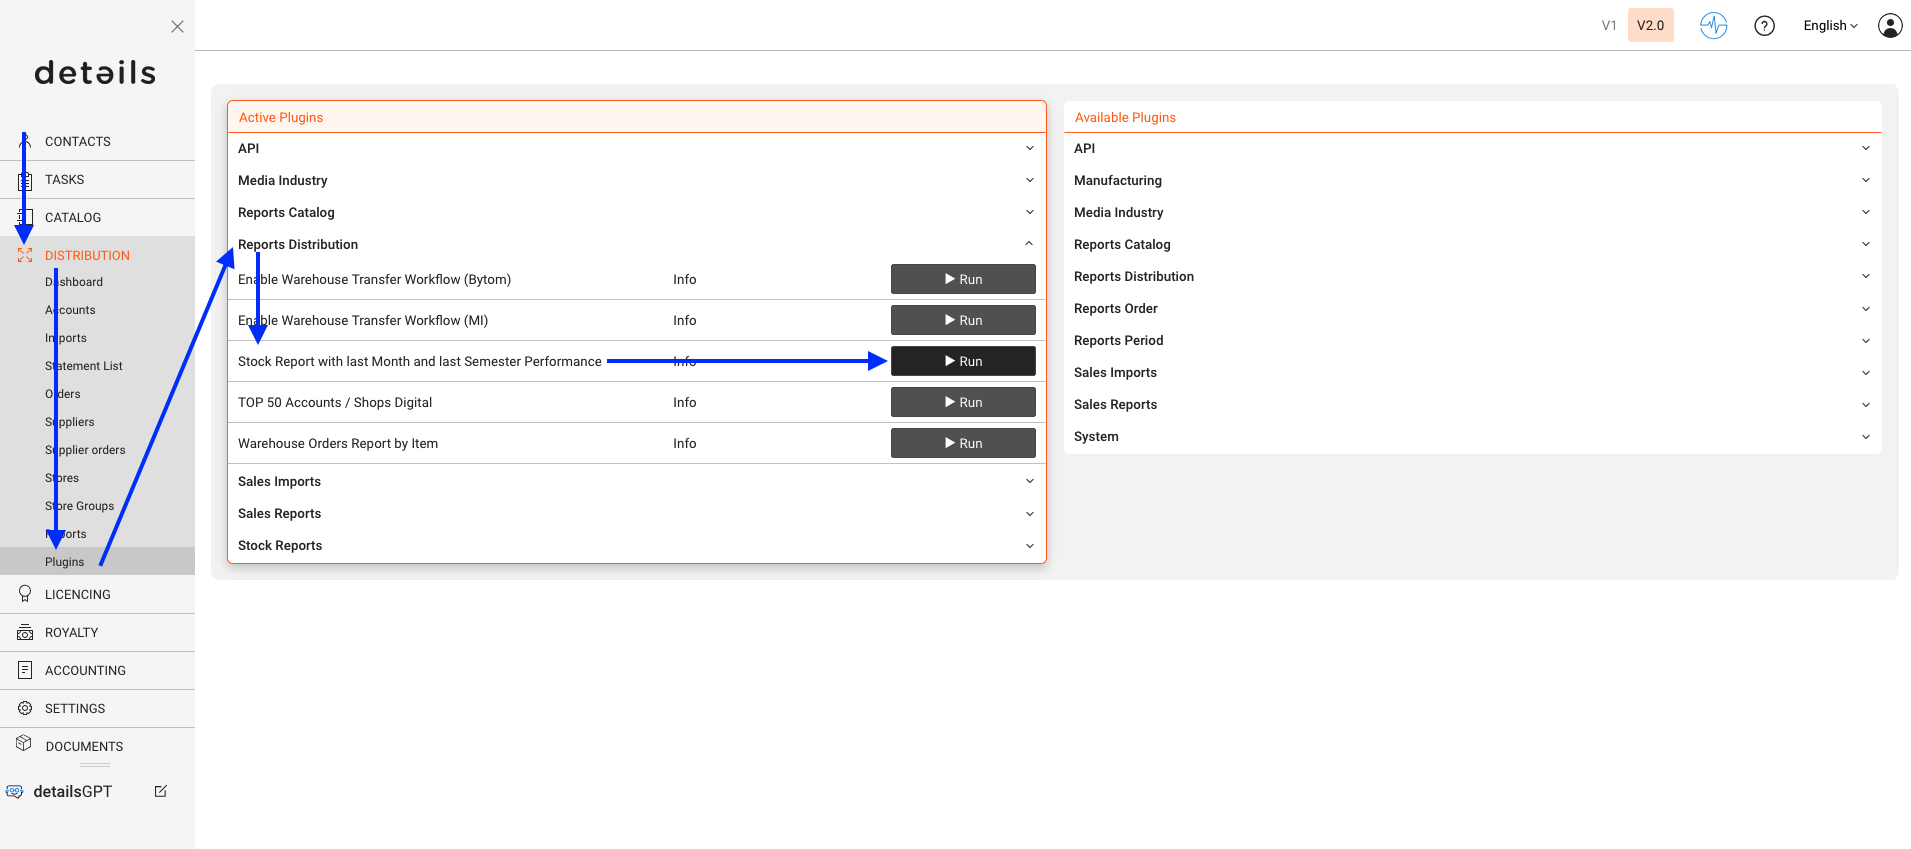
Plugin Explained: Stock Report on Sales Performance

Table of contents

The PLUGIN Report is designed to compare your stock levels with your recent sales performance. It focuses on items that have shown measurable sales activity because stock relevance mainly applies to products that are actually selling.

In other words, the report highlights when fast-selling products are running low, rather than including items that have not moved for several months.

The report displays stock levels only for items that have been sold within the past six months.

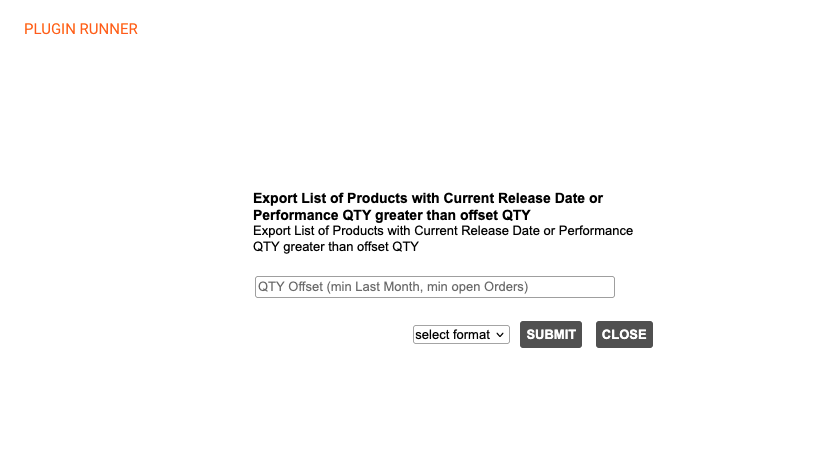
Offset Quantity

The Offset Qty defines the minimum number of sold units required for an item to appear in the report. This acts as a filter to narrow down products with relevant sales.

  • Offset Qty = 1: shows all items that sold at least 1 unit in the last 6 months.
  • Offset Qty = 5: shows all items that sold at least 5 units in the last 6 months.
  • Offset Qty = X: shows all items that sold at least X units in the last 6 months.

Note: This report helps identify which fast-moving items need to be restocked and ensures better inventory control based on real sales data.

SHARES External Users : Who has access and how is it managed?

Table of contents


SHARES is the artist dashboard section of detYils that lets you invite your royalty partners and other third parties like artist managers etc. to view royalty statements, analytics and other information, all while maintaining control over your own data and how much you want to share.

SHARES provides royalty reporting safely and securely to your business partners. Royalty statements, however, are sensitive financial information that should not be shared lightly.


For this reason, we place complete control over who sees what information and when in the hands of our clients, who can create and manage the authorised individuals as so-called “external users” in detYils and, of course, remove them at any time.

You may allow your artists, producers, labels or any other third party (band members, manager, etc) to access data of one or multiple royalty accounts.


Legal Disclaimer
: No different from the regular submission of royalty statements, we hand control to our clients along with the responsibility over who is given access to which royalty statements and when.
We recommend to inform all employees of the royalty department who come into contact with confidential financial information/data about the sensitivity of this data. While
detYils takes responsibility for the overall security architecture of the platform, we cannot be held responsible for the disclosure of information to third parties by our clients’ employees.


External Users

To give access to SHARES, you need to create External Users.
External Users are free of charge.
External Users have access to SHARES only, but not to the detYils application.

There are two ways to create External Users:


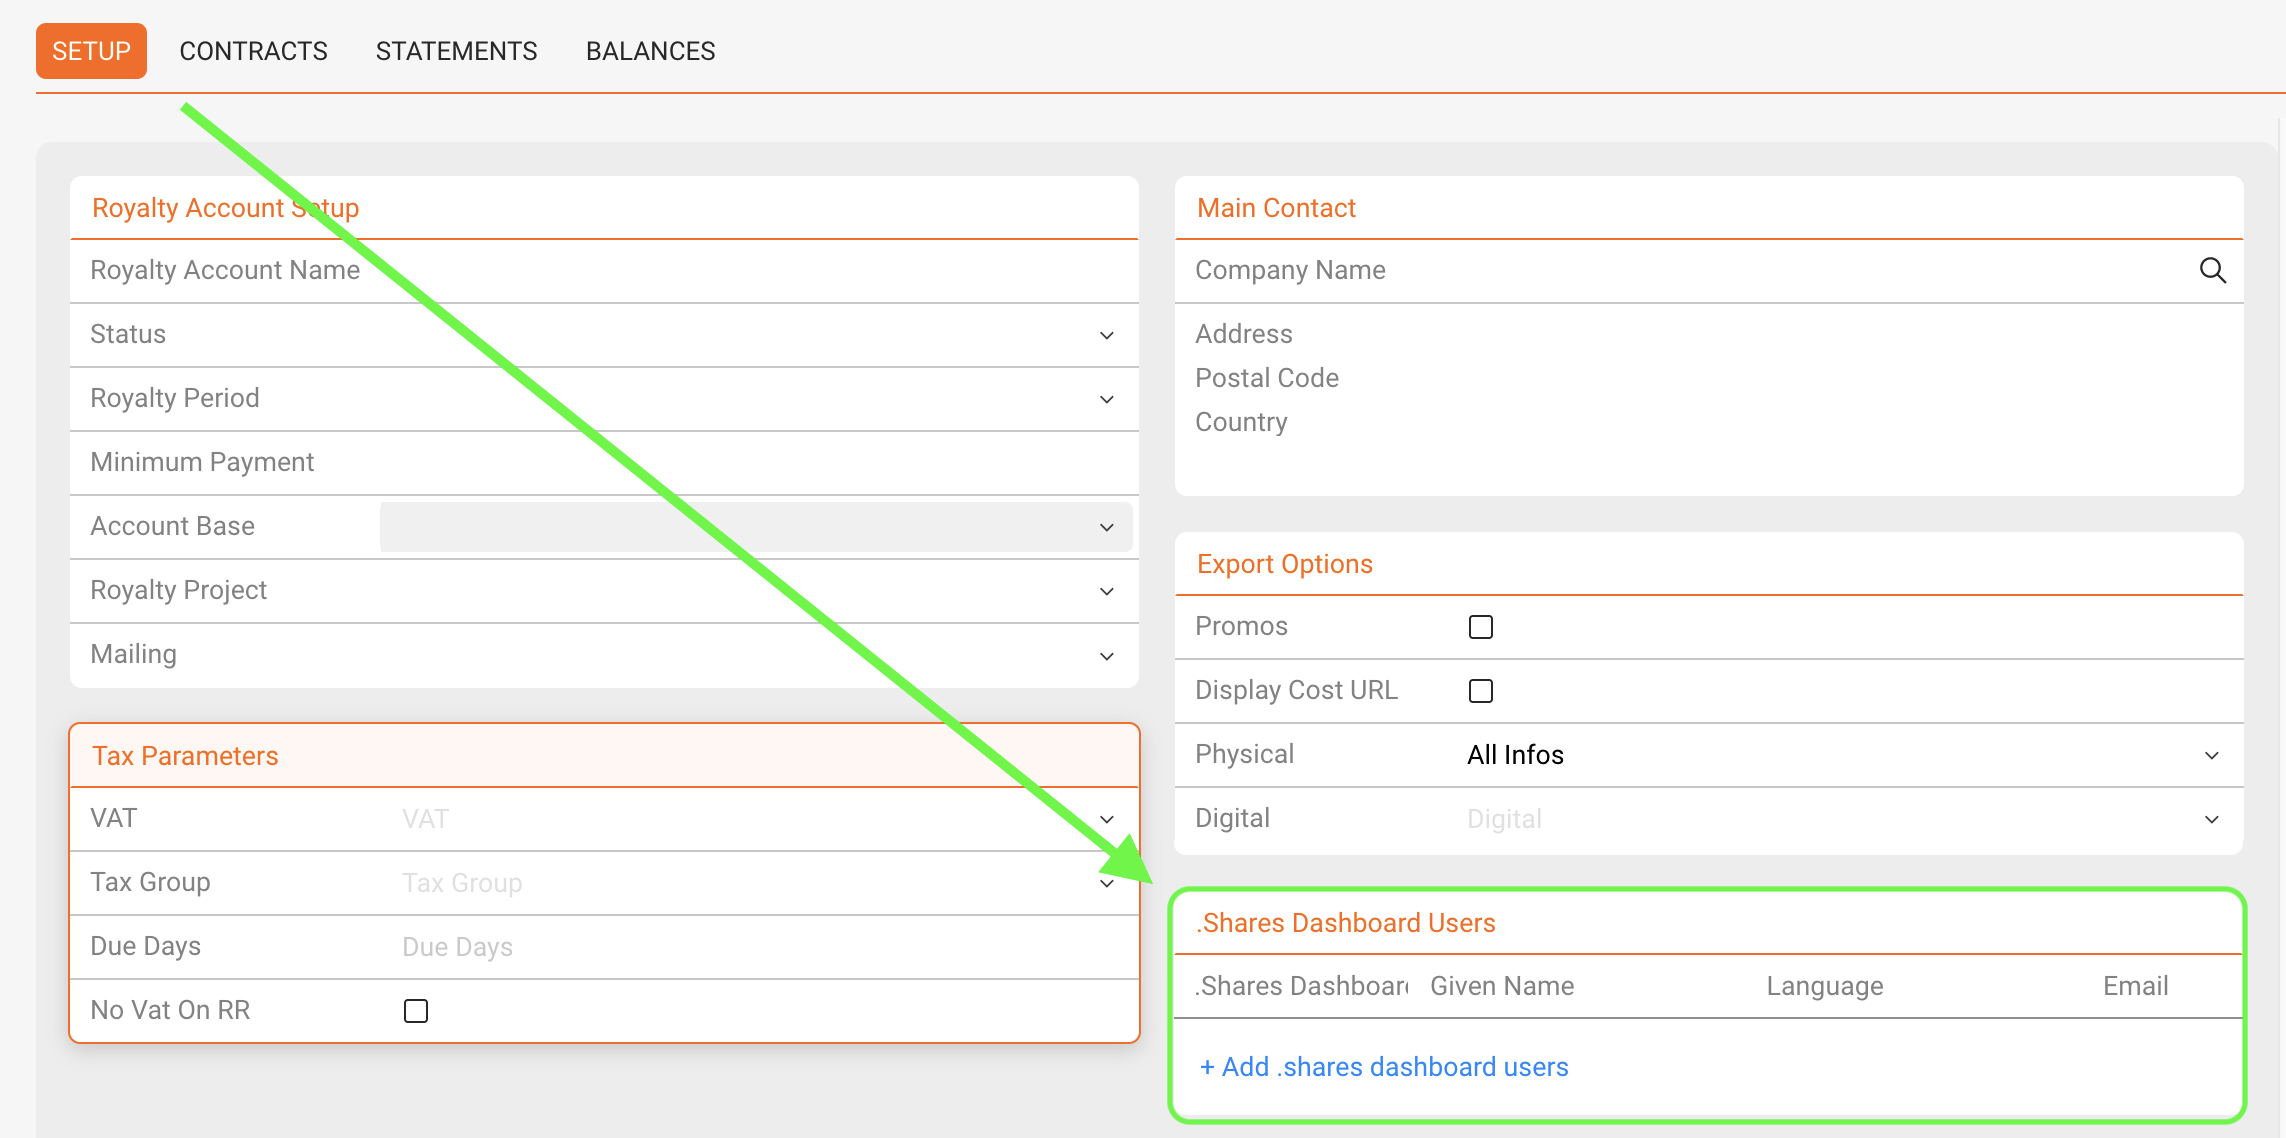
1) On the Setup subtab of Royalty Accounts in LABEL / ROYALTY you can find a B2B ACCESS box.
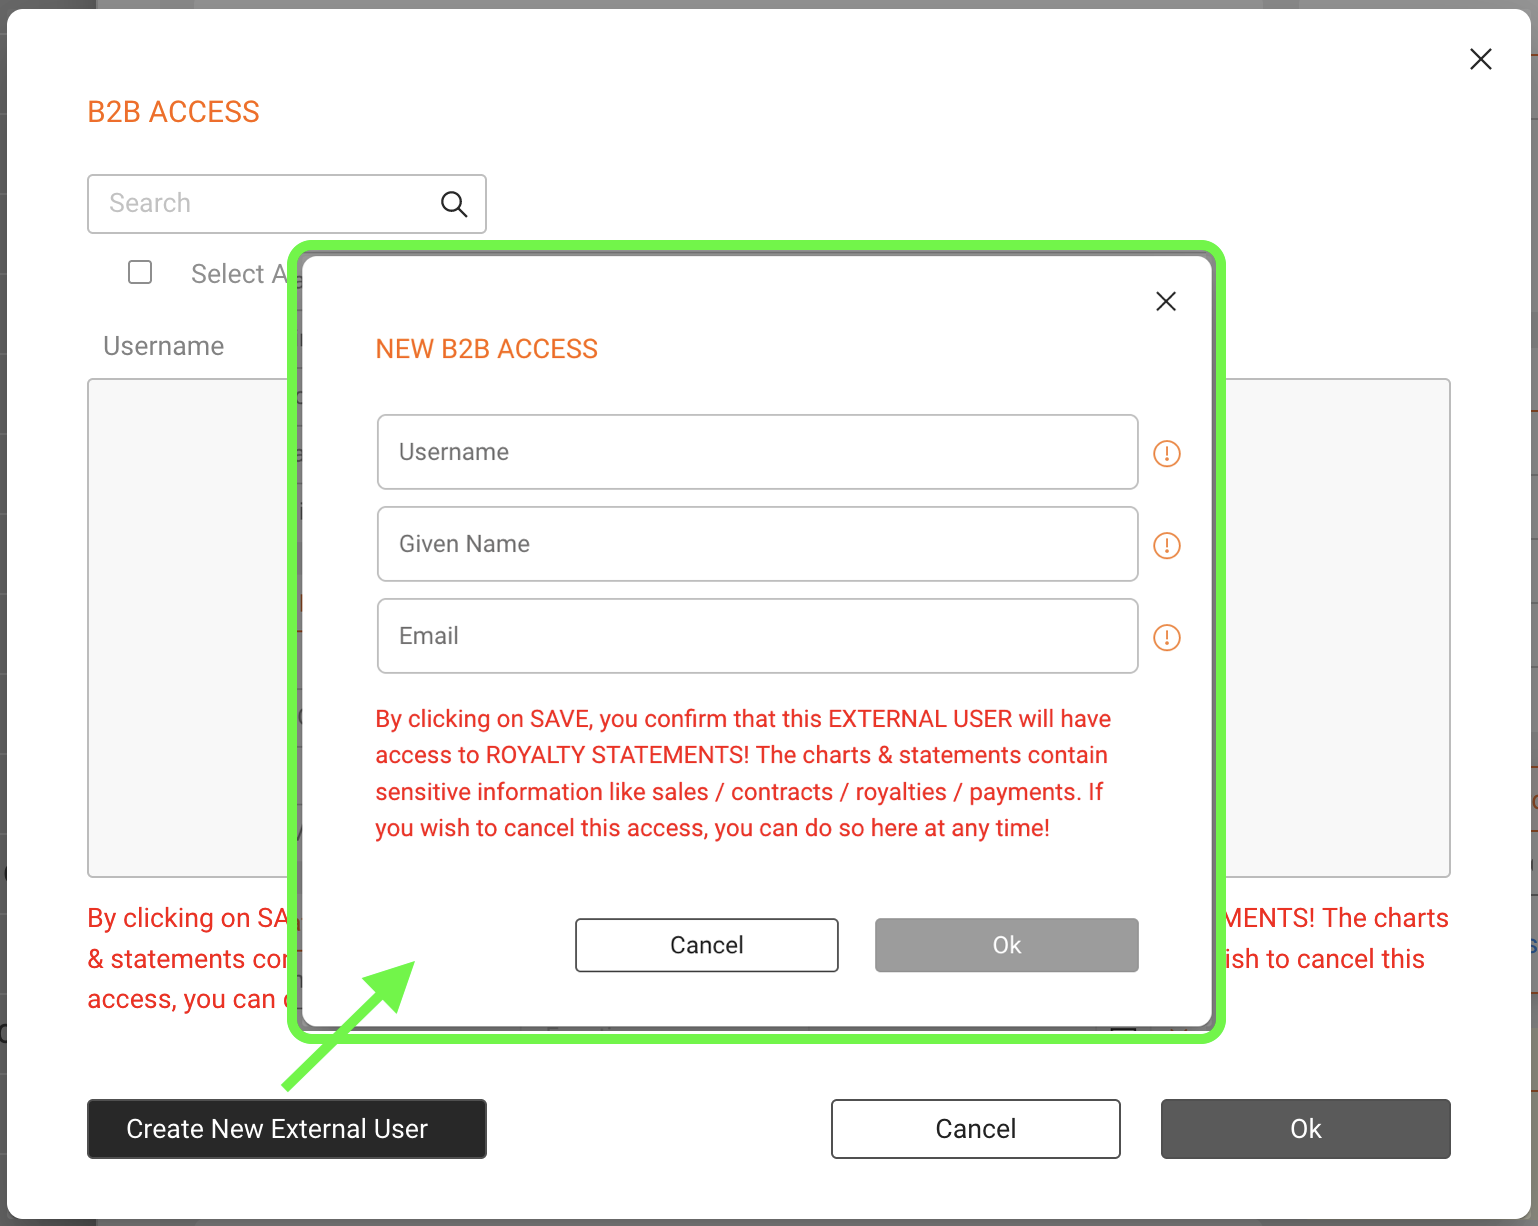
Click on the green [plus] icon and search either
I) for an external user that is either already existing and add the contact by clicking on the name or
II) create a new external user by clicking on the button on the bottom left and fill its

  • username (mandatory for their login),
  • given name (for a personal address in emails),
  • email address(mandatory) and
  • the preferred language for the user display (de, fr, en, it, es, pt)


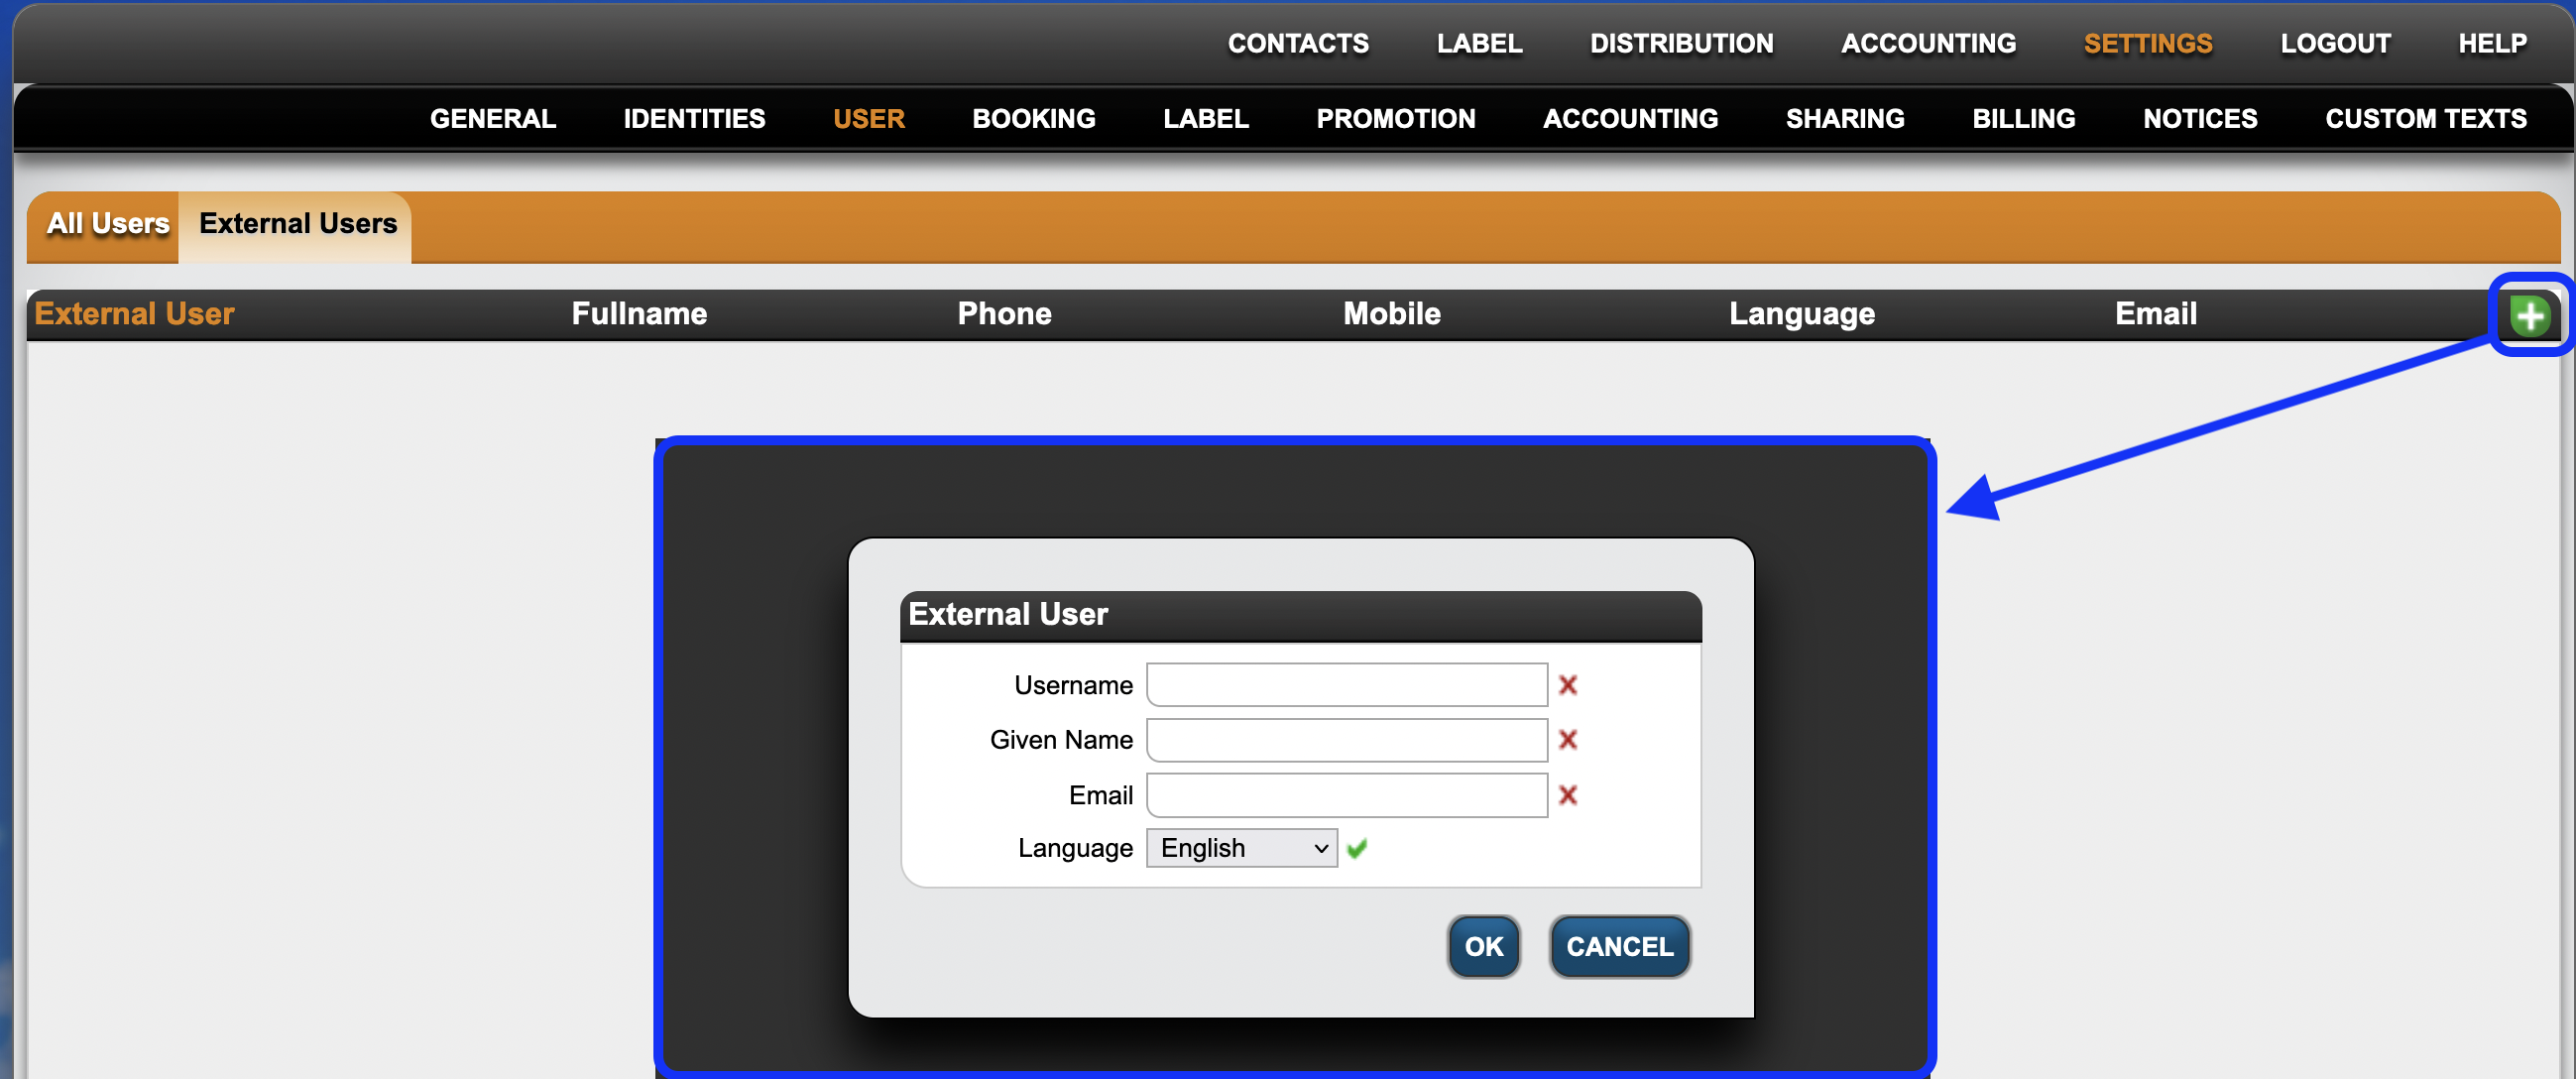
2) If you have admin rights and want to create, edit or remove multiple external users, you may also go to the SETTINGS / USER tab and the External Users subtab.

To create a new external user, click on the green [plus] to add username, given name, email address and preferred language for every login that you would like to add.


When creating external users from SETTINGS you will also need to select which royalty accounts the external user should have access to (one or multiple). For this open on the external user and click on the green [plus] icon to choose the respective royalty account(s).

You can remove external users and their access permissions with the red [X] icon next to each external user / permission.


Note :
External Users
will have access to all locked statements of the related Royalty Accounts.

The charts & statements contain business information like sales / contracts / royalties / payments (later version). Giving access is a the clients responsibility.
If you wish to cancel an access, you can do so any time!


read more on detYils.SHARES :


Managing Task Templates and Template Groups

In the SETTINGS / TASKS section, you can manage task templates across various categories. These templates define reusable task structures that can be applied repeatedly to different projects, bookings, or releases. This guide will walk you through creating task templates, understanding their parameters, and organizing them into task template groups to represent entire workflows.

Task Template Categories

The TASKS section is divided into several categories, each focusing on different operational areas. These categories are:

” General Tasks
Booking Tasks
” Licence Tasks
” Release Tasks
” Product Tasks
” Contract Tasks

Each category allows you to define task templates specific to that operational area, providing a consistent and organized approach to task setup.

Managing Task Templates

Single Task Templates

Single task templates define individual tasks that can later be applied to real-world situations such as a specific booking, release, or licence. These templates include default settings like deadlines, responsibilities, and optional metadata.

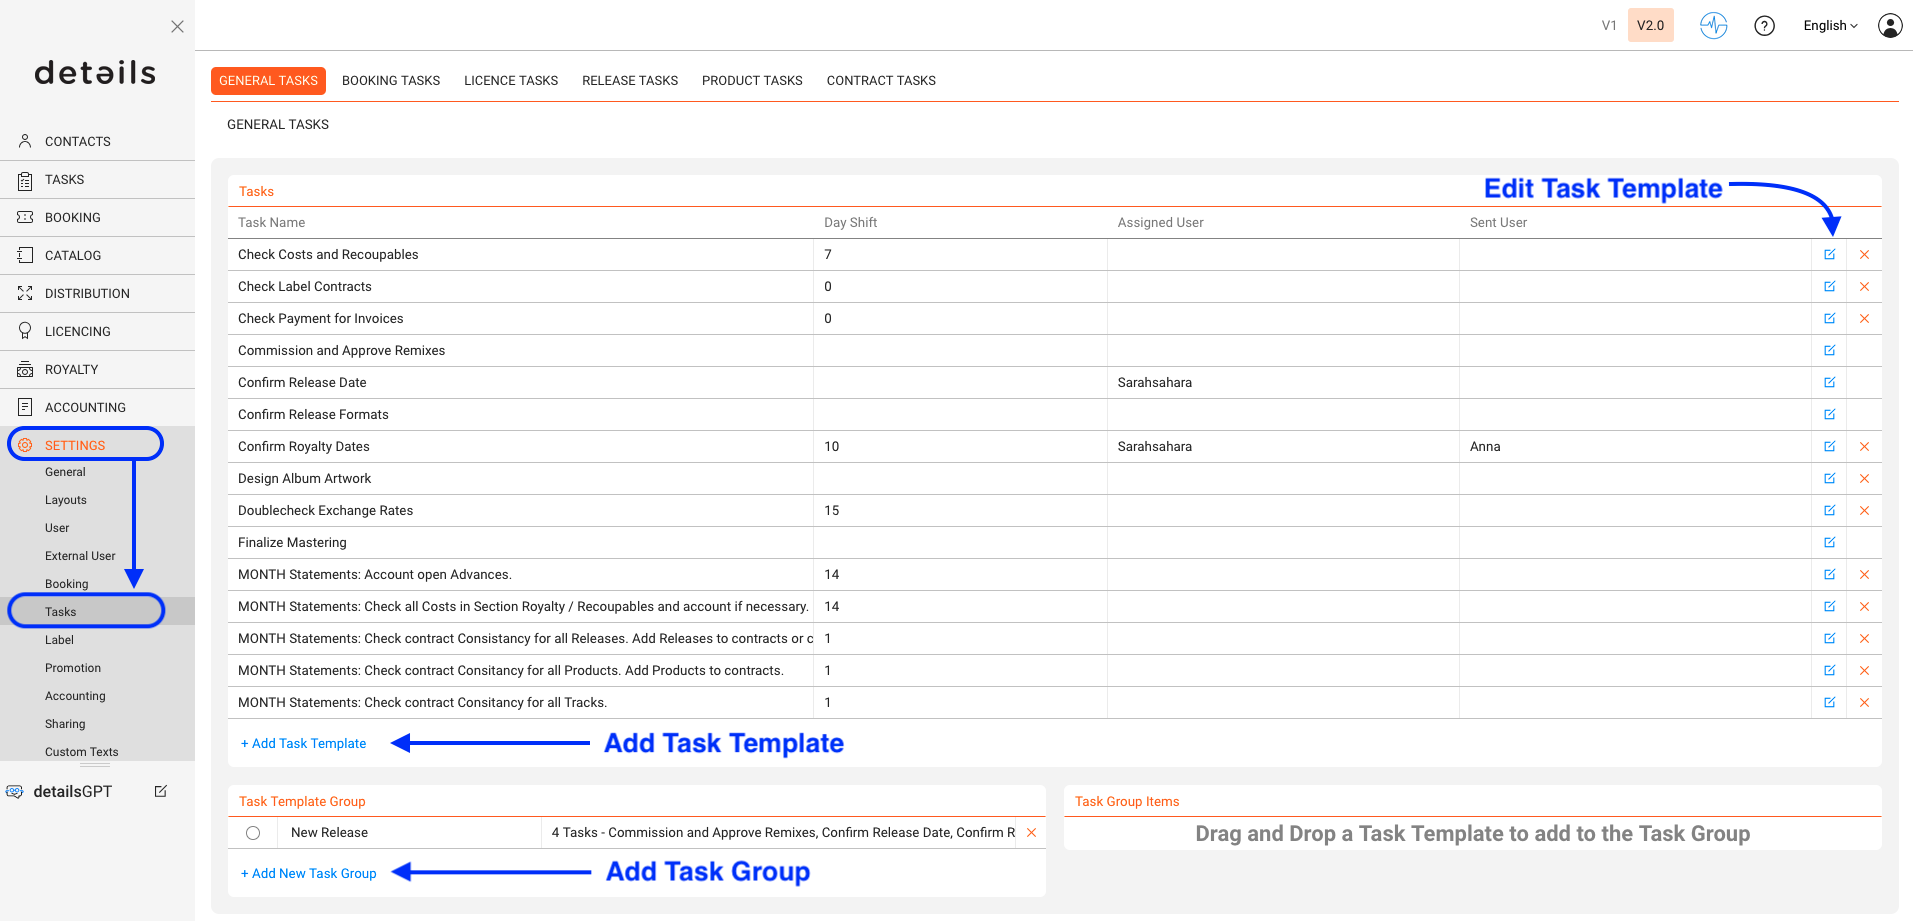
► Access the TASKS section

  1. Navigate to SETTINGS in the left-hand menu.
  2. Click on TASKS under SETTINGS.
  3. Select the tab of the relevant task template category (e.g. GENERAL TASKS, BOOKING TASKS).

► Create a new task template

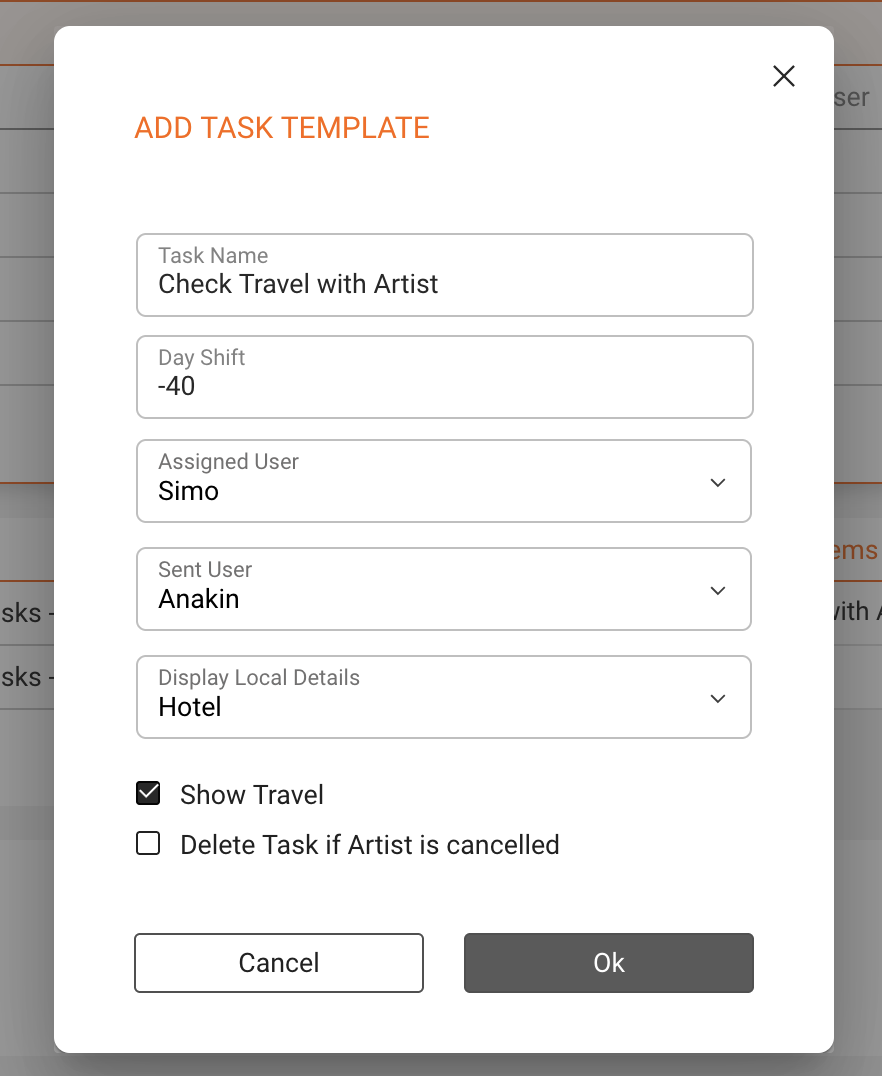
    1. Click on [+] Add Task Template.
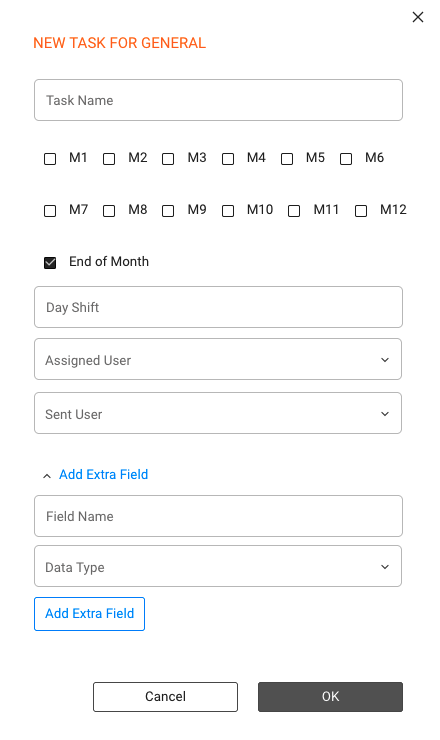
    2. Fill in the required fields:
      • Task Name: Enter a name that clearly describes the task.
      • Timeframe Selection: If applicable, select the relevant months or periods for this task (as shown by the month checkboxes).
      • End of Month: If this task is due at the end of the month, ensure the “End of Month” checkbox is selected.
      • Day Shift: Define the relative deadline (e.g. -30 days before event, +5 days after).
      • Assigned User: Default user who should carry out this task.
      • Sent User: If the task is being sent from another user, select the appropriate person from the “Sent User” dropdown menu.
      • Extra Fields (Optional): If additional fields are needed, click “Add Extra Field,” enter the field name and data type.

► Additional options for BOOKING TASKS

  1. Display Local Details: Show local context for better coordination.
  2. Display Travel Information: Add logistical data like pickup or travel schedules.
  3. Delete Task if Artist is Cancelled: Automatically remove the task if no longer relevant.

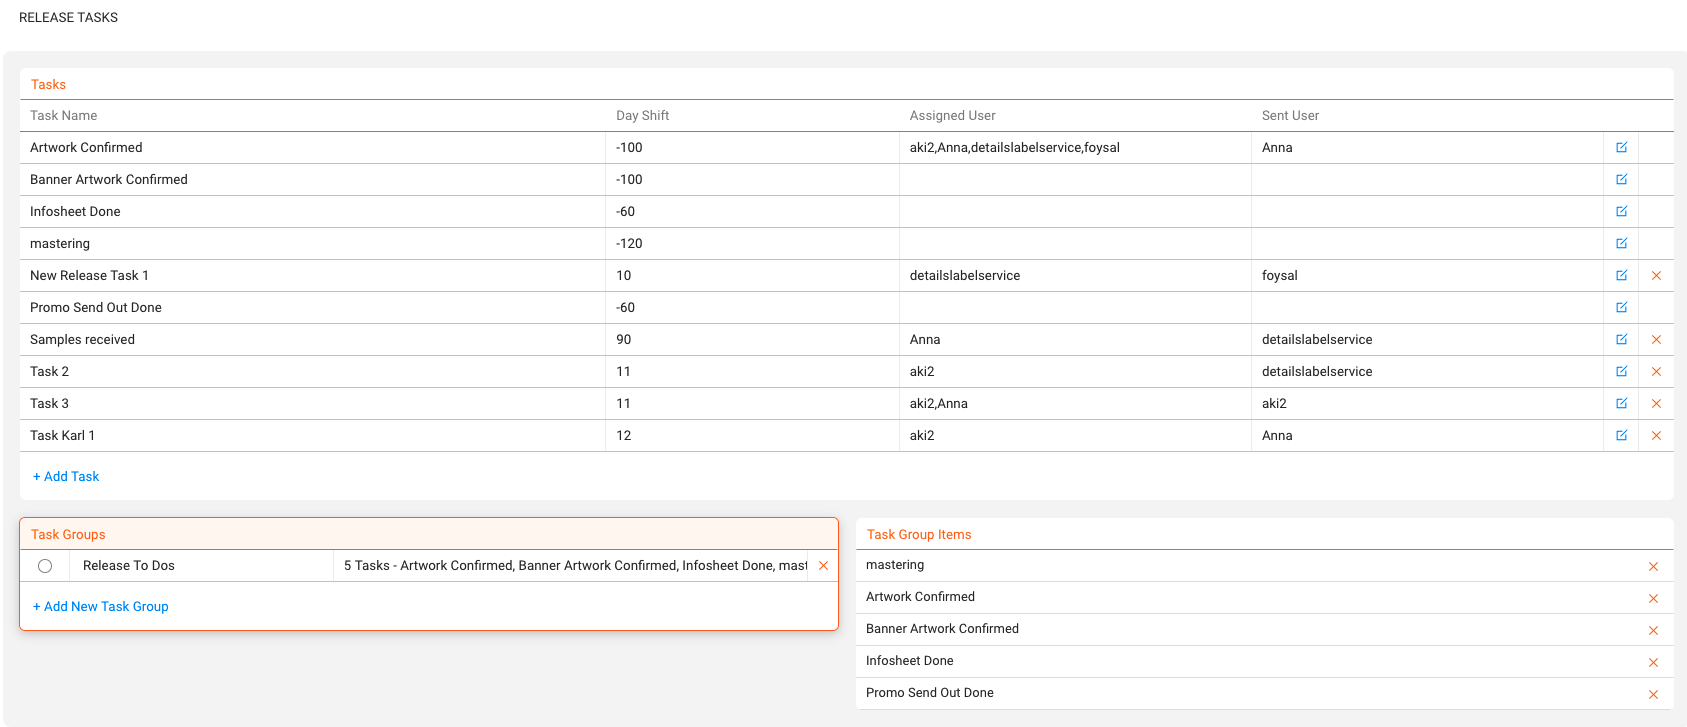
Task Template Groups

Task template groups allow you to combine multiple task templates into one structured workflow. This is especially useful for setting up standardised processes for entire projects like tours, album releases, or licensing campaigns.

► Create a Task Template Group

  1. Scroll down to the TASK TEMPLATE GROUPS section.
  2. Click on [+] Add New Task Group.
  3. Give your group a name and assign one or more existing task templates to it.

► Manage Task Template Groups

  1. Each group displays its included templates. Click to expand and review them.
  2. Use the [edit] or [x] icons to update or remove task templates from the group.

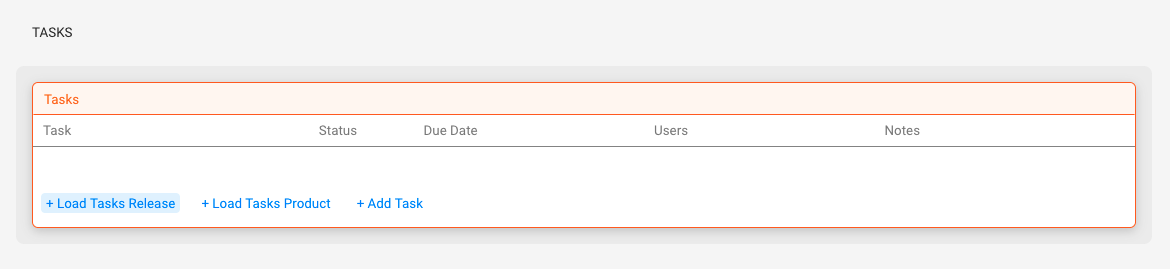
► Apply a Task Template Group, e.g. to a Release

  1. Open the relevant release in the RELEASES section.
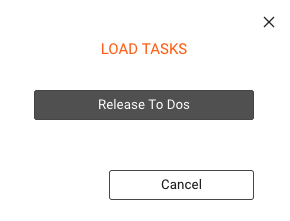
  2. Click on [+ LOAD RELEASE TASKS] at the top of the task panel.


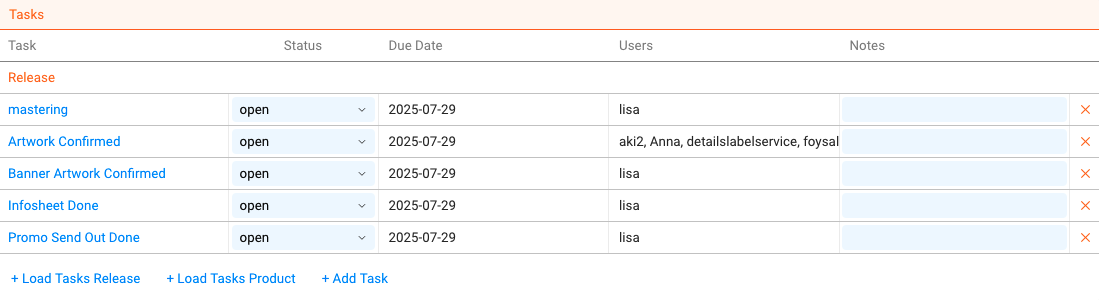
  3. In the pop-up window, select one of your saved Task Template Groups.

  4. All tasks from the selected group will be inserted into the release automatically.

  5. Tasks with predefined responsibilities will retain them. Tasks without a default assignee will be assigned to the person performing the insertion.