SHARES External Users : Who has access and how is it managed?


SHARES is the artist dashboard section of details that lets you invite your royalty partners and other third parties like artist managers etc. to view royalty statements, analytics and other information, all while maintaining control over your own data and how much you want to share.

SHARES provides royalty reporting safely and securely to your business partners. Royalty statements, however, are sensitive financial information that should not be shared lightly.


For this reason, we place complete control over who sees what information and when in the hands of our clients, who can create and manage the authorised individuals as so-called “external users” in details and, of course, remove them at any time.

You may allow your artists, producers, labels or any other third party (band members, manager, etc) to access data of one or multiple royalty accounts.


Legal Disclaimer
: No different from the regular submission of royalty statements, we hand control to our clients along with the responsibility over who is given access to which royalty statements and when.
We recommend to inform all employees of the royalty department who come into contact with confidential financial information/data about the sensitivity of this data. While
details takes responsibility for the overall security architecture of the platform, we cannot be held responsible for the disclosure of information to third parties by our clients’ employees.


External Users

To give access to SHARES, you need to create External Users.
External Users are free of charge.
External Users have access to SHARES only, but not to the detYils application.

There are two ways to create External Users:


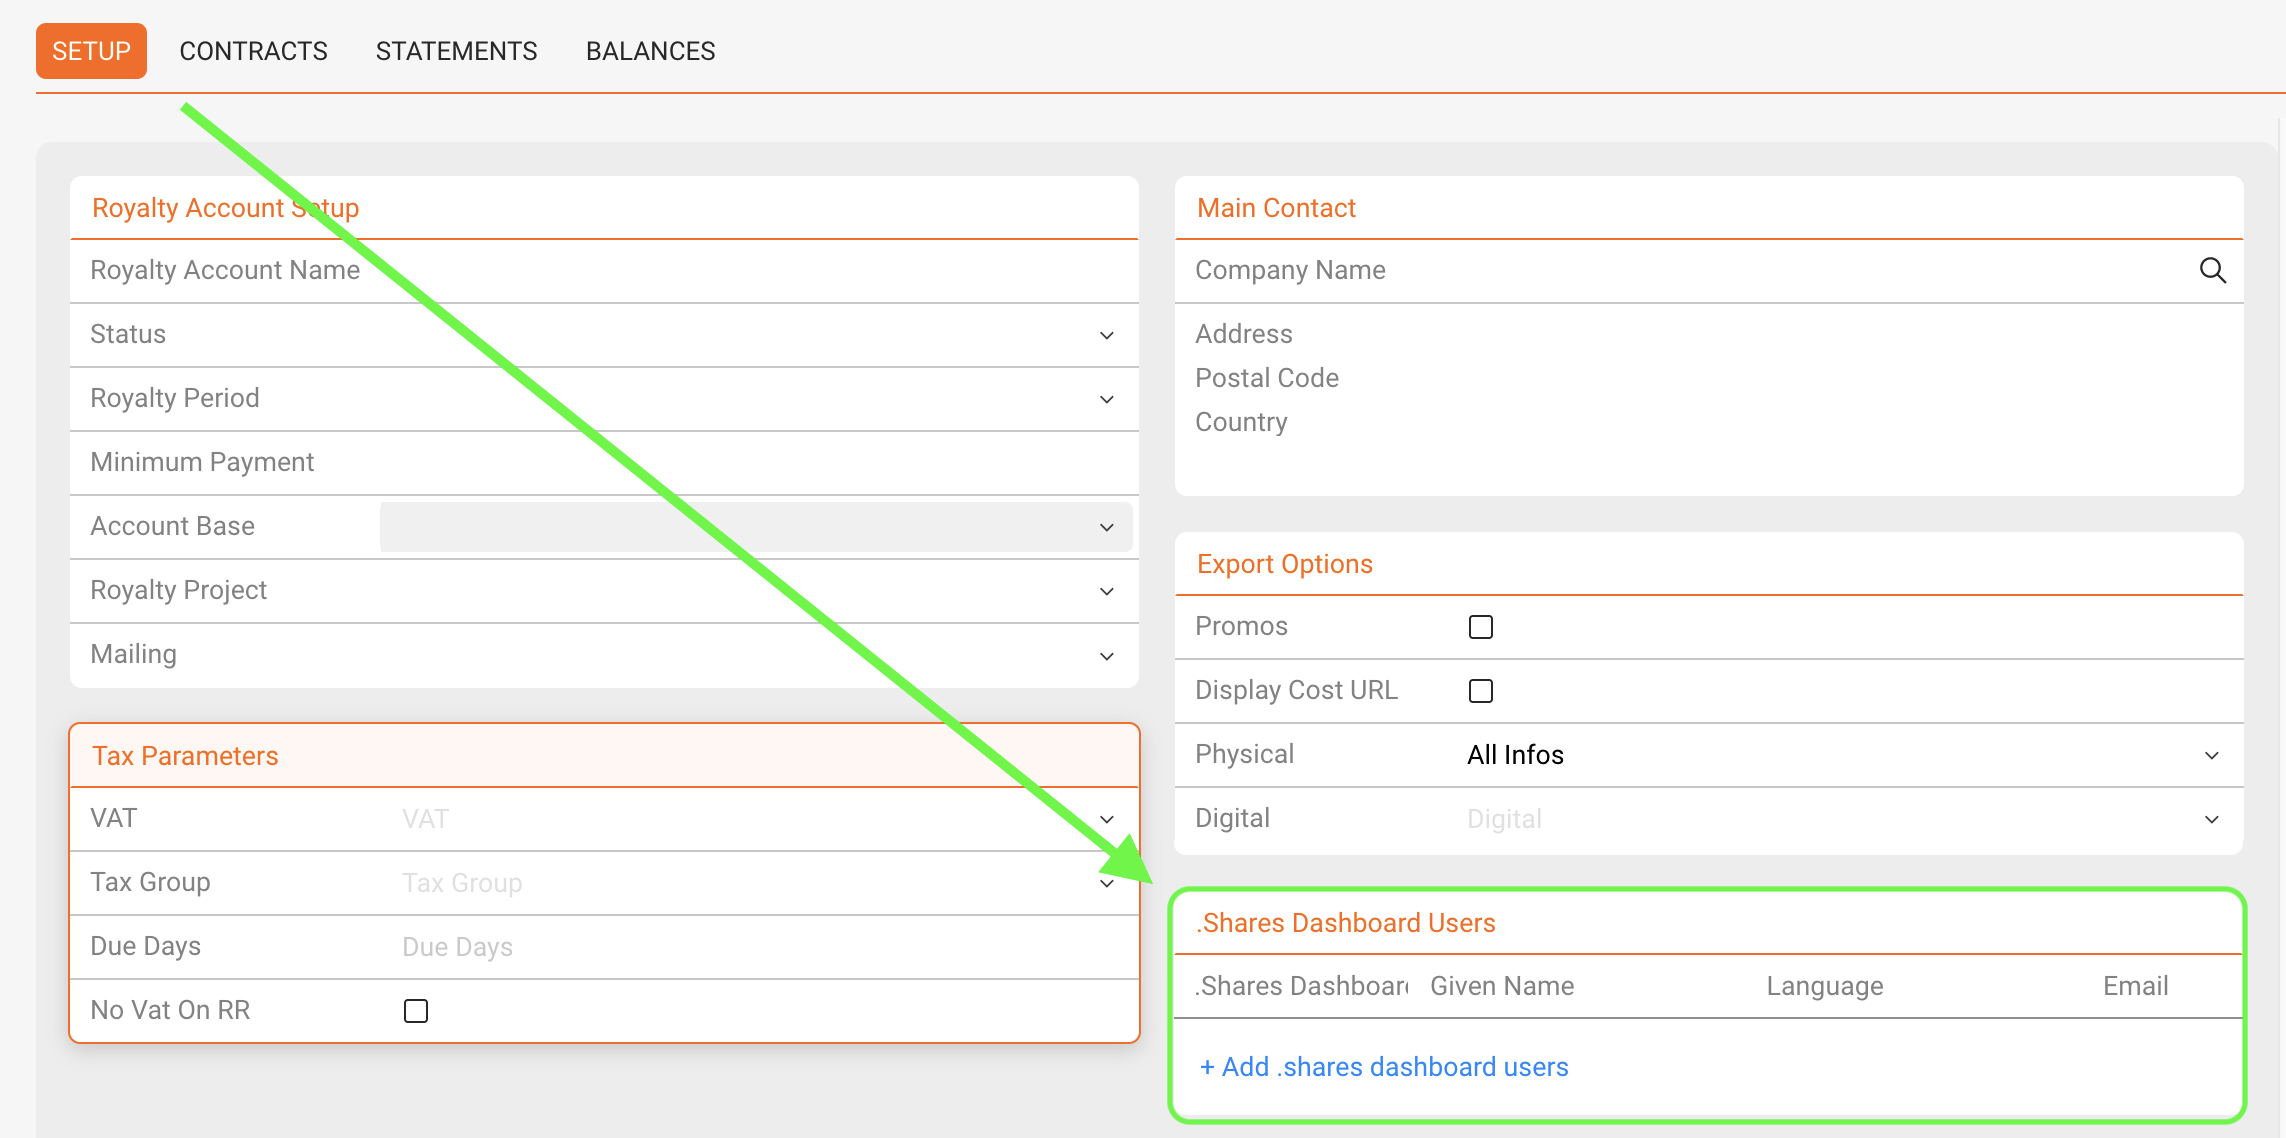
1) On the Setup subtab of Royalty Accounts in LABEL / ROYALTY you can find a B2B ACCESS box.
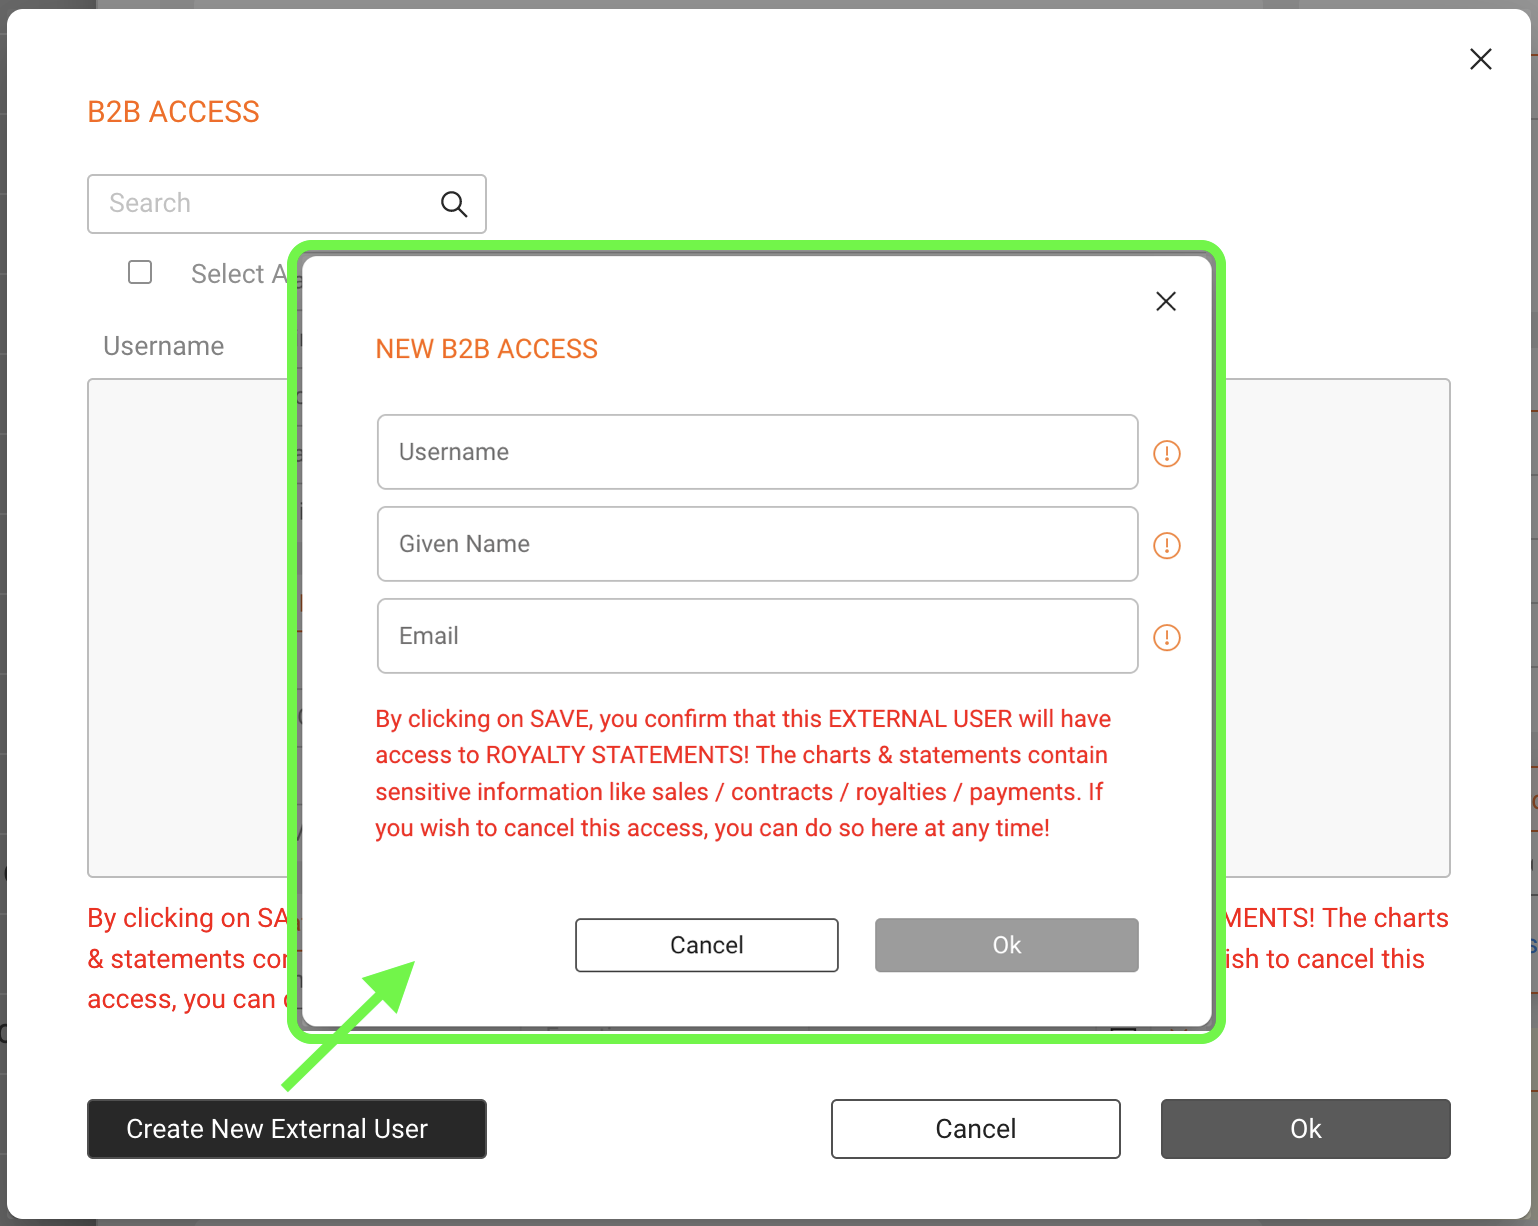
Click on the green [plus] icon and search either
I) for an external user that is either already existing and add the contact by clicking on the name or
II) create a new external user by clicking on the button on the bottom left and fill its

  • username (mandatory for their login),
  • given name (for a personal address in emails),
  • email address(mandatory) and
  • the preferred language for the user display (de, fr, en, it, es, pt)
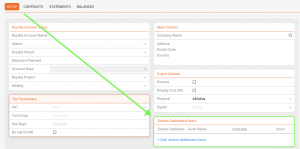
 

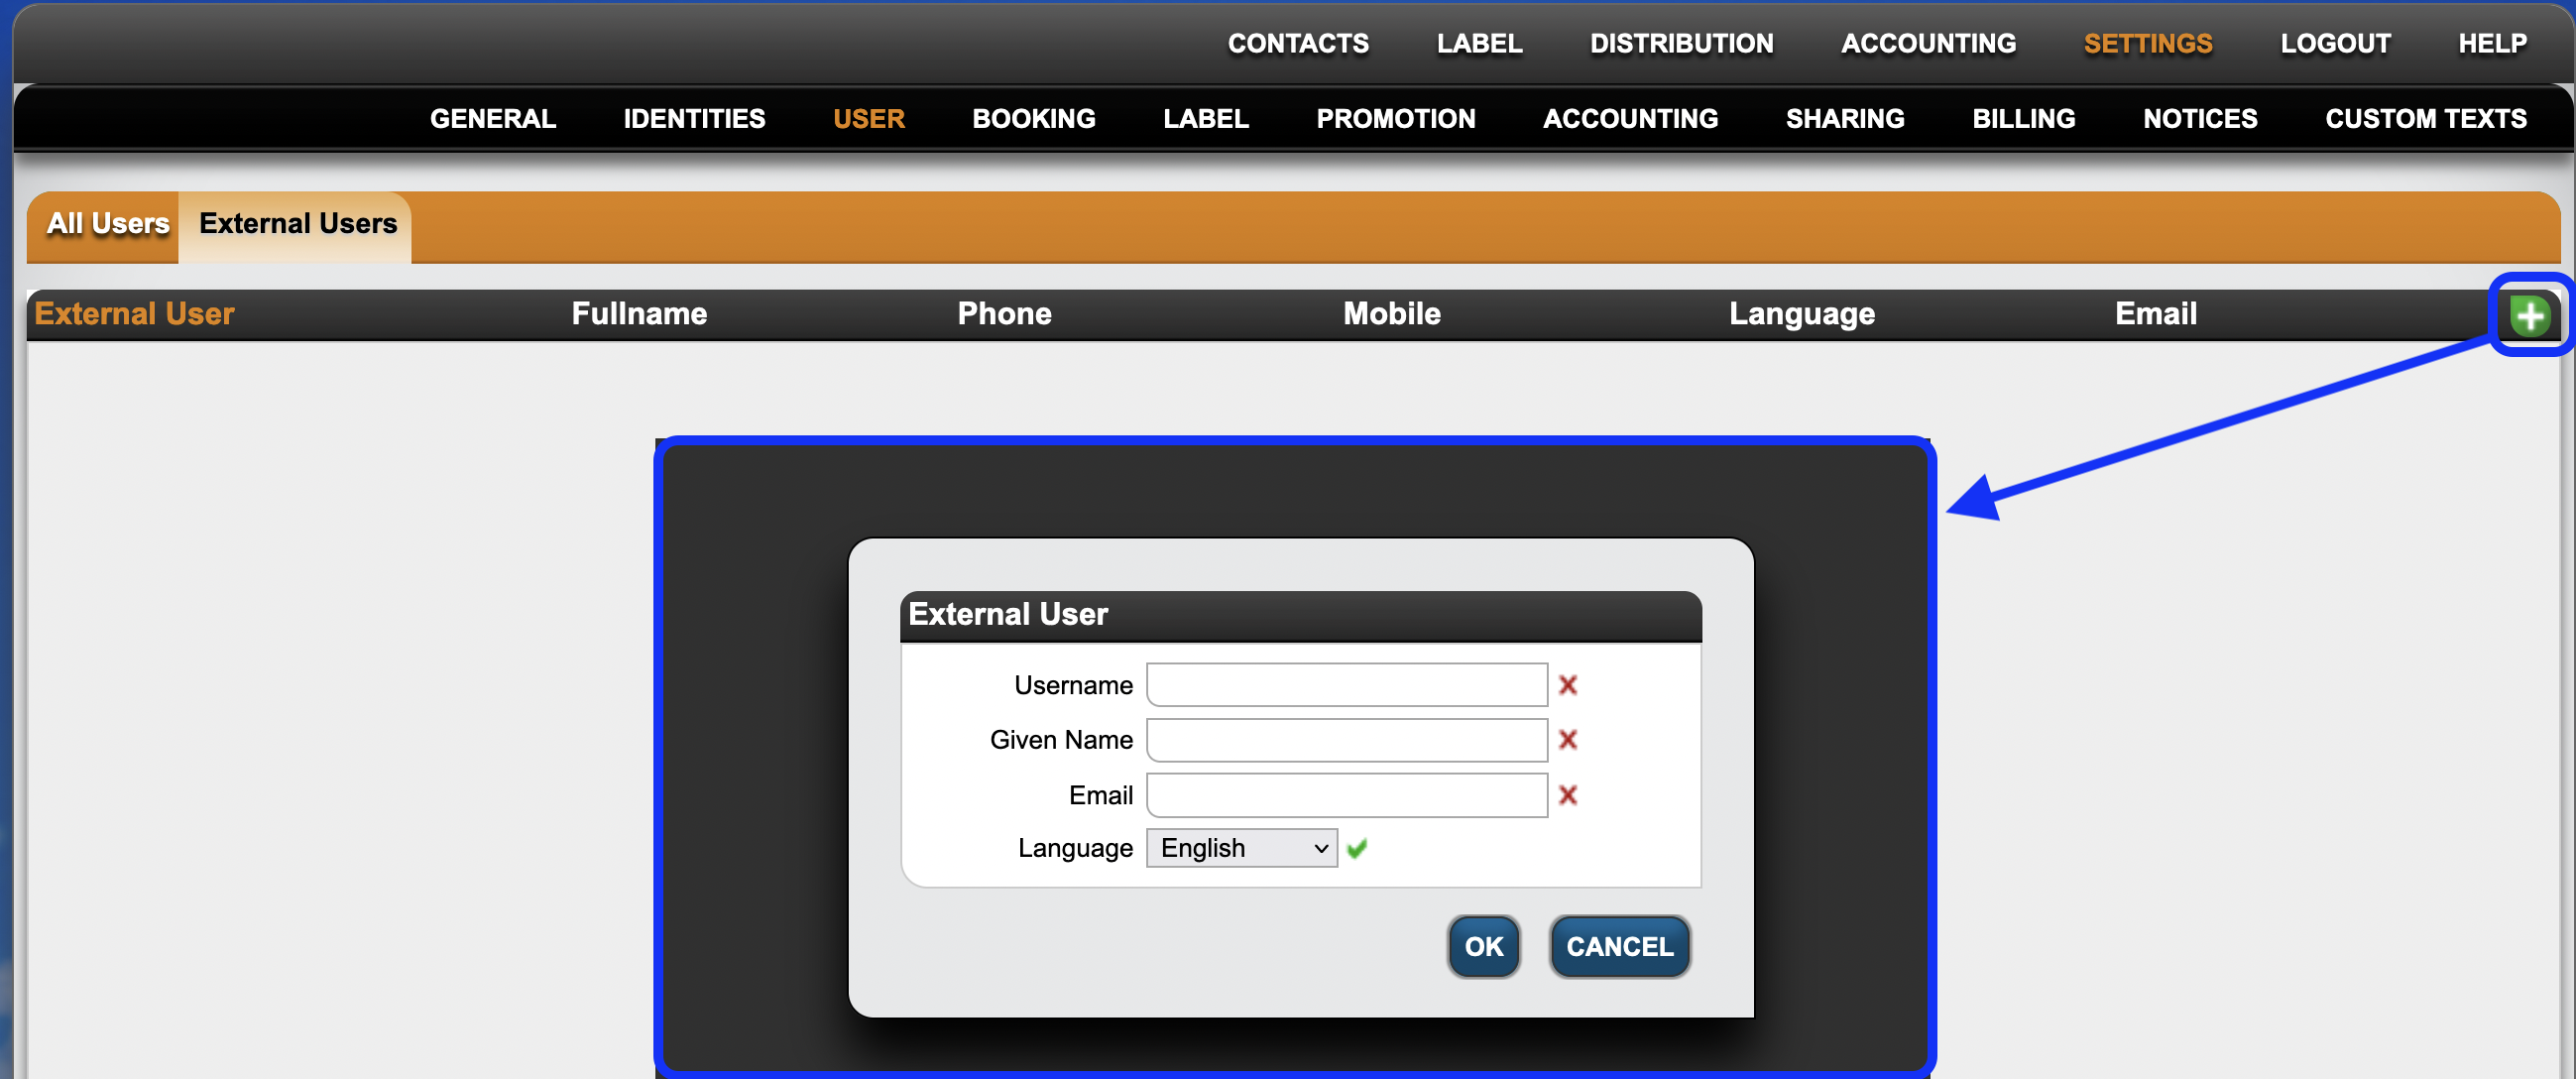
2) If you have admin rights and want to create, edit or remove multiple external users, you may also go to the SETTINGS / USER tab and the External Users subtab.

To create a new external user, click on the green [plus] to add username, given name, email address and preferred language for every login that you would like to add.


When creating external users from SETTINGS you will also need to select which royalty accounts the external user should have access to (one or multiple). For this open on the external user and click on the green [plus] icon to choose the respective royalty account(s).

You can remove external users and their access permissions with the red [X] icon next to each external user / permission.


Note :
External Users
will have access to all locked statements of the related Royalty Accounts.

The charts & statements contain business information like sales / contracts / royalties / payments (later version). Giving access is a the clients responsibility.
If you wish to cancel an access, you can do so any time!


read more on details.SHARES :


How to set up royalty statement emails for .shares


For giving a person access to the B2B section you first need to set up the person as an External User.
(see HERE how to set up external user).


When this is done go to SETTINGS – IDENTITIES and choose the invoice layout.


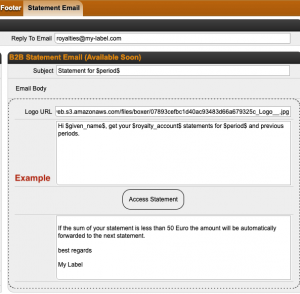
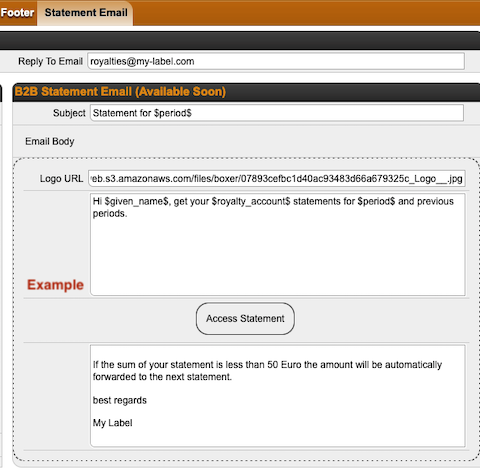
(Then go to the SHARES EMAIL tab and fill out the subject. It is possible, but not mandatory, to add a variable period to the subject field, so the respective period(s) will automatically be inserted to the email subject.
Please note that the period is the only variable that can be used in the subject.

To insert the period variable in the subject you need to add $period$(e.g. “Statement for $period$”


For the email text you can create a standard text with the variables GIVEN NAME $given_name$, ROYALTY ACCOUNT NAME $royalty_account$ and PERIOD $period$.

e.g. “Hi $given_name$,( get your $royalty_account$ statements for $period$ and previous periods.”

You also be able to add a trailing text, that will appear under the ACCESS STATEMENT Button.


(To add your logo to the email you need to follow this steps unless you have not already uploaded a logo into Details:


1) go to CONTACTS / FILES and upload your new picture, logo file etc. to FILES.(NOTE: Don’t forget to name the file in a way that you will allow you to find it again.


2) Right Click on the uploaded file and select “Copy link location”.(This will copy the link of the file into the clipboard and allows you to paste the URL to the Logo URL field. ((


Bildschirmfoto_2022-01-11_um_14.34.44.png


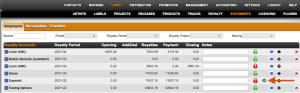
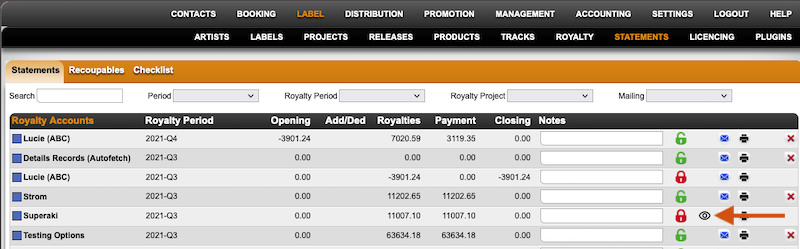
To have an overview of all Royalty Accounts that give access to external user we’ve added a new icon.
Bildschirmfoto_2022-01-11_um_13.28.45.png

In the LABEL – ROYALTY ACCOUNT – STATEMENT list and in the LABEL – STATEMENTS list overview you will find the icon beside all relevant statements.


(All statements showing this icon allow one or more external user(s) access to the royalty account. By clicking on the icon you will find all users that have access to the respective account.

Please note, that only locked statements allow access to external user and will be used for the reporting overview.

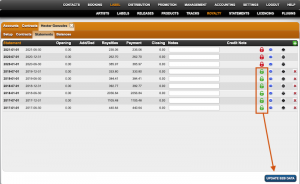
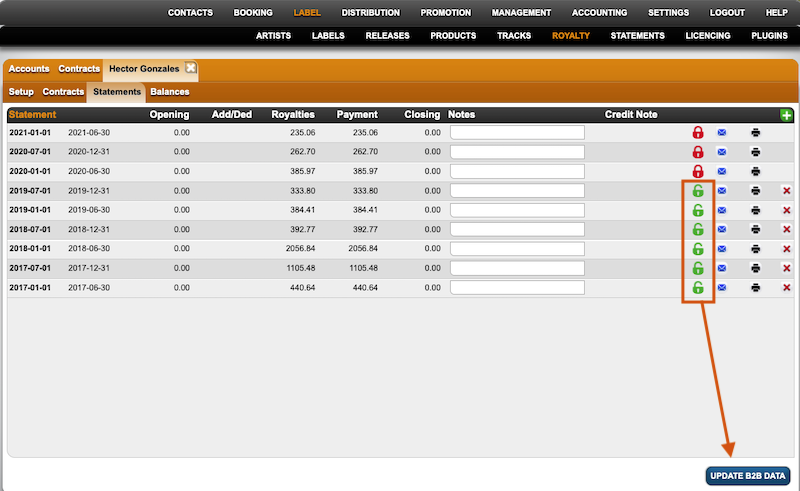
If you want to add the complete statement history (incl. unlocked statements) to the B2B data you can go to LABEL – ROYALTY – SELECTED ROYALTY ACCOUNT – STATEMENTS.
(There you find the button UPDATE B2B DATA.


By clicking this button all unlocked statements will be locked and all sales data will be included to the sales history in the B2B account.
(By sending the statement, every external user will receive a link for a landing page where to register or to log in.


How to preview the SHARES royalty dashboard for a specific Royalty Account

You may wonder what the SHARES Royalty Dashboard looks like for a specific royalty account before sending out the login credentials, just to make sure you are on the safe side.

Fortunately, DETAILS allows logged in users to preview the dashboard quickly and hassle-free.

You do not need to know the link, login, or password; you only need to have access to the royalty section and the royalty account in details.


Accessing Your Royalty Account Preview

Log into details: Only users logged into details with access to the ROYALTY section can benefit from the direct access.

Select Royalty Account: Navigate to the ROYALTY section and within the ROYALTY ACCOUNTS, select the royalty account you wish to check.

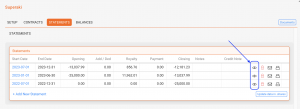
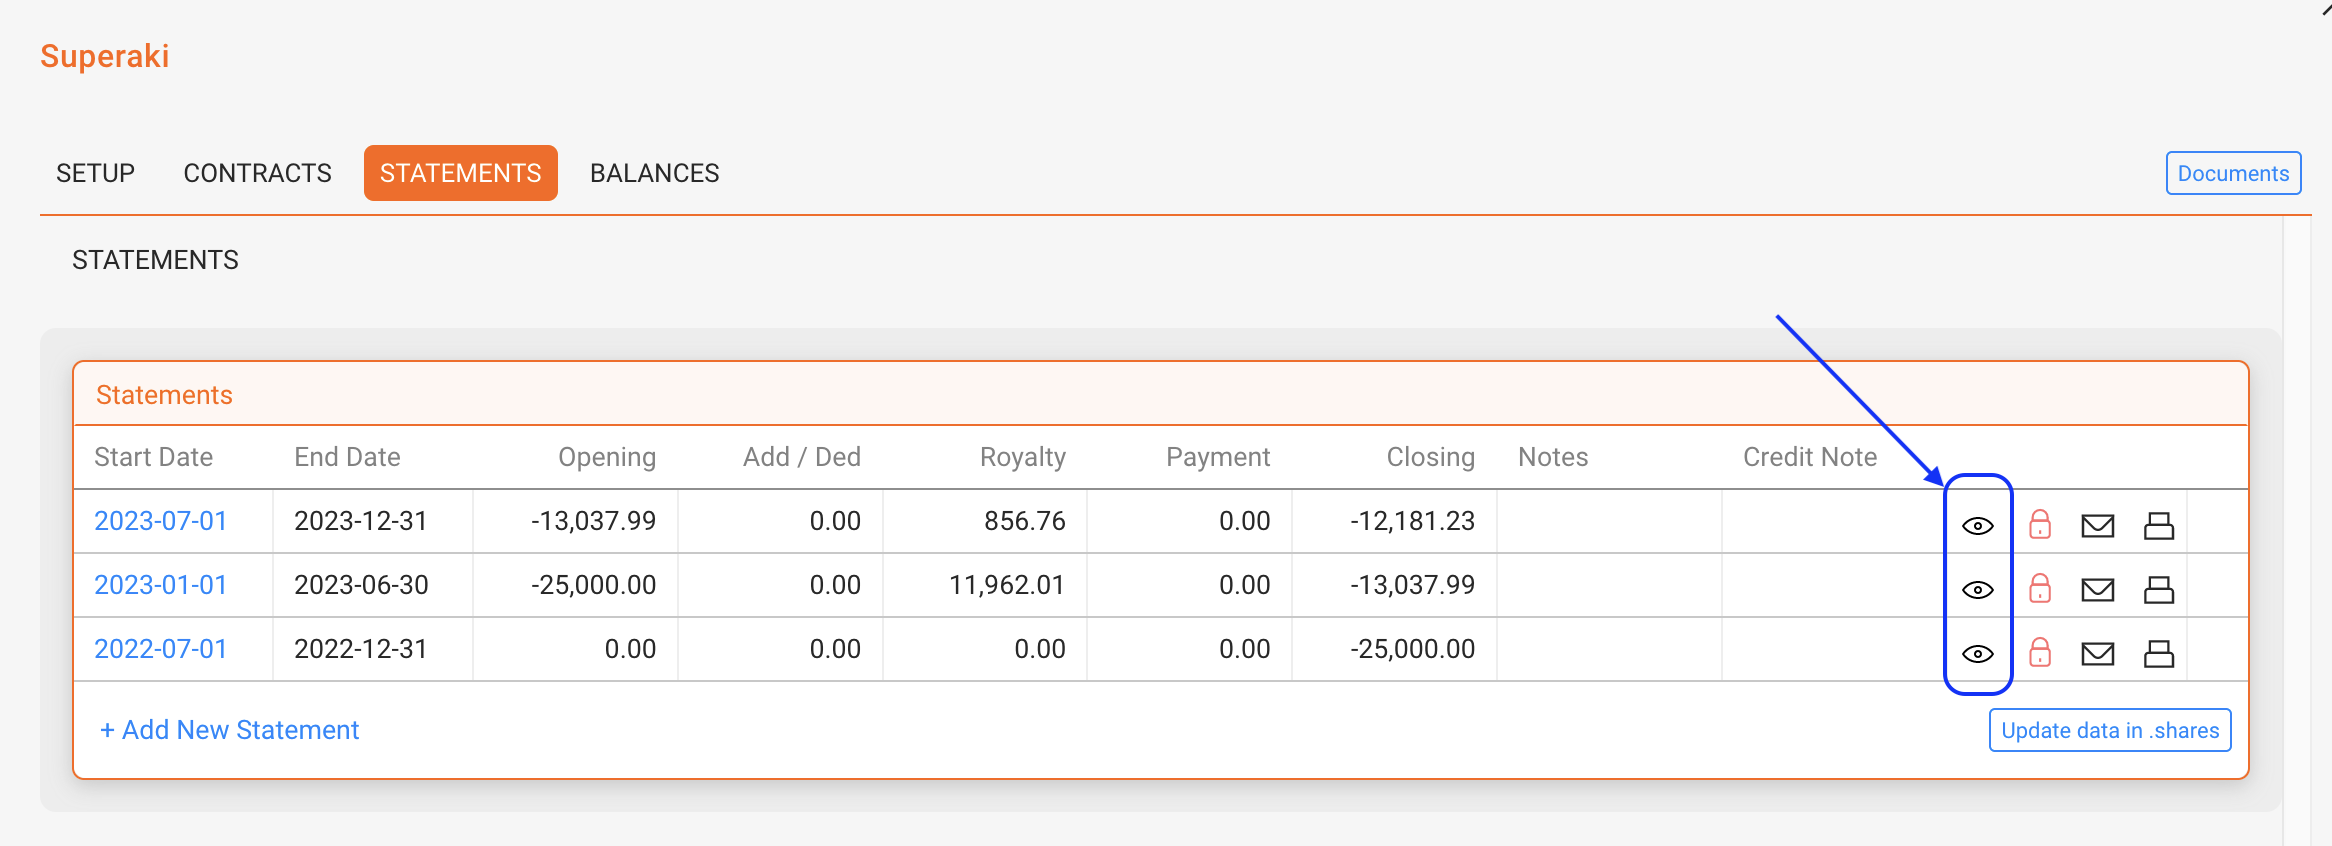
Click the [Eye] icon: In the “Statements” section of the royalty account, look for the eye icon. Click on the icon to access a selection of external users you may select from for your preview.

Preview Your Account: Upon selection, a preview window will open, displaying exactly what is being shown to the selected external user.


What You Can Expect to See

When previewing a royalty account in the SHARES royalty dashboard, you can:

  • Evaluate the data visualization and overall visual impression.
  • See the financial overview of your royalty account, including the most recent statements and a 24-month royalty graph.
  • Check the current year or previous years, including graphs on revenue generated from digital and/or physical sales, depending on your royalty account display settings.


No Password Required: Accessing an account preview does not require knowing their password if and as long as you are a logged-in details user with access to the royalty section. The preview function provides a secure way to access a SHARES account without compromising the account security.

But do not change their passwords: While previewing your account, do not change the account’s password unless requested by the account. Only alter their password if you want to provide a new password or to block access.

Managing Shares Users & Access (details User Guide)


This guide explains how to create, manage, and control access to .shares users in details.

In details, access to .shares is always managed by you as the client.

Users who access the dashboard are called External Users. These are typically artists, managers, labels, or other partners who need to view royalty statements and analytics.

External Users only have access to .shares and cannot access the main details application.

As a details user, you are responsible for:

  • Creating and managing External Users
  • Controlling which royalty accounts they can access
  • Ensuring that access is granted only to the right people

This setup gives you full control over sensitive financial data and how it is shared.

Note: External users cannot create accounts themselves. Access is always created and controlled by the details client.

► CREATE AND MANAGE SHARES USERS

You can create and manage users directly inside a royalty account.

Where to find it

Go to ROYALTY / SELECTED ROYALTY ACCOUNT and open Royalty Dashboard Users.

Create a new user

  1. Click [+ Add Shares User]
  2. Enter the name and check if the user already exists
  3. If not, add an email address
  4. Send the invitation

If the user already exists, you can directly link them to the royalty account.

You can also edit or remove users at any time from this section.

► VIEW ALL SHARES USERS

To see all users across all royalty accounts, go to:

SETTINGS / EXTERNAL USERS

Here you can:

  • View all existing users
  • See which royalty accounts they are linked to
  • Edit or remove access

► PASSWORD MANAGEMENT

Passwords are always defined by the external user.

This means:

  • You cannot see user passwords
  • You cannot set or change passwords for users

If a user forgets their password, they can reset it themselves:

  1. Click Reset Password on the login page
  2. Enter username or email
  3. Follow the link received by email

► INVITATION & INITIAL PASSWORD

The invitation is mainly used for the first access to .shares.

When sending an invitation:

  • An initial password is automatically generated
  • The user receives login details by email
  • The user is prompted to change the password immediately

Important: The initial password is sent by email and should not be used permanently.

Every time you send a new invitation:

  • The current password is overwritten
  • A new initial password is generated

Only use the invitation for the first setup or if access needs to be reset.

► TROUBLESHOOTING

User did not receive invitation

You can resend the invitation, but keep in mind that this will overwrite the current password.

Anything else

If you encounter any issue, please contact label_team@details.eu.

SHARES External Users : Who has access and how is it managed?

Table of contents


SHARES is the artist dashboard section of detYils that lets you invite your royalty partners and other third parties like artist managers etc. to view royalty statements, analytics and other information, all while maintaining control over your own data and how much you want to share.

SHARES provides royalty reporting safely and securely to your business partners. Royalty statements, however, are sensitive financial information that should not be shared lightly.


For this reason, we place complete control over who sees what information and when in the hands of our clients, who can create and manage the authorised individuals as so-called “external users” in detYils and, of course, remove them at any time.

You may allow your artists, producers, labels or any other third party (band members, manager, etc) to access data of one or multiple royalty accounts.


Legal Disclaimer
: No different from the regular submission of royalty statements, we hand control to our clients along with the responsibility over who is given access to which royalty statements and when.
We recommend to inform all employees of the royalty department who come into contact with confidential financial information/data about the sensitivity of this data. While
detYils takes responsibility for the overall security architecture of the platform, we cannot be held responsible for the disclosure of information to third parties by our clients’ employees.


External Users

To give access to SHARES, you need to create External Users.
External Users are free of charge.
External Users have access to SHARES only, but not to the detYils application.

There are two ways to create External Users:


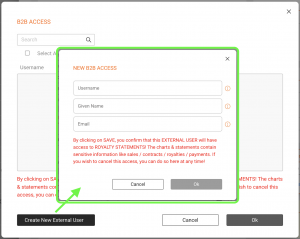
1) On the Setup subtab of Royalty Accounts in LABEL / ROYALTY you can find a B2B ACCESS box.
Click on the green [plus] icon and search either
I) for an external user that is either already existing and add the contact by clicking on the name or
II) create a new external user by clicking on the button on the bottom left and fill its

  • username (mandatory for their login),
  • given name (for a personal address in emails),
  • email address(mandatory) and
  • the preferred language for the user display (de, fr, en, it, es, pt)
 

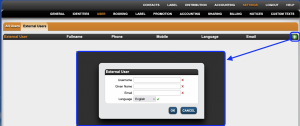
2) If you have admin rights and want to create, edit or remove multiple external users, you may also go to the SETTINGS / USER tab and the External Users subtab.

To create a new external user, click on the green [plus] to add username, given name, email address and preferred language for every login that you would like to add.
 

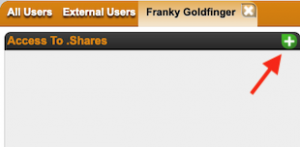
When creating external users from SETTINGS you will also need to select which royalty accounts the external user should have access to (one or multiple). For this open on the external user and click on the green [plus] icon to choose the respective royalty account(s).
You can remove external users and their access permissions with the red [X] icon next to each external user / permission.


Note :
External Users
will have access to all locked statements of the related Royalty Accounts.

The charts & statements contain business information like sales / contracts / royalties / payments (later version). Giving access is a the clients responsibility.
If you wish to cancel an access, you can do so any time!


read more on detYils.SHARES :


How to set up royalty statement emails for .shares


For giving a person access to the B2B section you first need to set up the person as an External User.
(see HERE how to set up external user).When this is done go to SETTINGS – IDENTITIES and choose the invoice layout.


(Then go to the SHARES EMAIL tab and fill out the subject. It is possible, but not mandatory, to add a variable period to the subject field, so the respective period(s) will automatically be inserted to the email subject.
Please note that the period is the only variable that can be used in the subject.

To insert the period variable in the subject you need to add $period$(e.g. “Statement for $period$”


For the email text you can create a standard text with the variables GIVEN NAME $given_name$, ROYALTY ACCOUNT NAME $royalty_account$ and PERIOD $period$.

e.g. “Hi $given_name$,( get your $royalty_account$ statements for $period$ and previous periods.”

You also be able to add a trailing text, that will appear under the ACCESS STATEMENT Button.


(To add your logo to the email you need to follow this steps unless you have not already uploaded a logo into Details:


1) go to CONTACTS / FILES and upload your new picture, logo file etc. to FILES.(NOTE: Don’t forget to name the file in a way that you will allow you to find it again.


2) Right Click on the uploaded file and select “Copy link location”.(This will copy the link of the file into the clipboard and allows you to paste the URL to the Logo URL field. ((


To have an overview of all Royalty Accounts that give access to external user we’ve added a new icon.
Bildschirmfoto_2022-01-11_um_13.28.45.png

In the LABEL – ROYALTY ACCOUNT – STATEMENT list and in the LABEL – STATEMENTS list overview you will find the icon beside all relevant statements.


(All statements showing this icon allow one or more external user(s) access to the royalty account. By clicking on the icon you will find all users that have access to the respective account.

Please note, that only locked statements allow access to external user and will be used for the reporting overview.

If you want to add the complete statement history (incl. unlocked statements) to the B2B data you can go to LABEL – ROYALTY – SELECTED ROYALTY ACCOUNT – STATEMENTS.
(There you find the button UPDATE B2B DATA.


By clicking this button all unlocked statements will be locked and all sales data will be included to the sales history in the B2B account.
(By sending the statement, every external user will receive a link for a landing page where to register or to log in.


How to preview the SHARES royalty dashboard for a specific Royalty Account

You may wonder what the SHARES Royalty Dashboard looks like for a specific royalty account before sending out the login credentials, just to make sure you are on the safe side.

Fortunately, DETAILS allows logged in users to preview the dashboard quickly and hassle-free.

You do not need to know the link, login, or password; you only need to have access to the royalty section and the royalty account in details.


Accessing Your Royalty Account Preview

Log into details: Only users logged into details with access to the ROYALTY section can benefit from the direct access.

Select Royalty Account: Navigate to the ROYALTY section and within the ROYALTY ACCOUNTS, select the royalty account you wish to check.

Click the [Eye] icon: In the “Statements” section of the royalty account, look for the eye icon. Click on the icon to access a selection of external users you may select from for your preview.

Preview Your Account: Upon selection, a preview window will open, displaying exactly what is being shown to the selected external user.


What You Can Expect to See

When previewing a royalty account in the SHARES royalty dashboard, you can:

  • Evaluate the data visualization and overall visual impression.
  • See the financial overview of your royalty account, including the most recent statements and a 24-month royalty graph.
  • Check the current year or previous years, including graphs on revenue generated from digital and/or physical sales, depending on your royalty account display settings.


No Password Required: Accessing an account preview does not require knowing their password if and as long as you are a logged-in details user with access to the royalty section. The preview function provides a secure way to access a SHARES account without compromising the account security.

But do not change their passwords: While previewing your account, do not change the account’s password unless requested by the account. Only alter their password if you want to provide a new password or to block access.

Managing Shares Users & Access (details User Guide)


This guide explains how to create, manage, and control access to .shares users in details.

In details, access to .shares is always managed by you as the client.

Users who access the dashboard are called External Users. These are typically artists, managers, labels, or other partners who need to view royalty statements and analytics.

External Users only have access to .shares and cannot access the main details application.

As a details user, you are responsible for:

  • Creating and managing External Users
  • Controlling which royalty accounts they can access
  • Ensuring that access is granted only to the right people

This setup gives you full control over sensitive financial data and how it is shared.

Note: External users cannot create accounts themselves. Access is always created and controlled by the details client.

► CREATE AND MANAGE SHARES USERS

You can create and manage users directly inside a royalty account.

Where to find it

Go to ROYALTY / SELECTED ROYALTY ACCOUNT and open Royalty Dashboard Users.

Create a new user

  1. Click [+ Add Shares User]
  2. Enter the name and check if the user already exists
  3. If not, add an email address
  4. Send the invitation

If the user already exists, you can directly link them to the royalty account.

You can also edit or remove users at any time from this section.

► VIEW ALL SHARES USERS

To see all users across all royalty accounts, go to:

SETTINGS / EXTERNAL USERS

Here you can:

  • View all existing users
  • See which royalty accounts they are linked to
  • Edit or remove access

► PASSWORD MANAGEMENT

Passwords are always defined by the external user.

This means:

  • You cannot see user passwords
  • You cannot set or change passwords for users

If a user forgets their password, they can reset it themselves:

  1. Click Reset Password on the login page
  2. Enter username or email
  3. Follow the link received by email

► INVITATION & INITIAL PASSWORD

The invitation is mainly used for the first access to .shares.

When sending an invitation:

  • An initial password is automatically generated
  • The user receives login details by email
  • The user is prompted to change the password immediately

Important: The initial password is sent by email and should not be used permanently.

Every time you send a new invitation:

  • The current password is overwritten
  • A new initial password is generated

Only use the invitation for the first setup or if access needs to be reset.

► TROUBLESHOOTING

User did not receive invitation

You can resend the invitation, but keep in mind that this will overwrite the current password.

Anything else

If you encounter any issue, please contact label_team@details.eu.