In Excel, in order to properly format barcodes, a useful tip is to adjust EXCEL / FORMAT to the Custom format with 13x “0” for the barcode column.
This allows you to add the leading 0s in case of loss.
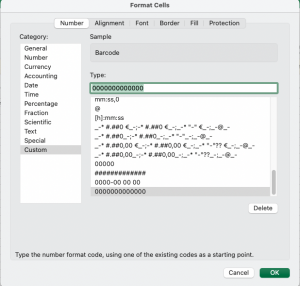
In Excel, in order to properly format barcodes, a useful tip is to adjust EXCEL / FORMAT to the Custom format with 13x “0” for the barcode column.
This allows you to add the leading 0s in case of loss.
In May 2024, details introduces Product Dates, which are essentially release dates for products, not overall projects. This approach allows for more granular control over individual product timelines while maintaining a clear overarching release schedule.
This will enable our distribution clients to effectively manage project planning on one hand and product delivery on the other.
Project Release Dates and Product Dates
Project release dates and product dates are now two separate entities within Details, each serving a unique purpose in project management.
Project Release Dates refer to the dates assigned to overall projects, traditionally known as “releases” in the music business. These include the official street date of an album and possibly multiple singles or single-track products. These dates mark milestones for the entire project.
Product Dates are the dates set for each specific physical or digital product within the project. Each single track or physical product can have its own timeline and deadlines, which are independent of the overall release date. This allows for detailed planning and management of individual lifecycles within the project.
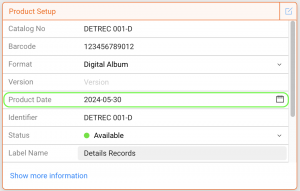
Product Dates can be set in the “Product Setup” box of any product in CATALOG / PRODUCTS.
Why Did We Do This?
The separation between release dates and product dates allows for greater flexibility and more precise management of distinct product timelines, specifically for products, re-issues, etc. You can still refer to the overall project date to coordinate promotional activities, but at the same time, ensure that each product meets its specific deadlines without being constrained by the overall release timeline.
NOTE:
From now on, adjusting only the release date of a project will not affect the dates of individual products and vice versa!
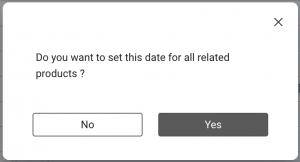
You will, however, be asked if you would like to update the related product dates when you update a project release date. If you choose ‘yes,’ all related products will be updated with the new date.
Imports
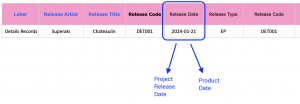
Future imports will import the column Release Date into both the project release dates and the product dates. Should there be multiple dates in that column, the FIRST will be set as the project release date, and all others will be specific product dates within the said project.
Migration
Before deployment, we have updated all product release dates according to the set release dates and release shifts set in Details at the end of May 2024.
Duplicate tracks (same ISRC, Artist, Title, Version, and Label) can appear in catalogs. To clean these up, details provides a Track Merge Process managed by our support team. You can prepare your tracks to ensure a smooth and quick merge.
Once prepared, contact our support team to initiate the merge process. The actual merge will be performed by our staff within minutes.
This article provides an overview of the Spotify Import interface in CATALOG MANAGEMENT / CATALOG IMPORT.
Use this interface to search Spotify, review results, and import digital releases into details.
► Import a Catalog
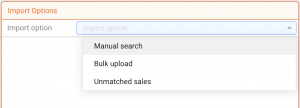
This is the starting point of the Spotify Import.
Select an Import option to define how Spotify should be searched.
► Search Results
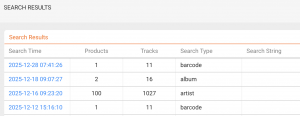
The SEARCH RESULTS tab lists all Spotify searches performed.
Each entry shows:
Open a result to inspect the products and tracklists before importing.
► Instructions
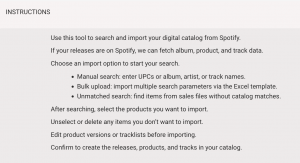
The INSTRUCTIONS tab summarizes the Spotify Import workflow.
It explains which search options are available and how to proceed after results are returned.
► Templates
The TEMPLATES tab provides the Excel file required for Bulk upload searches.
Use this template to submit multiple search parameters in one upload.

This article explains how details automatically ingests sales reports from DSPs delivered via the MERLIN Network, removing the need for manual downloads and recurring imports.
► What Automatic Merlin Ingestion Means
Merlin acts as a central licensing and reporting hub for independent music companies. Many DSPs deliver their monthly sales statements to rightsholders via Merlin.
details provides dedicated importers for these Merlin-delivered reports. Once configured, the platform automatically retrieves new files as they become available and processes them inside details.
This means you no longer need to:
► How the Process Works
The ingestion process follows a predictable, hands-off workflow:
Importer logic is continuously maintained to reflect format changes, new DSP requirements, and Merlin updates.
► Supported Merlin DSP Sources
details currently provides automatic ingestion for the following Merlin-delivered DSP reports:
This list is continuously extended as new Merlin-delivered DSPs are added or reporting formats evolve.
► Benefits for You
This setup is especially valuable for labels, distributors, and label services companies handling large catalogs and frequent reporting cycles.
► Ongoing Maintenance & Extensions
Automated ingestion from MERLIN is designed to save your team a significant amount of time by removing recurring manual work. Instead of downloading, checking, and importing statements every month, everything is handled automatically inside details.
To make this possible, details continuously maintains and updates all MERLIN-related importers. Reporting formats and delivery structures evolve over time, and importer logic needs to be adjusted accordingly to keep imports reliable and accurate.
From time to time, new importers are also added when additional MERLIN-delivered DSPs become relevant or when extended handling is required.
This ongoing maintenance and development effort is the reason why automated MERLIN ingestion is offered as a paid service. The fee is intentionally kept low and capped, while the time savings and reduction of manual work are substantial.
Sales ingestion fees (MERLIN):
Automated ingestion from MERLIN is a paid service. Because DSPs and distributors frequently change reporting formats, details continuously maintains and updates all ingestion logic.
Examples:
Only the first import of a statement is charged. Re-imports are free. Multi-currency splits count as one statement.
At details, we are committed to continuously improving our service and enhancing your user experience through new features and simpler workflows.
We value the ideas and inspiration shared by both our team and clients. However, catering to the diverse business models and workflows in the music industry makes the task of creating a universal service complex. Therefore, we carefully consider every new development and its implications for all our valued customers worldwide.
To cater to these diverse needs, we’ve meticulously crafted a system called “$$$” (pronounced “magical moolah!”).
When clients request a feature to be dealt with as a priority, this allows them to contribute towards programming costs, ensuring effective task prioritization while maintaining a balanced roadmap that benefits all our users.
Here is an overview of when and how much clients will be asked to contribute to our programming costs:
General Improvements: If it’s a general improvement that we believe will benefit all clients, we’ll include it in our programming schedule, and it’s provided free of charge as part of our ongoing development. This also includes bug fixing, which always has the highest priority. Clients won’t be charged for these improvements.
Priority on General Improvements: If it’s a general improvement, but the client wants to set a priority for our programmers to work on it, the client will need to pay 50% of the programming costs after receiving an upfront quote.
Special Client Requests: If it’s not a general improvement but a special request from a client, we might include it in our programming schedule, and the client will be required to pay 50% of the programming costs after receiving an upfront quote.
Priority on Special Client Requests: If it’s not a general improvement, and the client wishes to prioritize it above other tasks for our programmers, the client will be responsible for paying 100% of the programming costs after receiving an upfront quote.
With these guidelines in place, we strive to balance client requests with our ongoing efforts to enhance and improve our services for the benefit of all our valued clients.
In PRODUCTS / TRACKS you can manage the ISRC (International Standard Recording Code) of each track. The ISRC is the globally recognized identifier for sound recordings and music video recordings. Every track in details must have a valid ISRC in order to be reported correctly in statements and royalty accounting.
An ISRC is always 12 characters long and follows a fixed structure:
Example format: CCXXXYYNNNNN (Hyphens are often shown for readability, but in details the ISRC is stored without them.)
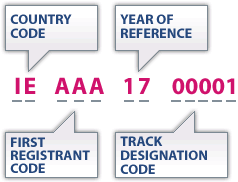
In details, you can generate ISRCs automatically. This saves time and ensures codes are consistent and correct.
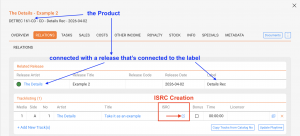
To generate a new ISRC, click the grey icon in the ISRC column of the Tracklisting within a product (CATALOG / PRODUCTS / selected product / RELATIONS).
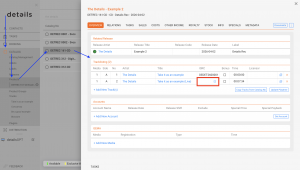
Automatic ISRC generation only works if the following three conditions are met:
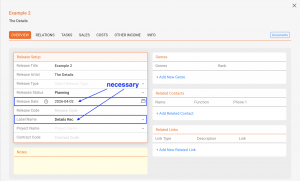
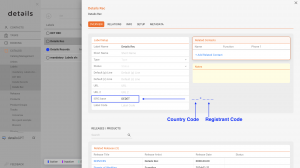
Once these conditions are fulfilled, the system will generate the next sequential ISRC based on your Label s ISRC base.
Details allows you to upload cost proofs to RELEASES – Costs and PRODUCTS – Costs.
Those proofs may be for internal documentation only or may be made available in the Royalty Statements.
To do this, proceed with the following simple steps: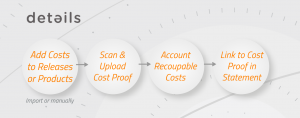
On each COSTS tab you will find a cloud icon. By clicking the cloud you can upload any document or scan.
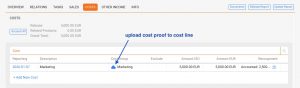
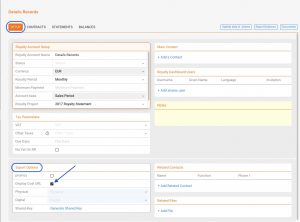
If you wish to share the uploaded cost proofs with your royalty partners, go to the selected Royalty Account / Setup tab and activate the “display cost URL” checkbox as on the screen below.
details offers a range of options to manage product prices. Some are more static, others more variable. Some are for buying, others for selling, and all can be used in royalty calculations or be affected by discounts in purchase orders and invoices.
Because prices affect multiple workflows (sales, royalties, logistics), it s important to understand the basics before using automation with Price Codes.
► Static Prices: PPD & Cost Price
For physical products, the two core fields on the OVERVIEW tab are:
Both fields are typically stable over time. They are best used when prices are negotiated once and don t change often.
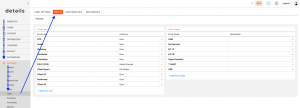
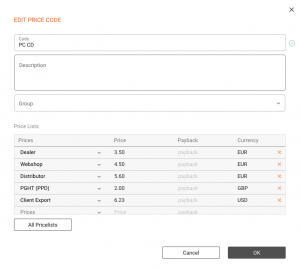
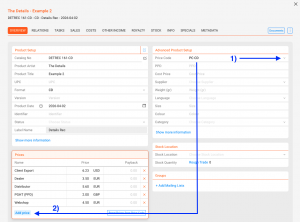
Price Codes allow you to standardize prices across many products. Instead of filling PPD and Cost Price manually every time, you assign a Price Code to a product and let it autofill the values.
Royalty scales are a smart way to implement variable royalties based on sales units or turnover of specified products. Essentially, you set different thresholds (or scales), and when sales hit those marks, different royalty rates kick in.
In details, you have the flexibility to set up scales based on either the number of units sold (Quantity Scales) or the revenue generated (Turnover Scales).
These scales allow you to tailor royalty rates to different levels of sales or earnings, providing a dynamic way to account based on sales performances.
When setting up Quantity or Turnover Scales in our application, there are four essential rules you should follow:
1. Include Previous Sales in the Base Amount:
If there were any sales before implementing the scales, make sure to include those quantities in the Base Amount field.
2. Start from the First Threshold:
Up until the first threshold, the standard royalty rate (as specified in the royalty rates box) applies. You don t start at zero; instead, you begin at the first quantity threshold where a new rate needs to be applied.
3. Set the First Unit for Each New Scale:
For subsequent scales, always enter the first unit of the new scale where a new rate should be applied.
4. Enter Additional Rates:
In the scale rates field, input the rates that should be added to the base royalty rate (without the scale). These rates are not cumulative but should be set as an addition to the base rate.
5. Enter Turnover Thresholds correctly:
It s important to note that these thresholds are based on turnover, not royalties.
A threshold will be reached when the revenue calculated as base for the royalty calculation multiplied with the contract items shares reaches the indicated turnover.
Quantity Scales are ideal for physical products where royalties are typically based on the number of units sold. This setup allows you to create multiple thresholds, each with its own royalty rate, which adjusts as sales volumes increase.
Let’s say you want to set this Example for an album CD (excluding Vinyl)
” Threshold 1: 0 – 1.000 units = 5% royalty
” Threshold 2: 1.001 – 5.000 units = 8% royalty
” Threshold 3: Over 5.000 units = 10% royalty
Example:
” Base Rate : 0 – 1.000 units
” Scale 1: 1.001 – 5.000 units
” Scale 2: 5.001 units and more
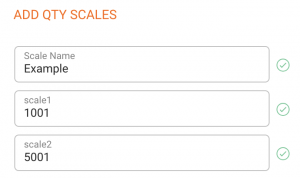
Once you ve determined your tipping points, assign a royalty rate to each scale. Remember, the first level uses your base royalty rate from the Royalty Rates section, and any additional percentages should be added on top of this base rate.
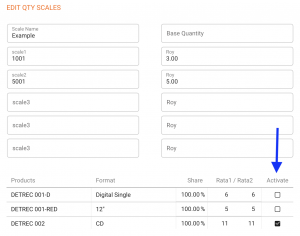
For example, if your base royalty rate is 5%, you might set the rate to 8% for sales above 1,001 units and 10% for sales over 5,001 units. This means the additional royalty would be the base rate 5% + 3% for the first scale and the base rate 5% + 5% for the second scale.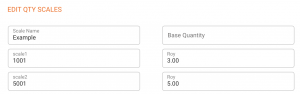
If the Base Quantity field is left empty, the Details application will only calculate based on sales imports and orders recorded within the application itself.
Finally, make sure to select the products that should be included in the scale calculation.
Keep in mind that if you don t select the related products, the scales won t be applied, as the system won t know which sales to include in the calculation
Turnover Scales are more used for digital products or mixed scales of digital and physical products, where royalties are based on the revenue generated rather than the number of units sold.
Unlike Quantity Scales, you can only set up one Turnover Scale per contract, but it can be just as flexible and effective.
Identify the revenue benchmarks that will trigger different royalty rates. These thresholds are based on overall cumulative revenue over time, rather than revenue within a specific period.
It s important to note that these thresholds are based on turnover, not royalties.
In other words, you re calculating thresholds based on the revenue used as the base for royalty calculation, such as net revenue, fixed price, or another selected royalty base not on the royalties earned themselves!
Also note: The turnover scale calculation takes contract shares into account.
For example, if your contract represents a 50% item share, it would require 2,000/ in total turnover to reach a 1,000/ threshold on your scale!
Just like with Quantity Scales, you ll assign additional royalty rates to each revenue threshold.
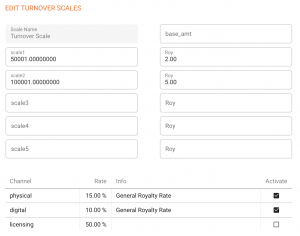
For instance, if for digital sales you want to set a 10% royalty for revenue up to $50,000, 12% for revenue between $50,001 and $100,000, and 15% for revenue over $100,000, this – in details logic translates into a base royalty plus two scales :
” Base Royalty = 10%
” Scale 1 : $50.001 = 10% + 2% additional royalty
” Scale 2: $100.001 = 10% + 5% additional royalty
Note: If you include physical products in the Turnover scale and those physical sales have a different royalty rate, details will calculate the additional rates proportionally to the base rates for each channel!
For example, if your digital sales have a base rate of 10%, the rates might be 10% + 2% or 10% + 5%. For physical sales with a base rate of 15%, the corresponding rates would be 15% + 2% or 15% + 5%.
When we talk about Turnover in the context of Turnover Scales, it s important to understand that this term does not have a universal definition across all contracts. The turnover figure used in your scale calculations can vary significantly depending on how it s defined in the base settings in your contract.
The actual turnover could be based on net income, which accounts for the revenue after all applicable deductions like discounts or returns. Alternatively, it might be based on PPD (Published Price to Dealer) income, which can either be imported or be fixed in the products as price, multiplied by the units sold. Another possibility is that turnover is calculated using fixed prices multiplied by the number of units sold, offering a straightforward approach where each unit sold contributes a set amount to the total turnover.
For this reason, the specific definition of turnover in your contract determines the basis on which royalties are calculated. This means that the turnover you use in your scales isn t just a generic revenue figure but one that s deeply tied to the contractual royalty base, whether that be net income, PPD income, a fixed price or any other another base.
Here s a summary of the most important points to remember about how to handle Scales in details:
1. Threshold Settings:
The amounts entered in the scale fields should align with the lower limit of the thresholds. Additionally, the rate percentages should be considered as increments added or deducted to the base royalty rates specific to each channel.
3. Turnover vs. Royalties:
It s crucial to understand that in details the turnover is the starting point for determining royalties, not the result of past royalty calculations. In other words, the set thresholds are earnings, not royalties!
2. Turnover Calculation:
The turnover within a scale is directly influenced by the selected royalty base:
” Net Revenue: Turnover equals the net revenue received.
” PPD: Turnover is determined by multiplying the number of units sold by the PPD (imported or Product PPD).
” Fixed Price: Turnover is calculated by multiplying the quantity sold by the fixed price per unit.