Income Groups


Details provides the ability to define and add income other than physical/digital sales, licenses and 3rd party income to the artist statement.
This can be subventions, sponsoring or any other type of income.


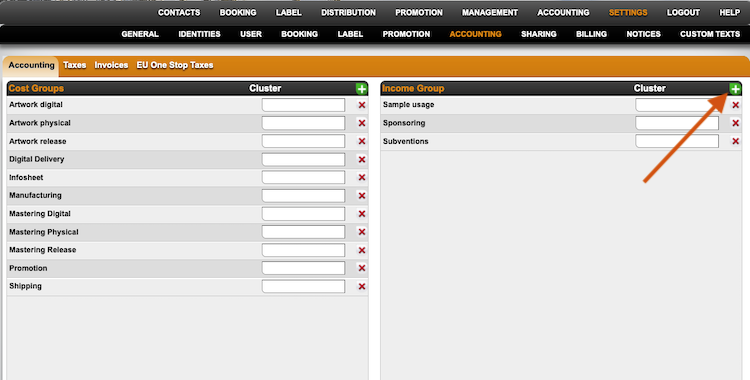
To create an Income Group, go to SETTINGS / ACCOUNTING, click on the green plus in the INCOME GROUP box and add the name of the new Income Group.
Then select where this income should be projected to, whether it will be added to the digital product, physical product or release.
If you want the income to be charged as an advance (100% recoupable), please check the Advance box.


If your royalty contracts are set to a general Recoupable status, all income groups are accounted with the existing share – just as your costs.

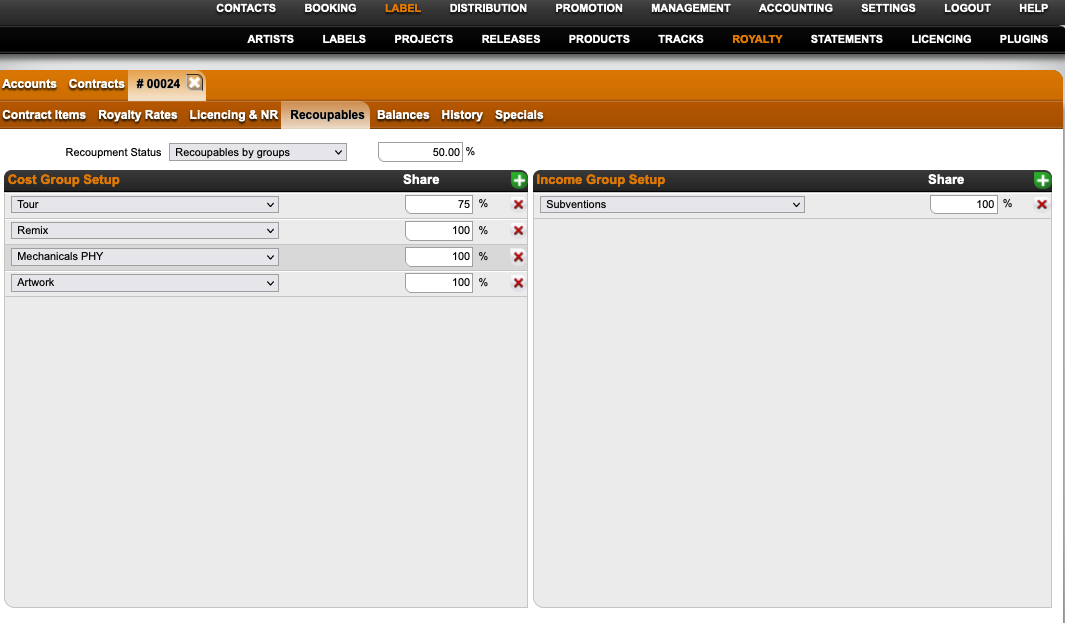
As soon as you have royalty contracts with Recoupables by Group, you will need to go the RECOUPABLE tab in the relevant contract and add the new income group on the right box .

Select the new INCOME GROUP by clicking the green plus and add the share.


Read HERE how to add Other Income to your releases.
How to add payments in foreign currencies

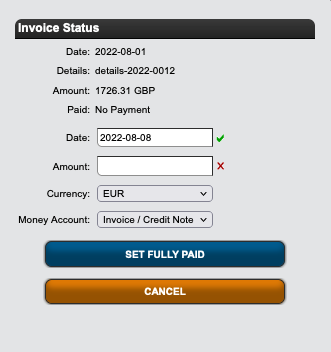
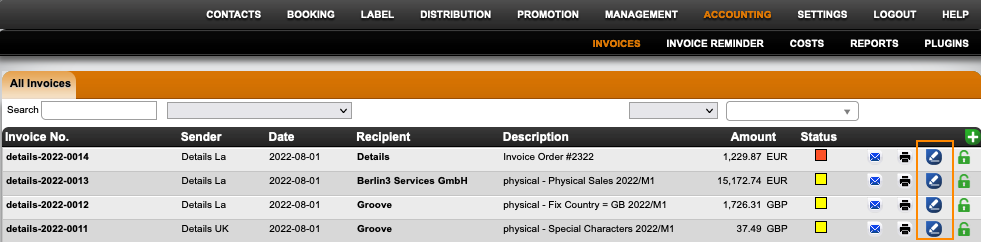
To set your invoice to paid, go to ACCOUNTING / INVOICES and click the PEN icon on the right side of the list.

In the Invoice Status modal select Set Fully Paid and add the amount you received in your details system currency.

Please note, if you account royalties on Payment Period, the payment date added here will the royalty relevant date.


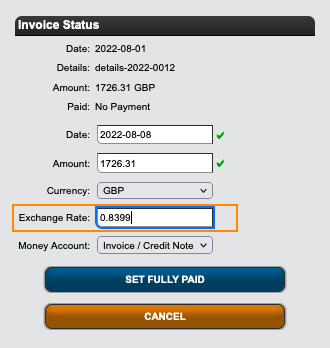
If you like to work with exchange rates instead, please change the currency to the invoice’s original currency, add the amount that got paid and add your exchange rate.


In case you received partly payments, you can select Set Partly Paid and add the amount. Whenever you receive the additional payment, you can set the invoice to fully paid in the same modal.

If you need to revert or correct a payment, click the Pen icon and select DELETE PAYMENTS AND SET OPEN to enter new payment details.

Locking informations in the new Questionnaire

Locking fields in the questionnaire is an important function to have control over the data of a show.

Therefore, we have developed further options to be able to lock fields in even more detail.

Important: This is only working in the new design & with the new questionnaires!


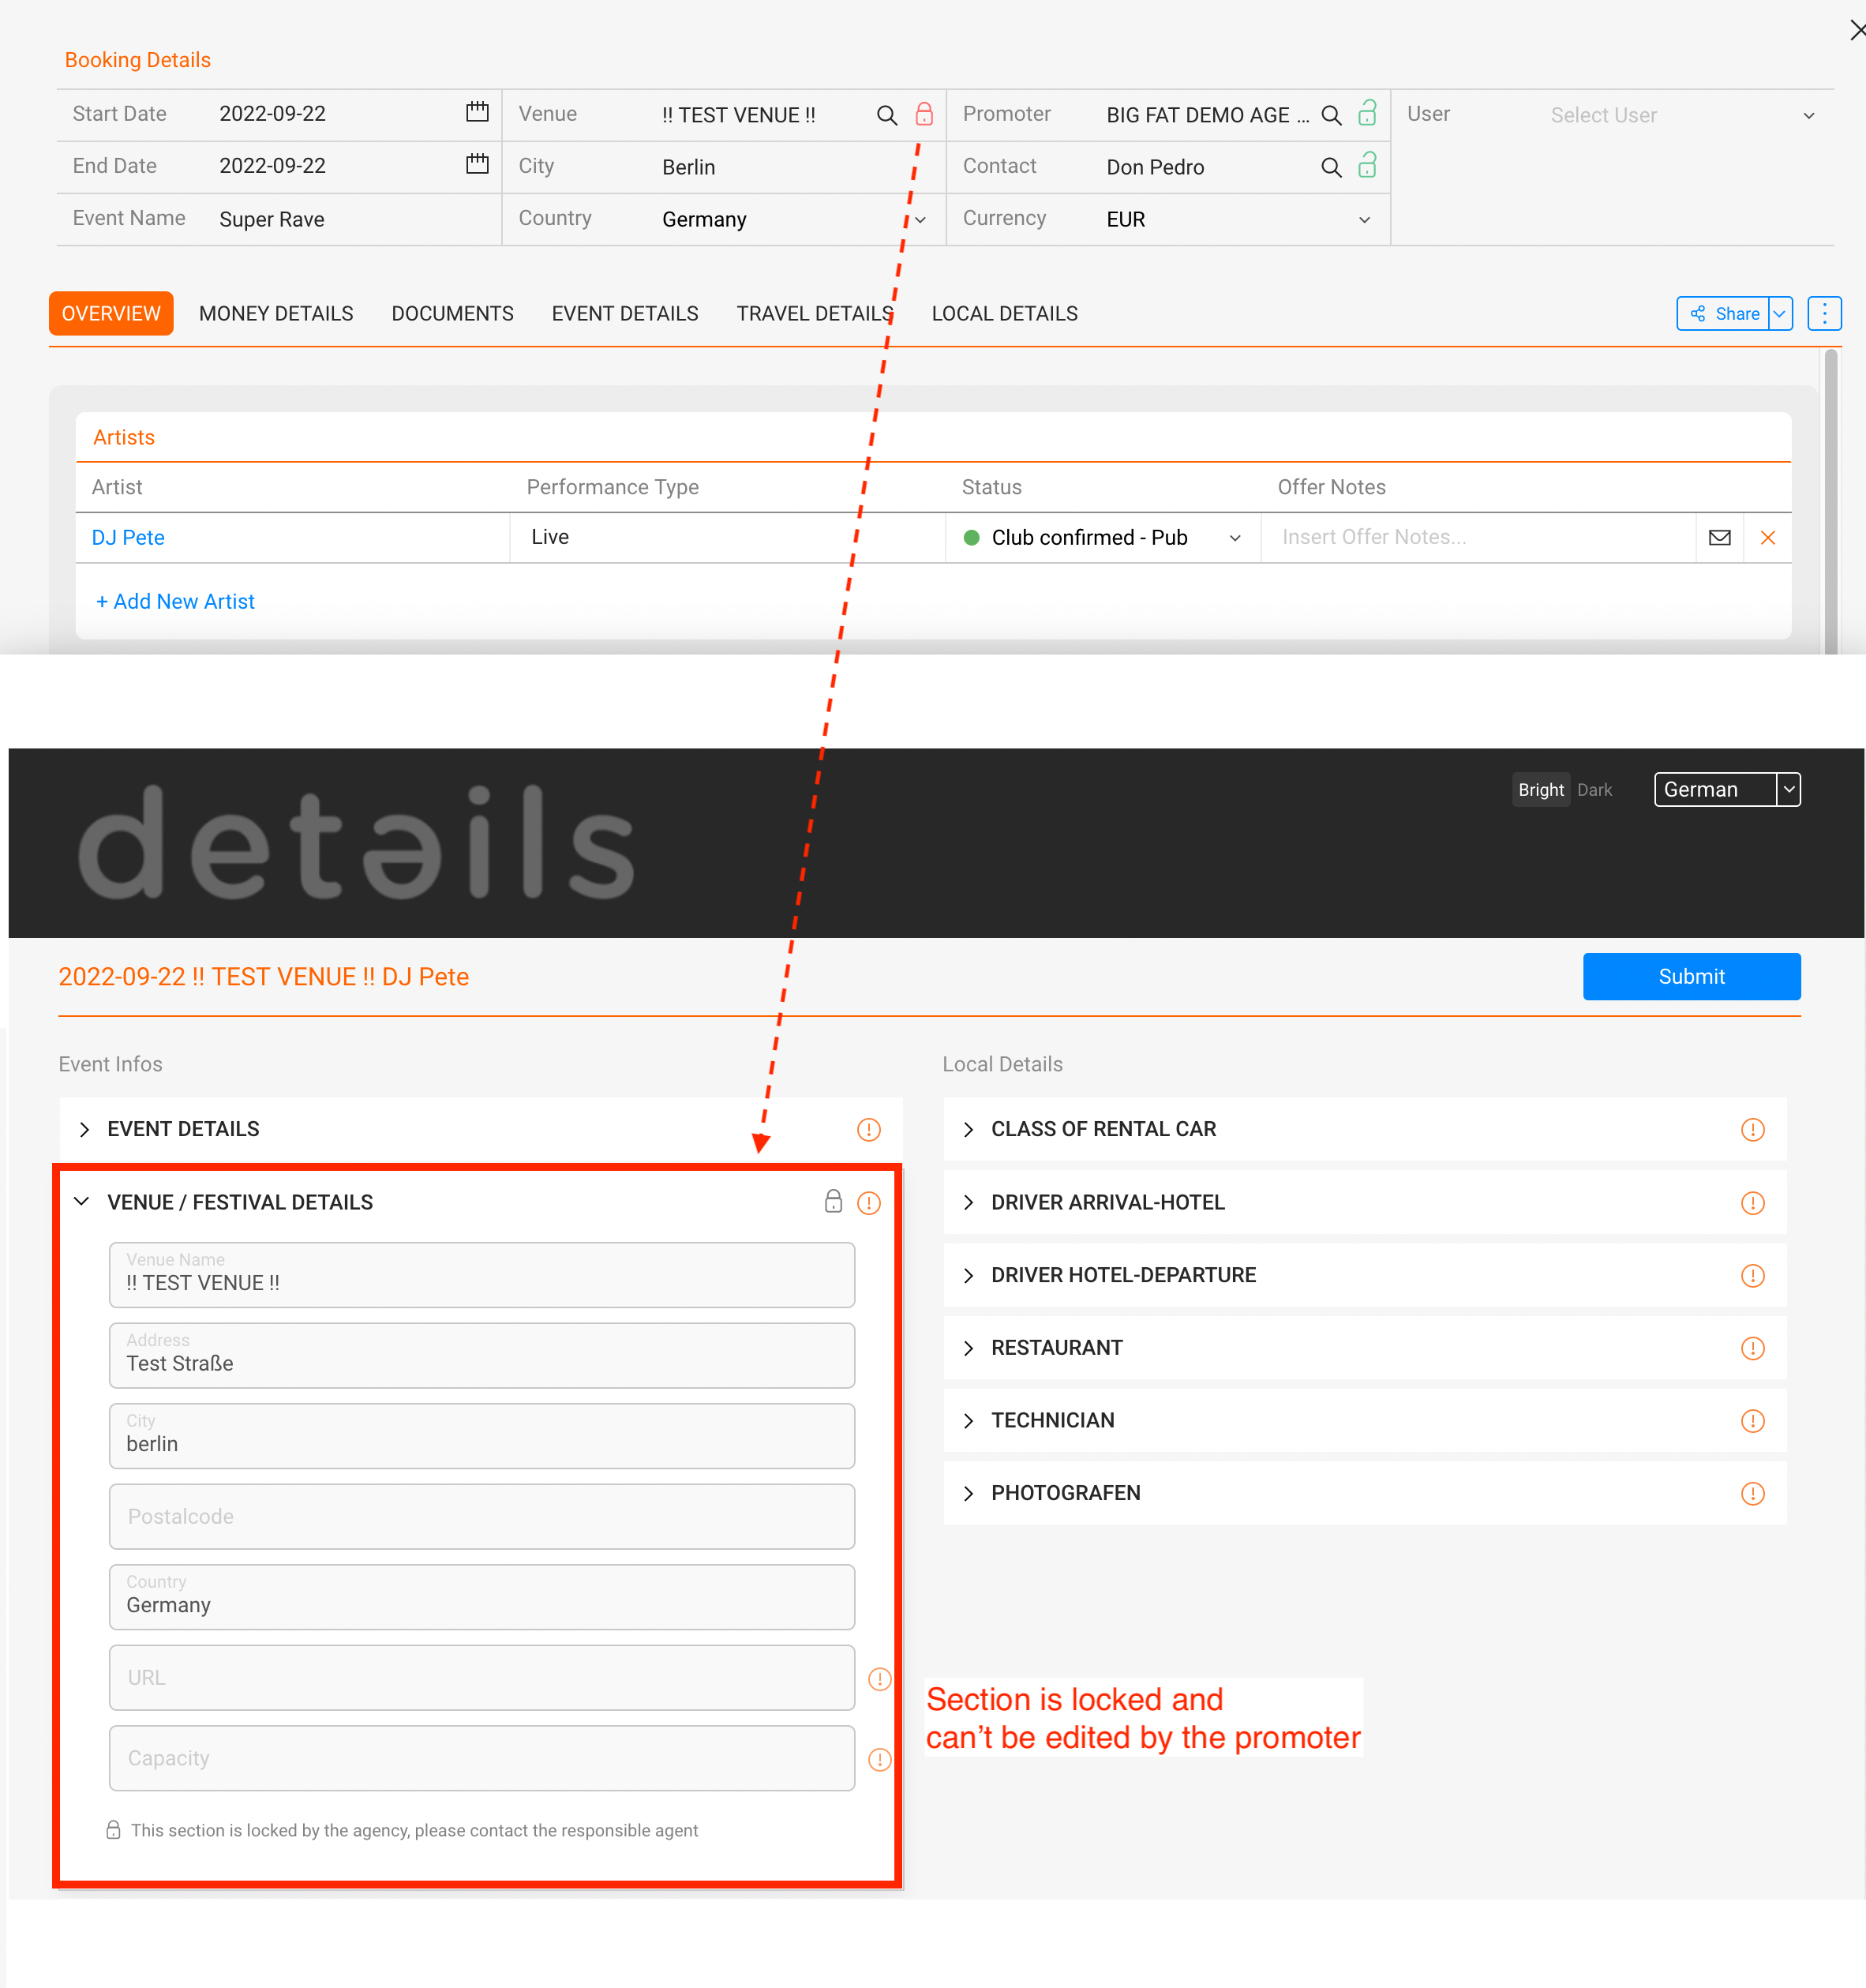
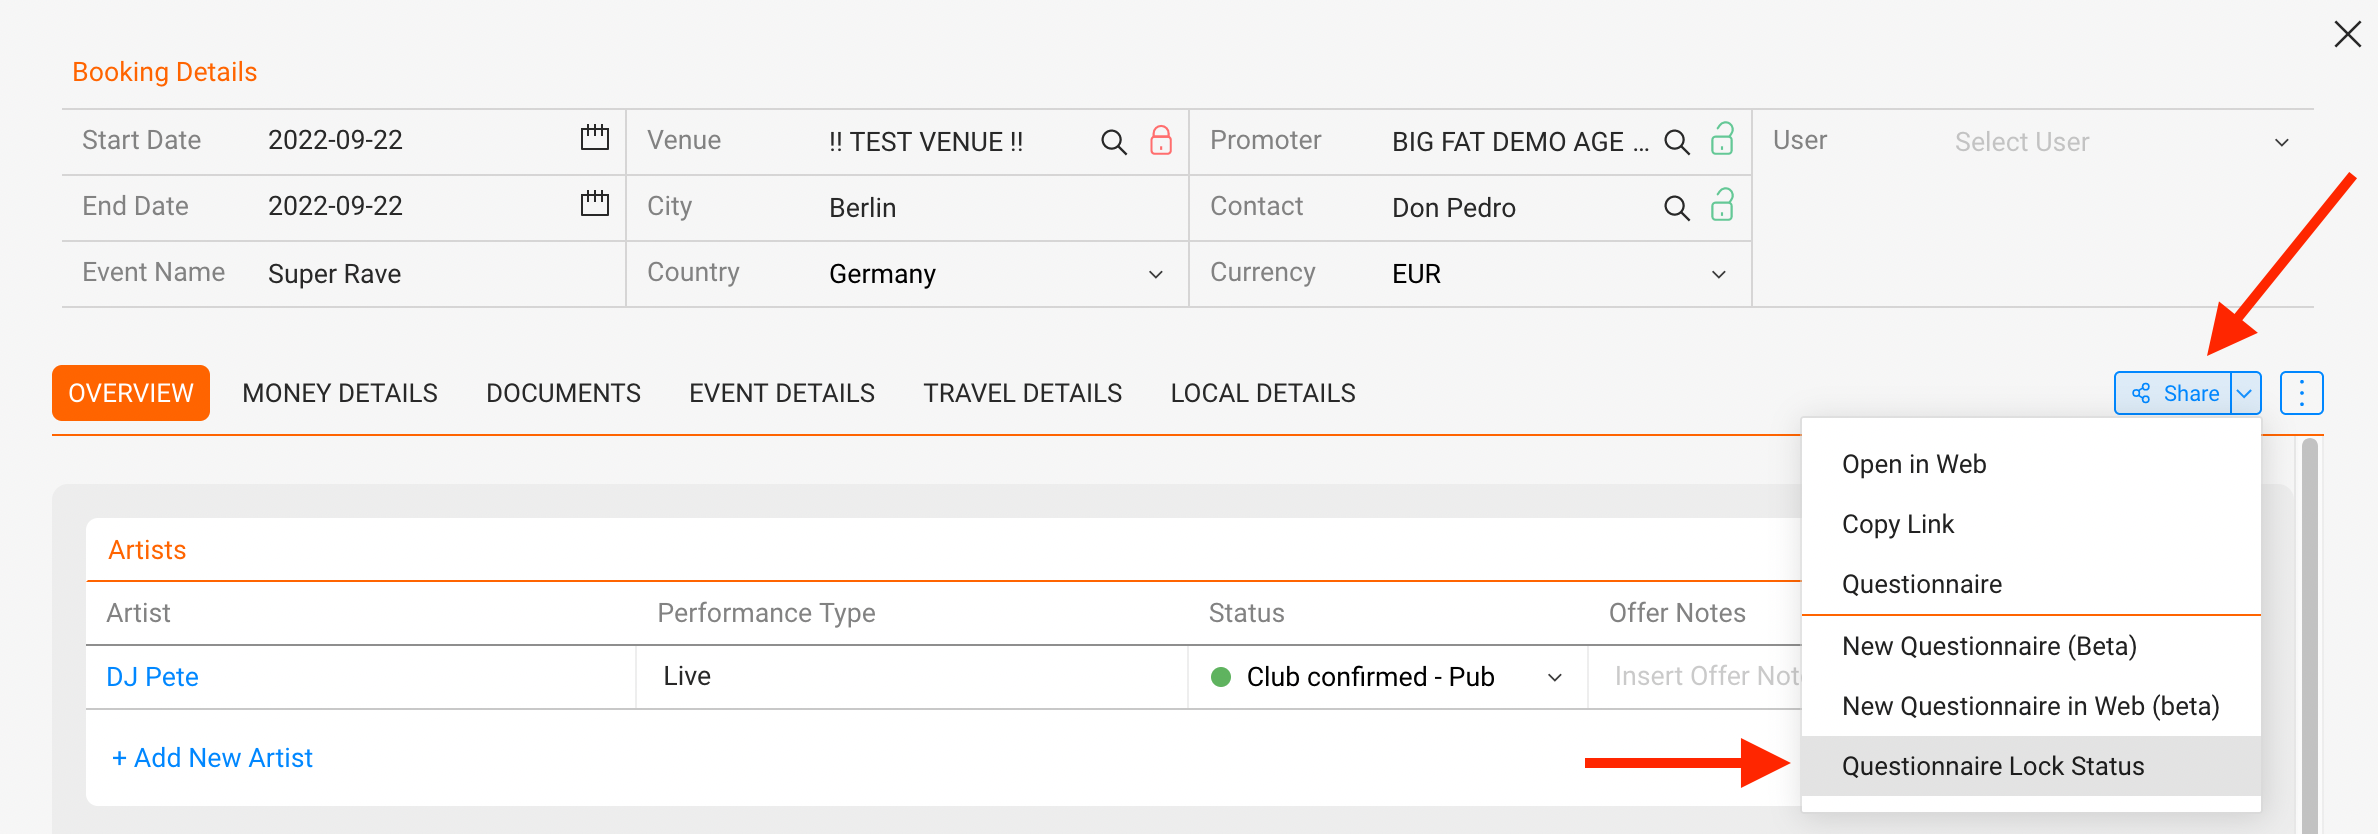
You can lock sections of the questionnaire either directly from the show, by clicking on the lock:

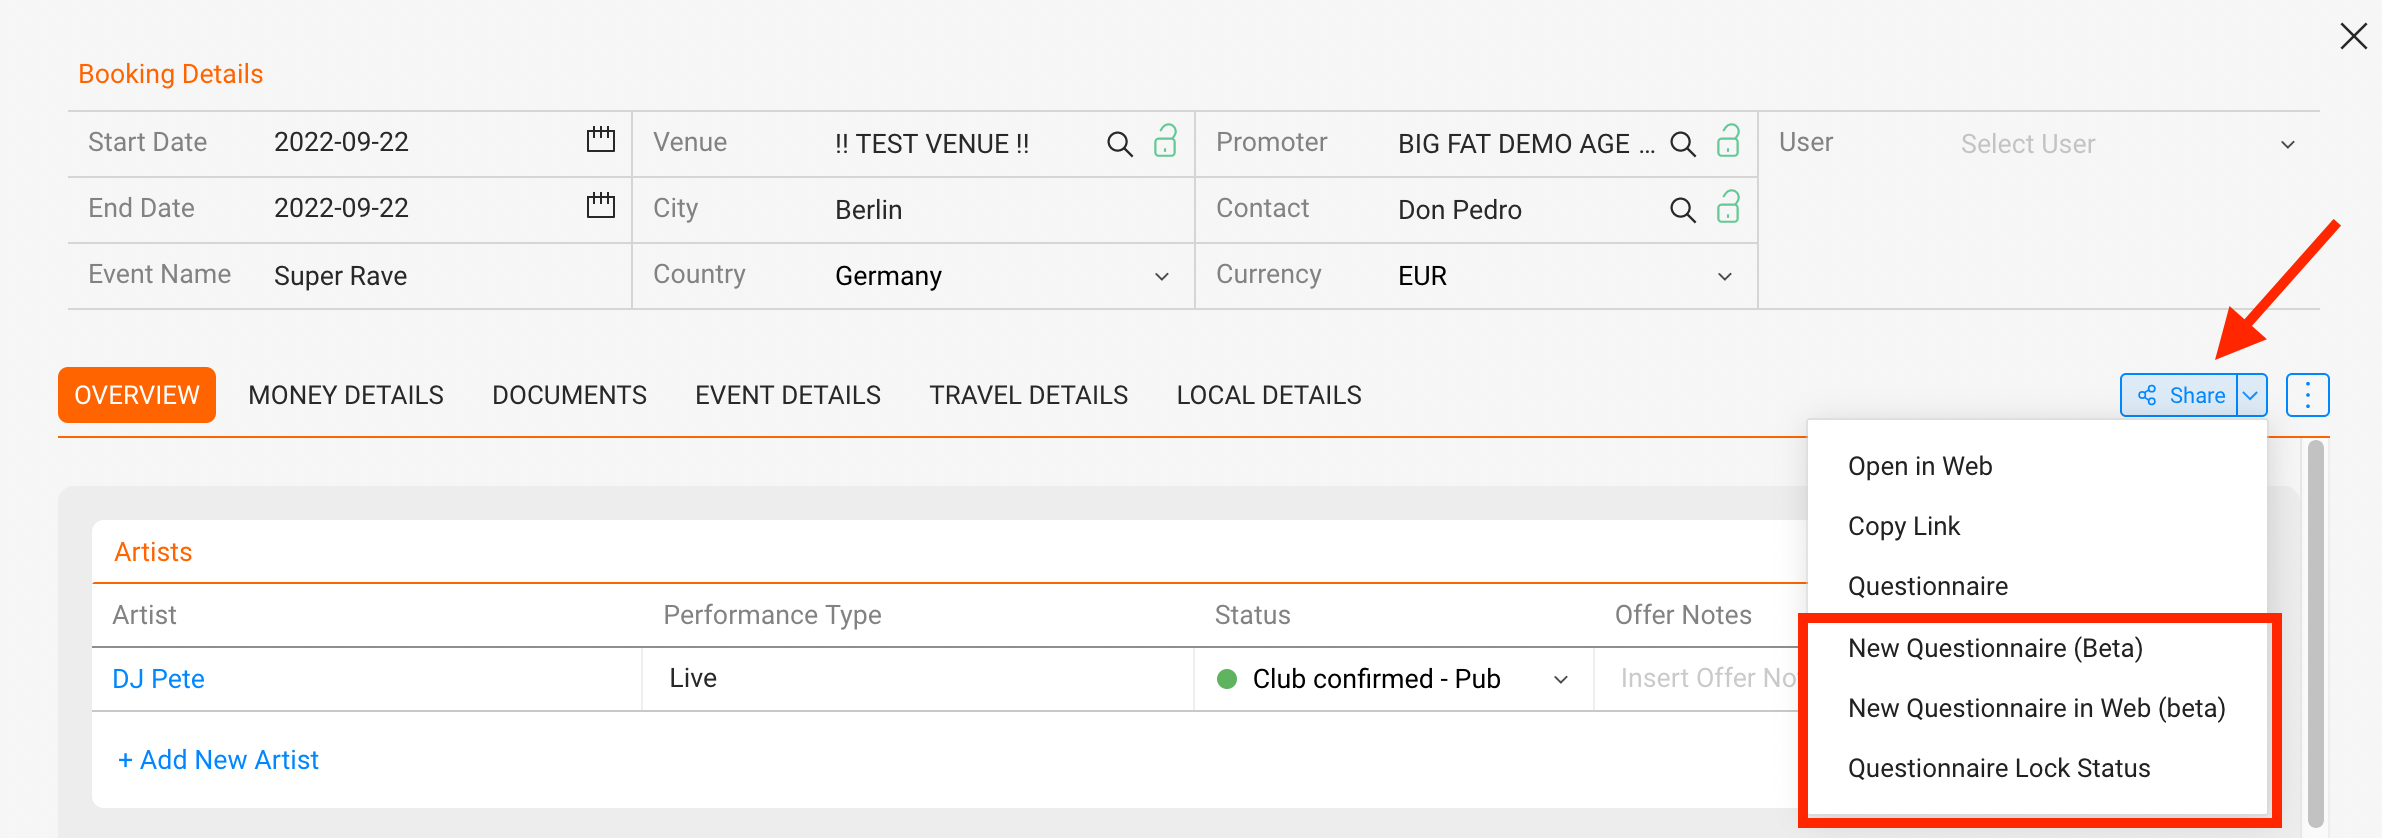
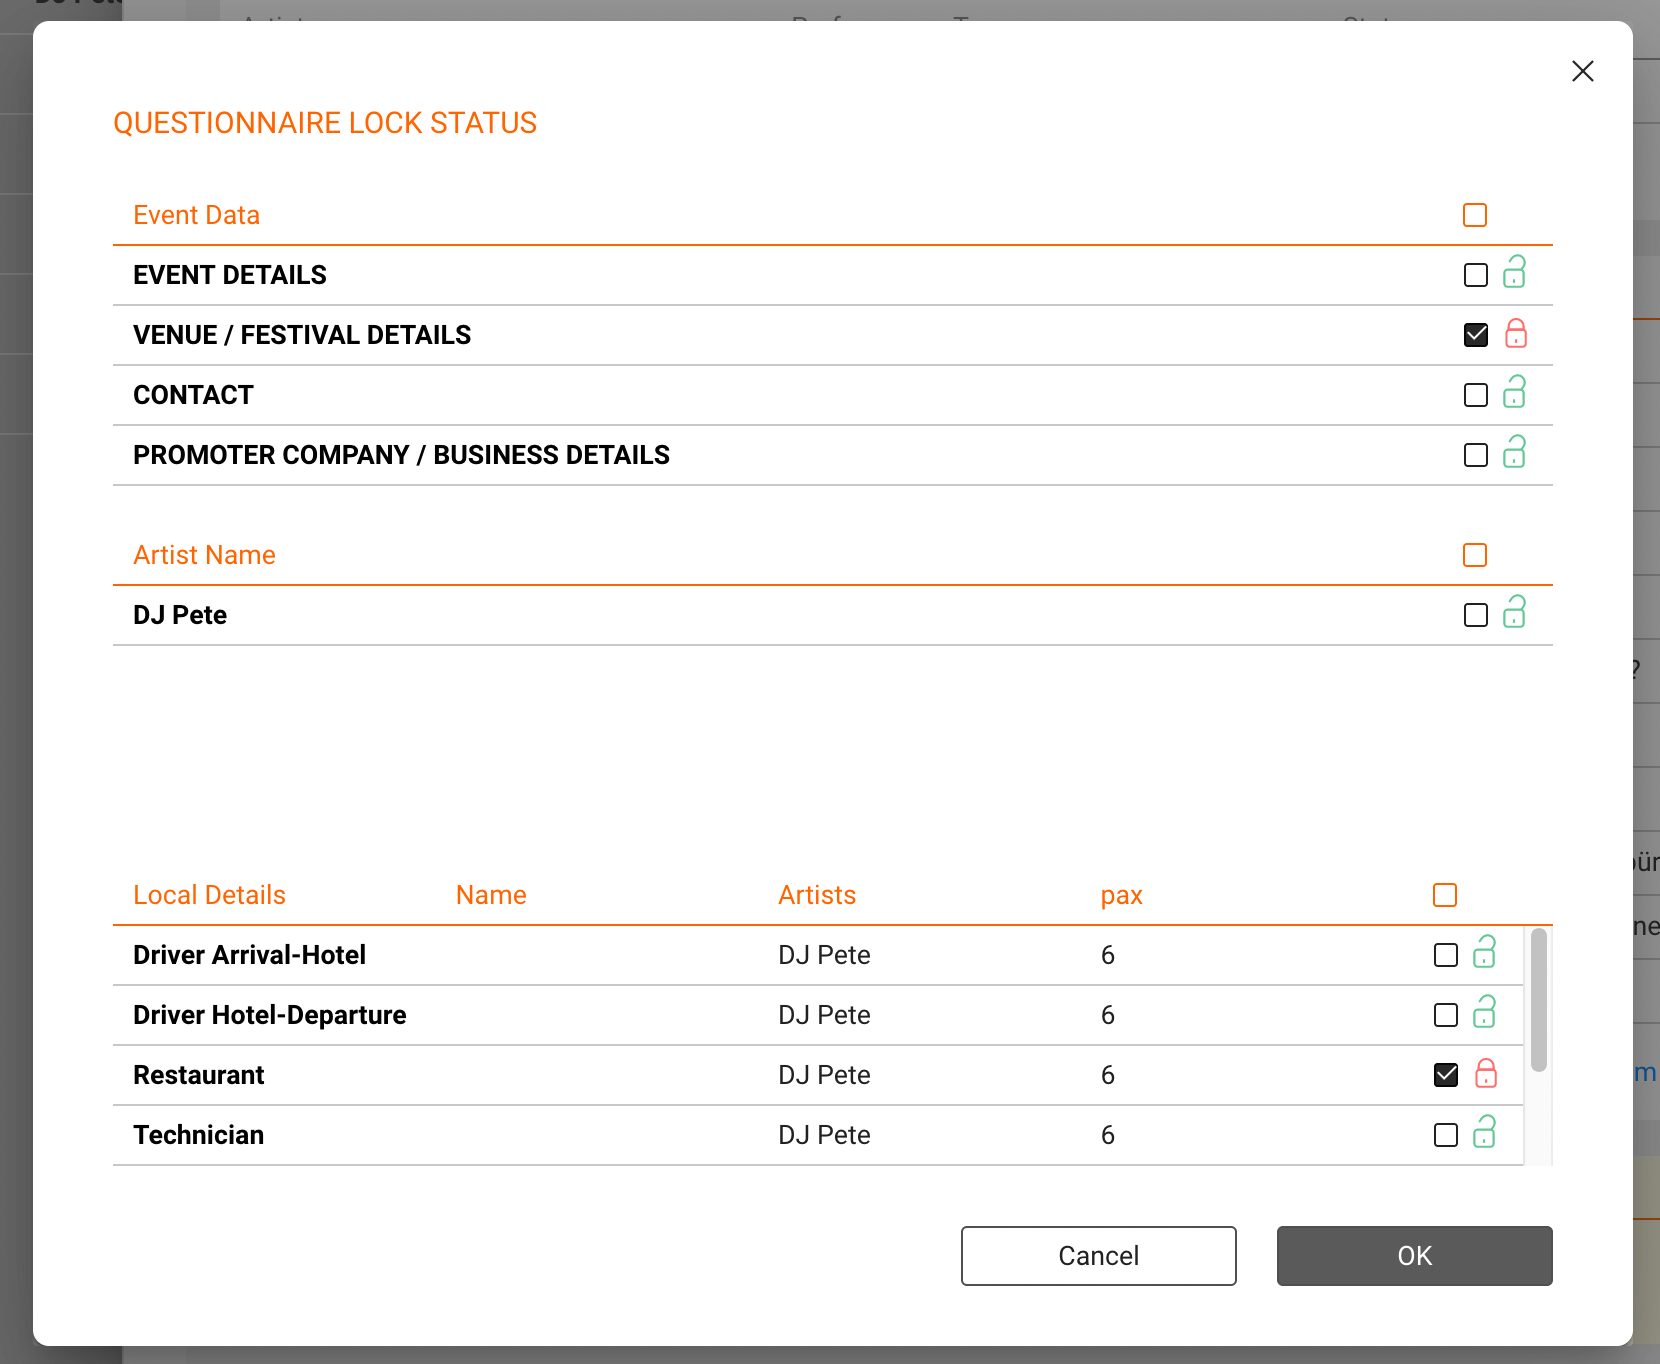
Or you can lock information from our new “Questionnaire Lock Status” popup – there you can also lock single items of the Local details, like only the hotel, while the restaurant is still changeable.


The menu can be found in a show under “SHARE -> Questionnaire Lock Status“:

The new Questionnaire Lock Status window looks like following and gives options to lock entire parts or just single items:►


The result is an individually fillable questionnaire where the agent has control over all information

Zendesk_-_Questionnaire_Lock_Status_Local_Details.png


AI Invoice notifications

The “INVOICE NOTIFICATIONS” settings provide you with control over when and where invoice notifications are sent. Here’s how you can configure these options.

**How to Use the Settings**

1. **Access the Settings**:
To access these settings, go to the “SETTINGS” section of the software, then navigate to “ACCOUNTING,” and finally select “AI OPTIONS.”

zendesk - settings - accounting - AI .png

2. **Configure “INVOICE REMINDER”**:
In the “INVOICE REMINDER” form, choose the appropriate option from the “NOTIFY TO” select menu based on who you want to receive reminders.

Please note: The Accounting person can be set in the User’s settings:

zendesk - settings - user - accounting.png

3. **Configure “INVOICE NOTIFICATIONS”**:
In the “INVOICE NOTIFICATIONS” form, toggle the “NOTIFICATIONS” checkbox to ON if you want notifications, enter a specific email address (or leave it blank for the default), and set the number of days for notifications using the provided input field.

3.1. **”NOTIFICATIONS” Checkbox**:
Toggle this ON or OFF according to your preference. When turned ON, notifications will be active; when turned OFF, no notifications will be sent.

3.2. **”Send to Mail” Input**:
If you have a specific email address where notifications should be sent, you can enter it here. If you prefer to use the default email, simply leave this field blank.

3.3 **”Number of Days Before or After Due Date” Input**:
Use this field to specify when you want notifications to be sent. A positive number indicates notifications will be sent after the due date, while a negative number indicates notifications will be sent before the due date.

With these settings, you can streamline your invoice management, improve communication, and ensure that everyone involved is well-informed about invoice statuses. If you have any questions or encounter any issues, please don’t hesitate to reach out to our support team. We’re here to help you make the most of these powerful features!

Questionnaire default lock settings


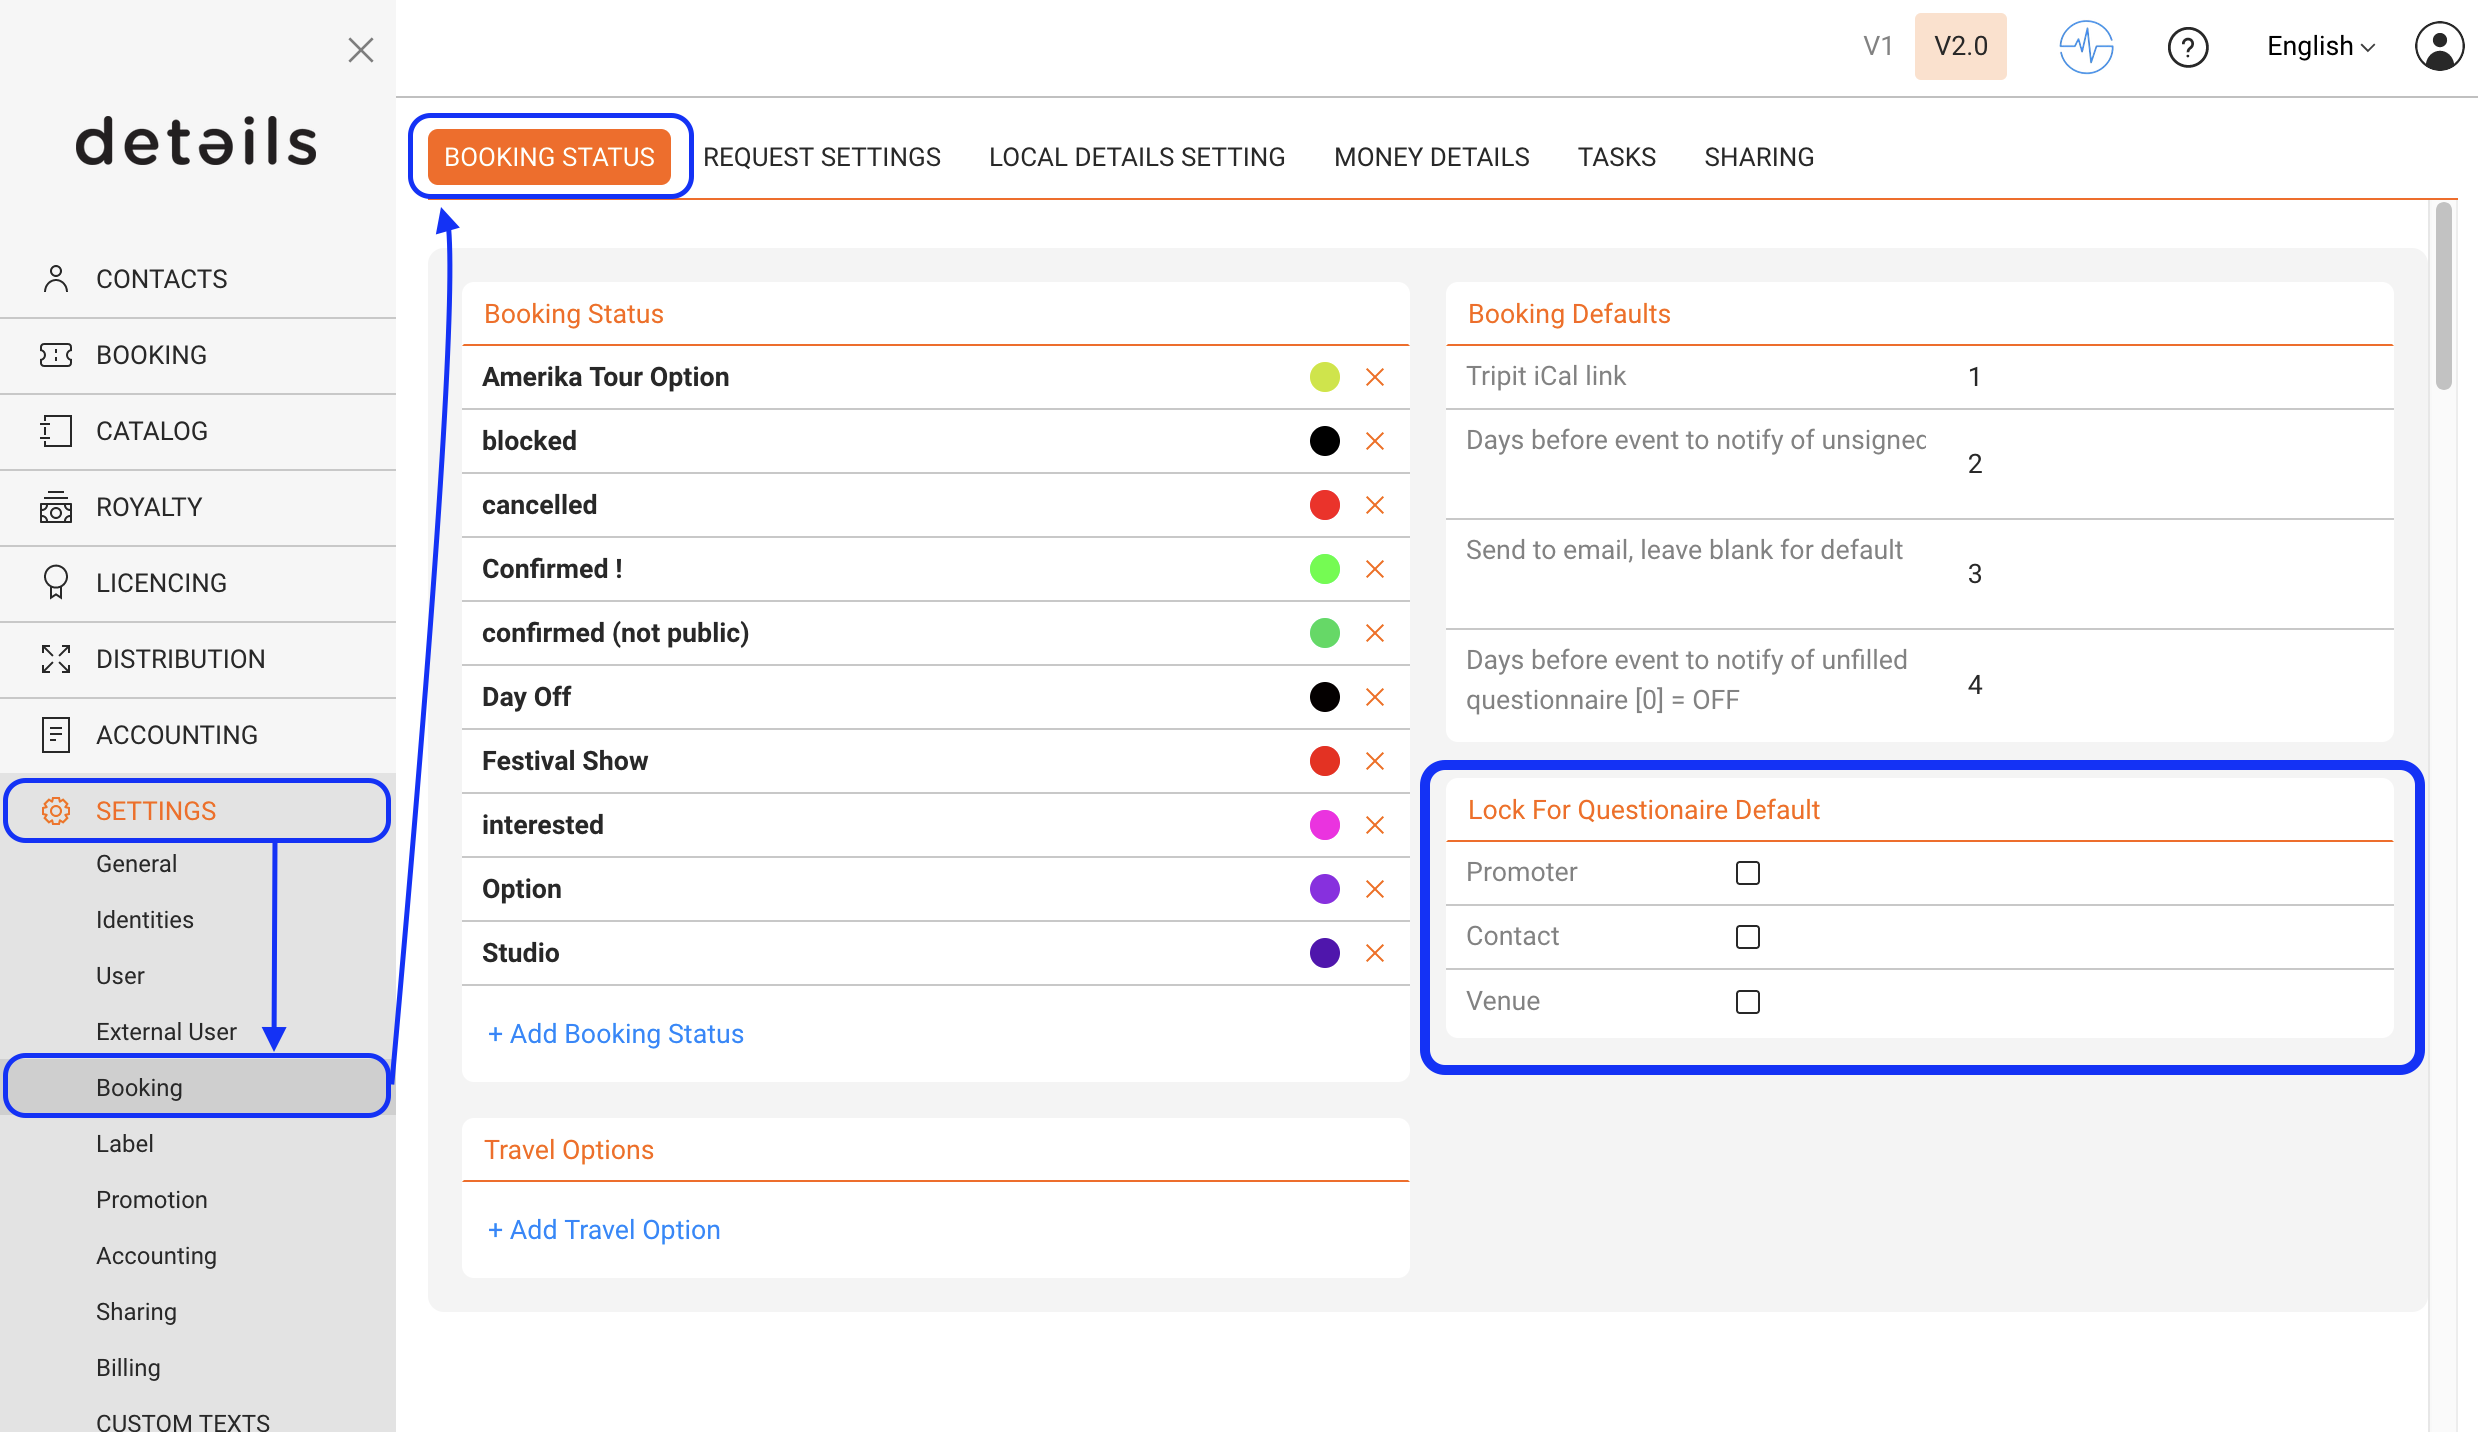
You can establish a default lock status within the questionnaire settings, ensuring consistent behavior across all newly created shows. This will determine whether the following fields are initially locked or unlocked by default:

  • Promoter
  • Contact
  • Venue

Please navigate to Settings -> Booking -> Booking Status and go to the “Lock for questionnaire default” box.


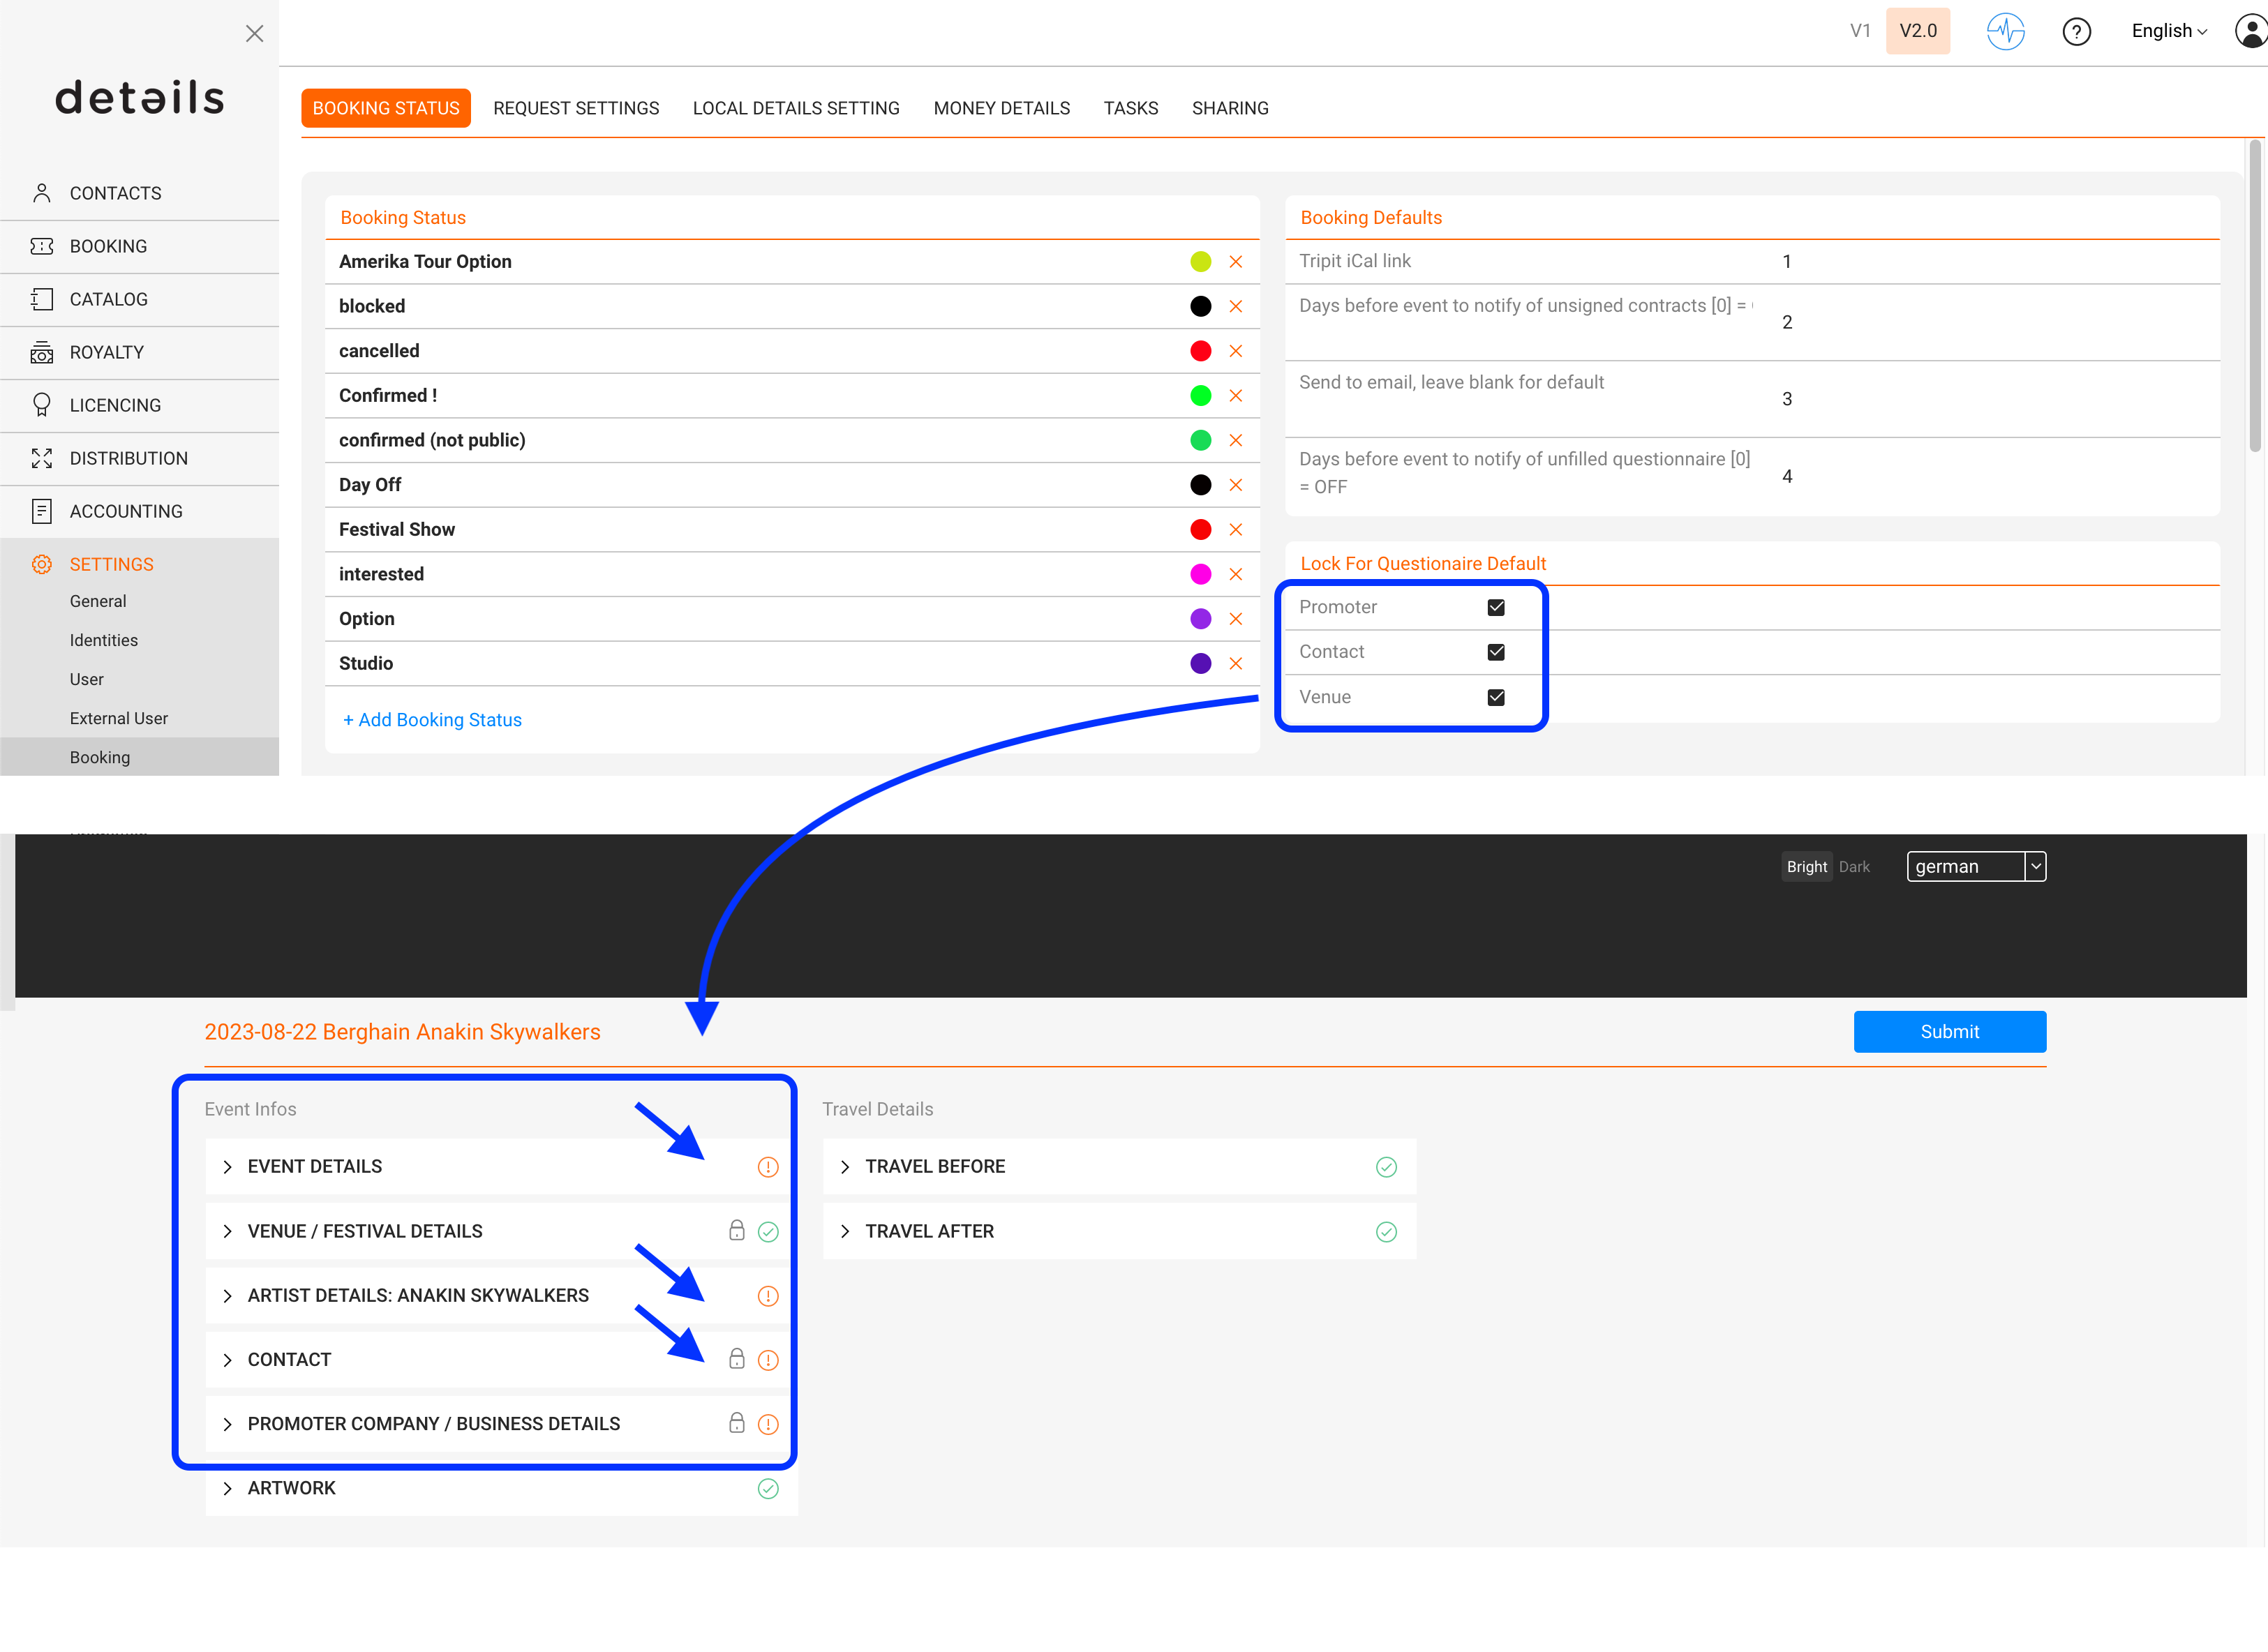
In the example below you can see that the standard lock for Promoter, Contact & Venue is activated and they are automatically locked in the questionnaire so the promoter can not edit those informations:

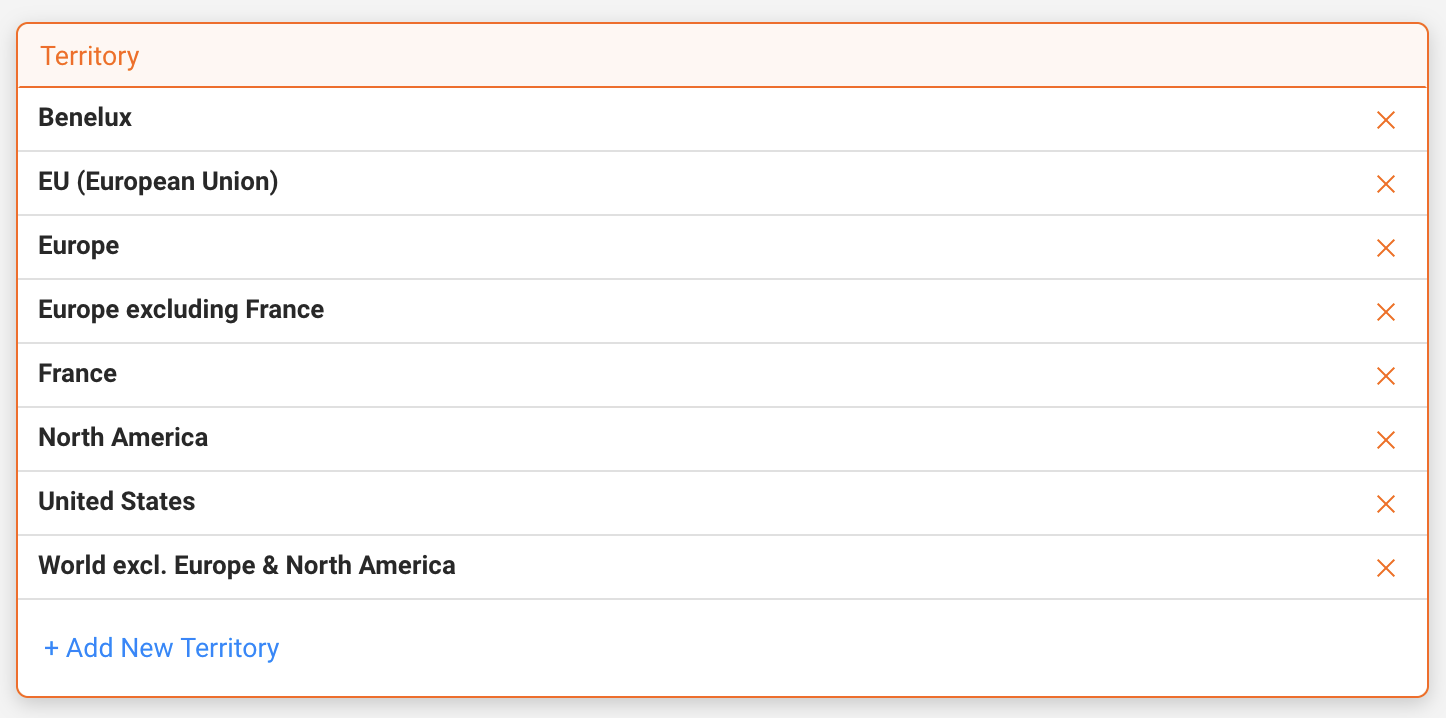
How to set up a Territory

Territories are used in details to group countries and apply them consistently across LABEL, DISTRIBUTION, and ROYALTY workflows.

Typical use cases include royalty calculation rules, contract conditions, distribution permissions, and territory-based reporting.

Important: Territories in details are fully custom. You only need to create territories where different rules or conditions apply.

► WHERE TERRITORIES ARE MANAGED

Territory groups are managed in SETTINGS / GENERAL / TERRITORIES.

All territories created here are available throughout the application wherever territory conditions can be applied.

► CREATE A NEW TERRITORY

  1. Go to SETTINGS / GENERAL / TERRITORIES.
  2. Click [+].
  3. Select one or multiple countries from the list.
  4. Optionally use predefined continent groups to speed up selection.
  5. Enter a clear and descriptive territory name.
  6. Click [OK] to save.

► EDIT OR DELETE A TERRITORY

Edit

  1. Click on the territory name.
  2. Add or remove countries as needed.
  3. Click [OK] to confirm your changes.

Delete

  1. Locate the territory in the list.
  2. Click [x] on the right.

Note: When working with EU-based territories, remember that the UK must be handled separately due to Brexit.

► IMPORTANT: REST OF THE WORLD IN ROYALTY CALCULATIONS

A common misunderstanding is the idea that a separate Rest of the World territory must be created for royalty calculations. In most cases, this is not required.

In details, royalty calculations follow a priority logic: specific territory rules are applied first. Any sales not matching one of these territories are automatically handled by the default rule, called General Royalty.

Example: Multiple territory-specific royalty rules

  • One or more core countries or regions
  • Additional regional groupings as required by your contracts

In this setup, you only need to create territories for the countries or regions that require specific royalty conditions.

No additional Rest of the World territory is needed. All remaining countries will automatically be calculated using the General Royalty rule.

Note: In practice, many details users work primarily with European territories (for example GSA, France, or broader European regions). The same logic applies globally: define only the territories that need explicit rules, and let General Royalty handle everything else.

User Interface Navigation (V2.0)

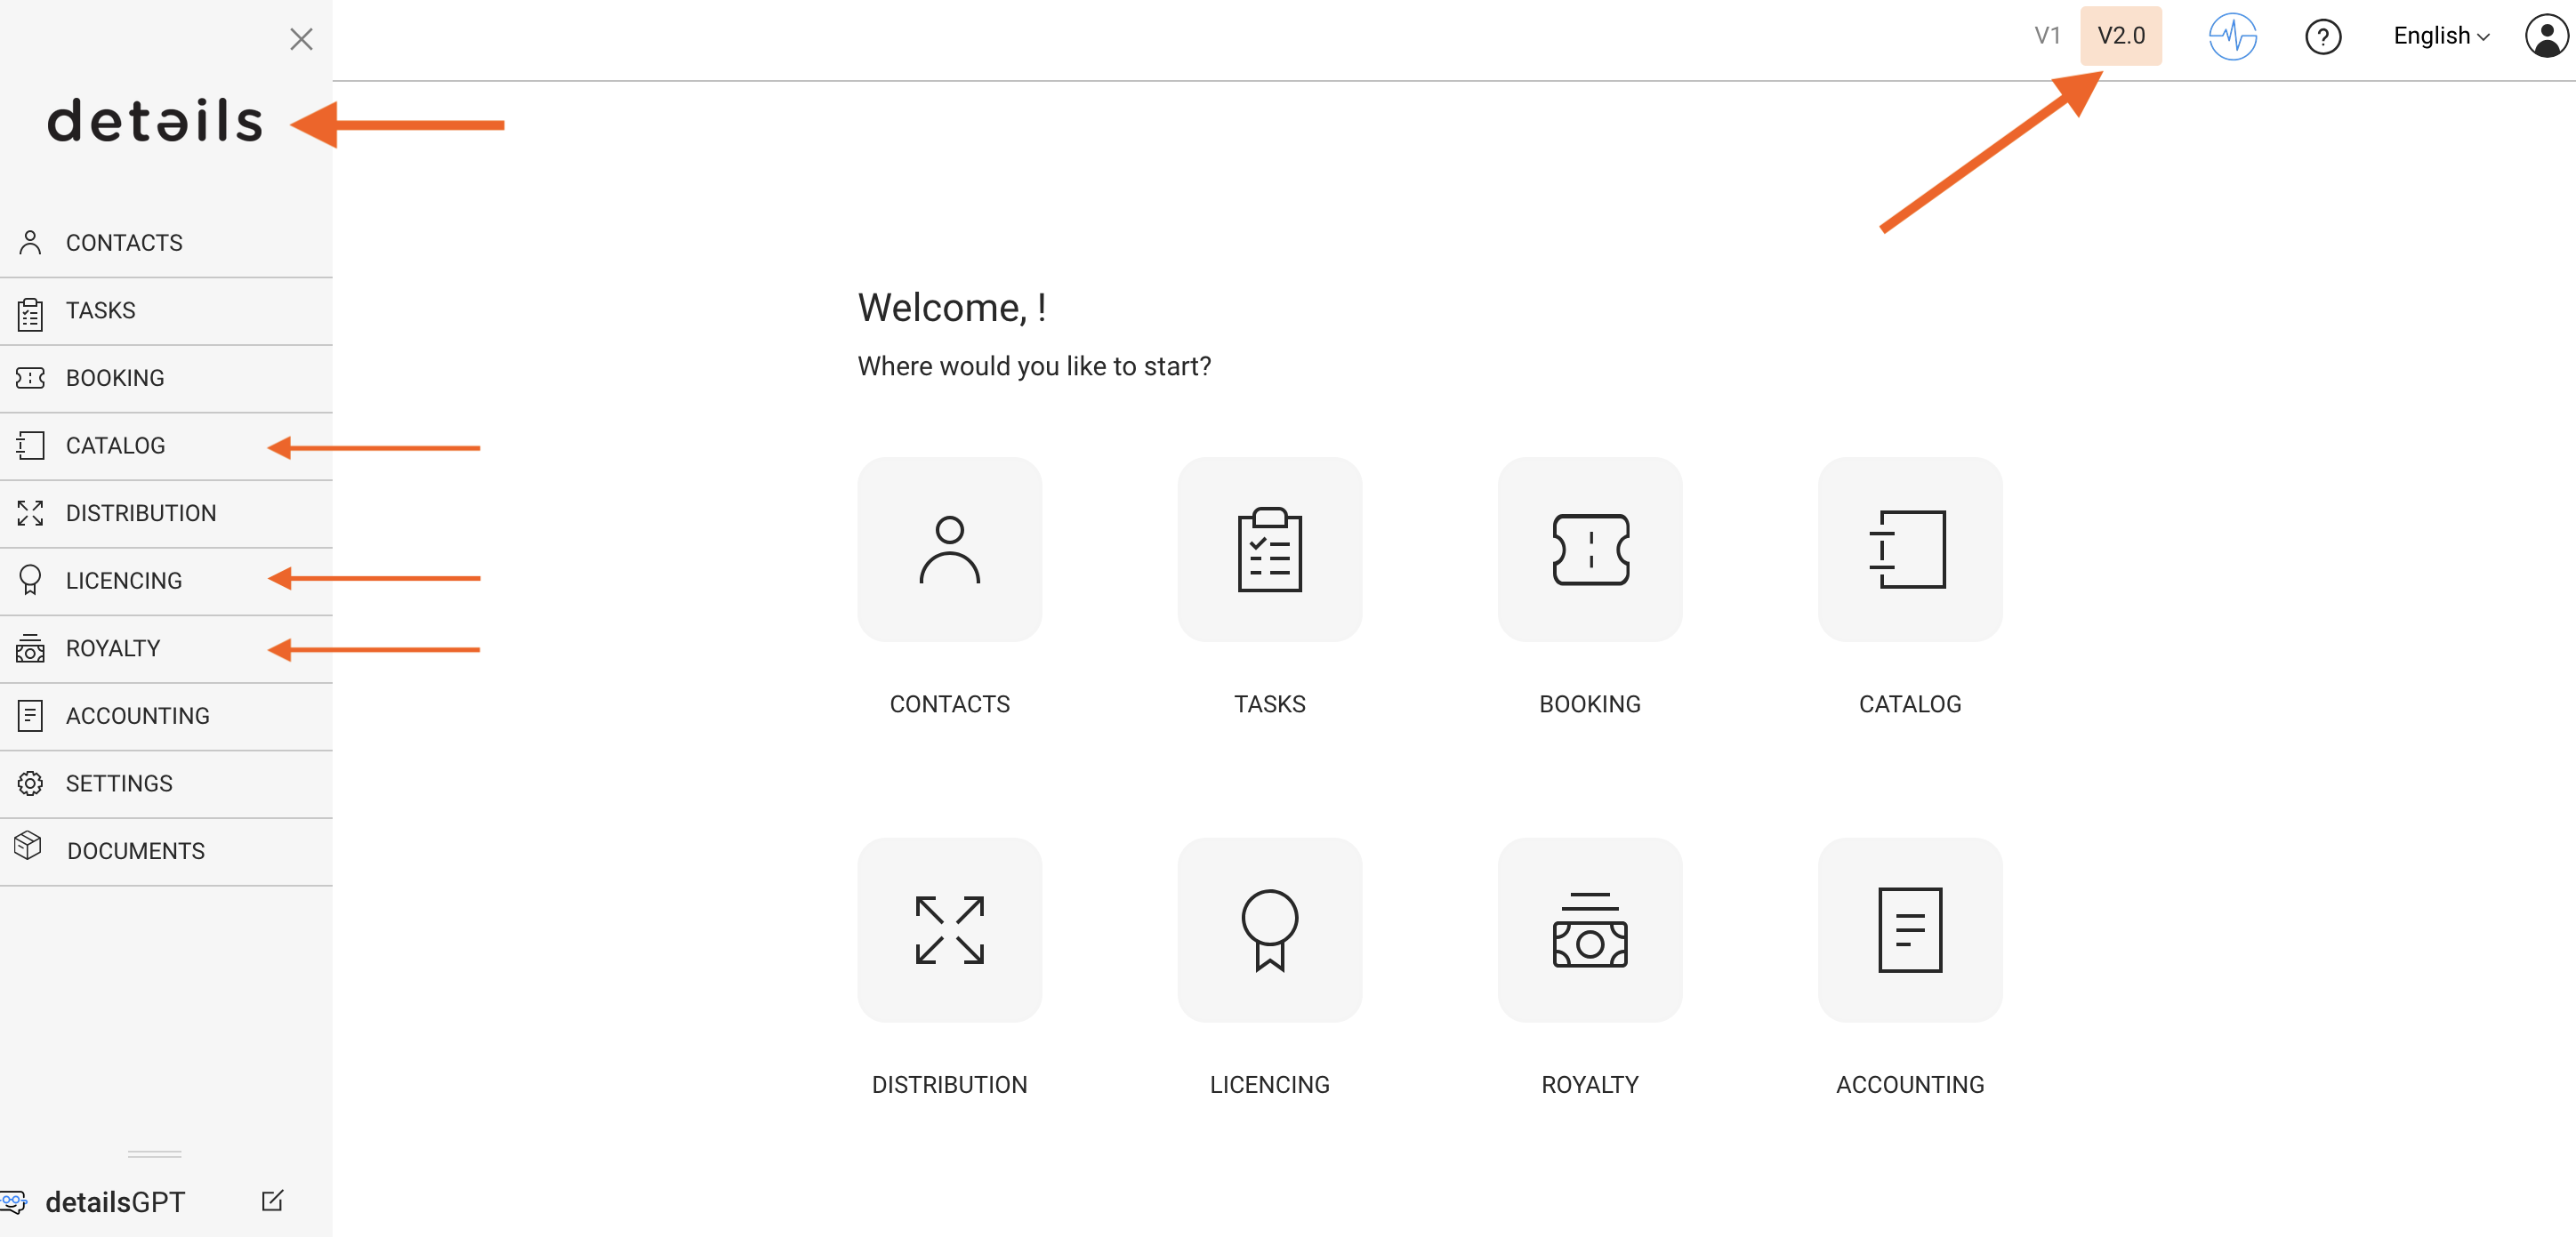
1. Main Navigation:

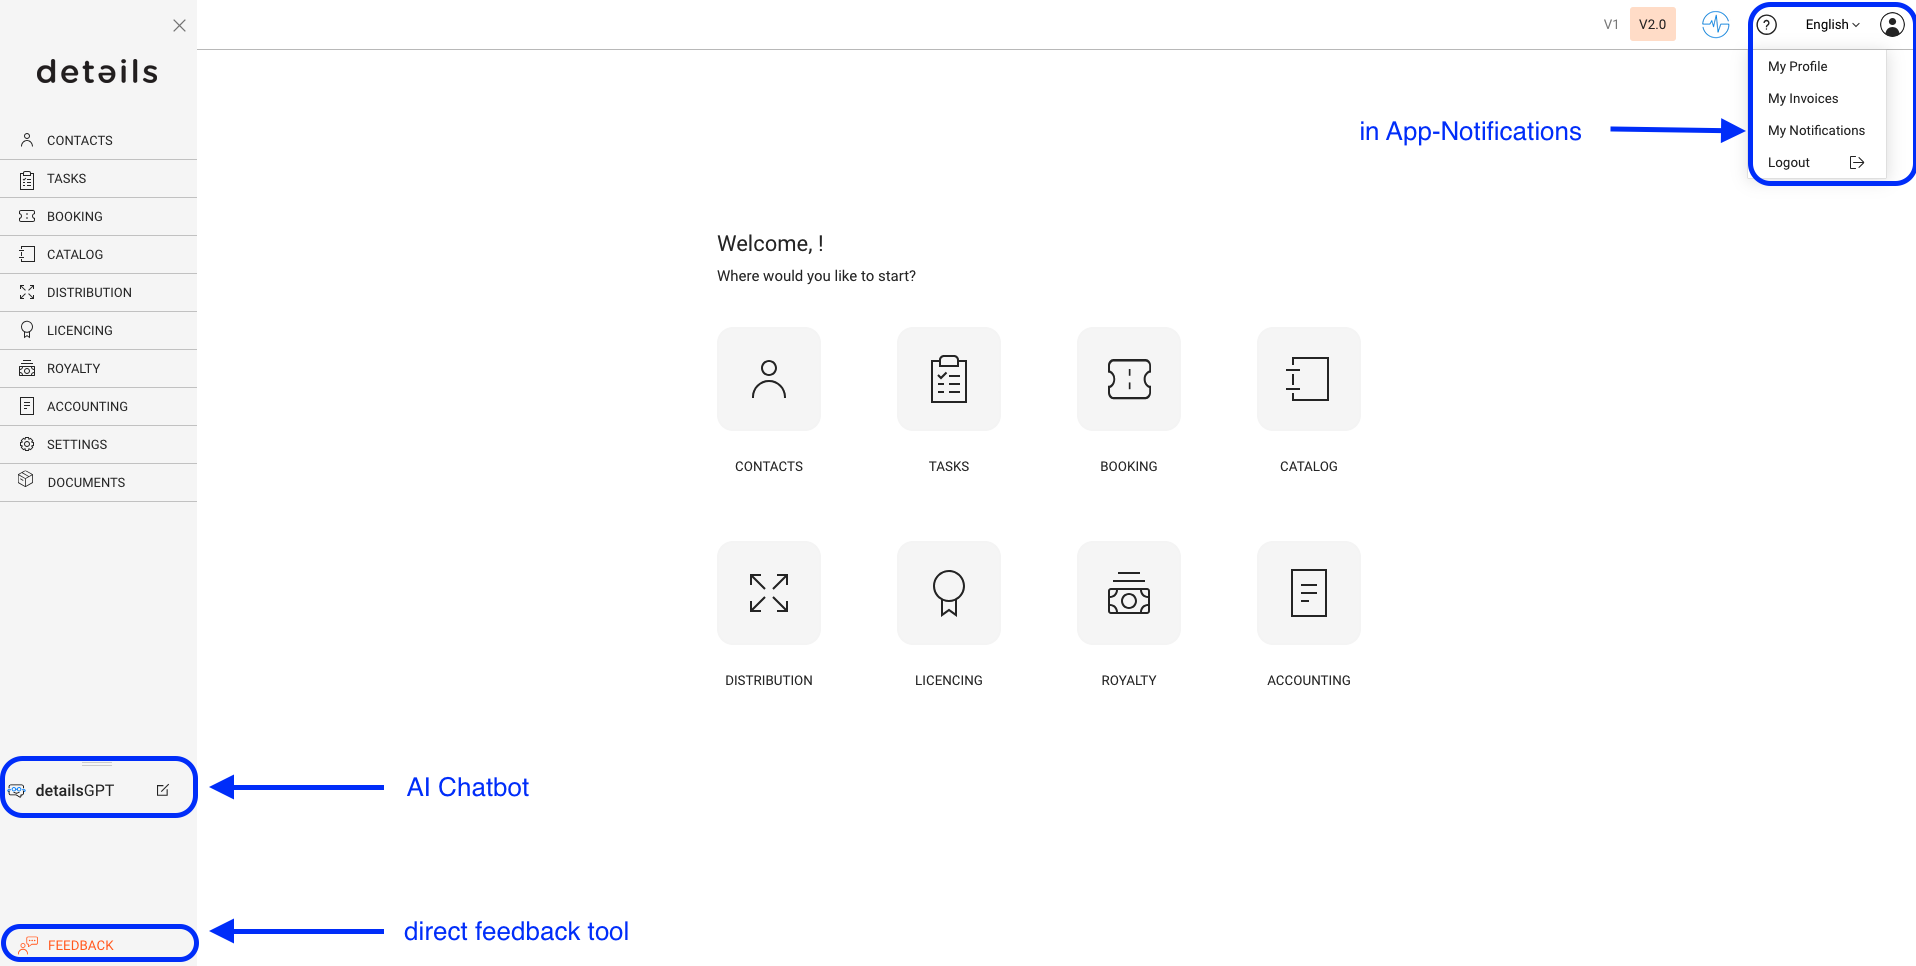
  • Module Accessibility: Modules can be accessed directly from the main menu on the left or from the home screen, ensuring quick and intuitive navigation.

  • Module Menu: The main menu is presented vertically on the left side, providing a clean layout and easy access to all core areas.

  • Visible Modules: The main dashboard and menu both give access to the 8 main modules: Contacts, Tasks, Booking, Repertoire, Distribution, Licensing, Royalty, and Accounting.

  • Language Settings: You can change the interface language via the top right corner.

  • Segmentation of LABEL: The section previously known as “LABEL” is structured into three clear areas: CATALOG, ROYALTY, and LICENSING making it easier to find what you need.

  • Access to V1 Interface: A switch to the legacy interface is available via the top right corner.
    However, please note: all new features and future improvements are only available in the current standard interface (V2.0).

    The new version offers a more modern design and significantly better usability.


2. Lists & Sidewindows:

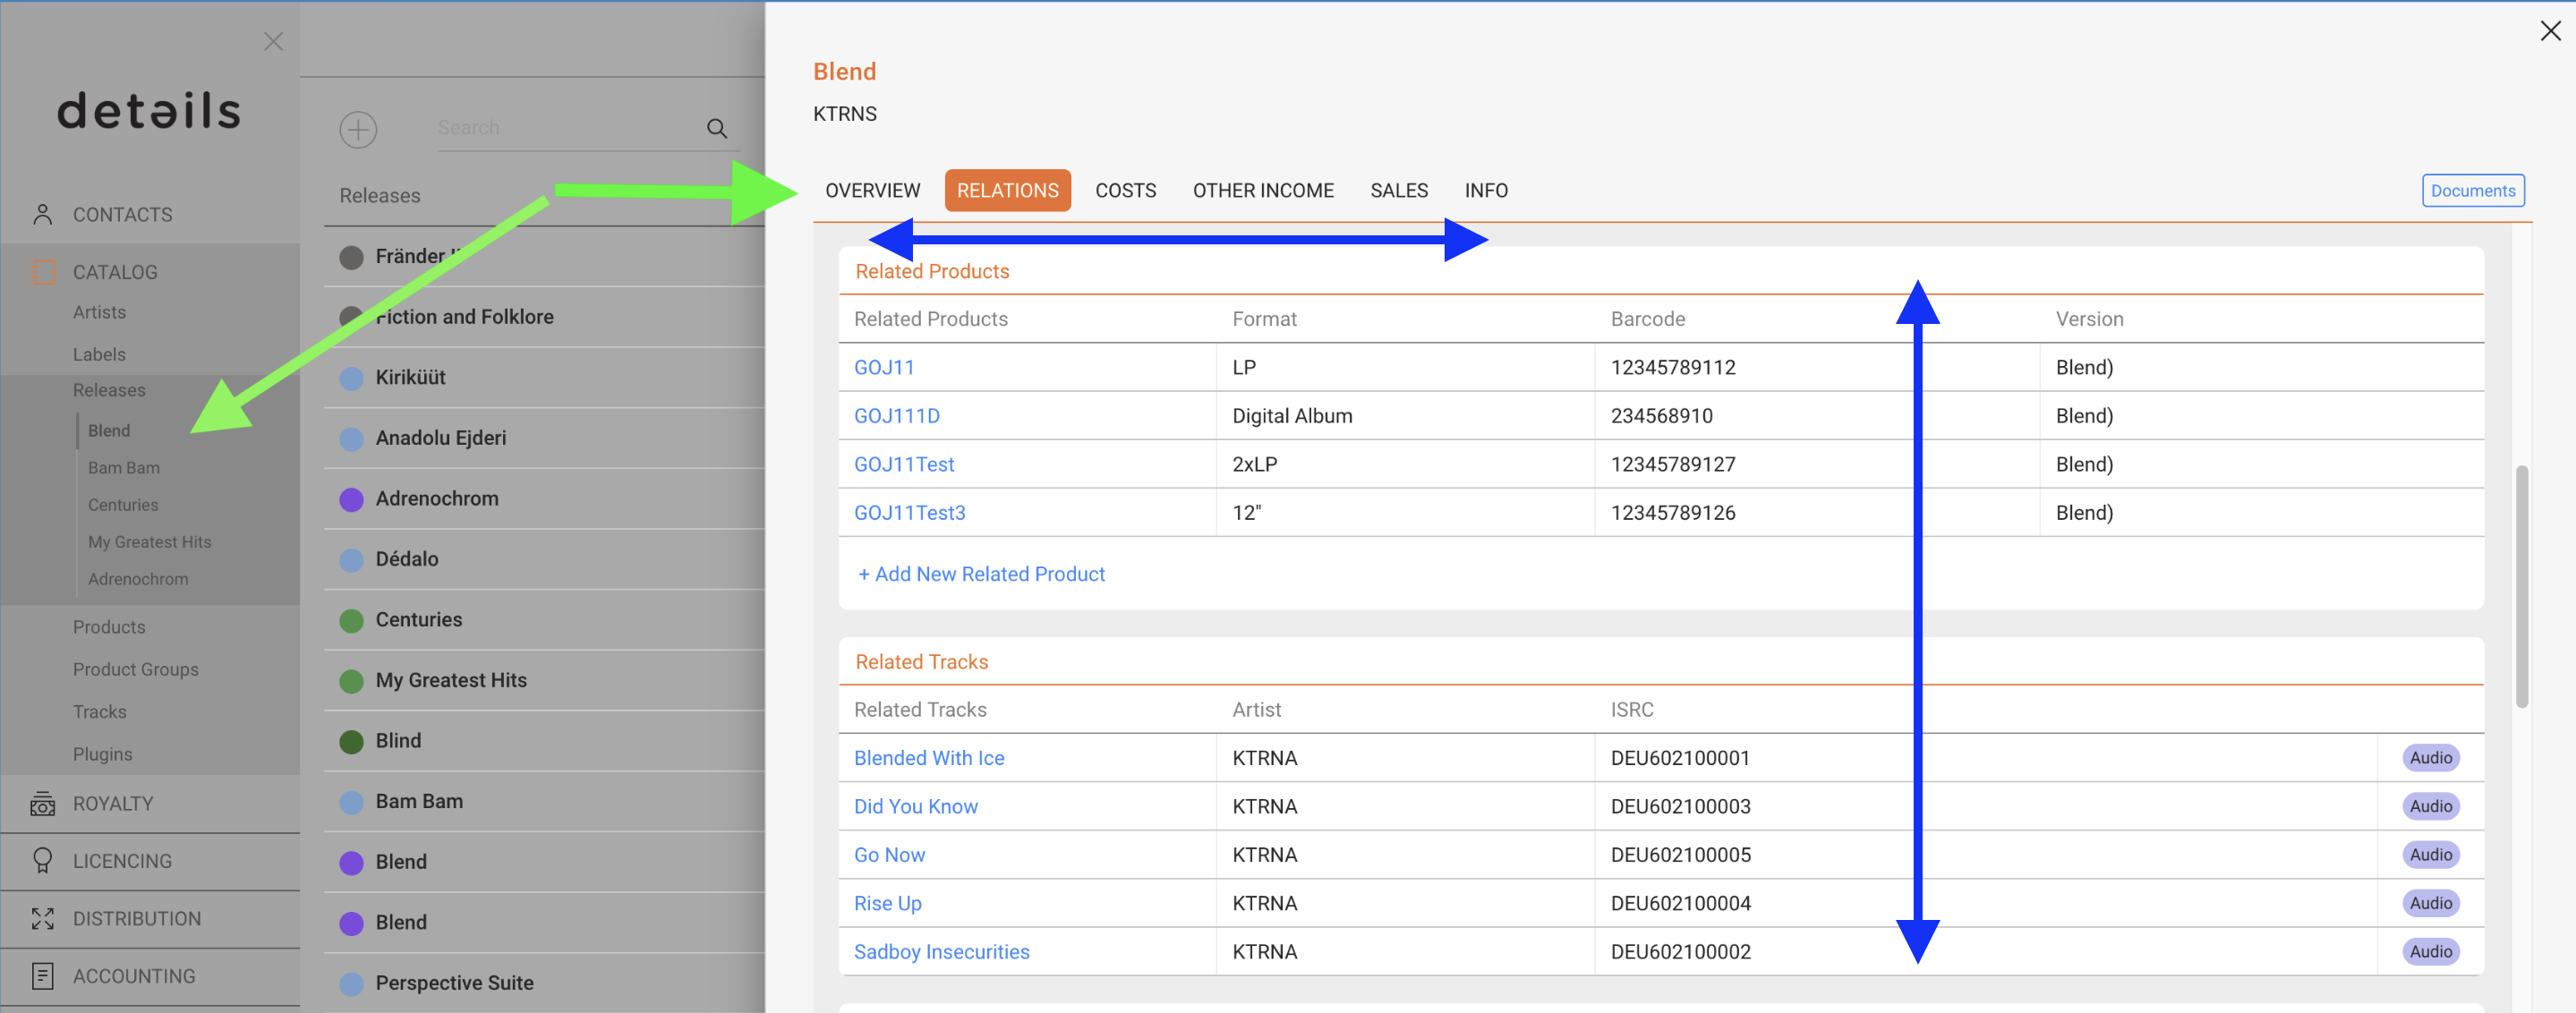
  • Subtab Placement: Subtabs are located within the sidewindows to keep the workspace organized and reduce visual clutter.

  • Sidewindow Scrolling: Sidewindows support smooth vertical and horizontal scrolling for easier navigation within detailed views.

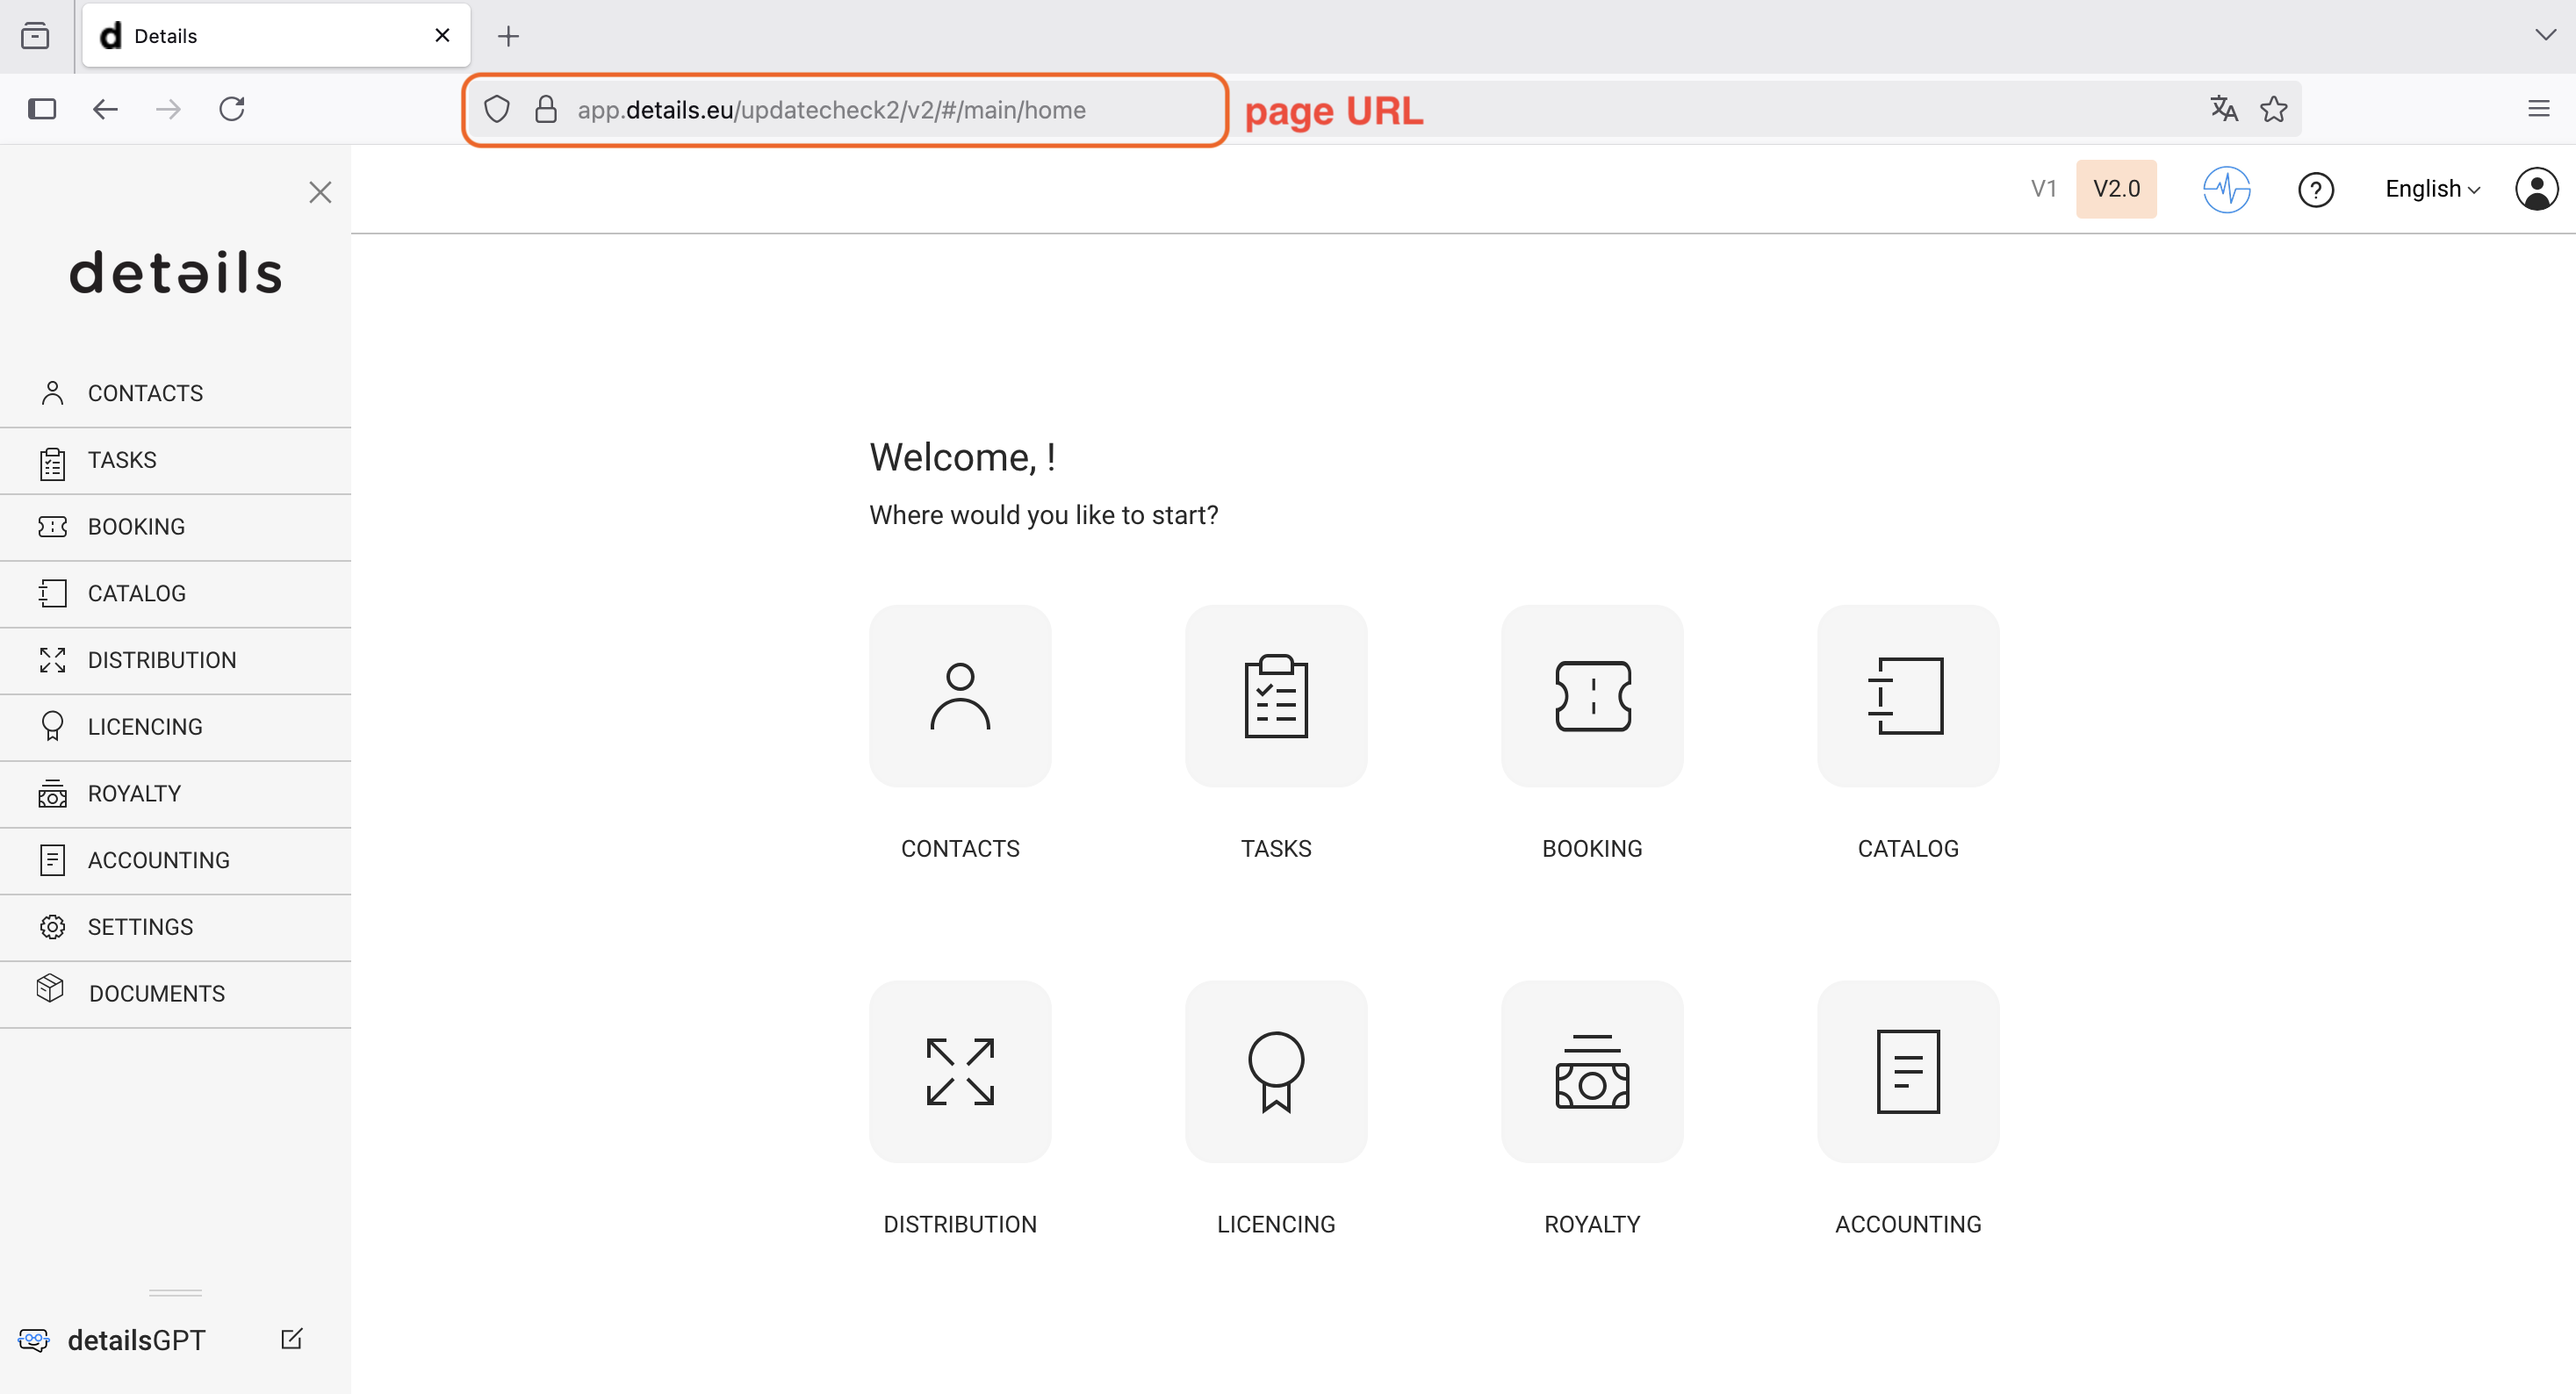
  • Navtabs Tagging: Open items are tracked as Navtabs in the main menu, allowing you to quickly jump back to active pages.

  • Dedicated Page Links: Each page has a unique link, making it easier to share your current view when asking for support or collaboration.

3. Profile & Communication Tools:

  • Icon:

    • User Profile: Via [MY PROFILE] you can add contact details can be added but are not required.

    • Invoices: Here you find your invoice documents.
    • System Notifications: Under [MY NOTIFICATIONS] you will find announcements and updates directly from the details team.

  • Feedback Tool: Use the [FEEDBACK] option at the bottom left to submit issues or suggestions. Your message will be sent directly into our internal ticketing system. You can:

    • Set your own level of urgency
    • Include helpful screenshots
    • Let us receive technical background info (no need for follow-up questions)

  • detailsGPT (Beta): Our assistant chatbot, similar to ChatGPT, is integrated in the system and constantly improving. For now, some answers may still be incorrect or incomplete.

Task List for Booking

The Task List is a powerful tool that provides an overview of all tasks associated with your bookings. This article will guide you through the features of the task list, including how to filter tasks to find exactly what you need.

Task List Overview:

The Task List displays all tasks related to bookings, including key details such as the task name, artist, status, due date, assigned user, and any relevant notes.

Task Name: The name of the task.
Artist Name: The artist associated with the task.
Status: The current status of the task (e.g., pending, open, done).
Due Date: When the task is due.
Assigned User: The person responsible for completing the task.
Notes: Any additional information related to the task.


Navigating to a Task:

Click on a Task: By clicking on any task in the list, you will be taken directly to the related booking. This makes it easy to manage and update tasks within the context of their respective bookings.


Using the Filter Bar:

At the top of the Task List, you will find a filter bar that allows you to refine the list of tasks displayed. This makes it easier to focus on specific tasks or to check on the status of ongoing tasks.

Here s how you can use the filters:

1. Free Text Search:
” Enter any keyword or phrase to search across all tasks. This is useful for quickly finding specific tasks based on their content.
2. Task Status:
” Filter tasks by their status (e.g., done, open, pending, question). This allows you to focus on tasks that need attention or to review completed tasks.
3. Booking Status:
” Narrow down the tasks based on the status of the associated booking.
4. Assigned User:
” Filter by the person responsible for the task. This is helpful for managing workloads or tracking specific users responsibilities.
5. Sent User:
” Filter by the person who assigned or created the task. This helps in tracking task assignments.
6. Start Date and End Date:
” Use these date filters to view tasks within a specific time frame. This is particularly useful for time-sensitive projects or for reviewing past tasks.

7. Apply Filter:
” After setting your desired filters, click on Apply Filter to refresh the task list with the specified criteria.

Managing Tasks for a Booking

When managing a booking, you can add tasks in two ways: either by loading a Task Group (a set of predefined tasks) or by adding a Single Task.

Below are the detailed steps for each method, accompanied by screenshots for clarity.

1. Adding a Single Task

To add a single task to your booking, follow these steps:

1. In a Booking, navigate to the Tasks Tab:
Open the booking details for the event you want to manage.
Click on the Tasks tab.

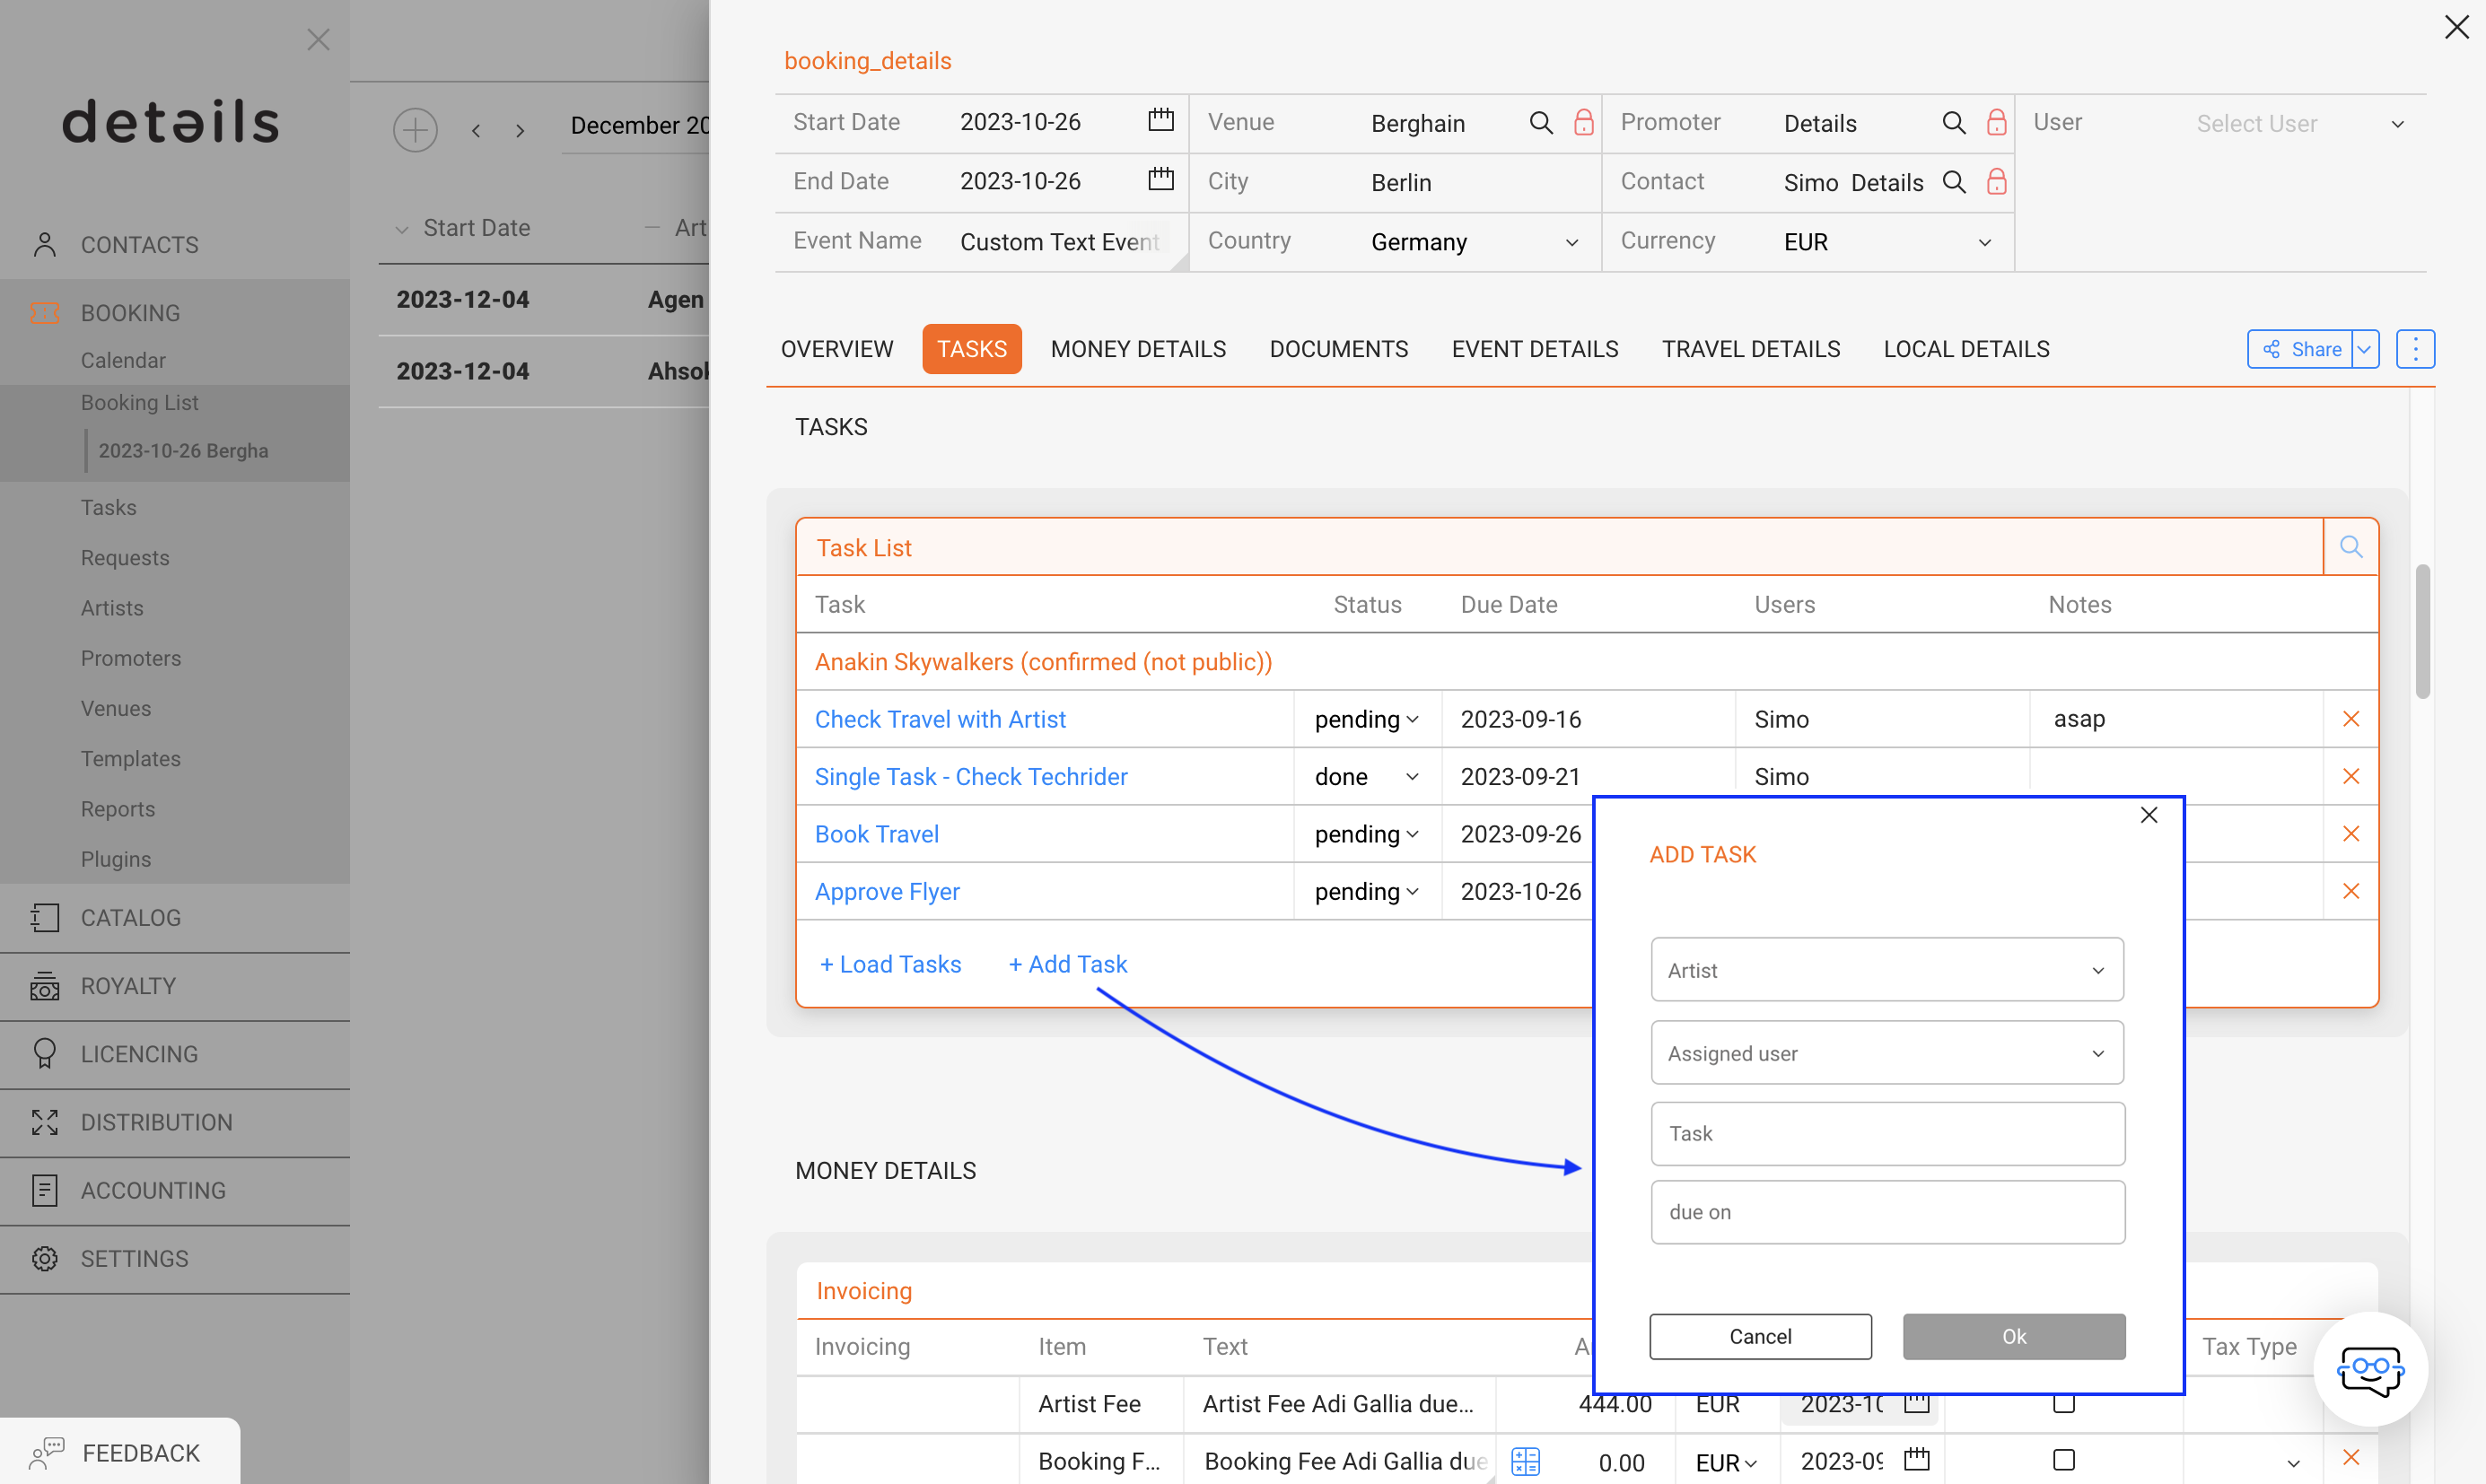
2. Click on +Add Task:
In the Tasks section, click on the +Add Task button.

3. Fill Out the Required Information:
Artist: Select the artist.
Assigned User: Choose the responsible user.
Task: Enter the task (e.g., book flight).
Due On: Set the due date.
Click OK to save.

This method allows you to create and assign individual tasks tailored to your booking.

2. Managing Task Groups for Booking

Task Groups are predefined sets of tasks that can be loaded into a booking to streamline your workflow.

1. Click on +Load Tasks:
In the Tasks section, click on the +Load Tasks button.

2. Choose an Artist and Task Group:
Artist: Select the artist.
Task Group: Choose a predefined group (e.g., Travel Tasks, Social Media Tasks).
Click OK to load all tasks.

This approach is ideal for recurring workflows, allowing you to assign multiple tasks quickly.

How to preview the SHARES royalty dashboard for a specific Royalty Account

You may wonder what the SHARES Royalty Dashboard looks like for a specific royalty account before sending out the login credentials, just to make sure you are on the safe side.

Fortunately, DETAILS allows logged in users to preview the dashboard quickly and hassle-free.

You do not need to know the link, login, or password; you only need to have access to the royalty section and the royalty account in details.


Accessing Your Royalty Account Preview

Log into details: Only users logged into details with access to the ROYALTY section can benefit from the direct access.

Select Royalty Account: Navigate to the ROYALTY section and within the ROYALTY ACCOUNTS, select the royalty account you wish to check.

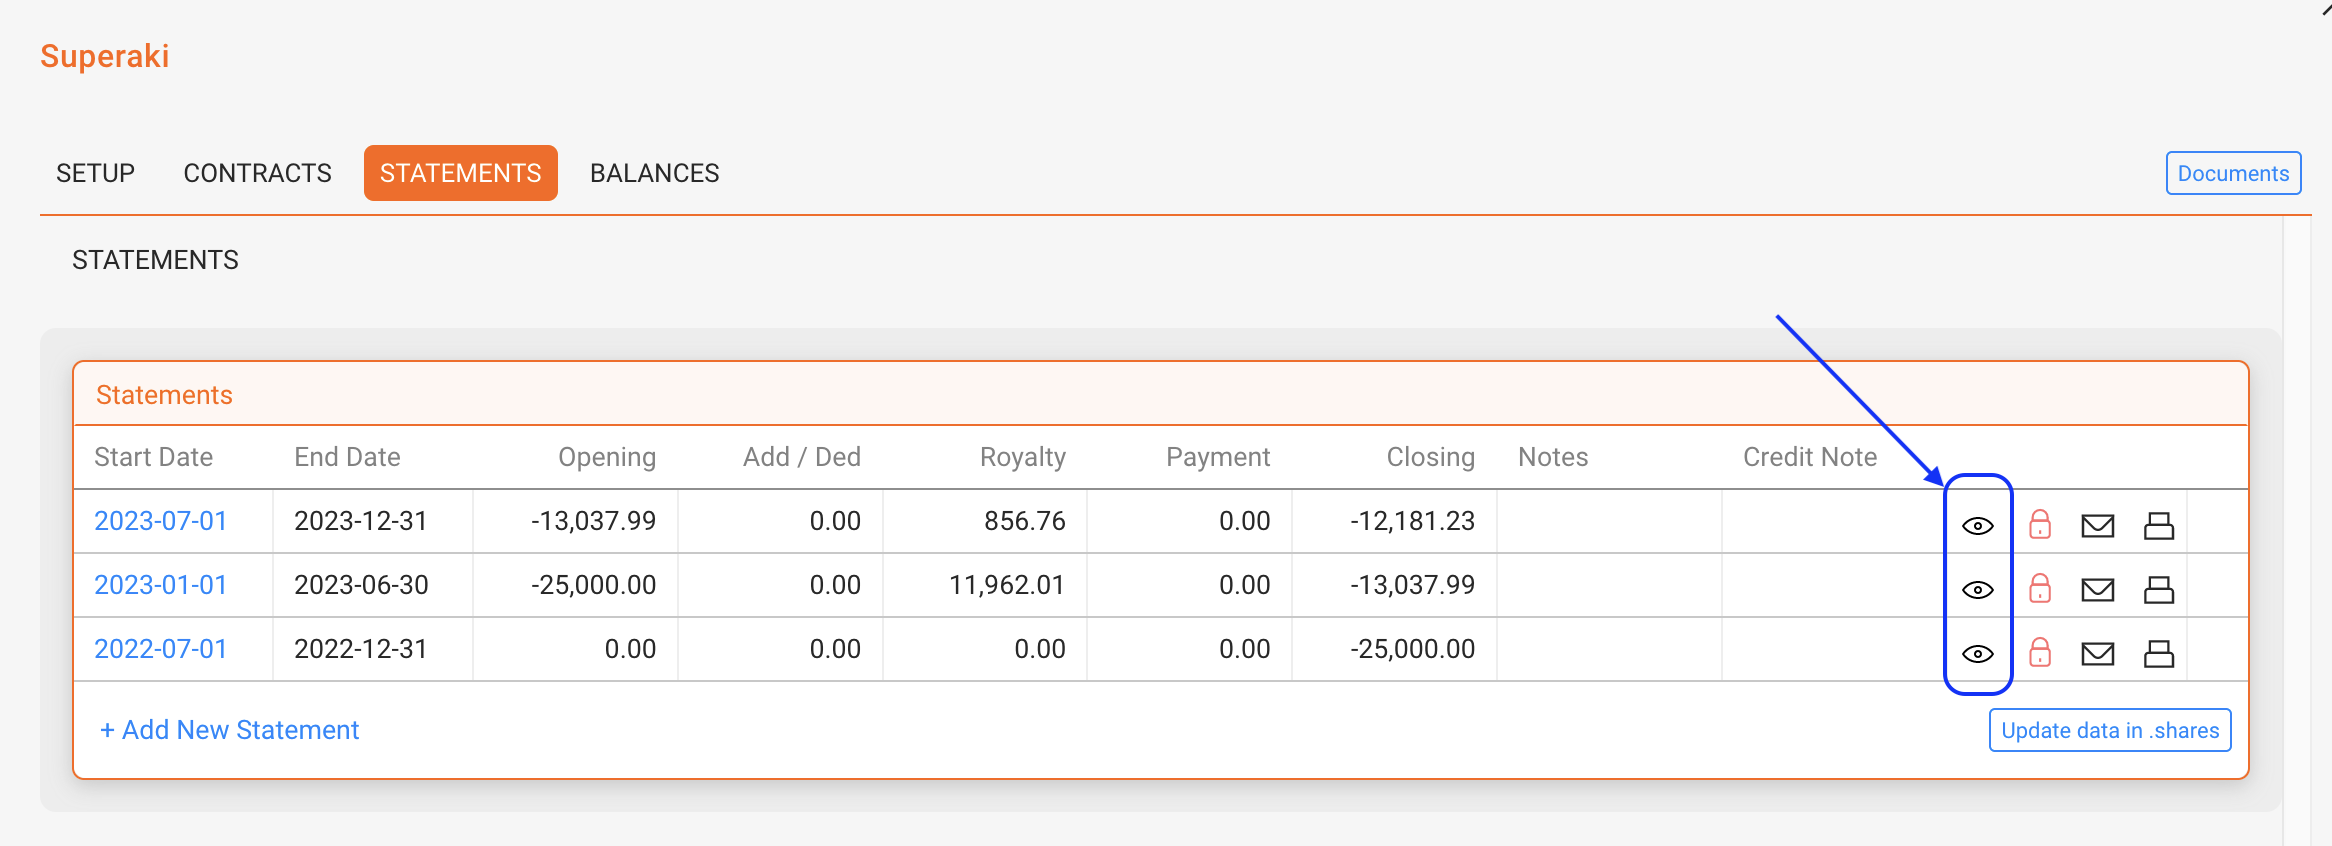
Click the [Eye] icon: In the “Statements” section of the royalty account, look for the eye icon. Click on the icon to access a selection of external users you may select from for your preview.

Preview Your Account: Upon selection, a preview window will open, displaying exactly what is being shown to the selected external user.


What You Can Expect to See

When previewing a royalty account in the SHARES royalty dashboard, you can:

  • Evaluate the data visualization and overall visual impression.
  • See the financial overview of your royalty account, including the most recent statements and a 24-month royalty graph.
  • Check the current year or previous years, including graphs on revenue generated from digital and/or physical sales, depending on your royalty account display settings.


No Password Required: Accessing an account preview does not require knowing their password if and as long as you are a logged-in details user with access to the royalty section. The preview function provides a secure way to access a SHARES account without compromising the account security.

But do not change their passwords: While previewing your account, do not change the account’s password unless requested by the account. Only alter their password if you want to provide a new password or to block access.