How to manage STORES


In details, the term Store refers to any place or source where income is generated and reported. This concept goes beyond the common understanding of online shops or streaming platforms it covers all relevant revenue sources that appear in your statements.

Typical examples include:

  • Digital Service Providers (DSPs) such as Spotify, Apple Music, Deezer, Amazon Music, or YouTube
  • Collecting Societies such as GVL, SENA, PPL, SABAM
  • User Generated Content (UGC) Platforms such as YouTube, SoundCloud, TikTok, or Instagram
  • Physical Sales Sources such as distributors or retail partners

Remember: In details, a Store is not limited to digital platforms. Any channel through which income flows into your system physical, digital, or rights-based is considered a Store. This broader definition ensures that your royalty data remains transparent and comparable across different sources.
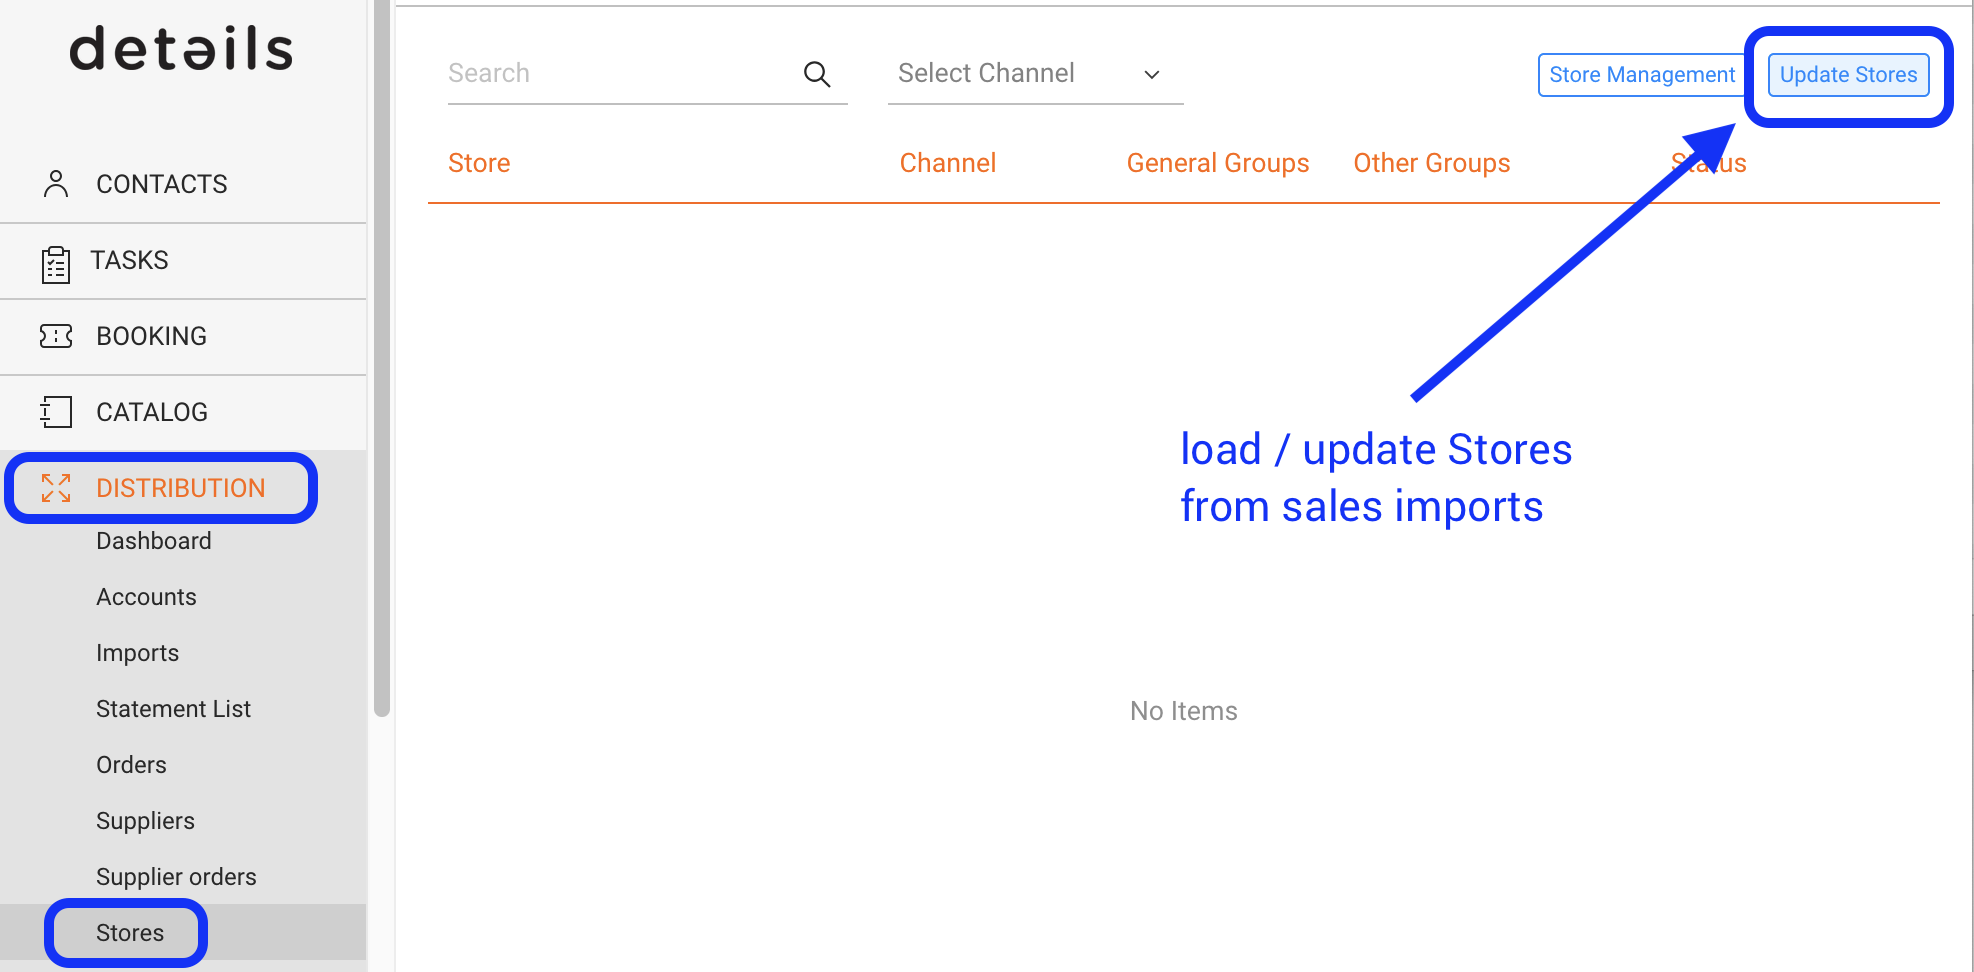
You can access all Stores via DISTRIBUTION / STORES. From there, you can manage naming consistency, merge duplicates, or create store groups to keep your income data structured and accurate.

Note: Stores are created automatically from imported sales and royalty data. After importing new files, update your list with [Update Stores] in the top right corner.


► STORE MANAGEMENT

The Store list helps you keep names consistent and reporting accurate. You can:

  • Rename Stores to fix misspellings or align naming.
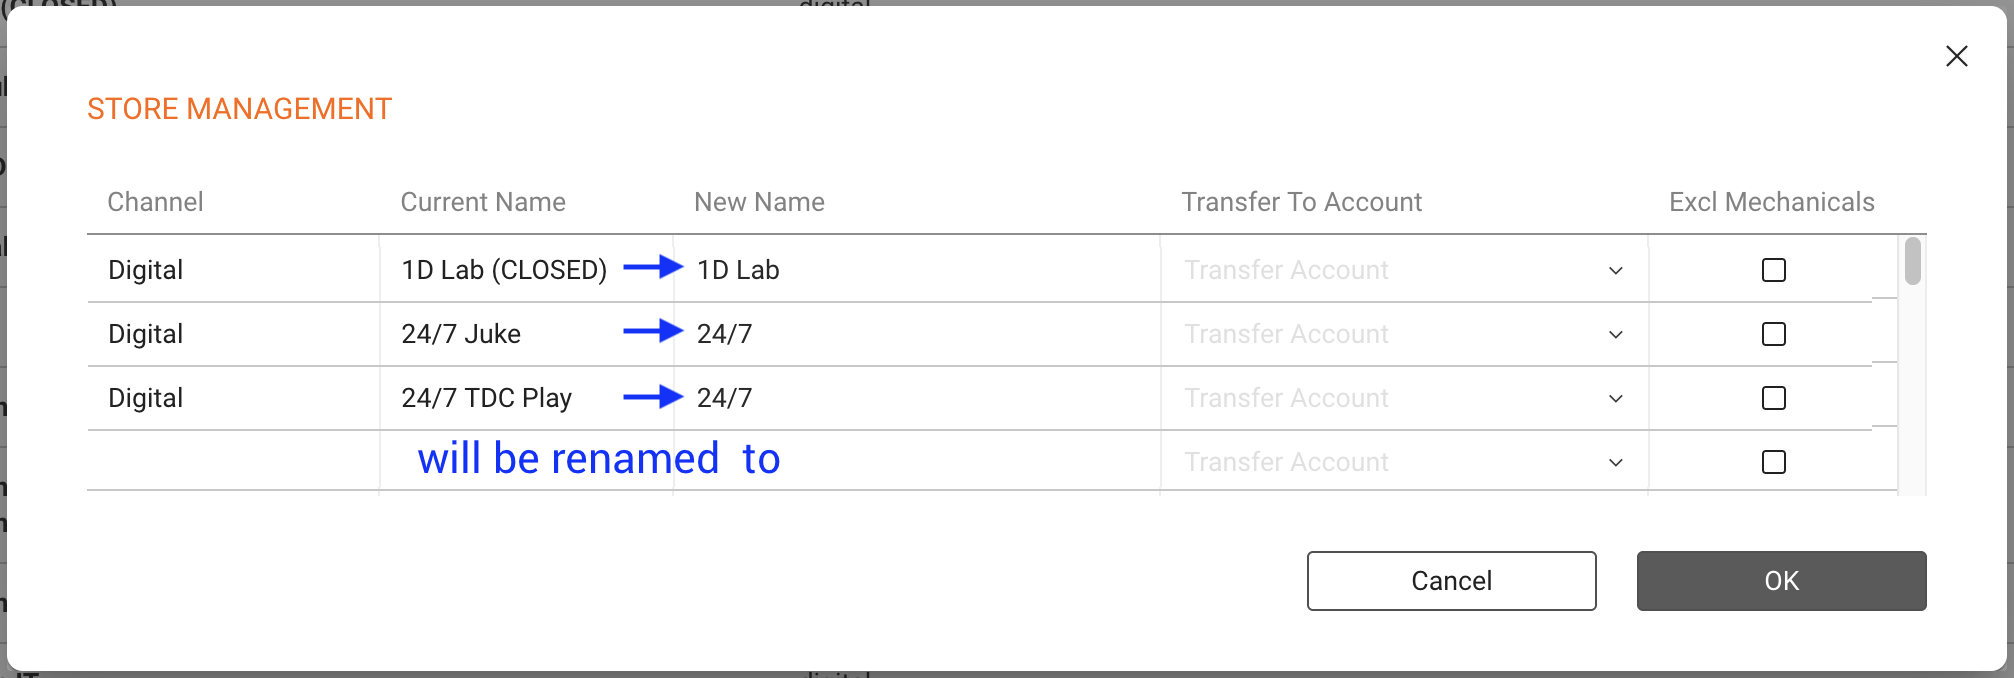
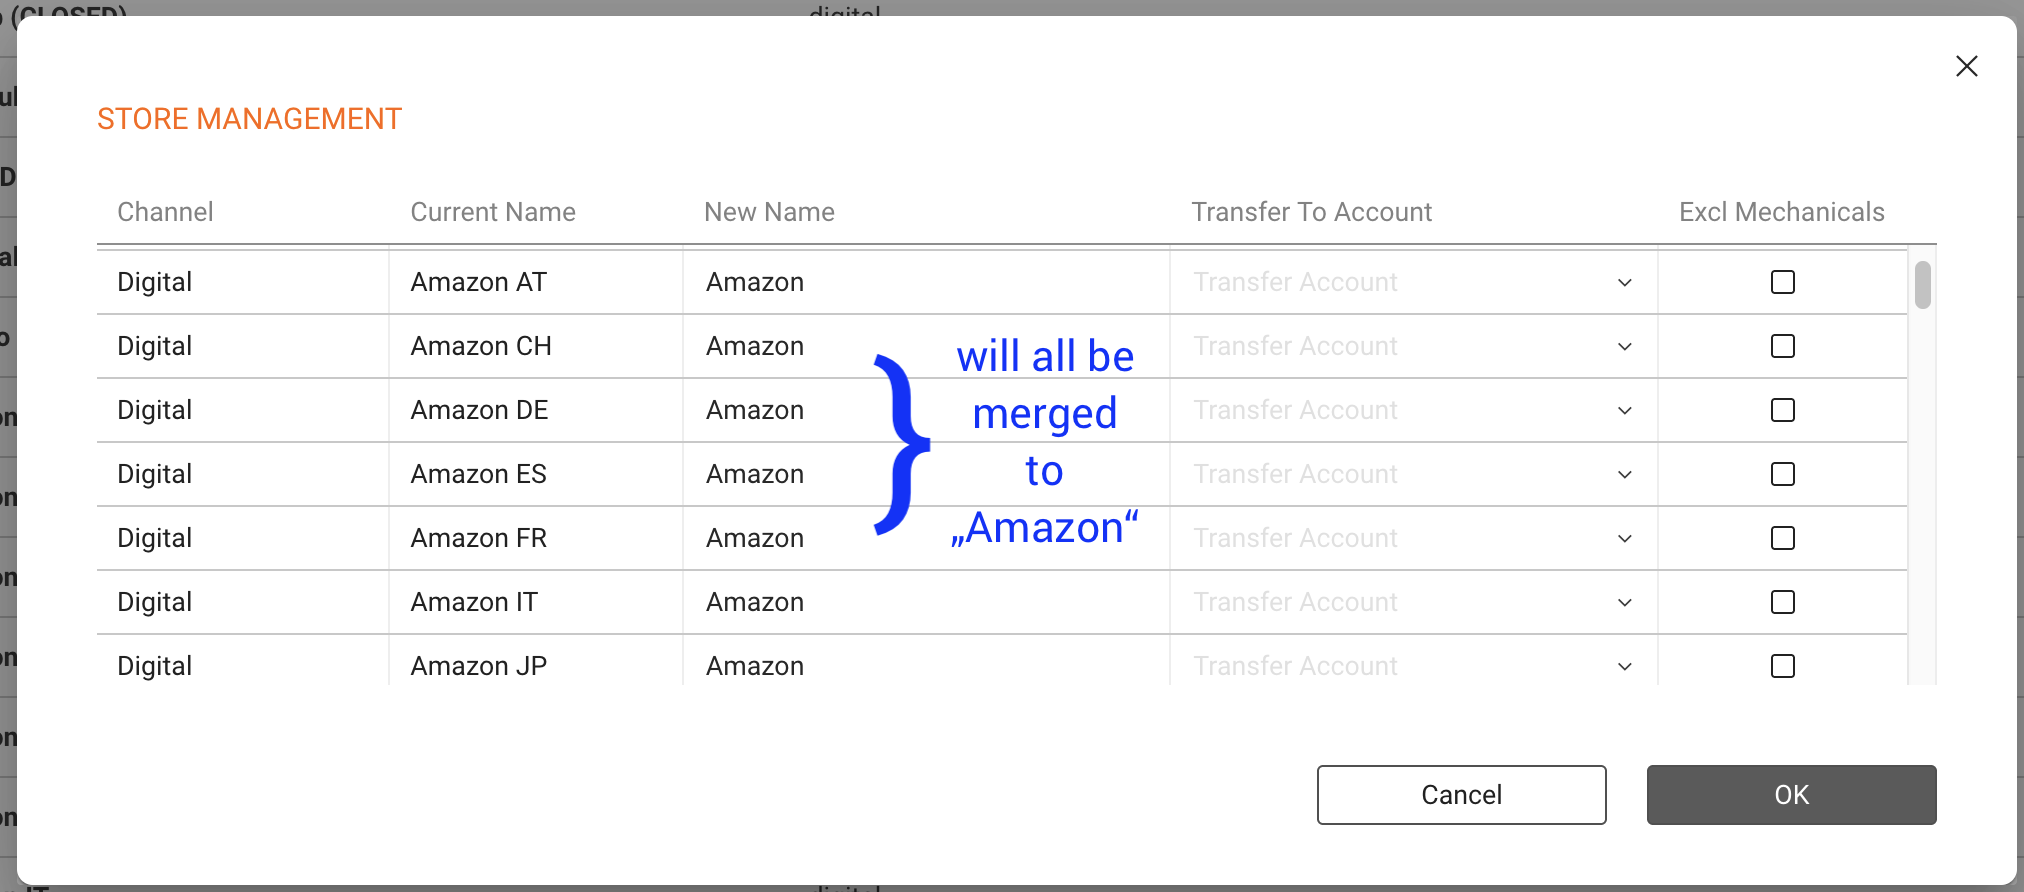
  • Merge Stores by renaming multiple entries to a single unified name.
  • Transfer to Account to reassign sales from selected Stores to a different distribution account (use only when necessary).
  • Exclude Mechanicals to remove selected Stores from mechanical calculations.

► RENAME & MERGE STORES

Open Store Management

Click [Store Management] (top right). Loading may take time if there are many millions of rows.

Rename a Store

  1. Select the Store you want to change.
  2. Enter New Name.
  3. Confirm with [OK].

Merge multiple Stores

  1. Select each duplicate or variant Store name.
  2. Rename all of them to the same New Name.
  3. Confirm with [OK]; entries will consolidate under the unified name.
► TROUBLESHOOTING

  • Misnamed Stores (e.g., Credit Card , AAAA ): Likely caused by an import mapping issue. Review the source file and mapping, correct the import, and then standardize the Store names via [Store Management]. Contact support if you need help tracing the source.
Creating, Assigning, and Managing Tasks

This guide will walk you through the process of setting up and working with tasks in details. From initial planning to hands-on task management and collaboration tips this article covers it all.

► Getting Started with Task Management
  • Define task sequences: Start by breaking your processes into manageable steps. For example, define recurring workflows like tour planning or release rollout as task sequences.
  • Assign team members: Assign tasks directly during setup to clarify responsibilities and ensure smooth transitions between task stages.
► Navigate to the TASKS Section
    1. Log in to your details account.
    2. Go to TASKS / TASKS to access the full task overview.

      Task overview
    3. To access item-specific tasks:
      • Select a section like CATALOG / RELEASES.
      • Click on an item to open it.
      • Go to SELECTED ITEM / TASKS to manage tasks there.
    4. For an overview of predefined task lists by work area, visit:
      Booking Task Lists
► Create a Task
  1. Click [+] at the top right corner in TASKS OR
    click [+ Add Task] in the CATEGORY / SELECTED ITEM / TASKS►at bottom of the list.
    • If you’re in a category view like BOOKING, PRODUCT or RELEASE, make sure the correct tab is selected first.

      Item-specific tasks
  2. This opens the [New Task] form.
    Task form
  3. Fill in the required details:
    • Task Name: A clear and short title.
    • Assigned User: Person responsible for the task.
    • Due Date: Set the task deadline.
    • Notes: Add any additional info or special instructions.
  4. Click [OK] to save the task. It will now appear in the list below the selected category.
► Update Task Status
  1. Click on the task name to open it.
  2. Select a status from the Status dropdown (e.g. Open, Pending, Completed).

    Task status dropdown
► Keep Tasks Up to Date
  1. Check the TASKS section regularly to keep track of all open items.
  2. Review Status and Due Dates to stay on top of deadlines.
  3. Edit tasks to update notes, reassign, or complete them as needed.
► Helpful Tips
  • Update consistently: Ask your team to keep statuses and notes up to date so that progress is always visible.
  • Meet regularly: Hold short weekly check-ins with your team to review open tasks and solve blockers together.
  • Group recurring work: Use Task Groups to organize repetitive or related tasks.
  • Use filters to prioritize: In TASKS, filter by Status, Due Date or Assigned User to focus on what matters.

If you need more help, don’t hesitate to reach out to our Label Team (for Labels) or Simo (for Booking).

How to Copy a Show in the Booking Module

Copying a show is a great way to save time when creating multiple, similar bookings for the same artist or event. With this feature, you can quickly duplicate key details and adjust only what s necessary, like the date or specific local details. Here s how you can easily copy a show in just a few steps:

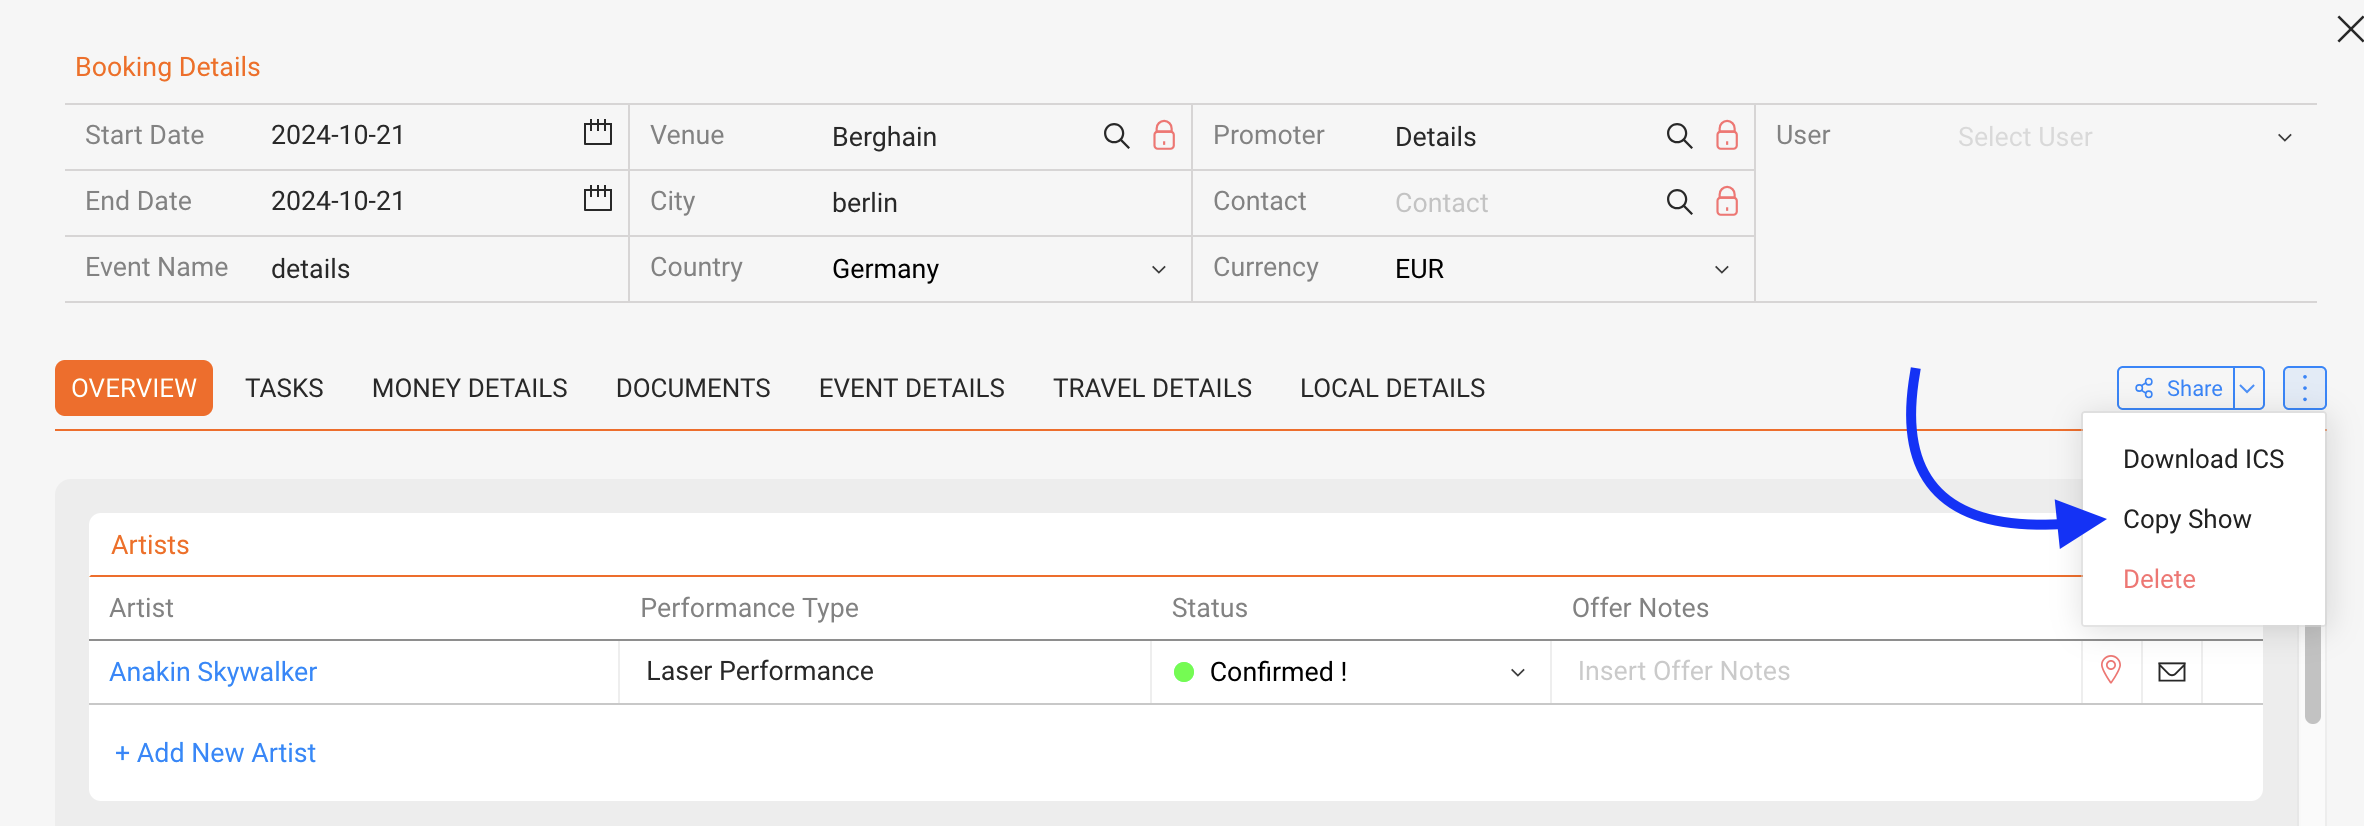
To copy a show, navigate to the show you want to copy, click on the “…” (more options) menu, and select “Copy Show.

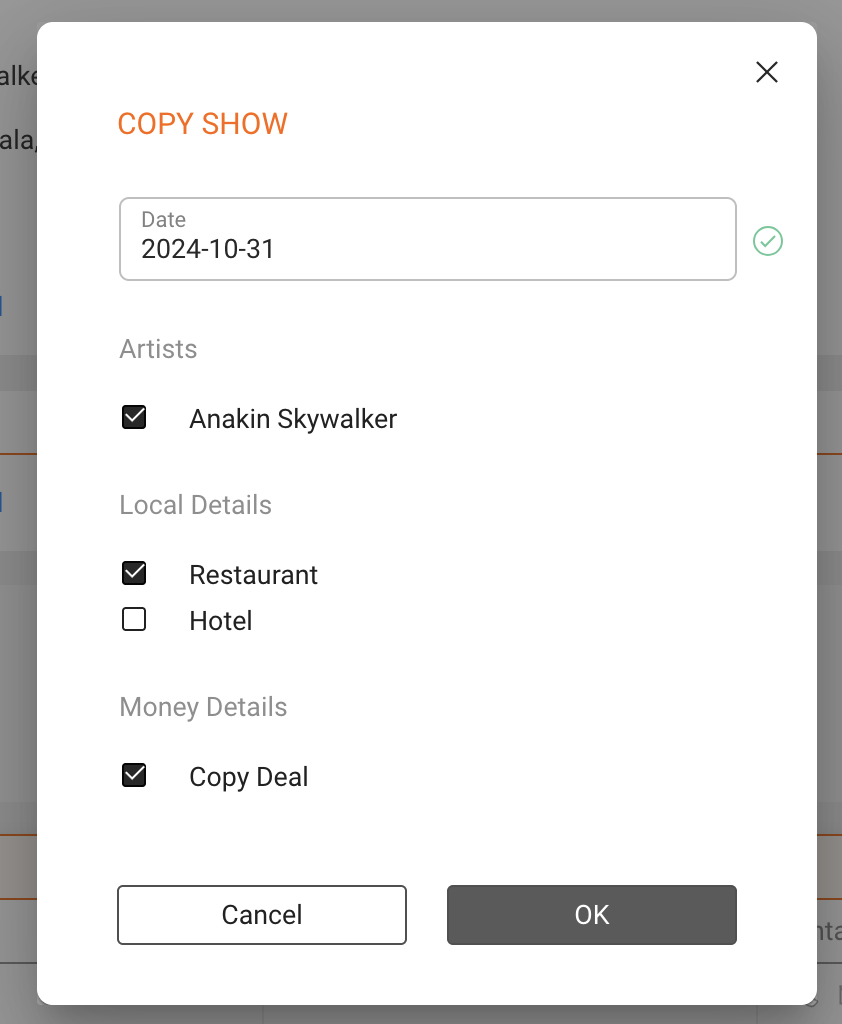
A pop-up window will appear, where you ll need to make a few key selections for the new, copied show:

  • Set the New Date: Choose the date for the new show by selecting it from the date picker. This will be the date on which the duplicated show is scheduled.

  • Select the Artist: Confirm the artist for the copied show. By default, this will be the same artist as in the original show, but you can select a different artist if needed.

  • Choose Which Local Details to Copy: Specify if you want to duplicate certain local details such as venue information, contacts, or other local arrangements. You can select all, some, or none of these details based on what s relevant for the new show.

  • Decide Whether to Copy the Deal: If there s a deal associated with the original show (such as financial terms or specific agreements), you can choose to duplicate it here as well. Select this option if the terms of the deal should carry over to the new booking.


After making your selections, click OK to complete the copy process. The system will create the new show with all your specified details, saving you time from manually entering information again.

Booking Update 11 2024

Table of contents

We’re looking for ways to make your booking experience more seamless, efficient, and user-friendly.
Check out our updates for the Booking Module in November 2024!

In this release, you’ll find tools to help you manage bookings faster, like the option to copy or clone bookings and a refined Booking Request Form, now officially out of beta.
We’ve also improved how booking details are displayed across views, with easier navigation and enhanced search options.

Here’s a closer look at what’s new and improved.

New Features

  • Copy/Clone Bookings: Easily copy a booking to create similar ones. How to copy a booking
  • Timestamps in Checklist: Track when checklist items were completed.
  • Updated Booking Request Form: Now officially out of beta.
  • Conditional Display in Artist App / iCal: Show only confirmed local details. Learn more
  • Venue Contact Update: Keep venue contacts updated via bookings. Learn more
  • Exclusivity Settings: Set exclusivity for artists

Improvements

  • Task Management in Settings: Enable/disable tasks per user.
  • Task List Enhancements: Update task status directly from list.
  • Promoter Search: Search bookings by promoter name.
  • Accounting Navigation: Stay in place when closing overlays.
  • Default Questionnaire Language: Matches browser language.
  • Instant Local Details Display: No refresh needed.

Bugfixes

  • Invoice Layout Dropdown: Fixed jump issue.
  • Booking Header Hyperlink: Now copies instead of opening.
  • iCal Creation: Improved stability.
  • Accounting Status Dropdown: Fixed language issues.
  • Local Details Auto-fill: Fixed missing Zip/City/Country.
  • Questionnaire Duration: Always visible now.
  • Travel Load Issue: Loads only correct data.

Option to display only confirmed local details in the Artist App / iCal

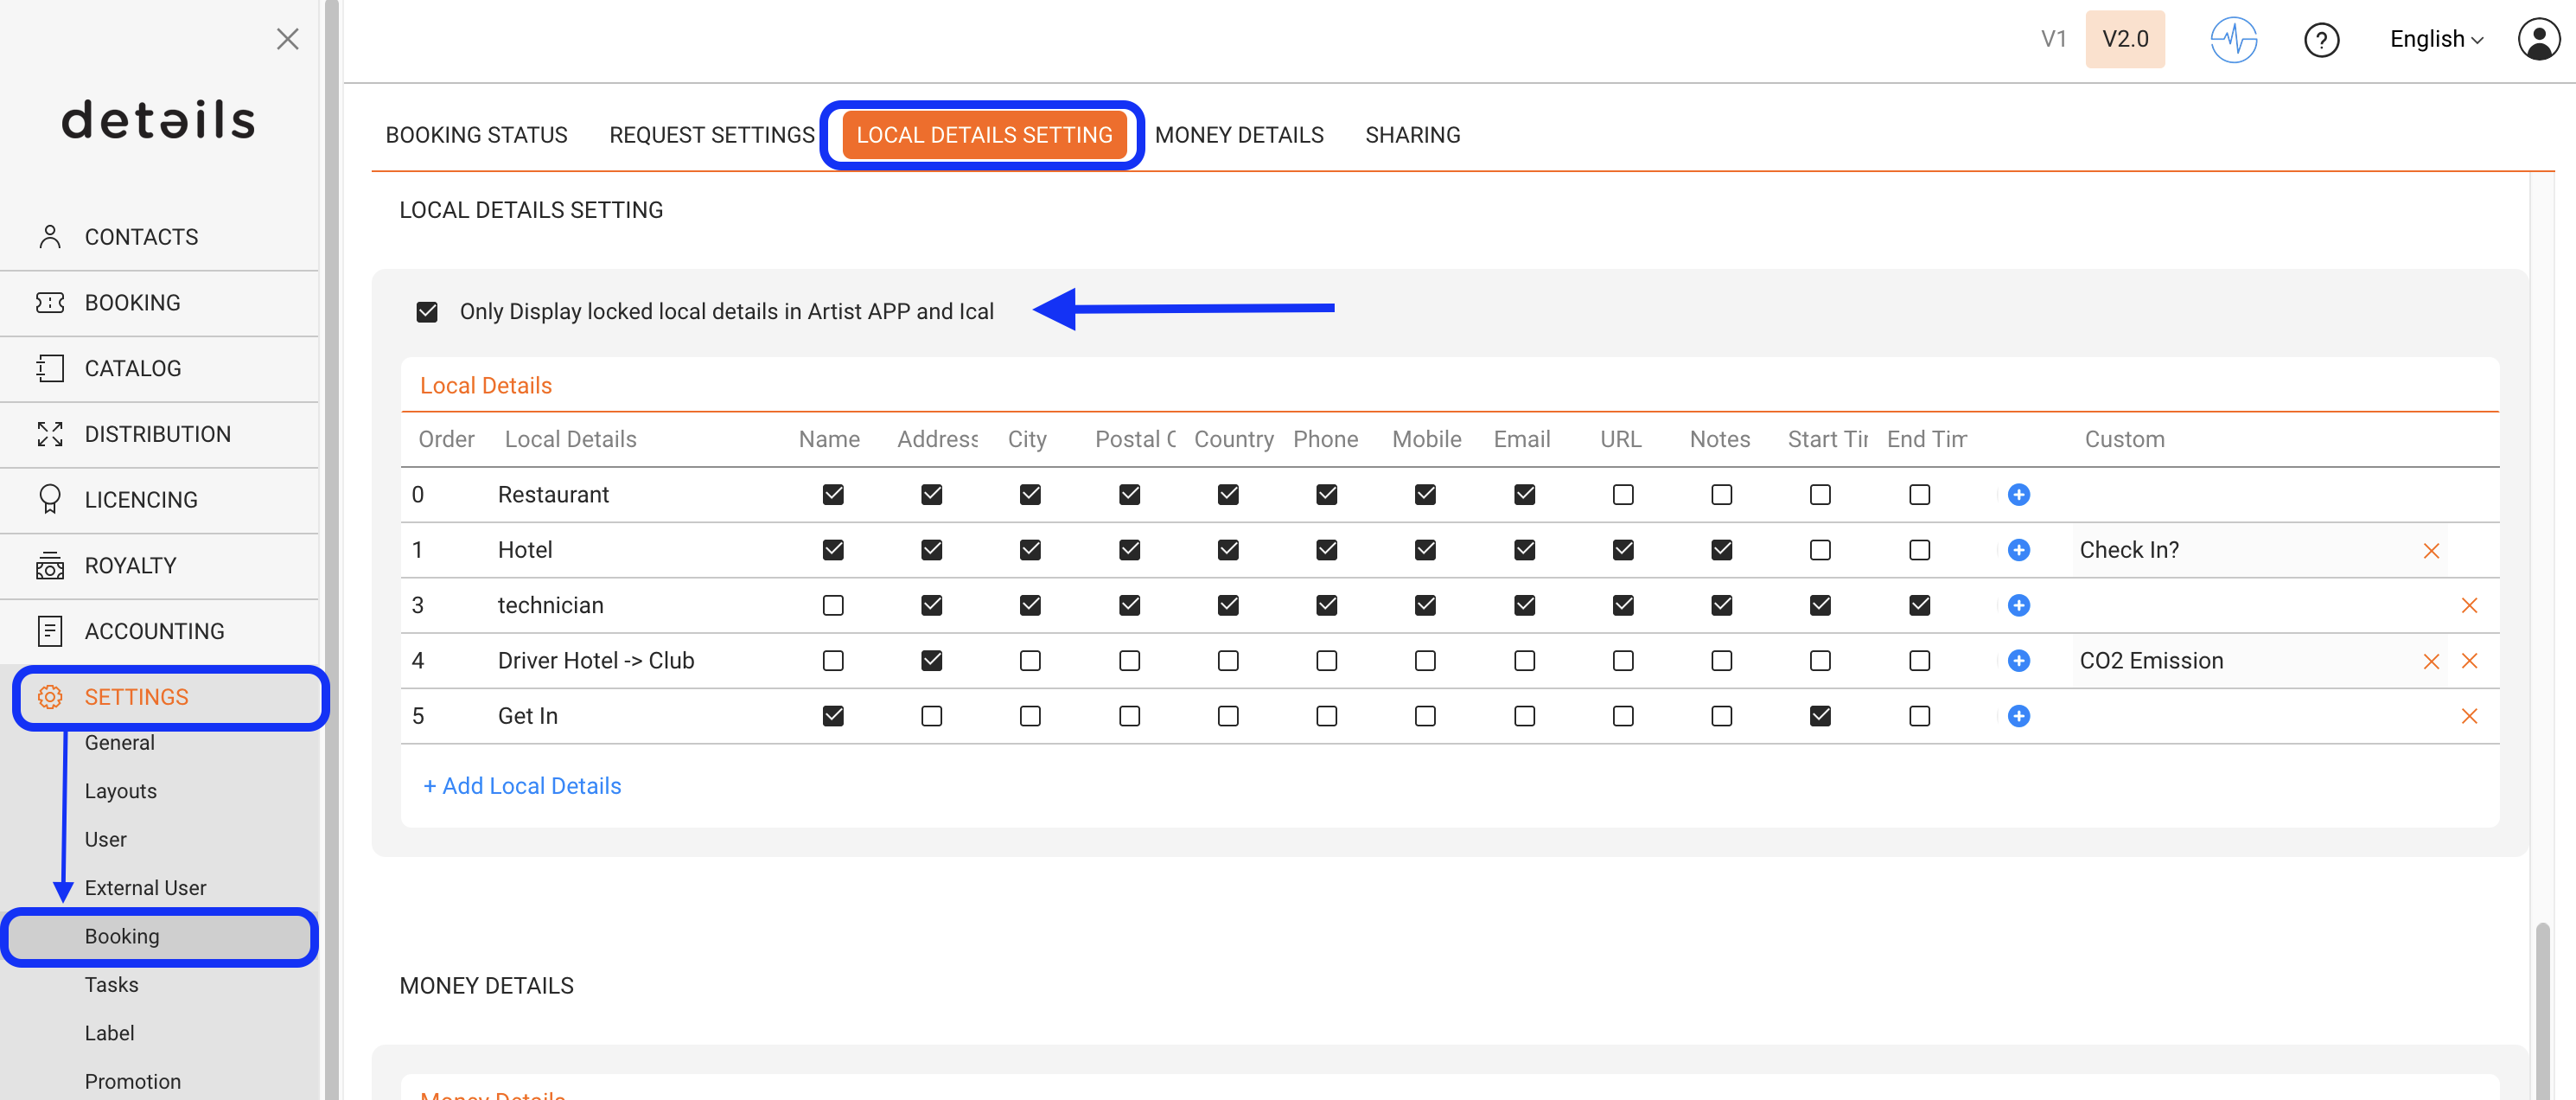
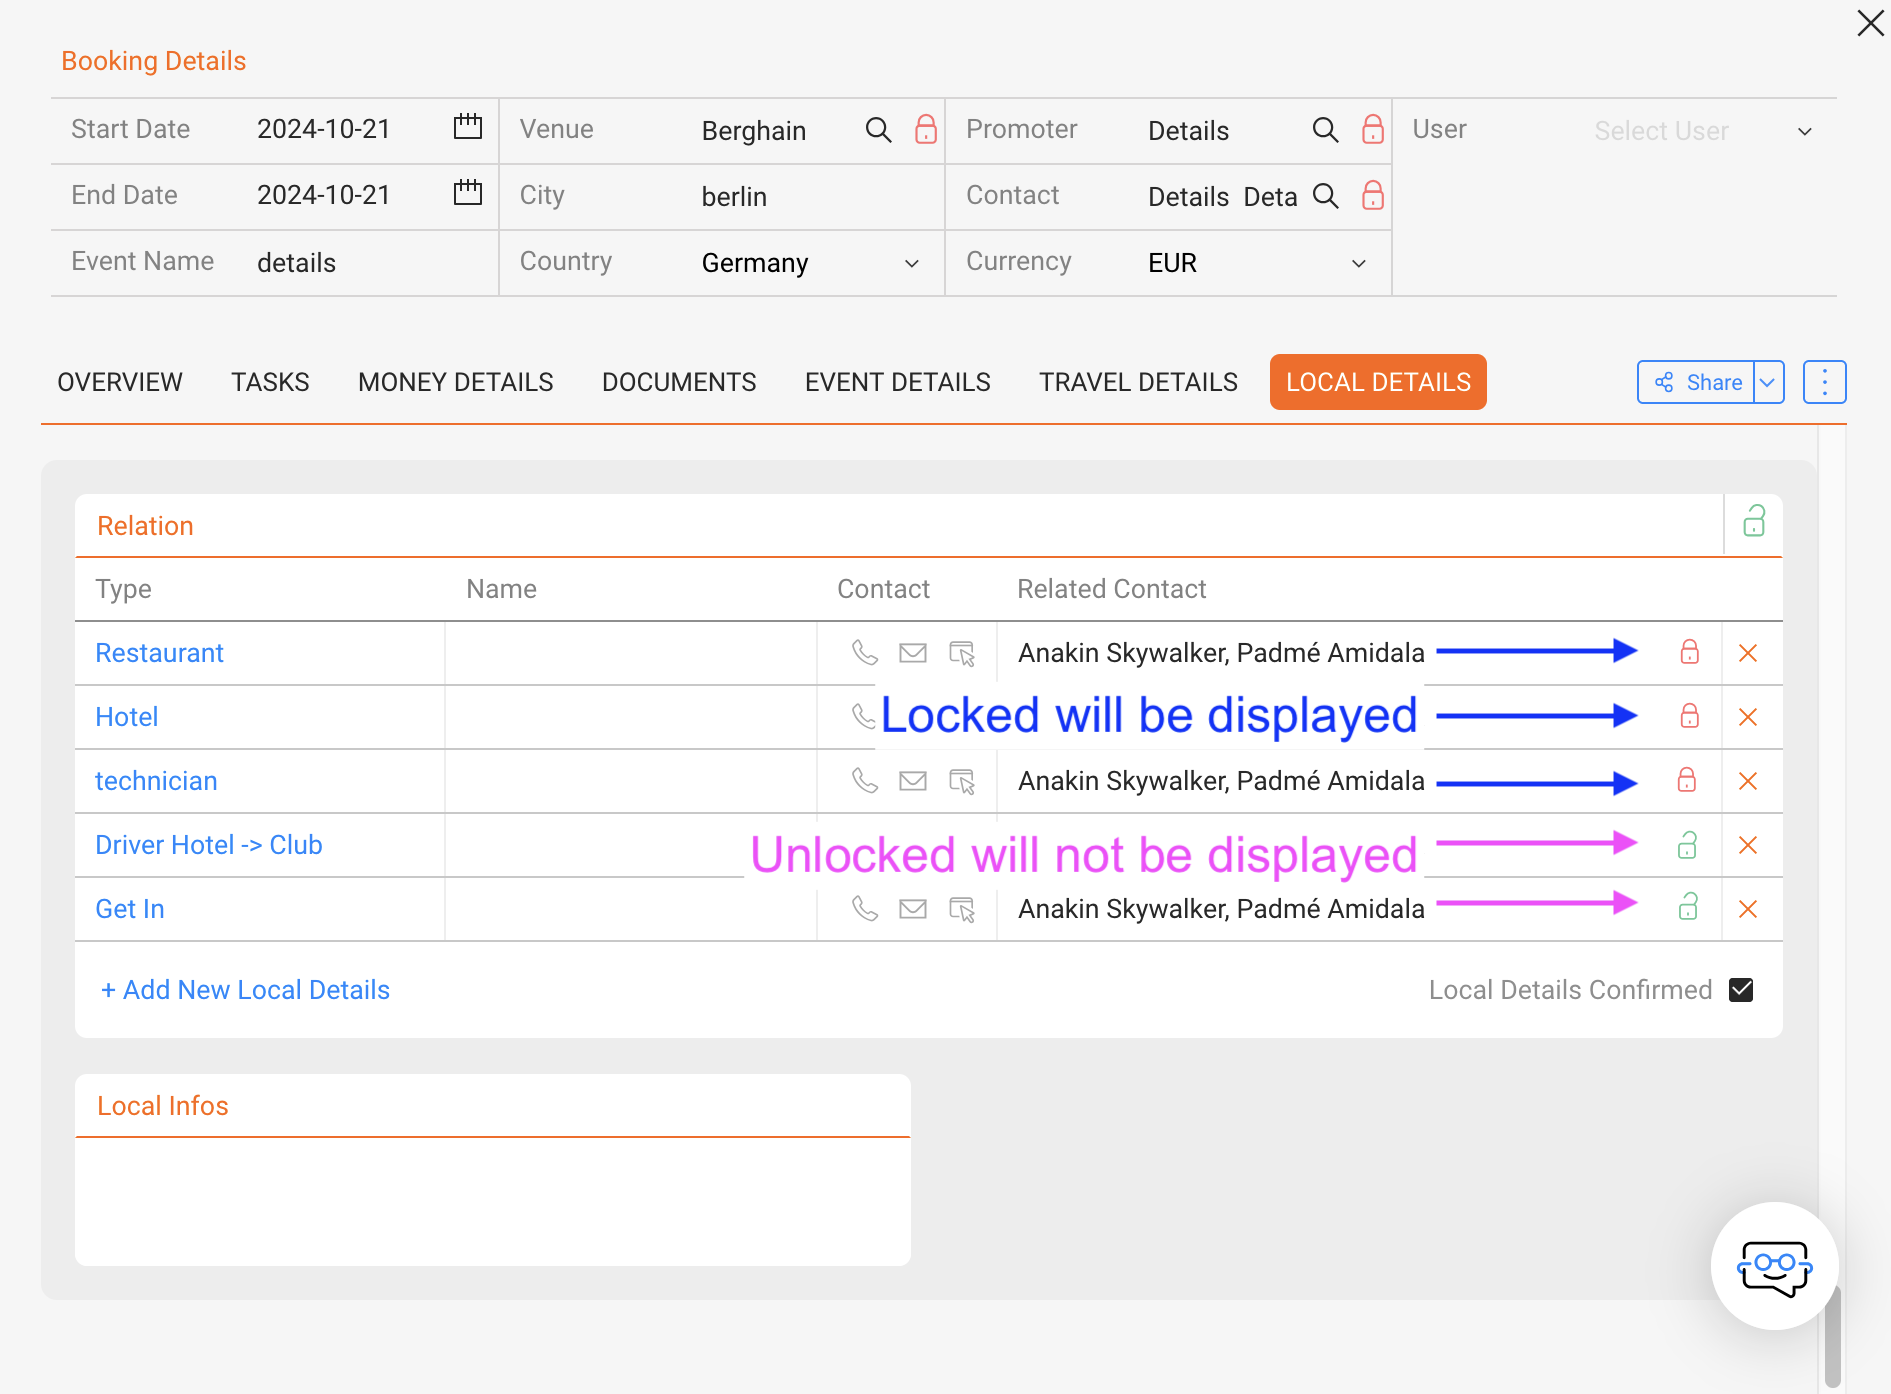
To display only confirmed/locked local details in the Artist App or iCal, instead of all local details, go to:

Settings -> Booking -> Local Detail Settings

and check the box labeled “Only Display locked local details in Artist App and iCal.”


  • If the option is checked, only the locked local details will be displayed in the Artist App / Ical.
  • If you do not choose the option, all informations no matter if locked or not will be displayed.

Venue – Update related contacts using bookings

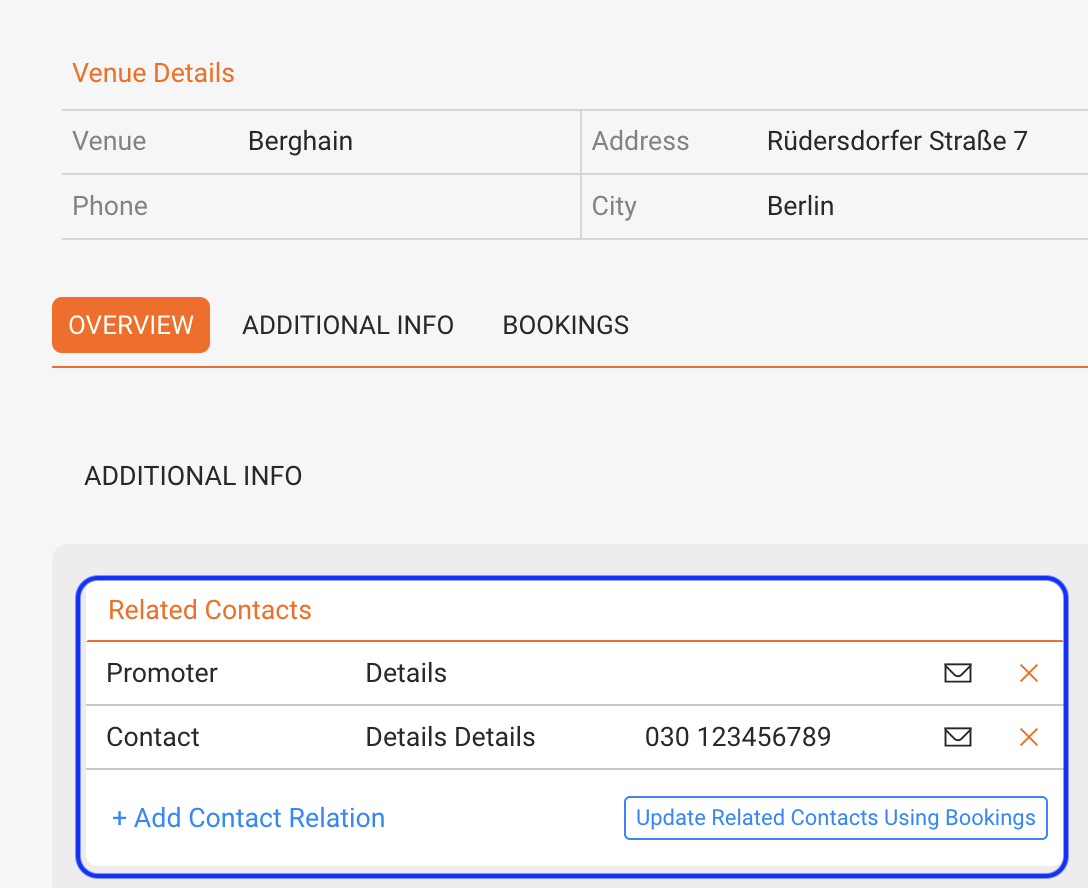
In details, you have the option to manage the relationships between venues and contacts.

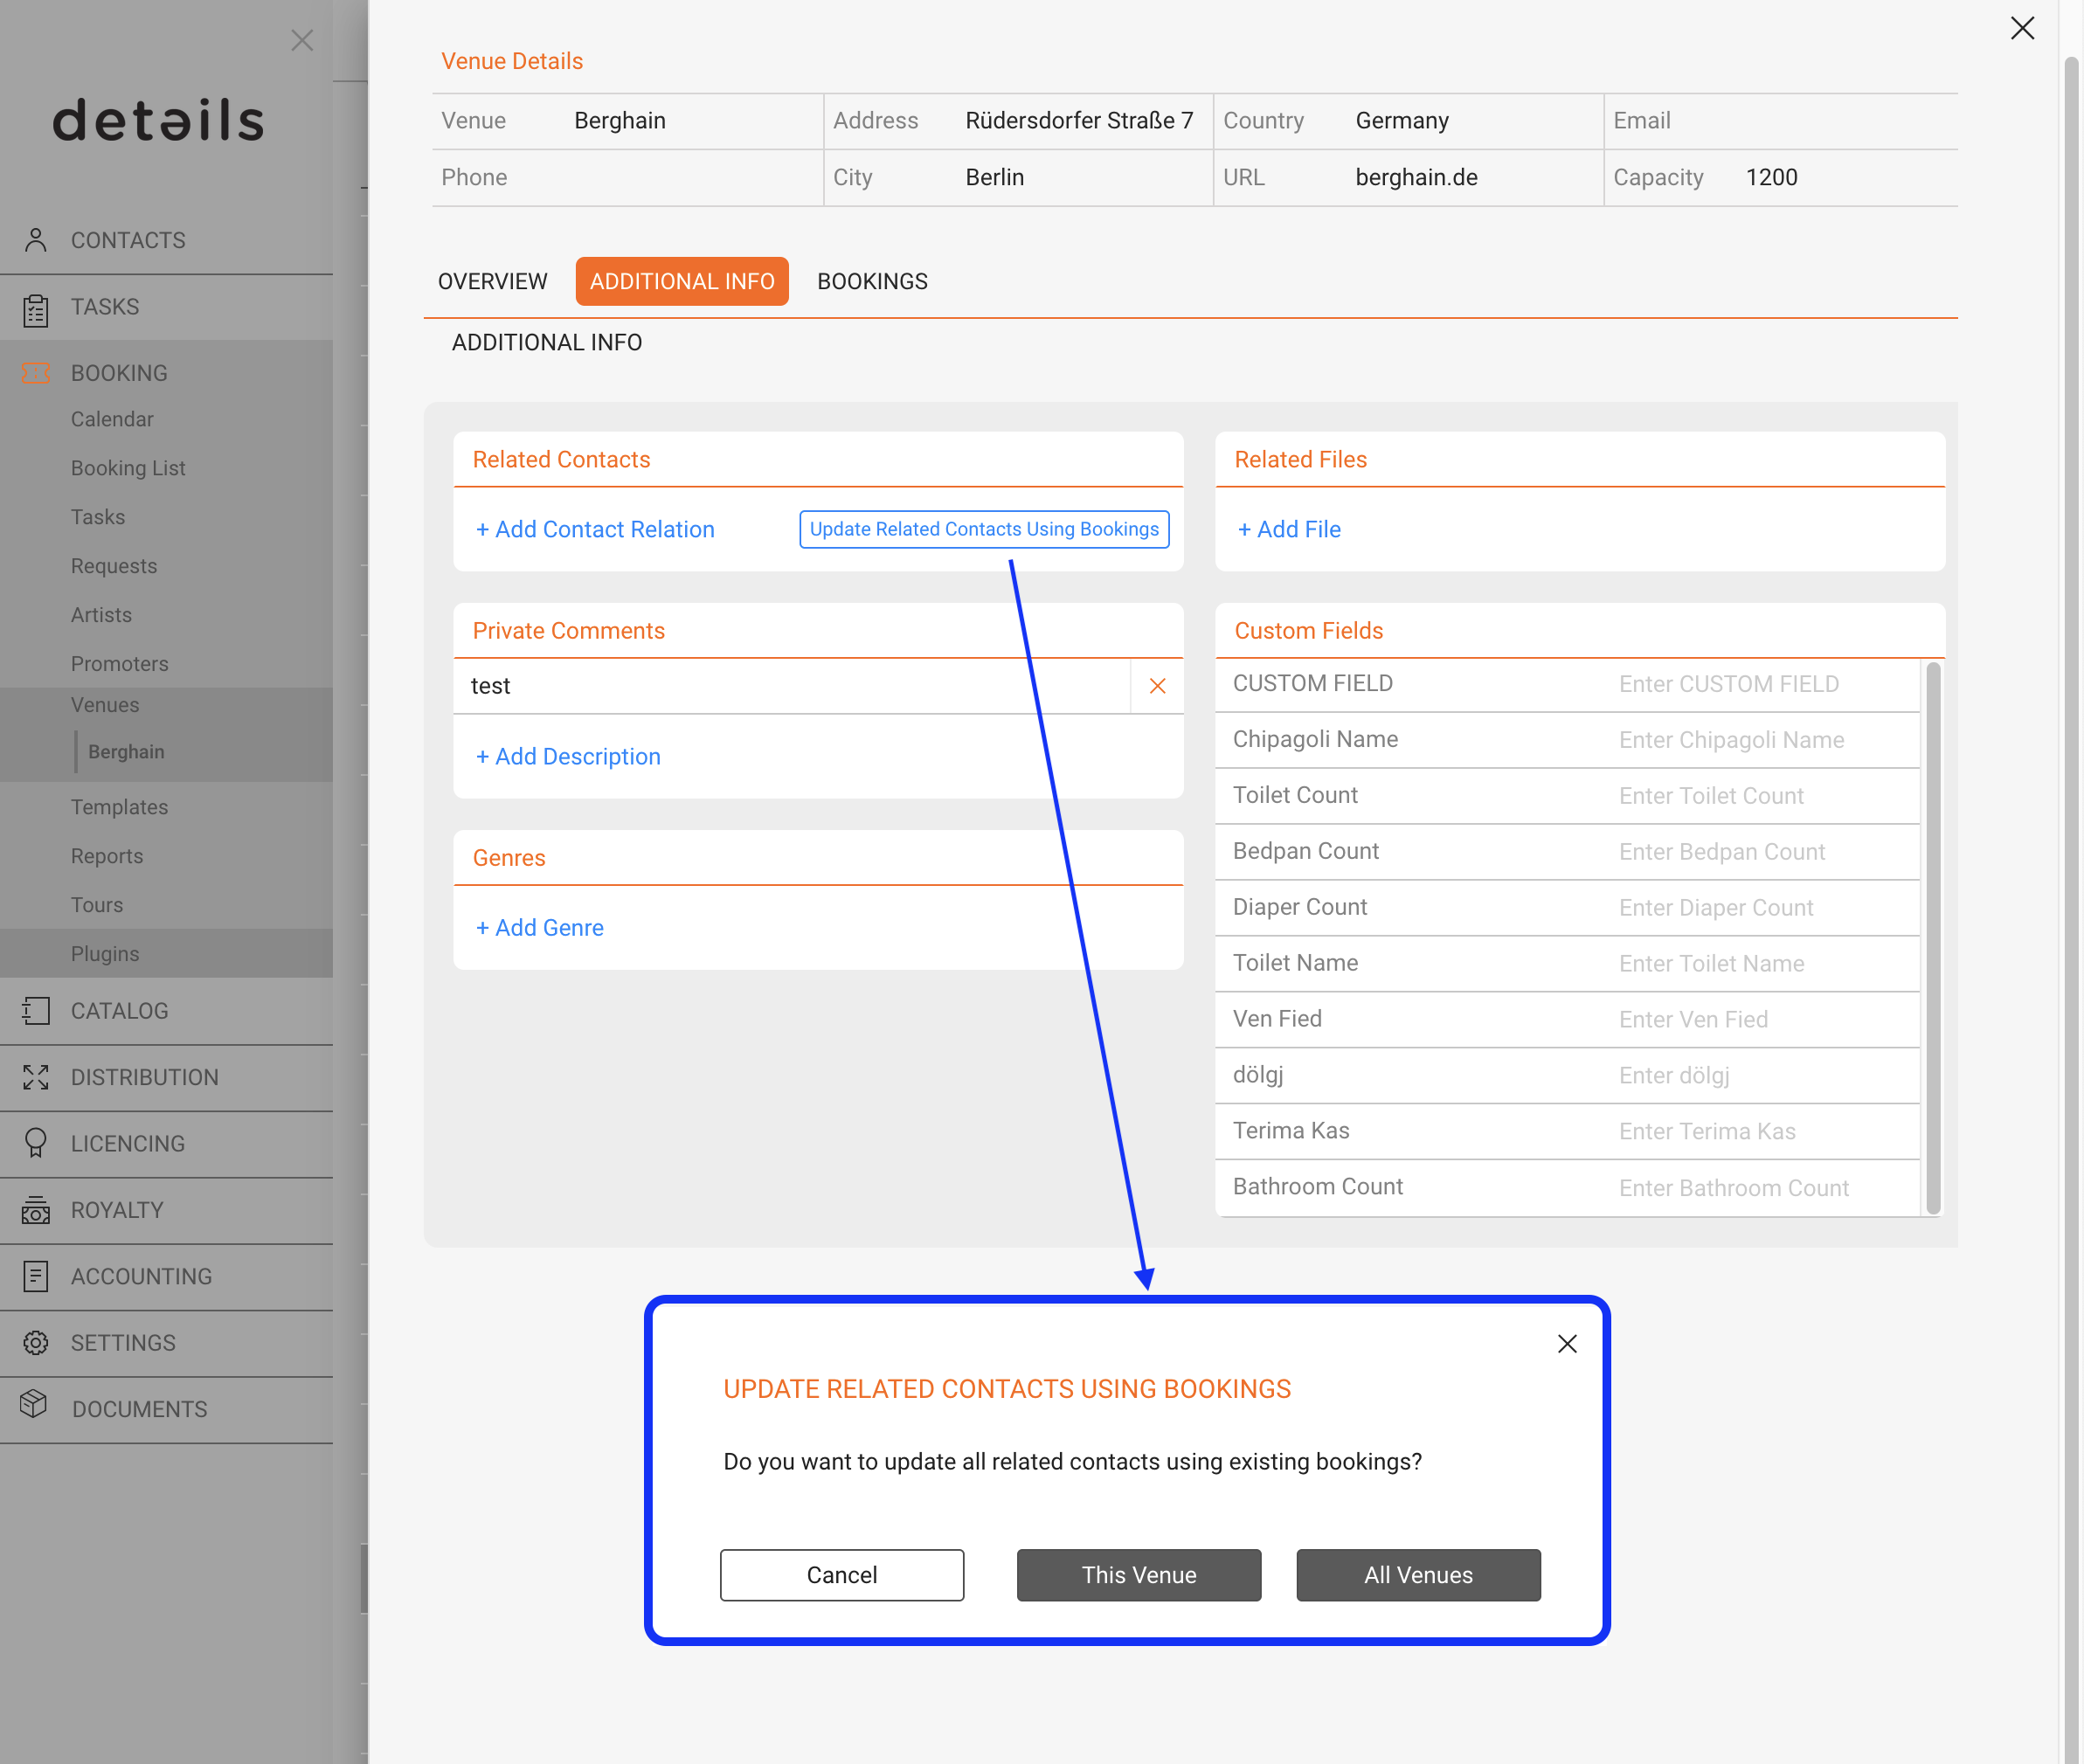
You can either manually add contacts related to a venue or automate the process by using the Update Related Contacts Using Bookings feature.

1. Go to the Venue / Overview page.
2. In the Related Contacts section, click the + Add Contact Relation button.
3. Search for and select the contact you want to associate with the venue.

This option is useful when you want to link specific contacts to a venue without reviewing all existing bookings.

Automating Contact Updates with Bookings

If you prefer to automatically update contacts based on past bookings, you can use the Update Related Contacts Using Bookings button.

1. Go to the Venue / Overview page.
2. In the Related Contacts section, click the Update Related Contacts Using Bookings button.
3. A modal window will appear, allowing you to choose between two options:
This Venue: Updates contacts based on bookings associated with the selected venue only.
All Venues: Updates contacts across all venues.
4. After selection, details will process bookings and add related contacts automatically.

The contacts that can be pulled include:
• Promoters
• Booking-related contacts (agents, partners, etc.)

This feature is especially useful for large databases, ensuring relationships stay accurate without manual work.

Setting Exclusivity for an Artist

The exclusivity feature allows you to set conditions around an artist s bookings to help ensure compliance with any contractual exclusivity clauses.

Why Use the Exclusivity Feature?

Exclusivity settings help manage and monitor shows with exclusivity clauses, ensuring that the artist doesn t perform in nearby venues within a set period before and after a specific show. This feature is especially useful for avoiding conflicting events that might violate an artist s agreement with a promoter or venue.

Here s a step-by-step guide to setting and managing exclusivity for an artist.

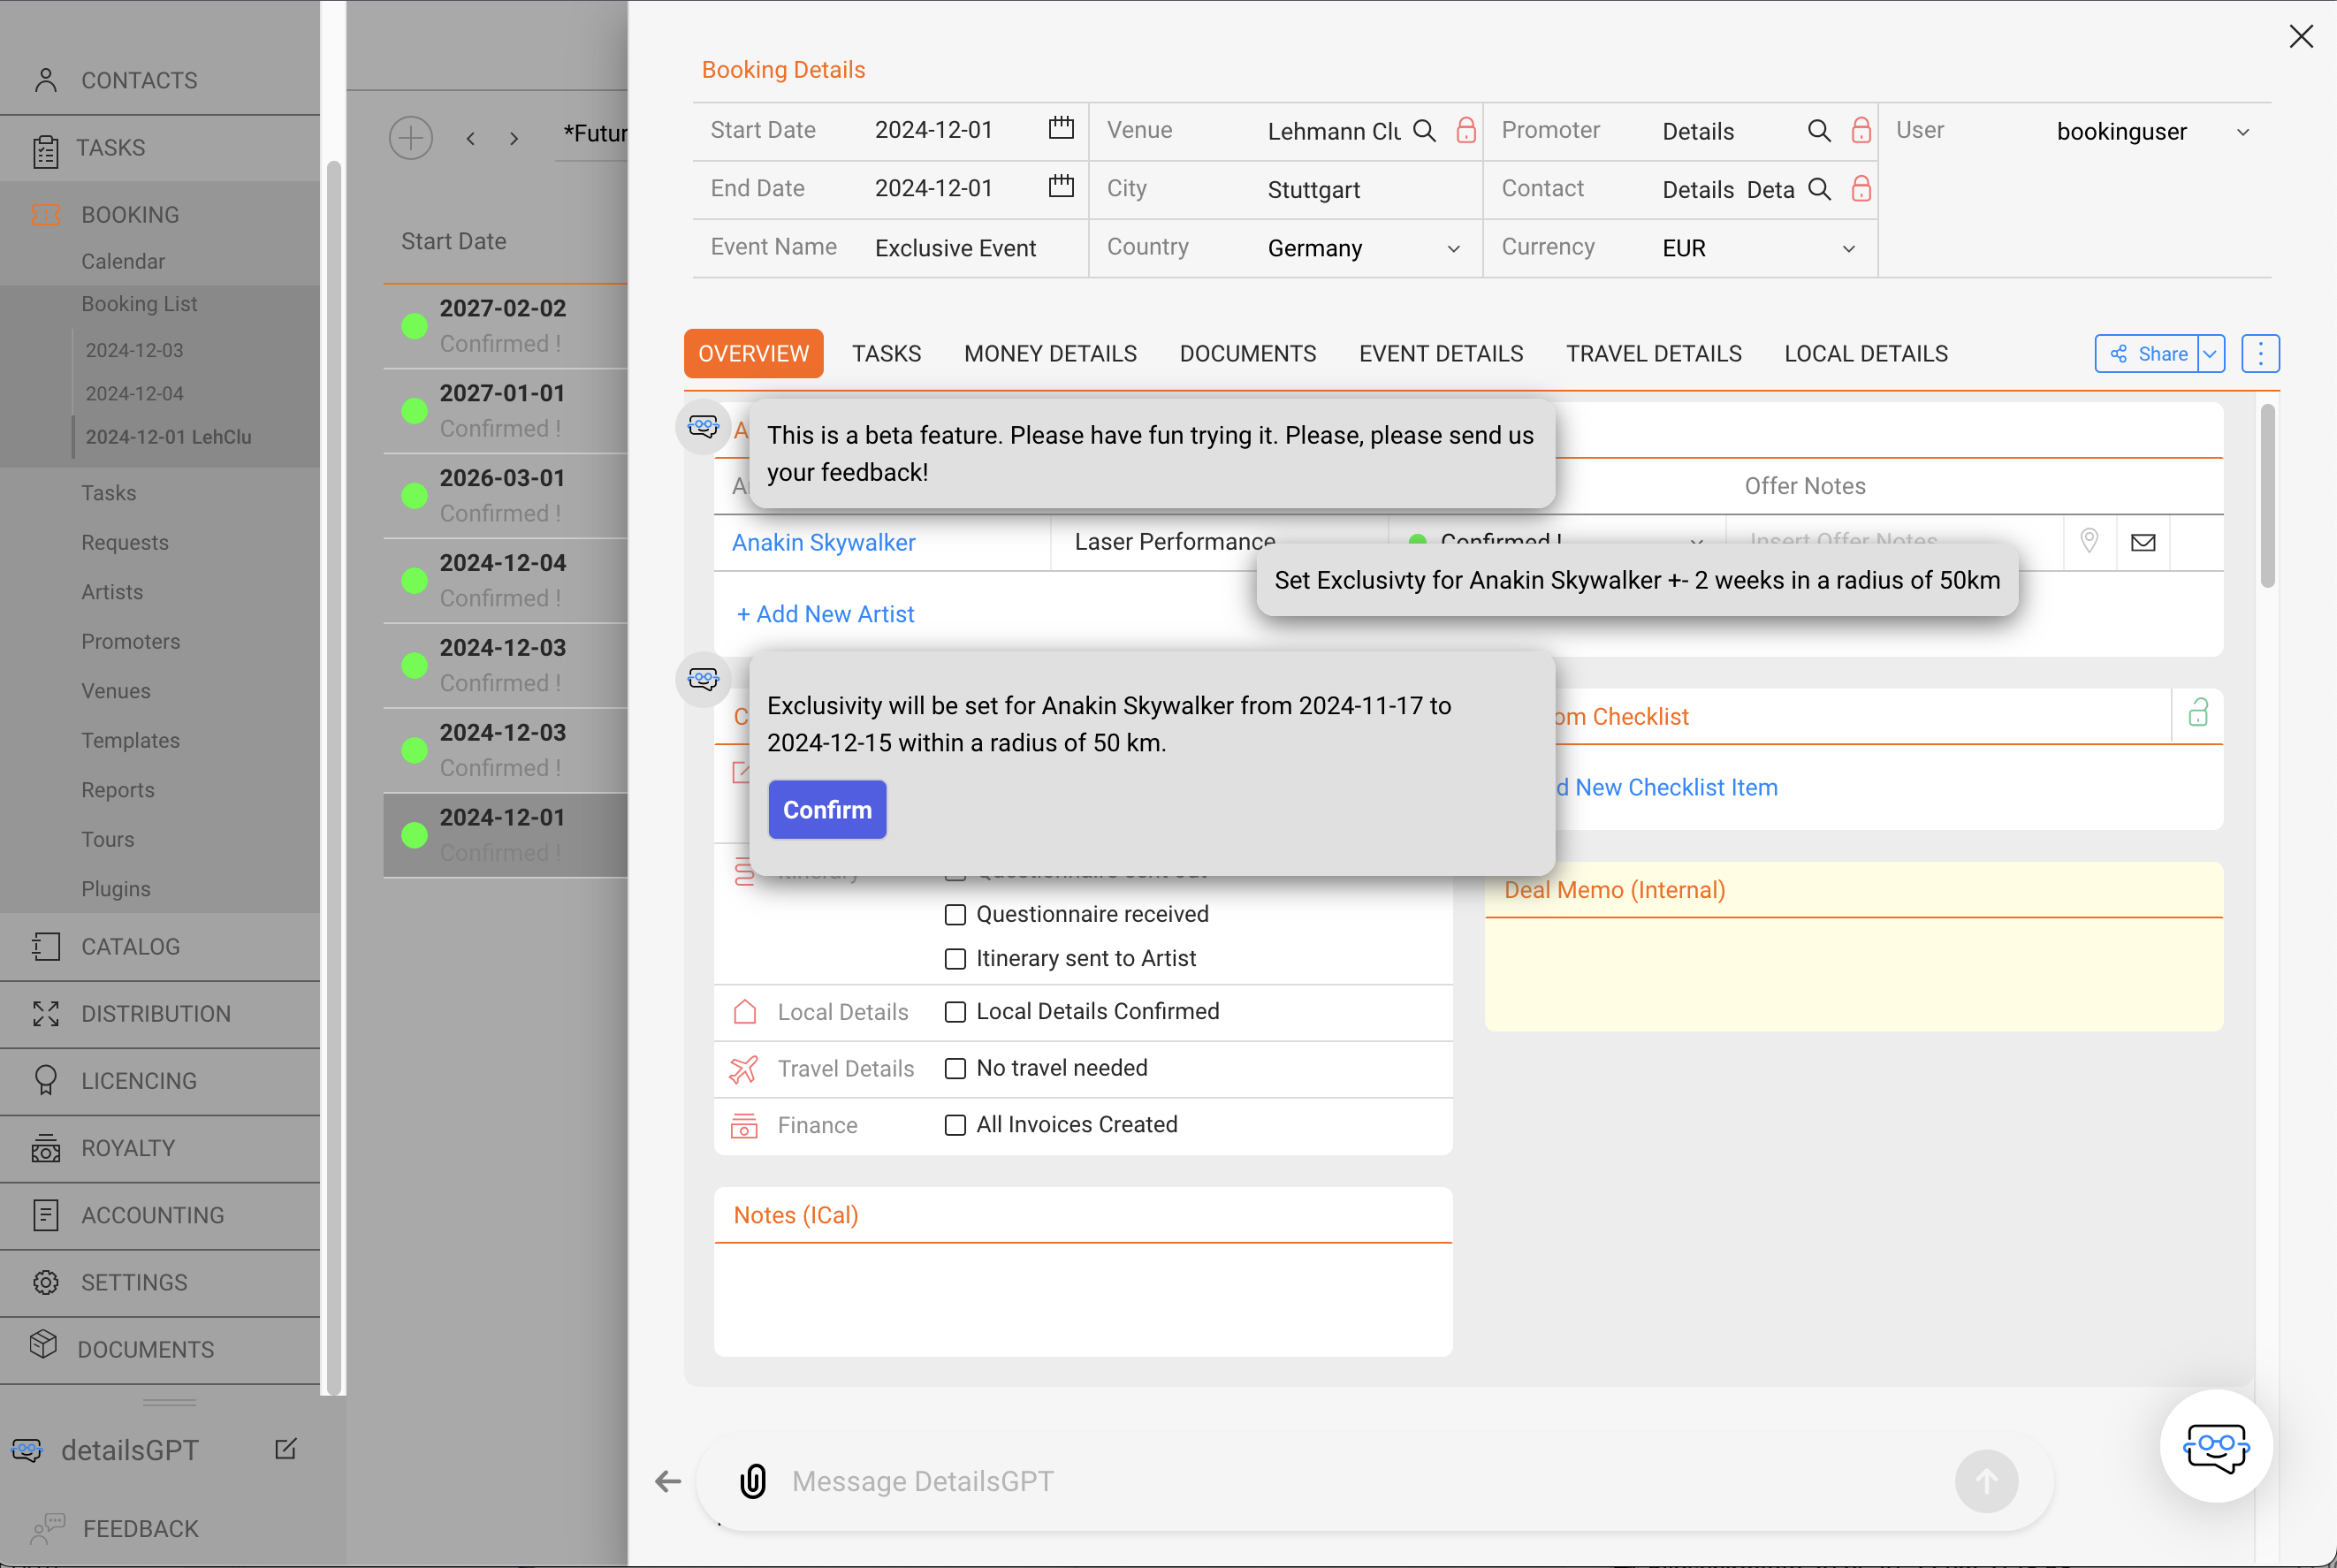
1. Open the detailsGPT BETA Chatbot
” In the bottom left corner of your screen, you ll see the detailsGPT chatbot. It will help you set exclusivity parameters with simple, conversational commands.

NOTE : The detailsGPT chatbot is a new feature currently in BETA. It s designed to allow users to prompt a variety of requests within the application. Feel free to experiment with detailsGPT, and we welcome any feedback!

2. Input the Exclusivity Command
” Type in the desired exclusivity details, such as the time period (+- showdate) and radius around the venue.
For example, type:

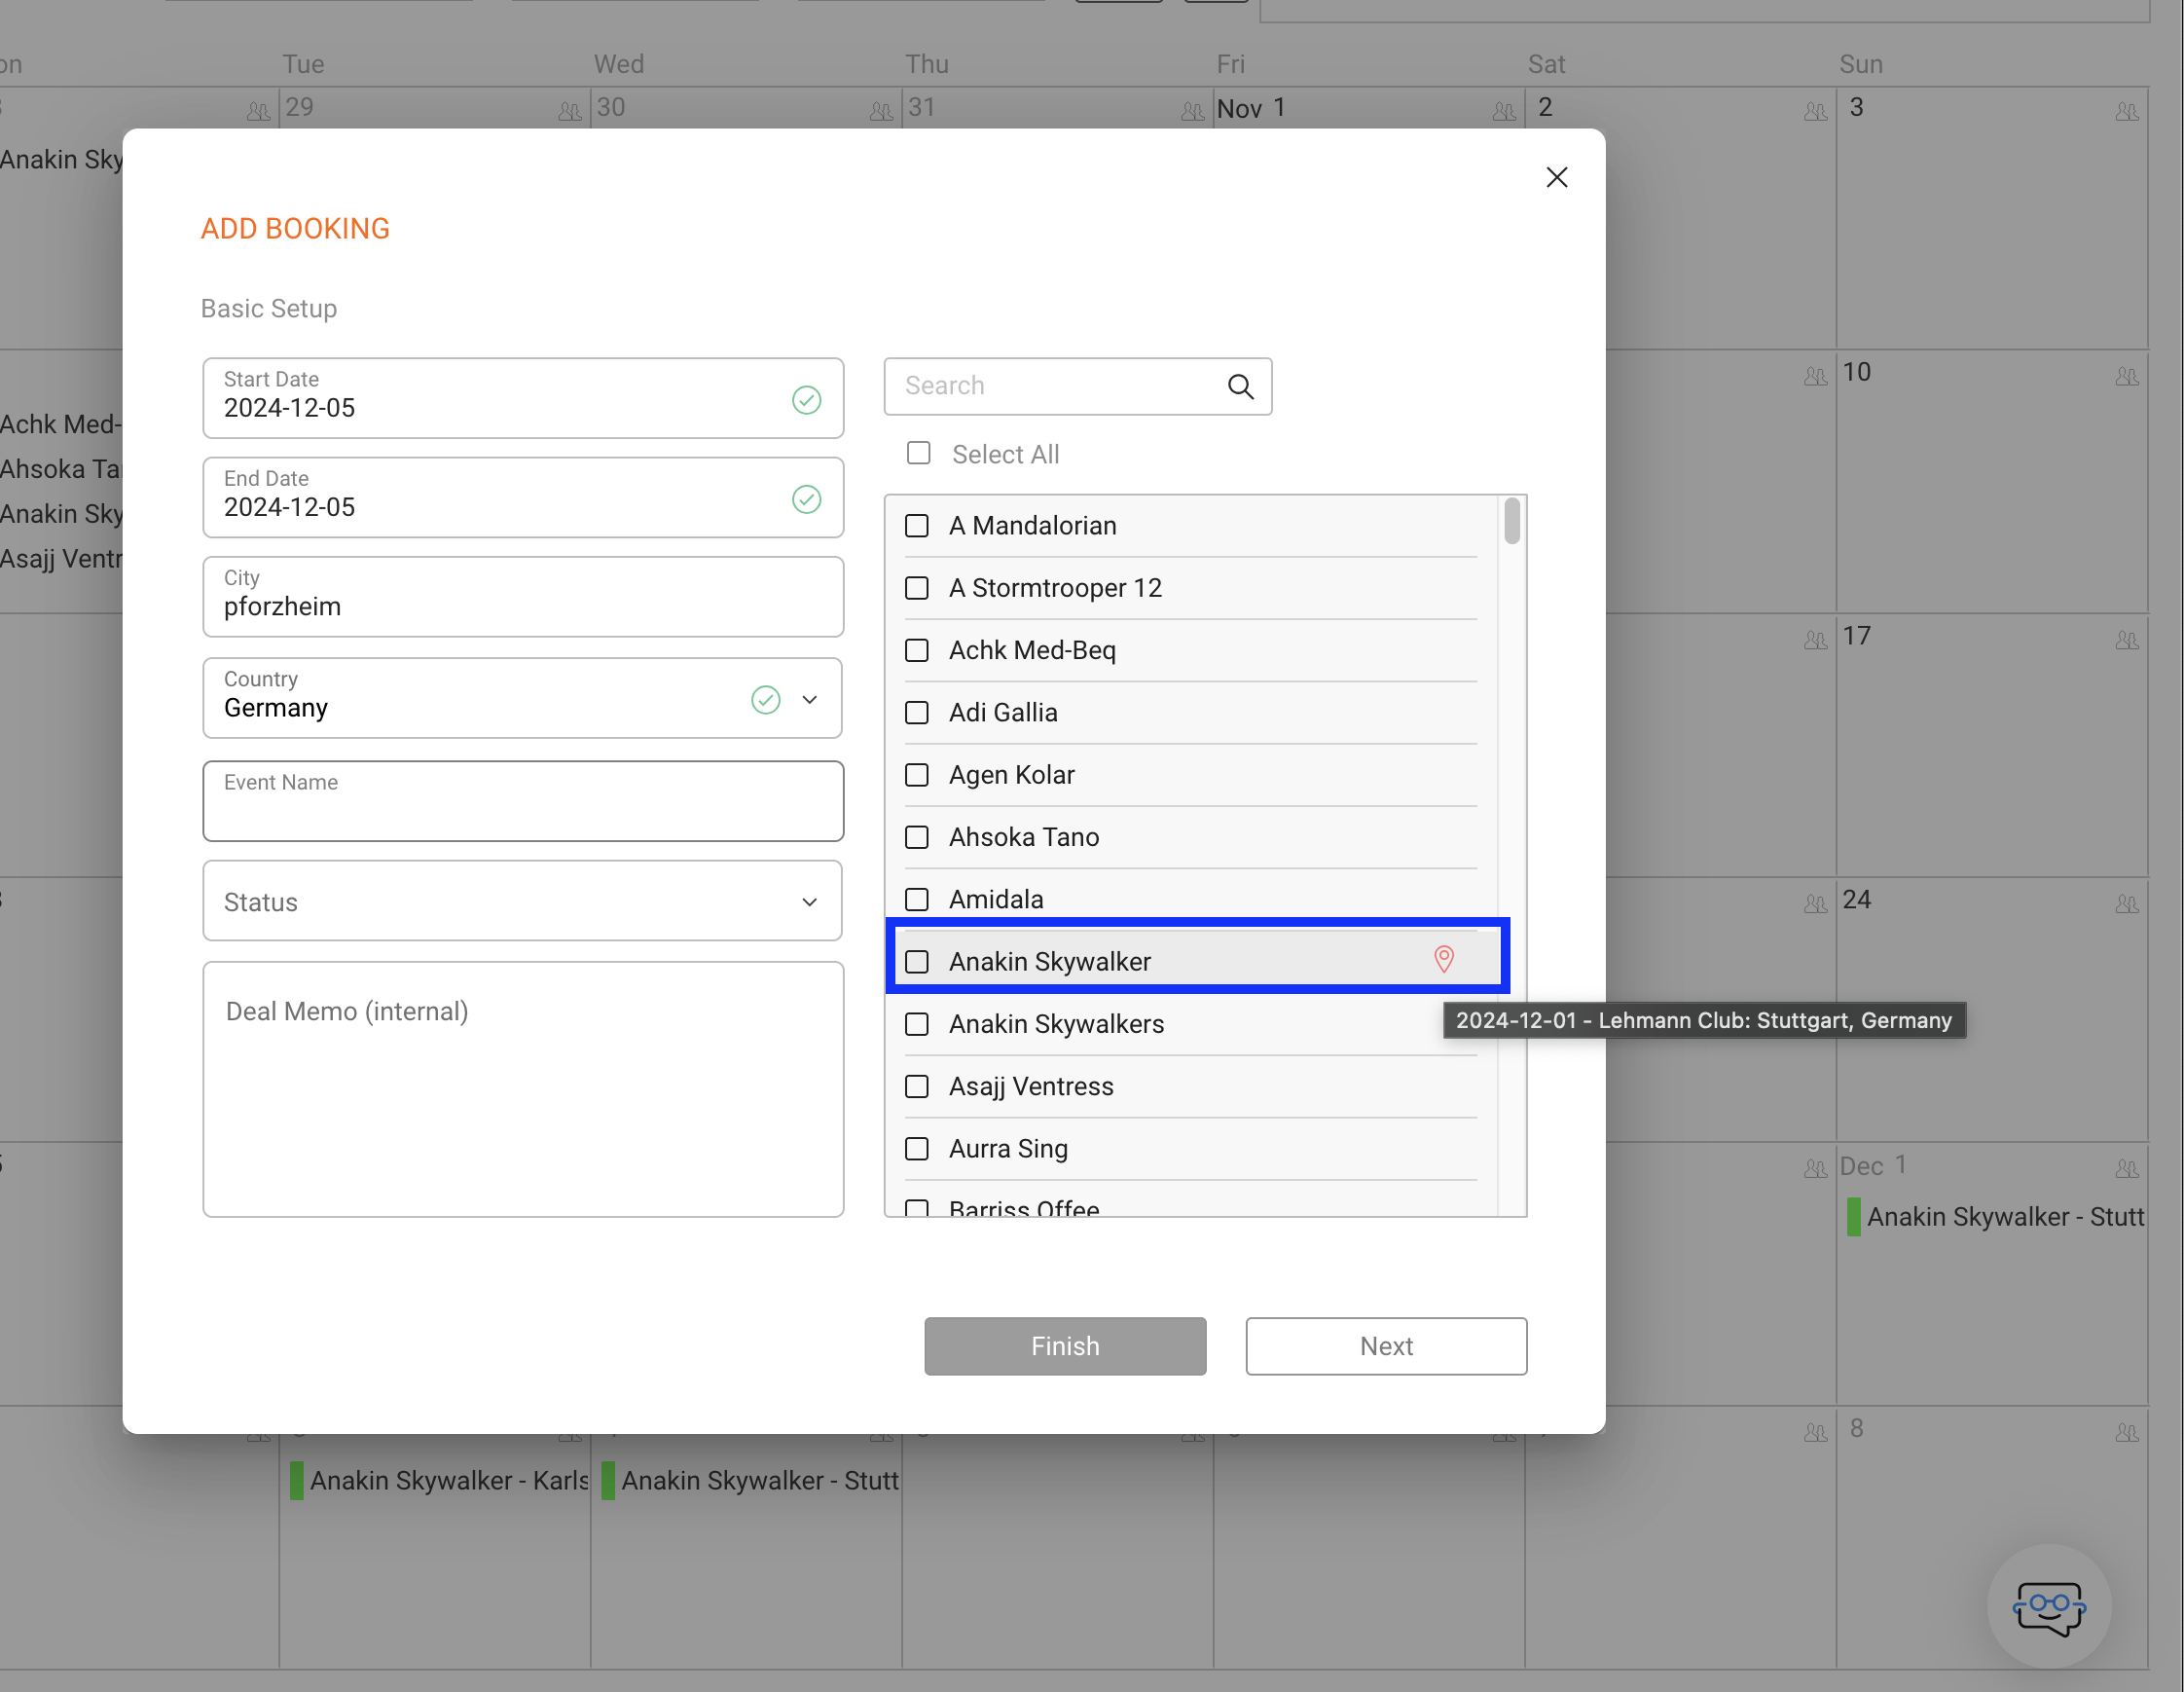
Set exclusivity for Anakin Skywalker for +-2 weeks, radius 50km.


3. Understanding the Settings

  • Timeframe: The exclusivity period begins a specified number of days or weeks before the show date and extends for the same amount after the show date.

  • Radius: The exclusivity radius restricts the artist from performing at other venues within a set distance (in km or miles) of the selected venue.

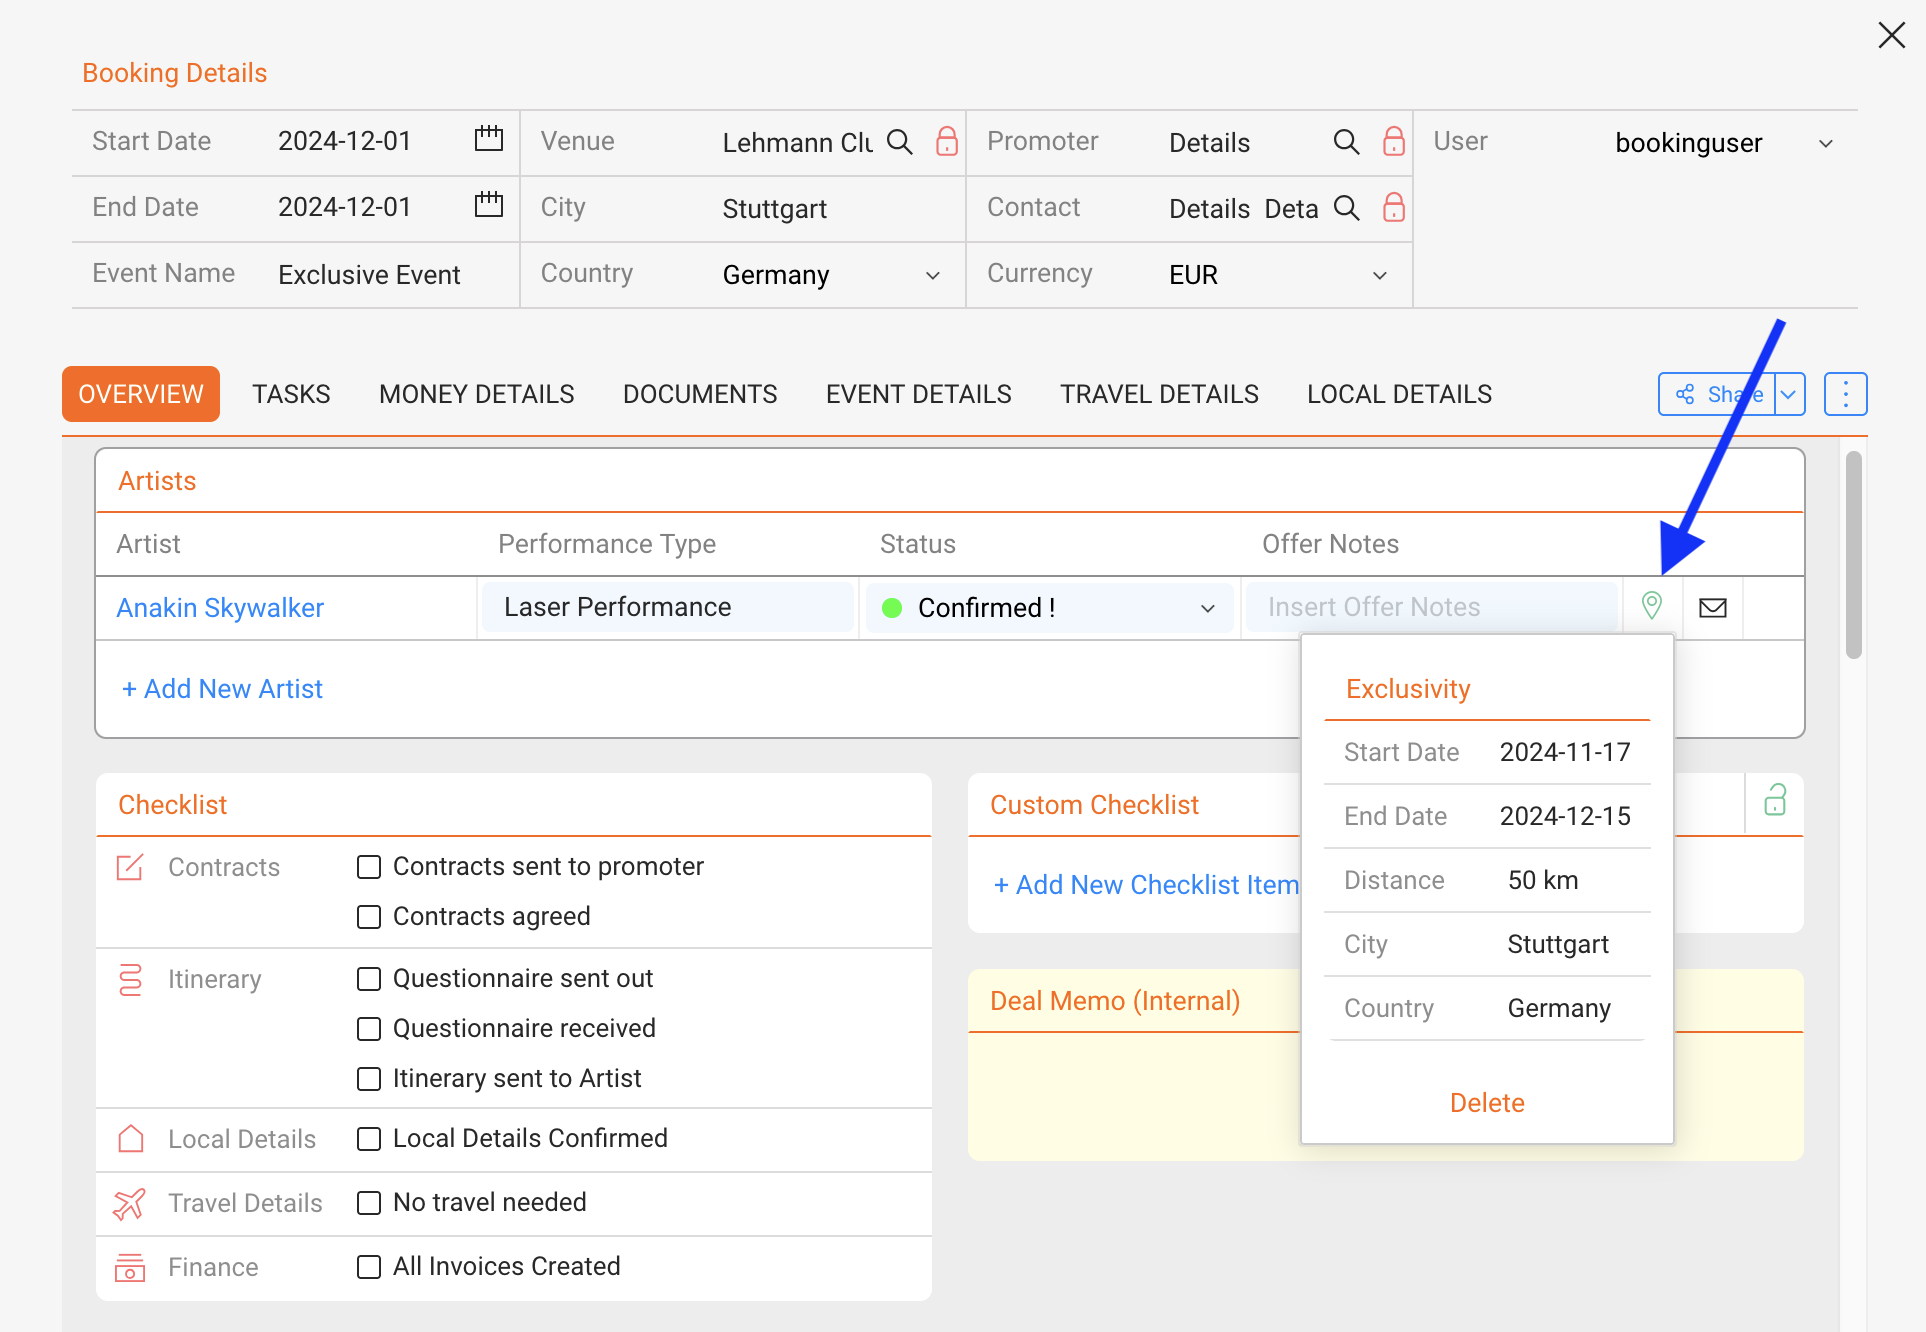
    In the example, it will set the exclusivity around Lehmann Club in Stuttgart from 17.11.24 to 15.12.24 with a radius of 50km.

4. Automatic Display of Conflicting Events
Once the exclusivity is set, any existing or future events that fall within the specified timeframe and radius will display a red exclusivity icon. This icon indicates a potential conflict, helping you manage bookings with clear visibility into exclusivity restrictions.

The icon is displayed both in the Artist section of a Show or in the Event creation wizard.


exclusivity icon in a show:


exclusivity icon in the Event Creation Wizard:


” Adjusting Parameters: You can always return to detailsGPT to modify exclusivity settings if conditions change, such as expanding or narrowing the timeframe or radius.


Statement Payments


This feature is designed to streamline payment tracking and management for royalty statements.

Up until now, details focused on calculating royalty statements with amounts either due for payment or carried forward as closing balances for any given royalty account and period.

As a general enhancement and in preparation for future integrations with external payment systems we have now added a feature to record specific payment information on royalty statements.


The new Statement Payments function allows you to record payment dates, amounts, and other details, making it easier to track if and when statements have been paid (or not).

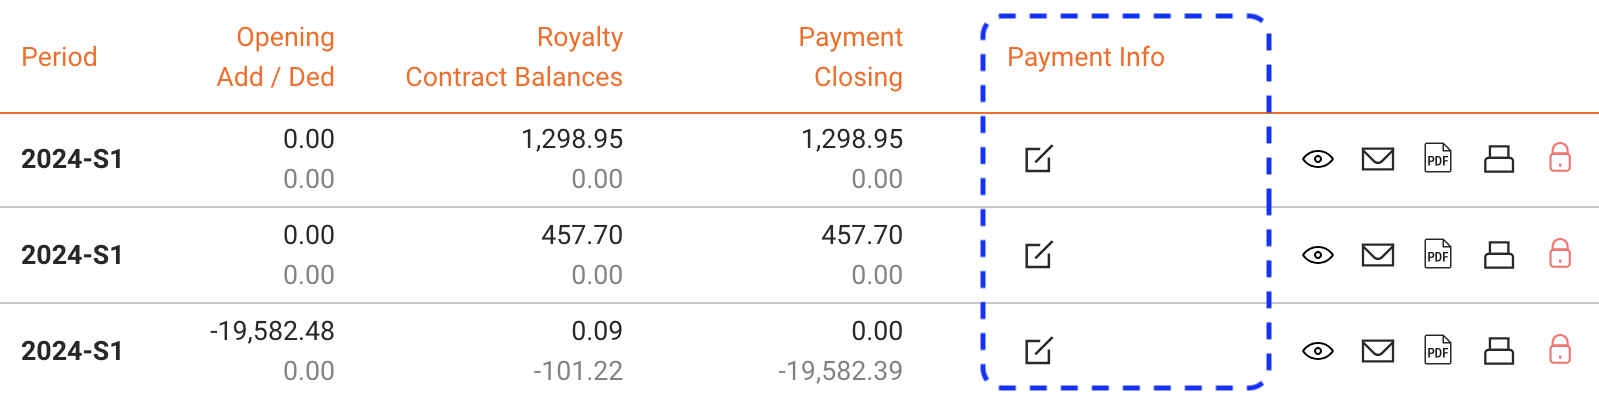
To add payment information, look for Edit icons next to statements in the Statements List or within the Royalty Account.

Steps to Set a Statement Payment

1. Locate the Statement:

In the ROYALTY section, go to the Statements List or Royalty Account to view statements.

2. Click the Edit Icon:

If available, click the Edit icon next to the statement to open the payment entry form. To understand when the icon is available or not, read the section below titled When Can Payment Info Be Added?


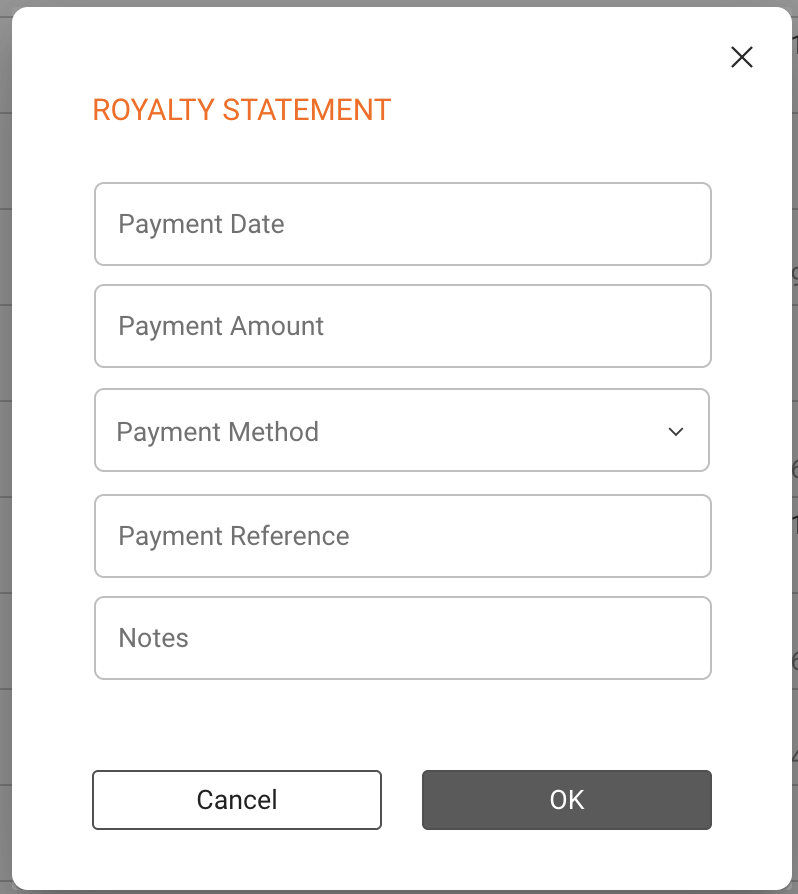
3. Enter Payment Details:

In the form, you can add:
” Payment Date: The date the payment was made.
” Payment Amount: The amount paid.
” Payment Method: Choose from available methods (e.g., bank transfer, credit card).
” Payment Reference: Any reference or transaction ID for the payment.
” Notes: Additional comments.

Special Fields available on demand:
” Display Currency: Optional different currency to display statement / in which the payment is made
” Exchange Rate: Exchange rate if payment was made in a different currency.

4. Save Changes:

Click OK to save the payment information.


When Can Payment Info Be Added?

You can add payment info directly to a royalty statements as long as the relatd statement layout is NOT set to create credit notes.

To check or adjust this setting, go to SETTINGS / LAYOUTS. A statement layout is set to create credit notes if the Format field contains a numbering series (and is not set to manual ). In this case, credit notes can be created automatically in a batch or added manually.

If credit notes are generated for royalty statements, you ll need to handle payments within those credit notes instead. The process for credit notes hasn t changed!
You can mark them as paid in the Payments section of the credit note, accessible in ACCOUNTING / COSTS or by clicking on the credit note number.


Automatic Payments

As we continue to develop the system, our goal is to integrate with external payment systems so that payment data can automatically sync, reducing the need for manual entry.


For further assistance, please contact label_team@details.eu.

User based ICAL & Artist App access (Permissions)

Managing Permissions for iCal and Artist App Information

details feature allows you to customize permissions for accessing iCal information and Artist App data. This ensures that different roles, such as tour managers, artists, or management teams, can view only the information relevant to them.

For example, financial details or specific booking statuses can be hidden from certain users while remaining visible to others.

Flexible Permission Management
With this system, you can easily modify existing permissions, add or remove information, or adjust statuses. Importantly, there s no need to recreate and resend iCal or Artist App links when permissions change the updates are applied seamlessly.

Transitioning to the New System
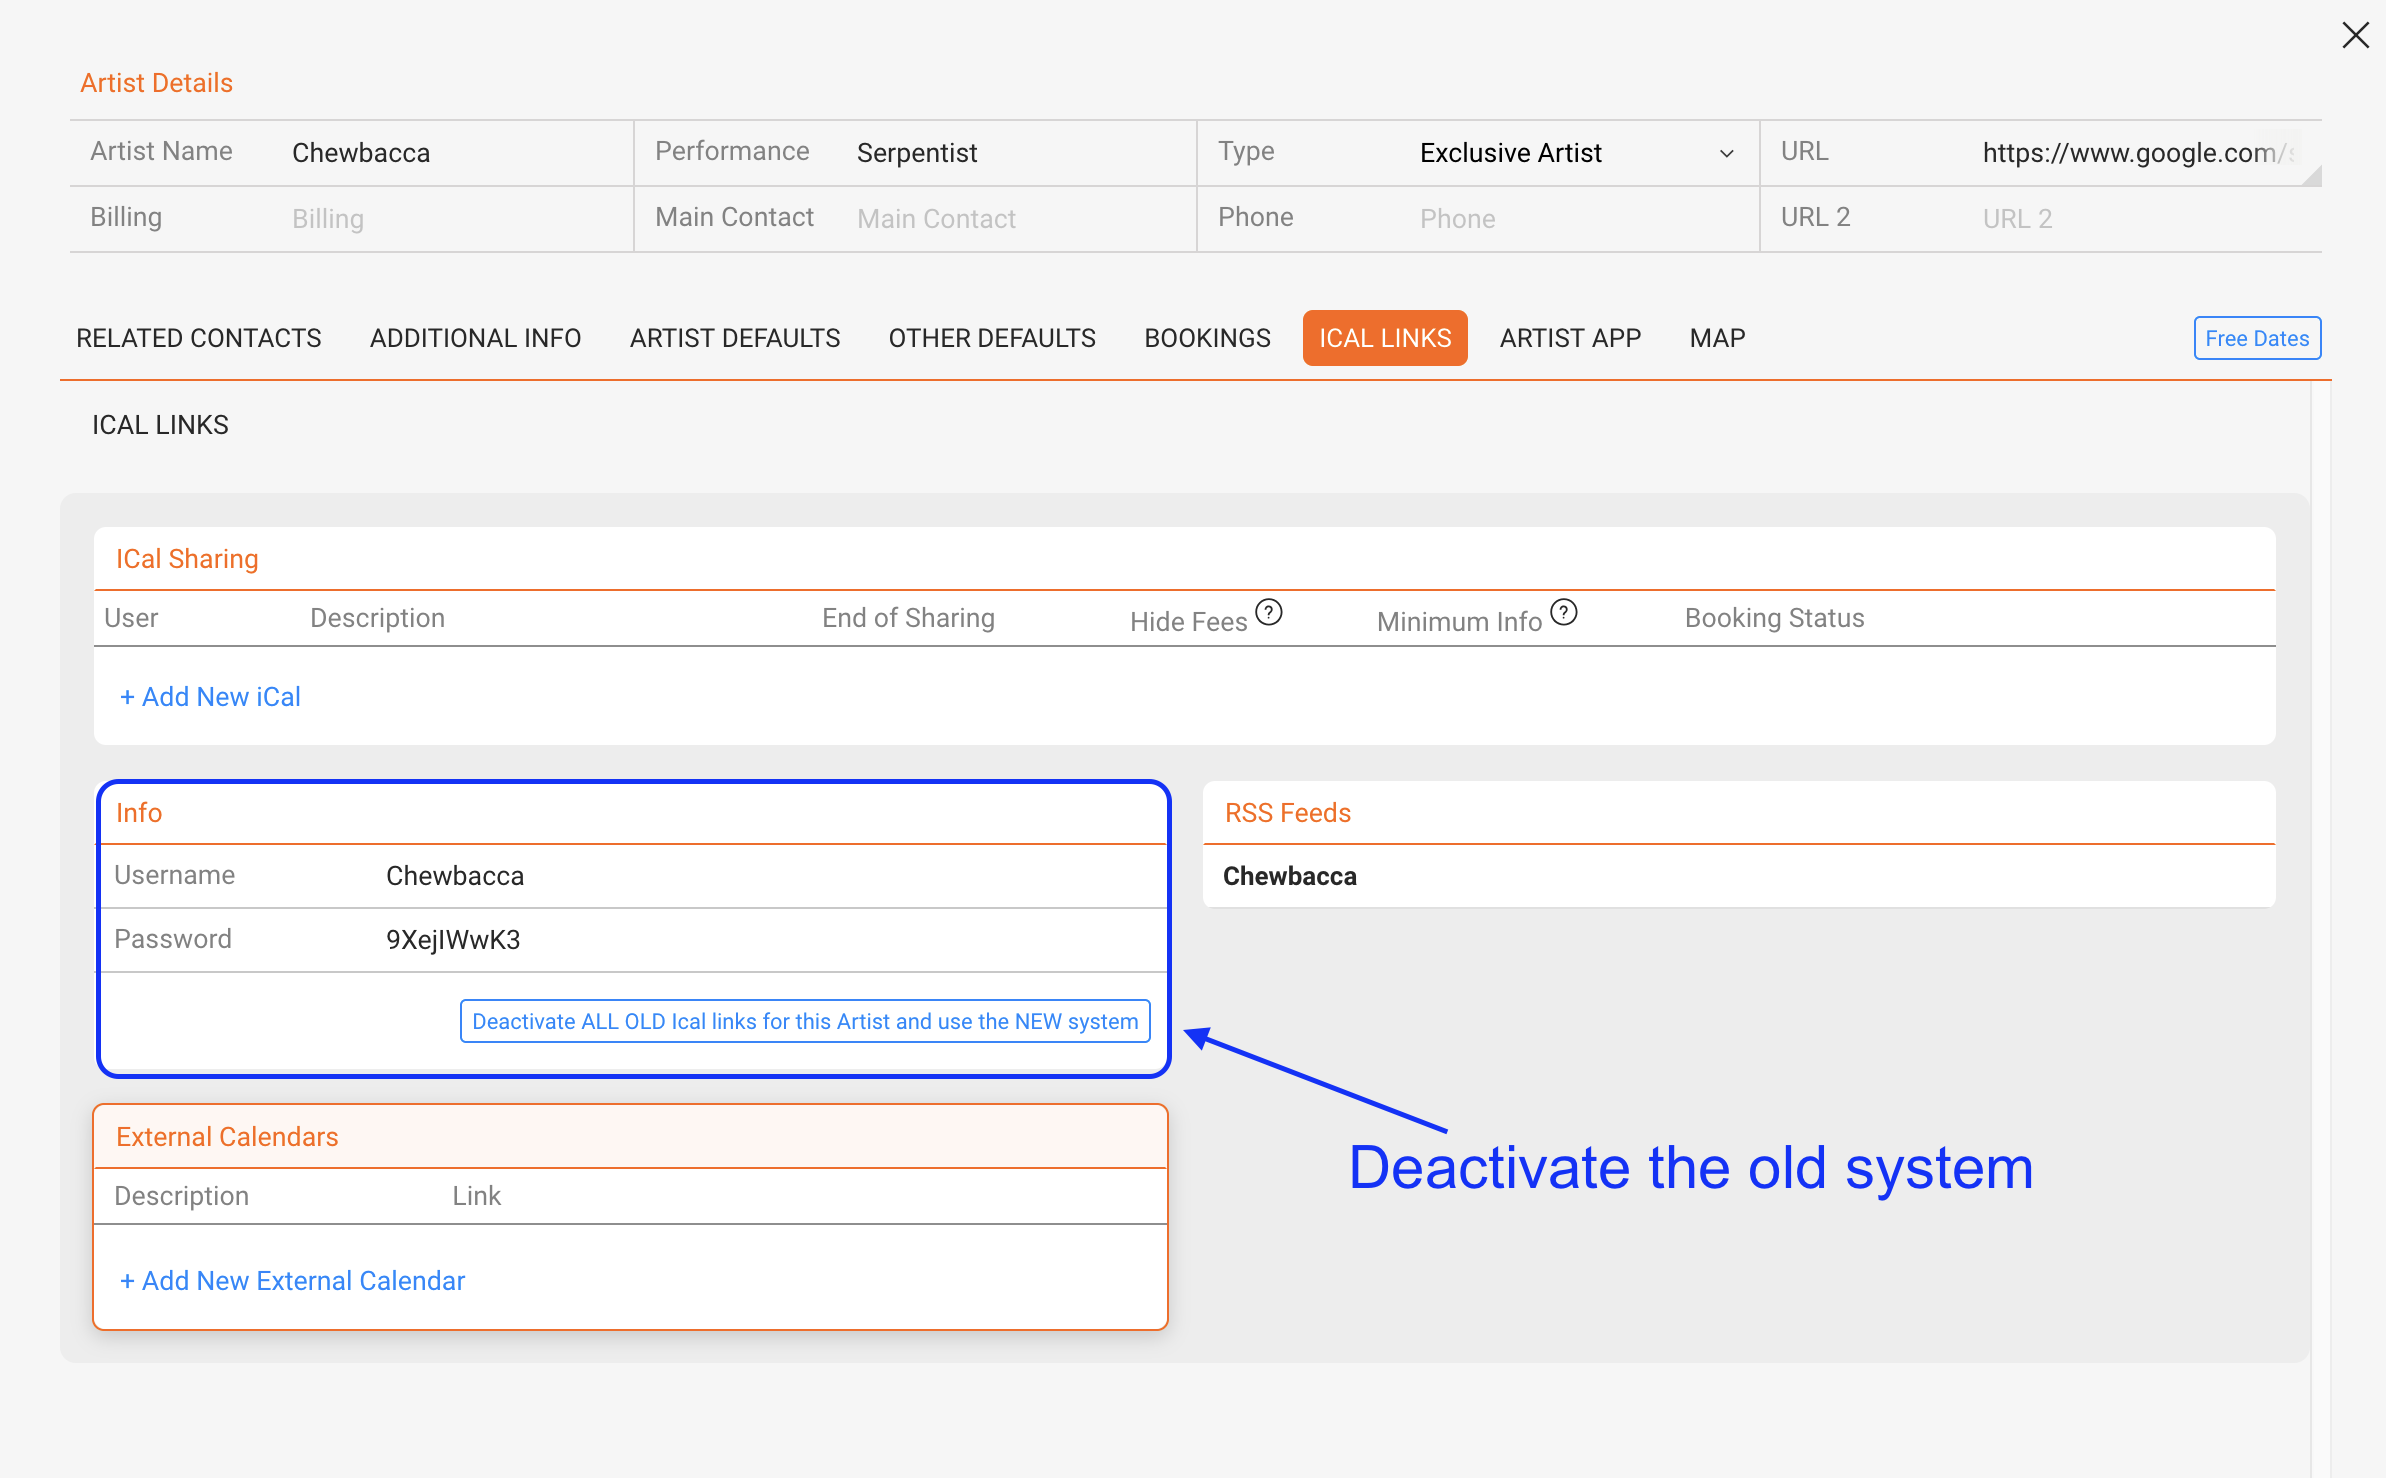
To use the new permission-based sharing system, you must first deactivate the old system.


Please note:

  • Once the old system is deactivated, existing links will no longer be updated.
  • This step is necessary because we have built a completely new architecture to support the advanced permission-sharing capabilities.


By switching to this system, you ll gain greater control and flexibility in managing access to your data.


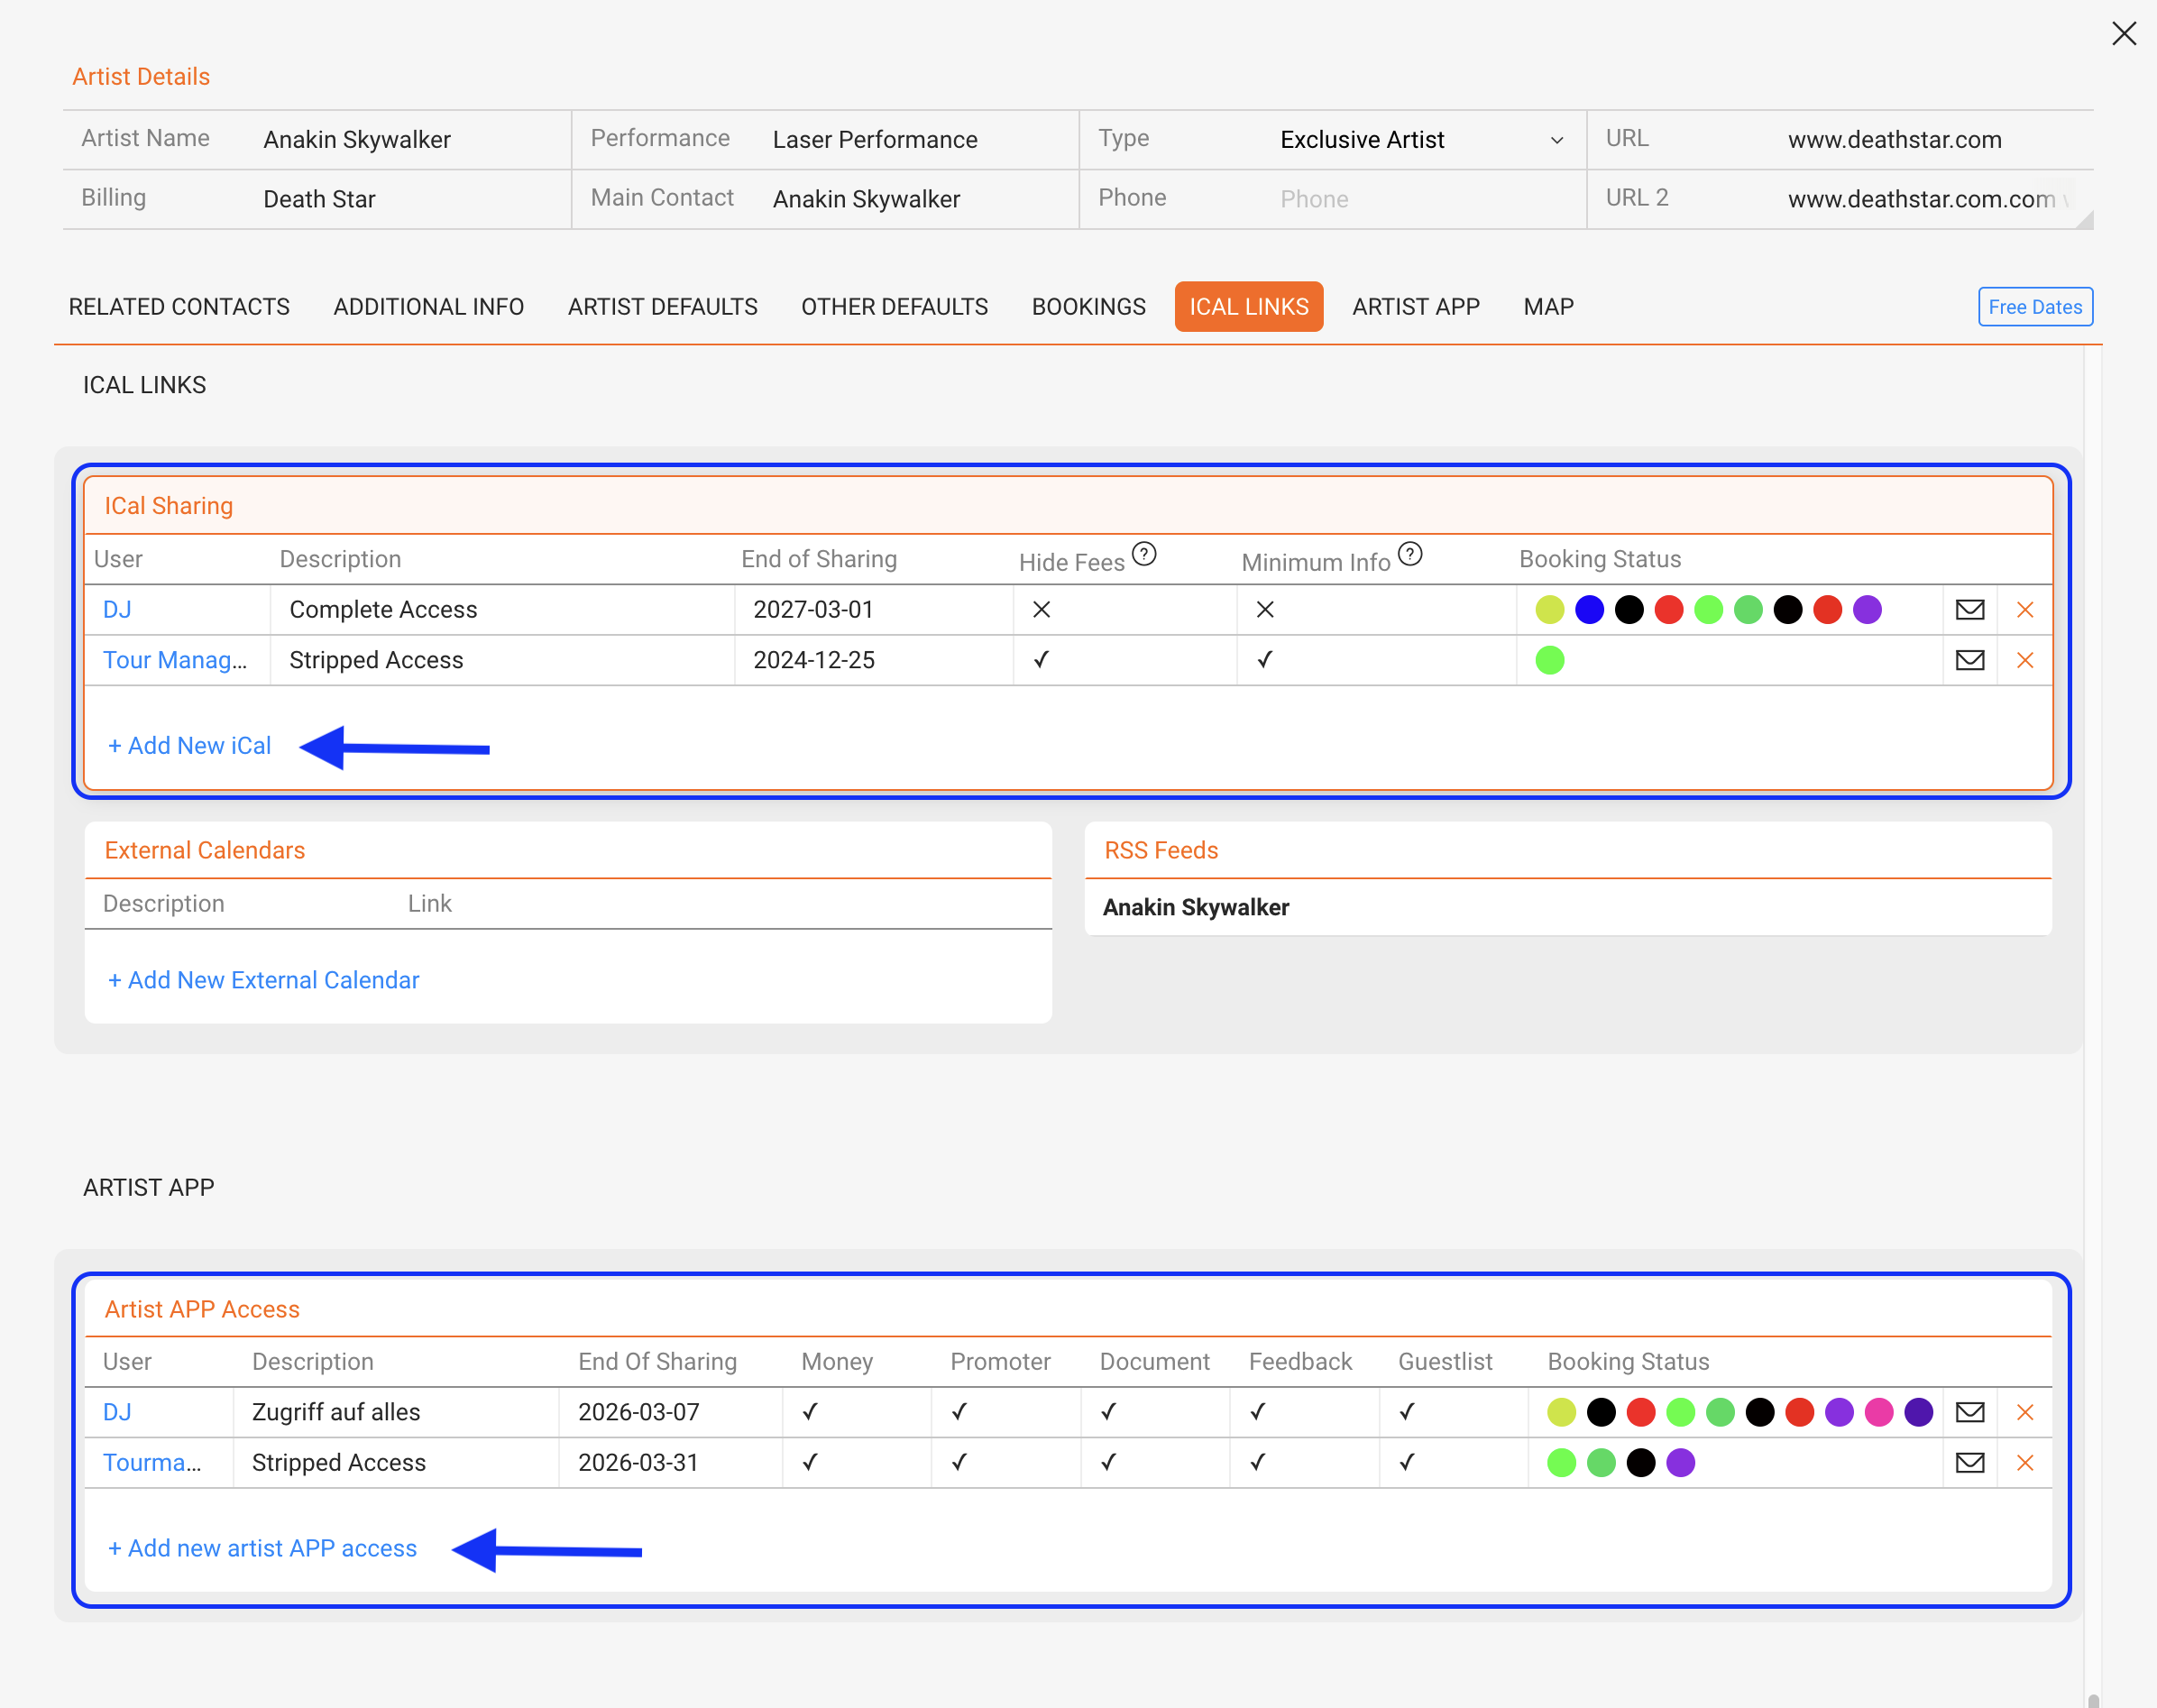
Once the old system is deactivated a new user based sharing can be created.

Click on either +Add new Ical or +Add new Artist app Access


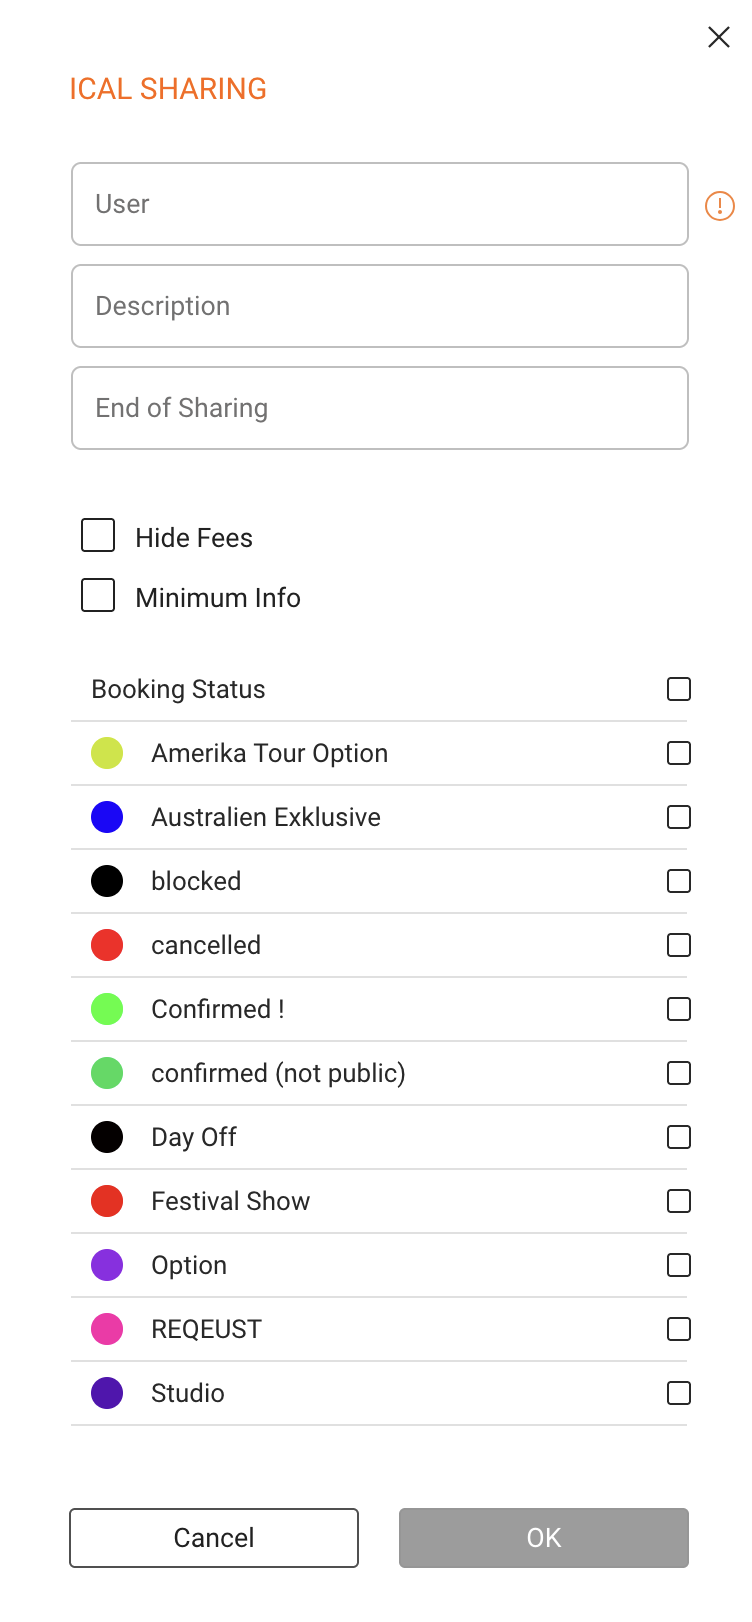
+Add new Ical gives you the following options:

  • User: Username, f.e. “Artist”
  • Description: f.e. “full access”
  • End of Sharing: a date can be set, after which the link will not be updated anymore. This is handy if a person will stop to work on a specific date.
  • Hide Fees: No money relevant data is being shared
  • Minimum Info: Only minimum info is contained in the ical (Artist, Date, City, Booking Status). This is perfect to be shared with 3rd parties such as subagencies.
  • Booking Status: Which status whould be shared


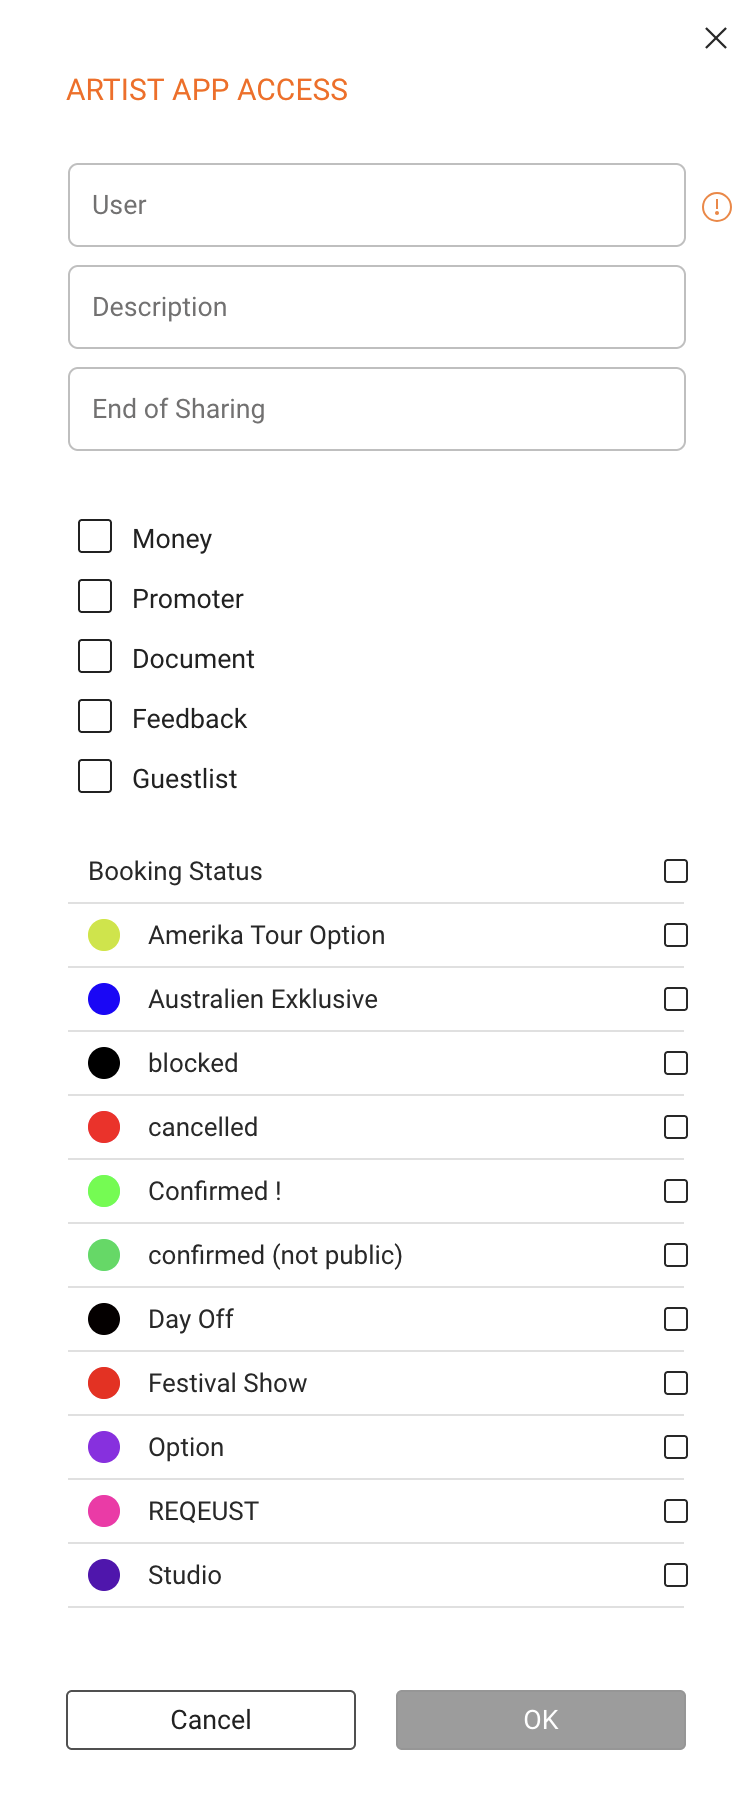
+Add new Artist app Access gives you the following options:


  • User: Username, f.e. “Artist”
  • Description: f.e. “full access”
  • End of Sharing: a date can be set, after which the link will not be updated anymore. This is handy if a person will stop to work on a specific date.


  • Money: money relevant data is being shared or not
  • Promoter: Promoter infos are shared or not
  • Document: The document section is shared or not
  • Feedback: The Feedback section is shared or not
  • Guestlist: The gustlist section is shared or not


  • Booking Status: Which status whould be shared


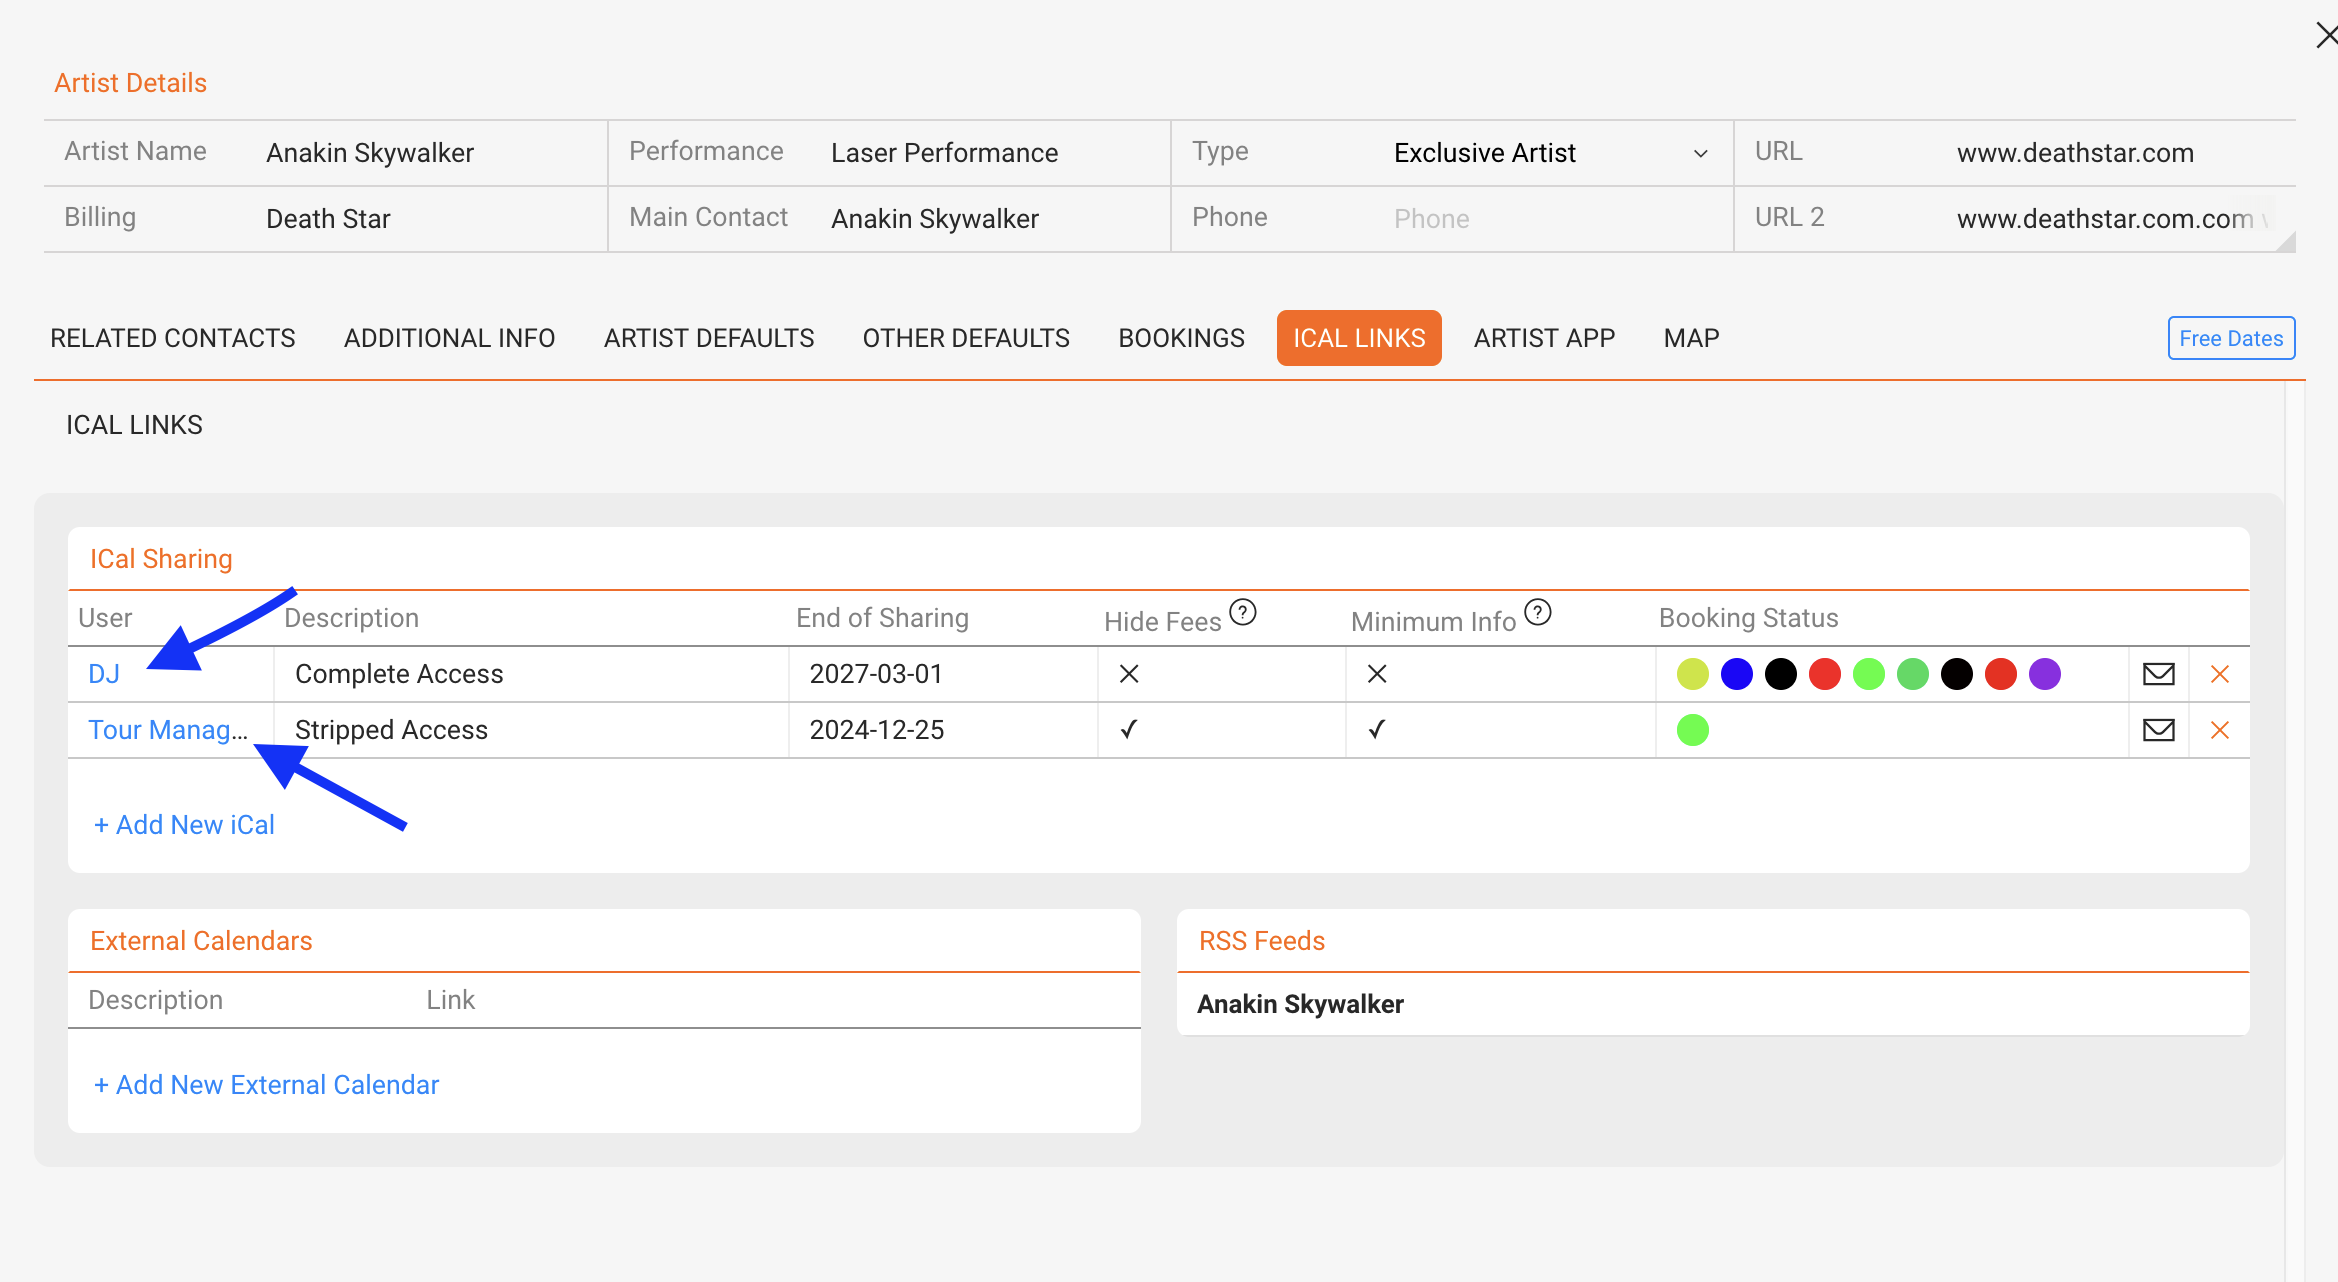
Once the permission / user is added, the informations can easily be modified.
To access it just click on the user name to open the modal.

Booking Update 02 2025

Table of contents

New Features

Improvements

  • Added [% ph.techrider_url %] to Custom Text
  • Extended Ical Display Duration (now +2 years into the future)
  • Calendar: Keep filters active when reloading page
  • Calendar: Artist Dropdown search by typing instead of scrolling
  • Contact Relations Update using Bookings
  • Style adjustments in ARTIST APP (Notes will be displayed in the same format as entered in details)

Bug Fixes

  • Negative amount in money details gets changed to positive
  • Default language in Request Form is now browser language