Why do invoices not appear in the Money Details Report

The Report from Accounting – Reports – Booking Reports – MONEY DETAILS REPORT exports all invoices that are linked to bookings, i.e. were written from within a booking.
Other invoices may have been created from Accounting / Invoices as free text invoices without connection to a booking. Those will not appear in the Booking Reports.
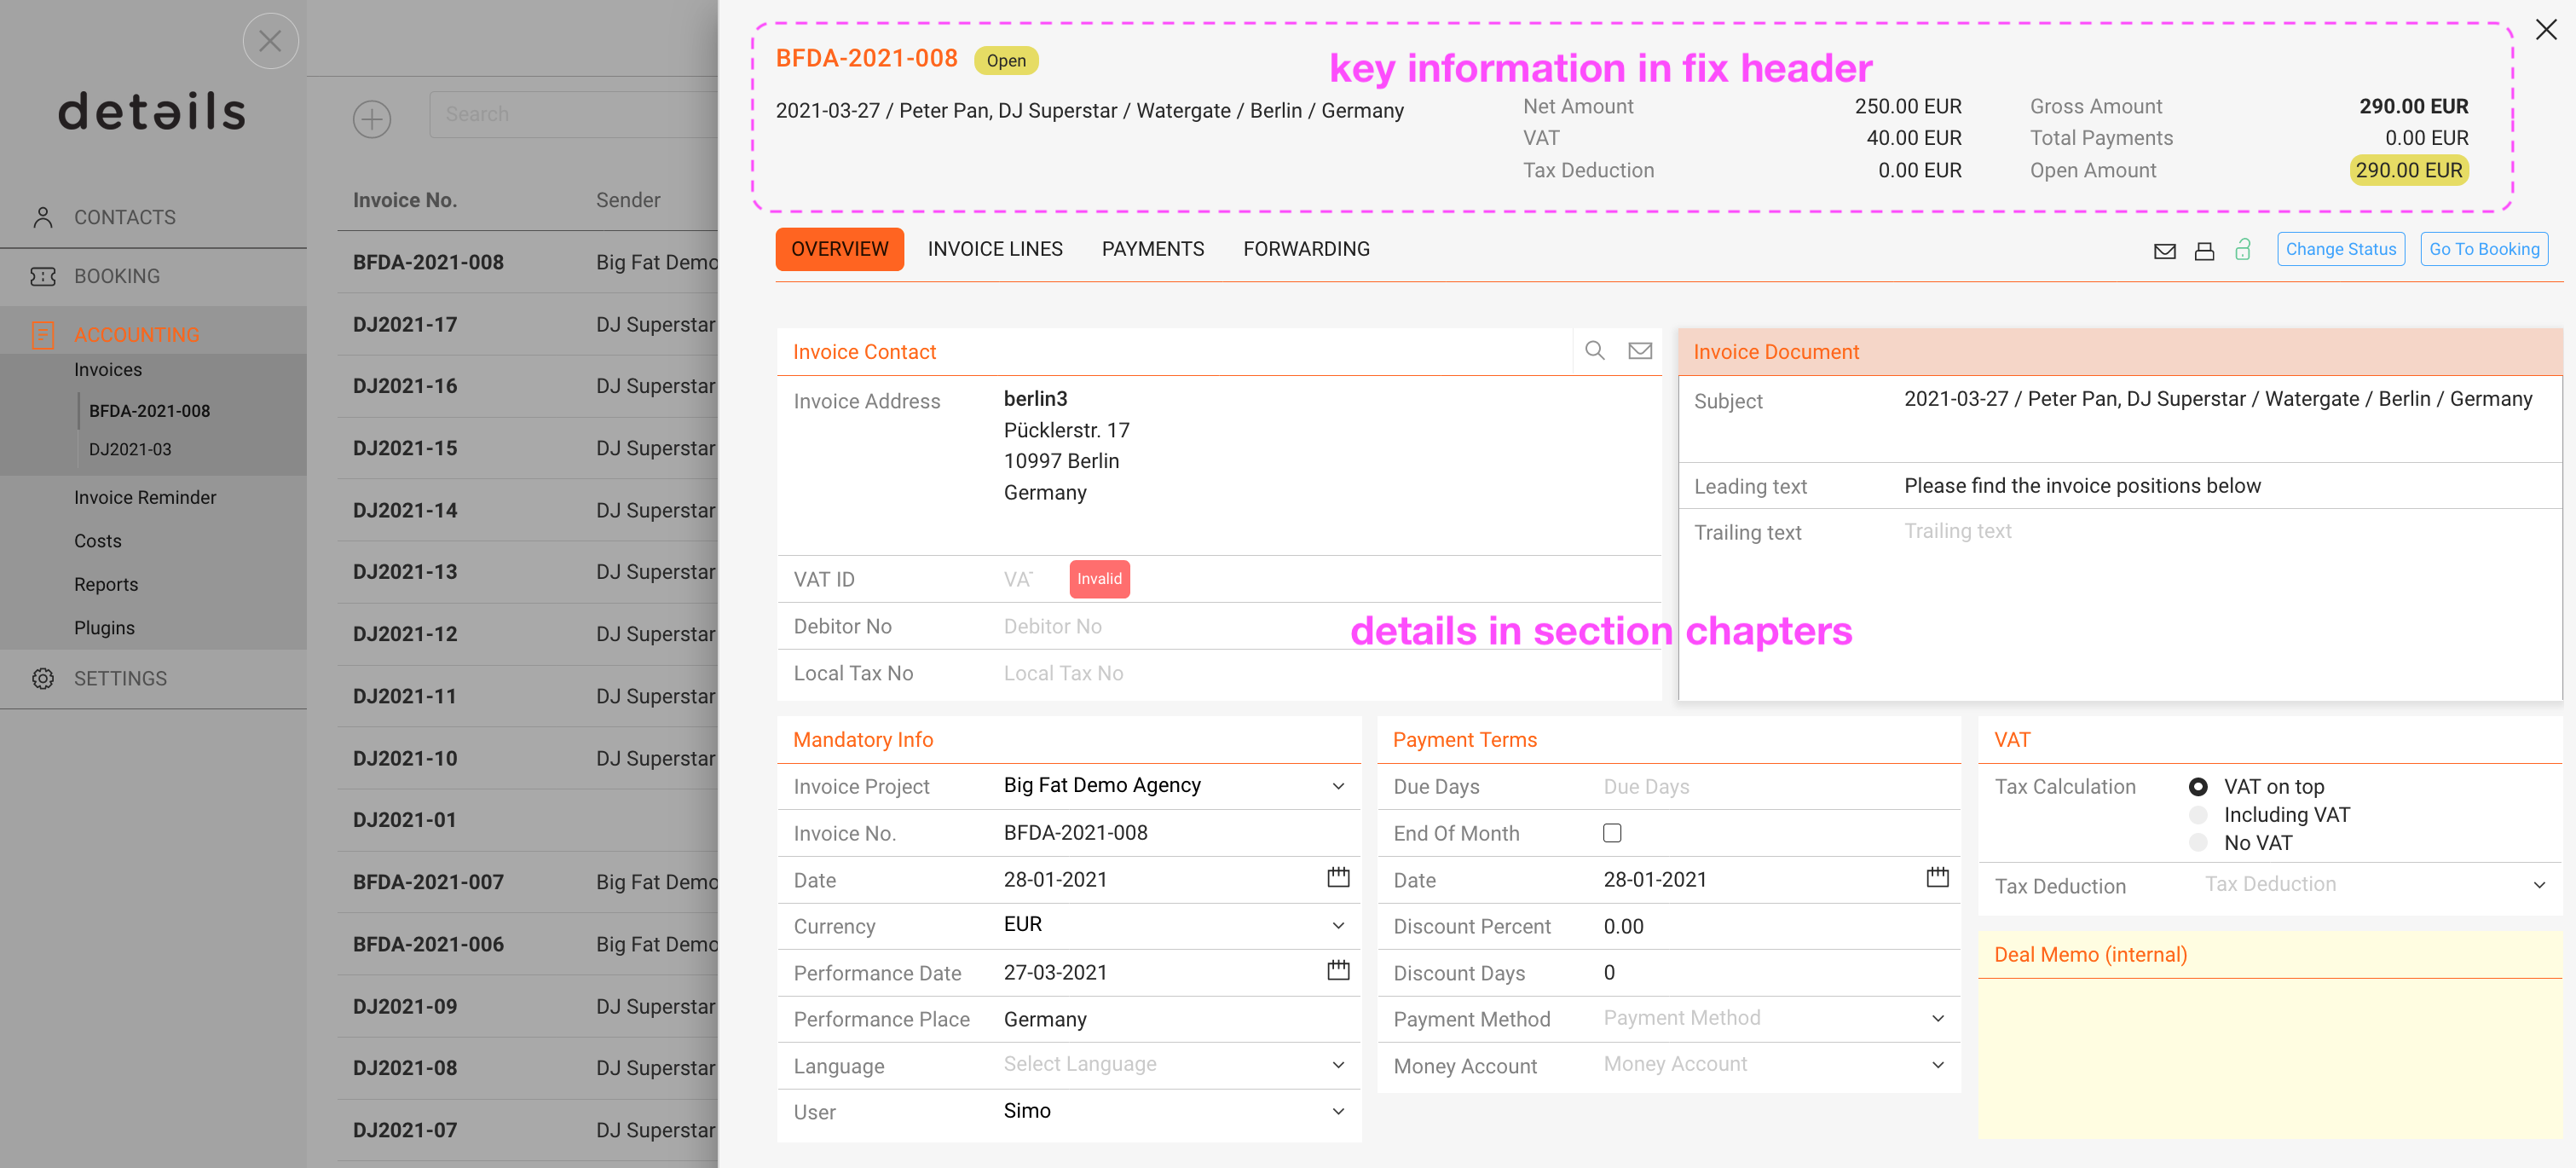
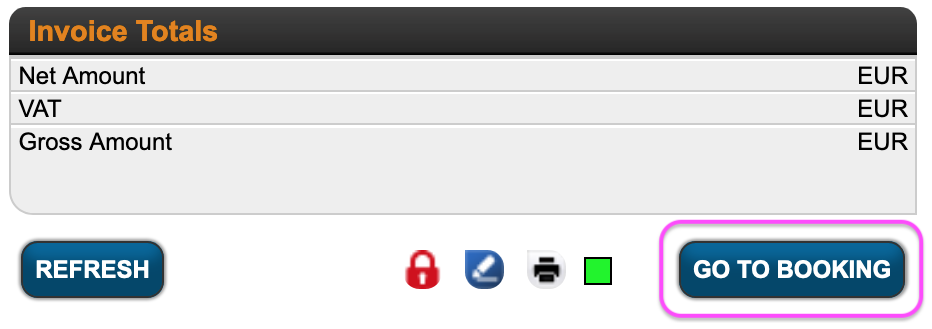
You can see whether an invoice is linked to a booking or not by booking for the button GO TO BOOKING at the bottom right of the invoice.
If the button is there, the invoice is linked, otherwise it is not
Go To Booking button

New user interface for BOOKING


Today we re excited to share our new user interface for detYils, a whole new user experience to streamline your workflow.

We are launching this for BOOKING only clients on February 1st 2021.
Other Modules will follow soon …

With the new design, you and your teammates can now …

  • enjoy a bright & clean work environment
  • see more information on larger screens
  • use any browser you want (Chrome, Firefox, Safari, Internet Explorer, etc.)
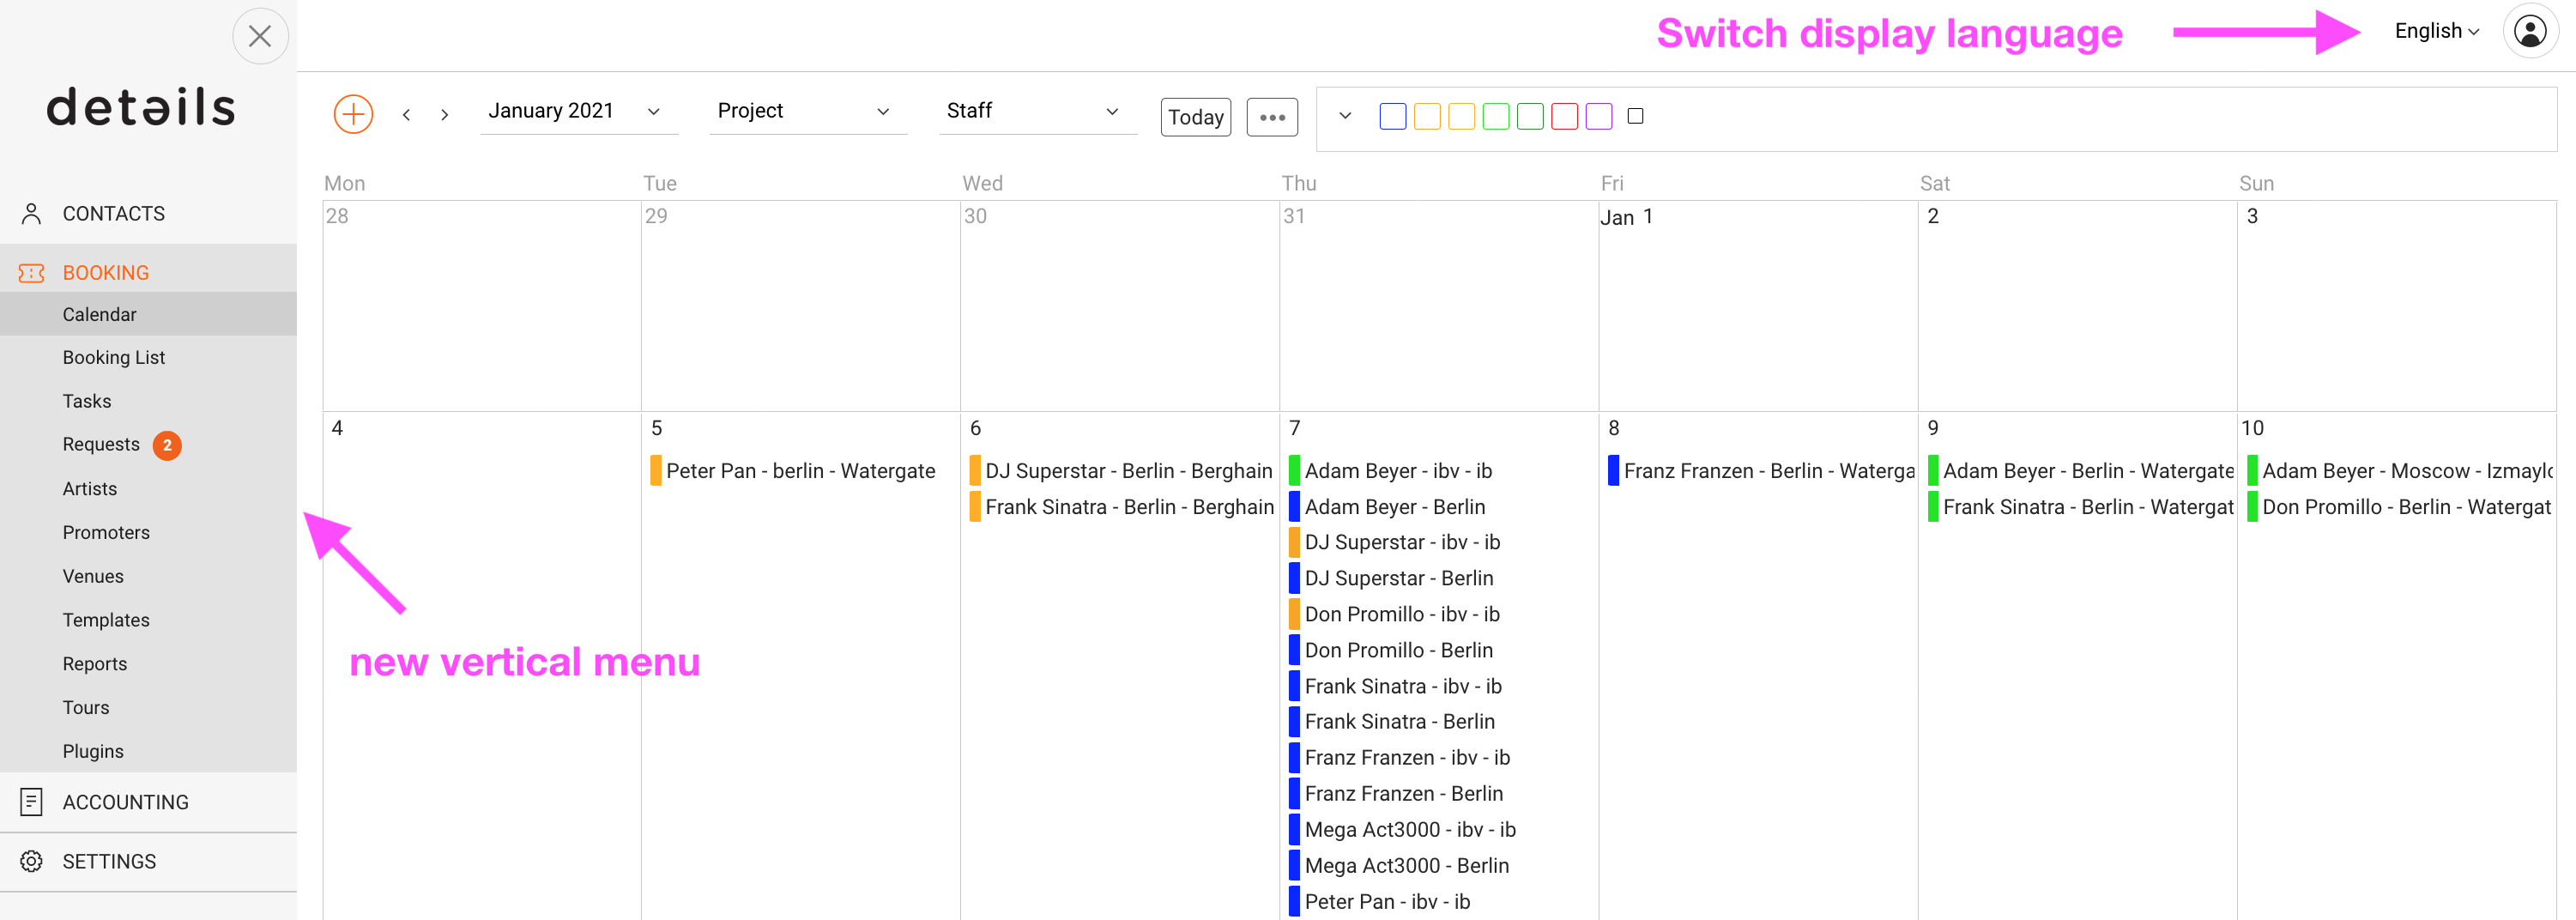
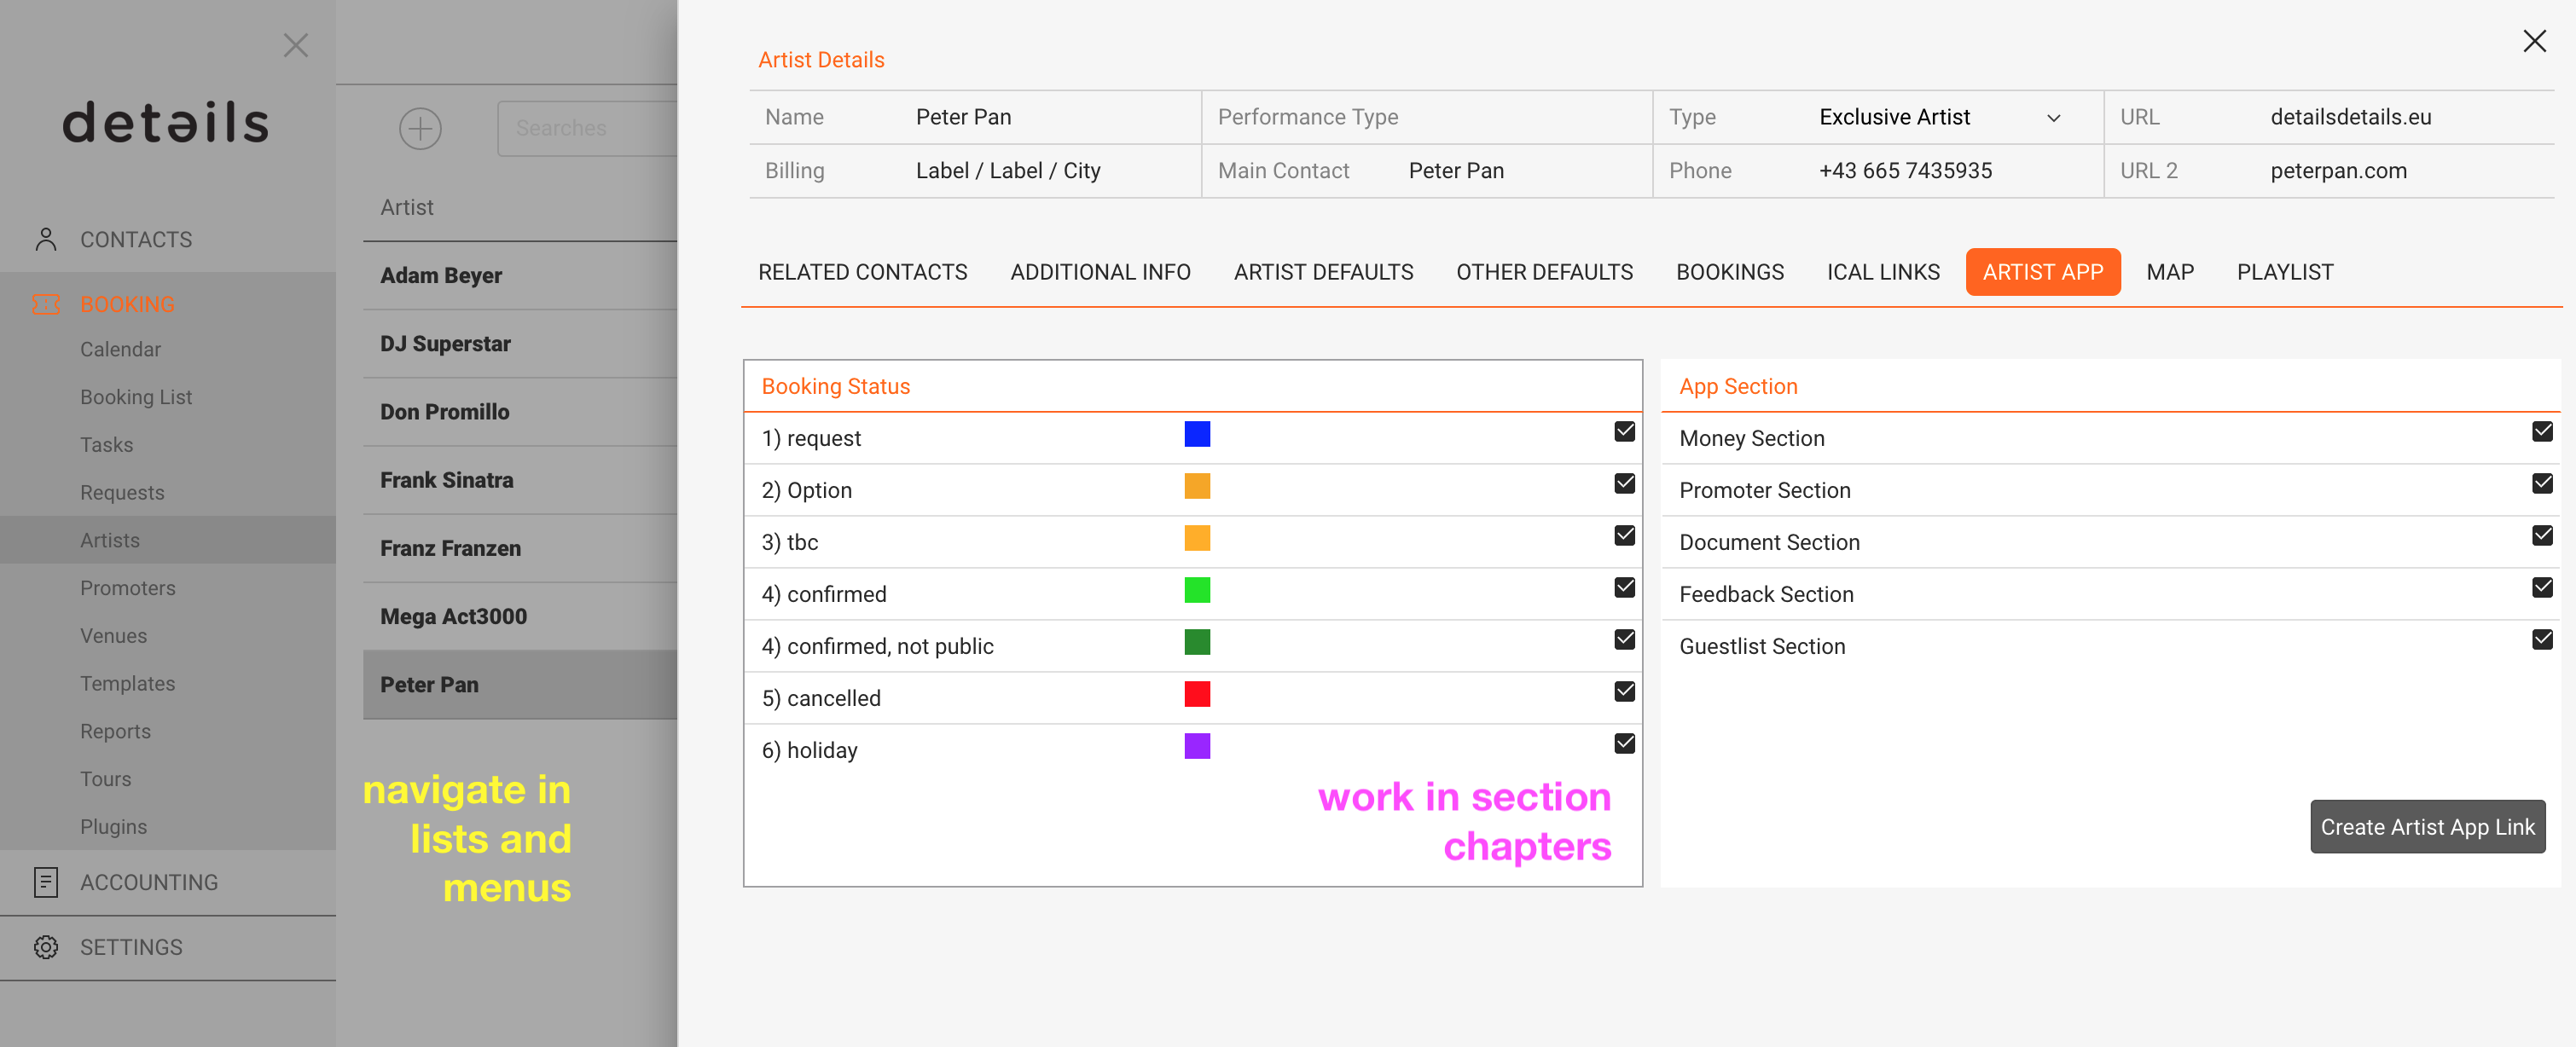
  • orientate yourself easily on the new vertical main menu
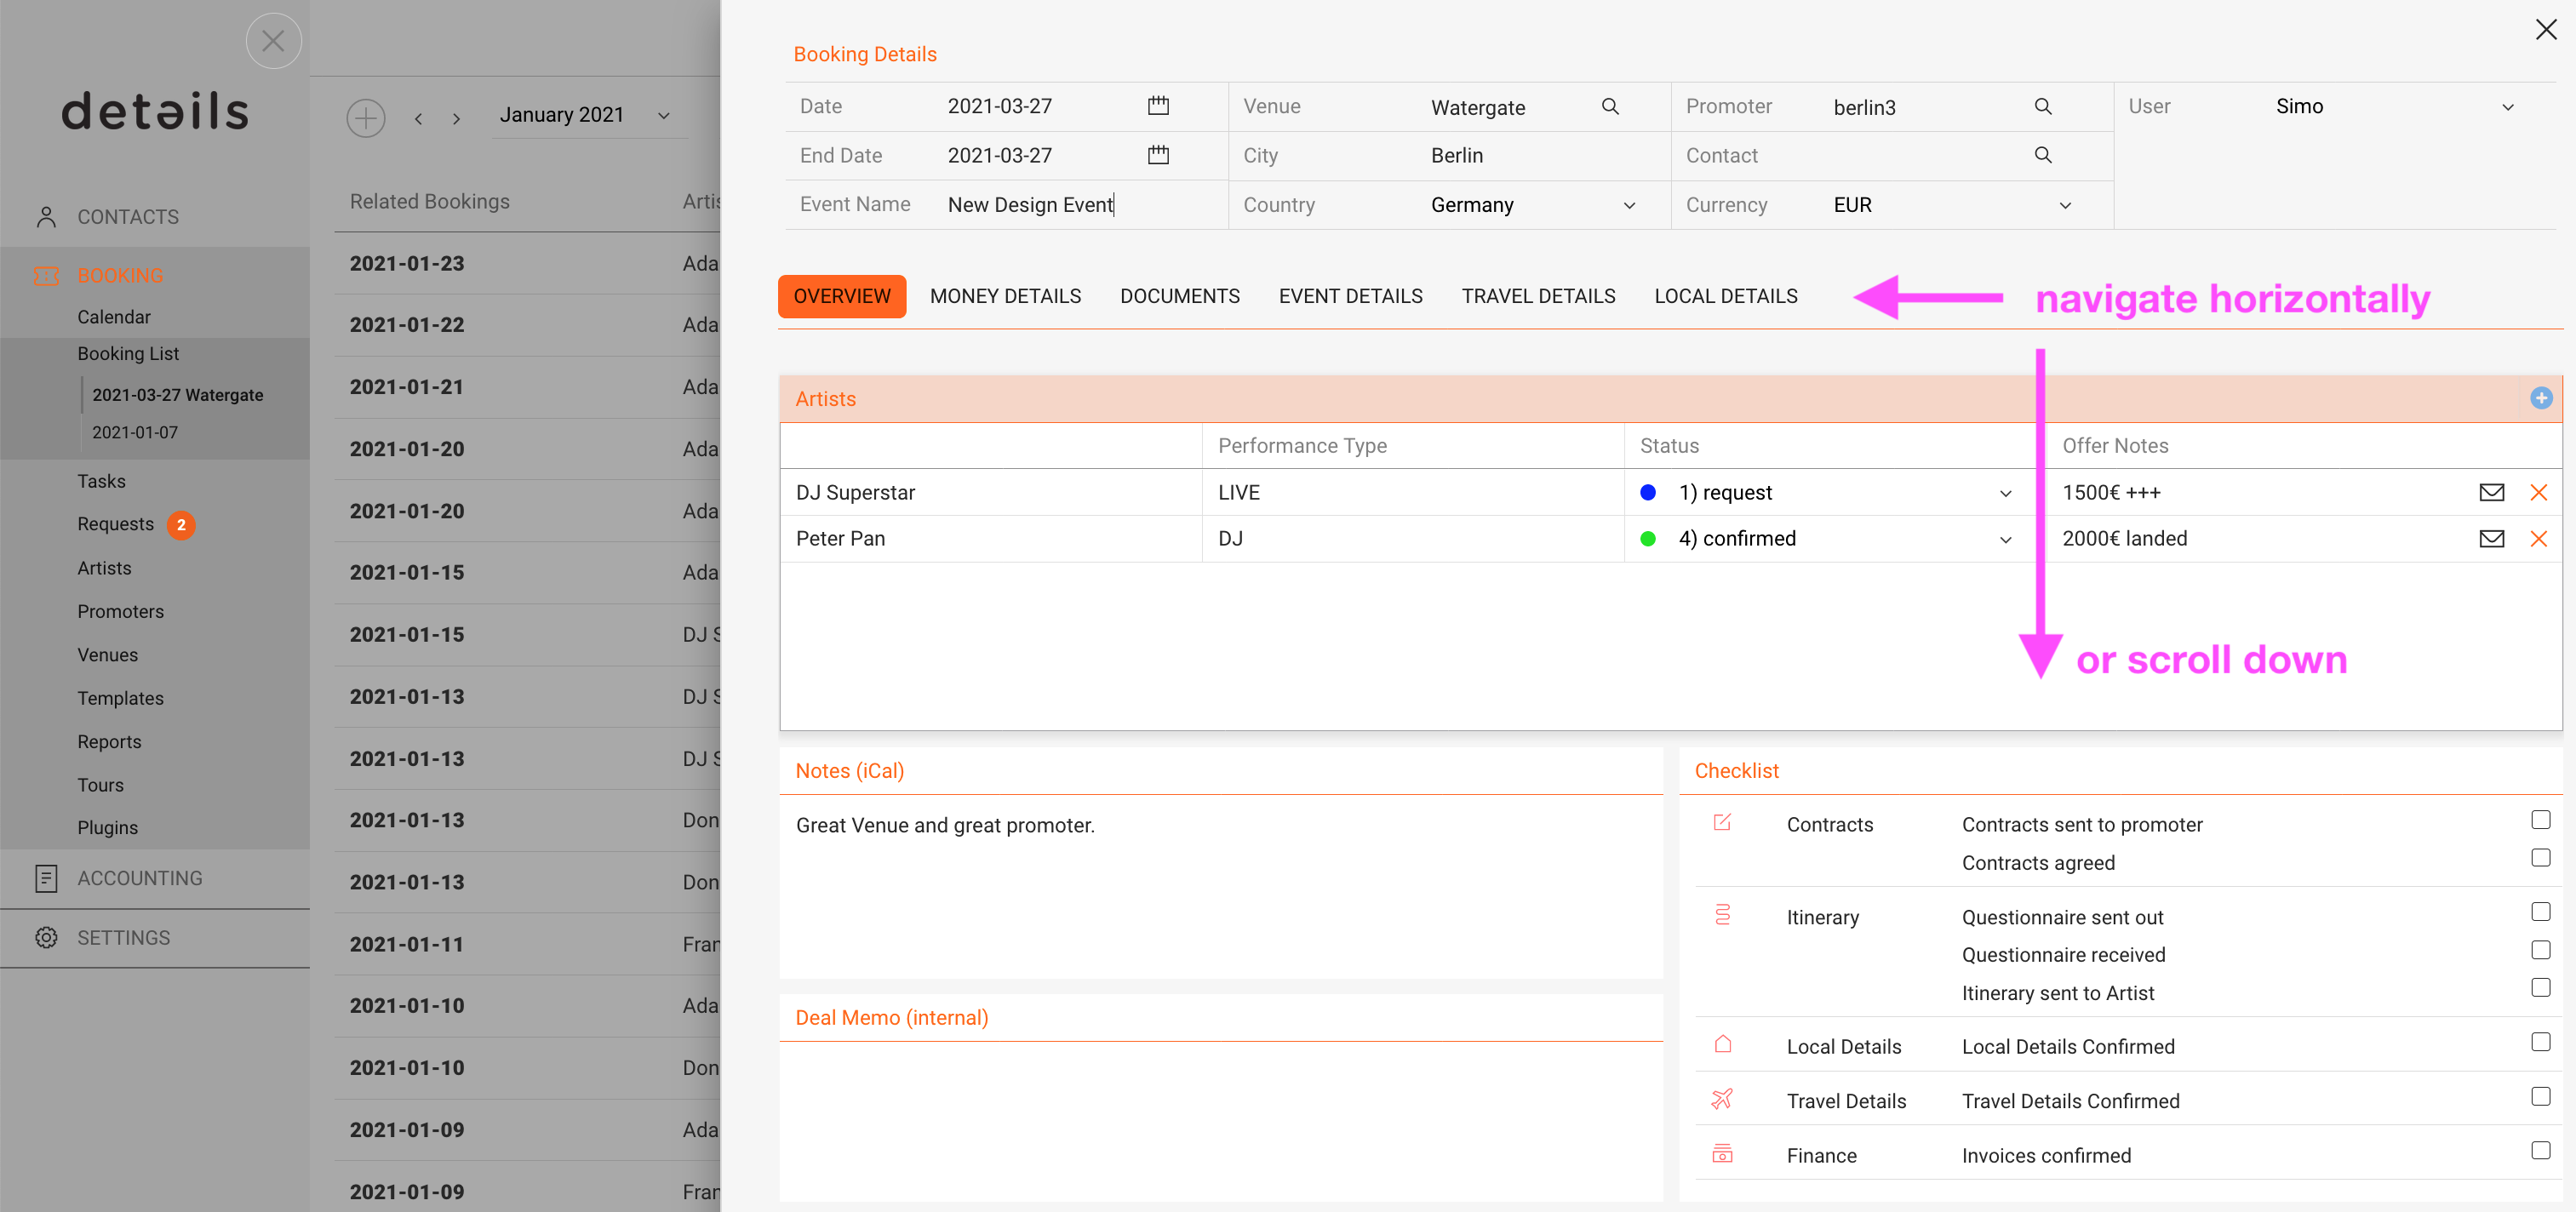
  • scroll down through bookings, invoices, etc. or move horizontally as before.
  • switch the display language any time
  • enjoy exclusive features for the new design tba.

Say goodbye to the 2000s. Hello detYils 2021!

PS: Should you find any glitches, thank you for contacting simo@berlin3.com

NOTE :
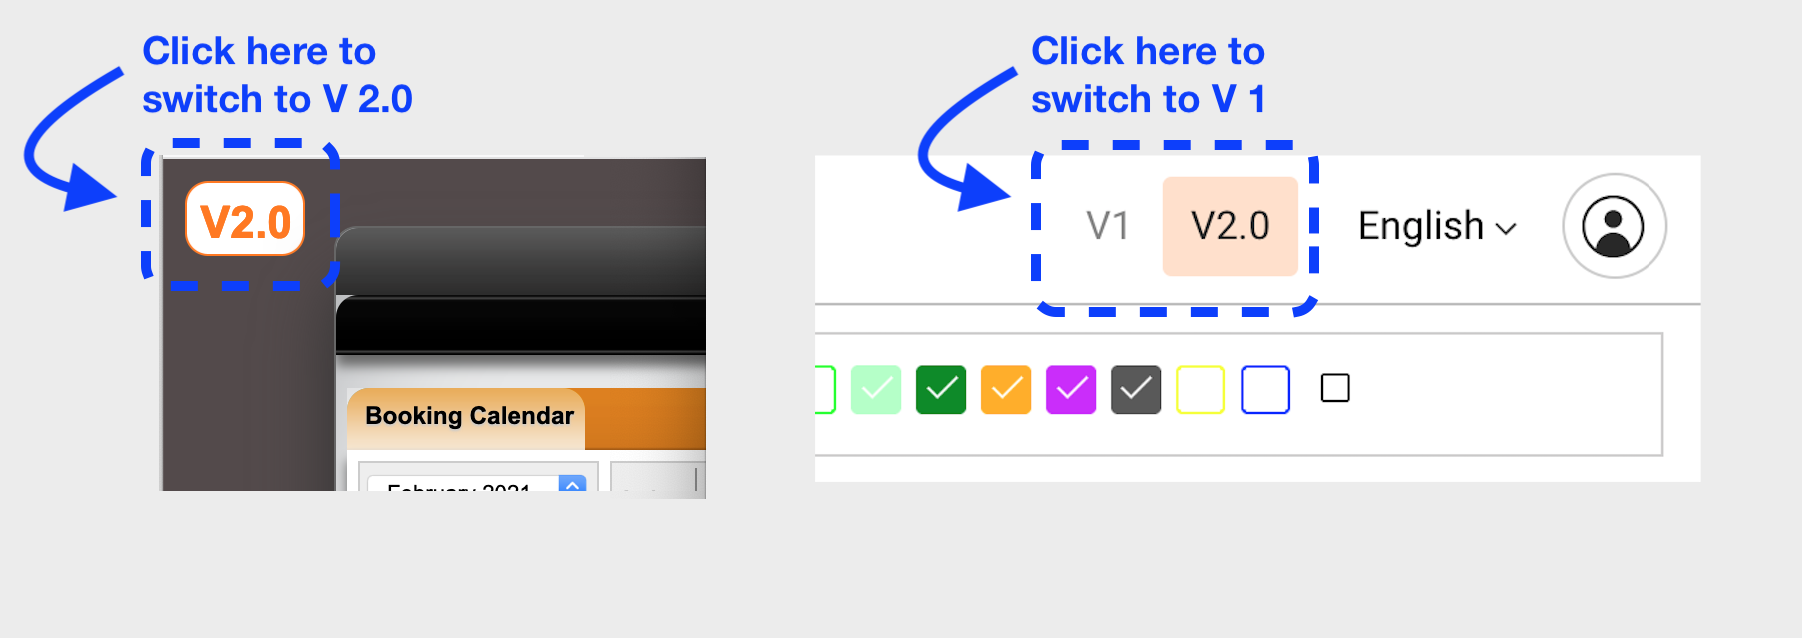
During the transition period you may switch between the old design (V1) and the new one (V2.0)


Why all dates after one year are removed from the iCal subscription?

As you might or might not know an iCal subscription is basically a text file (in an international standard format called ics).

The more dates are included in that file, the bigger it gets.

And the bigger a file gets, the longer it takes to download when it’s updated.

Now when text files get too big, smartphones may not be able to load all data within the time-frame defined by their settings. What happens then is a so called “time-out” which means new dates don’t get uploaded anymore.

This is the reason why the iCal you subscribe to in our ”details artist iCal subscription feed” displays all bookings between previous 1 month and next 1 year of your artists. It removes all booking dates older than 1 month and newer than 1 year.


i) use the ARTIST APP => This web interface can be opened on PC/Mac as well as on smartphones

ii) details => BOOKING => ARTISTS => Bookings Dates  lists all bookings of the selected artist

iii) details => BOOKING => BOOKING LIST =>  lists all bookings of the all or selected artist


How To Add New Product Format


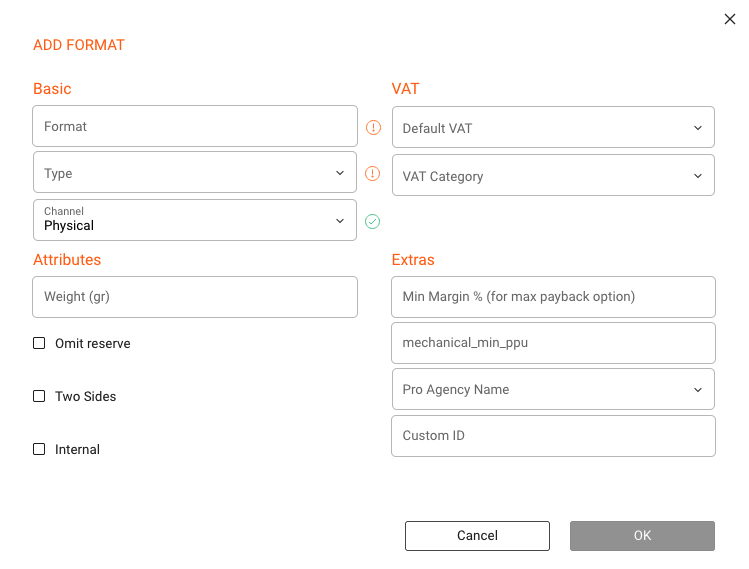
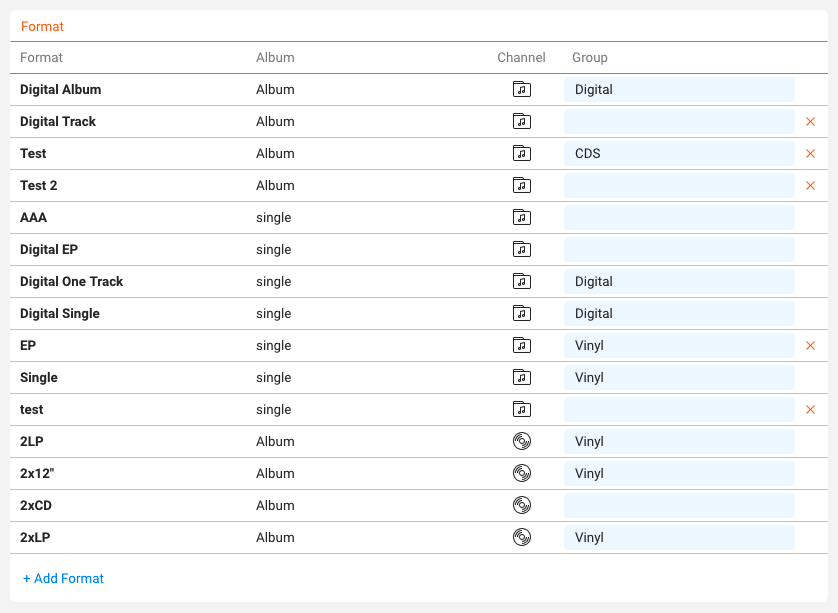
To create a new product format, go to LABEL / SETTINGS. Here you can add, edit, and remove all formats you need for your label.

To add a new format, click on [+ Add Format] at the end of the format list.

Enter the format name and configure its attributes. These include:

  • Channel: Physical or Digital. Determines applicable royalty rules and product display.
  • Type: Single, EP, Album, etc., for classification.
  • VAT Type: Full rate (VAT1), reduced rate (VAT2), or no VAT (NoVAT).
  • Weight: Default shipping weight for logistics calculations.
  • Omit Reserve: Skip physical return reserves for this format.
  • Other Attributes: Two Sides, Internal, and advanced fields like Minimum Margin or Mechanical Min PPU if applicable.

When ready, click [OK] to confirm.

Important: Select the correct CHANNEL (Physical or Digital) when creating the format. This setting affects royalty rules and product display. Do not change it once the format is in use, as it can disrupt accounting and reporting.

Editing & Deleting Formats

To edit an existing format, click on its title in the list. To delete a format, click the [x] icon. You can only delete formats that are not currently in use by any products. If a format is in use, move those products to another format (keeping the same channel) before deletion.

Assigning Formats to Products

Once created, formats can be assigned to products in CATALOG / PRODUCTS.

Best Practices

  • Decide early whether a product is Physical or Digital and stick with it.
  • Keep formats simple only create as many as needed for pricing, logistics, and reporting.
  • Use Omit Reserve for formats with low return risk (e.g., tickets, limited editions).
  • Set accurate VAT and weight defaults to reduce errors; override per product only when needed.
  • Use advanced fields like Minimum Margin or Mechanical Min PPU only when required by contracts.

04 2021 details update

Details 2021 Spring Update

Dear all,
we are pleased to announce that our spring update of details is now online! Please find below further information about the update and the new features:

Booking : Update for Promoter Contacts

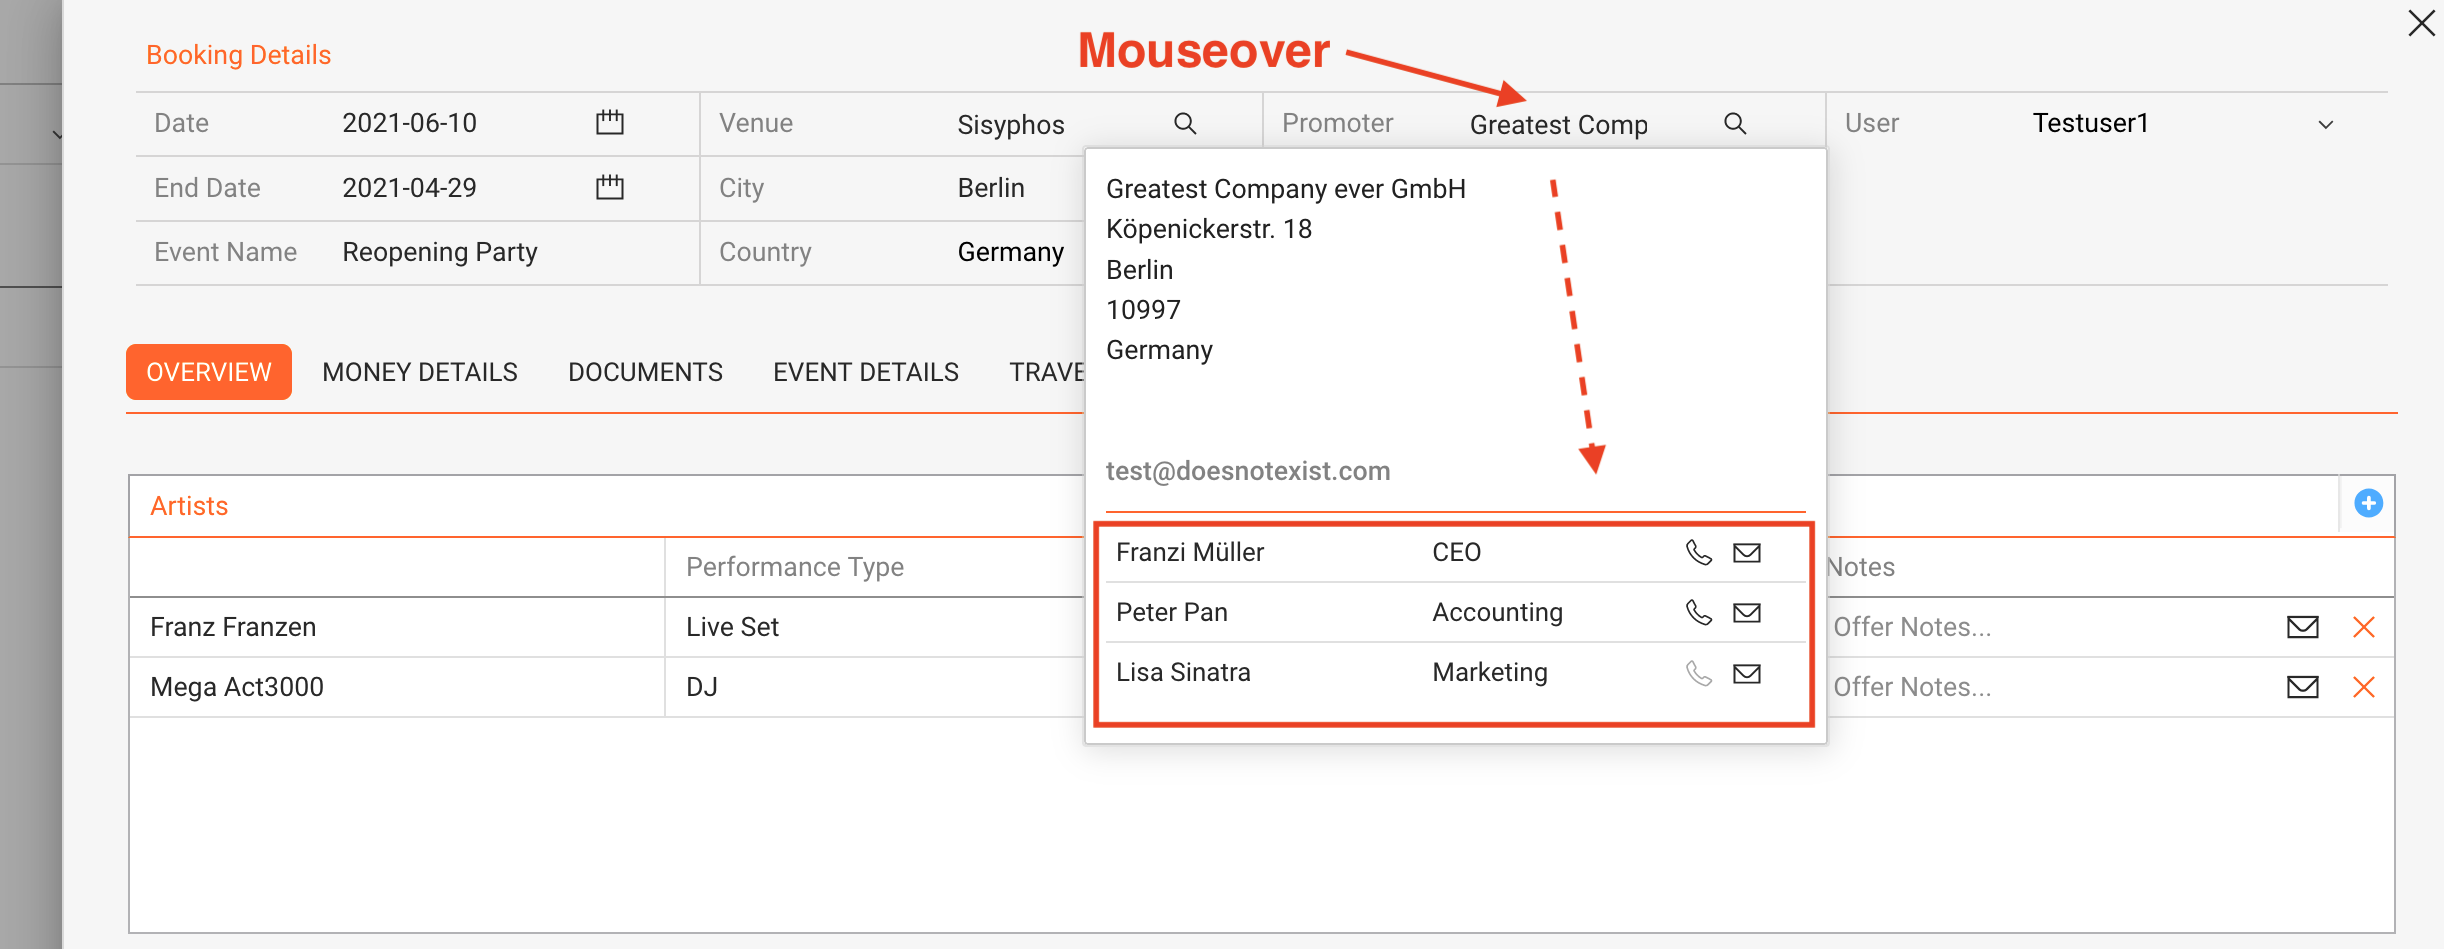
We have released our first new feature in the V2.0 design: hovering the mouse over the Promoter of an event now displays all related contacts with their function and contact. Simple yet convenient!


Distribution : Order Discounts

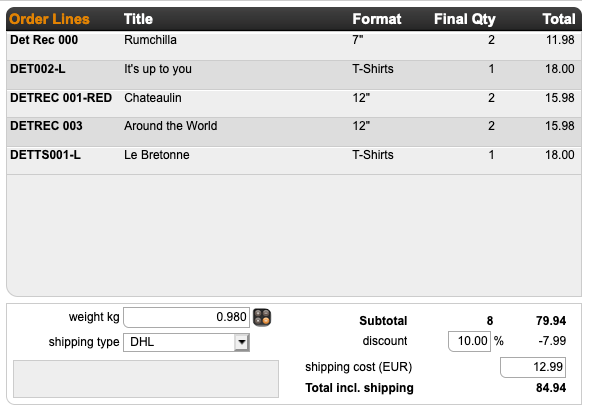
Managing physical orders is getting more and more important. We added new options of order discounts to the distribution section. Read
here
how to use different order discounts.


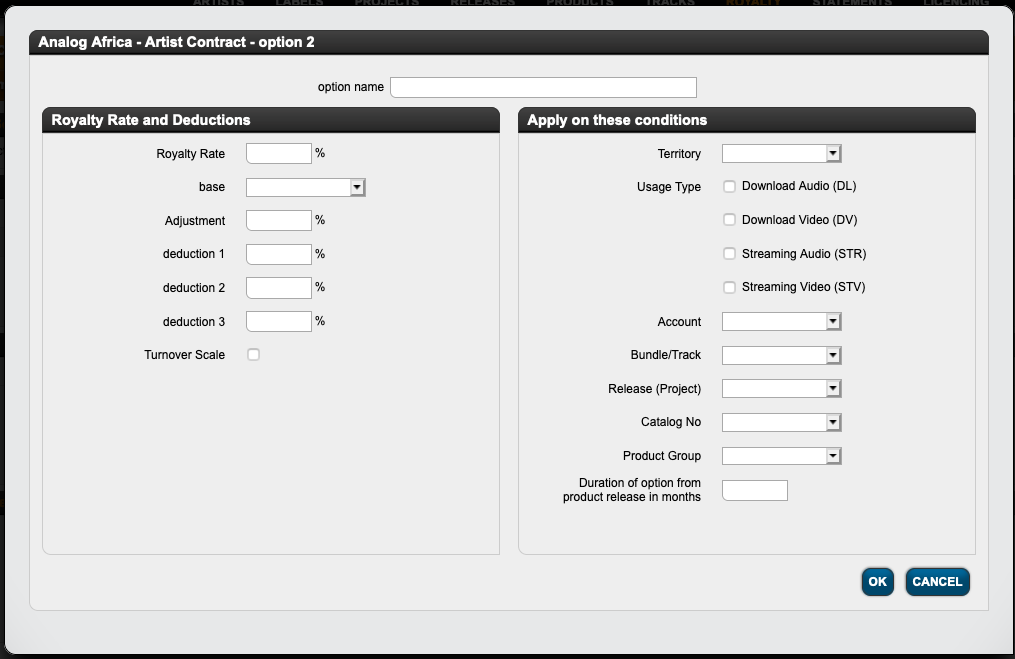
Label : New Interface for Royalty Options

For royalty accounting, it is essential to set up contracts properly. We have improved the design of the royalty options window, making it easier to manage your contracts. Read
here
what’s new.


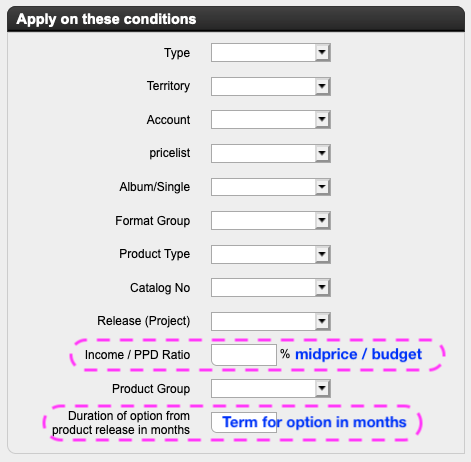
Label : Expiring rates & Mid Price options

Do you need mid-price options for legacy contracts? Do you want a rate to expire after two years? We have implemented
new options
for royalty contracts!


Additionally, we have released multiple fixes. Let us know if you experience any issues!

Invoice – Correction

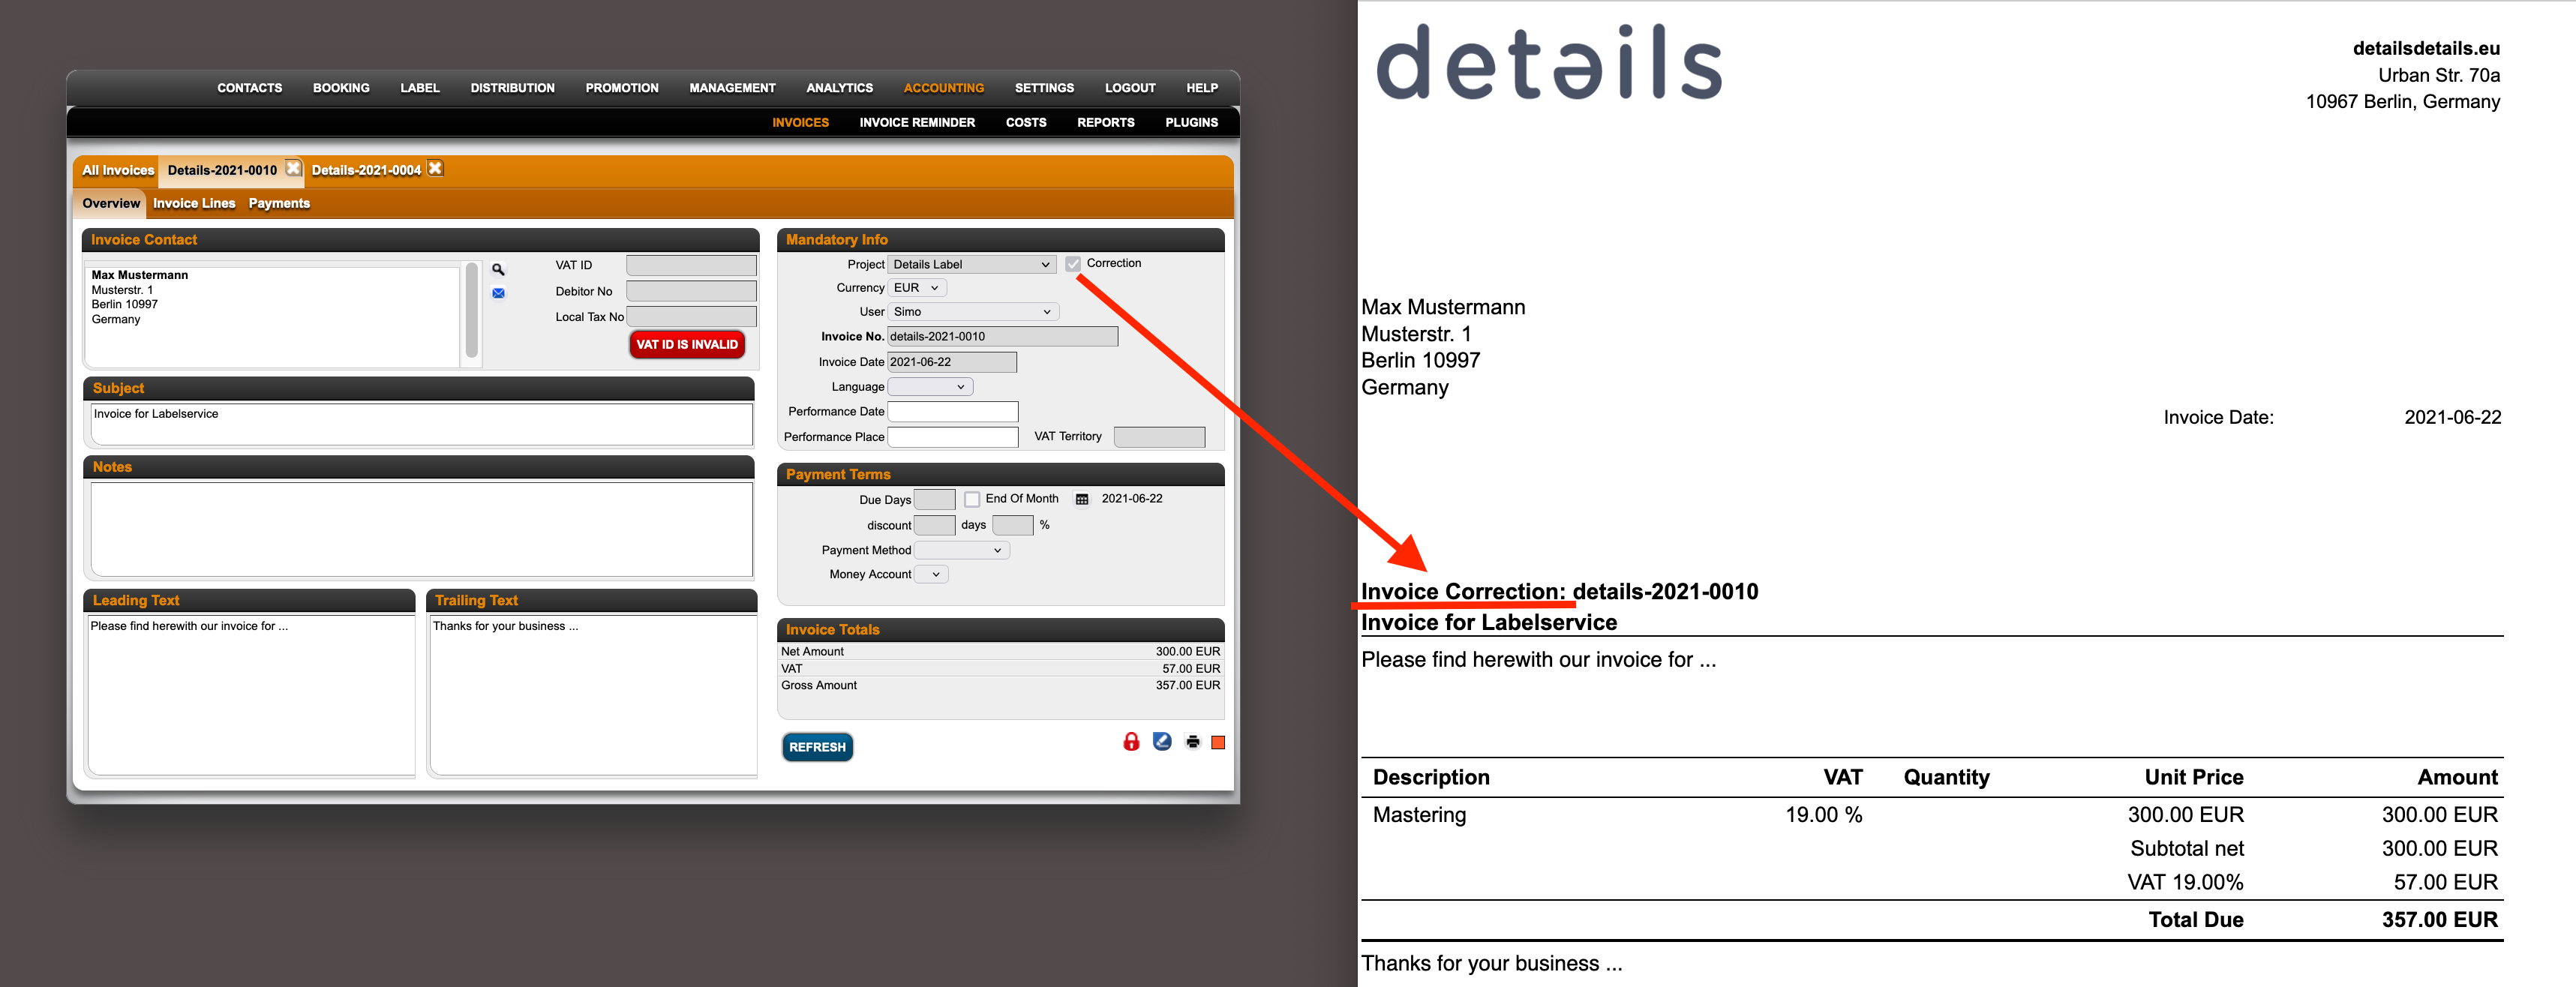
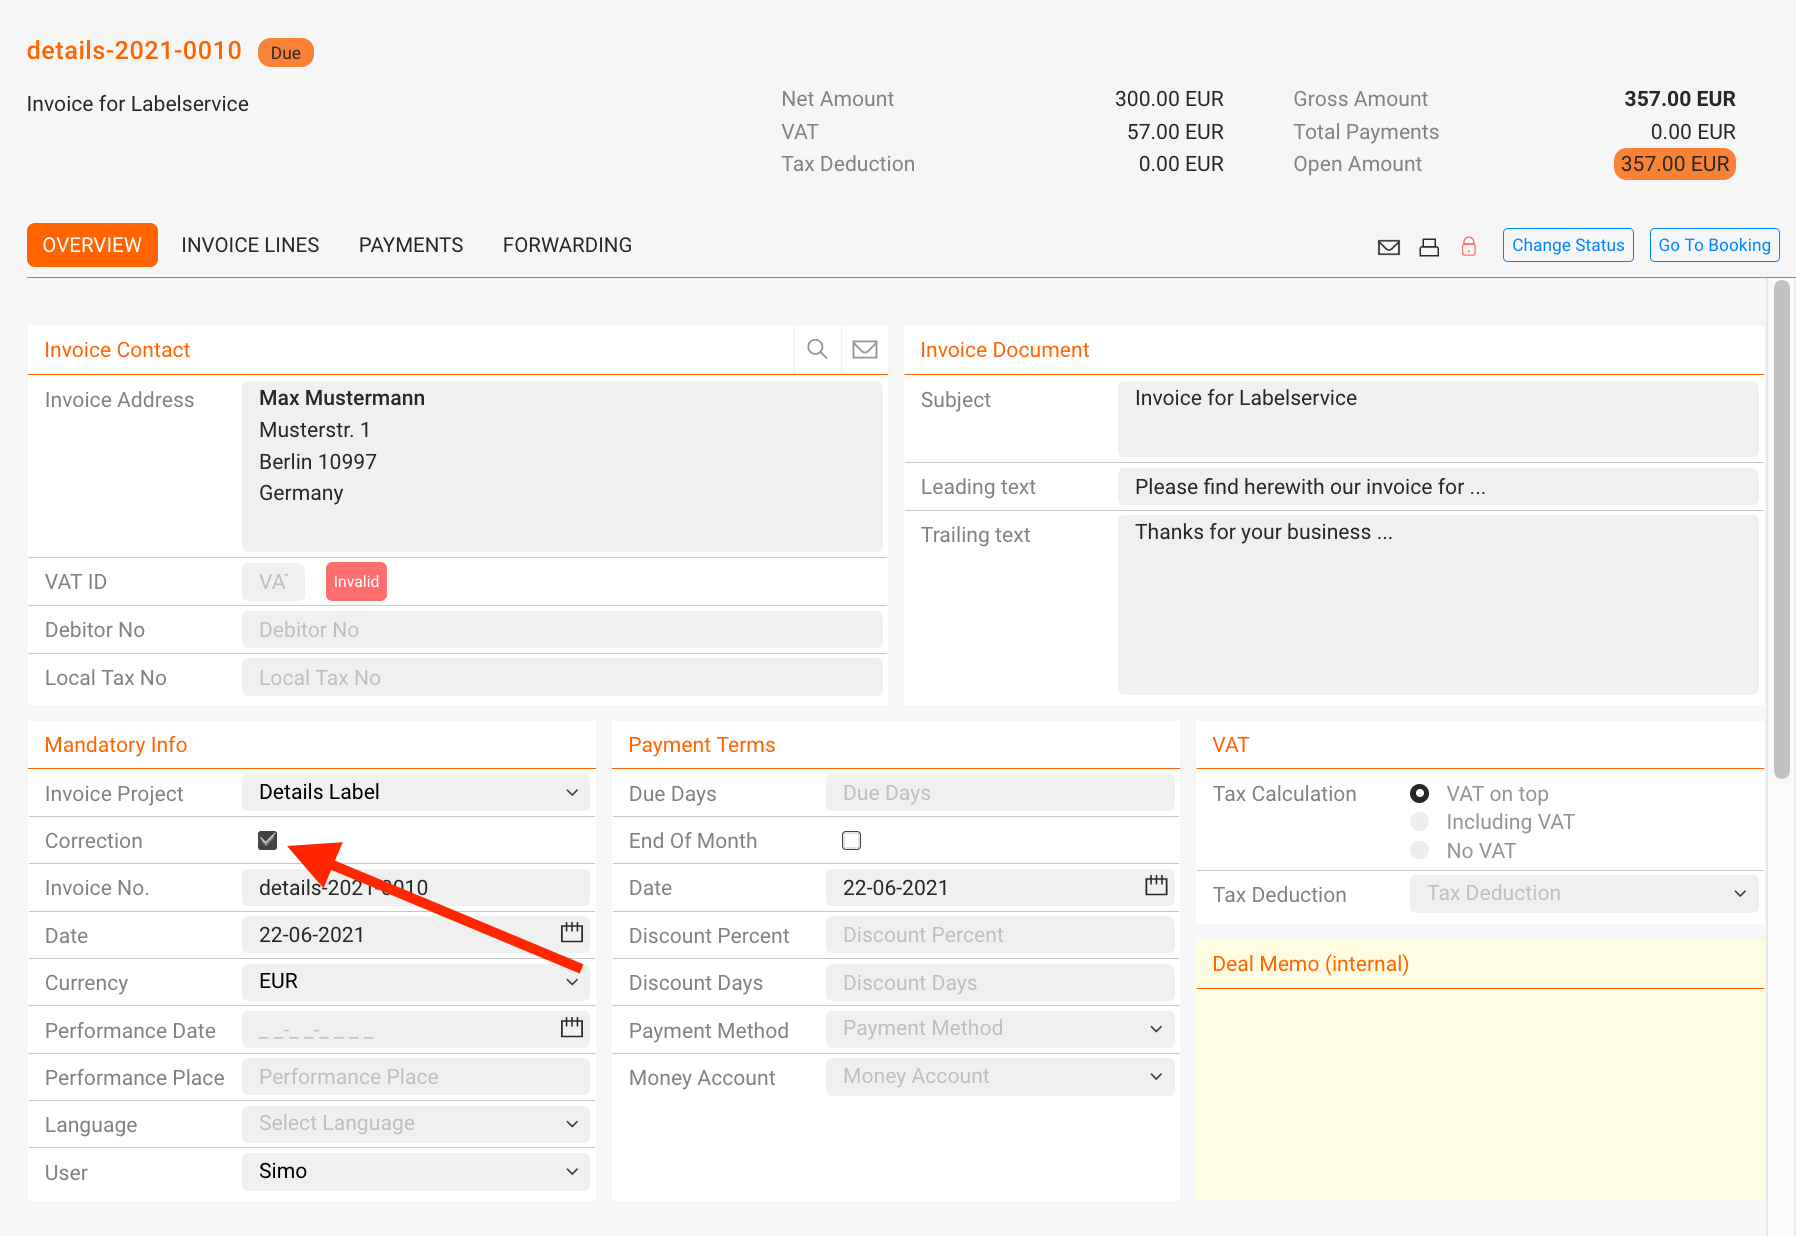
detils now offers the possibility to mark an invoice as a CORRECTED Invoice.
Marking the checkbox “Correction” in an invoice leads to placing “Invoice correction” before the invoice number.


Don’t confuse this with the CANCEL function which cancels an invoice (german: STORNO), which means the invoice will be invalid but (the number) remains in your books.


This feature is both available in Version 1 and in Version 2.0:

How to reset a password

Table of contents

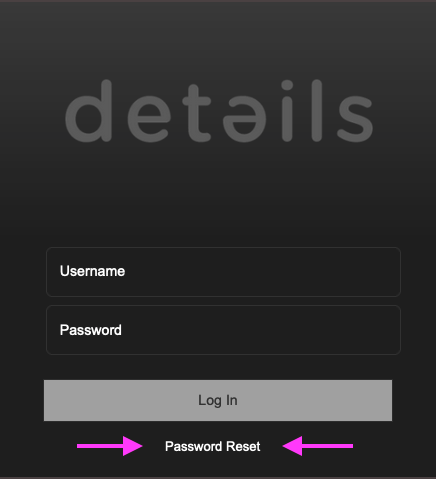
If you’ve forgotten your password, you can request a reset directly from the login screen.

Click [RESET PASSWORD] to open the password recovery page.

Set your password

On the next screen, you’ll see simple instructions explaining how to request a password reset:

  1. Enter your user name or email address.
  2. The system will send a recovery link to the associated email address.
    If you don’t see the email, please check your spam folder.
  3. Use the link to create a new password.

For security reasons, the system does not confirm whether a user name or email address exists. If a matching account is found, a recovery email will be sent automatically.

Once you’ve set a new password using the recovery link, you’ll see a confirmation and can log in again as usual.

To ensure you receive recovery emails, make sure your user account has a valid email address.

If you’re an admin, you can add or update user email addresses under SETTINGS > USERS.

Import Costs

How to start with details – manual

read read previous step here – how to Import Sales


You can easily import your costs via excel sheet import just as sales imports.

To import costs you can compile an excel file with the following mandatory columns:


  • Identifier: This is the matching identifier; Release Codes will be matched on Releases, Barcodes & Catalog Numbers will be matched against Products
  • Cost Date: Day or month you want to have these costs imported to (if date is blank, the last day of the import month is used as cost date).
  • Cost Group: Select a matching Cost Group from Settings / Accounting (all your cost groups are managed here)
  • Description: Free text
  • Cost Amount: The cost amount in your system currency; must be positive for costs.

Optionally you can add artist / title information. You can download a sample cost import template here

If you receive cost files from your partners and they include all mandatory info, you can also import these as described.

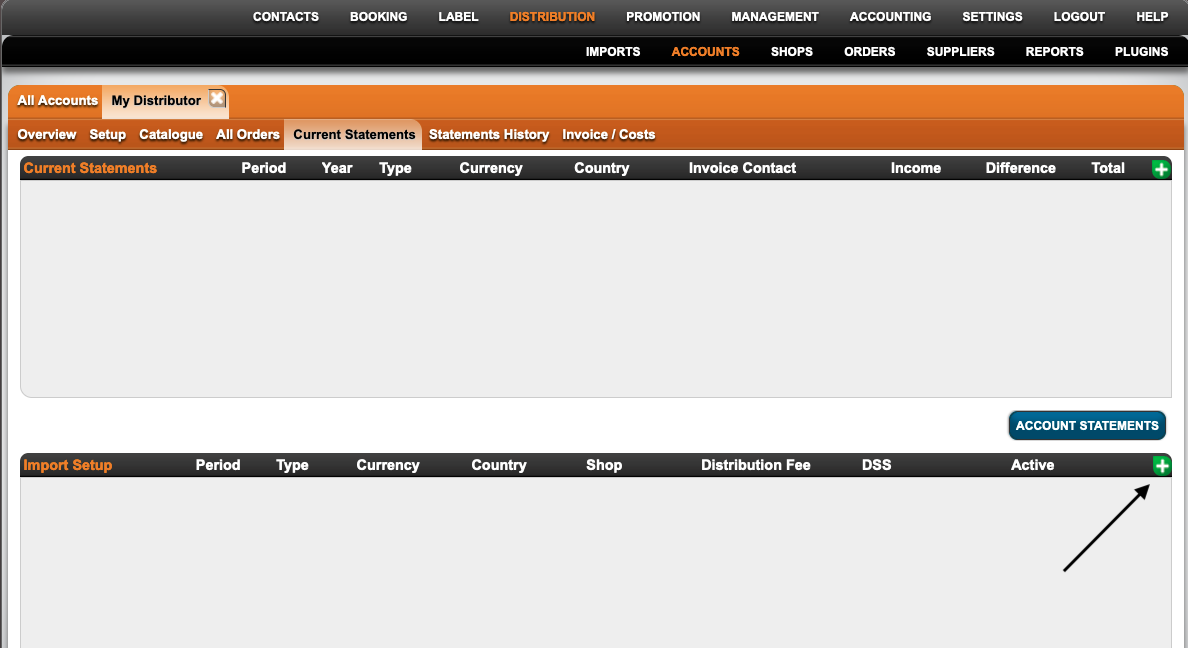
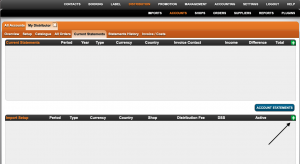
Now go to Distribution / Accounts and select the account you want to import costs for. On the Current Statements tab you create a new import setup for costs. Click [+] on top right of the Statement setup box


Now enter a description such as “Label Costs” and select invoice project, type costs, currency and period.

Click [OK] to confirm and select an invoice contact if applicable (you can skip that if you set up label costs).


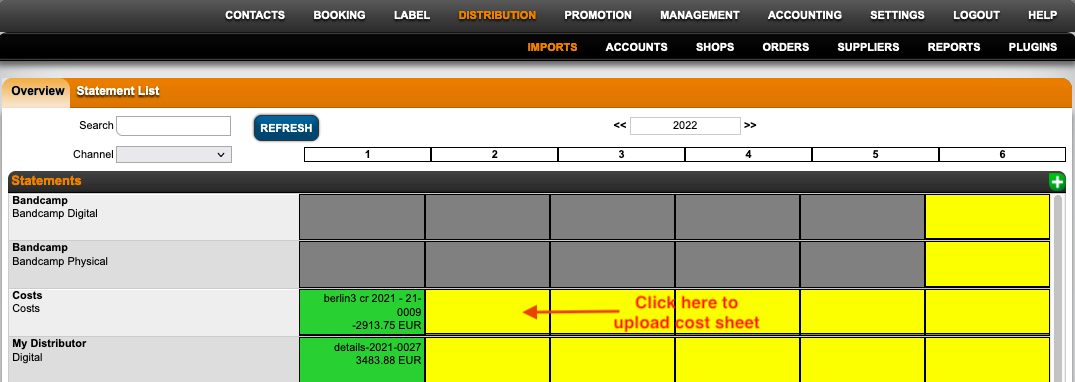
Once the cost import setup has been created you can import your cost sheet on Distribution / Imports on the relevant tile. Assign the import headers from the drop down menus. All column headers need to match with the headers of the file you have imported.

Please note: To save the configuration for your future imports, click on the Save Configurations button. Then click Proceed.
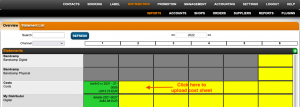
 

You will be notified by mail when the import process is complete. Once the import is complete, go back to the statement by clicking on the orange import tile on Distribution / Imports.


Attention: If there are products / releases that could not be matched automatically by identifier (such as catalog number, barcode etc), these need to be matched manually with scrutiny on the Import Matching tab.


To match costs, click on the bold text in the first column and select the correct product/release you want to add the costs to. All manual matches will be saved for future statements.

If all lines have been matched, go to Import Result. At the bottom you find your total costs amount. Click Account Statement to create your cost invoice.

This is a crucial & sometimes challenging task, feel free to double check with your details support team.

Alternatively you can upload costs manually. See here how to add costs manually to Releases and Products.read next step here – how to set up / add Royalty Accounts, Contracts and Recoupables.
How to set up royalty statement emails for .shares


For giving a person access to the B2B section you first need to set up the person as an External User.
(see HERE how to set up external user).When this is done go to SETTINGS – IDENTITIES and choose the invoice layout.


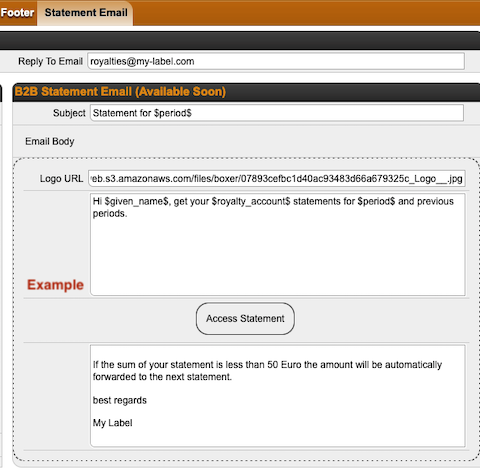
(Then go to the SHARES EMAIL tab and fill out the subject. It is possible, but not mandatory, to add a variable period to the subject field, so the respective period(s) will automatically be inserted to the email subject.
Please note that the period is the only variable that can be used in the subject.

To insert the period variable in the subject you need to add $period$(e.g. “Statement for $period$”


For the email text you can create a standard text with the variables GIVEN NAME $given_name$, ROYALTY ACCOUNT NAME $royalty_account$ and PERIOD $period$.

e.g. “Hi $given_name$,( get your $royalty_account$ statements for $period$ and previous periods.”

You also be able to add a trailing text, that will appear under the ACCESS STATEMENT Button.


(To add your logo to the email you need to follow this steps unless you have not already uploaded a logo into Details:


1) go to CONTACTS / FILES and upload your new picture, logo file etc. to FILES.(NOTE: Don’t forget to name the file in a way that you will allow you to find it again.


2) Right Click on the uploaded file and select “Copy link location”.(This will copy the link of the file into the clipboard and allows you to paste the URL to the Logo URL field. ((


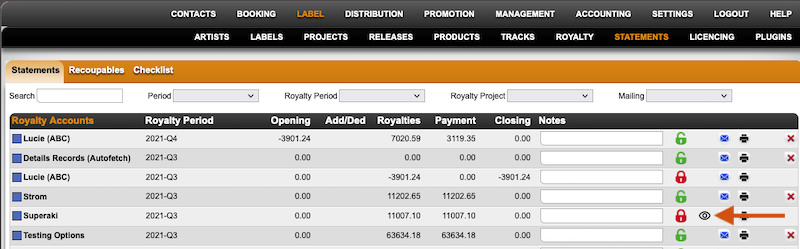
To have an overview of all Royalty Accounts that give access to external user we’ve added a new icon.
Bildschirmfoto_2022-01-11_um_13.28.45.png

In the LABEL – ROYALTY ACCOUNT – STATEMENT list and in the LABEL – STATEMENTS list overview you will find the icon beside all relevant statements.


(All statements showing this icon allow one or more external user(s) access to the royalty account. By clicking on the icon you will find all users that have access to the respective account.

Please note, that only locked statements allow access to external user and will be used for the reporting overview.

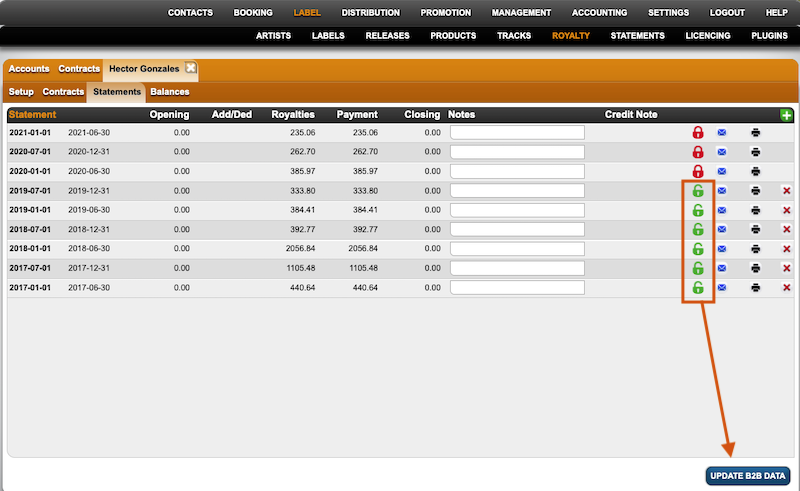
If you want to add the complete statement history (incl. unlocked statements) to the B2B data you can go to LABEL – ROYALTY – SELECTED ROYALTY ACCOUNT – STATEMENTS.
(There you find the button UPDATE B2B DATA.


By clicking this button all unlocked statements will be locked and all sales data will be included to the sales history in the B2B account.
(By sending the statement, every external user will receive a link for a landing page where to register or to log in.


How to set an invoice to paid


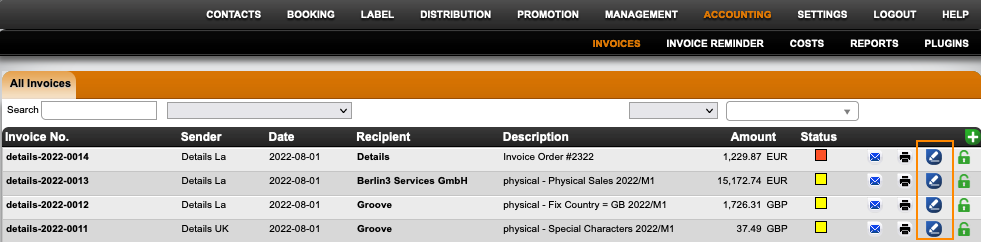
To set your invoice to paid, go to ACCOUNTING / INVOICES and click the PEN icon on the right side of the list.


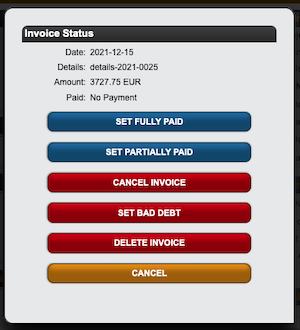
In the Invoice Status modal select Set Fully Paid.

In case you received partly payments, you can select Set Partly Paid and add the amount. Whenever you receive the additional payment, you can set the invoice to fully paid in the same modal.


If you need to revert or correct a payment, click the Pen icon and select DELETE PAYMENTS AND SET OPEN to enter new payment details.

Read here to handle foreign currency payments.