Request Forms vs. Questionaires


As you might discover, details offers TWO different links for external data entry:
a) REQUEST FORM
b) QUESTIONAIRE

The main difference between both is that

  • QUESTIONAIRES are for SPECIFIC events with selected DATE, ARTIST(S), VENUE and PROMOTER where the
  • REQUEST FORM link is NOT YET related to a specific booking.

The REQUEST FORM is a GENERIC form where promoters can actually suggest a date and one or multiple artists of their choice and send you a REQUEST. REQUESTS will appear in your inbox as email notification and in the REQUEST subtab of BOOOKING.

A REQUEST is NOT a BOOKING yet!

You`ll need to confirm the request to turn it into a booking date. The Request Form may be integrated into your website and may be adapted to your website style.

The QUESTIONAIRE on the other hand is related to a SPECIFIC BOOKING, which already exists as booking date in details. This is used to allow the promoter to add missing infos for deal & logistics for a specific booking that you are currently working on. It may include more fields sections, especially the LOCAL DETAILS, which are customizable in SETTINGS, such as Hotel Infos, Hospitality Infos, Drivers, etc. QUESTIONAIRE links can be send via the SHARE button which should open an email including the link. If not, try open in web► to send out the same link.

Filled QUESTIONAIRE Infos will be available in the SPECIFIC booking date.
Fields to display in
a) REQUEST FORM and b) QUESTIONAIRE are fully customizable in
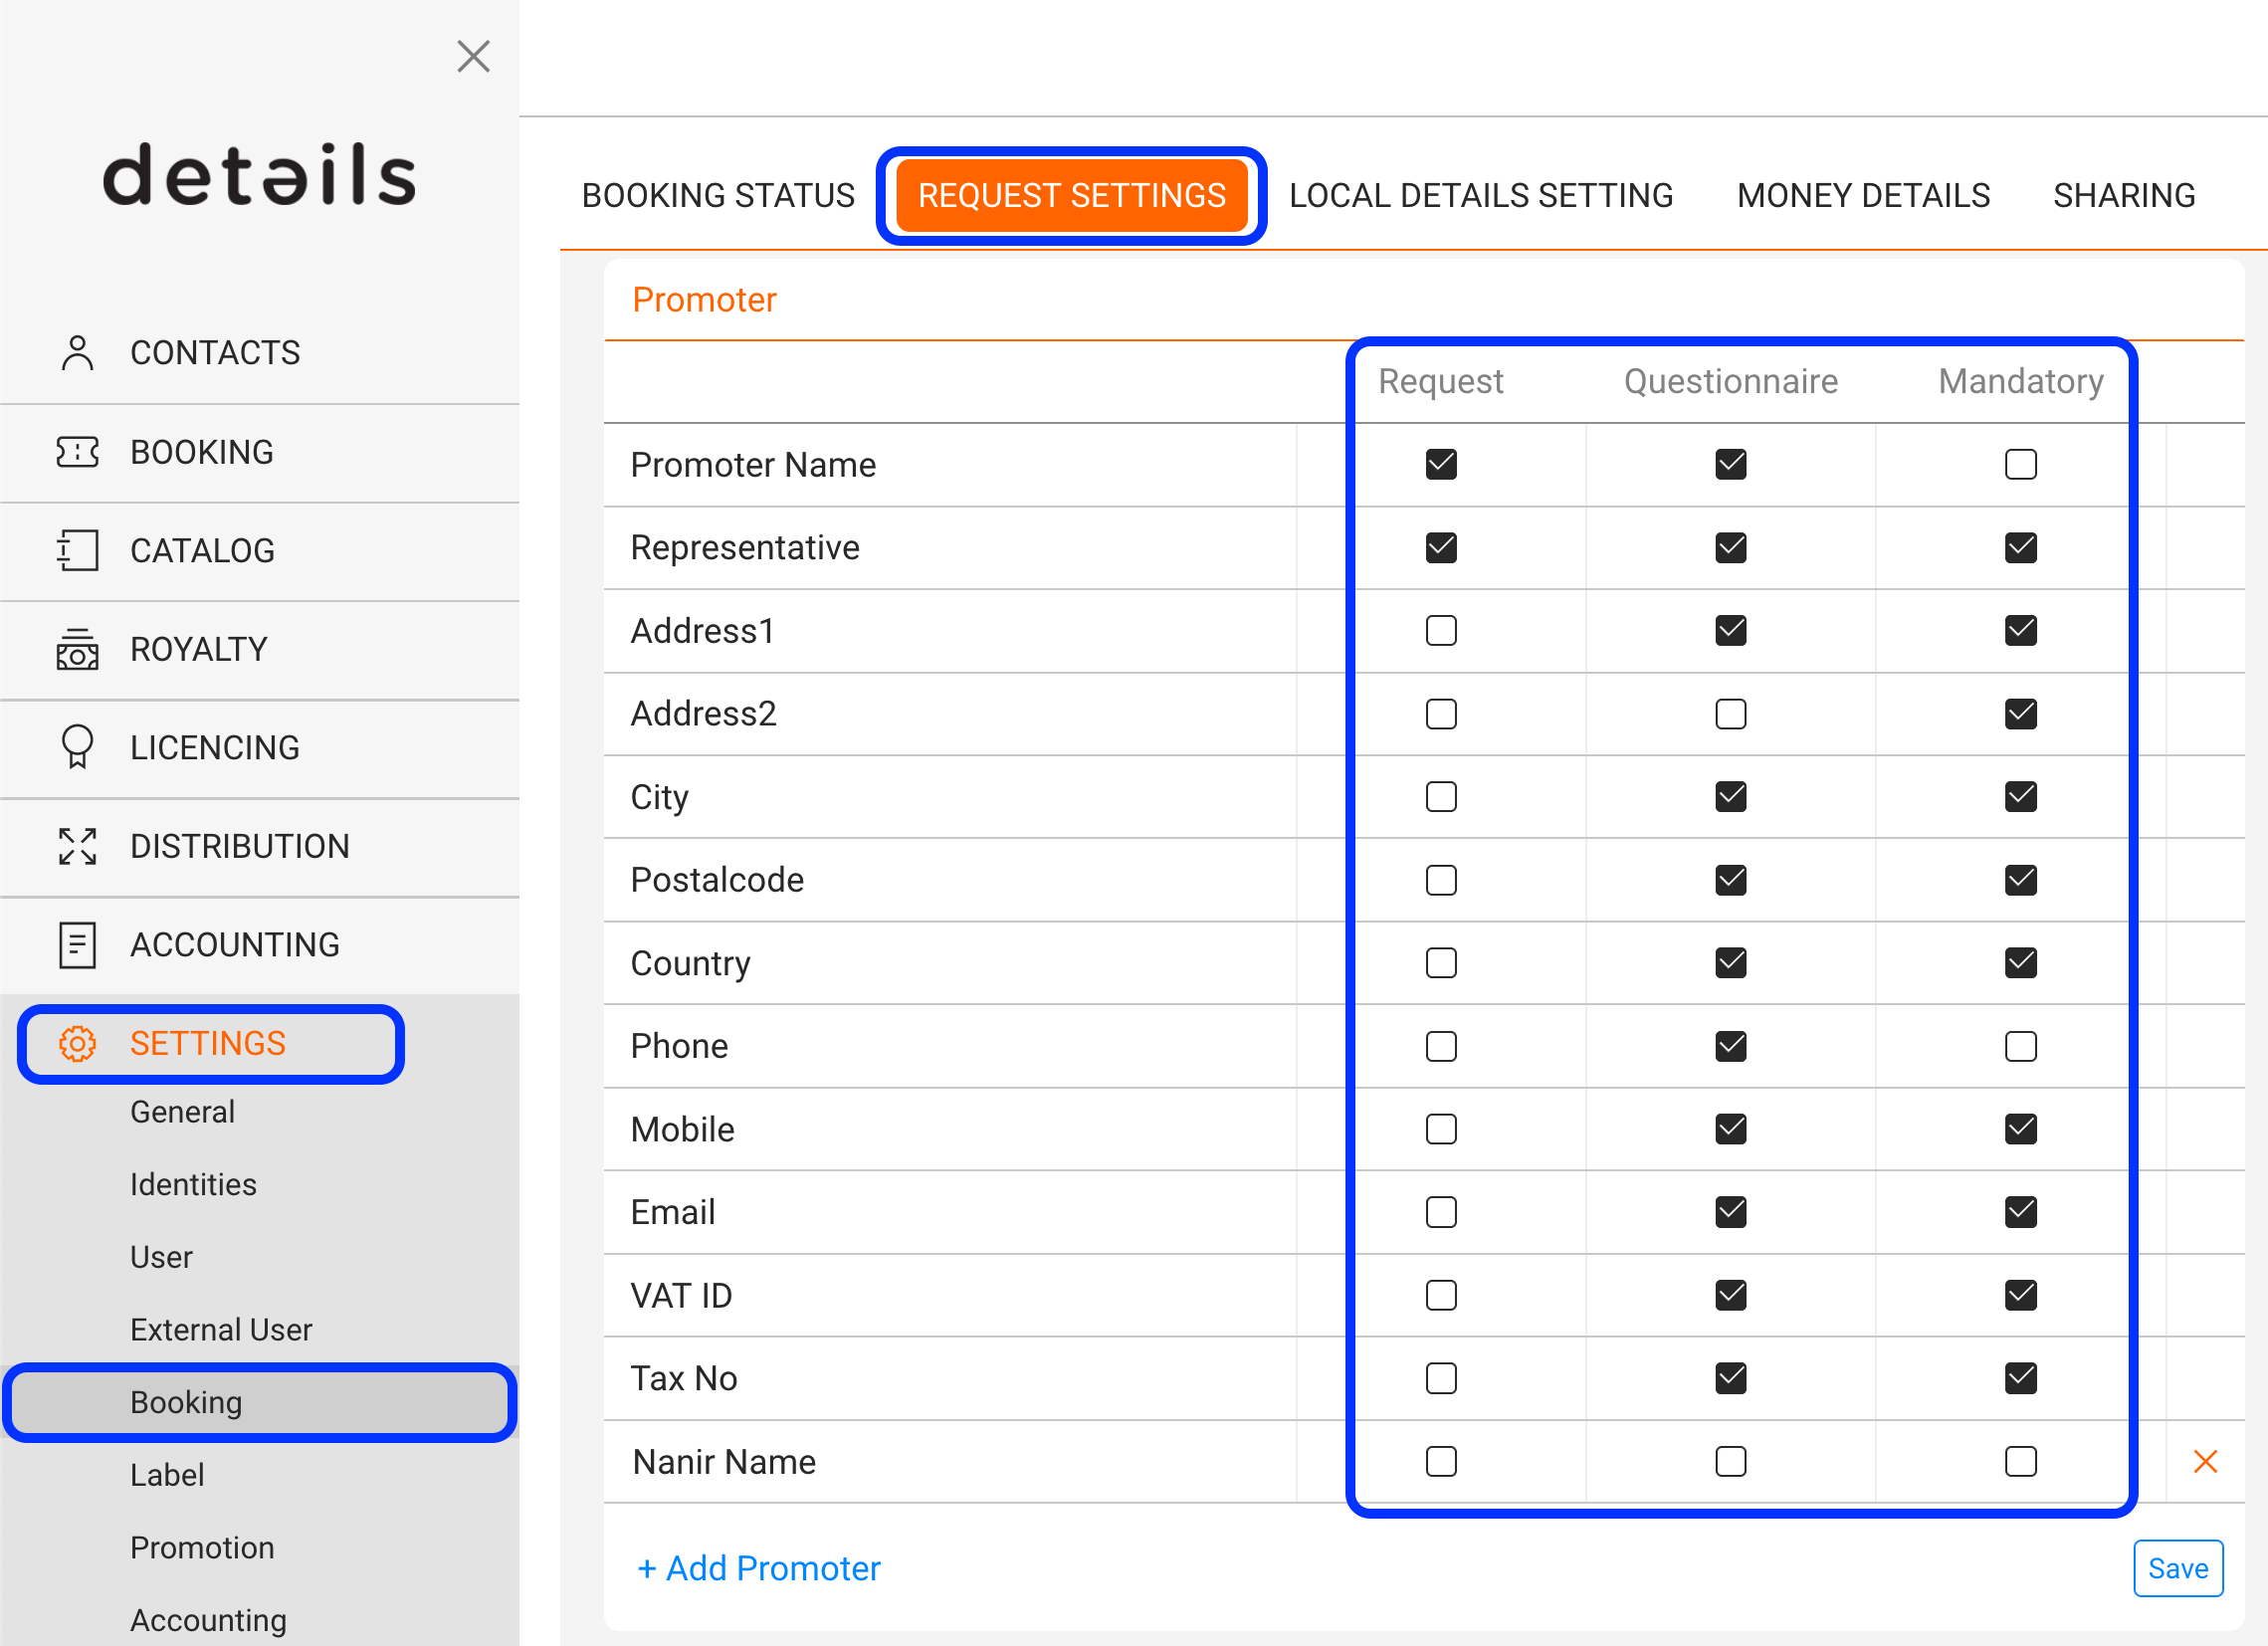
SETTINGS / BOOKING / REQUEST SETTINGS

Select checkboxes in the REQUEST column of each section for the REQUEST FORM
Select checkboxes in the QUESTIONAIRE column of each section for the QUESTIONAIRE
Select checkboxes in the MANDATORY column to make a field mandatory for either a) or b) or both


How to adapt the Booking Request form to your style

The embeddable Booking Request form can be styled to match the CI of your website.

Please make sure your page encoding should be utf-8 to display special characters for various languages:
meta http-equiv=”Content-Type” content=”text/html; charset=UTF-8″

The code you need looks like this

<script src='http://app.detailsdetails.eu/request/yourloginname/?artist_id=&lang=en&version=2' type='text/javascript' charset='UTF-8'></script>


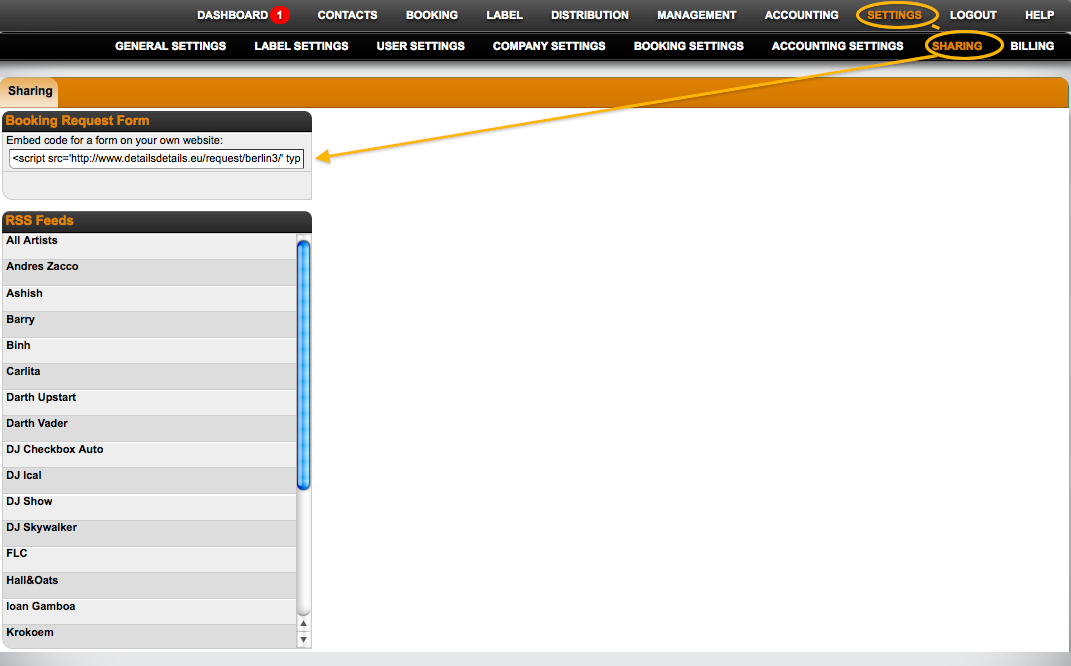
You will find it in Settings – Sharing:


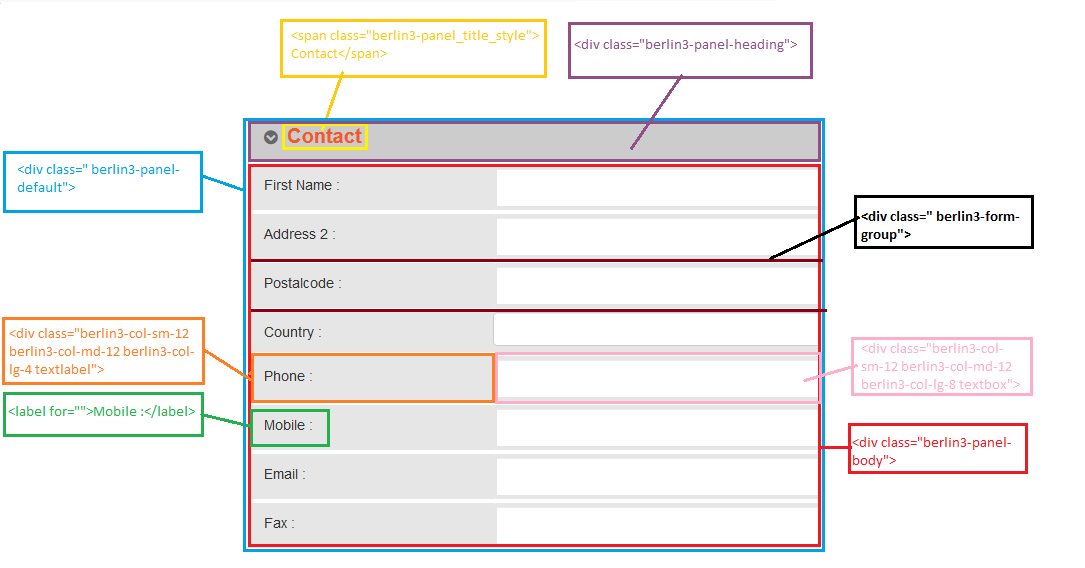
Below is a diagram illustrating the different classes and IDs that are available for CSS and other styling.


The following styles are declared and can be overwritten to customize your embedded request form:

img.client-logo {
}

ul.berlin3-lang {
}

li.berlin3-change_lang {
}

div#berlin3-calender_info {
padding-left: 15px;
font-size: 30px;
color: #f15a24;
}

section#contact_request_form {
}

.berlin3-panel-default > .berlin3-panel-heading {
background-color: #cccccc;
background-image: none;
background-repeat: repeat-x;
}

.berlin3-panel-title {
margin-top: 0;
margin-bottom: 0;
font-size: 16px;
color: inherit;
}

.berlin3-row.berlin3-form-group .textlabel {
padding: 10px 0 10px 15px;
background-color: #e6e6e6;
}

.berlin3-row.berlin3-form-group .textlabel label {
font-weight: normal;
}

.berlin3-col-lg-8 {
width: 66.66666667%;
}

.berlin3-col-lg-4 {
width: 33.33333333%;
}

#berlin3-press {
color: #FFF;
}

#berlin3-press .submit_status {
padding-bottom: 10px;
}

#berlin3-submit {
color: #fff;
}

.berlin3-btn_white_round {
border-radius: 14px;
background-color: #FFF;
color: #f15a24;
font-weight: bold;
font-size: 17px;
line-height: 0.9;
}

.berlin3-btn {
display: inline-block;
padding: 6px 12px;
margin-bottom: 0;
font-size: 14px;
font-weight: normal;
line-height: 1.42857143;
text-align: center;
white-space: nowrap;
vertical-align: middle;
-ms-touch-action: manipulation;
touch-action: manipulation;
cursor: pointer;
-webkit-user-select: none;
-moz-user-select: none;
-ms-user-select: none;
user-select: none;
background-image: none;
border: 1px solid transparent;
border-radius: 4px;
}

.berlin3-bg_orange {
background-color: #f15a24;
}

.berlin3-sub {
text-align: center;
height: 145px;
vertical-align: middle;
padding-top: 18px;
}

.berlin3-fixed_rightbutton {
float: right;
right: 0;
left: 336px;
top: 50%;
width: 40px;
height: 70px;
padding: 6px;
position: absolute;
border-radius: 8px 0 0 8px;
display: none;
}

.berlin3-rotated-text {
display: inline-block;
overflow: hidden;
width: 1.5em;
}


Initially all panels of the form are closed. But If want the form is fully visible then the bellow javascript code can be used:

jQuery("#openall").trigger("click");


NOTE!!!
Because the stylesheet for the Booking Request form is loaded in the BODY section you will need to make sure that your stylesheet is placed or loaded in such a way that it overrides the default stylesheet of the form.

Also note, because of the highly technical nature of CSS design we cannot address questions about this topic without charging for support time.
All bugs are free-of-charge.

We have used Bootstrap front-end framework to design this. It can be follow Bootstrap CSS guide to change it’s style.
link:: http://getbootstrap.com/css/

How to set up artists

Setting Up your ARTISTS correctly from the very beginning is one of the most important steps to be done during the SetUp process. Please, be sure to get all the required info inside the ARTIST profile. This way you won’t miss the information later on in the templates. Here’s how you set up your artists in details:

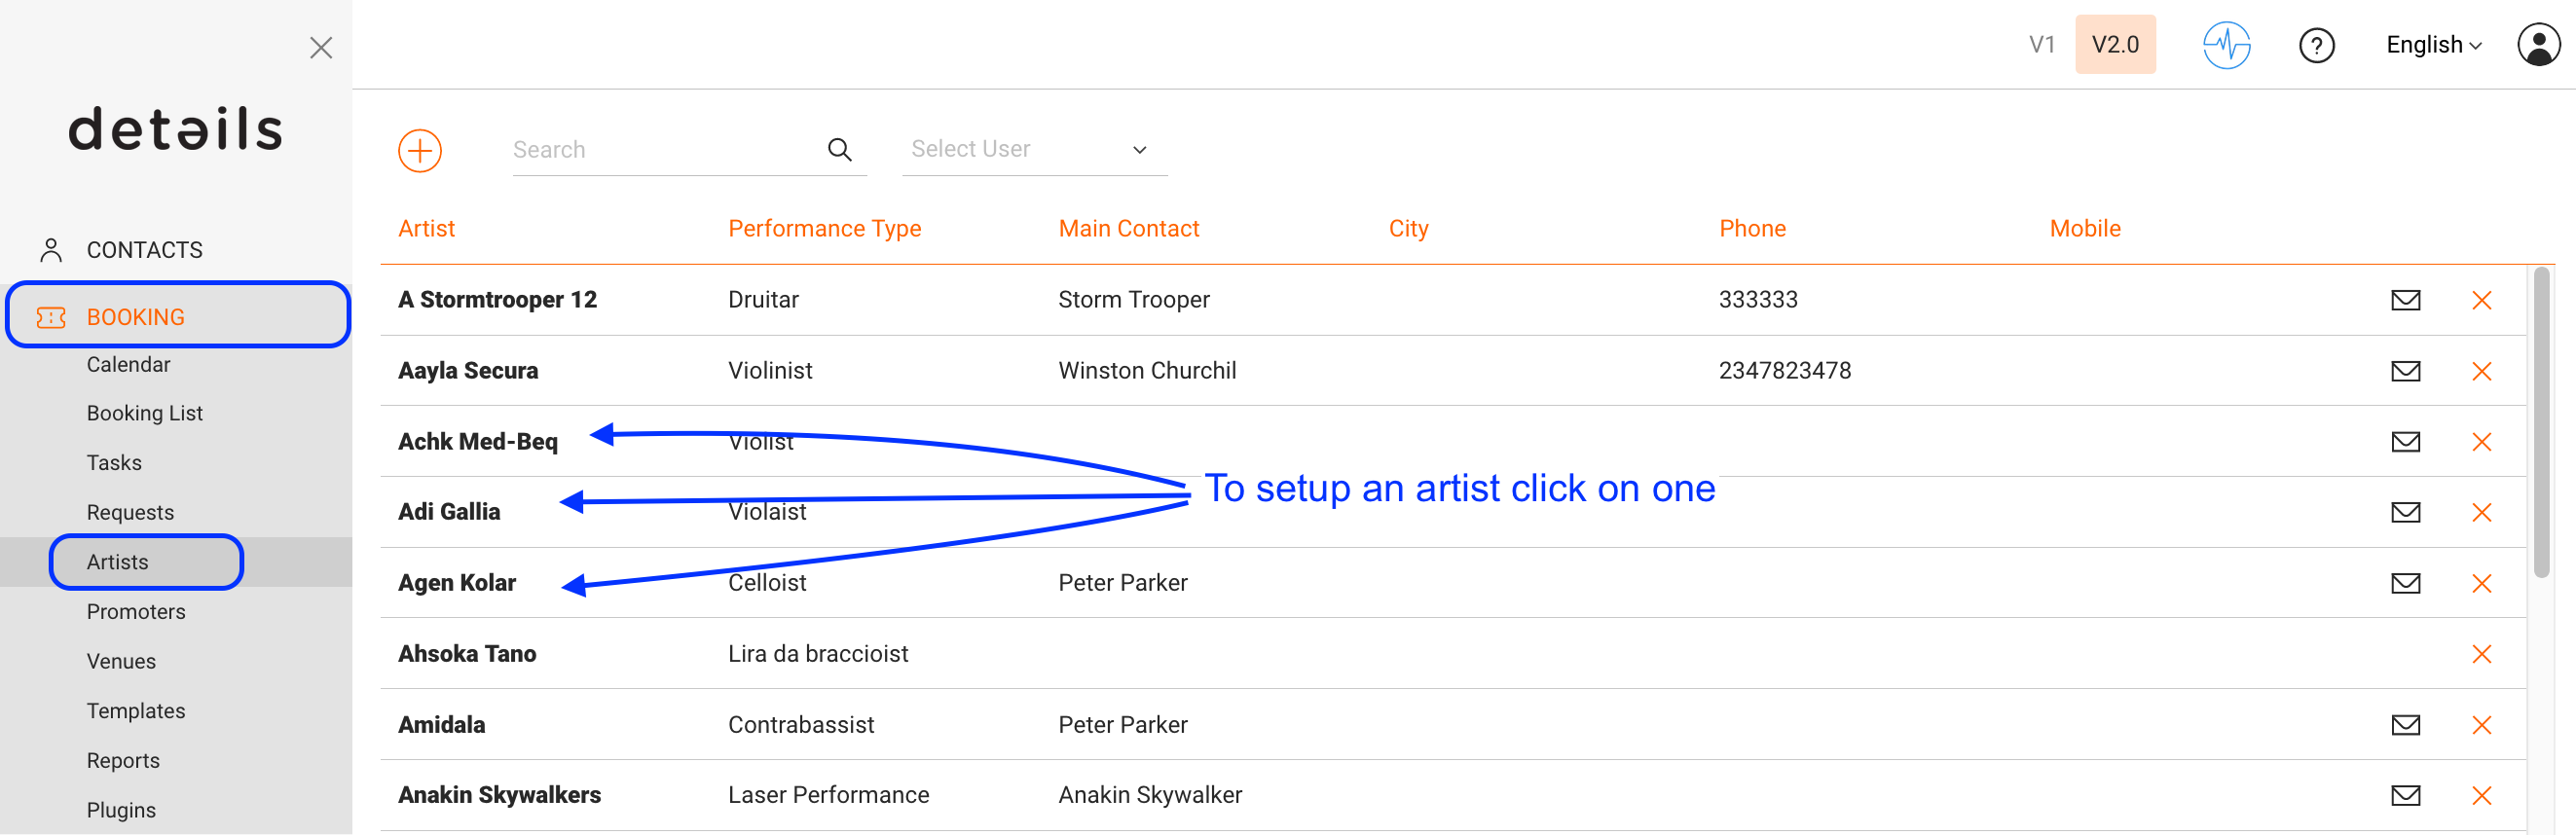
1) First go to BOOKING / ARTISTS and select the artist you want to set up


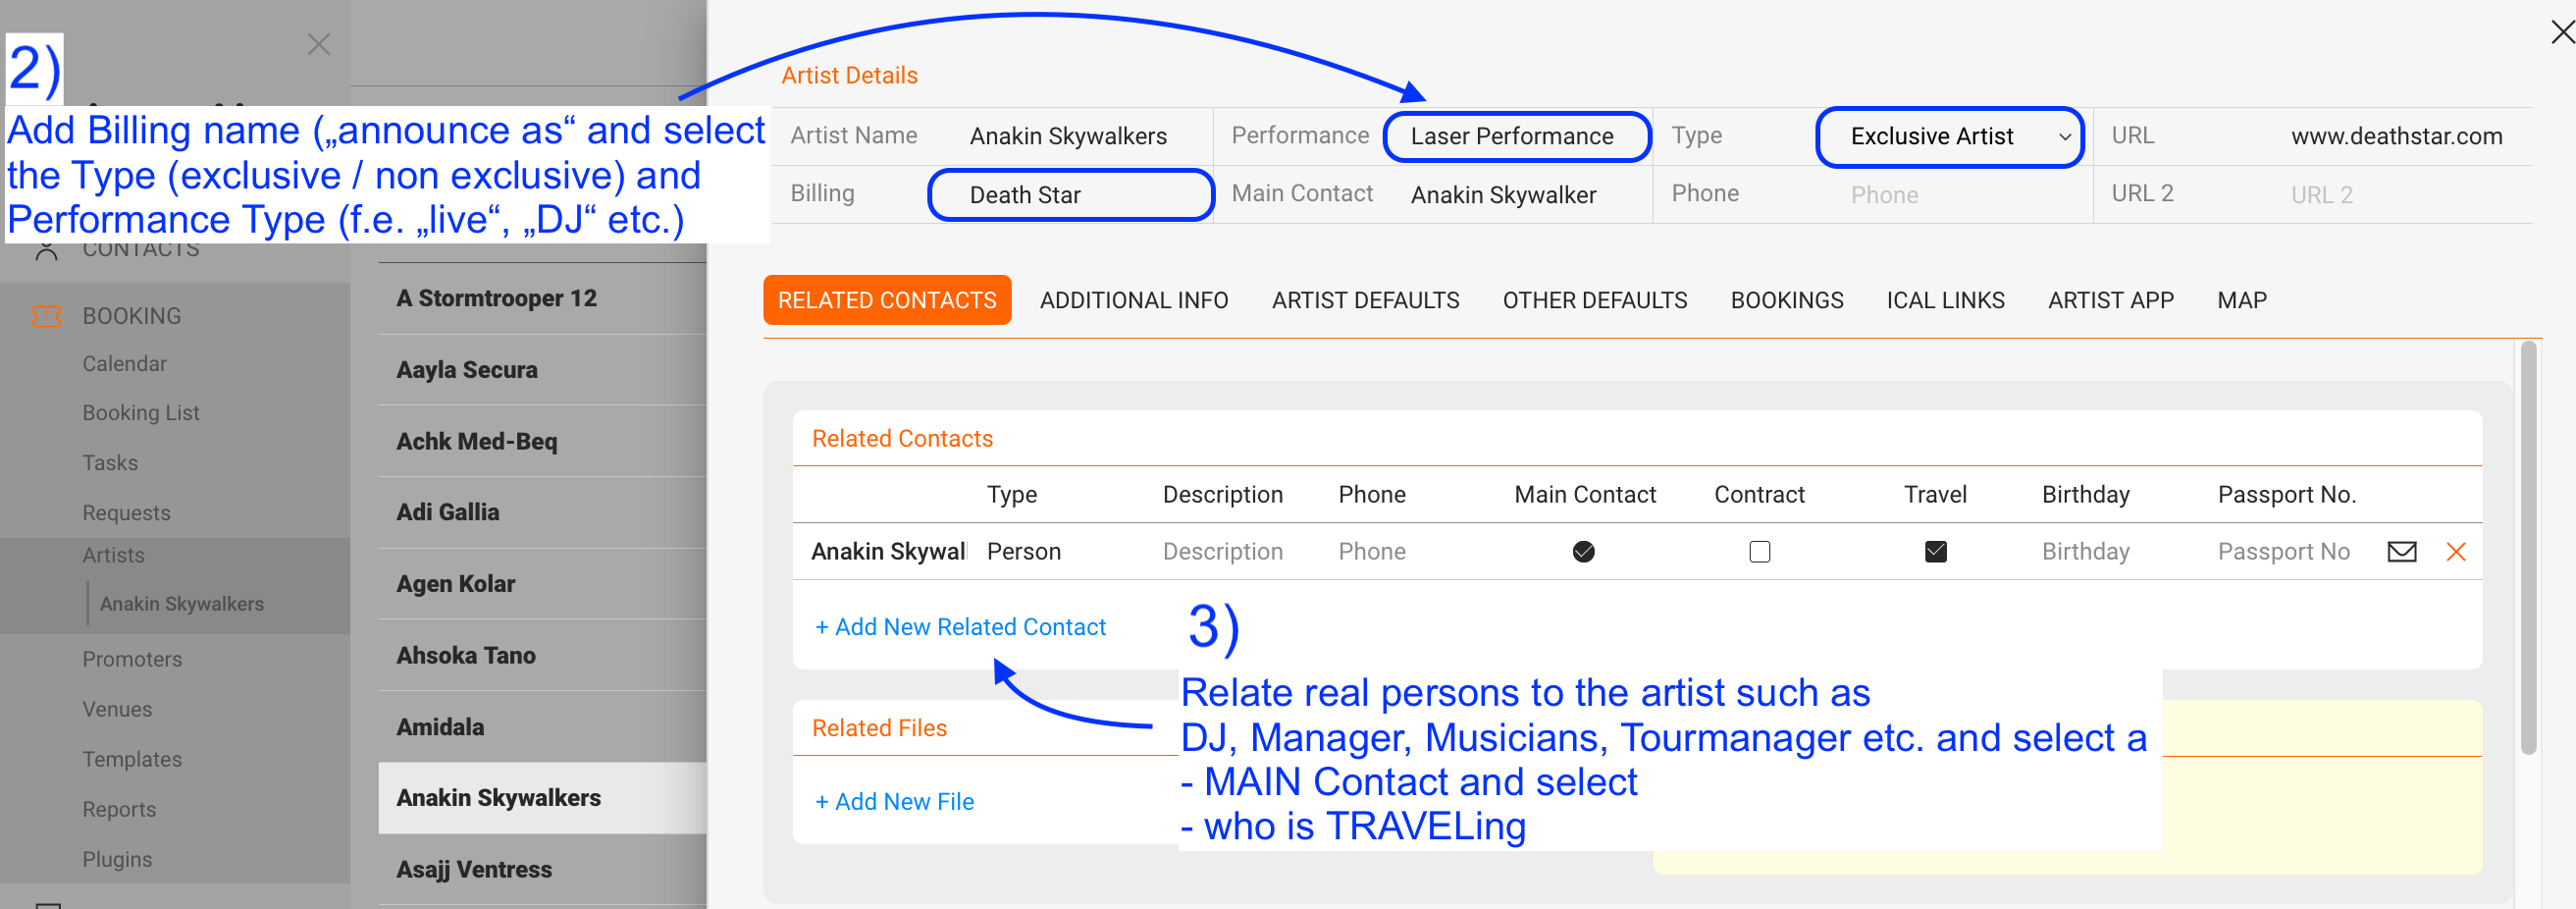
2) For the basic setup please

* add the billing name of the artist (“announce as“)

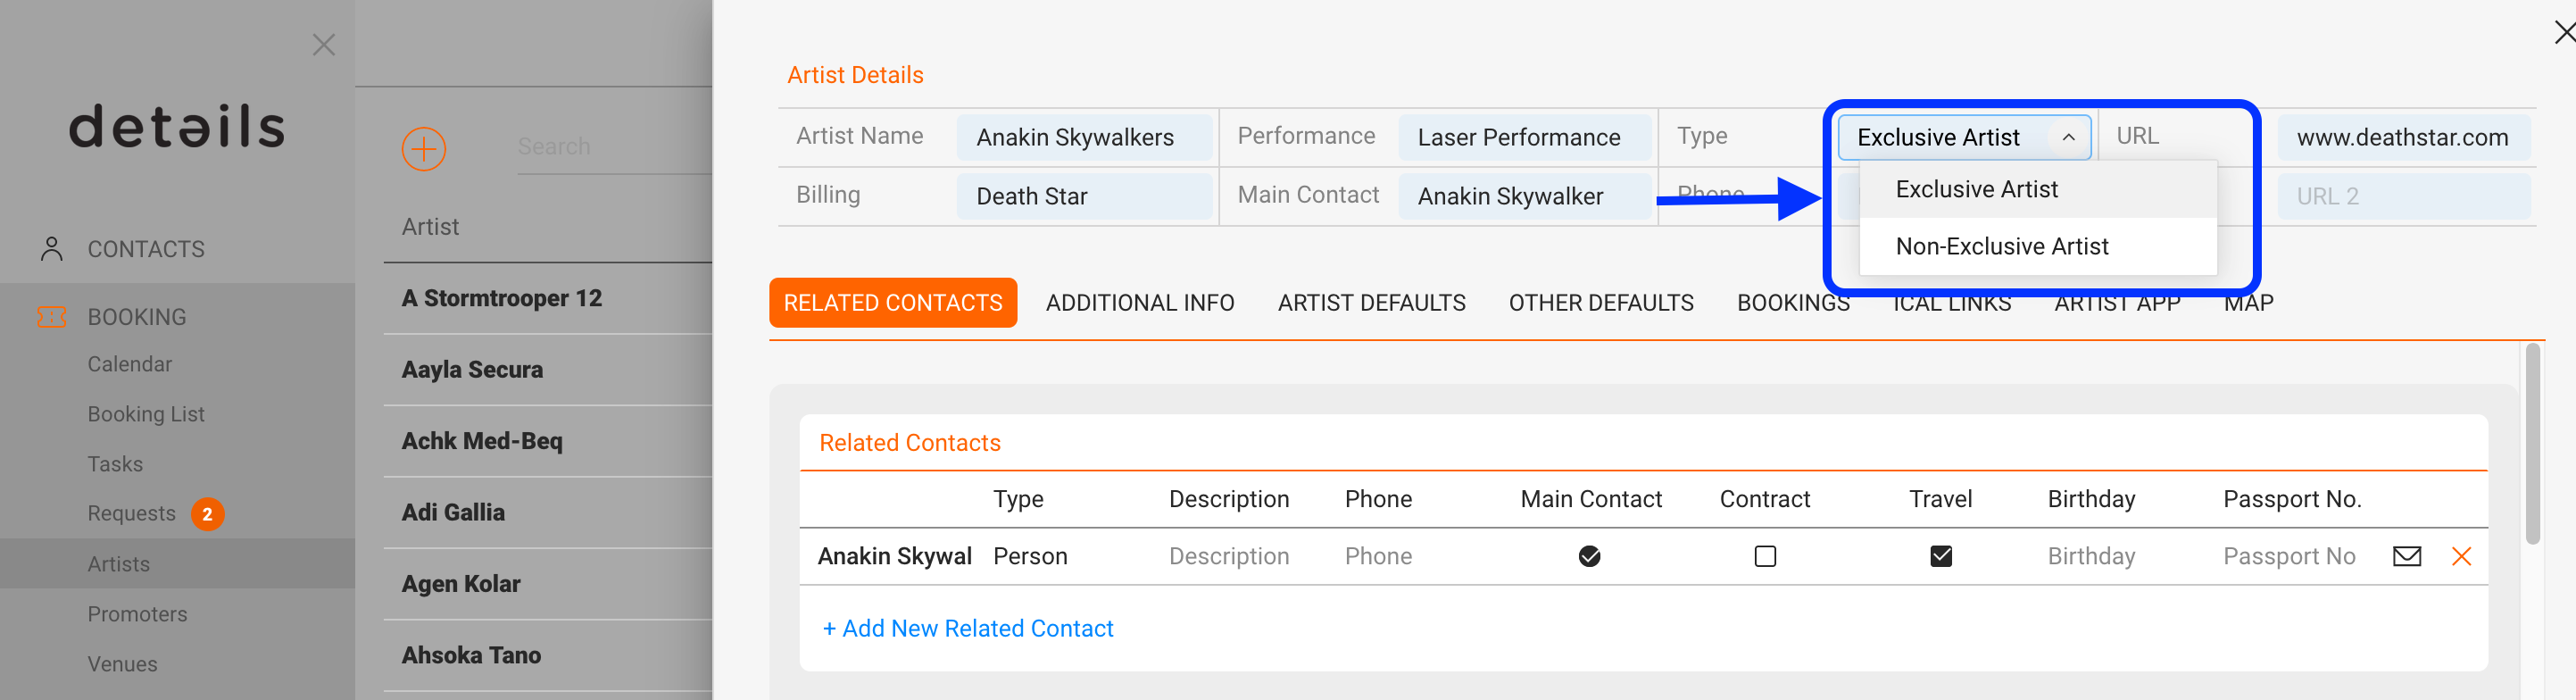
* select the TYPE of the artist (“exclusive” or “non-exclusive”) NOTE: Only Artists with TYPE = “exclusive” will be displayed in the Online Request Form

* type the PERFORMANCE TYPE of the Artist (“DJ”, “Live” or both)


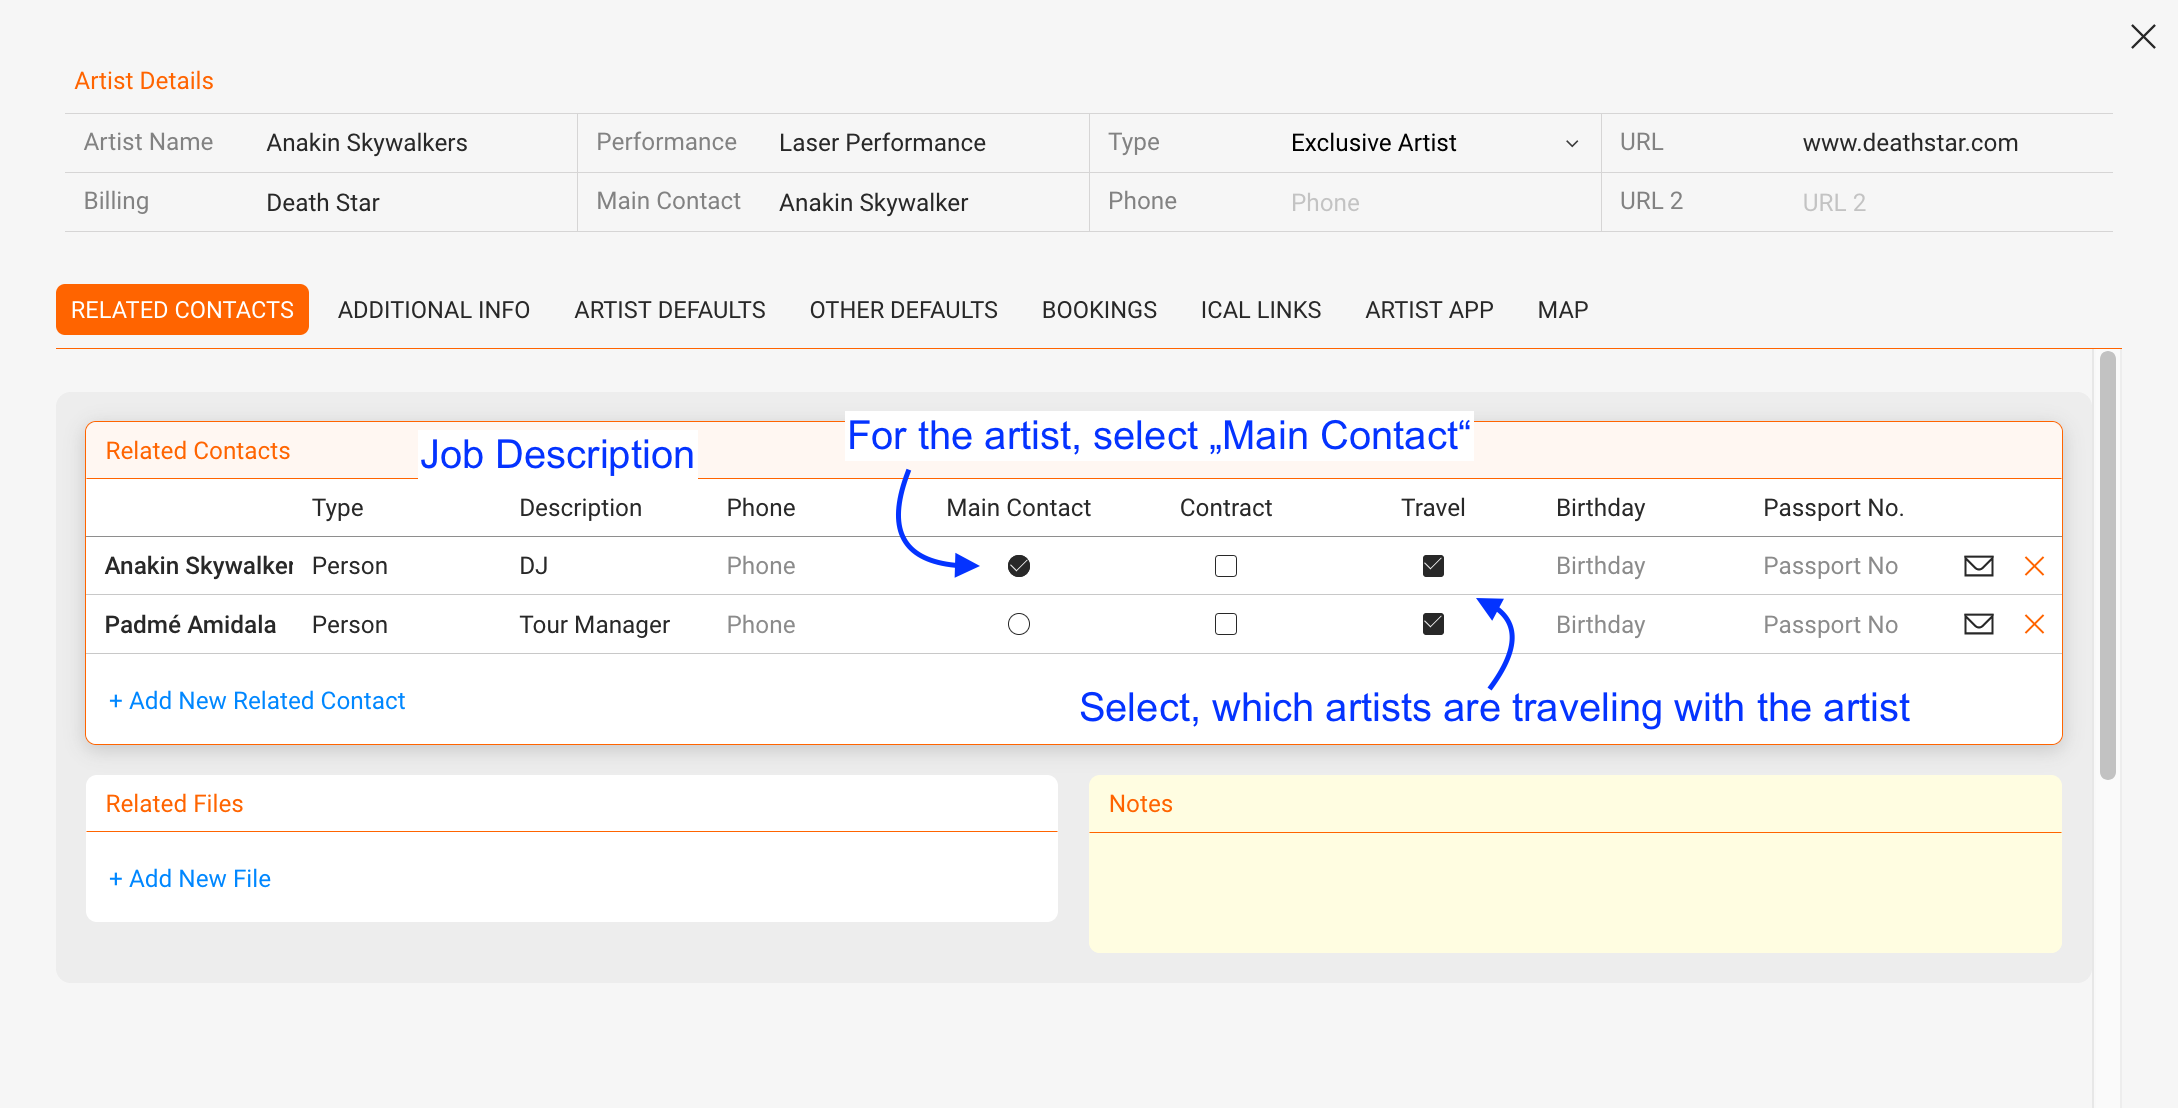
3) Then you need to RELATE one or multiple CONTACTS to your ARTIST – this is important! Example: ARTIST might be “Anakin Skywalker”, but his related CONTACTS will be all the contacts that are already in the system, related to his gigs. This means: His real name (important info to take the plane), his manager “Stephan Rombach” (who always flights with him), “Carla Daz” (his Tour Manager)…etc. To add a related contact click on the PLUS icon on the top right of “Related Contacts” in the Artist “Overview”

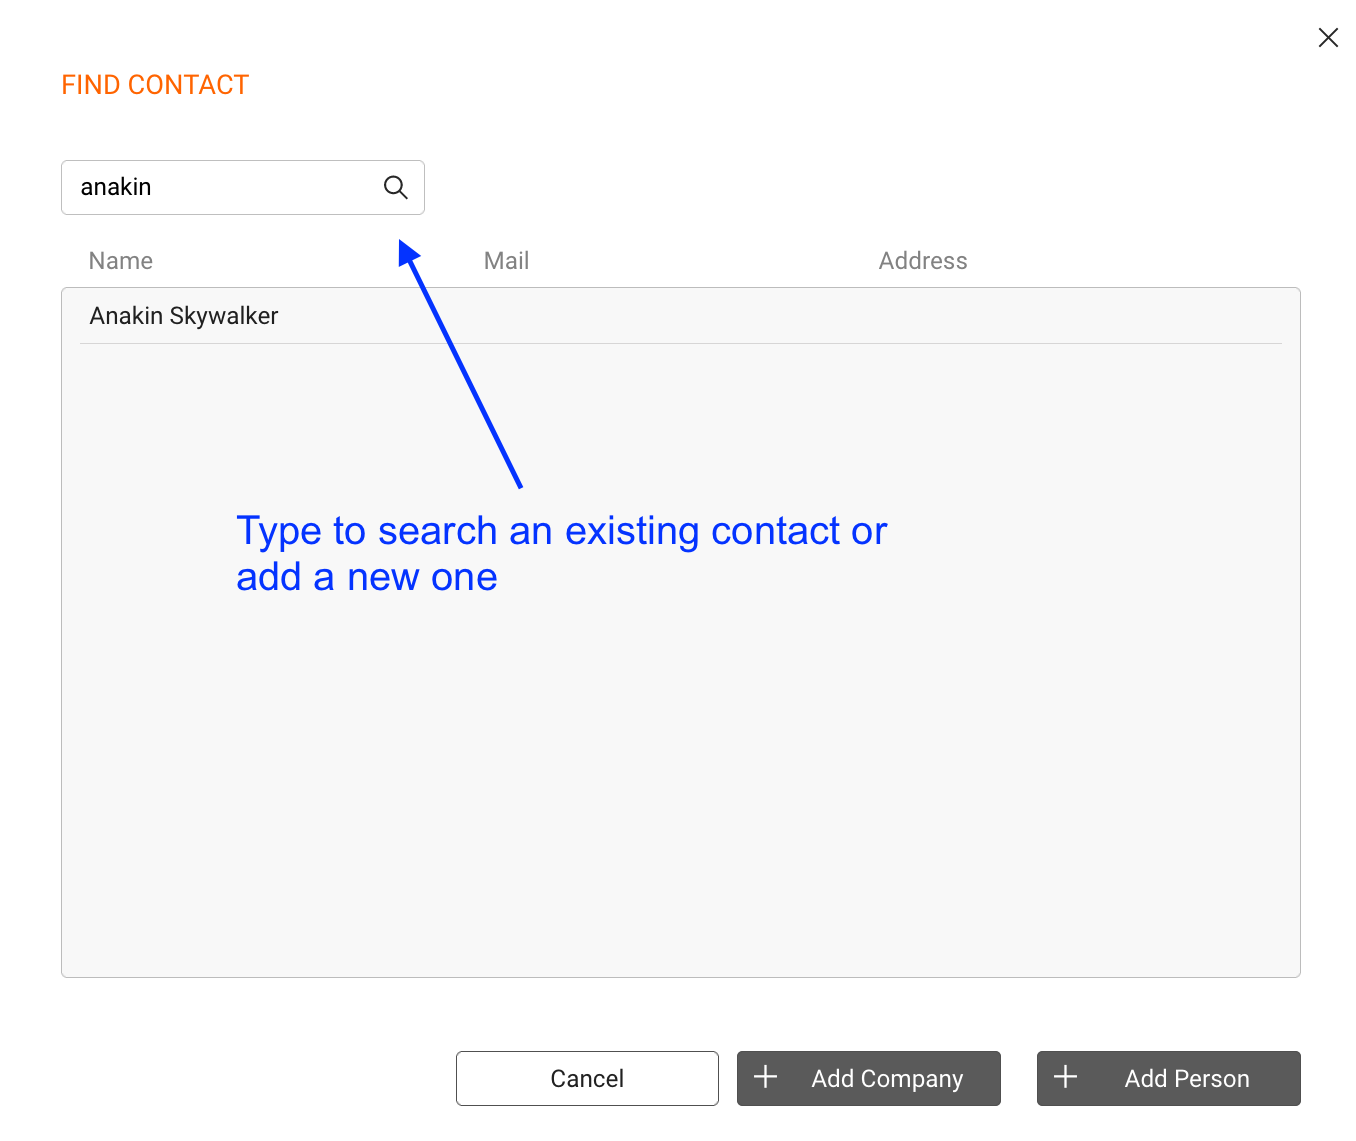
4) In the popup window you need to TYPE in the search field to search a contact or ADD a new one.

5) After you add a RELATED CONTACT to an artist, give him a job title (“Artist”, “Tour Manager”, etc.): *IF the person normally travels, click TRAVEL. *Don’t forget to add the REAL NAME of the artist as a related contact, because *Select who’s the MAIN CONTACT (main contacts have the bank details to receive the payments)


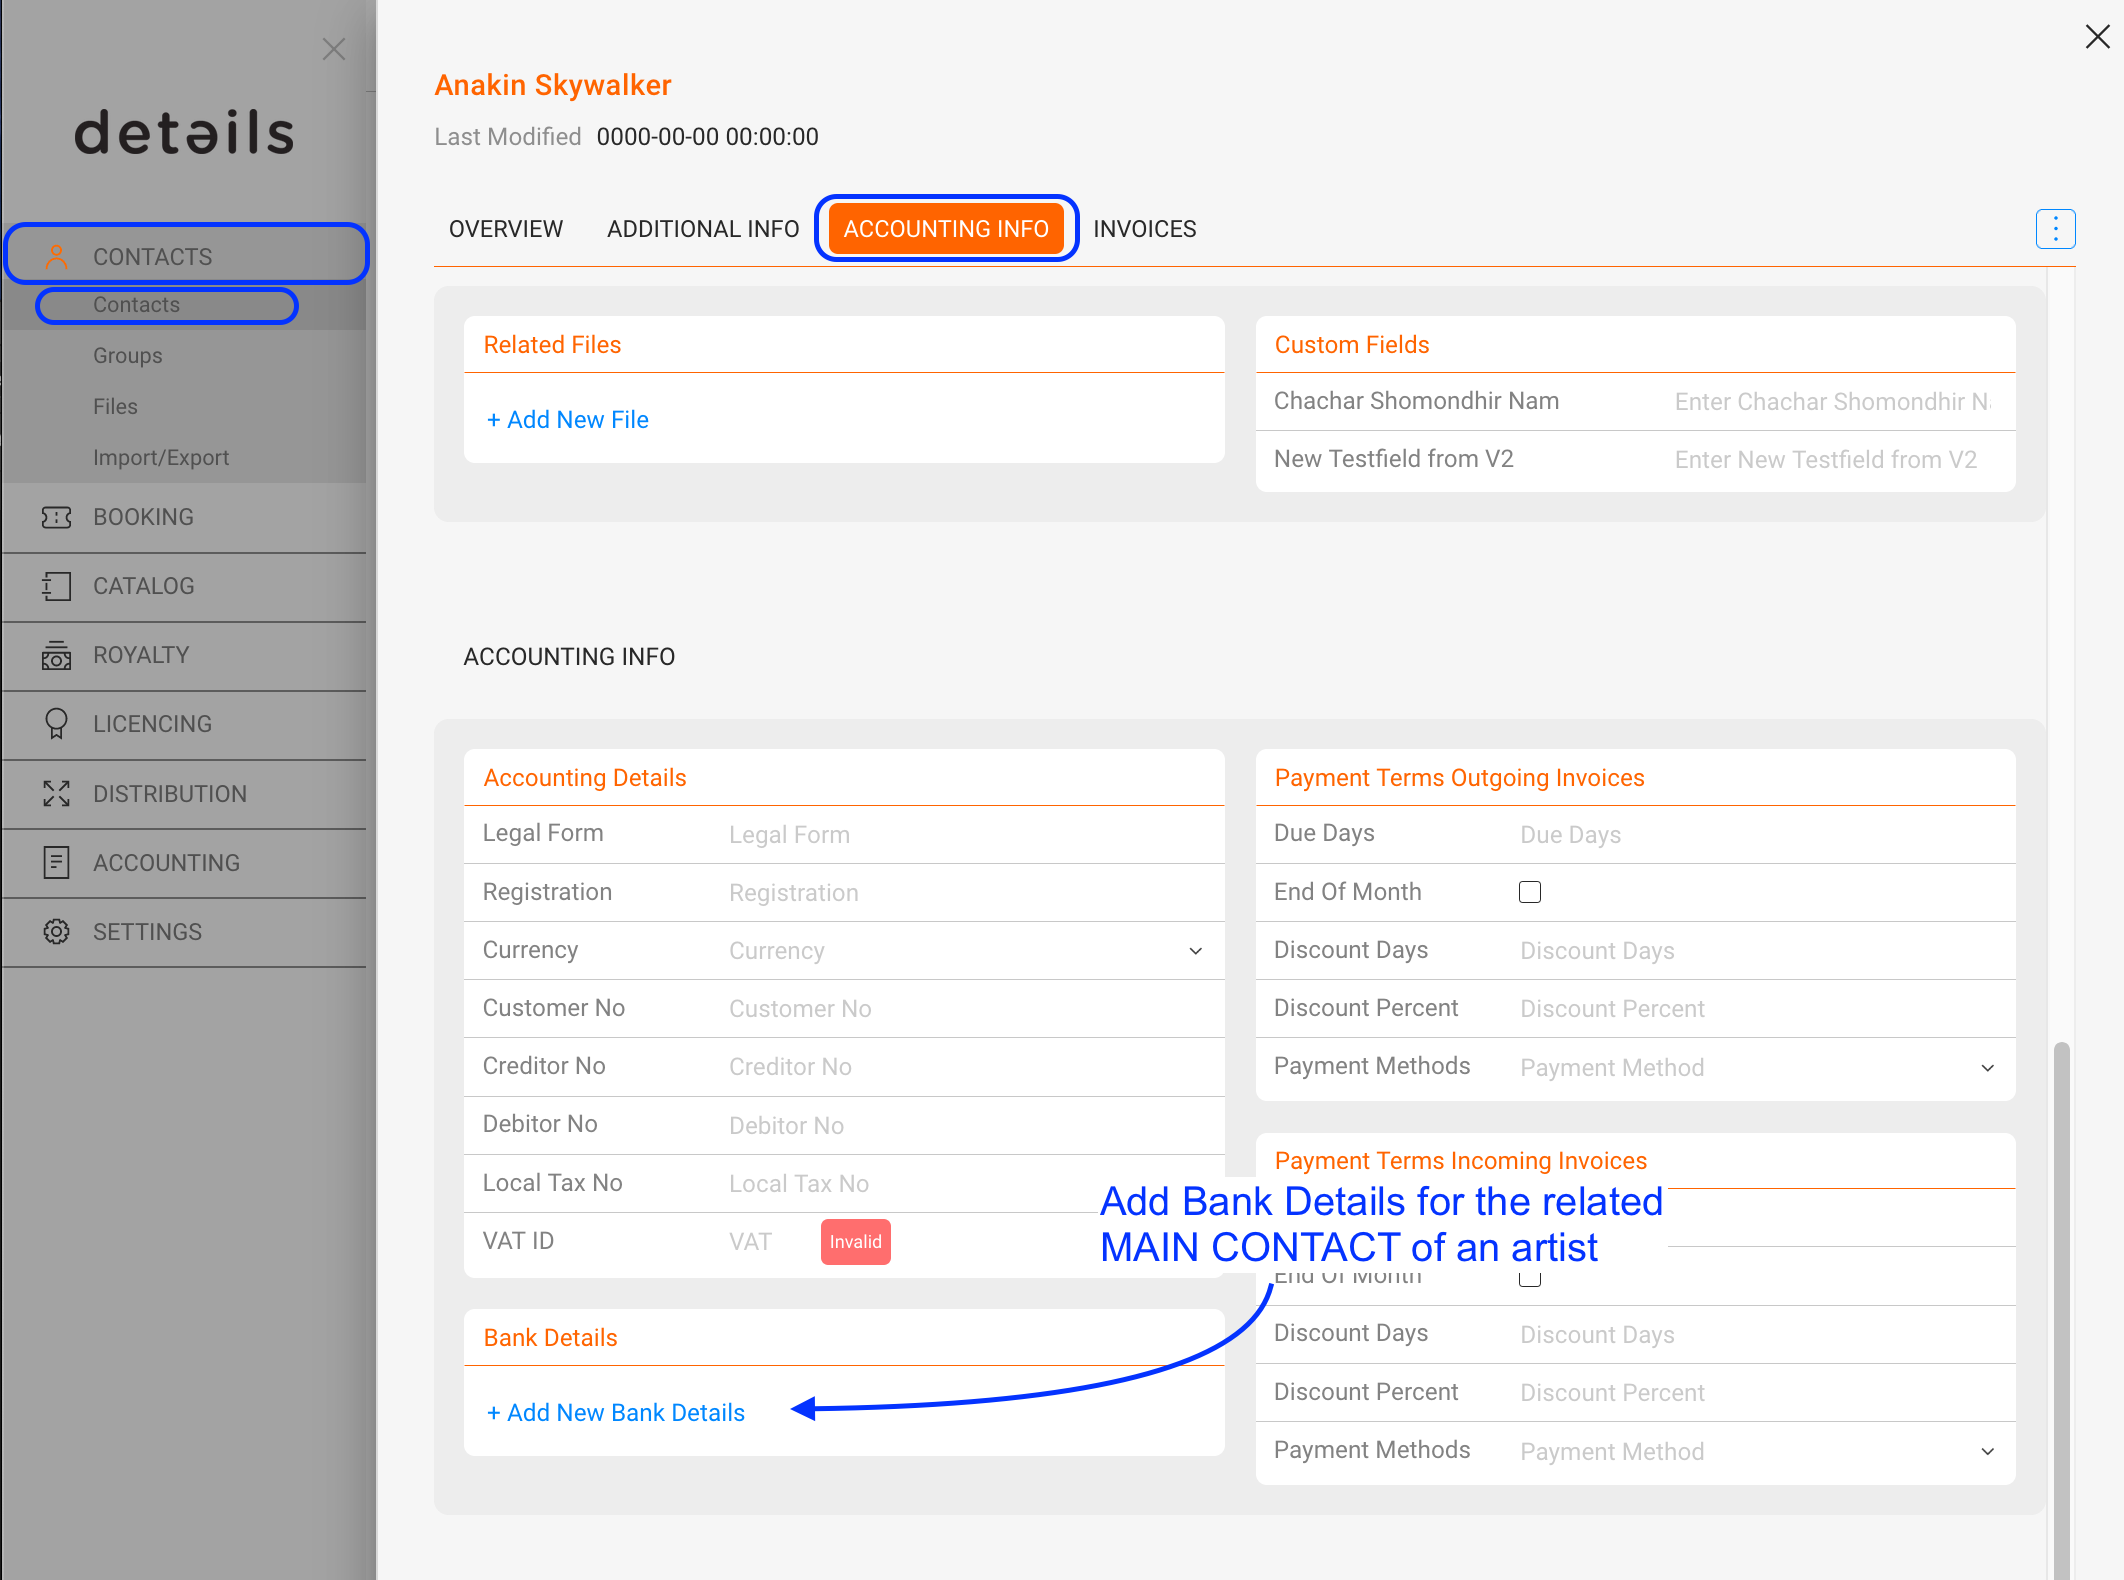
6) To add the ACCOUNTING INFO: click on the name of your main contact to open this contact, then select subtab Accounting Info and add bank details for this artist to appear in the contracts


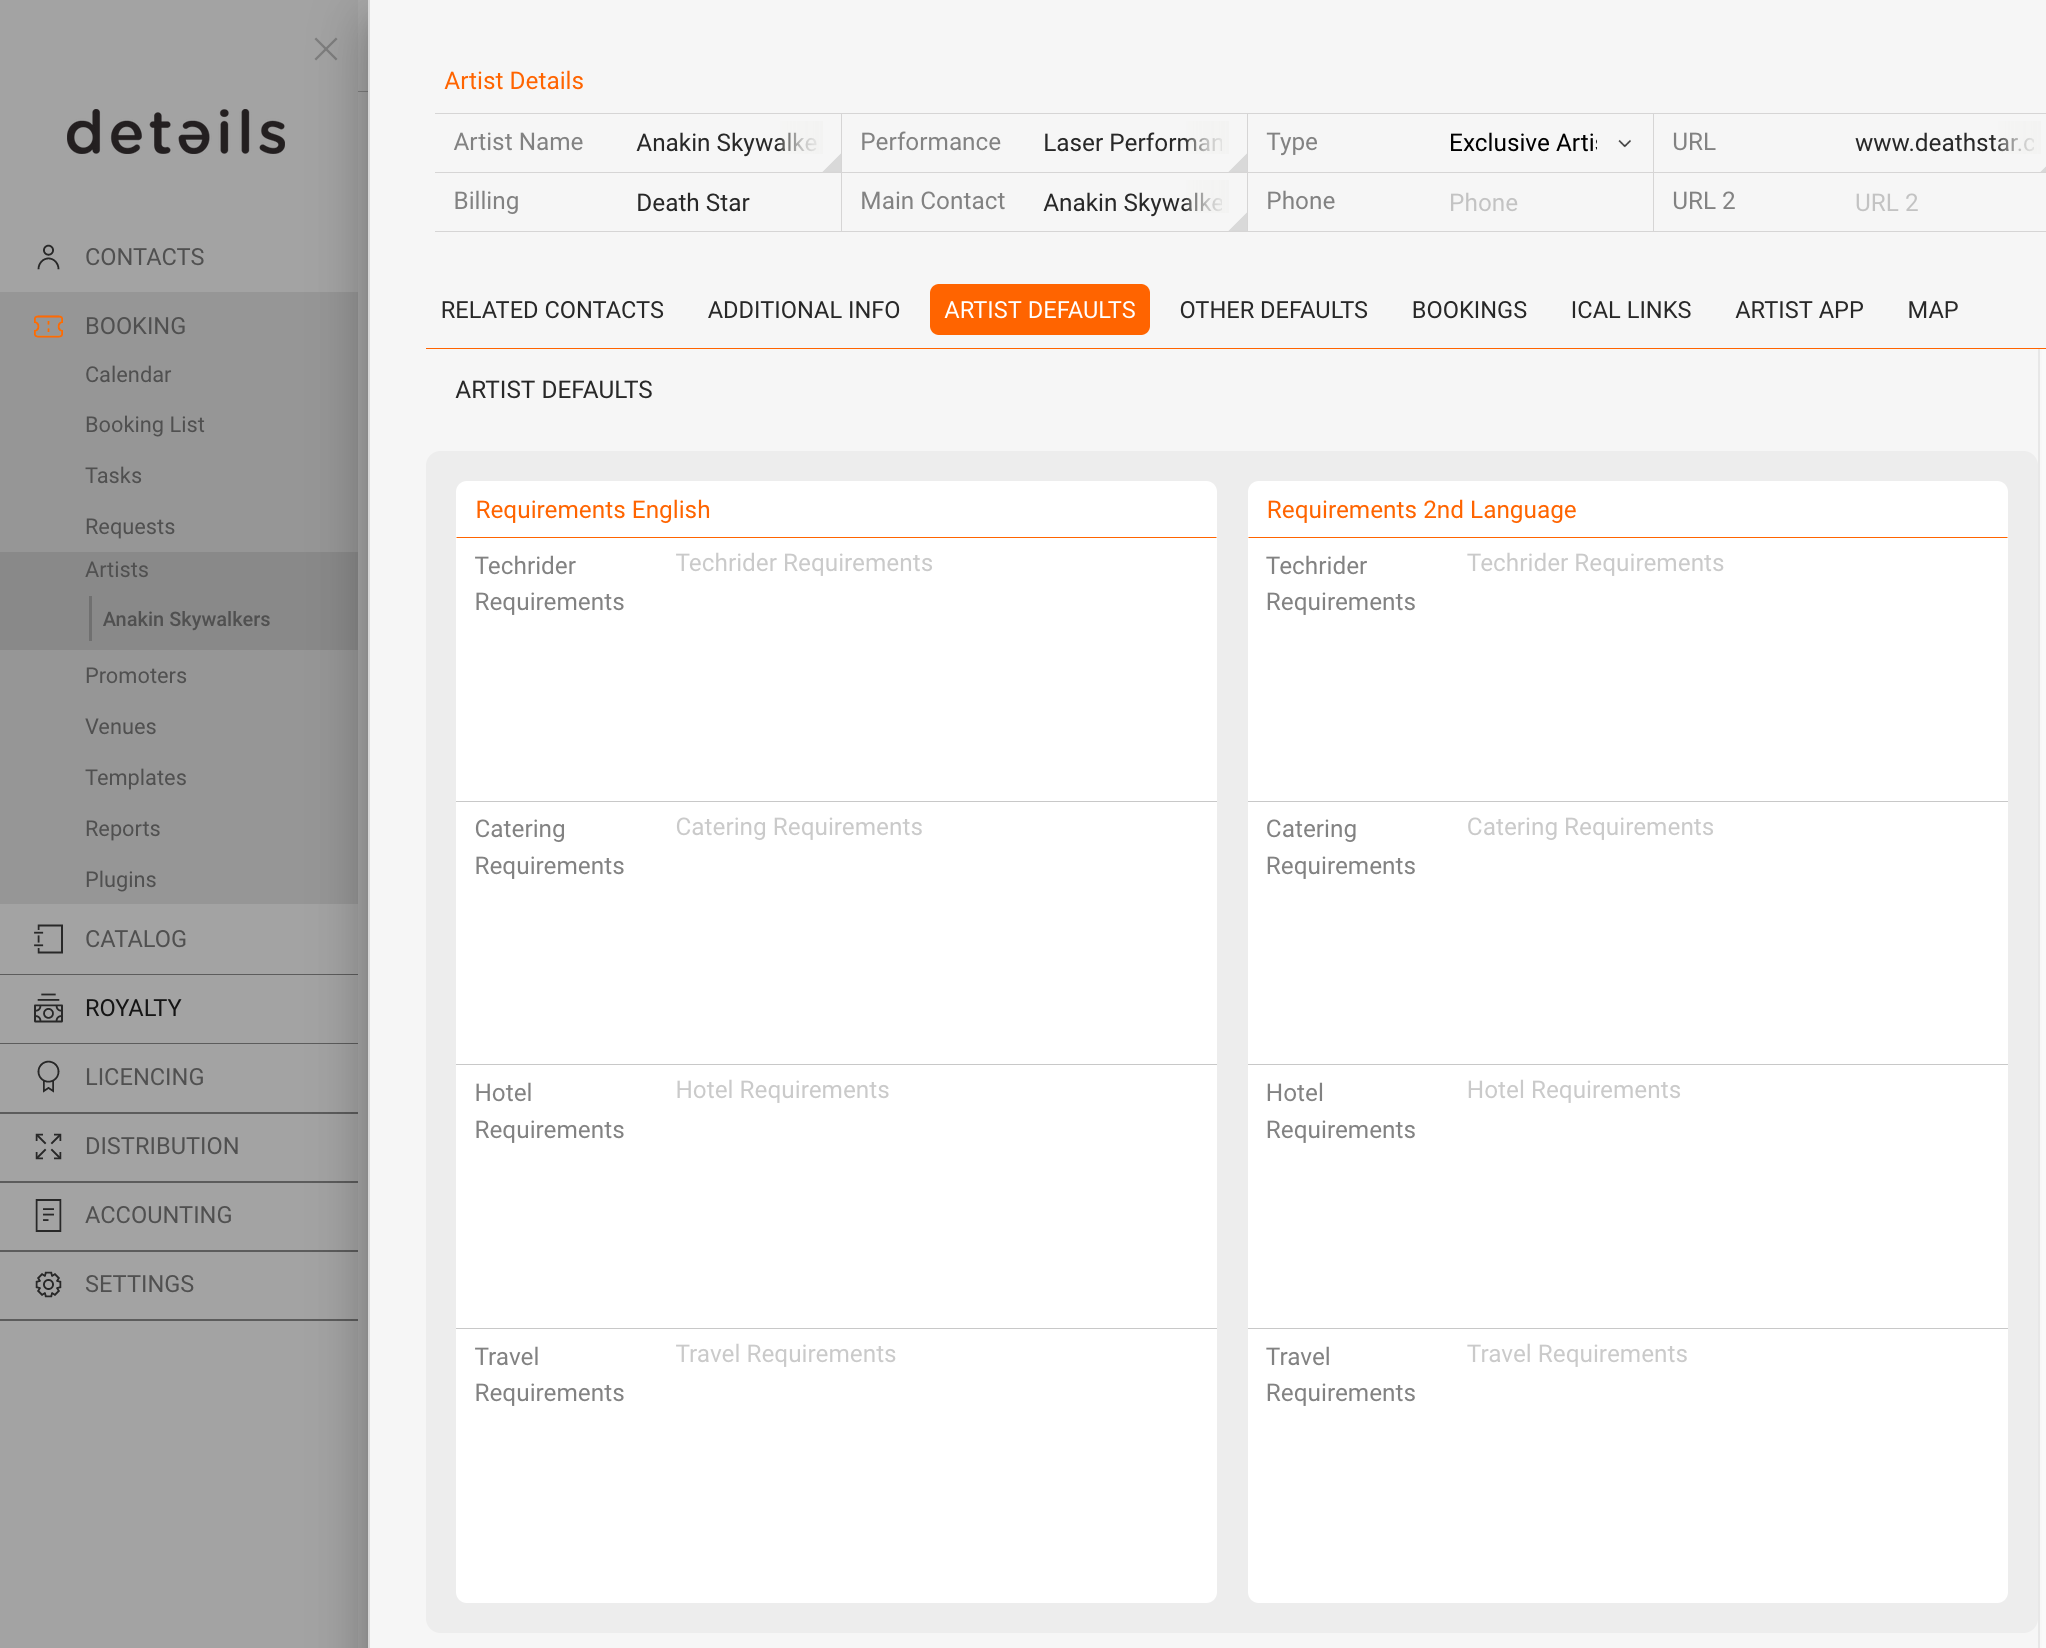
7) Then you can fill out the ARTIST DEFAULTS for Techriders, Catering, Hotel Requirements and Travel Requirements in both English and Spanish (2nd Language)

Available Artists


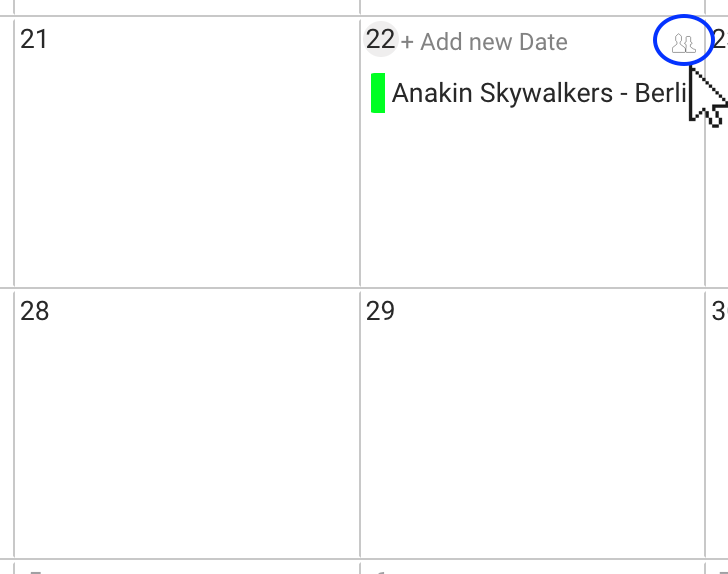
When the “available artist” icon is clicked (picture above), Details will provide an automatic email message including all your roster artists that are available on this specific day.
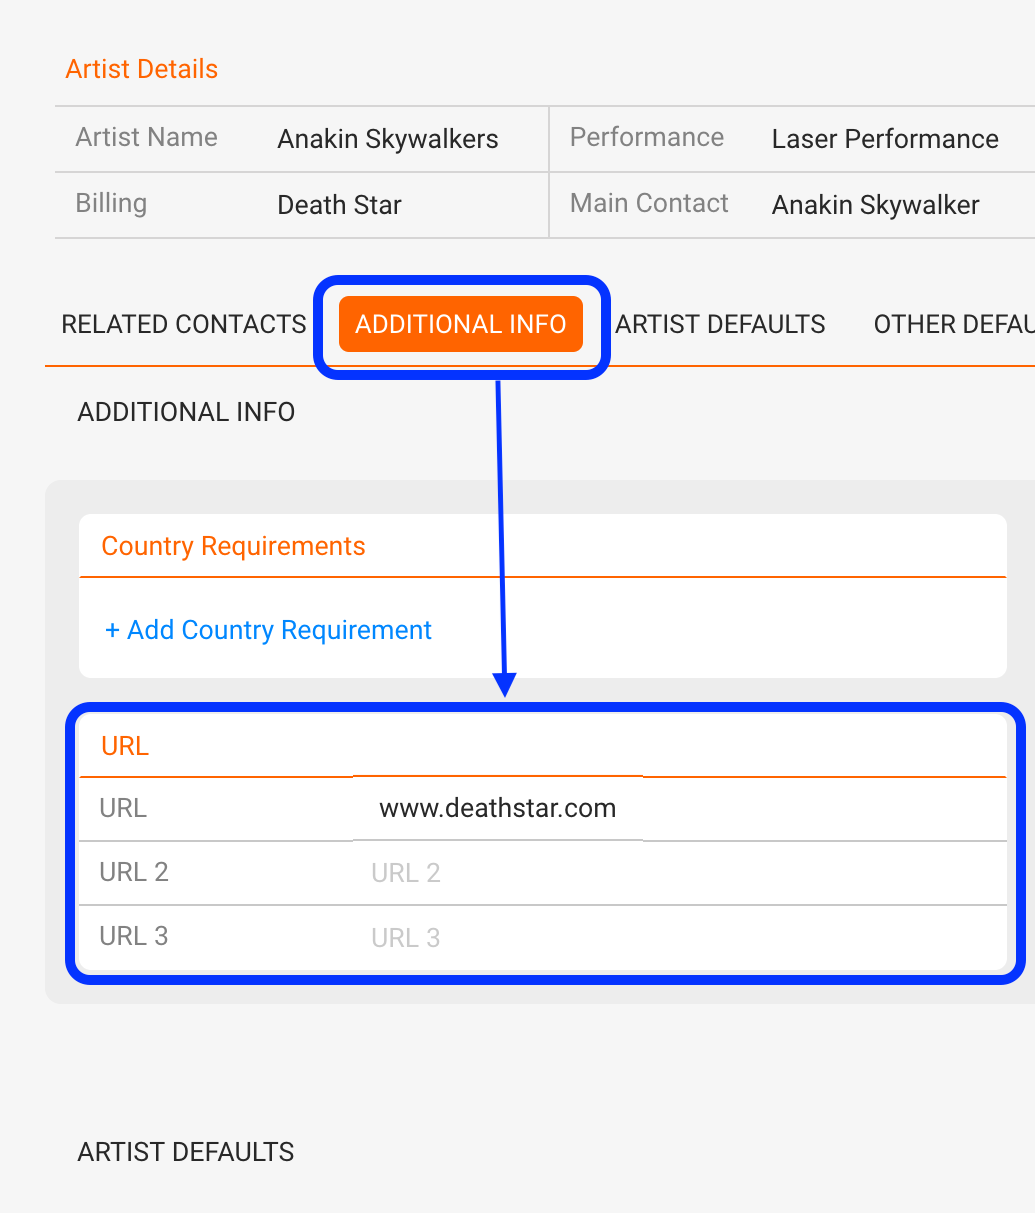
The email will include the Artist URL provided in the Artist / Additional Infos.


That artists will be displayed there, two conditions for an “available artist” have to be fulfilled:

1) the Artist has to be an “exclusive” artist


AND

2) the artist does not have a “confirmed” booking on the same day.
You can find more infos about booking status settings Booking Status


If BOTH conditions are met, then the artist will appear on the “available artist” message.


re 1) An artist can be set as exclusive or non-exclusive in Artists / selected Artist / Overview

re 2) a booking is confirmed if their current booking status has the checkbox “confirmed” checked

FAQ – Local Details are not shown in the Artist App or Itinerary

If you see that some LOCAL DETAILS (Pick Up Driver, Restaurant, Nightmanager..etc) are not shown in the ARTIST App, please check that the LOCAL DETAILS in your booking are related to the ARTIST with a marked check-box (see screenshot)


If the Travel Party is empty and you can not see any Related Contacts, please make sure you have a Traveling Contact set in your artist.
You can find more informations here: How to set up artists

If you just related a travel contact in the artist but it is not shown, you want to click
“Get Contacts Via Artists”. That way details will update the related contacts of an artist in a show:


FAQ – The Artist defaults are not shown in the Booking / Templates / Artist App

If you have changed the Artist Defaults recently (Artist section – techrider, catering…) , you might see that the changes are not appearing in the booking date or in your template.

This happens because the booking dates were created BEFORE the changes were done in the artist defaults.
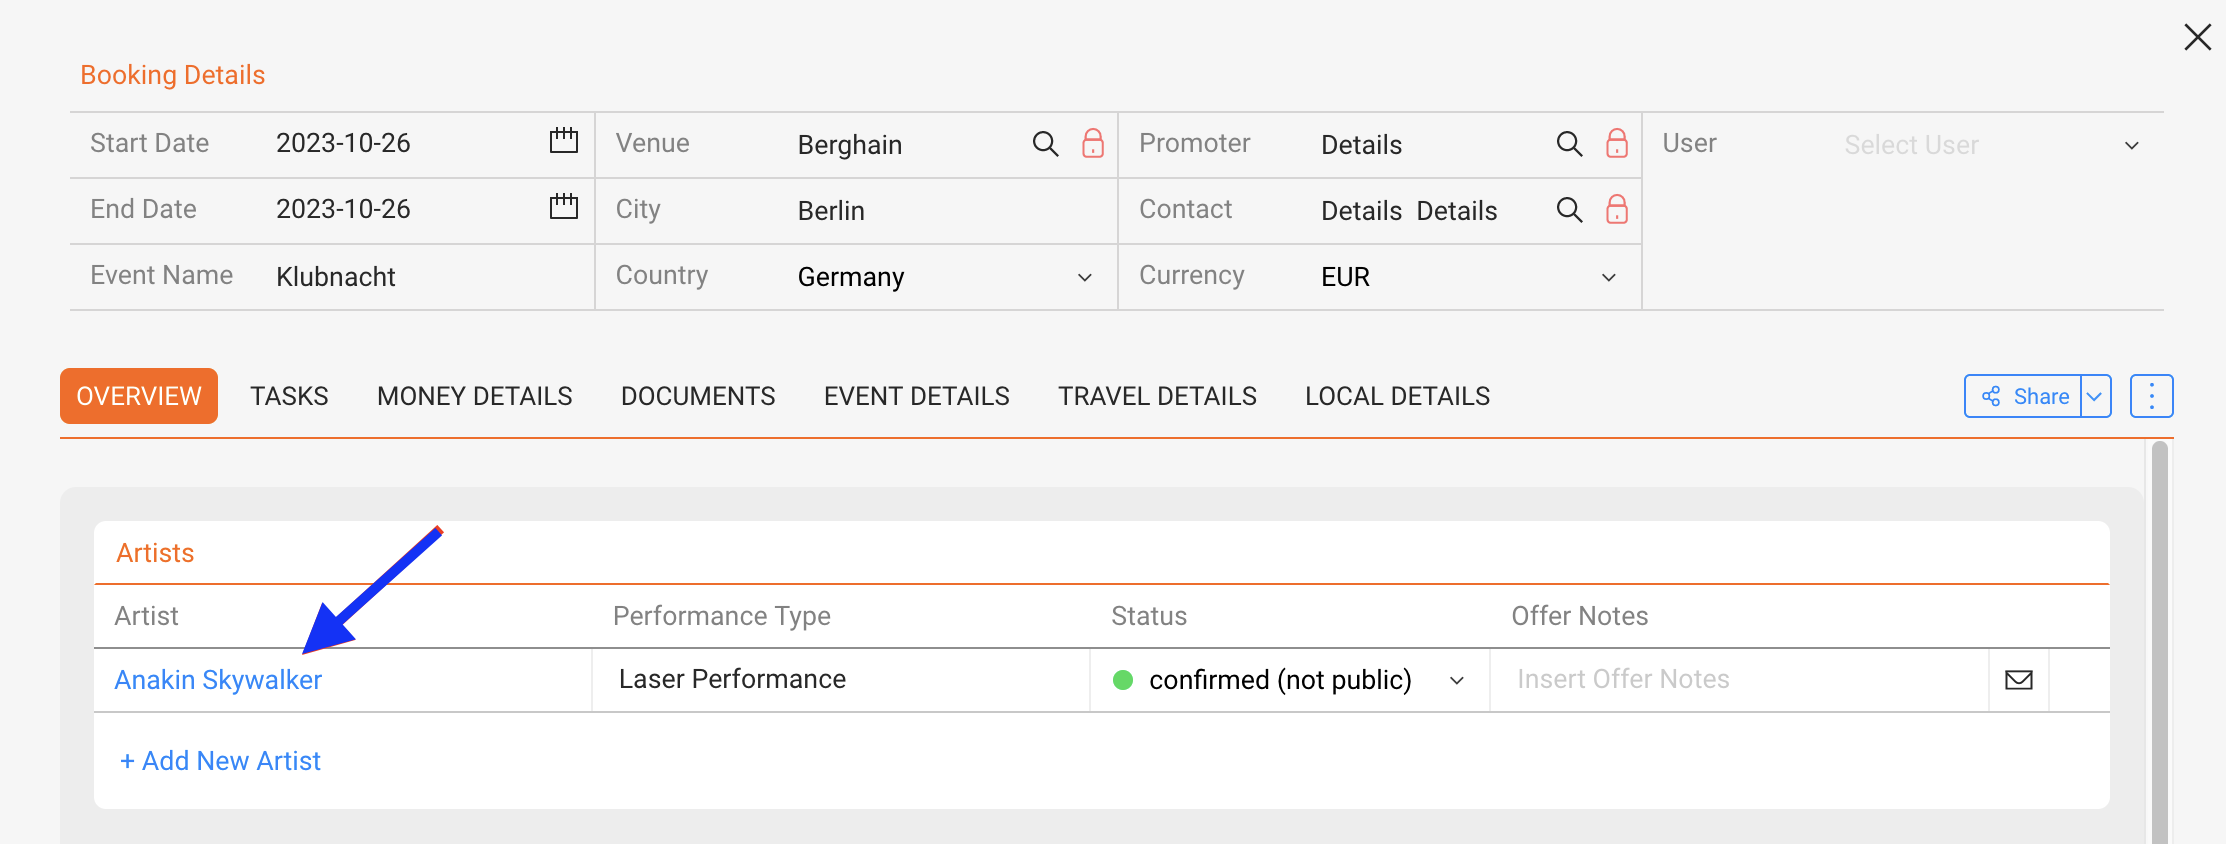
This can be solved by clicking on the ARTIST NAME in each particular booking (see below)

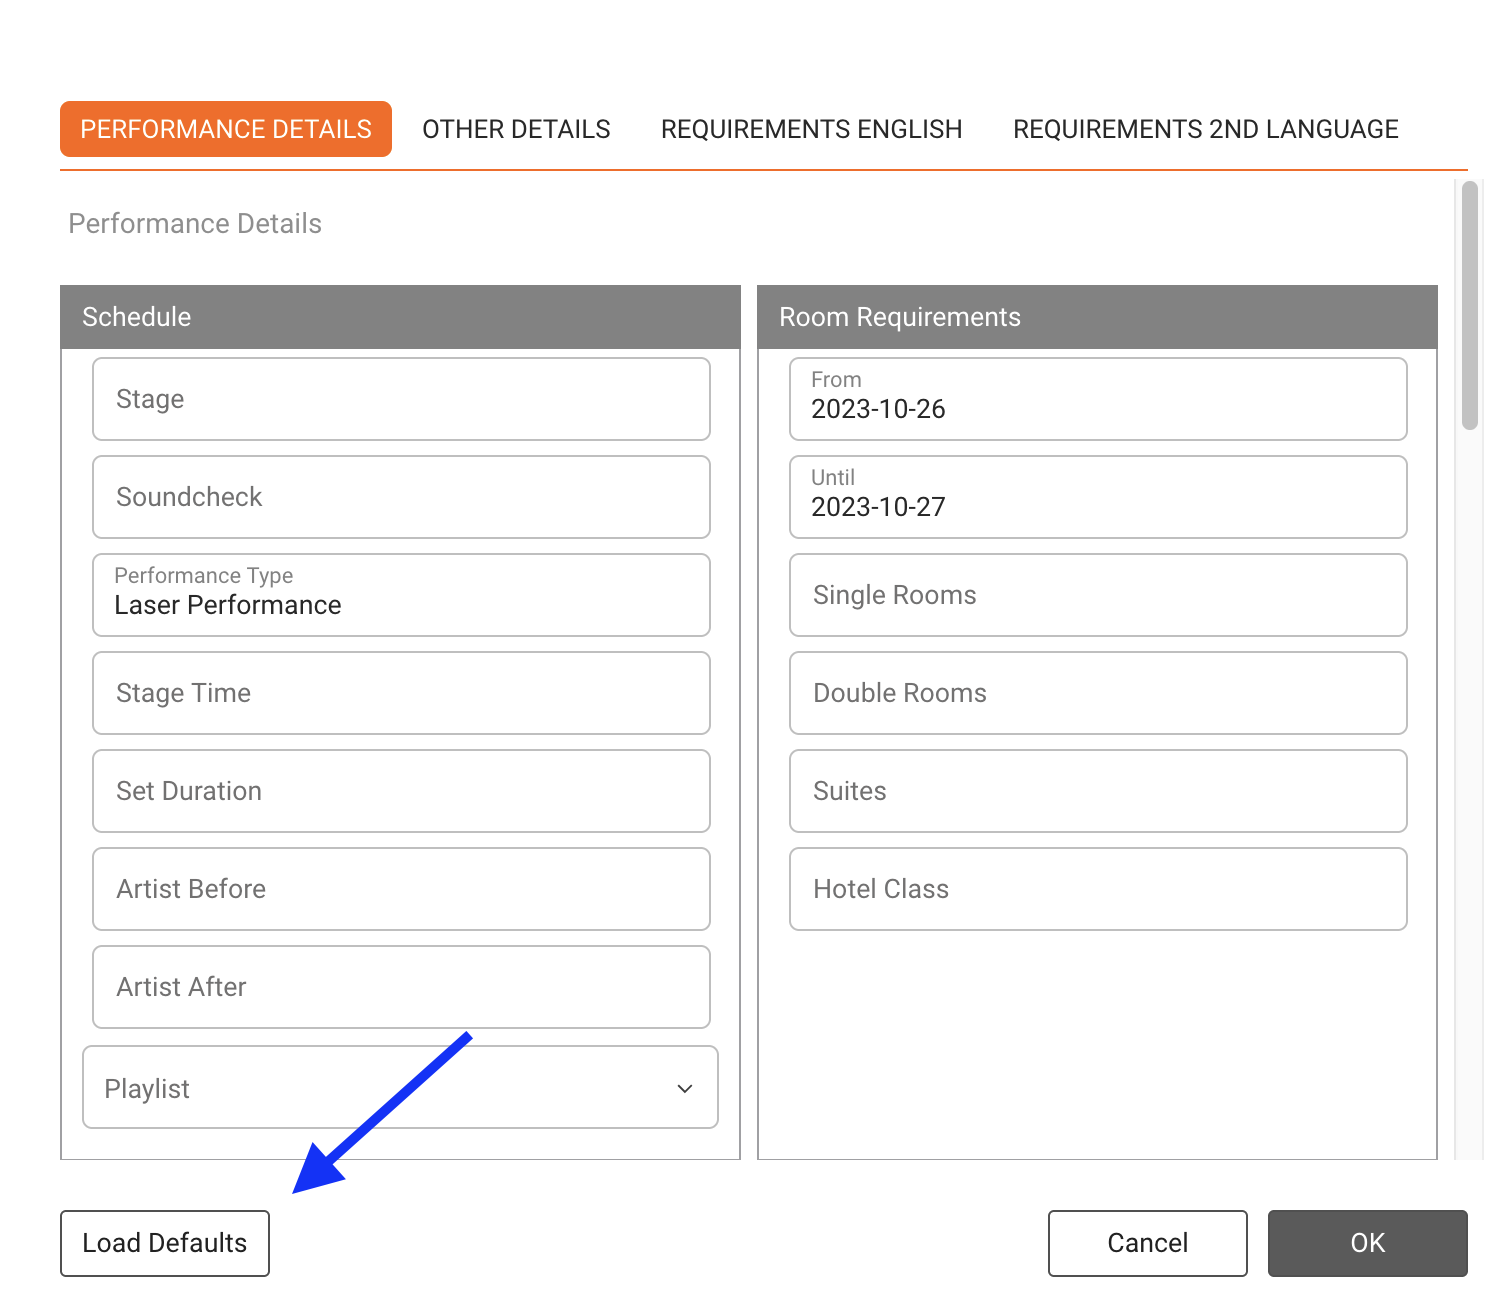
and then clicking on the LOAD DEFAULTS button that you will find on the DEFAULTS section (see screenshot 2). This action is only needed for the Booking dates that were already created before the changes. Not the new ones.


Booking – Artists

How to set up artists

How to set responsible agents for artists

How to use the ‘Available artists’ option

How to create Ical links & Artist Access to the App

How to install the Artist App on mobile devices

How to relate Artist►s bank details to Templates


::# # # Here starts a detailed overview of the BOOKING / ARTISTS section # # #::

All Artists

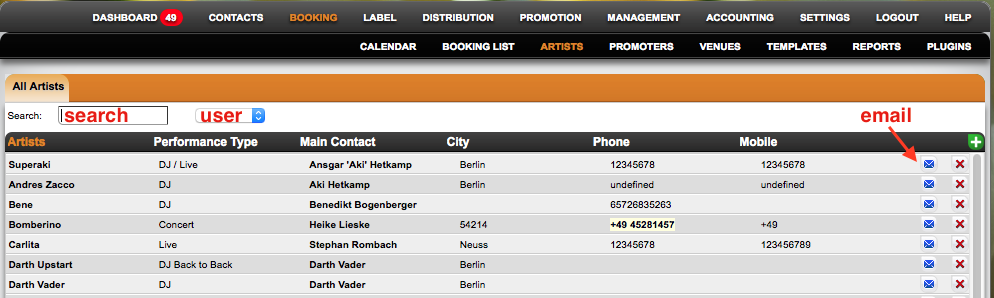
The List displays all booking artists currently available in your database including default performance type and basic contact information.


You can ADD, EDIT or DELETE booking artists.
* to add an artist click on the green PLUS icon on the top right of the list.
* to edit an artist click on the artist name to open the selected artist.
* to delete an artist, click on the red x icon on the far right of the list for the selected artist.
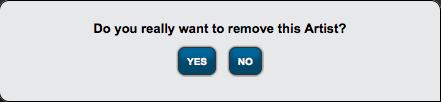
NOTE: You will be asked to confirm wheter or not you really want to delete this artist!
If you do, all artist information will be removed from the database, so make sure you don►t delete artists lightly …


Selected Artist
* Overview
* Additional Info
* Artist Defaults
* Other Defaults
* Bookings
* iCal Web Links
* Artist App
* Map


Contact Interface

This article gives you an overview of the CONTACTS module in details. It introduces the general layout and interface for managing contacts.

All modules in details including BOOKING, CATALOG, DISTRIBUTION, LICENCING, ROYALTY, and ACCOUNTING use a shared contact database.

Each contact acts as a reusable business card with address and communication data.

In the top menu go to CONTACTS / CONTACTS to access the full contact list:

  • Company Contacts
  • Individual Contacts

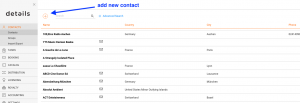
Use the [+] button to add a new contact.

OVERVIEW

Add and edit address details, and assign contact groups.

ADDITIONAL INFO

Attach files, notes, and export contact data as vCard.

ACCOUNTING INFO

Enter bank details and payment terms for automated workflows.

Booking – FIRST STEPS

This article will try to help you getting started with our BOOKING module.

If you have suggestions on how we should improve our service and application, please let us know HERE!

The first steps into a seamless workflow with details should be

1) Setup your ARTISTS

It is super important that you RELATE one or multiple CONTACTS to your artists!
Otherwise you will have trouble with travels and Hotels later.

See here how to set up your Artists


2) Customize the BOOKING STATUS

We have some default values in your database, but these are suggestions only.
You can customize all status names and colors.

Booking Status that need to be published automatically need a checkbox in confirmed, but not in private

Booking Status that are confirmed, but should NOT be published automatically need a checkbox in►confirmed AND one in►private

More infos here: Managing booking statuses


3) Customizing your TEMPLATES

You can find an introduction of How details pulls information from bookings to templates .


4) First Bookings

Now you are ready to create your first bookings: READ a step-by-step-guide

5) Using the iCal the Artist App

At some point you may want to subscribe yourself and the Artists to the iCal Calendar or Artist App.


6) Request Form

If you want to integrate our request form into your website, here is how to adapt the Booking Request Form to your website style.

How to customize the fields on the Booking Request Form/Questionnaire


7) User Management

At some point you may want to manage your user settings and/or create more users.

Here►s how to set up new users & price


8) Share your confirmed Bookings

How to create Ical links (Calendar links)


# #

Details Overview Video 2014

Details Overview Video 2012