Skip to content

Helpdesk

Recent Posts

  • How to log in to Details
  • Order Types Explained
  • How to Create a New Order
  • Add a QR Code to Your Invoice Layout (for SEPA Payment)
  • Configurer les prélèvements sociaux dans details

Recent Comments

    Tag: User

    How to log in to Details

    How to log in to Details

    To access details, you need:

    • your details login URL
    • your username
    • your password

    Your details administrator will create your user account and provide you with your username and login URL.

    Find your details login

    Each details database has its own login page. Your login URL will look something like this: https://app.details.eu/YOURCLIENTNAME/v2/#/main/login

    If you don’t remember your login URL, you can find it here:
    Find your details login

    Enter your email address and follow the instructions.

    First login

    When logging in for the first time, you’ll need to create your password.
    To do this, click RESET PASSWORD on your details login page.
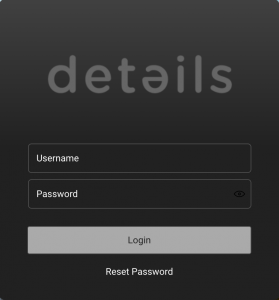
    Enter your username or email address and you’ll receive an email with a secure link to create your password. Then follow the instructions in the email.

    Once your password has been set, you can return to your details login page and log in with your username and new password.
    For more information, see How to reset a password.

    Your daily login

    Once everything is set up, simply use your usual details login page and enter your username and password.

    We recommend bookmarking the login page and saving your credentials securely in your browser or password manager so you can easily return to it.

    If you forget your password, just use RESET PASSWORD on the login page to create a new one.
    Posted on September 1, 2026September 2, 2026Author stromCategories GENERAL, Login & Performance, User SettingsTags login, User, user loginLeave a comment

    User Access & Permissions and ‘Booking-only’ Users


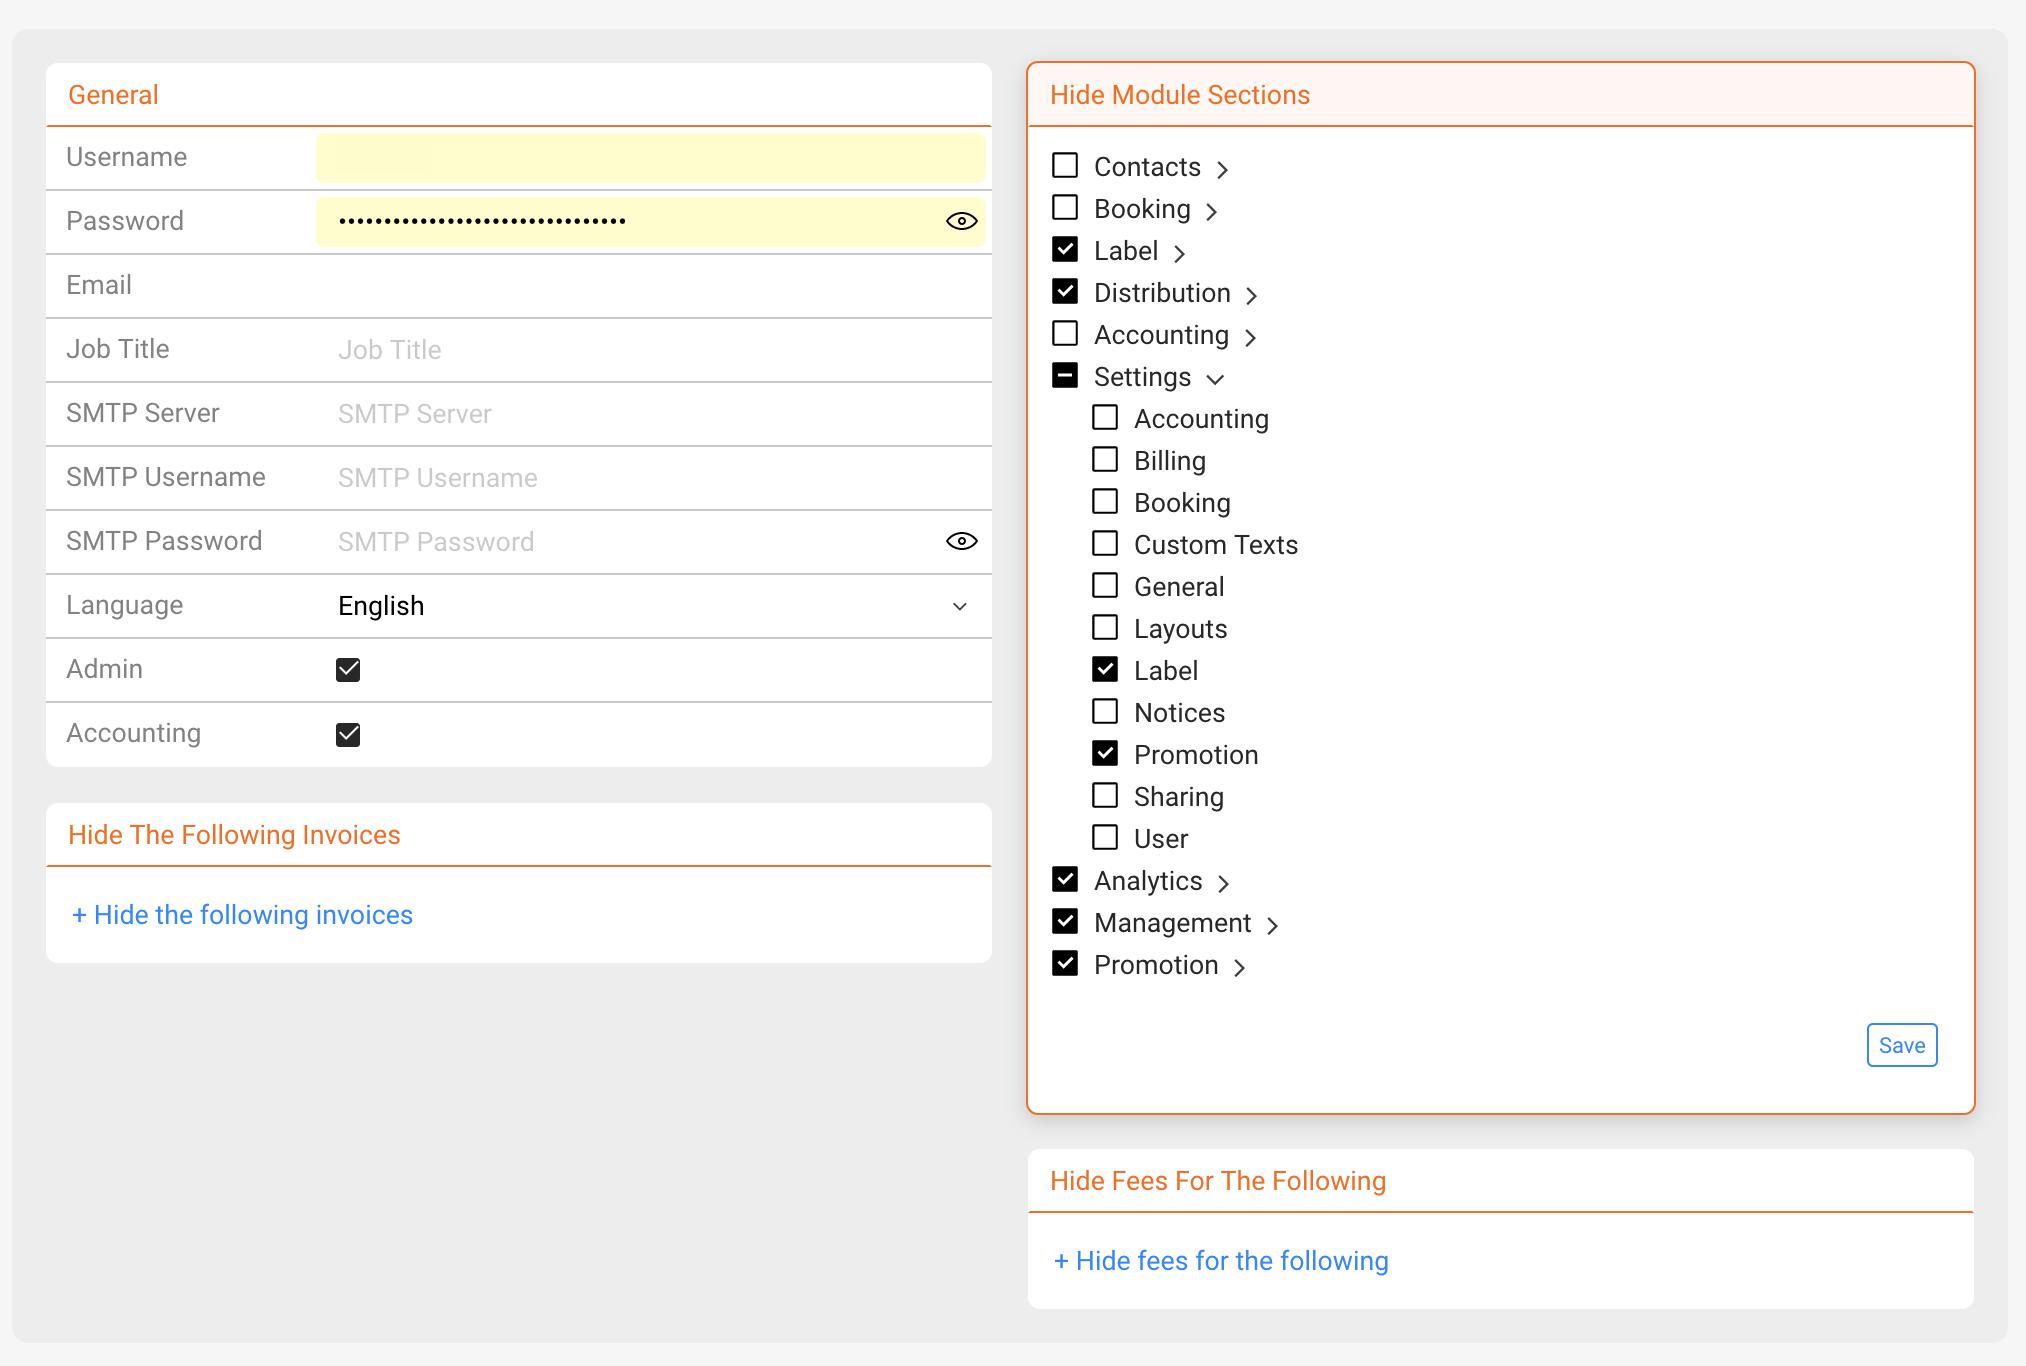
    This article explains how Hide Module Sections works in SETTINGS / USERS and how to configure user access correctly, including a recommended setup for booking-only users.

    Important:
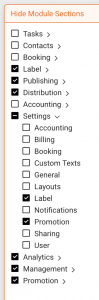
    Checked items will be hidden from the user.
    To allow access to a module or section, leave it unchecked.

    Before configuring access and permissions, make sure the user is created and properly set up.
    See User Management & Profile Settings .

    ► WHAT HIDE MODULE SECTIONS DOES

    Hide Module Sections controls which parts of the interface are visible to a user.

    • Checked = the module or section is hidden
    • Unchecked = the module or section is visible

    This setting does not grant permissions. It only controls what the user can see in the interface.

    ► MAIN SECTIONS AND SUBSECTIONS

    Modules are structured in two levels:

    • Main sections (for example Booking)
    • Subsections inside a main section

    Even if a main section is unchecked and therefore visible, individual subsections may still be checked and hidden.

    This allows precise control. A user may see a module, but only selected parts of it.

    ► BOOKING-ONLY USER: RECOMMENDED SETUP

    A booking-only user should only have access to booking-related workflows.

    Main sections that remain visible

    Leave these unchecked:

    • Contacts
    • Booking
    • Accounting
    • Settings

    Main sections that should be hidden

    Check these to hide them:

    • Label
    • Distribution
    • Publishing
    • Promotion
    • Management
    • Analytics

    Within visible modules, you can optionally hide individual subsections, depending on the user s role.

    ► SAVING YOUR CHANGES

    Important:
    Changes to user permissions are not saved automatically.

    After adjusting Hide Module Sections, you must click [SAVE] to apply the changes.

    This differs from many other areas in details, where changes are stored immediately.

    ► WHERE TO CONFIGURE THIS

    User access is managed by administrators under:

    SETTINGS / USERS

    Open a user profile, adjust Hide Module Sections, and click [SAVE] to confirm your changes.

    Related:
    Learn how to create and manage users in User Management & Profile Settings .

    Posted on June 30, 2026July 29, 2026Author detailsadminCategories SETTINGS, User SettingsTags Booking, Settings, UserLeave a comment

    User Management & Profile Settings

    This article explains how to create, edit, and remove users, and how to manage the main profile settings available for each user.

    Note:
    Only users with Admin rights can access USER SETTINGS in the SETTINGS section.

    To control which modules and sections a user can see, refer to User Access & Permissions (Hide Module Sections) .

    ► CREATE A NEW USER

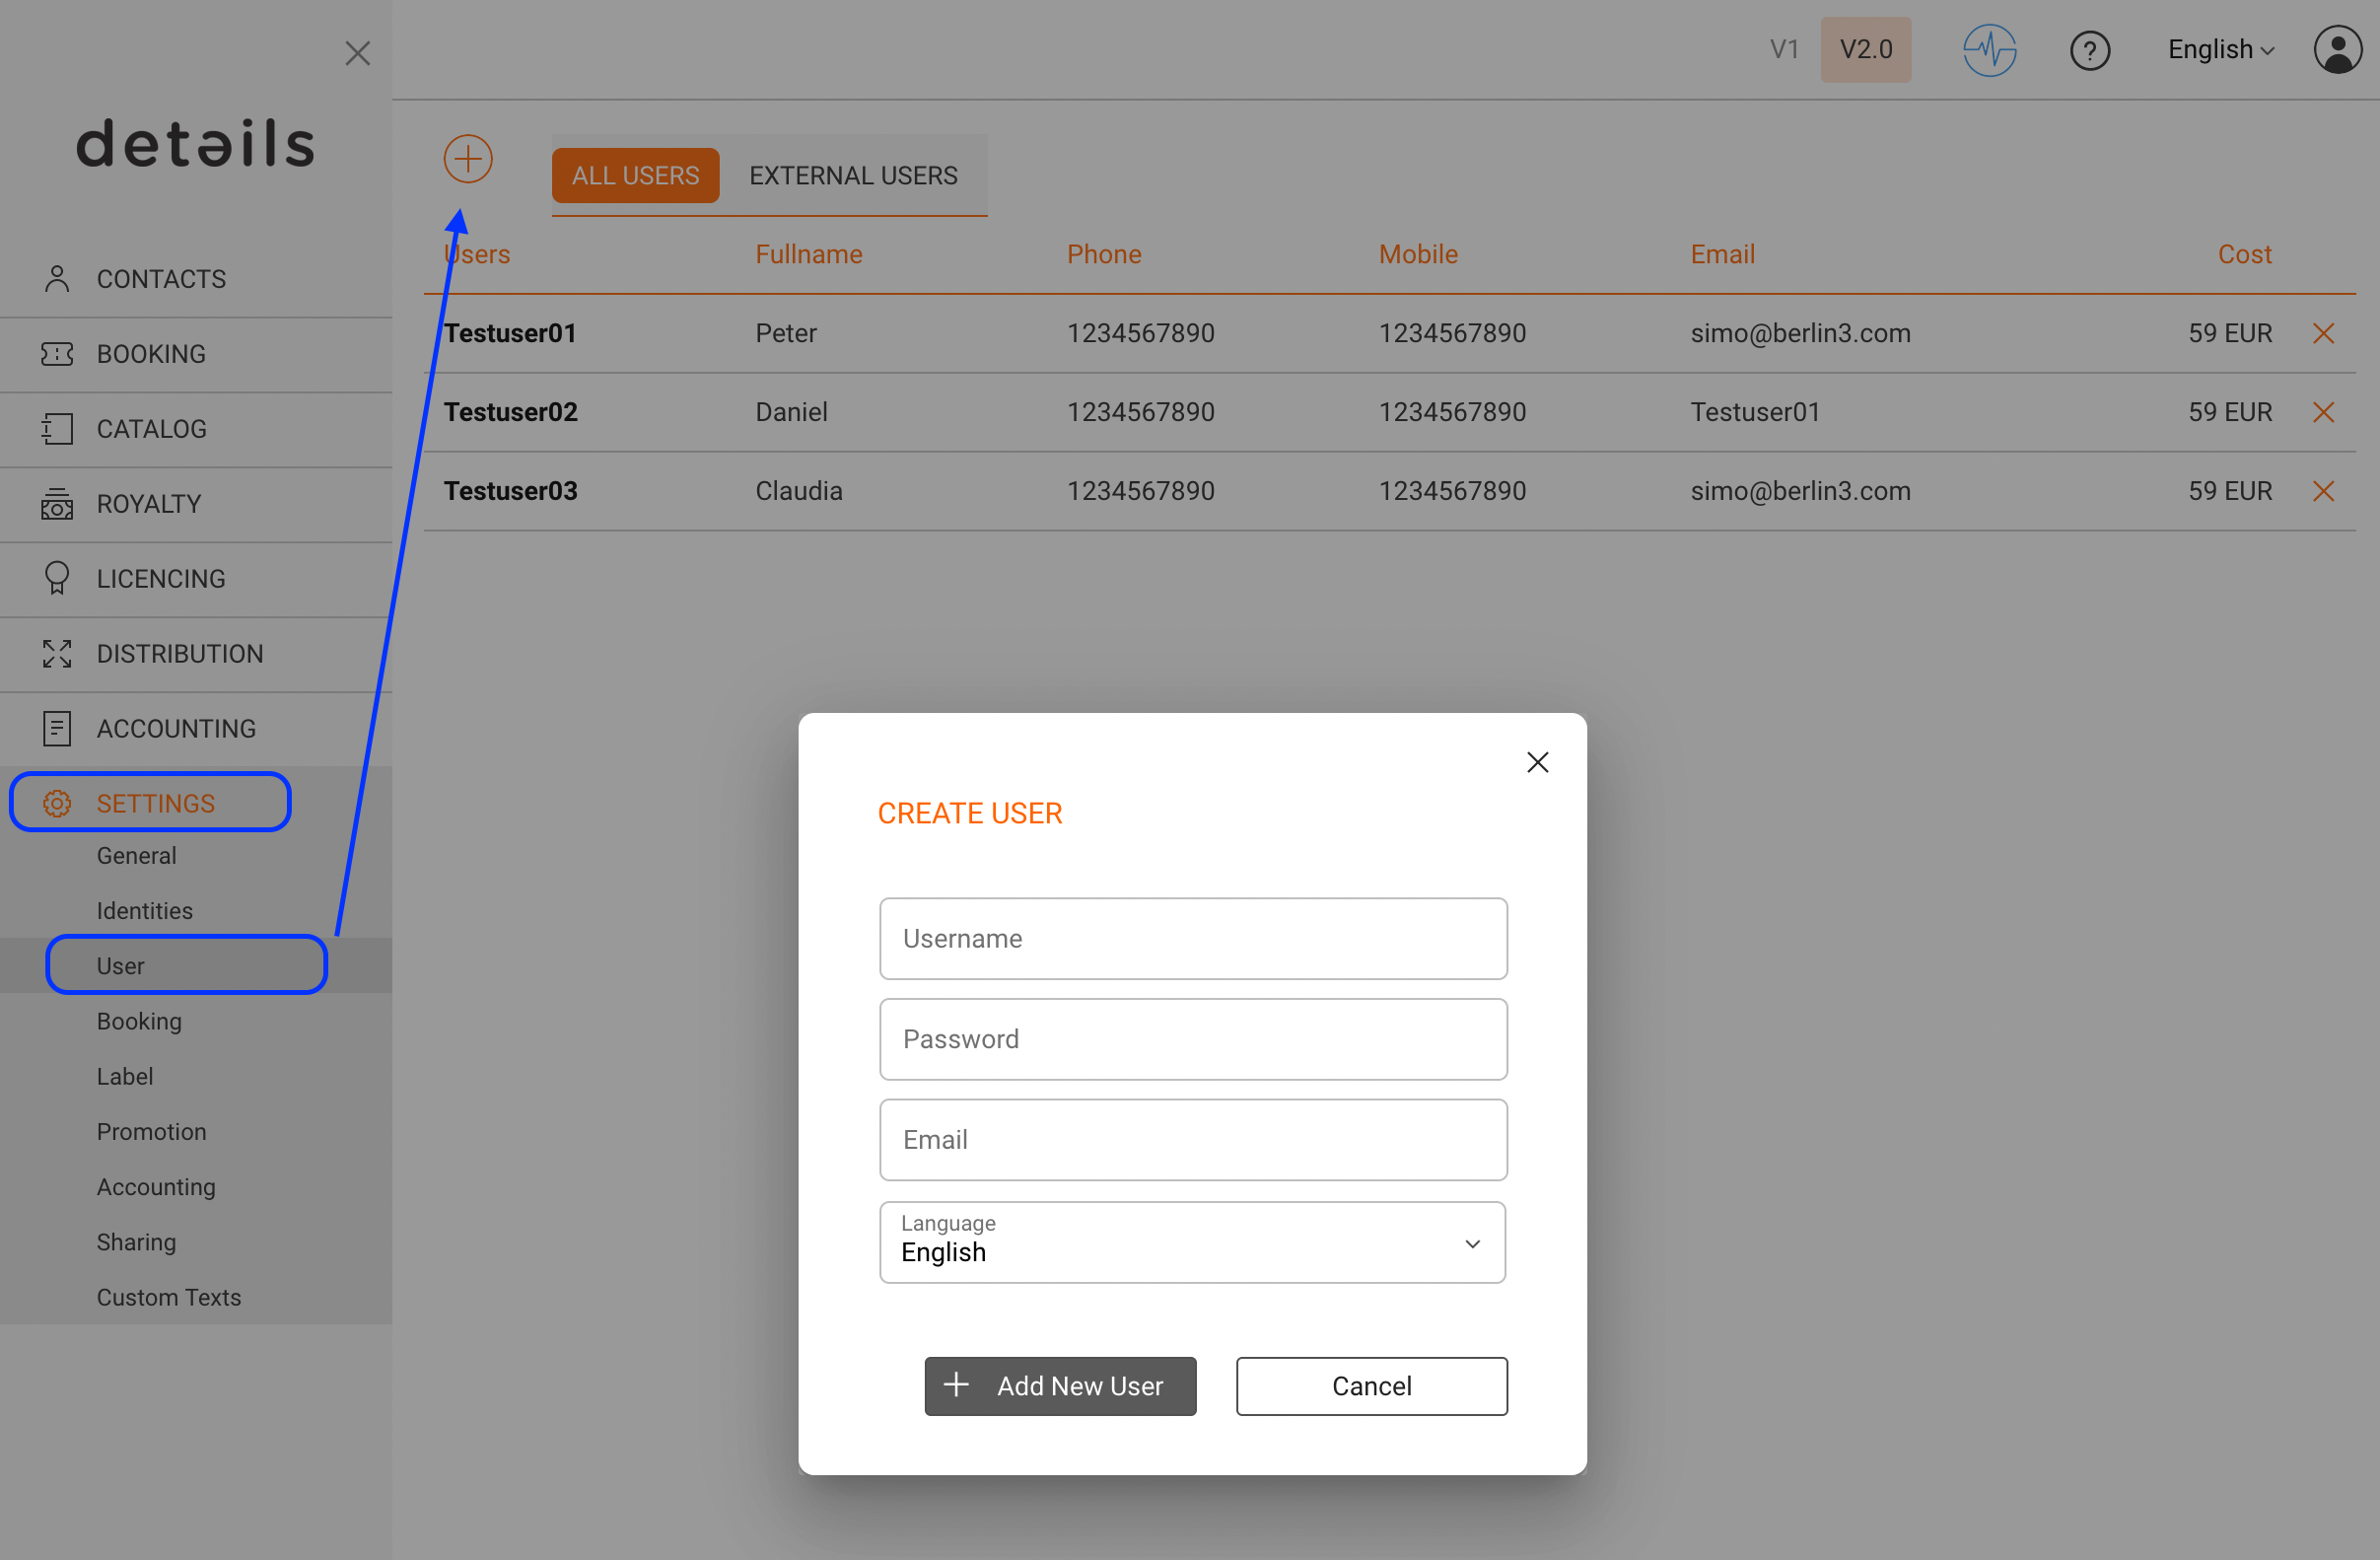
    As an administrator, you can manage users under SETTINGS / USERS.

    1. Go to SETTINGS / USERS.
    2. Click [+] in the top-right corner.
    3. Enter the required information: Username, Initial password, and Email address.

    The username is required to log in to the application. The email address is used for notifications and password reset links.

    create_users_v2.png

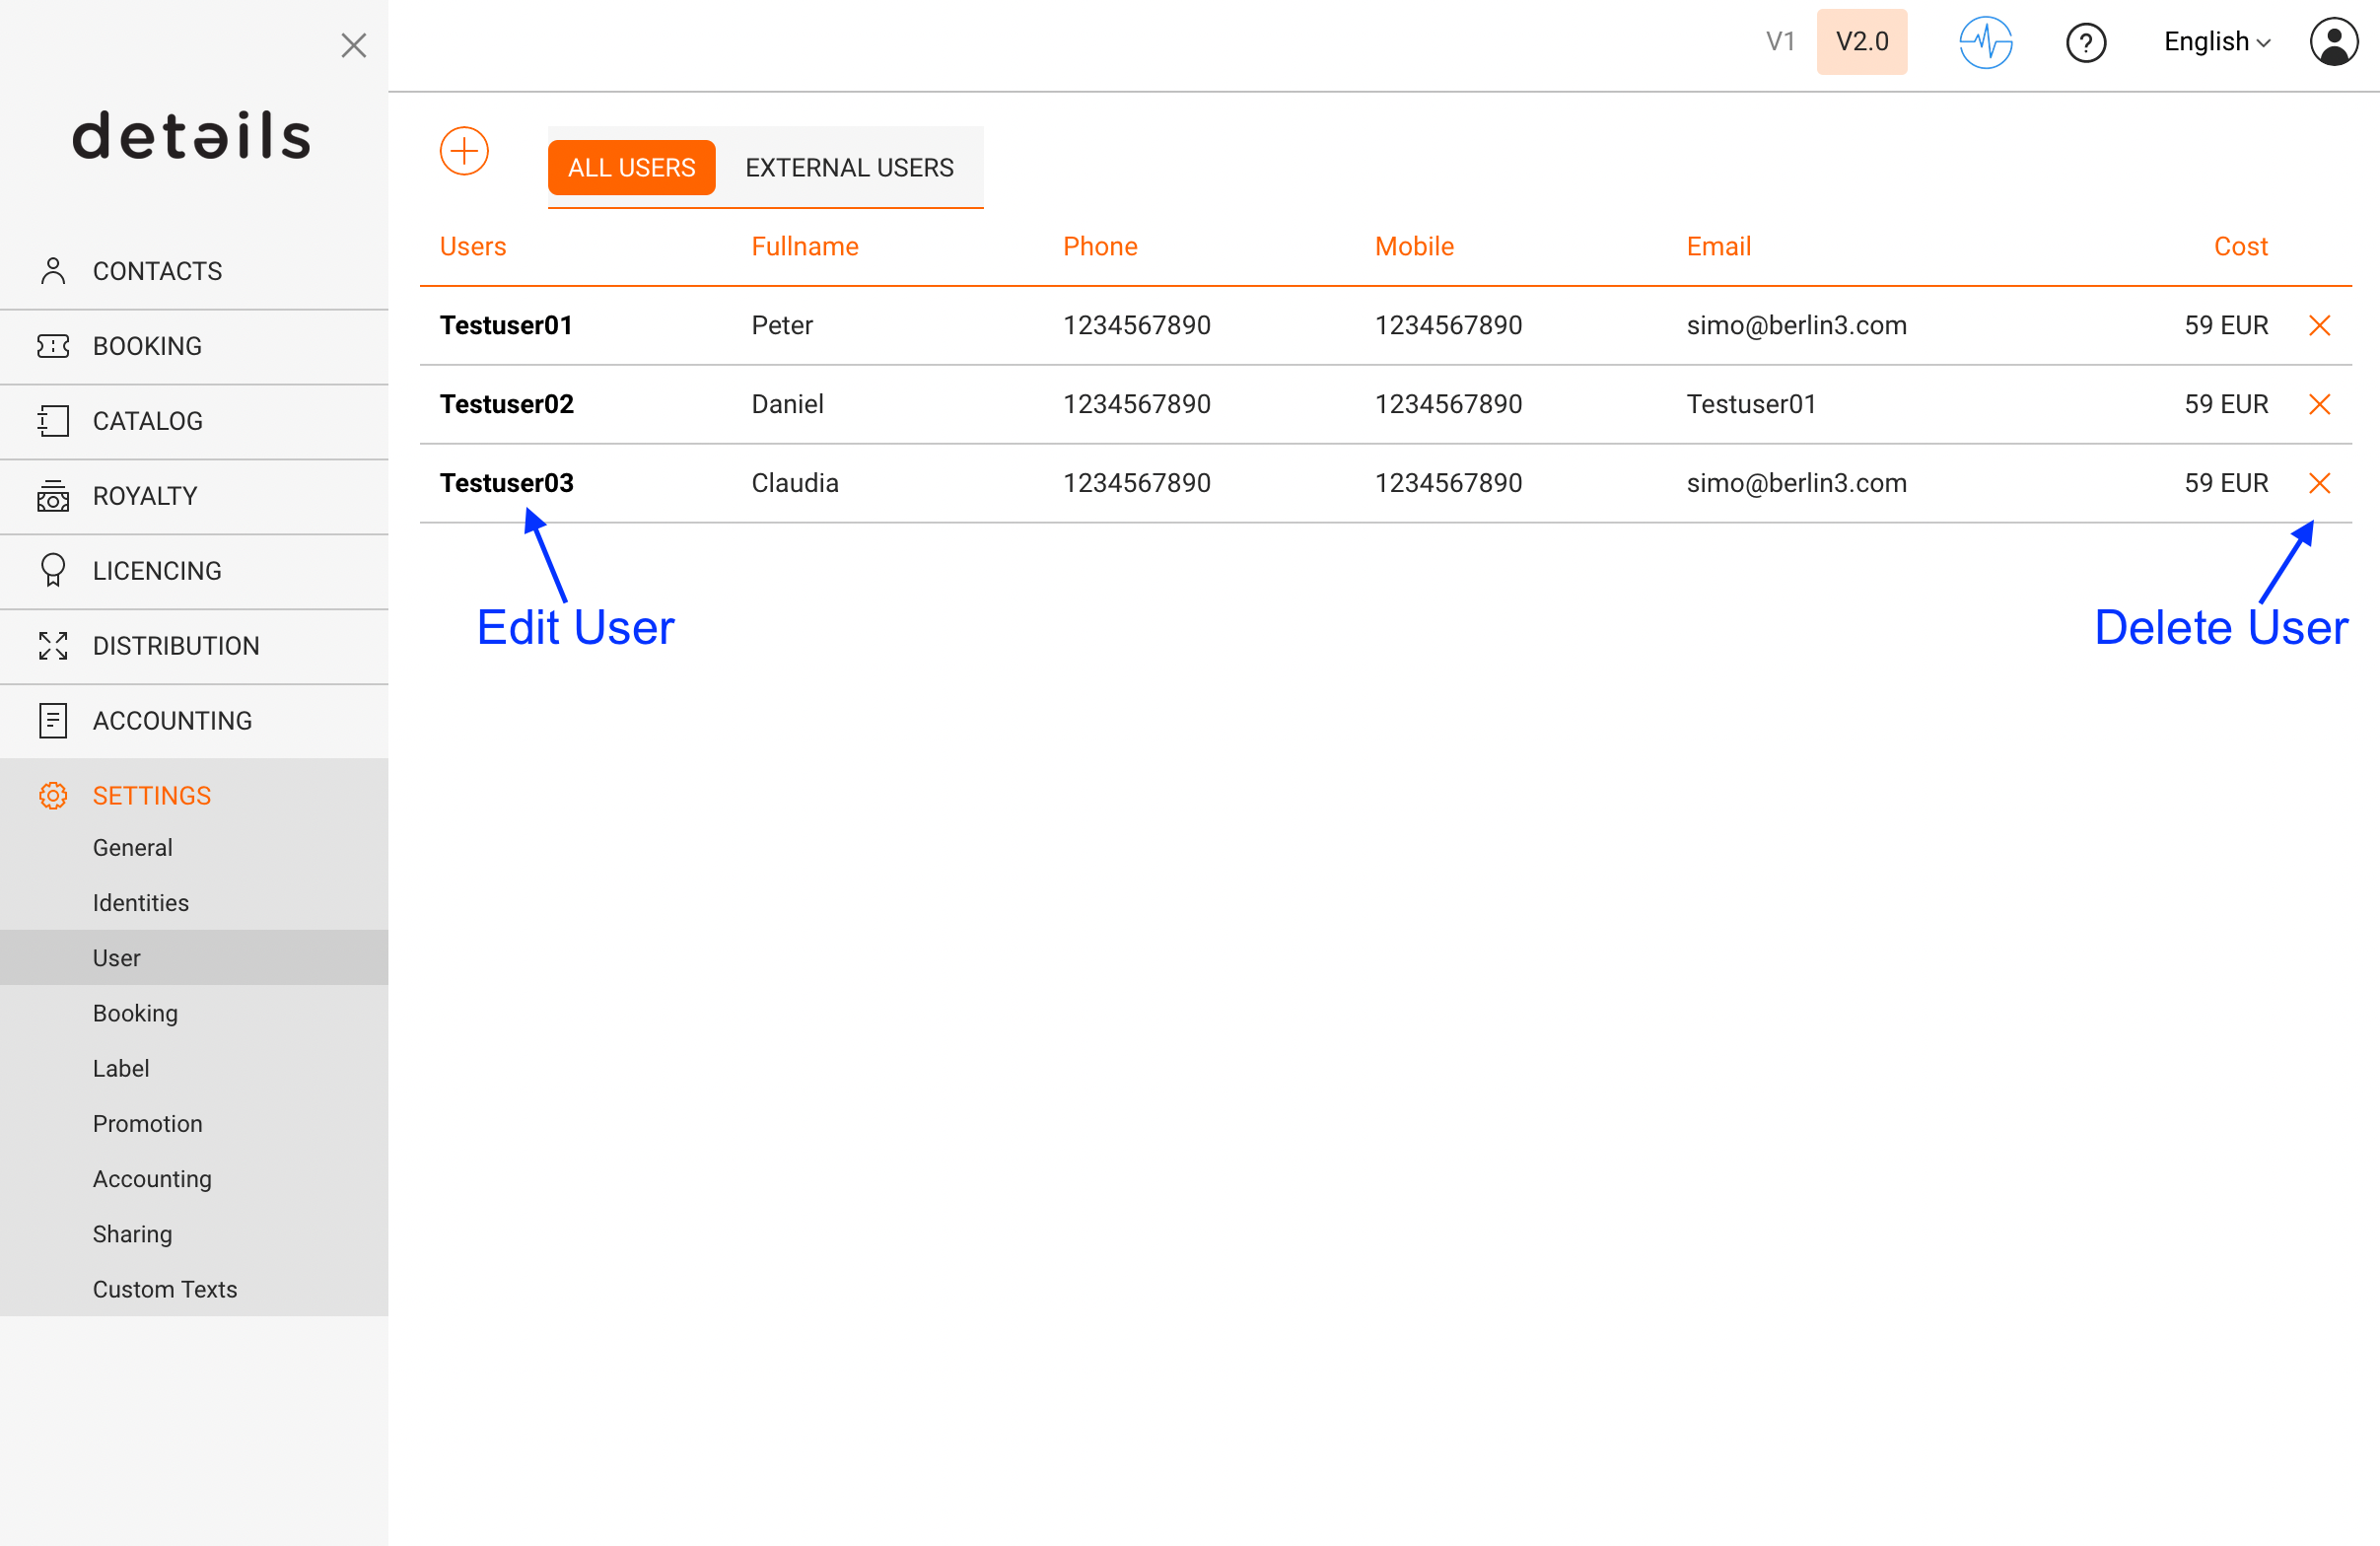
    ► EDIT AN EXISTING USER

    To edit a user:

    1. Go to SETTINGS / USERS.
    2. Click on the name of the user you want to edit.

    user_overview_v2.png

    You can update the user s profile information and settings at any time.

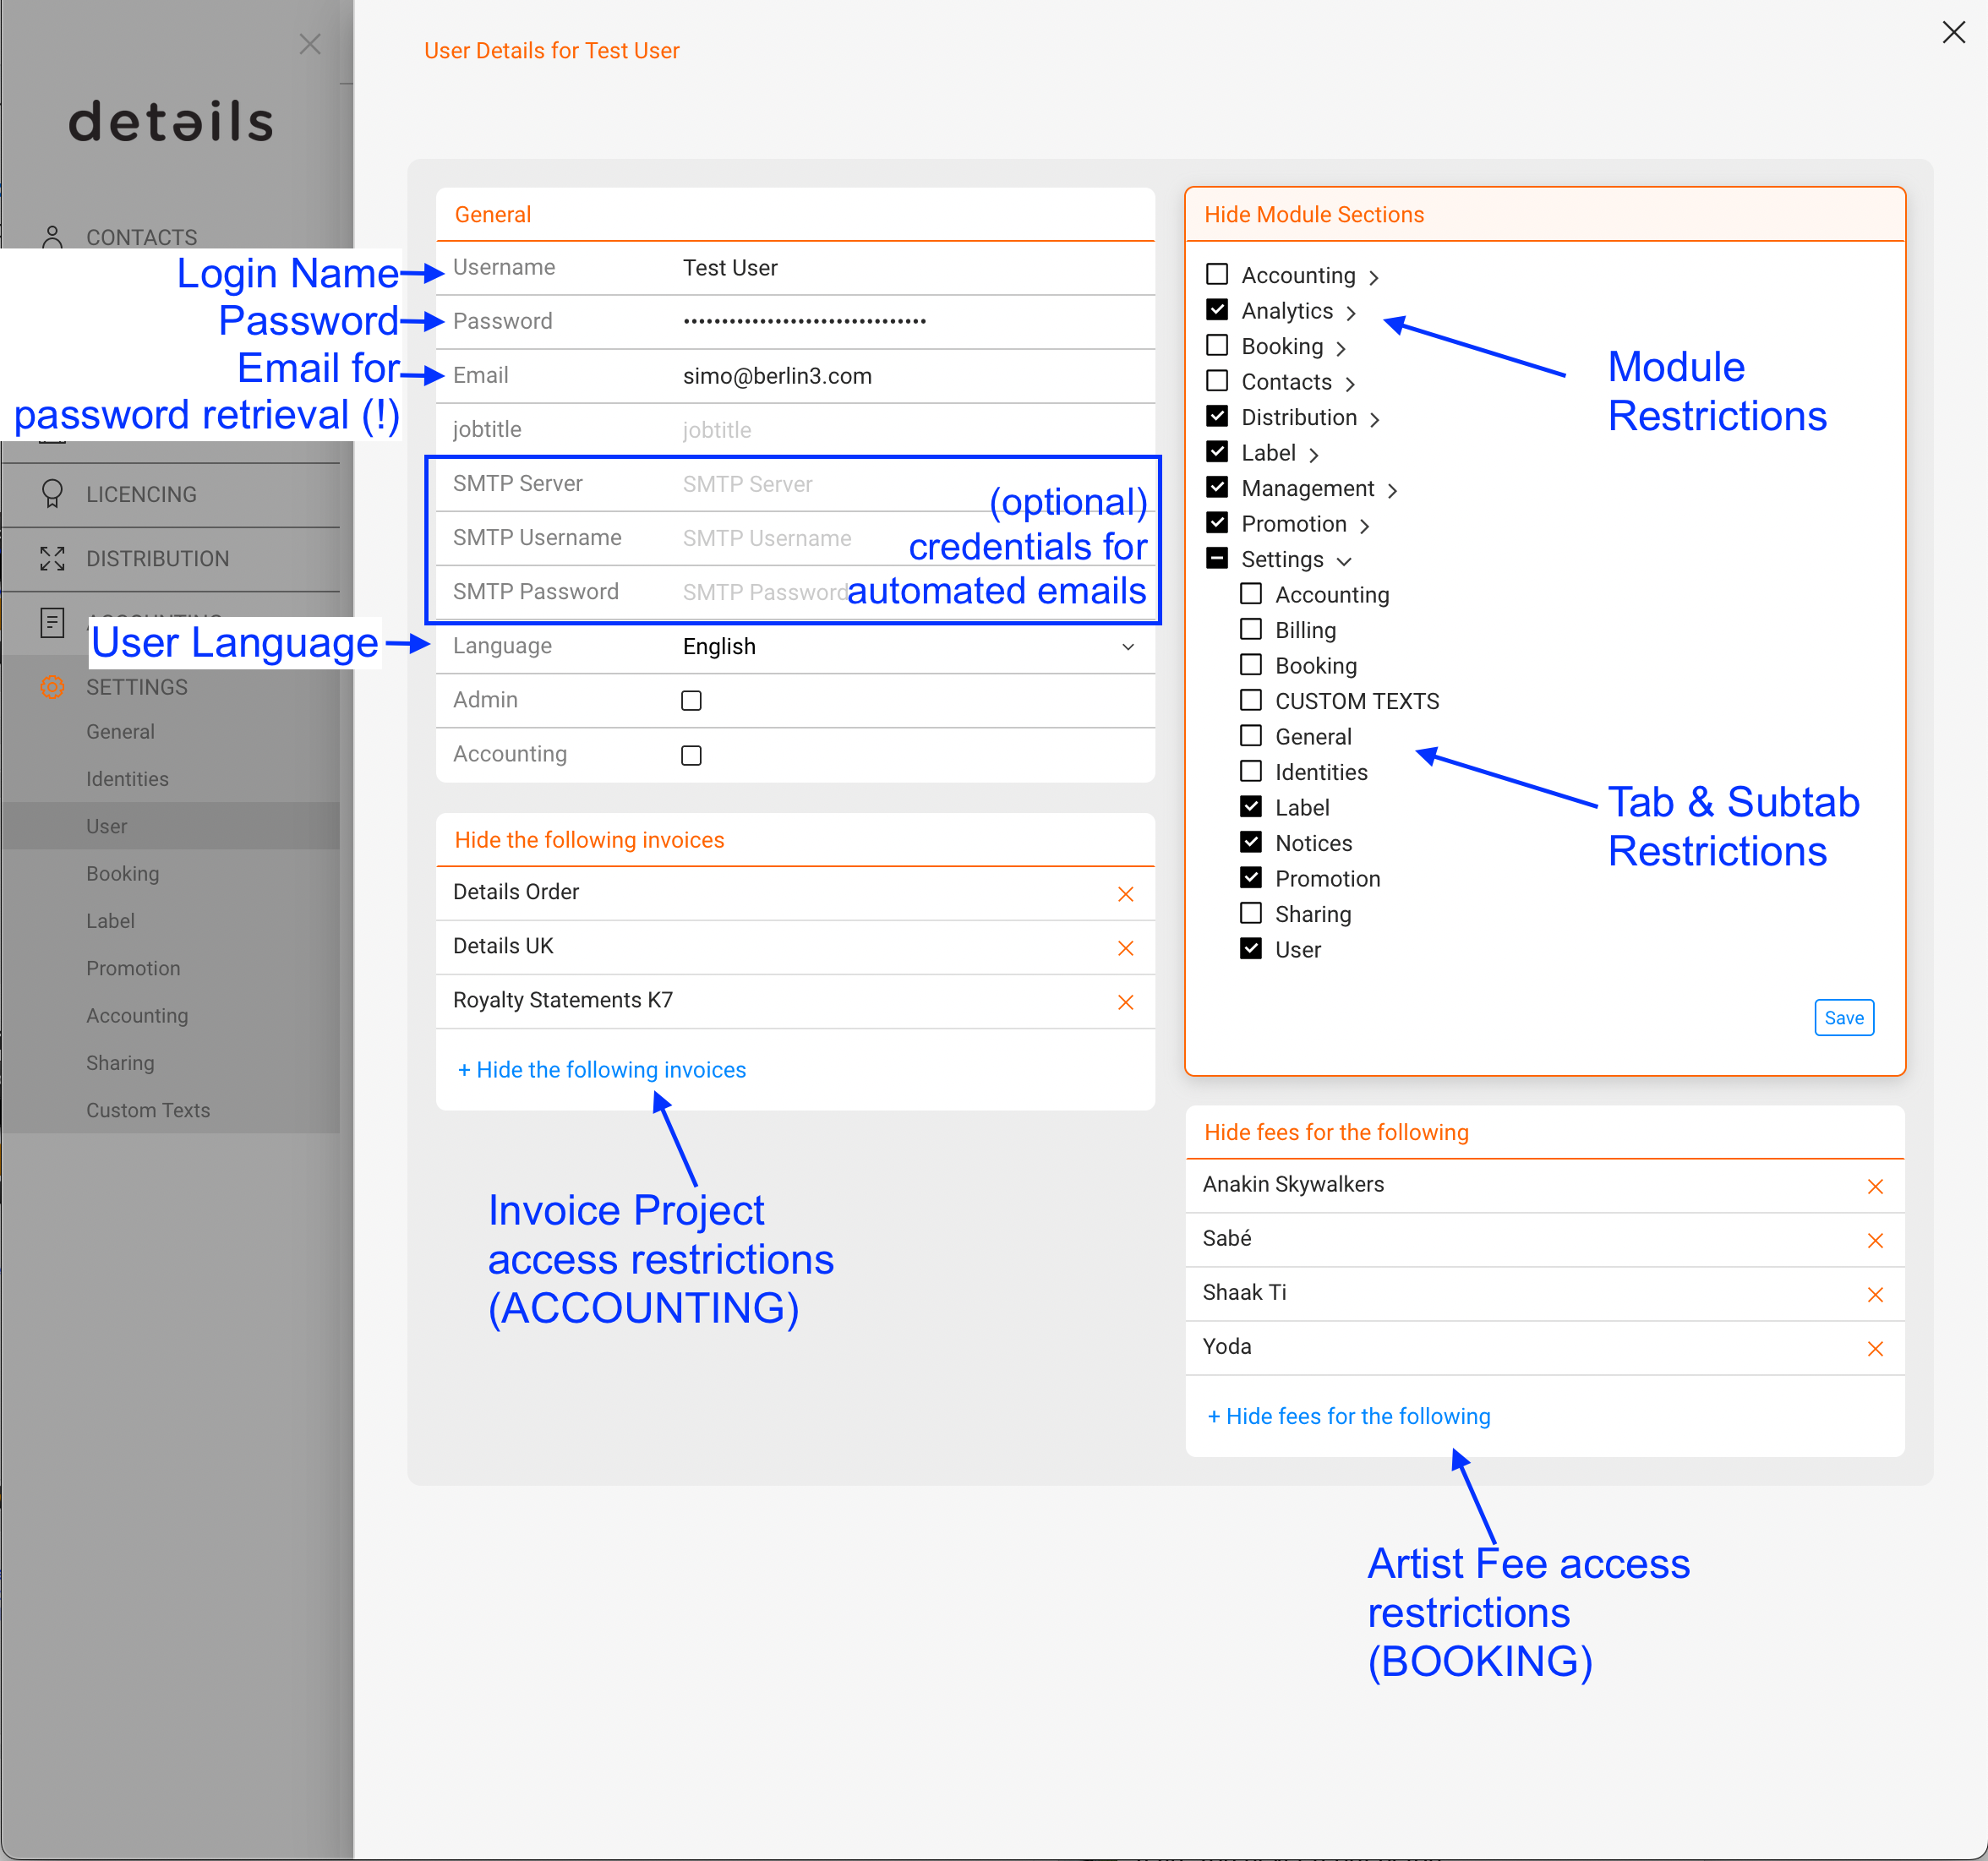
    ► USER PROFILE SETTINGS (FIELDS & FLAGS)

    Each user profile contains the following settings:

    • Username The login name used to access details. This field is essential.
    • Email The primary communication address.
      All notifications from details are sent here, including alerts, confirmations, reports, and password reset links.
    • Language Defines the interface language.
    • Job title Optional descriptive field.

    Optional email delivery settings:

    • SMTP server
    • SMTP username
    • SMTP password

    These settings are only required if emails should be sent through the user s own mail server.

    Administrative flags:

    • Admin Grants access to administrative areas, including USER SETTINGS.
    • Accounting Grants access to accounting-related data.

    Edit Users.png

    ► REMOVE A USER

    To remove a user:

    1. Go to SETTINGS / USERS.
    2. Click the [x] icon next to the user.

    Note:
    If a user has been active for more than 14 days within a billing month, the user can only be removed after the next billing cycle.

    User_Menue_V2.png

    Next step:
    Learn how to control module visibility and booking-only access in User Access & Permissions (Hide Module Sections) .

    Posted on June 30, 2026June 30, 2026Author detailsadminCategories SETTINGS, User SettingsTags Add User, Delete User, Edit User, Setting up Users, User, User Management, User Restrictions, UsersLeave a comment

    User Management & Profile Settings

    This article explains how to create, edit, and remove users, and how to manage the main profile settings available for each user.

    Note:
    Only users with Admin rights can access USER SETTINGS in the SETTINGS section.

    To control which modules and sections a user can see, refer to User Access & Permissions (Hide Module Sections) .

    ► CREATE A NEW USER

    As an administrator, you can manage users under SETTINGS / USERS.

    1. Go to SETTINGS / USERS.
    2. Click [+] in the top-right corner.
    3. Enter the required information: Username, Initial password, and Email address.

    The username is required to log in to the application. The email address is used for notifications and password reset links.

    ► EDIT AN EXISTING USER

    To edit a user:

    1. Go to SETTINGS / USERS.
    2. Click on the name of the user you want to edit.

    You can update the user s profile information and settings at any time.

    ► USER PROFILE SETTINGS (FIELDS & FLAGS)

    Each user profile contains the following settings:

    • Username The login name used to access details. This field is essential.
    • Email The primary communication address.
      All notifications from details are sent here, including alerts, confirmations, reports, and password reset links.
    • Language Defines the interface language.
    • Job title Optional descriptive field.

    Optional email delivery settings:

    • SMTP server
    • SMTP username
    • SMTP password

    These settings are only required if emails should be sent through the user s own mail server.

    Administrative flags:

    • Admin Grants access to administrative areas, including USER SETTINGS.
    • Accounting Grants access to accounting-related data.

    ► REMOVE A USER

    To remove a user:

    1. Go to SETTINGS / USERS.
    2. Click the [x] icon next to the user.

    Note:
    If a user has been active for more than 14 days within a billing month, the user can only be removed after the next billing cycle.

    Next step:
    Learn how to control module visibility and booking-only access in User Access & Permissions (Hide Module Sections) .

    Posted on April 20, 2026August 16, 2026Author detailsadminCategories User SettingsTags Add User, Delete User, Edit User, Setting up Users, User, User Management, User Restrictions, UsersLeave a comment
    Proudly powered by WordPress