
Our Label and Label Service clients are now able to provide royalty statements to their royalty accounts in a custom b2b area with access to royalty statements and analytics.
This feature comes FREE without additional costs to our clients
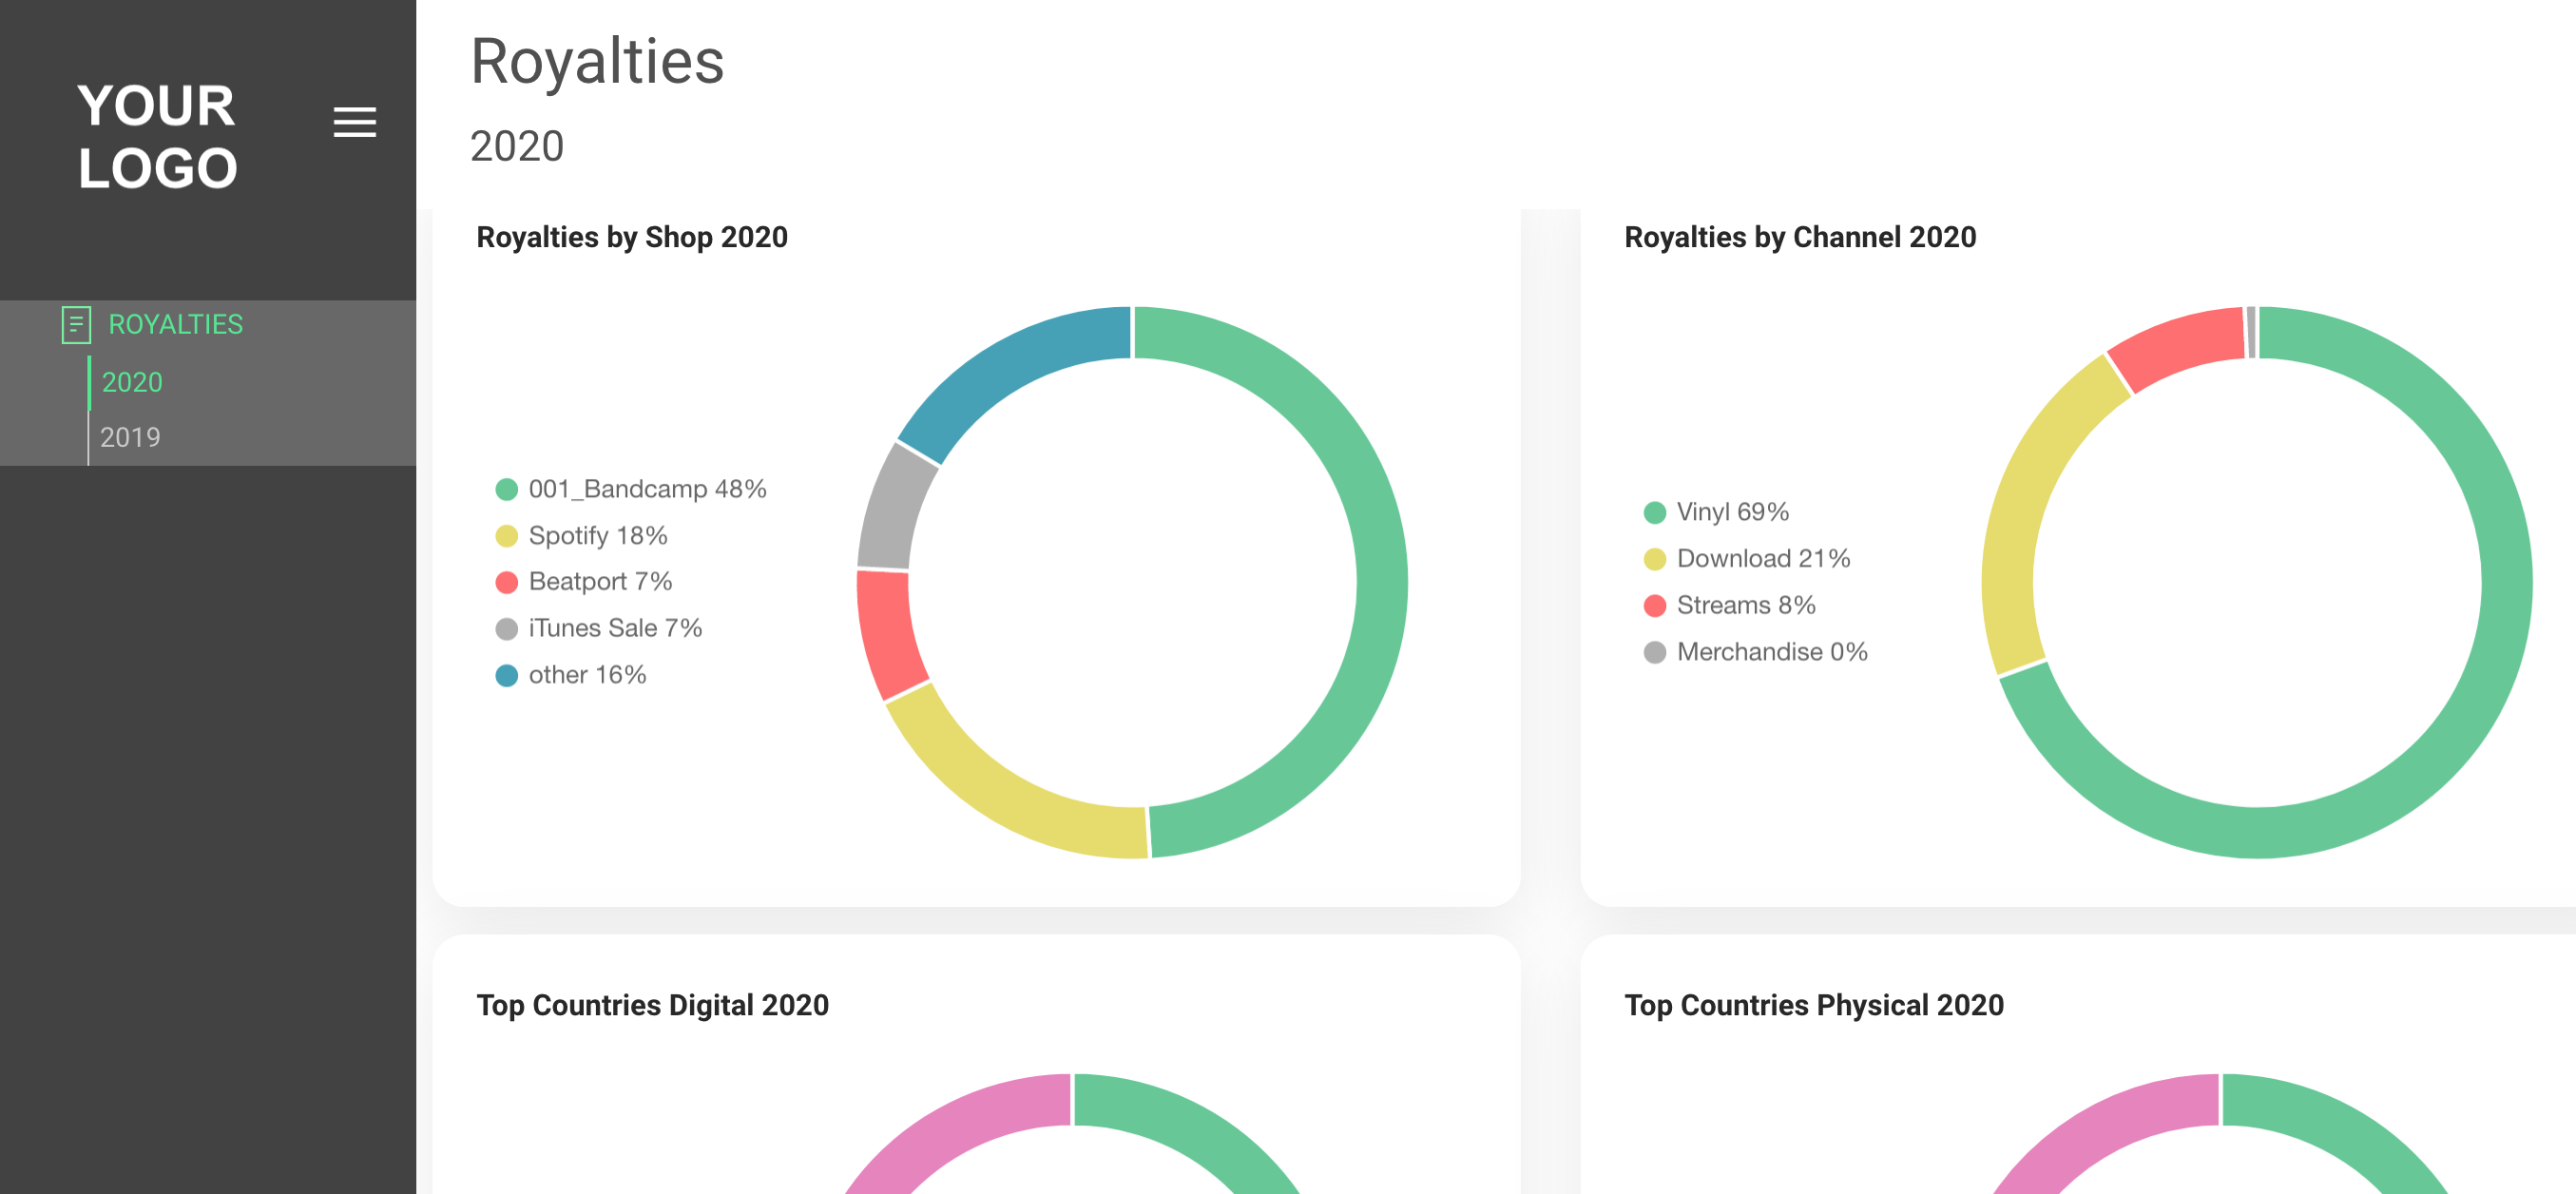
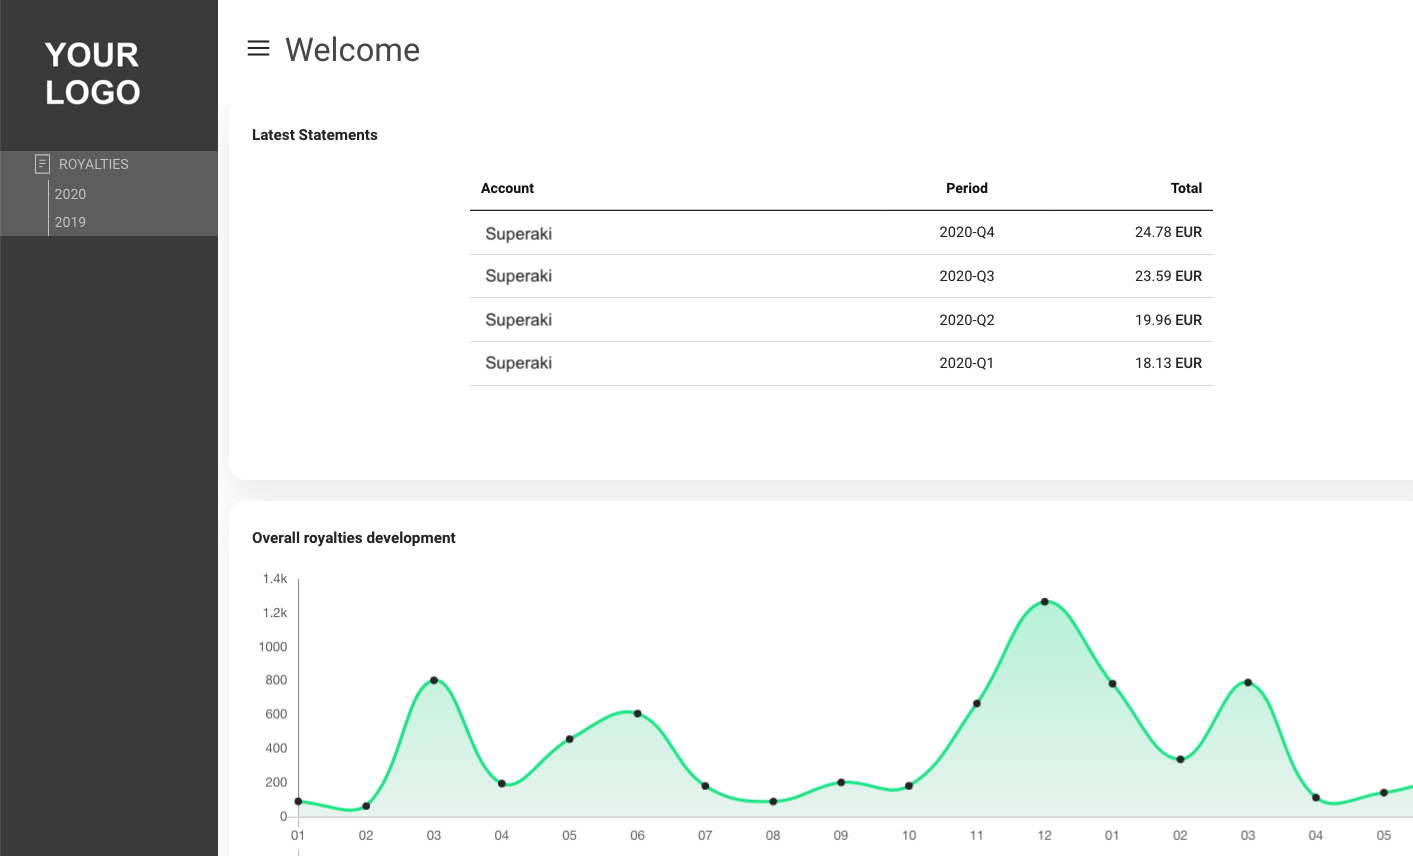
Our Label and Label Service clients are now able to provide royalty statements to their royalty accounts in a custom b2b area with access to royalty statements and analytics.
This feature comes FREE without additional costs to our clients
Use this guide to send orders into details via a POST request. This article documents the Order API.
Note: The endpoint expects a JSON array of orders in the request body. Identifiers can be provided as UUID, barcode, or catalog_no. Barcodes must be unique.
Go to SETTINGS / SHARING and open the open api box named [JSON Orders Import].
Base URL:
https://openapi.berlin3.com:10000/orders/json_import/Path format (with credentials):
https://api.berlin3.com:10000/api/orders/json_import/<client_id>/<checksum>| Parameter | Description | In | Expected Value |
|---|---|---|---|
| client_id | Unique client identifier | path | details client_id |
| checksum | API key | path | details open api key |
| params | Array of orders | body | JSON |
Each order is an object. The table below lists available fields. Mandatory fields must be present in every order.
| API Field Name | Mandatory / Optional | Data Type | Expected Value | Field Description |
|---|---|---|---|---|
| order_date | Mandatory | string | YYYY-MM-DD | Date of the order. |
| account_id | Mandatory | integer | min e 1 | Internal ID of the account. |
| contra_account_id | Mandatory | integer | Internal ID of the contra account. | |
| invoice_project_id | Mandatory | integer | Internal ID of the invoicing project. | |
| vat_handling | Mandatory | integer | 1, 2, 3 | 1 = excluding VAT, 2 = including VAT, 3 = no VAT. |
| vat_territory | Mandatory | string | Territory for VAT calculation. | |
| vat_rate1 | Mandatory | number | Primary VAT rate. | |
| vat_rate2 | Mandatory | number | Secondary VAT rate. | |
| orderlines | array | Line items of the order (see fields below). | ||
| shipping_type_id | Optional | integer | Internal ID of shipping type. | |
| order_value | Optional | number | Total order value. | |
| uuid / barcode / catalog_no | Optional | string | Item identifiers. Barcodes must be unique. |
curl -X POST
  "https://api.berlin3.com:10000/api/orders/json_import/<client_id>/<checksum>"
  -H "Content-Type: application/json"
  -d '[
    {
      "order_date": "2015-06-01",
      "account_id": 167,
      "contra_account_id": 2,
      "invoice_project_id": 4,
      "currency": "EUR",
      "order_type": 1,
      "vat_handling": 1,
      "vat_territory": "EU",
      "vat_rate1": 19,
      "vat_rate2": 0,
      "orderlines": [
        {"uuid": "b1862090-469e-4035-a073-9f106d270502", "ppu": 12.50, "order_qty": 1},
        {"uuid": "c796d64c-90c6-493f-a8ea-0f244904069b", "ppu": 10.90, "order_qty": 3}
      ]
    }
]'{
"$schema": "http://json-schema.org/draft-07/schema#",
"title": "import orders",
"description": "import orders from json",
"type": "array",
"items": {
"type": "object",
"required": [
"order_date",
"account_id",
"contra_account_id",
"invoice_project_id",
"currency",
"order_type",
"vat_handling",
"vat_territory",
"vat_rate1",
"vat_rate2"
],
"properties": { /* full property list remains supported */ }
}
}For completeness, the original schema property list from your legacy documentation is preserved below.
Full legacy JSON schema (expanded)
/* Original JSON Schema from your text */

$SCHEMA_BLOCK_START
[{
  "status": "Invoice",
  "user_id": null,
  "currency": "EUR",
  "vat_rate1": null,
  "vat_rate2": null,
  "account_id": 167,
  "order_date": "2015-06-01",
  "order_type": 1,
  "orderlines": [
    {"ppu": 12.50, "uuid": "b1862090-469e-4035-a073-9f106d270502", "barcode": "487328472388", "catalog_no": "Detrec 002 CD", "notes": null, "vat_rate": null, "order_qty": 1, "promo_foc": null, "vat_amount": null},
    {"ppu": 10.90, "uuid": "c796d64c-90c6-493f-a8ea-0f244904069b", "notes": null, "vat_rate": null, "order_qty": 3, "promo_foc": null, "vat_amount": null},
    {"ppu": 11.20, "uuid": "ab96df0f-d94a-44b0-ab63-99340bc778fb", "notes": null, "vat_rate": null, "order_qty": 2, "promo_foc": null, "vat_amount": null}
  ],
  "order_value": 504.50,
  "deliver_city": "Subiaco",
  "deliver_name": "Andrew Sinclair",
  "order_source": "fertig prepaid!",
  "vat_handling": null,
  "deliver_phone": "+61406213638",
  "delivery_text": null,
  "one_stop_flag": null,
  "proforma_text": "Good Company RecordsnAndrew Sinclairn267 Hay St.nSubiaco - 6008n",
  "shipping_date": null,
  "shipping_info": null,
  "tracking_data": null,
  "vat_territory": null,
  "internal_notes": "Good Company RecordsnAndrew Sinclairn267 Hay St.nn6008 SubiaconAUSTRALIA",
  "order_discount": null,
  "shipping_costs": 95.40,
  "weight_kg_edit": 17.800,
  "deliver_company": "Good Company Records",
  "deliver_country": "Australia",
  "order_reference": null,
  "deliver_address1": "267 Hay St.",
  "deliver_address2": null,
  "shipping_type_id": 1,
  "contra_account_id": 2,
  "customs_reference": null,
  "payment_method_id": null,
  "deliver_postalcode": "6008",
  "invoice_project_id": 4,
  "deliver_address_type": null,
  "deliver_street_number": null
}]{"details":"Data is received successfully, for more details please check email.","error":0}
To help you customize your royalty statement layout, we ve provided three main components:
Below you will find the HTML/CSS code that you can use as a base to create your customized royalty statements.
This section displays the logo and address on the top of the royalty statement.
This section displays the Royalty Statement summary page and overview of contracts.
[% SET contact = data.contact; %]
[% SET stmt_summary = data.stmt_summary; %]
[% SET rp = data.rp; %]
[% SET ra = data.ra; %]
[% SET statement_info = data.statement_info; %]
[% SET contracts = statement_info.contracts %]
[% SET invoice_project = data.invoice_project %]
<html>
<head>
<meta http-equiv=”content-type” content=”text/html; charset=UTF-8″>
<title>Royalty Statement – [% ra.royalty_account_name %] – [% rp.start_date _’ – ‘_ rp.end_date %]</title>
<style type=”text/css”>
@import url(‘https://fonts.googleapis.com/css2?family=Roboto:ital,wght@0,100;0,300;0,400;0,500;0,700;0,900;1,100;1,300;1,400;1,500;1,700;1,900&display=swap’);
body {
font-family: “Roboto”, sans-serif;
font-weight: 400;
font-style: normal;
font-size: 10pt;
margin-left: 50px;
}
.grey_text {
color: #828282;
}
span {
line-height: 1.3 !important;
}
#footer {
margin-top: 50px;
clear: both;
display: block;
position: fixed;
bottom: 0;
display: none;
}
.page-header2 {
visibility: hidden;
}
tfoot,
#tfoot {
margin-top: 50px;
}
.button {
display: inline-block;
padding: 5px;
margin-right: 5px;
font-size: 12px;
color: #007bff;
text-align: center;
text-decoration: none;
border: 1px solid #007bff;
border-radius: 3px;
opacity: 1;
transition: background-color 0.3s, color 0.3s;
}
.green_number{
color: #333;
background-color: #e0f5e0;
padding: 0 0 0 5;
}
.red_number{
color: #333;
background-color: #ffacac;
padding: 0 0 0 5;
}
.page-break {
page-break-before: always;
break-before: always;
}
</style>
<style type=”text/css” media=”print”>
body {
margin-left: 0px;
}
#first_trailing_text {
margin-bottom: 50px;
position: absolute;
bottom: 0;
}
.page-header2 {
visibility: visible;
width: 100%;
}
#buttons{
display: none;
}
#footer {
margin-top: 50px;
display: block;
position: fixed;
bottom: 0;
}
tfoot,
#tfoot {
margin-top: 50px;
opacity: 0.0;
filter: Alpha(opacity=0);
}
.page-break {
page-break-before: always;
break-before: always;
}
</style>
</head>
<body>
<table style=”width: 965px; font: 10pt Roboto, Gotham, ‘Helvetica Neue’, Helvetica, Arial, ‘sans-serif’;” border=”0″>
<thead>
<tr>
<td>
[% invoice_project.header_royalty %]
</td>
</tr>
</thead>
►
<tbody>
<tr>
<td>
<table style=”width: 965px;” border=”0″>
<tbody>
<p> </p>
<p>
[% IF contact.company_name != ” %][% contact.company_name %][% ELSE %][% contact.first_name _’ ‘_ contact.last_name %][% END %]<br />
[% IF contact.company_legalname != ” %][% contact.company_legalname %]<br />[% END %]
[% IF contact.address1 != ” %][% contact.address1 %]<br>[% END %]
[% IF contact.address2 != ” %][% contact.address2 %]<br>[% END %]
[% IF contact.city != ” %][% contact.city %]<br>[% END %]
[% IF contact.region != ” %][% contact.region %] – [% END %][% IF contact.postalcode != ” %][% contact.postalcode %][% END %]<br>
[% IF contact.country != ” %][% contact.country %][% END %]
</p>
<p> </p>
<p><span style=”font-size: 16pt;”>[% ra.royalty_account_name %]</span></p>
<table border=”0″ cellpadding=”0″ cellspacing=”0″ style=”width: 100%; font: 10pt Roboto, Gotham, ‘Helvetica Neue’, Helvetica, Arial, ‘sans-serif’;”>
<tbody>
<tr>
<td style=”width: 60%; margin-top: 0;”>
<table border=”0″ cellpadding=”0″ cellspacing=”0″ style=”width: 100%; font: 10pt Roboto, Gotham, ‘Helvetica Neue’, Helvetica, Arial, ‘sans-serif’;”>
<tbody>
<tr>
<td style=”width: 50%; border-bottom: 1px solid #828282; padding: 7px 0;”>
<span class=”grey_text”>Opening Balance</span>
</td>
<td style=”width: 50%; text-align: right; border-bottom: 1px solid #828282;”>
<span>[% stmt_summary.opening_balance | format(‘%.2f’) | format_number(“de”) %]</span>
</td>
</tr>
<tr>
<td style=”border-bottom: 1px solid black; padding: 7px 0;”>
<span class=”grey_text”>Royalty Amount</span>
</td>
<td style=”text-align: right; border-bottom: 1px solid black;”>[% stmt_summary.royalty_amount | format(‘%.2f’) | format_number(“de”) %]</td>
</tr>
[% IF stmt_summary.additions != “” && stmt_summary.additions*1 != 0 %]
<tr>
<td style=”border-bottom: 1px solid #828282; padding: 7px 0;”>
<span class=”grey_text”>Additions</span>
</td>
<td style=”text-align: right; border-bottom: 1px solid #828282;”>[% stmt_summary.additions | format(‘%.2f’) | format_number(“de”) %]</td>
</tr>
[% END %]
[% IF stmt_summary.deductions != “” && stmt_summary.deductions*1 != 0 %]
<tr>
<td style=”border-bottom: 1px solid #828282; padding: 7px 0;”>
<span class=”grey_text”>Deductions</span>
</td>
<td style=”text-align: right; border-bottom: 1px solid #828282;”>[% stmt_summary.deductions | format(‘%.2f’) | format_number(“de”) %]</td>
</tr>
[% END %]
<tr>
<td style=”border-bottom: 1px solid #828282; padding: 7px 0;”>
<span class=”grey_text”>Net Amount</span>
</td>
<td style=”text-align: right; border-bottom: 1px solid #828282;”>
<span style=”border-radius: 5px; font-weight: bold;” class=”[% IF stmt_summary.net_amount > 0 %]green_number[% ELSIF stmt_summary.net_amount > 0 < 0 %]red_number[% END %]”>
[% stmt_summary.net_amount | format(‘%.2f’) | format_number(“de”) %]
</span>
</td>
</tr>
<tr>
<td style=”border-bottom: 1px solid #828282; padding: 7px 0;”>
<span class=”grey_text”>VAT [% (rp.vat_rate || 0) | format(‘%.2f’) %]%</span>
</td>
<td style=”text-align: right; border-bottom: 1px solid #828282;”>[% stmt_summary.vat_amount | format(‘%.2f’) | format_number(“de”) %]</td>
</tr>
[% IF stmt_summary.tax_amount != “” && stmt_summary.tax_amount*1 != 0 %]
<tr>
<td style=”border-bottom: 1px solid black; padding: 7px 0;”>
<span class=”grey_text”>Withholding Tax</span>
</td>
<td style=”text-align: right; border-bottom: 1px solid black;”>[% stmt_summary.tax_amount | format(‘%.2f’) | format_number(“de”) %]</td>
</tr>
[% END %]
<tr>
<td style=”border-bottom: 1px solid #828282; padding: 7px 0;”>
<span class=”grey_text”>Gross Amount</span>
</td>
<td style=”text-align: right; border-bottom: 1px solid #828282;”>
<span style=”border-radius: 5px; font-weight: bold;” class=”[% IF stmt_summary.net_amount > 0 %]green_number[% ELSIF stmt_summary.net_amount > 0 < 0 %]red_number[% END %]”>
[% stmt_summary.gross_amount | format(‘%.2f’) | format_number(“de”) %]
</span>
</td>
</tr>
<tr>
<td style=”border-bottom: 1px solid #828282; padding: 7px 0;”>
<span class=”grey_text”>[% IF stmt_summary.closing_balance != ‘0.00’ %]
Closing Balance
[% ELSE %]
Amount Payable
[% END %]</span>
</td>
<td style=”text-align: right; border-bottom: 1px solid #828282;”>[% IF stmt_summary.closing_balance != ‘0.00’ %]
[% stmt_summary.closing_balance | format(‘%.2f’) | format_number(“de”) %]
[% ELSE %]
[% stmt_summary.amount_payable | format(‘%.2f’) | format_number(“de”) %]
[% END %]</td>
</tr>
<tr>
<td> </td>
<td> </td>
</tr>
</tbody>
</table>
</td>
<td style=”width: 10%;”> </td>
<td style=”width: 30%; vertical-align: top;”>
<table width=”100%” border=”0″ style=”font: 10pt Roboto, Gotham, ‘Helvetica Neue’, Helvetica, Arial, ‘sans-serif’;”>
<tbody>
<tr>
<td>
<span class=”grey_text”>Date</span>
</td>
</tr>
<tr>
<td>[% data.today %]</td>
</tr>
<tr>
<td style=”line-height: 0.5;”> </td>
</tr>
<tr>
<td>
<span class=”grey_text”>Period</span>
</td>
</tr>
<tr>
<td>[% rp.start_date _’ – ‘_ rp.end_date %]</td>
</tr>
<tr>
<td style=”line-height: 0.5;”> </td>
</tr>
<tr>
<td>
<span class=”grey_text”>Statement Number</span>
</td>
</tr>
<tr>
<td>[% rp.royalty_period_id %]</td>
</tr>
<tr>
<td style=”line-height: 0.5;”> </td>
</tr>
<tr>
<td>
<span class=”grey_text”>Minimum Payment</span>
</td>
</tr>
<tr>
<td>[% stmt_summary.minimum_payment | format(‘%.2f’) | format_number(“de”) %]</td>
</tr>
<tr>
<td style=”line-height: 0.5;”> </td>
</tr>
<tr>
<td>
<span class=”grey_text”>Currency</span>
</td>
</tr>
<tr>
<td>[% data.currency_iso %]</td>
</tr>
<tr>
<td style=”line-height: 0.5;”> </td>
</tr>
</tbody>
</table>
</td>
</tr>
</tbody>
</table>
<p id=”buttons”>
<a href=”javascript:void(0)” class=”button” onclick=”window.open(window.location + ‘&’ + ‘xls=1’);”>Export Details to Excel</a>
<!– a href=”javascript:void(0)” class=”button” onclick=”window.open(‘[% invoice_external_link %]’, ‘_blank’, ‘menubar=yes,scrollbars=yes’);”>Credit Note</a>
<a href=”javascript:void(0)” class=”button”>Stock Report</a>
<a href=”javascript:void(0)” class=”button”>Digital Sales CSV</a –>
</p>
<p> </p>
<div id=”first_trailing_text” style=”padding: 20px;background-color: #f7f7f7;border-radius: 10px;opacity: 1; font: 10pt Roboto, Gotham, ‘Helvetica Neue’, Helvetica, Arial,
‘sans-serif’; color: #333;”>
[% invoice_project.trailing_text_royalty %]
</div>
</tbody>
</table>
<div class=”page-break”></div>
<table style=”width: 965px;” border=”0″>
<thead>
<tr>
<td>
<div class=”page-header2″>
[% invoice_project.header_royalty %]
</div>
</td>
</tr>
</thead>
<tbody>
<table style=”width: 100%;” border=”0″>
<tr>
<td>
<p> </p>
<p><span style=”font-size: 16pt;”>[% ra.royalty_account_name %]</span></p>
<p> </p>
</td>
</tr>
</table>
<table
style=”width: 965px; border-collapse: collapse; font: 10pt Roboto, Gotham, ‘Helvetica Neue’, Helvetica, Arial, ‘sans-serif’; color: #333; border: 0;”>
<tr>
<td style=” text-align: left; color: #999; font-weight: normal;”>Date</td>
<td style=” text-align: left; color: #999; font-weight: normal;”>Period</td>
<td style=” text-align: left; color: #999; font-weight: normal;”>Statement Number</td>
<td style=” text-align: left; color: #999; font-weight: normal;”>Minimum Payment</td>
<td style=” text-align: left; color: #999; font-weight: normal;”>Currency</td>
</tr>
<tr>
<td style=” text-align: left;”>[% data.today %]</td>
<td style=” text-align: left;”>[% rp.start_date _’ – ‘_ rp.end_date %]</td>
<td style=” text-align: left;”>[% rp.royalty_period_id %]</td>
<td style=” text-align: left;”>[% stmt_summary.minimum_payment | format(‘%.2f’) | format_number(“de”) %]</td>
<td style=” text-align: left;”>[% data.currency_iso %]</td>
</tr>
</table>
<p> </p>
<p> </p>
<table
style=”width: 965px; border-collapse: collapse; font: 9pt Roboto, Gotham, ‘Helvetica Neue’, Helvetica, Arial, ‘sans-serif’; color: #333; border: 0;”
cellpadding=”0″ cellspacing=”0″>
<tr>
<td style=” width:15%; border-bottom: 2px solid #000;”>
<span style=”text-align: left; color: #999; font-weight: normal;”>Royalty Contracts</span>
</td>
<td style=” width:8%; text-align: right; border-bottom: 2px solid #000;”>
<span style=”text-align: left; color: #999; font-weight: normal;”>Contract<br/>Opening</span>
</td>
<td style=” width:10%; text-align: right; border-bottom: 2px solid #000;”>
<span style=”text-align: left; color: #999; font-weight: normal;”>Advances/ Deductions</span>
</td>
<td style=” width:10%; text-align: right; border-bottom: 2px solid #000;”>
<span style=”text-align: left; color: #999; font-weight: normal;”>Digital Sales</span>
</td>
<td style=” width:10%; text-align: right; border-bottom: 2px solid #000;”>
<span style=”text-align: left; color: #999; font-weight: normal;”>Physical Sales</span>
</td>
<td style=” width:10%; text-align: right; border-bottom: 2px solid #000;”>
<span style=”text-align: left; color: #999; font-weight: normal;”>Return<br/>Reserve</span>
</td>
<td style=” width:9%; text-align: right; border-bottom: 2px solid #000;”>
<span style=”text-align: left; color: #999; font-weight: normal;”>Licensing</span>
</td>
<td style=” width:10%; text-align: right; border-bottom: 2px solid #000;”>
<span style=”text-align: left; color: #999; font-weight: normal;”>Performance</span>
</td>
<td style=” width:10%; text-align: right; border-bottom: 2px solid #000;”>
<span style=”text-align: left; color: #999; font-weight: normal;”>Contract<br/>Payable</span>
</td>
<td style=” width:8%; text-align: right; border-bottom: 2px solid #000;”>
<span style=”text-align: left; color: #999; font-weight: normal;”>Contract<br/>Closing</span>
</td>
</tr>
[%
SET total_opening_contract_all = 0;
SET total_advances = 0;
SET total_deductions_contract = 0;
SET total_roy_digital = 0;
SET total_roy_physical = 0;
SET total_return_reserve_amount = 0;
SET total_credit_reserve = 0;
SET total_roy_licensing = 0;
SET total_roy_performance = 0;
SET total_payment_net_all = 0;
SET total_closing_contract_all = 0;
%]
[% FOREACH row = contracts %]
[%
total_opening_contract_all = total_opening_contract_all + row.opening_contract_all;
total_advances = total_advances + row.advances;
total_deductions_contract = total_deductions_contract + row.deductions_contract;
total_roy_digital = total_roy_digital + row.roy_digital;
total_roy_physical = total_roy_physical + row.roy_physical;
total_return_reserve_amount = total_return_reserve_amount + row.return_reserve_amount;
total_credit_reserve = total_credit_reserve + row.credit_reserve;
total_roy_licensing = total_roy_licensing + row.roy_licensing;
total_roy_performance = total_roy_performance + row.roy_performance;
total_payment_net_all = total_payment_net_all + row.payment_net_all;
total_closing_contract_all = total_closing_contract_all + row.closing_contract_all;
%]
<tr>
<td style=” text-align: left; border-bottom: 1px solid #ddd;”>
<a href=”javascript:void(0)” style=”color: #007bff; text-decoration: none;” class=”contract-level-display” contract_id=”[% row.contract_id %]”
contract_period_id=”[% row.contract_period_id %]”>
[% row.contract_name %]
</a>
</td>
<td style=” text-align: right; border-bottom: 1px solid #ddd; padding: 15px 0px;”>[% (row.opening_contract_all || 0) | format(‘%.2f’) | format_number(“de”) %]</td>
<td style=” text-align: right; border-bottom: 1px solid #ddd;”>[% (row.advances || 0) | format(‘%.2f’) | format_number(“de”) %]<br>[% (row.deductions_contract || 0) |
format(‘%.2f’) | format_number(“de”) %]</td>
<td style=” text-align: right; border-bottom: 1px solid #ddd;”>[% (row.roy_digital || 0) | format(‘%.2f’) | format_number(“de”) %]</td>
<td style=” text-align: right; border-bottom: 1px solid #ddd;”>[% (row.roy_physical || 0) | format(‘%.2f’) | format_number(“de”) %]</td>
<td style=” text-align: right; border-bottom: 1px solid #ddd;”>[% (row.return_reserve_amount || 0) | format(‘%.2f’) | format_number(“de”) %]<br>[% (row.credit_reserve || 0) |
format(‘%.2f’) | format_number(“de”) %]</td>
<td style=” text-align: right; border-bottom: 1px solid #ddd;”>[% (row.roy_licensing || 0) | format(‘%.2f’) | format_number(“de”) %]</td>
<td style=” text-align: right; border-bottom: 1px solid #ddd;”>[% (row.roy_performance || 0) | format(‘%.2f’) | format_number(“de”) %]</td>
<td style=” text-align: right; border-bottom: 1px solid #ddd; font-weight: bold;”>[% (row.payment_net_all || 0) | format(‘%.2f’) | format_number(“de”) %]</td>
<td style=” text-align: right; border-bottom: 1px solid #ddd;”>[% (row.closing_contract_all || 0) | format(‘%.2f’) | format_number(“de”) %]</td>
</tr>
[% END %]
<tr>
<td style=” text-align: left; border-top: 2px solid black; padding: 15px 0px;”><a href=”#” style=”color: #000; text-decoration: none;”><strong>Total</strong></a></td>
<td style=” text-align: right; border-top: 2px solid black;”>[% total_opening_contract_all | format(‘%.2f’) | format_number(“de”) %]</td>
<td style=” text-align: right; border-top: 2px solid black;”>[% total_advances | format(‘%.2f’) | format_number(“de”) %]<br>[% total_deductions_contract | format(‘%.2f’) |
format_number(“de”) %]</td>
<td style=” text-align: right; border-top: 2px solid black;”>[% total_roy_digital | format(‘%.2f’) | format_number(“de”) %]</td>
<td style=” text-align: right; border-top: 2px solid black;”>[% total_roy_physical | format(‘%.2f’) | format_number(“de”) %]</td>
<td style=” text-align: right; border-top: 2px solid black;”>[% total_return_reserve_amount | format(‘%.2f’) | format_number(“de”) %]<br>[% total_credit_reserve | format(‘%.2f’) |
format_number(“de”) %]</td>
<td style=” text-align: right; border-top: 2px solid black;”>[% total_roy_licensing | format(‘%.2f’) | format_number(“de”) %]</td>
<td style=” text-align: right; border-top: 2px solid black;”>[% total_roy_performance | format(‘%.2f’) | format_number(“de”) %]</td>
<td style=”border-radius: 5px; color: #333; font-weight: bold; text-align: right; border-top: 2px solid black;”>
<span style=”background-color: #e0f5e0; “><strong>[% total_payment_net_all | format(‘%.2f’) | format_number(“de”) %]</strong></span>
</td>
<td style=” text-align: right; border-top: 2px solid black;”><strong>[% total_closing_contract_all | format(‘%.2f’) | format_number(“de”) %]</strong></td>
</tr>
</table>
</tbody>
</table>
</td>
</tr>
</tbody>
►
</table>
►
<div id=”footer”>
<table style=”width: 965px; font: 10pt Roboto, Gotham, ‘Helvetica Neue’, Helvetica, Arial, ‘sans-serif’;” border=”0″>
<tbody>
<tr>
<td style=”width: 100%; text-align: right;” class=”grey_text”>royalty processing by <a href=”https://www.details.eu”>www.details.eu</a></td>
</tr>
</tbody>
</table>
</div>
<script type=”text/javascript”>
document.addEventListener(‘DOMContentLoaded’, function() {
let load_data = false;
if (!load_data) {
load_data = true;
document.addEventListener(‘click’, function(evt) {
if (evt.target && evt.target.classList.contains(‘contract-level-display’)) {
let url = location.href;
let matches = url.match(/(.*/)(.*)/);
let main_part = matches[1];
let arr = matches[2].split(‘&’);
for (let i = 0; i < arr.length; i++) {
if (arr[i].match(‘action’)) {
arr[i] = ‘action=contract_level_display’;
}
}
let contract_period_id = evt.target.getAttribute(‘contract_period_id’);
arr.push(`contract_period_id=${contract_period_id}`);
url = main_part + arr.join(‘&’);
window.open(url, “_blank”);
}
});
}
});
</script>
</body>
</html>
This section displays details for a selected single contract.
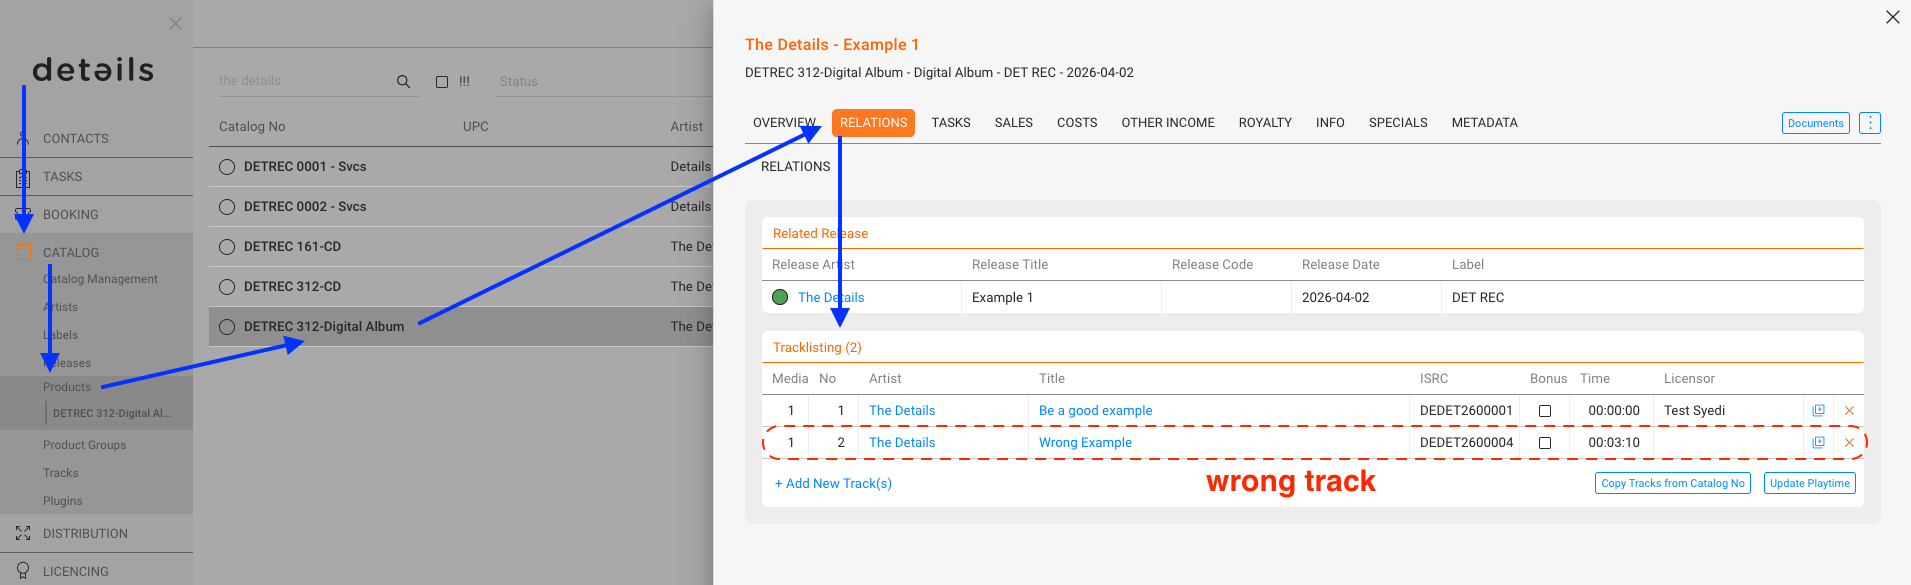
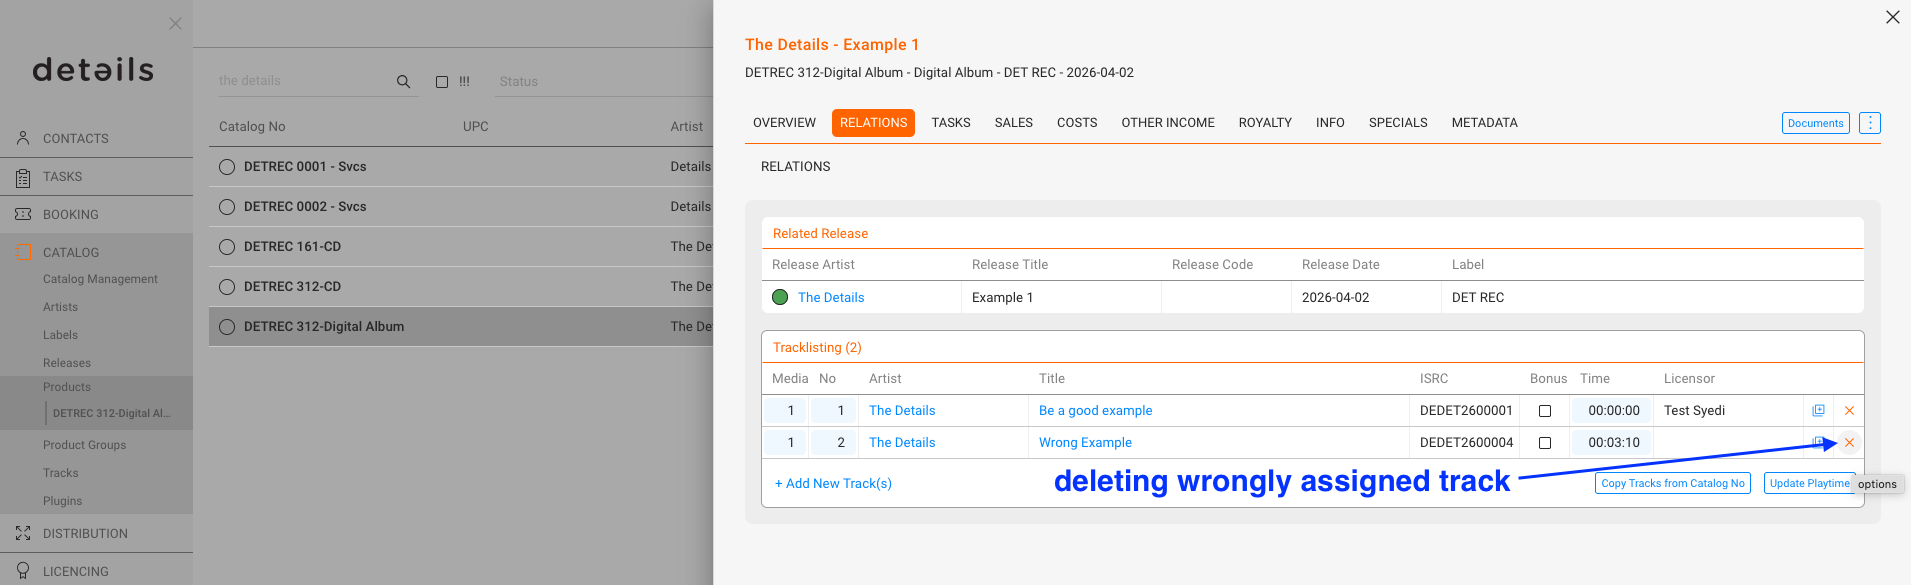
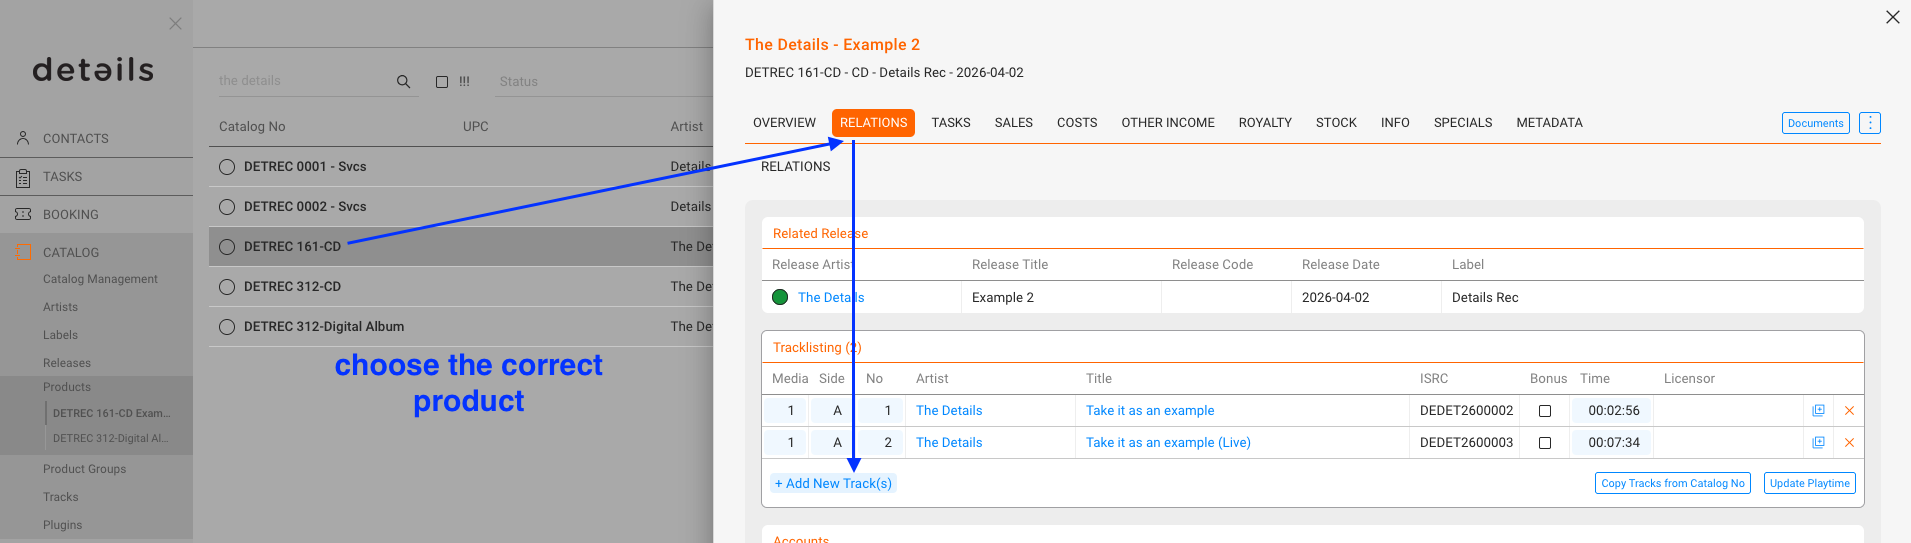
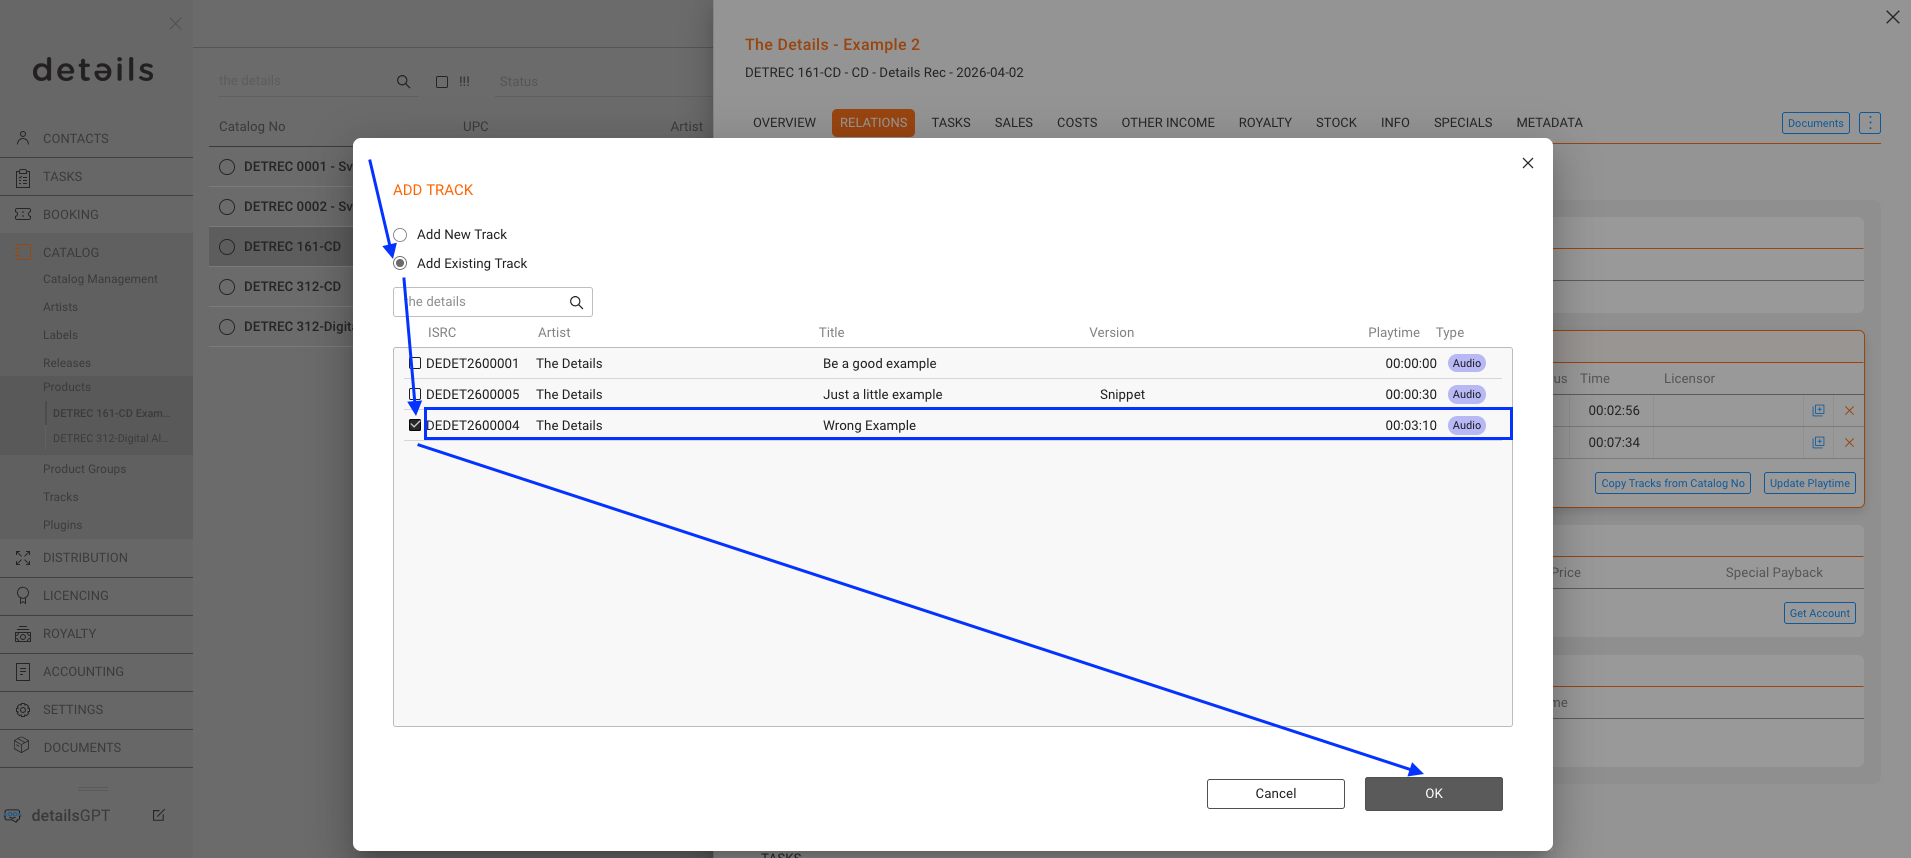
The Product Track List allows you to update, add, or move tracks between products in CATALOG / PRODUCTS. This is useful when correcting product assignments or adjusting track lists after release planning.
Merging releases is a smart way to clean up duplicates and unify your catalog.
Use this tool to combine two releases that refer to the same record but may differ in metadata, contract assignment, or track structure.
You’ll find the Merge Releases function in CATALOG MANAGEMENT / CLEAN CATALOG.
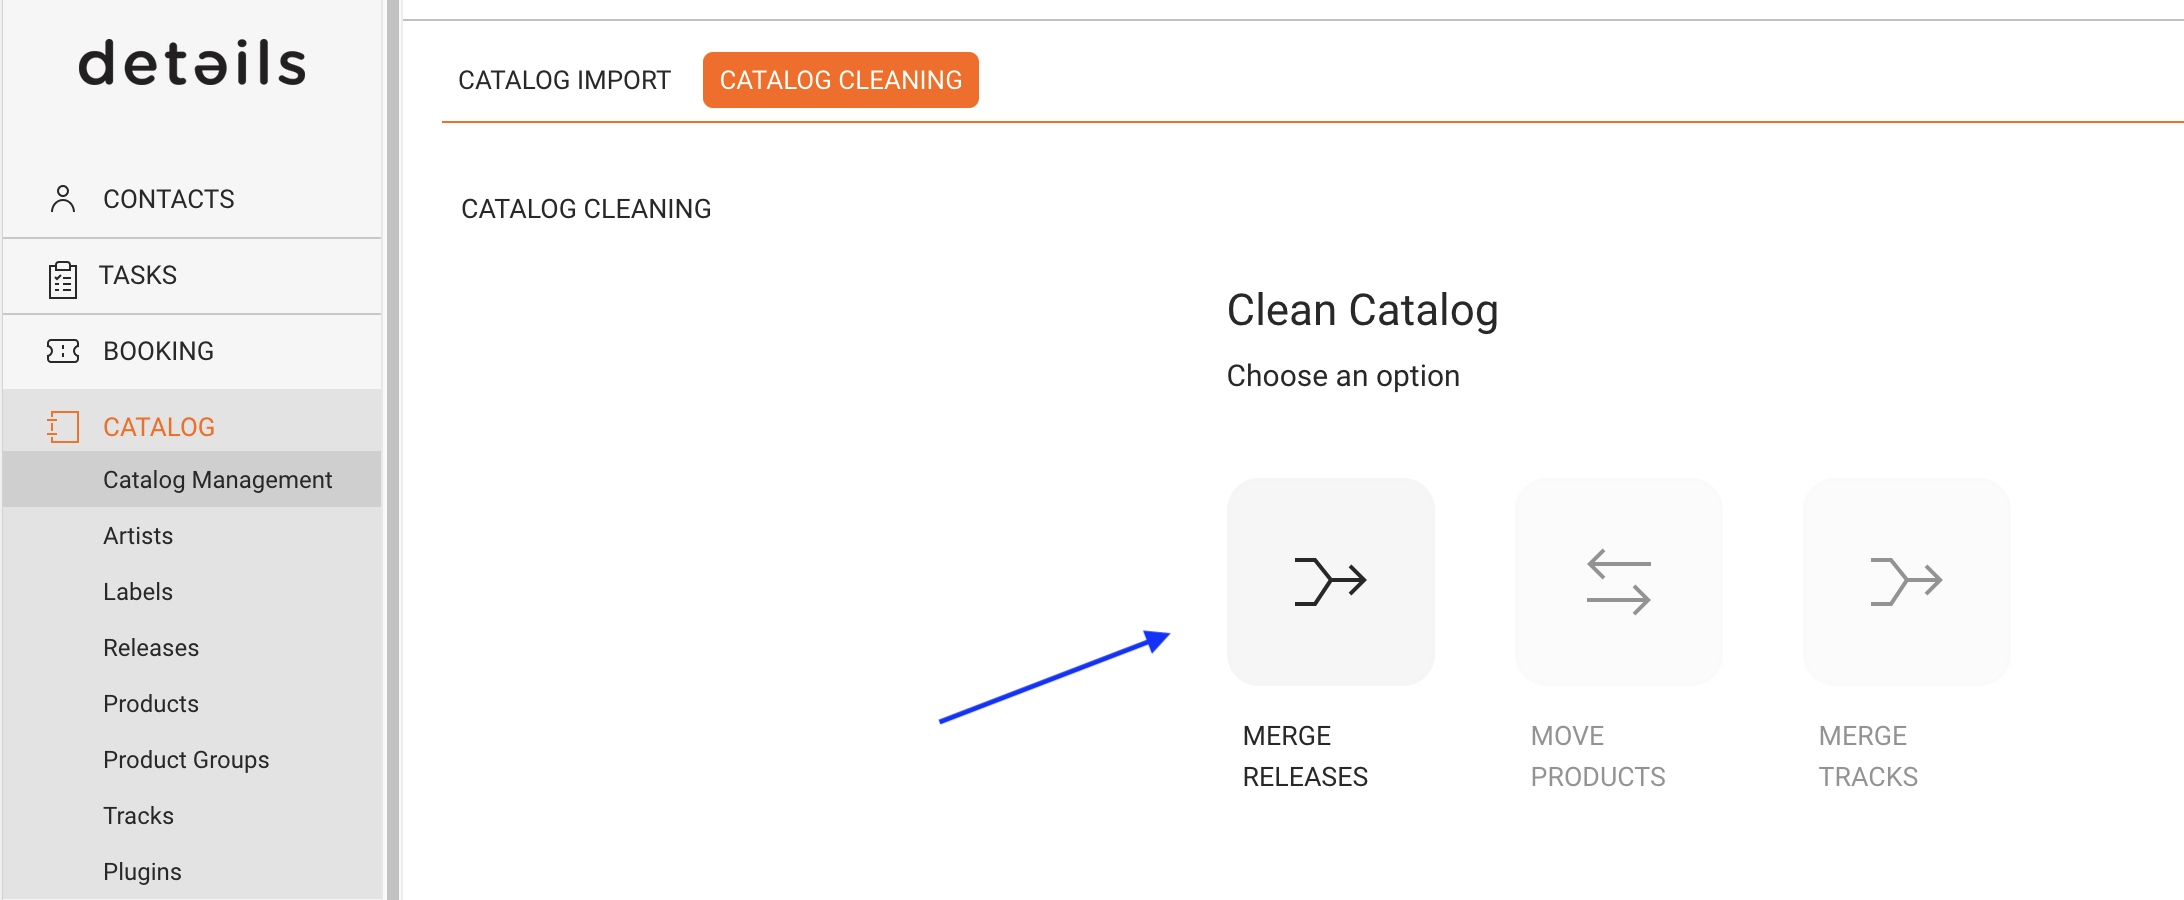
To begin, click [MERGE RELEASES]. A side window opens.
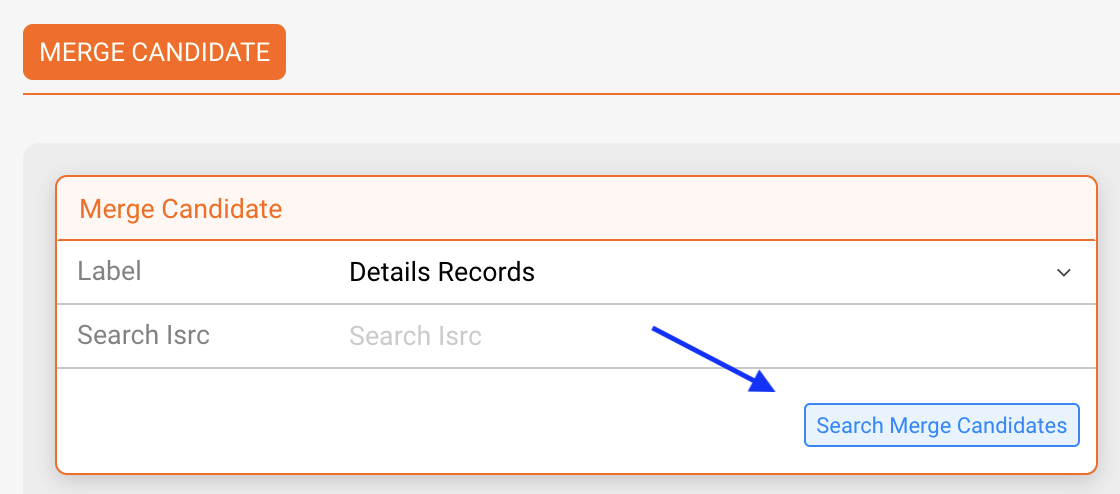
To narrow down your results, either use the dropdown to select the label whose releases you want to check or enter an ISRC to find all releases containing a specific track. Then click [SEARCH MERGE CANDIDATES].
When you click [SEARCH], details will show you a list of releases that could potentially be merged. From the results table, choose:
Use the radio buttons in each row to mark your choices.
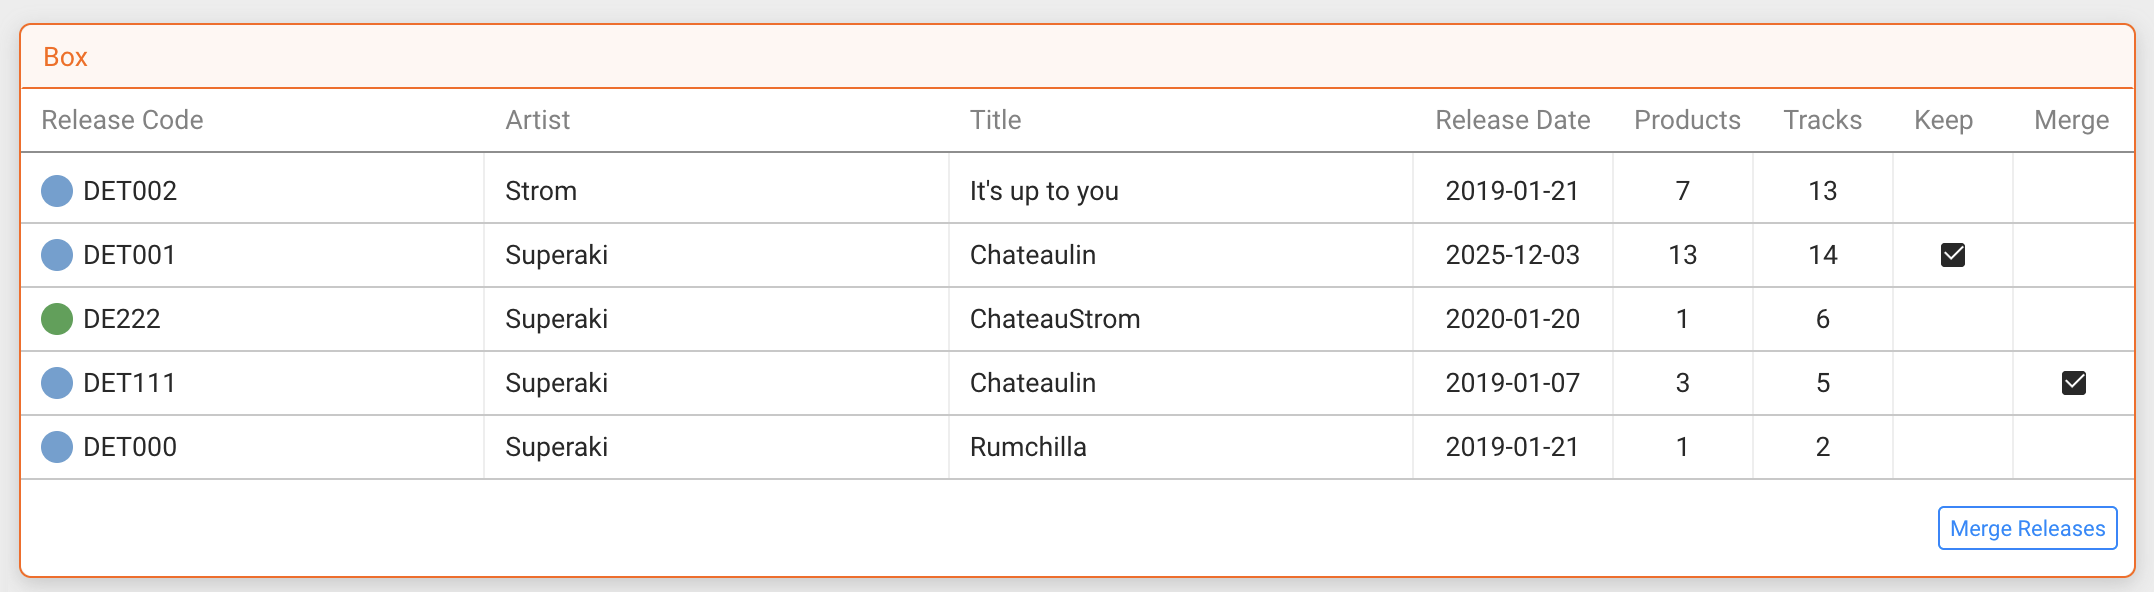
If the two selected releases have different contract settings, you’ll see a warning. Here you can either:
If there are no conflicts, a confirmation modal will appear showing both releases side by side:
Click [CONFIRM MERGE] to proceed.
After merging, the system may prompt you to complete the process by handling missing contract data. Follow the modals that appear:
If new tracks were introduced, you’ll be asked to assign them to contracts. Click [ADD TO CONTRACT] to complete this step, or [CANCEL] to abort.
If product-level data is missing, the system will show a list of items needing updates. Review and click [ADD TO CONTRACT].
If needed, you’ll see a list of tracks without contract assignments. This is only for your reference. Click [OK] to close the modal.
Your selected releases have now been merged. All tracks, products, and metadata from the merged release have been moved to the kept release. You can now manage this unified release as usual.
Let us know if you encounter errors or unexpected behaviors. Our support team is happy to assist.
The Track API allows external systems to access track-level metadata stored in your details database. It is ideal for synchronizing catalog data, powering dashboards, or enabling custom integrations with other tools in your workflow.
The Track API returns track metadata stored in your database, including but not limited to:
The data is returned as structured JSON, ready for use in your own apps or services.
The Track API is suitable for:
Each client has a unique API key and endpoint. To find yours:
All API calls require your client-specific api_key. This key should be treated as a secret and must be included as a query parameter in every request:
?api_key=<your_key>
https://api.berlin3.com/api/<clientID>/?action=tracks&api_key=<your_key>
{
  "status": "ok",
  "results": [
    {
      "track_id": 14532,
      "uuid": "e73b8f30-b07d-4a68-8a6d-219ab9f9f742",
      "title": "The Story",
      "version": "Remastered",
      "artist": "Side Effect",
      "isrc": "FR9W12012717",
      "playtime": "00:03:45",
      "created": "2024-12-01T10:12:34Z",
      "last_modified": "2025-03-02T08:41:00Z"
    },
    ...
  ]
}
| Field | Type | Description |
|---|---|---|
track_id |
integer | Internal ID of the track |
uuid |
string | Globally unique identifier for the track |
title |
string | Track title |
version |
string | Version info (e.g. Edit, Remix, Remastered) |
artist |
string | Name of the track’s artist |
isrc |
string | International Standard Recording Code |
playtime |
string | Duration in format HH:MM:SS |
created |
datetime | Timestamp when the track was created |
last_modified |
datetime | Timestamp of last update |
The API returns an array of matching tracks inside the results field. The status field confirms the success of the request.
If you have questions about usage, performance, or custom integrations, feel free to contact our team at label_team@detailsdetails.eu.
Let details work for you.
If you’re having issues with your details account for example, calendars not downloading or your computer getting stuck in old patterns (which can slow down your software) it might help to refresh your cache memory.
The following steps show you how to do this in Firefox on a Mac. If you re using Windows, the steps look very similar only the layout might differ a little.
Other browsers (like Chrome) offer a similar option, usually found under a section called Privacy or Security. You re looking for something like clear browsing data or delete cached content.
Here s how to do it in Firefox on a Mac:
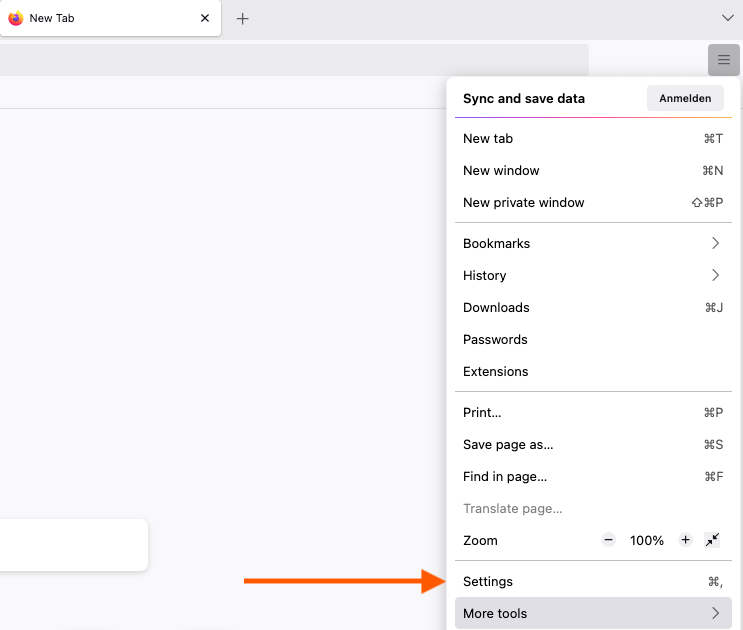
1. Open Firefox and go to Settings
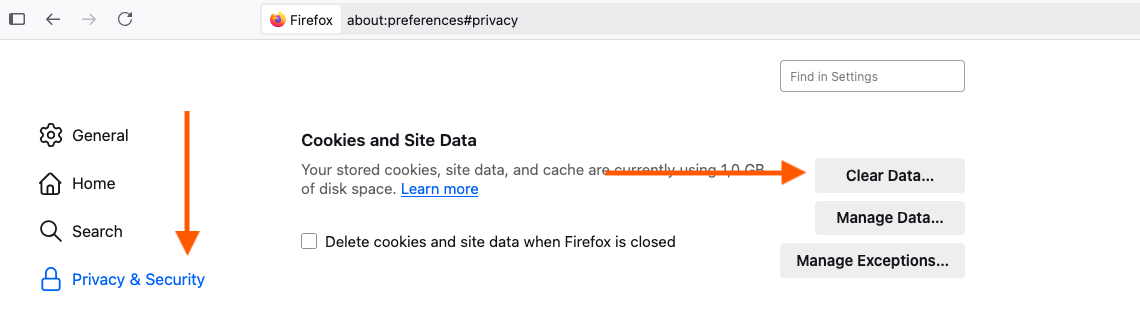
2. Select Privacy & Security, then go to Cookies and Site Data and click on Clear Data
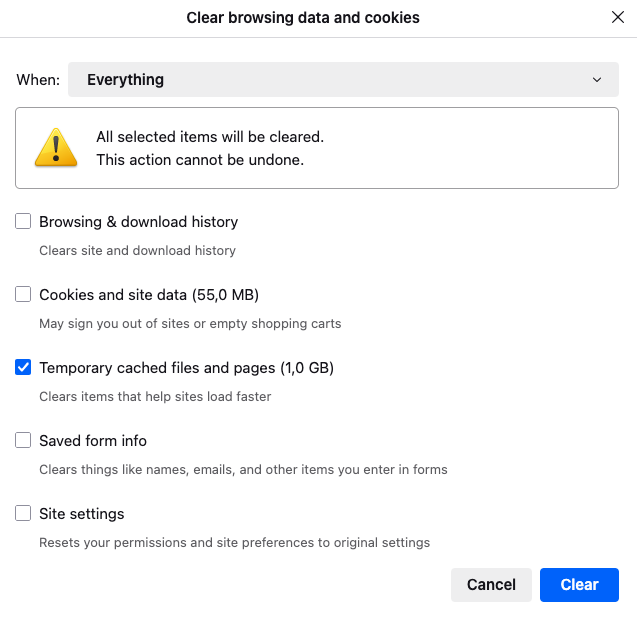
3. Tick the box for Cached Web Content and click Clear
That s it!
Want to know more about what a cache is? Have a look at this article.
A core functionality of our BOOKING module is to pull data from your bookings into templates for contracts, itineraries etc.
This article will explain you how this works:
1) The first step on the way from a booking to a fully featured template is to create a booking.
It is on the subtab “Documents” of any booking that you will be able to create documents such as contracts, itineraries, etc.
Obviously without a booking there will be no contract or itinerary.
There are two ways to create new bookings:
* create it manually by clicking on the Plus icon on any day in the Booking Calendar and work through the 4 steps of what we call the Booking Wizard (a. Date, City, Artists / b. Venue / c. Promoter / d. Contact)
* process an incoming Booking Request
Both workflows will already collect tons of information which you will be able to use for your documents later, for example
– the date
– the city and country
– the selected artist with all related infos
– the selected venue with all related infos
– the selected promoter with all related infos
– the selected contact with all related infos
All of these information can be pulled into your documents through your Templates
The way this works is that you can place variables in your templates that will be pulled for the specific document you are working on. You can find a list of all available standard variables here
2) Now in addition to standard information details also allows you to create custom fields.
Examples for custom fields are all custom fields from REQUEST SETTINGS and LOCAL DETAILS SETTINGS: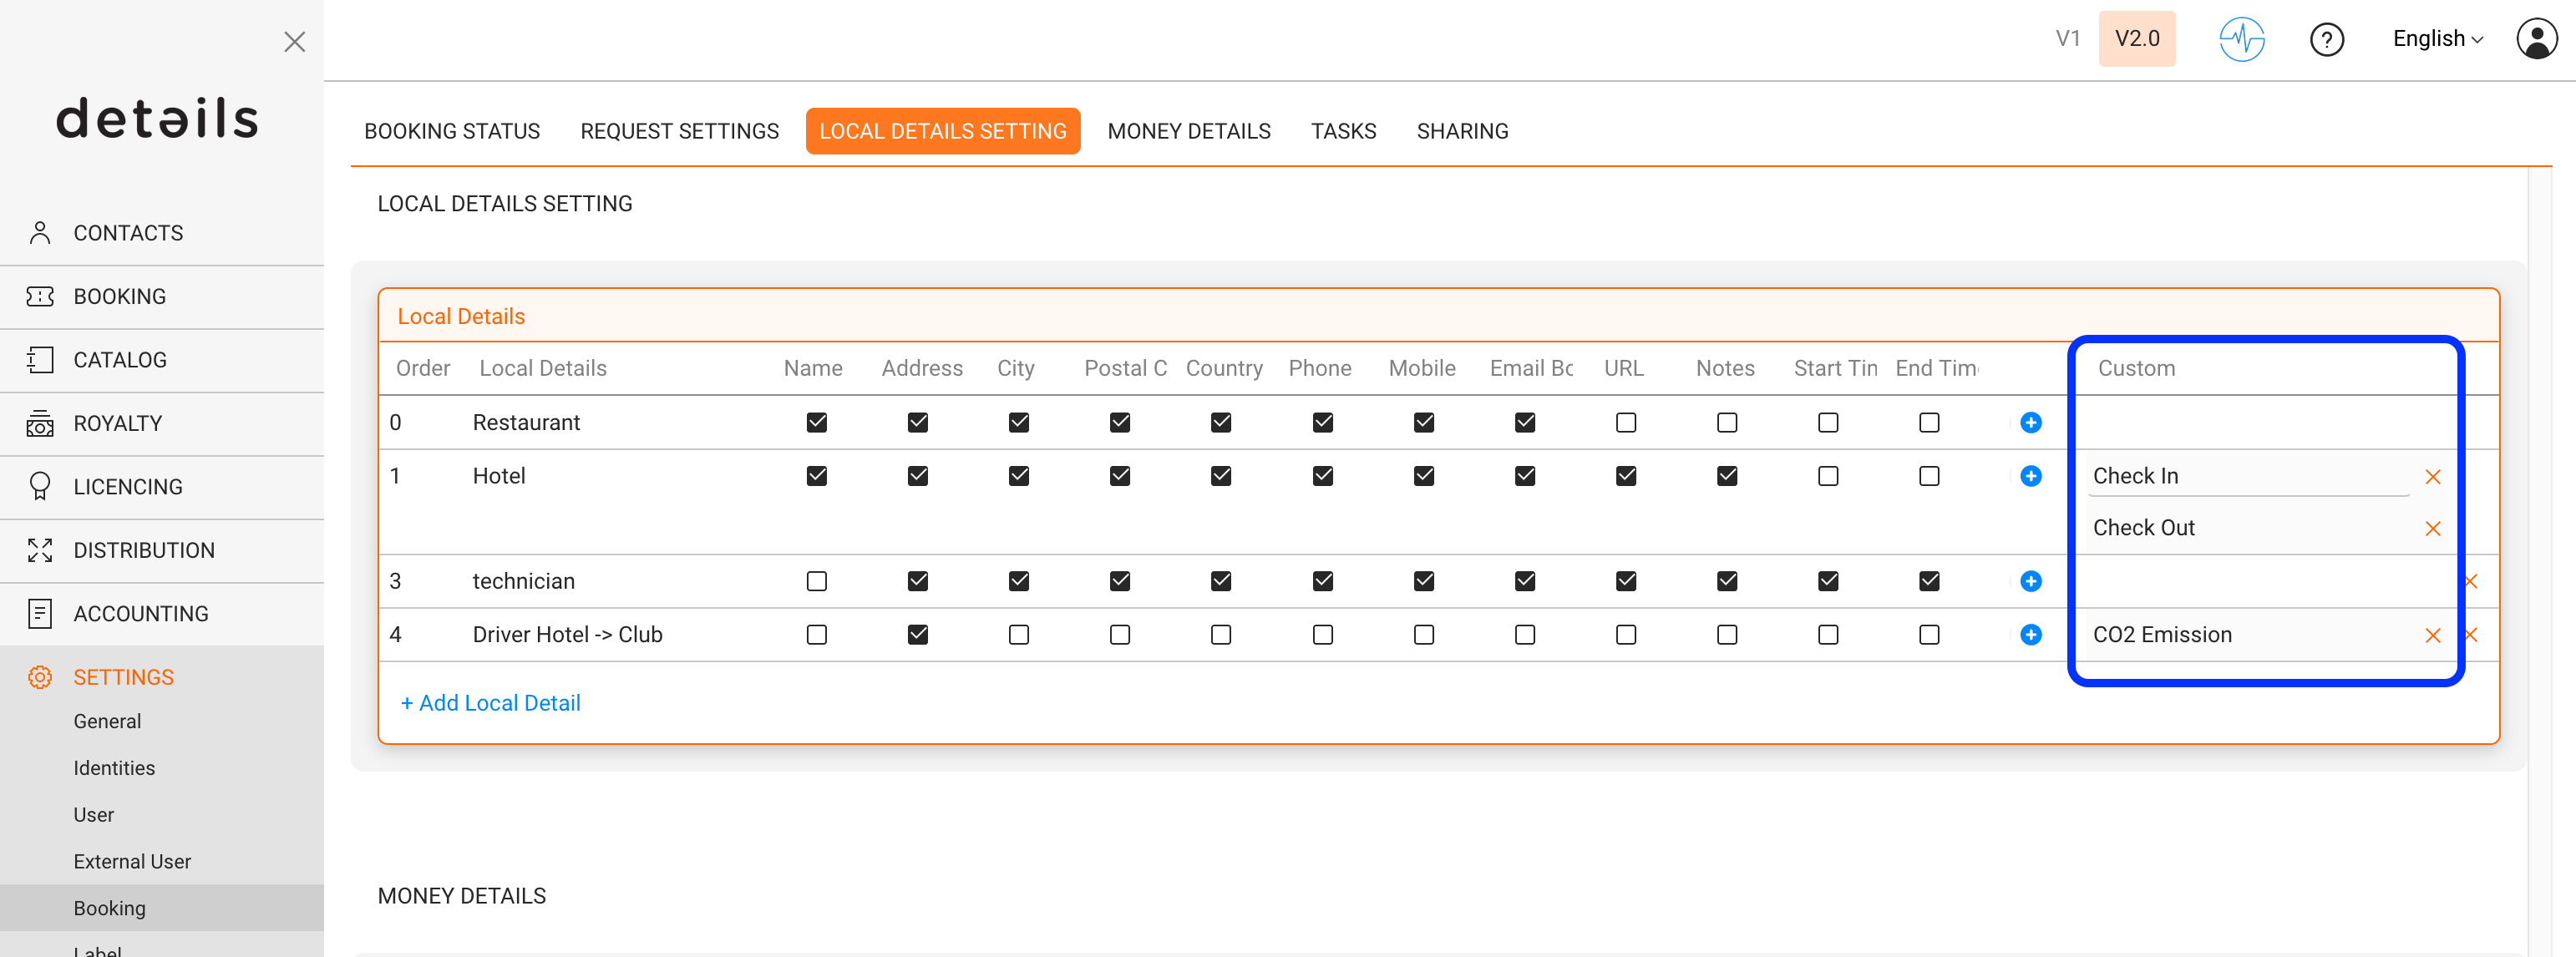
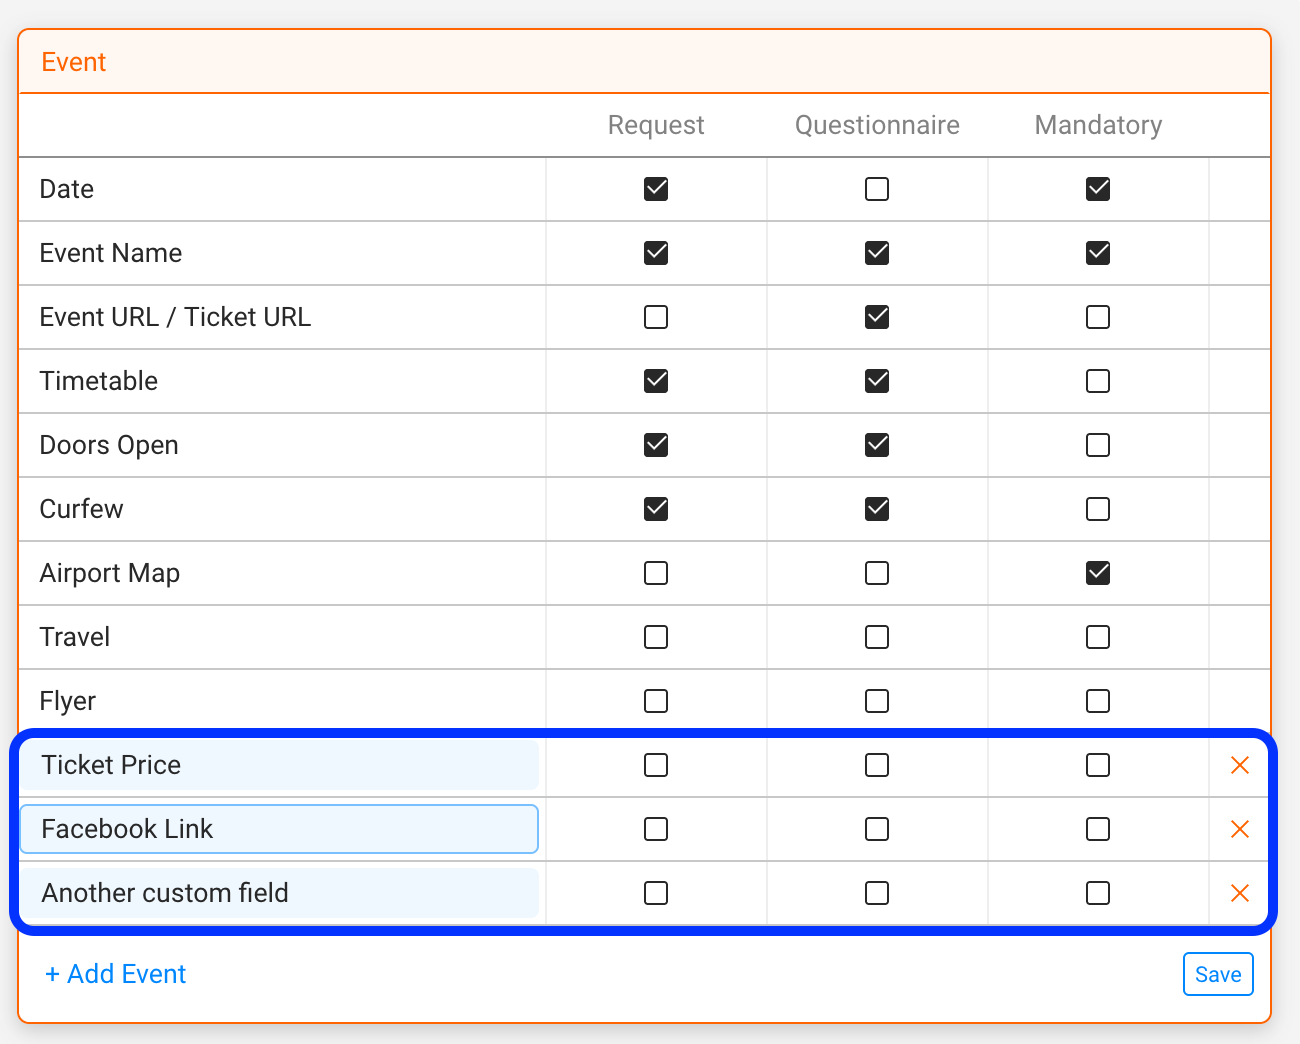
Each of those fields will automatically make their a specific custom variables available.
The custom variables for the custom fields “Ticket Price”, “Facebook Link” and “Custom field” would be
[% ph.custom(‘Ticket Price’,’calendar_dates’) %]
[% ph.custom(‘Facebook Link’,’calendar_dates’) %]
[% ph.custom(‘Another custom field’,’calendar_dates’) %]
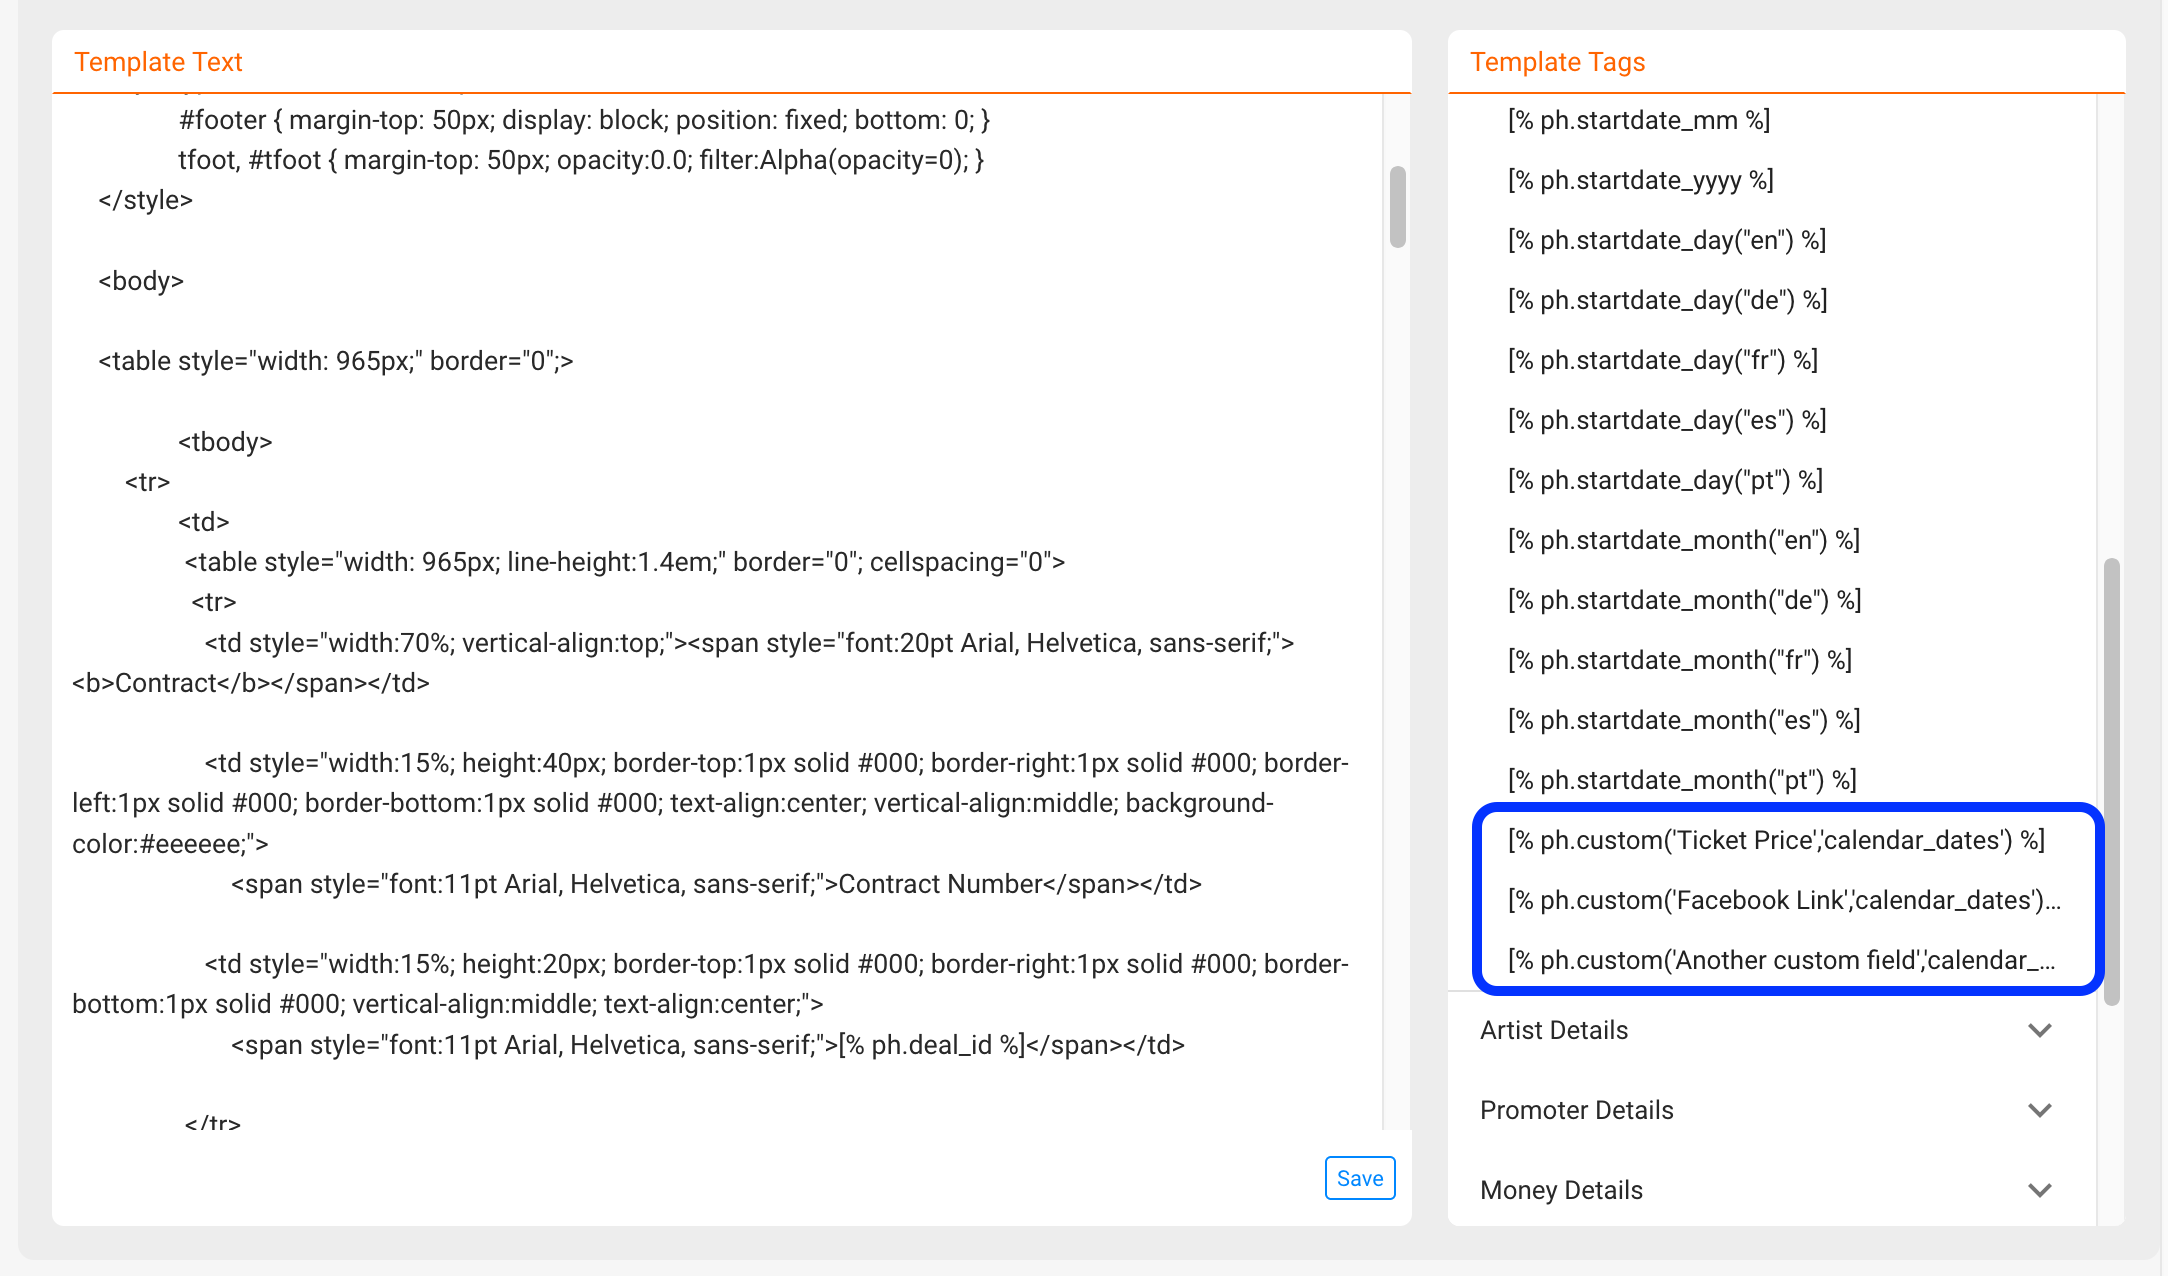
NOTE: Please remember that the custom variables include the NAME of the custom field.
This also means that whenever you change the name of a field, you will change the custom variable and variables will only pull data from a field if the name is identical.
In other words: If you change the names of your custom fields, the custom variables will need to be adapted as well!
Old custom variables will not work once you change the field names!
3) The third and last step to understand how data is pulled into documents is how to include variables into TEMPLATES.
A detailed description of how variables are included in contracts can be found HERE.
Those articles also include a lot of tips and tricks to use additional logic in the templates such as specific date formats, IF ELSE clauses etc.
The Bandcamp Plugin in details allows you to synchronize and manage sales and catalog data between your details account and your Bandcamp store. It is designed for labels and distributors who sell music or merchandise directly via Bandcamp while keeping all reporting and royalty data centralized in details.
The plugin connects Bandcamp’s sales and product data to details through automated imports. It enables the synchronization of catalog entries, sales reports, and accounting data to ensure that your Bandcamp activity is reflected accurately in your royalty statements.
This plugin is available under DISTRIBUTION / PLUGINS. Once activated, it appears as a separate module within the DISTRIBUTION section.
To activate and configure the plugin:
The connection allows details to pull sales reports and catalog data directly from your Bandcamp shop, keeping both systems aligned.
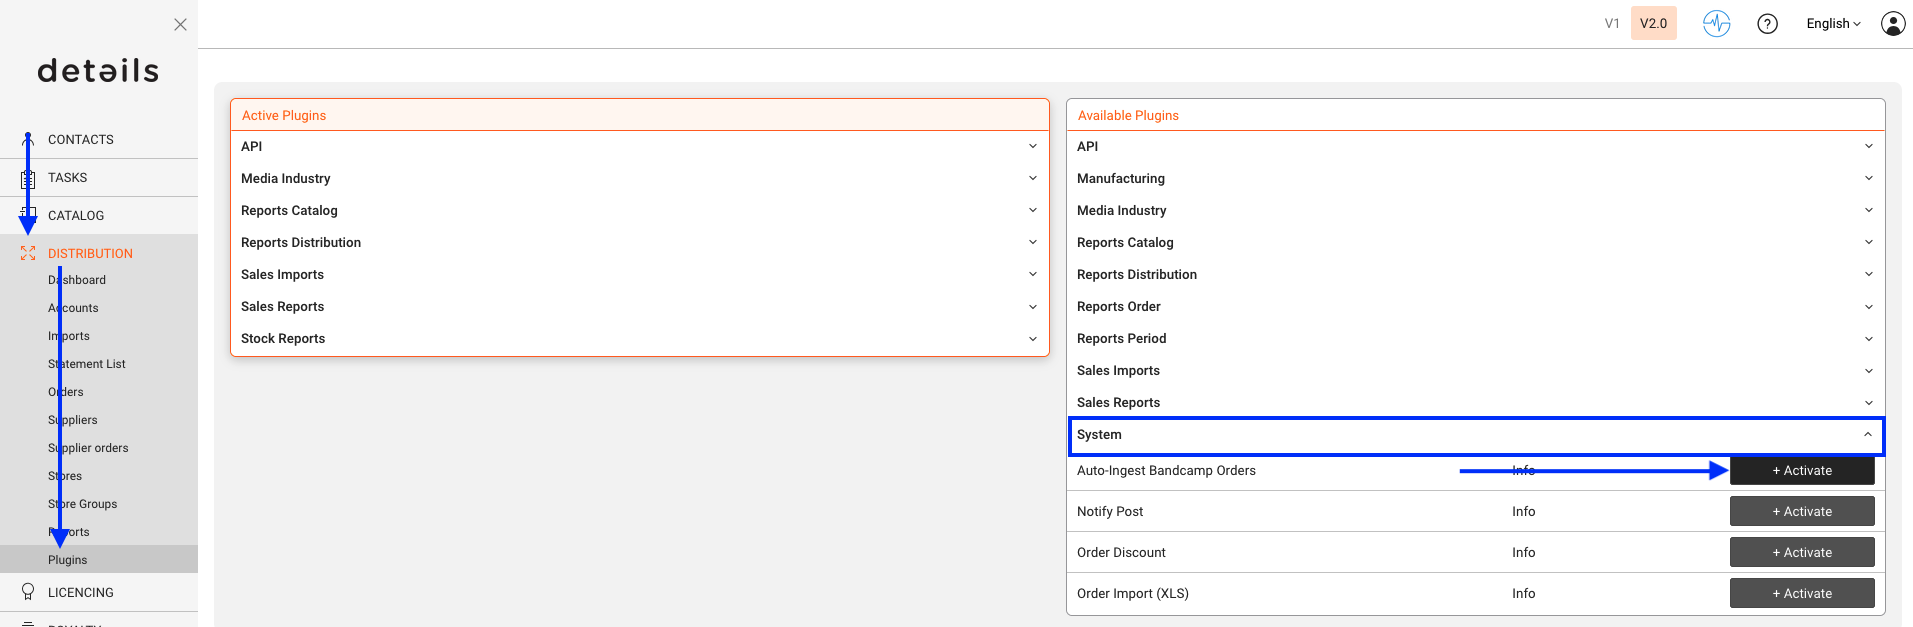
Once activated and connected, the Bandcamp Plugin performs two key functions:
Each import session generates a report under DISTRIBUTION / SALES IMPORTS, showing the number of matched, unmatched, and newly created entries. Unmatched lines can be manually linked to existing products or ignored if not relevant.
The Bandcamp Plugin is intended for labels and distributors managing their own Bandcamp accounts. It does not support artist sub-accounts or third-party Bandcamp logins.
Automatic imports rely on your Bandcamp data export settings. Ensure your Bandcamp account has report access and that your login or token remains valid. If an import fails, check your API credentials or reauthorize the plugin.
The plugin is optimized for catalog synchronization and royalty reporting, not for direct content uploads or price management. Those actions must still be performed directly on Bandcamp.
With the Bandcamp Plugin, your Bandcamp sales and catalog data stay in sync with details, ensuring complete and accurate royalty management for your artists and partners.