Order API (V1) – How to import Orders via JSON


How to import orders via the Order API (V1)

Use this guide to send orders into details via a POST request. This article documents the Order API V1.0 (2023) and keeps the V1 behavior.

Note: The endpoint expects a JSON array of orders in the request body. Identifiers can be provided as UUID, barcode, or catalog_no. Barcodes must be unique.

Where to find the endpoint

Go to SETTINGS / SHARING and open the open api box named [JSON Orders Import].

Endpoint & URL format

Base URL:

https://openapi.berlin3.com:10000/orders/json_import/

Path format (with credentials):

https://api.berlin3.com:10000/api/orders/json_import/<client_id>/<checksum>

Quick start

  1. Generate or locate your <client_id> and <checksum> in SETTINGS / SHARING.
  2. Build your POST request to the URL format above.
  3. Set header Content-Type: application/json.
  4. Send a JSON array of order objects in the request body.

Request parameters

Parameter Description In Expected Value
client_id Unique client identifier path details client_id
checksum API key path details open api key
params Array of orders body JSON

Payload schema (field overview)

Each order is an object. The table below lists available fields. Mandatory fields must be present in every order.

API Field Name Mandatory / Optional Data Type Expected Value Field Description
order_date Mandatory string YYYY-MM-DD Date of the order.
account_id Mandatory integer min e 1 Internal ID of the account.
contra_account_id Mandatory integer   Internal ID of the contra account.
invoice_project_id Mandatory integer   Internal ID of the invoicing project.
vat_handling Mandatory integer 1, 2, 3 1 = excluding VAT, 2 = including VAT, 3 = no VAT.
vat_territory Mandatory string   Territory for VAT calculation.
vat_rate1 Mandatory number   Primary VAT rate.
vat_rate2 Mandatory number   Secondary VAT rate.
orderlines   array   Line items of the order (see fields below).
shipping_type_id Optional integer   Internal ID of shipping type.
order_value Optional number   Total order value.
uuid / barcode / catalog_no Optional string   Item identifiers. Barcodes must be unique.

cURL example

curl -X POST 
  "https://api.berlin3.com:10000/api/orders/json_import/<client_id>/<checksum>" 
  -H "Content-Type: application/json" 
  -d '[
    {
      "order_date": "2015-06-01",
      "account_id": 167,
      "contra_account_id": 2,
      "invoice_project_id": 4,
      "currency": "EUR",
      "order_type": 1,
      "vat_handling": 1,
      "vat_territory": "EU",
      "vat_rate1": 19,
      "vat_rate2": 0,
      "orderlines": [
        {"uuid": "b1862090-469e-4035-a073-9f106d270502", "ppu": 12.50, "order_qty": 1},
        {"uuid": "c796d64c-90c6-493f-a8ea-0f244904069b", "ppu": 10.90, "order_qty": 3}
      ]
    }
  ]'

JSON schema (V1)

{
  "$schema": "http://json-schema.org/draft-07/schema#",
  "title": "import orders",
  "description": "import orders from json",
  "type": "array",
  "items": {
    "type": "object",
    "required": [
      "order_date",
      "account_id",
      "contra_account_id
How to sync your catalog and webshop orders via API


Use the Webshop API in details to (1) expose your catalog to a webshop and (2) push webshop orders into details for stock, invoicing, and reporting.

Important: The endpoints and keys below are examples. Replace placeholders like {API_KEY}, {ACCOUNT_ID}, etc. with your actual credentials and IDs. Keep your API key secret.

OVERVIEW

  • Catalog ► Webshop (GET): Provide Labels, Releases, Products, and Tracks as JSON feeds.
  • Webshop ► details (PUSH): Create orders in details via a parameterized request.

► Catalog export (GET endpoints)

Expose your catalog to the webshop via these read-only endpoints. The response format is JSON.

Labels

https://api.berlin3.com/api/noton/?action=labels&api_key={API_KEY}

Releases

https://api.berlin3.com/api/noton/?action=releases&api_key={API_KEY}

Products

https://api.berlin3.com/api/noton/?action=products&api_key={API_KEY}

Tracks

https://api.berlin3.com/api/noton/?action=tracks&api_key={API_KEY}

► Receive webshop orders (PUSH)

Create an order in details by calling the addOrder endpoint with URL parameters.

Endpoint

https://api.berlin3.com/api/noton/?action=addOrder&api_key={API_KEY}&account_id={ACCOUNT_ID}&invoice_project_id={INVOICE_PROJECT_ID}&webshop_order_id={SHOP_ORDER_NO}&internal_notes={NOTES}&order_date={YYYY-MM-DD}&order_type={ORDER_TYPE}&status={STATUS}&payment_method_id={PAYMENT_METHOD_ID}&currency_id={CURRENCY_ID}&vat_handling={VAT_MODE}&customer_no={CUSTOMER_NO}&email1={EMAIL}&company_name={COMPANY}&last_name={LAST_NAME}&address1={ADDRESS1}&city={CITY}&postalcode={POSTALCODE}&region={REGION}&country={COUNTRY}&order_source={ORDER_SOURCE}&contra_account_id={CONTRA_ACCOUNT_ID}&deliver_address_type=Address&deliver_name={DELIVER_NAME}&deliver_company={DELIVER_COMPANY}&deliver_address1={DELIVER_ADDRESS1}&deliver_city={DELIVER_CITY}&deliver_postalcode={DELIVER_POSTALCODE}&deliver_country={DELIVER_COUNTRY}&shipping_costs={SHIPPING}&order_value={ORDER_VALUE}&orderLines={PRODUCT_UUID}|{QTY}|{PPU}|1[&orderLines=...]

Tip: You can repeat orderLines multiple times to add more items.

Parameter reference

Parameter Description Example
api_key Your authentication token {API_KEY}
account_id Distribution account to book against {ACCOUNT_ID}
invoice_project_id Invoice project used for the order {INVOICE_PROJECT_ID}
order_type Order type identifier 1
status Initial order status open
payment_method_id Payment method (see table below) 1
currency_id Currency identifier 1
vat_handling VAT mode (1=including VAT, 3=no VAT) 1
orderLines One line per product: product_uuid|QTY|PPU|1 ab12cd...|2|12.00|1

Payment methods

ID Name
1 CREDIT CARD
2 SEPA LASTSCHRIFT
3 PAYPAL
4 BARZAHLUNG
5 VORKASSE

Order lines format

Each orderLines parameter represents one item in the order with the following pipe-separated format:

orderLines={PRODUCT_UUID}|{QTY}|{PPU}|1
  • {PRODUCT_UUID} the product UUID (fetch via the Products API).
  • {QTY} quantity.
  • {PPU} price per unit (net or gross depending on vat_handling).
  • 1 reserved constant.

VAT handling

vat_handling accepts these values:

  • 1 including VAT
  • 3 no VAT

How to import your catalog via IDOL Labelcamp

The Labelcamp Import feature is available in the Catalog Management section of details.

It allows you to connect your IDOL Labelcamp account and ingest new catalogue entries into your database all with a single click.

This import tool is designed to simplify catalogue updates and eliminate manual data entry. It supports automatic matching for products and tracks to prevent duplicates.


 How to Import Your Catalogue

Steps

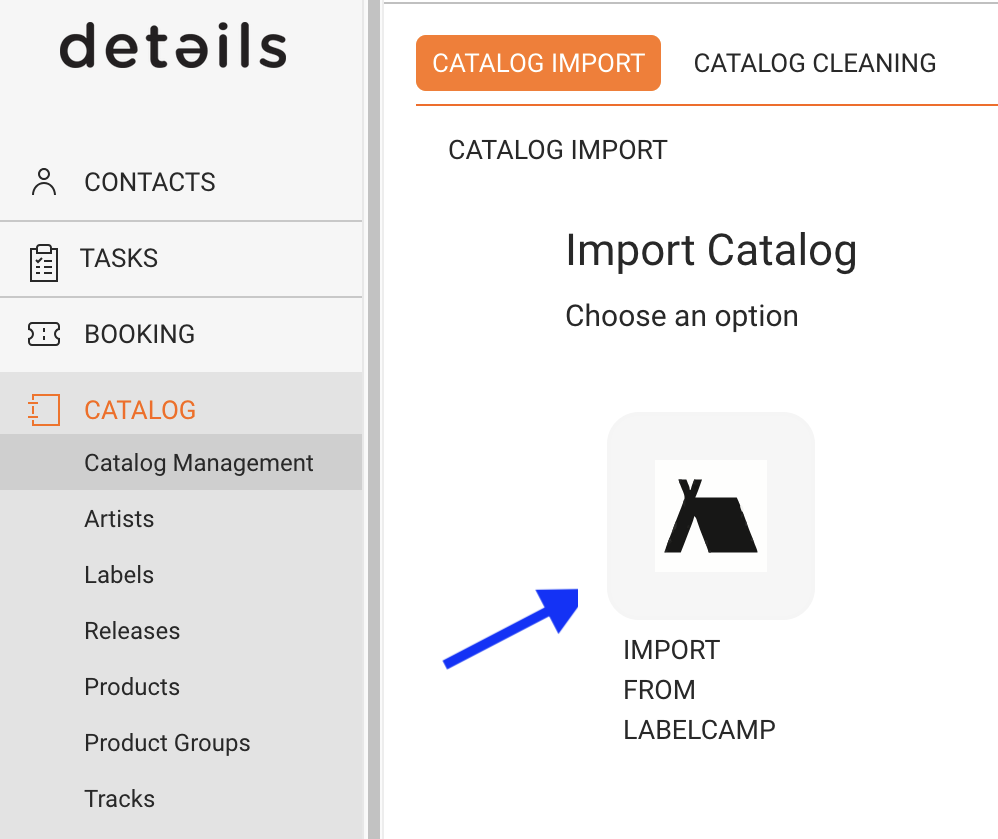
  1. Go to CATALOG > MANAGEMENT.
  2. Select Labelcamp Import.
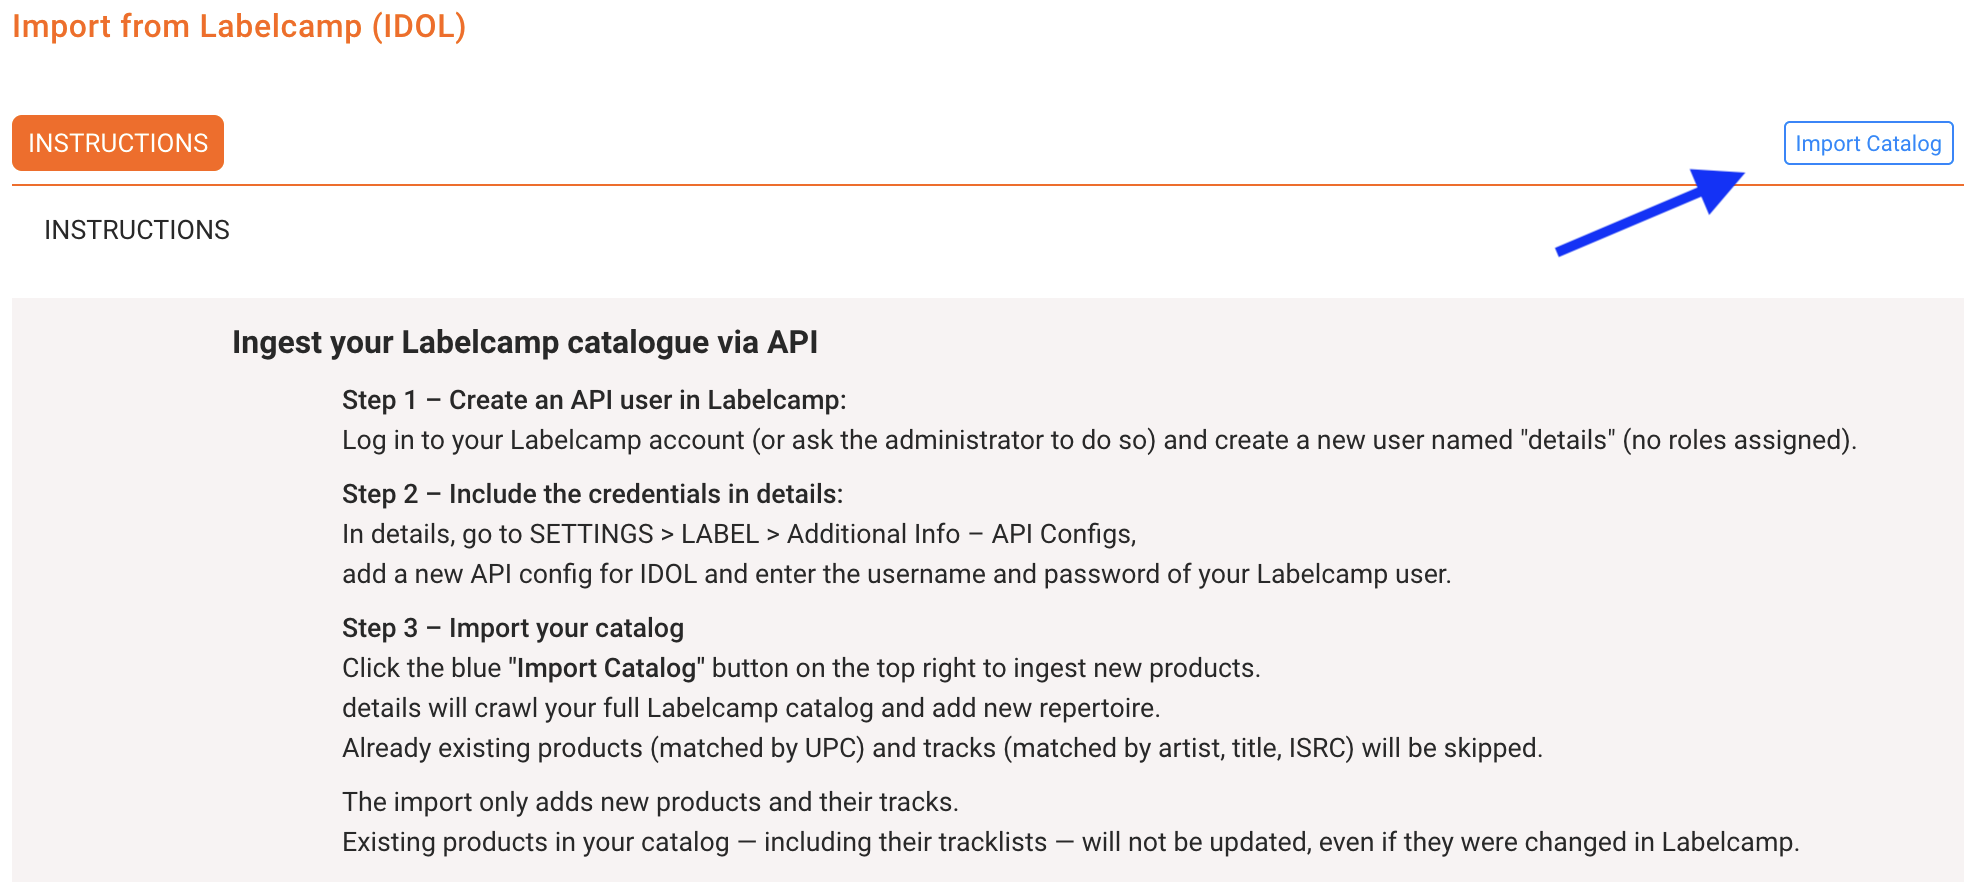
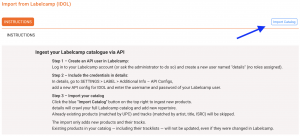
  3. Click Import Catalog to start the import process.

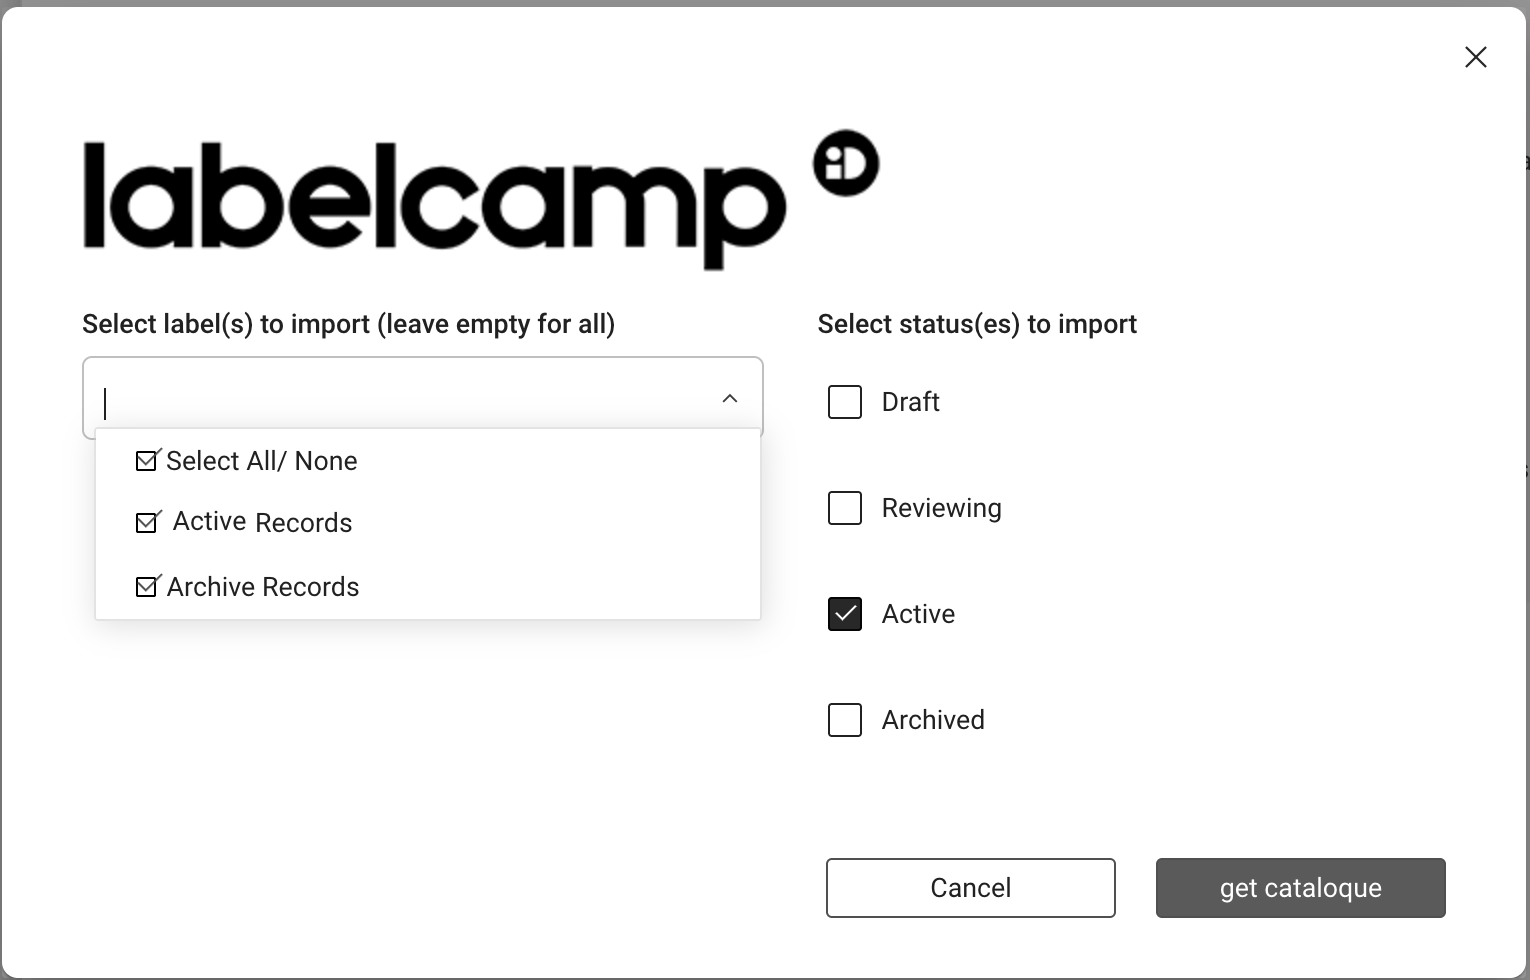
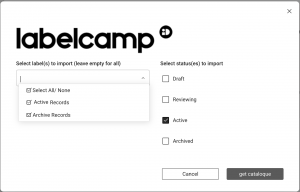
The system will connect to your Labelcamp account and load all labels connected to your account, plus the available product stati (e.g. Draft , Reviewing , Active , Archived ).

As a user, you should now select which label you want to collect products and tracks from you can select one, multiple, or all labels from your account.

You should also decide whether you want details to retrieve only Active products (recommended) or if you also need unfinished Draft, Reviewing, or Archived products.


Once your selection is complete, click Get Catalogue. The system will then retrieve all new products and tracks not already loaded into details.

Depending on your catalogue size, this may take a few minutes or longer.

Tip
Keep your Labelcamp credentials saved in SETTINGS > LABEL > Additional Info API Configs to allow faster imports in the future.

► Import Logic

Matching Rules

  • Products are matched by UPC (barcode).
  • Tracks are matched by Artist, Title, and ISRC.
  • Only new products and tracks will be added; existing items are skipped automatically.
  • Metadata from existing products or tracks is not updated during import.

► Initial Setup Required

One-Time API Connection

Before using the import feature, a one-time API setup is required to connect details with your Labelcamp account.

  1. Create an API user in Labelcamp:
    An administrator from your team must log in to Labelcamp and create a user named details. This user should have no assigned roles or permissions.
  2. Enter credentials in details:
    In SETTINGS > LABEL > Additional Info API Configs, create a new configuration for IDOL and enter the username and password of the Labelcamp user.
  3. Activate the plugin:
    Go to LABEL > PLUGINS > API and activate Auto-Ingest new products from idol.io. This enables the secure API connection.

► Support and Further Tools

If you need assistance during setup or encounter issues with the import process, our support team is available to help.

Order API – How to import Orders via JSON

How to import orders via the Order API

Use this guide to send orders into details via a POST request. This article documents the Order API.

Note: The endpoint expects a JSON array of orders in the request body. Identifiers can be provided as UUID, barcode, or catalog_no. Barcodes must be unique.

Where to find the endpoint

Go to SETTINGS / SHARING and open the open api box named [JSON Orders Import].

Endpoint & URL format

Base URL:

https://openapi.berlin3.com:10000/orders/json_import/

Path format (with credentials):

https://api.berlin3.com:10000/api/orders/json_import/<client_id>/<checksum>
Open API JSON Orders Import

Quick start

  1. Generate or locate your <client_id> and <checksum> in SETTINGS / SHARING.
  2. Build your POST request to the URL format above.
  3. Set header Content-Type: application/json.
  4. Send a JSON array of order objects in the request body.

Request parameters

Parameter Description In Expected Value
client_id Unique client identifier path details client_id
checksum API key path details open api key
params Array of orders body JSON

Payload schema (field overview)

Each order is an object. The table below lists available fields. Mandatory fields must be present in every order.

API Field Name Mandatory / Optional Data Type Expected Value Field Description
order_date Mandatory string YYYY-MM-DD Date of the order.
account_id Mandatory integer min e 1 Internal ID of the account.
contra_account_id Mandatory integer   Internal ID of the contra account.
invoice_project_id Mandatory integer   Internal ID of the invoicing project.
vat_handling Mandatory integer 1, 2, 3 1 = excluding VAT, 2 = including VAT, 3 = no VAT.
vat_territory Mandatory string   Territory for VAT calculation.
vat_rate1 Mandatory number   Primary VAT rate.
vat_rate2 Mandatory number   Secondary VAT rate.
orderlines   array   Line items of the order (see fields below).
shipping_type_id Optional integer   Internal ID of shipping type.
order_value Optional number   Total order value.
uuid / barcode / catalog_no Optional string   Item identifiers. Barcodes must be unique.

cURL example

curl -X POST 
  "https://api.berlin3.com:10000/api/orders/json_import/<client_id>/<checksum>" 
  -H "Content-Type: application/json" 
  -d '[
    {
      "order_date": "2015-06-01",
      "account_id": 167,
      "contra_account_id": 2,
      "invoice_project_id": 4,
      "currency": "EUR",
      "order_type": 1,
      "vat_handling": 1,
      "vat_territory": "EU",
      "vat_rate1": 19,
      "vat_rate2": 0,
      "orderlines": [
        {"uuid": "b1862090-469e-4035-a073-9f106d270502", "ppu": 12.50, "order_qty": 1},
        {"uuid": "c796d64c-90c6-493f-a8ea-0f244904069b", "ppu": 10.90, "order_qty": 3}
      ]
    }
  ]'

JSON schema

{
  "$schema": "http://json-schema.org/draft-07/schema#",
  "title": "import orders",
  "description": "import orders from json",
  "type": "array",
  "items": {
    "type": "object",
    "required": [
      "order_date",
      "account_id",
      "contra_account_id",
      "invoice_project_id",
      "currency",
      "order_type",
      "vat_handling",
      "vat_territory",
      "vat_rate1",
      "vat_rate2"
    ],
    "properties": { /* full property list remains supported */ }
  }
}

For completeness, the original schema property list from your legacy documentation is preserved below.

Full legacy JSON schema (expanded)

/* Original JSON Schema from your text */

$SCHEMA_BLOCK_START

Sample JSON payload

[{
  "status": "Invoice",
  "user_id": null,
  "currency": "EUR",
  "vat_rate1": null,
  "vat_rate2": null,
  "account_id": 167,
  "order_date": "2015-06-01",
  "order_type": 1,
  "orderlines": [
    {"ppu": 12.50, "uuid": "b1862090-469e-4035-a073-9f106d270502", "barcode": "487328472388", "catalog_no": "Detrec 002 CD", "notes": null, "vat_rate": null, "order_qty": 1, "promo_foc": null, "vat_amount": null},
    {"ppu": 10.90, "uuid": "c796d64c-90c6-493f-a8ea-0f244904069b", "notes": null, "vat_rate": null, "order_qty": 3, "promo_foc": null, "vat_amount": null},
    {"ppu": 11.20, "uuid": "ab96df0f-d94a-44b0-ab63-99340bc778fb", "notes": null, "vat_rate": null, "order_qty": 2, "promo_foc": null, "vat_amount": null}
  ],
  "order_value": 504.50,
  "deliver_city": "Subiaco",
  "deliver_name": "Andrew Sinclair",
  "order_source": "fertig prepaid!",
  "vat_handling": null,
  "deliver_phone": "+61406213638",
  "delivery_text": null,
  "one_stop_flag": null,
  "proforma_text": "Good Company RecordsnAndrew Sinclairn267 Hay St.nSubiaco - 6008n",
  "shipping_date": null,
  "shipping_info": null,
  "tracking_data": null,
  "vat_territory": null,
  "internal_notes": "Good Company RecordsnAndrew Sinclairn267 Hay St.nn6008 SubiaconAUSTRALIA",
  "order_discount": null,
  "shipping_costs": 95.40,
  "weight_kg_edit": 17.800,
  "deliver_company": "Good Company Records",
  "deliver_country": "Australia",
  "order_reference": null,
  "deliver_address1": "267 Hay St.",
  "deliver_address2": null,
  "shipping_type_id": 1,
  "contra_account_id": 2,
  "customs_reference": null,
  "payment_method_id": null,
  "deliver_postalcode": "6008",
  "invoice_project_id": 4,
  "deliver_address_type": null,
  "deliver_street_number": null
}]

Sample response

{"details":"Data is received successfully, for more details please check email.","error":0}

Troubleshooting

  • 400/422: Check required fields and data types (see mandatory list).
  • 401: Invalid <client_id> or <checksum>.
  • 500: Retry later; if persistent, contact support@details.eu.

How to sync your catalog and webshop orders via API

Use the Webshop API in details to (1) expose your catalog to a webshop and (2) push webshop orders into details for stock, invoicing, and reporting.

Important: The endpoints and keys below are examples. Replace placeholders like {API_KEY}, {ACCOUNT_ID}, etc. with your actual credentials and IDs. Keep your API key secret.

OVERVIEW

  • Catalog → Webshop (GET): Provide Labels, Releases, Products, and Tracks as JSON feeds.
  • Webshop → details (PUSH): Create orders in details via a parameterized request.

Catalog export (GET endpoints)

Expose your catalog to the webshop via these read-only endpoints. The response format is JSON.

Labels

https://api.berlin3.com/api/noton/?action=labels&api_key={API_KEY}

Releases

https://api.berlin3.com/api/noton/?action=releases&api_key={API_KEY}

Products

https://api.berlin3.com/api/noton/?action=products&api_key={API_KEY}

Tracks

https://api.berlin3.com/api/noton/?action=tracks&api_key={API_KEY}

Receive webshop orders (PUSH)

Create an order in details by calling the addOrder endpoint with URL parameters.

Endpoint

https://api.berlin3.com/api/noton/?action=addOrder&api_key={API_KEY}&account_id={ACCOUNT_ID}&invoice_project_id={INVOICE_PROJECT_ID}&webshop_order_id={SHOP_ORDER_NO}&internal_notes={NOTES}&order_date={YYYY-MM-DD}&order_type={ORDER_TYPE}&status={STATUS}&payment_method_id={PAYMENT_METHOD_ID}&currency_id={CURRENCY_ID}&vat_handling={VAT_MODE}&customer_no={CUSTOMER_NO}&email1={EMAIL}&company_name={COMPANY}&last_name={LAST_NAME}&address1={ADDRESS1}&city={CITY}&postalcode={POSTALCODE}&region={REGION}&country={COUNTRY}&order_source={ORDER_SOURCE}&contra_account_id={CONTRA_ACCOUNT_ID}&deliver_address_type=Address&deliver_name={DELIVER_NAME}&deliver_company={DELIVER_COMPANY}&deliver_address1={DELIVER_ADDRESS1}&deliver_city={DELIVER_CITY}&deliver_postalcode={DELIVER_POSTALCODE}&deliver_country={DELIVER_COUNTRY}&shipping_costs={SHIPPING}&order_value={ORDER_VALUE}&orderLines={PRODUCT_UUID}|{QTY}|{PPU}|1[&orderLines=...]

Tip: You can repeat orderLines multiple times to add more items.

Parameter reference

Parameter Description Example
api_key Your authentication token {API_KEY}
account_id Distribution account to book against {ACCOUNT_ID}
invoice_project_id Invoice project used for the order {INVOICE_PROJECT_ID}
order_type Order type identifier 1
status Initial order status open
payment_method_id Payment method (see table below) 1
currency_id Currency identifier 1
vat_handling VAT mode (1=including VAT, 3=no VAT) 1
orderLines One line per product: product_uuid|QTY|PPU|1 ab12cd...|2|12.00|1

Payment methods

ID Name
1 CREDIT CARD
2 SEPA LASTSCHRIFT
3 PAYPAL
4 BARZAHLUNG
5 VORKASSE

Order lines format

Each orderLines parameter represents one item in the order with the following pipe-separated format:

orderLines={PRODUCT_UUID}|{QTY}|{PPU}|1
  • {PRODUCT_UUID} the product UUID (fetch via the Products API).
  • {QTY} quantity.
  • {PPU} price per unit (net or gross depending on vat_handling).
  • 1 reserved constant.

VAT handling

vat_handling accepts these values:

  • 1 including VAT
  • 3 no VAT

How to import your catalog via IDOL Labelcamp

The Labelcamp Import feature is available in the Catalog Management section of details.
It allows you to connect your IDOL Labelcamp account and ingest new catalogue entries into your database with a single click.

This import tool is designed to simplify catalogue updates and eliminate manual data entry. It supports automatic matching for products and tracks to prevent duplicates.


► How to Import Your Catalogue

Steps

  1. Go to CATALOG > MANAGEMENT.
  2. Select Labelcamp Import.
  3. Click Import Catalog to start the import process.

The system will connect to your Labelcamp account and load all labels connected to your account, plus the available product statuses (e.g. Draft, Reviewing, Active, Archived).

As a user, you can select one, multiple, or all labels from your account.

You should also decide whether details should retrieve only Active products (recommended), or also Draft, Reviewing, or Archived products.

Once your selection is complete, click Get Catalogue. The system will then retrieve all new products and tracks not already loaded into details.

Depending on your catalogue size, this may take a few minutes or longer.

Tip
Keep your Labelcamp credentials saved in SETTINGS > LABEL > Additional Info API Configs to allow faster imports in the future.

► Import Logic

Matching Rules

  • Products are matched by UPC (barcode).
  • Tracks are matched by Artist, Title, and ISRC.
  • Only new products and tracks will be added; existing items are skipped automatically.
  • Metadata from existing products or tracks is not updated during import.

► Initial Setup Required

One-Time API Connection

Before using the import feature, a one-time API setup is required to connect details with your Labelcamp account.

  1. Create an API user in Labelcamp:
    An administrator from your team must log in to Labelcamp and create a user named details. This user should have no assigned roles or permissions.
  2. Enter credentials in details:
    In SETTINGS > LABEL > Additional Info API Configs, create a new configuration for IDOL and enter the username and password of the Labelcamp user.
  3. Activate the plugin:
    Go to LABEL > PLUGINS > API and activate Auto-Ingest new products from idol.io. This enables the secure API connection.

► Support and Further Tools

If you need assistance during setup or encounter issues with the import process, our support team is available to help.