What does “Cross Collect” mean in Royalty / Accounts / Contracts

Our Royalty Accounts may have multiple contracts. (1 account = n contracts)

Each contract has their own “economy”, meaning their own advance, incomes, costs, reserves and balances.

Within one Royalty Account therefore you may have contracts with positive balances at the same time as others with negative balances.

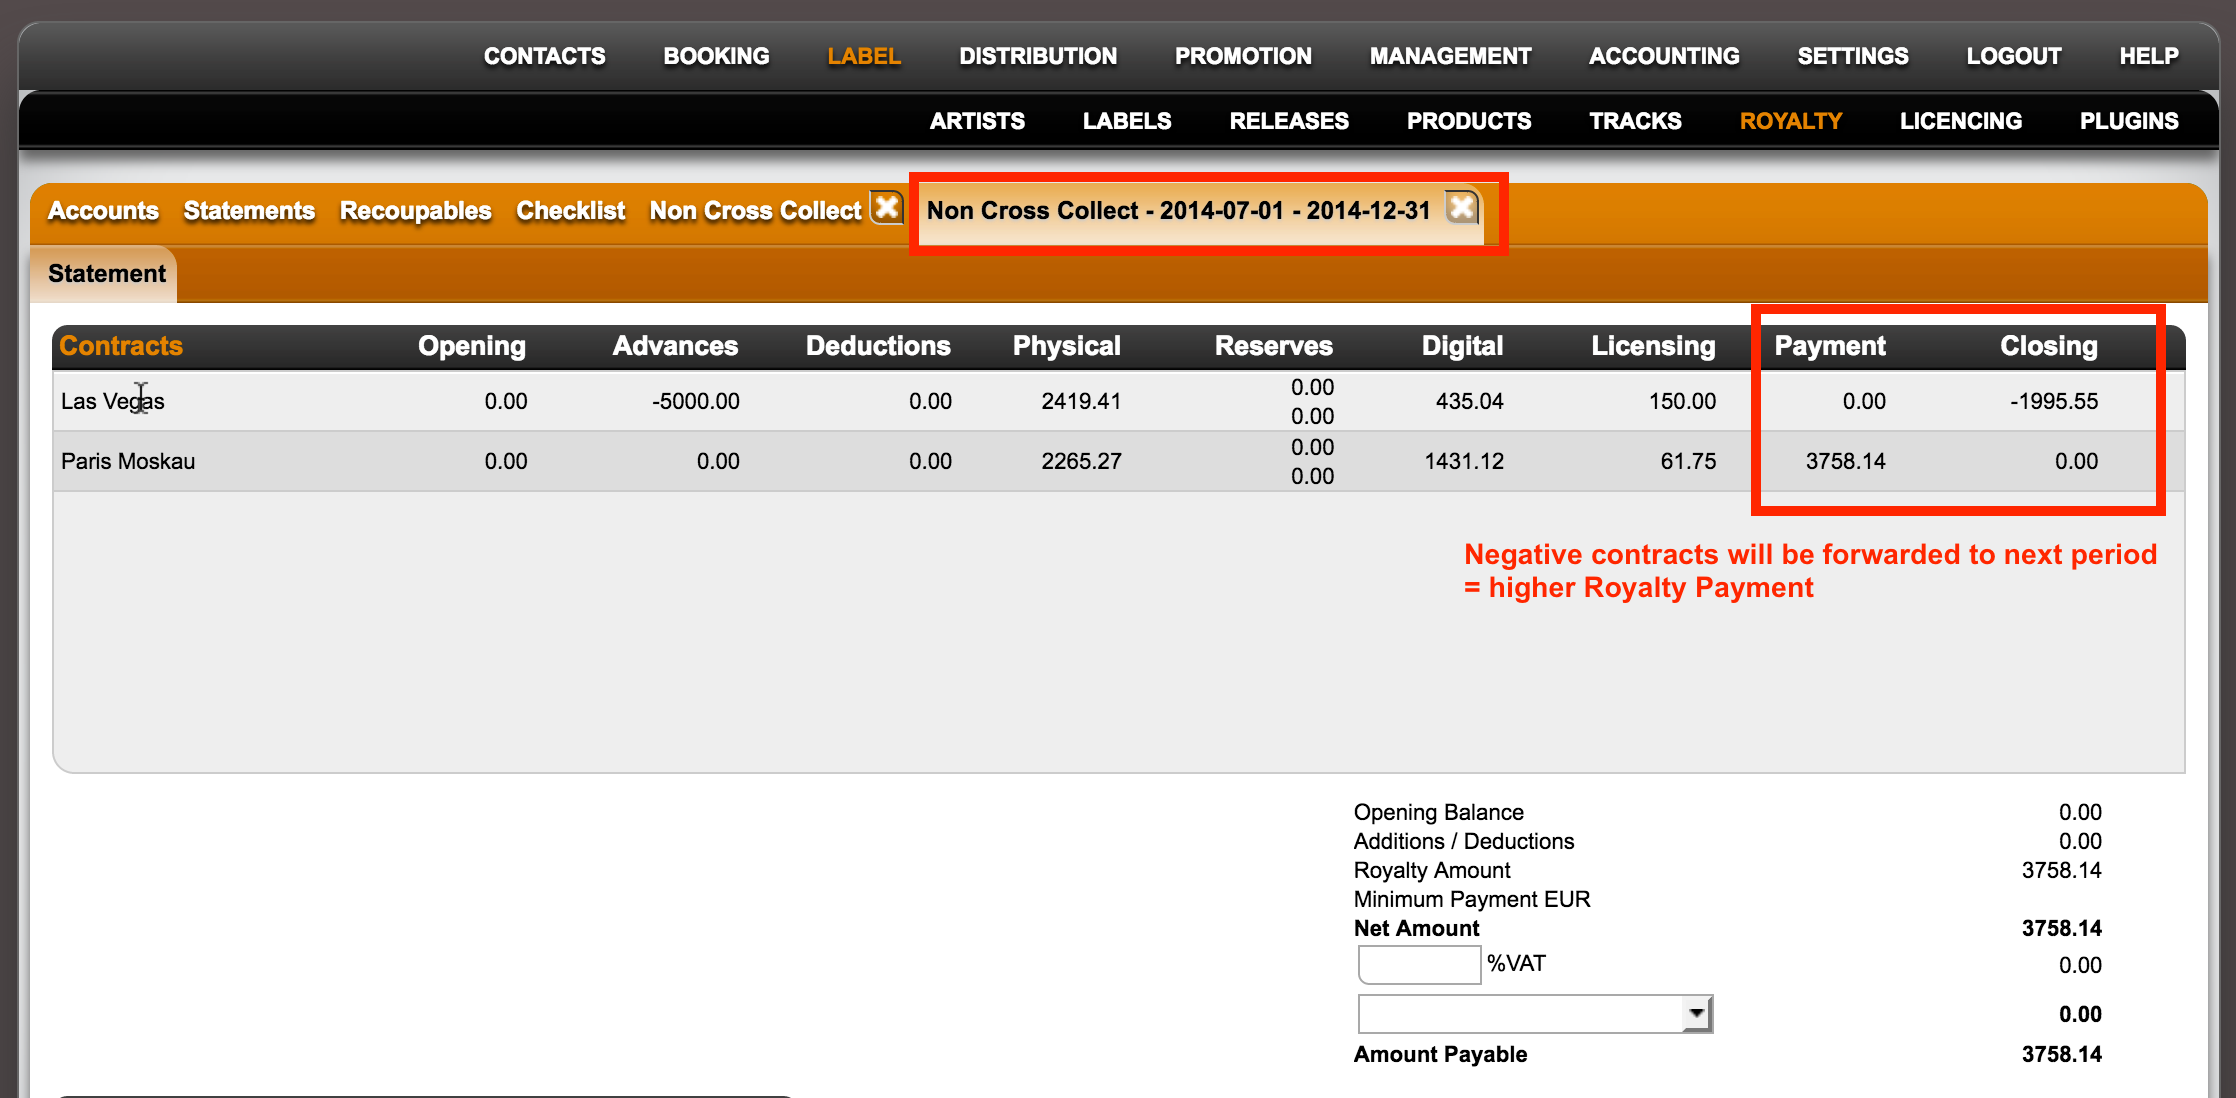
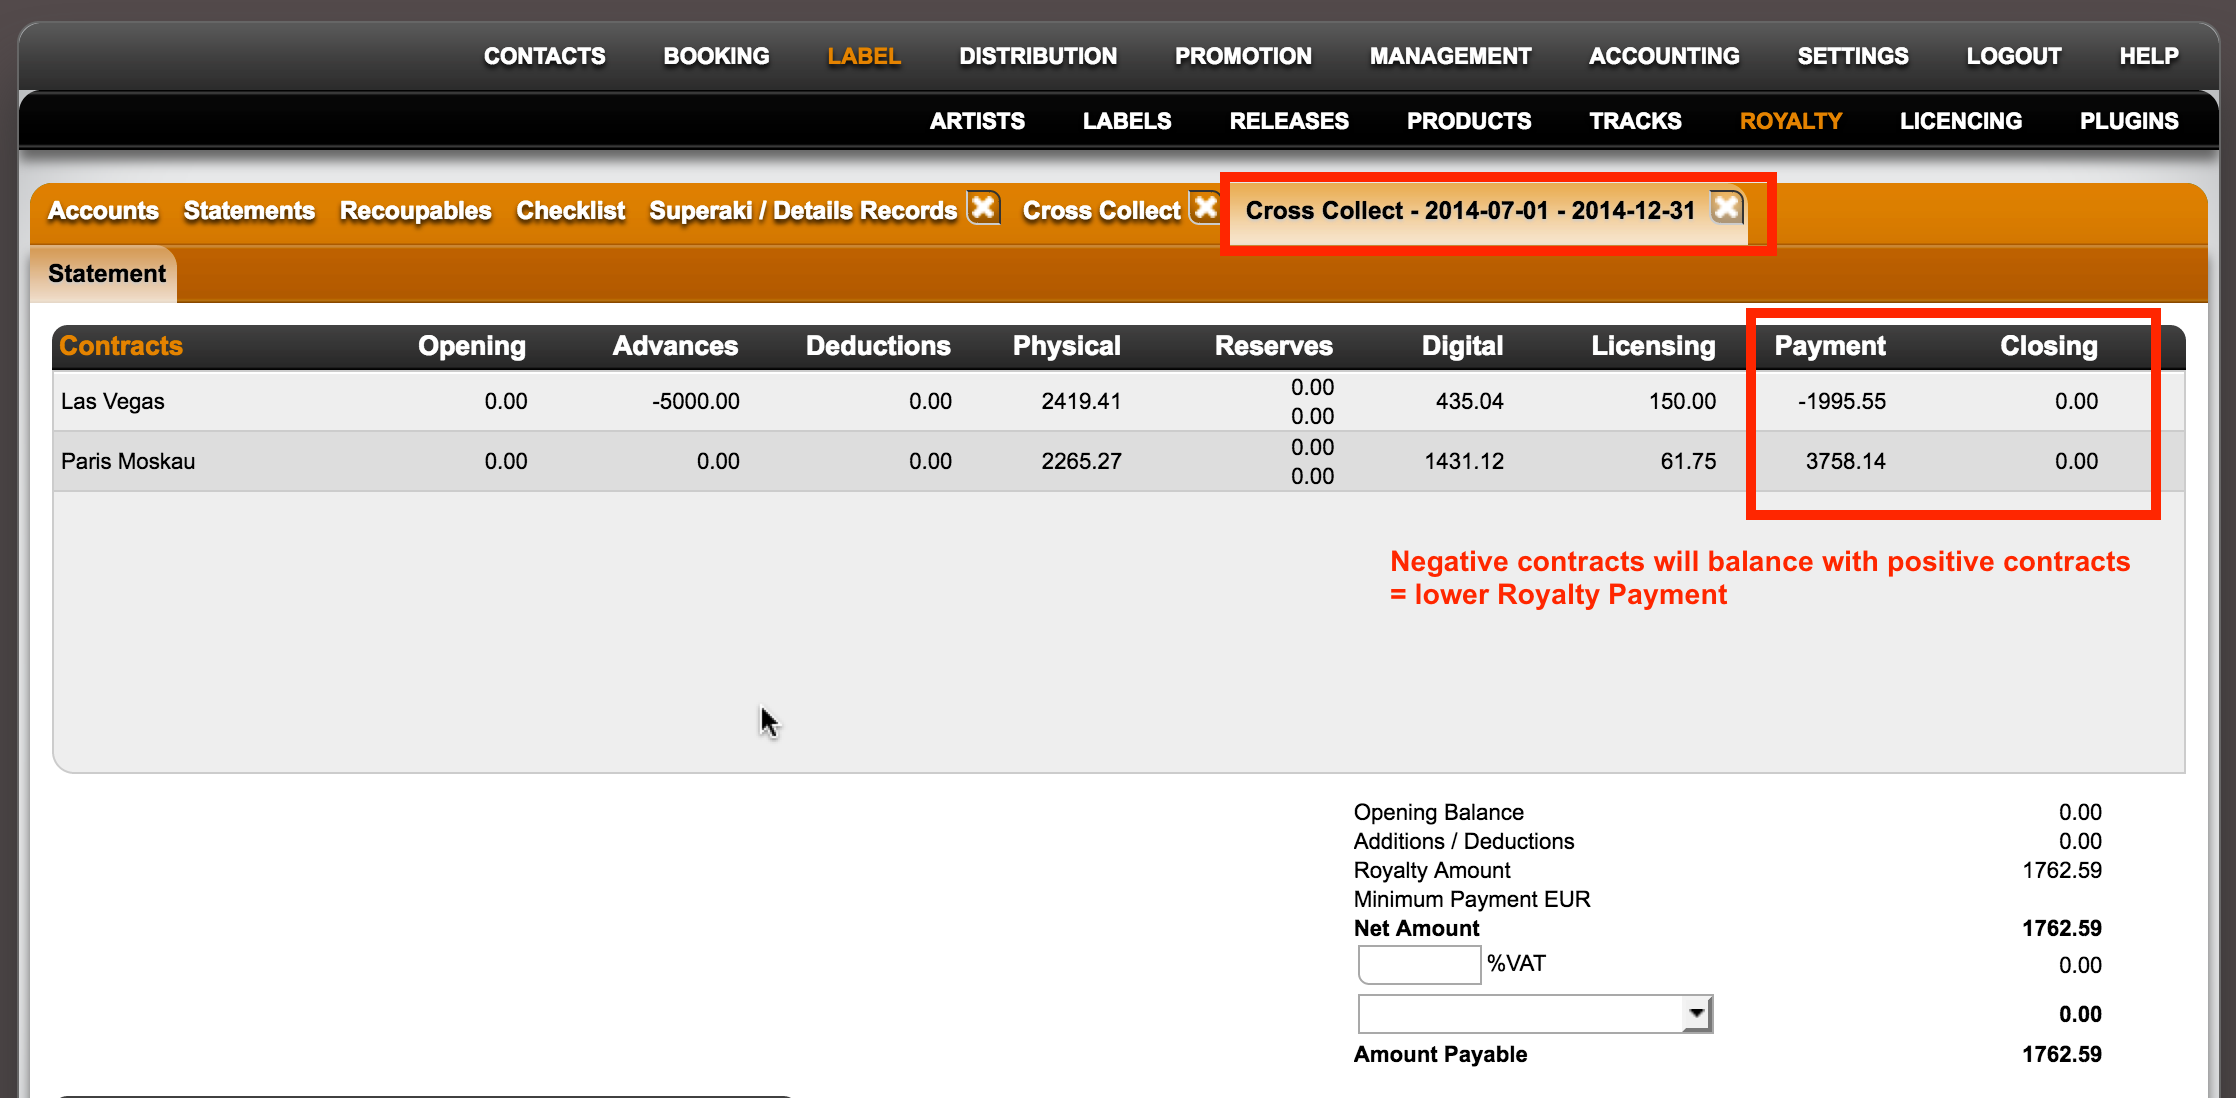
The ‘Cross Collect’ checkbox gives you the option to decide whether or not you want the contract-level ‘economies’ balanced on the level of the Royalty Account.

And yes, we recommend setting the cross-collect as active per default!


example 1 – non cross-collected:

Royalty Account A
contract 1 – positive balance 500 EUR payout
contract 2 – negative balance -1000 EUR forward

Balance Account A: 500 EUR payout


– – – – –

example 1 – incl. cross-collected:

Royalty Account B
contract 1 – positive balance 500 EUR cross-balanced
contract 2 – negative balance -1000 EUR cross-balanced

Balance Account B: -500 EUR negative forward
How to set Royalty Rates in Royalty Contracts

The calculation of royalties depends largely on the terms of the license agreement and the resulting accounting rules.

Put simply, royalties are calculated by multiplying a sales quantity at a specific base price with a royalty rate. A simple example would be 1.000 CDs * 7  PPD * 20% royalty rate = 1.400 .

However, if royalty calculation was always this simple, there would be no need for a database solution like detYils. This article shows you how to set up more complex rules for royalty calculation correctly.


In detYils you can manage rules for royalty calculation separately for each channel

  1. physical sales
  2. digital sales
  3. licensing / thirdparty revenue
  4. performance revenue

Each channel can have one or multiple rules or royalty options as we call them.


Please check below to find out …

how to set royalty rates for digital sales

how to set royalty rates for physical sales

how to set conditions for royalty options


How to set royalty options for physical sales


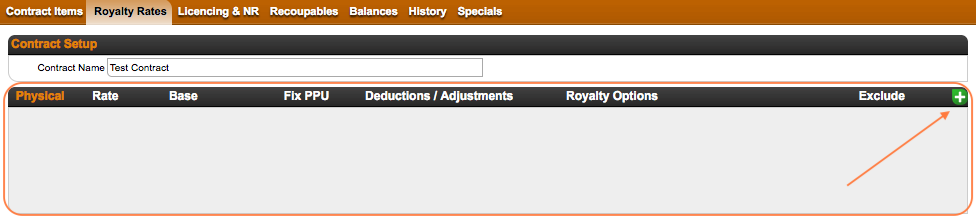
If you want to account physical sales to your royalty accounts, you will need to add one or multiple rules for physical royalty rates. Click the [+] icon on the contract’s Royalty Rate tab.


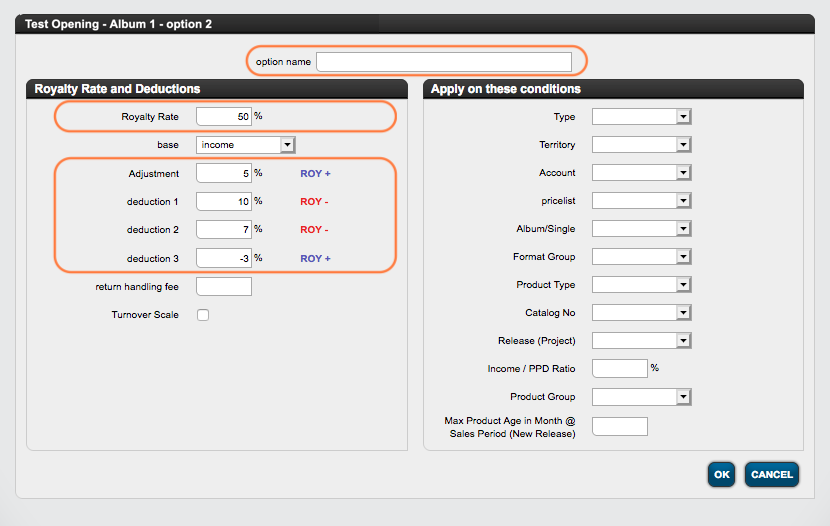
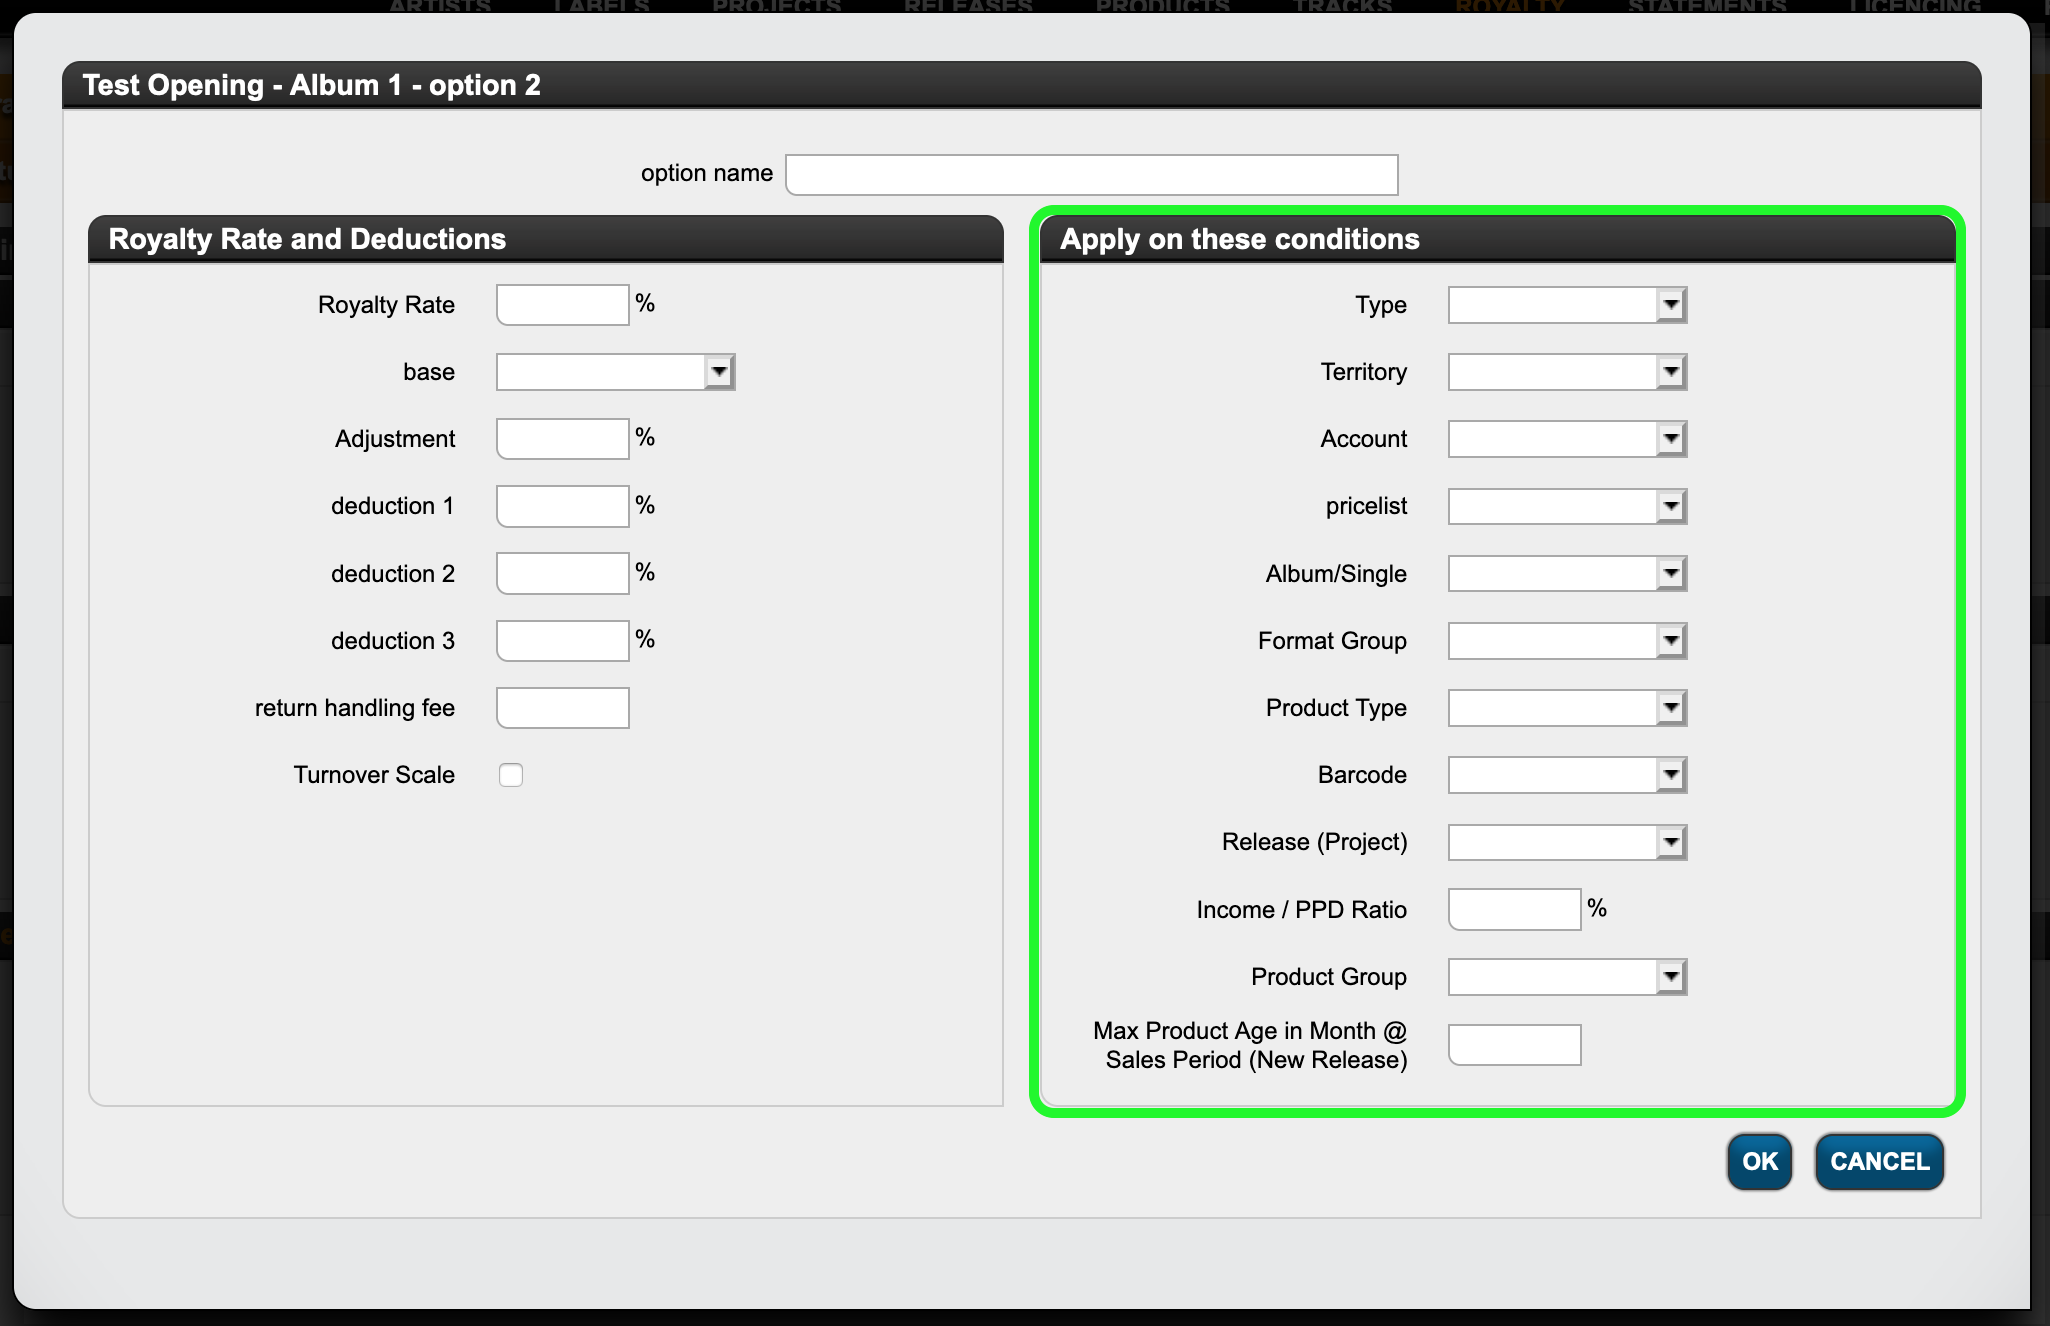
You will see a modal window with multiple options to set your royalty rate etc. for physical sales:

  • First, please give your calculation rule an option name. It helps both you and the artist if you have multiple royalty rules.

  • Then, of course, the most important information is the royalty rate on the top left of the modal window. This is the multiplier that is negotiated in contracts with rights holders.
    NOTE that the rate you enter here is the rate that your Royalty Account is supposed to receive as per contract (not your own share!).

  • Another important factor for the royalty calculation is the accounting base. This can be either the income, the retail price, thePublished Price of the Distributor (PPD) or any of the other
    options in details.

  • There are also options to add deductions to the royalty rate on the fields Deduction 1, Deduction 2, Deduction 3 and Adjustments. When a deduction/adjustment is applied, you will see whether it is added to or subtracted from the royalty rate, depending on the sign of the deduction/adjustment.
    NOTE : While the deductions are displayed to the royalty owner in his statement, an adjustment remains undisclosed. An adjustment is therefore a percentage based reduction of the royalty calculation without any indication in the statement.

  • Return handling fees are a more traditional deduction from royalties. Those are fixed amounts deducted per unit returned, i.e. 0.50  per unit.

On the right-hand side of the modal window, you can define the conditions for which the current calculation rule will apply. Find out more about the available conditions here!
Think of the conditions as a filter that triggers the application of the current rule.


IMPORTANT NOTE : If you have more than one royalty option in one contract, please be aware that the calculation in detYils starts with the first rule and then continues with 2,3, etc. until the last one – the general royalty rule, which catches all sales that do not fall into any of the previous options.


How to set royalty rates for digital sales


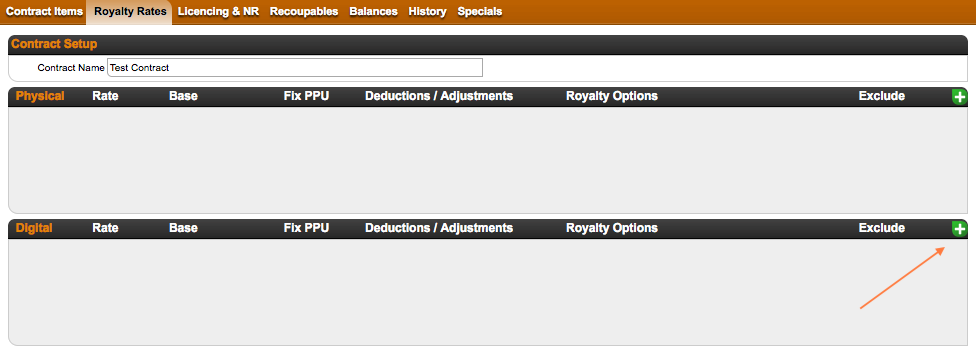
If you want to account digital income to your royalty accounts in detYils, you will need to add one or more digtal royalty options. Click the (+) icon on the contract’s Royalty Rate tab.


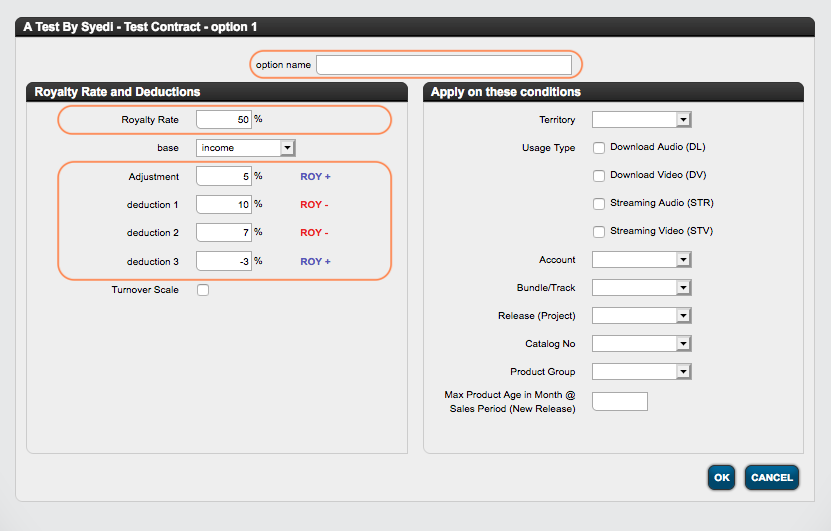
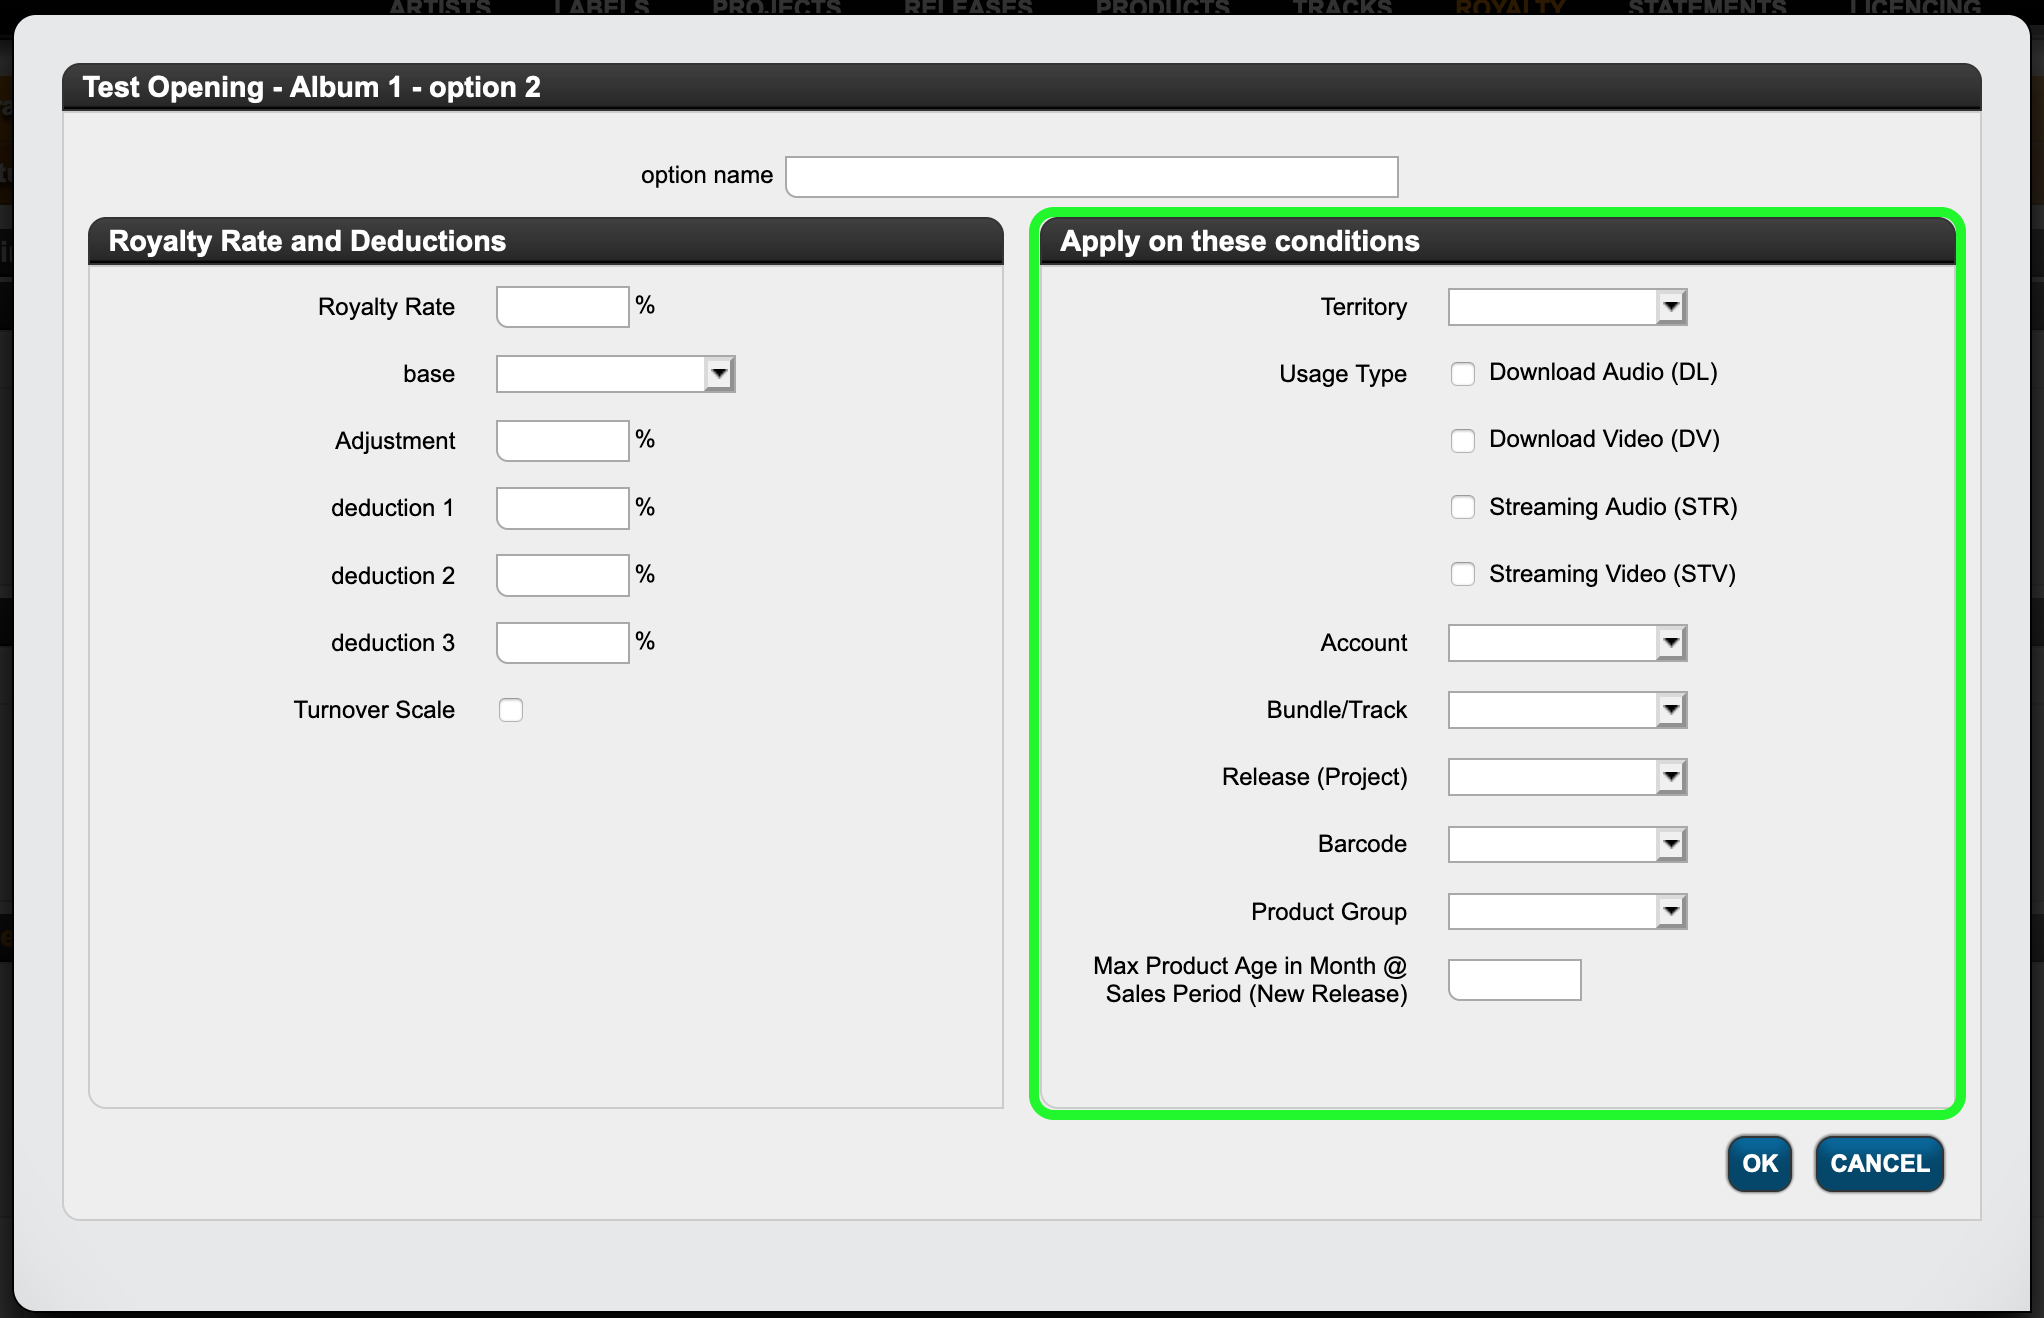
You will see a modal window with multiple options to set your royalty rate etc. for digital sales:

  • If you have multiple calculation rules, please give your calculation rule an option name.
  • In the field royalty rate field on the left side of the modal window, enter the digital royalty rate, which you want your royalty account to receive according to the contract.

  • Establishing the base for the calculation is the next important step. For Digital this is most likely to be “income“, as other available base options are not common for digital sales.

  • For each calculation rule you may also set adjustments and up to three optional deductions, which be applied to the calculation depending on the sign of the deduction/adjustment.

    NOTE : While the deductions are displayed to the royalty owner in his statement, an adjustment remains undisclosed. An adjustment is therefore a percentage based reduction of the royalty calculation without any indication in the statement.

On the right-hand side of the modal window, you can define the conditions for which the current calculation rule will apply. Find out more about the available conditions here!
Think of the conditions as a filter that triggers the application of the current rule.


IMPORTANT NOTE : If you have more than one royalty option in one contract, please be aware that the calculation in detYils starts with the first rule and then continues with 2,3, etc. until the last one – the general royalty rule, which catches all sales that do not fall into any of the previous options.


Conditions for Royalty Options

As our name suggests, we would never restrict our clients to a static set of royalty calculation types to choose from. In fact, quite the opposite:
In the detYils you will probably discover so many ways to calculate royalties that you may even be surprised that such terms actually exist! Well, yes, they do ….


Here is an overview of options to choose from that can be applied to royalty options in Royalty Contracts.

You can find those conditions on the right-hand side of the modal window to set your royalty rates.

Think of the conditions as a filter that triggers the application of the current rule:

IF the conditions on the right are met, THEN the rate and deductions on the left will be applied.

Let’s start with digital :

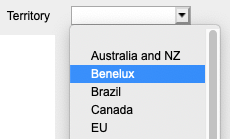
  • In the detYils you may apply a royalty option to a selected territory.Territories are customizable groups of countries which can be set in SETTINGS / GENERAL.
  • You can also specify which type of digital sale should be affected by the current rule.
    We differentiate 4 different usage types in detYils:
    Audio Download
    (“DL”)
    Video Download
    (“DV”)
    Audio Streaming
    (“STR”)
    Video Streaming
    (“STV”)

    NOTE: If you do not explicitly pick one of these options, the system will include all of them in the calculation. If you select specific ones, however, the current rule only applies to sales of those usage types.

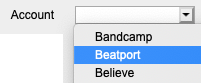
  • Another filter option is by distribution account, i.e. by source. With this option you may select to have sales accounted on a specifc rate when sold by a specific digital distributor / aggregator.


  • You can also choose to apply a royalty option specifically on bundle (album) or track sales only.

  • If you have contracts that include multiple releases and you want a particular rate to apply to a particular one only, specify the release covered by the royalty option.

  • The same applies to products. If you have contracts that cover multiple products and you want a specific rate to apply to only one product, enter the barcode for that royalty option.

  • If, however, you want to combine not only one product but several products at your own discretion and have them processed according to one rule, create a product group and select it for this rule.

  • If your contract states a specific term for a royalty rate, set the duration of rule application from product release in months. This rule will apply only within the period since product release, which is the release date plus any product release shift.
    The period is defined in months, i.e. one year = “12” and three years = “36”.
    This rule will apply for sales made within the set period only and not beyond.

    Example: If you want a royalty option to change after x months after the product release, you will first have to define one of these rules, and then another rule with the royalty rate to follow after the end of the initial period.


For physical sales some options are the same, others are different:

  • One particular aspect is the indication by type of sale. This condition allows you to set different royalty rates for sales than for returns, etc. See the list of sales types below.

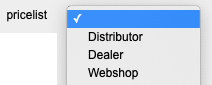
  • Another characteristic of physical sales is that they can be settled according to customised price lists. More information on price lists and price codes can be found here.

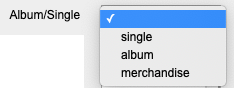
  • You can also create royalty options for predefined product categories, explicitly albums, singles and merchandise.
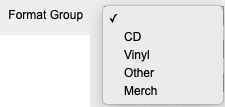
  • In addition you can customize your own product groups and set specific royalty rates accordingly.

How to Send Out Royalty Statements


There are different ways that labels and distributors send royalty statements to their rights holders. Below are the main options available:

1. Print and Send on Paper

If you prefer to print statements and send them physically:

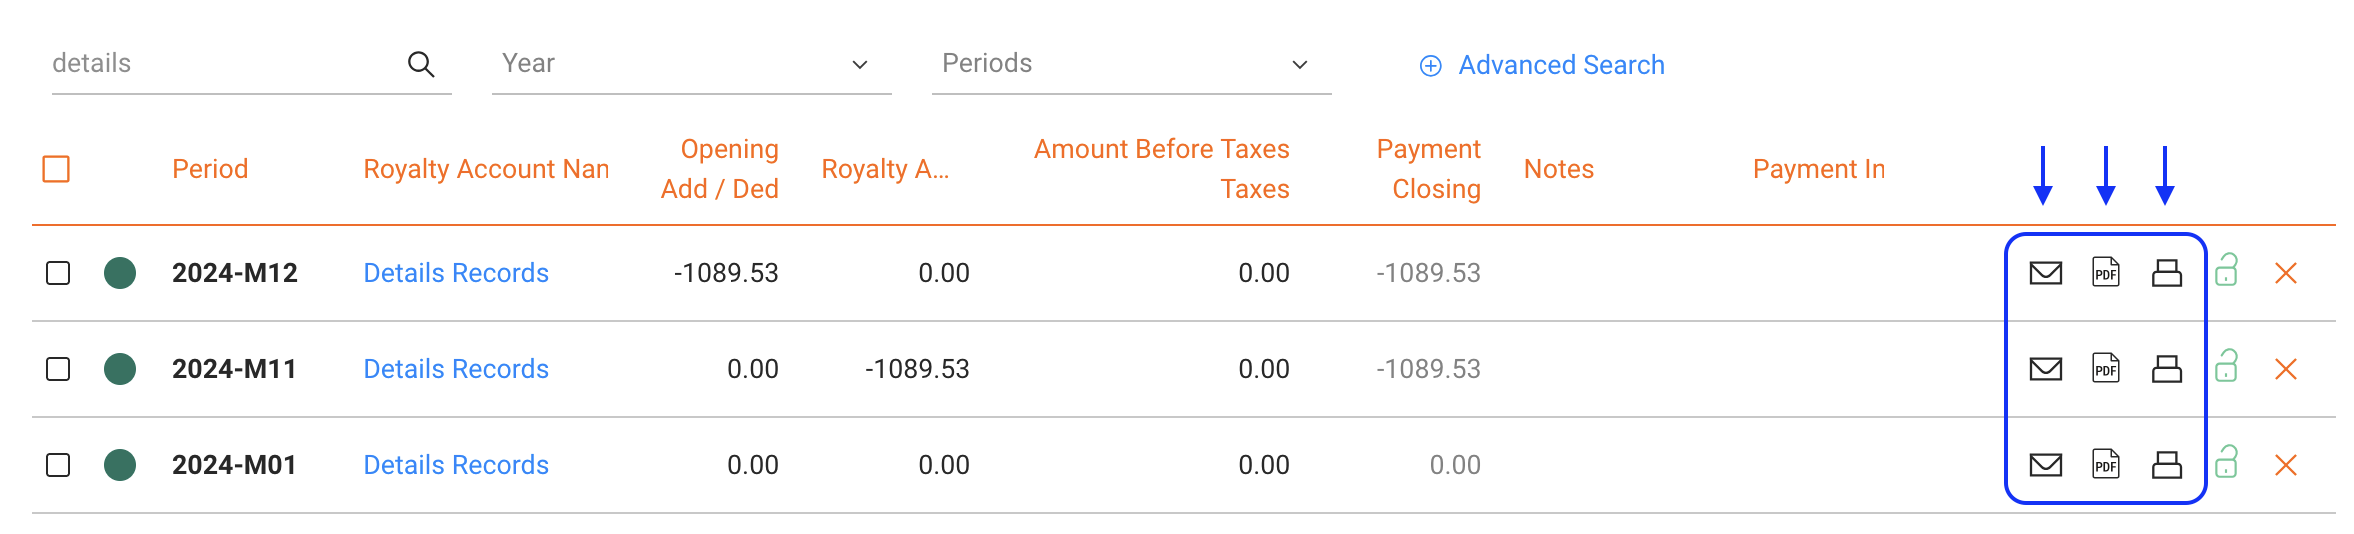
  • Go to ROYALTY / Royalty Statements
  • Use the printer icon to print directly or click the PDF icon to generate a printable PDF

2. Send Statements Individually by Email

To send one statement at a time:

  • Go to ROYALTY / Royalty Statements
  • Search and select the statement you wish to send
  • Click the email icon to open a pre-filled email with a statement link, or
  • Click the PDF icon to download the file and send it manually via email


3. Send Statements in a Batch (Recommended)

To efficiently send multiple statements at once, we recommend batch sending. You have two options:

Option A Classic Email Batch

Each royalty account receives an email with a link to their specific statement only.

Option B Dashboard Notification

Each royalty account receives an email notification that new statements are available in their online dashboard. They can log in to see all current and past statements, credit notes, and basic analytics.

How to Send a Batch Email

  1. Go to ROYALTY / Royalty Statements
  2. Filter the royalty period you want to send
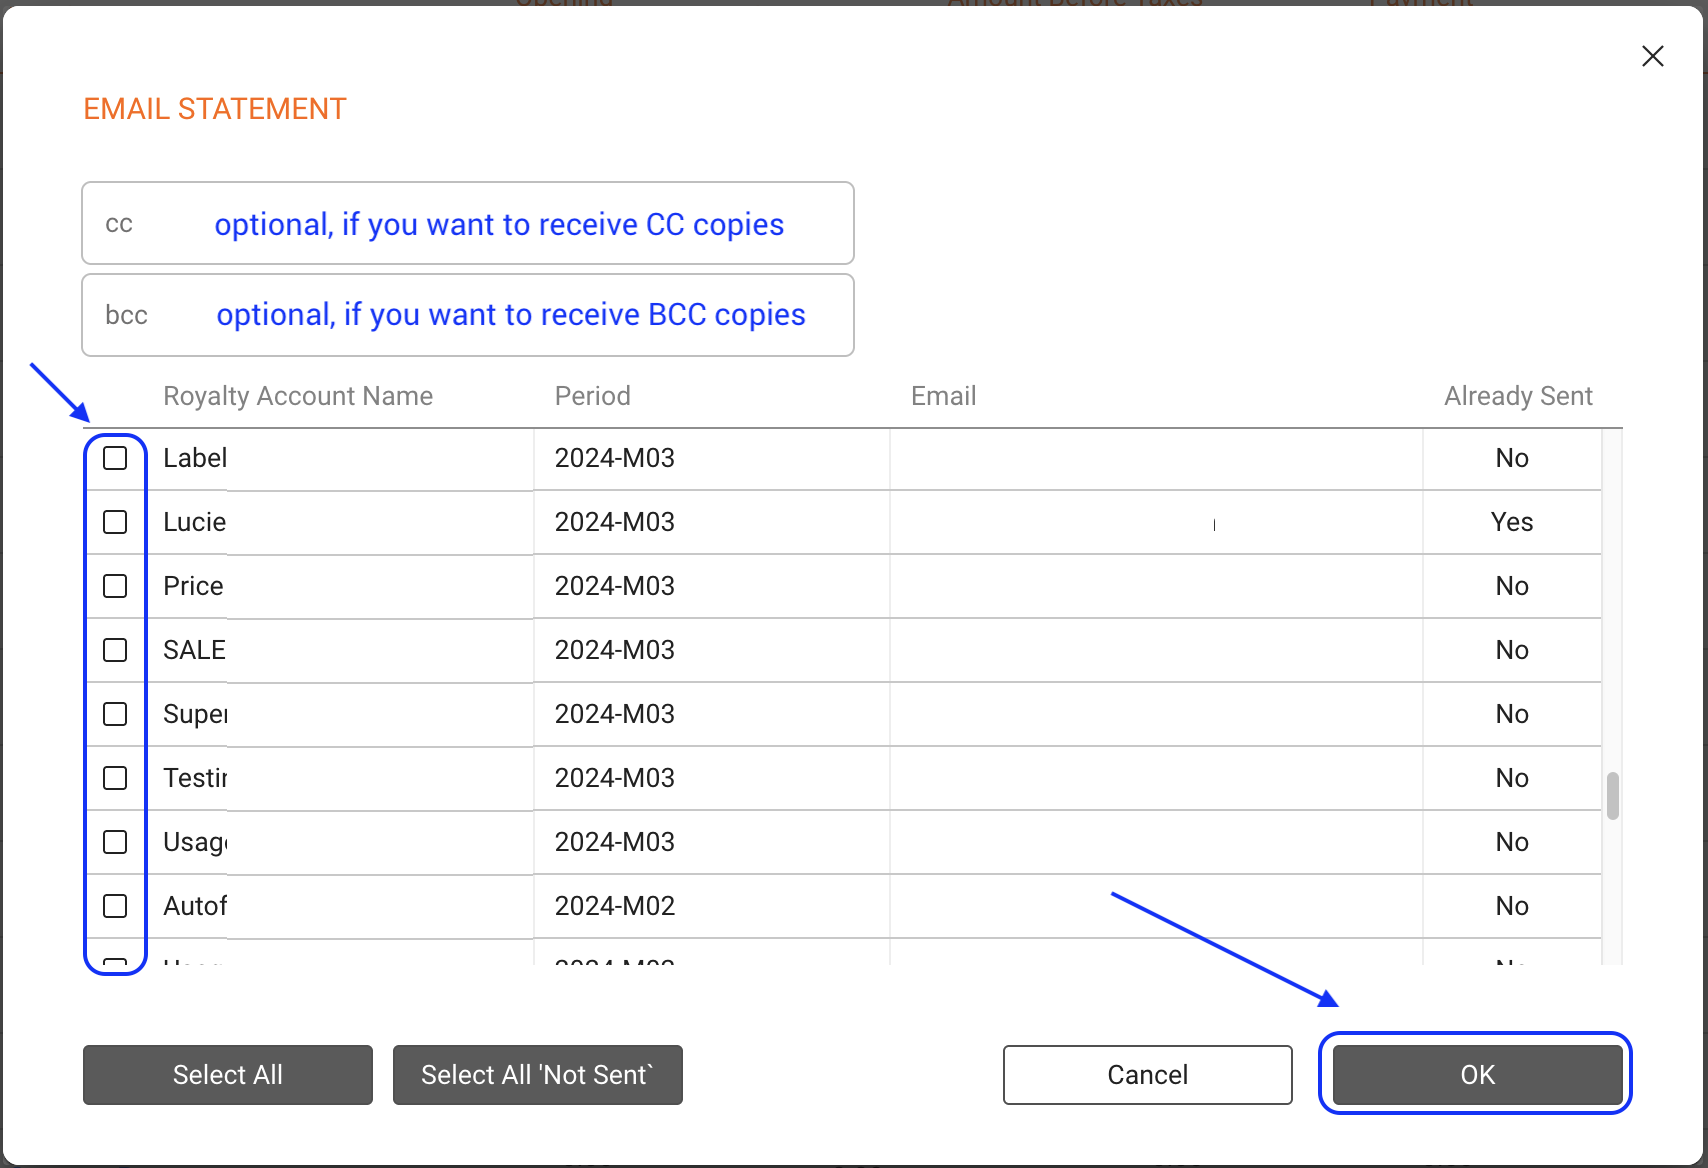
  3. Click Send Statements at the bottom right of the page

In the modal that opens:

  • Add a CC or BCC email address if you want to receive copies
  • Select statements manually or use quick filters:
    • SELECT ALL selects all statements in the current view
    • SELECT ALL “NOT SENT” selects only statements not yet sent
  • Click Send Emails to deliver them to all selected contacts

If you added yourself in CC or BCC, you will receive copies of the emails.

How to set up custom templates for batch statement emails

There are different ways to send out royalty statements to rights holders in detYils.

If you want to send a batch email out to a selection of royalty accounts including links to access statements, you need to set up a template for the email that will be send.

  • You can set custom texts per statement layout, i.e. for different statement business identities or languages you can define different default texts.
  • You can add default reply-to email address as well as a sender name, i.e. which email replies should go to and how the email sender appear in your right holders’ inbox.
  • You can choose whether or not you want the email to contain royalty amounts.

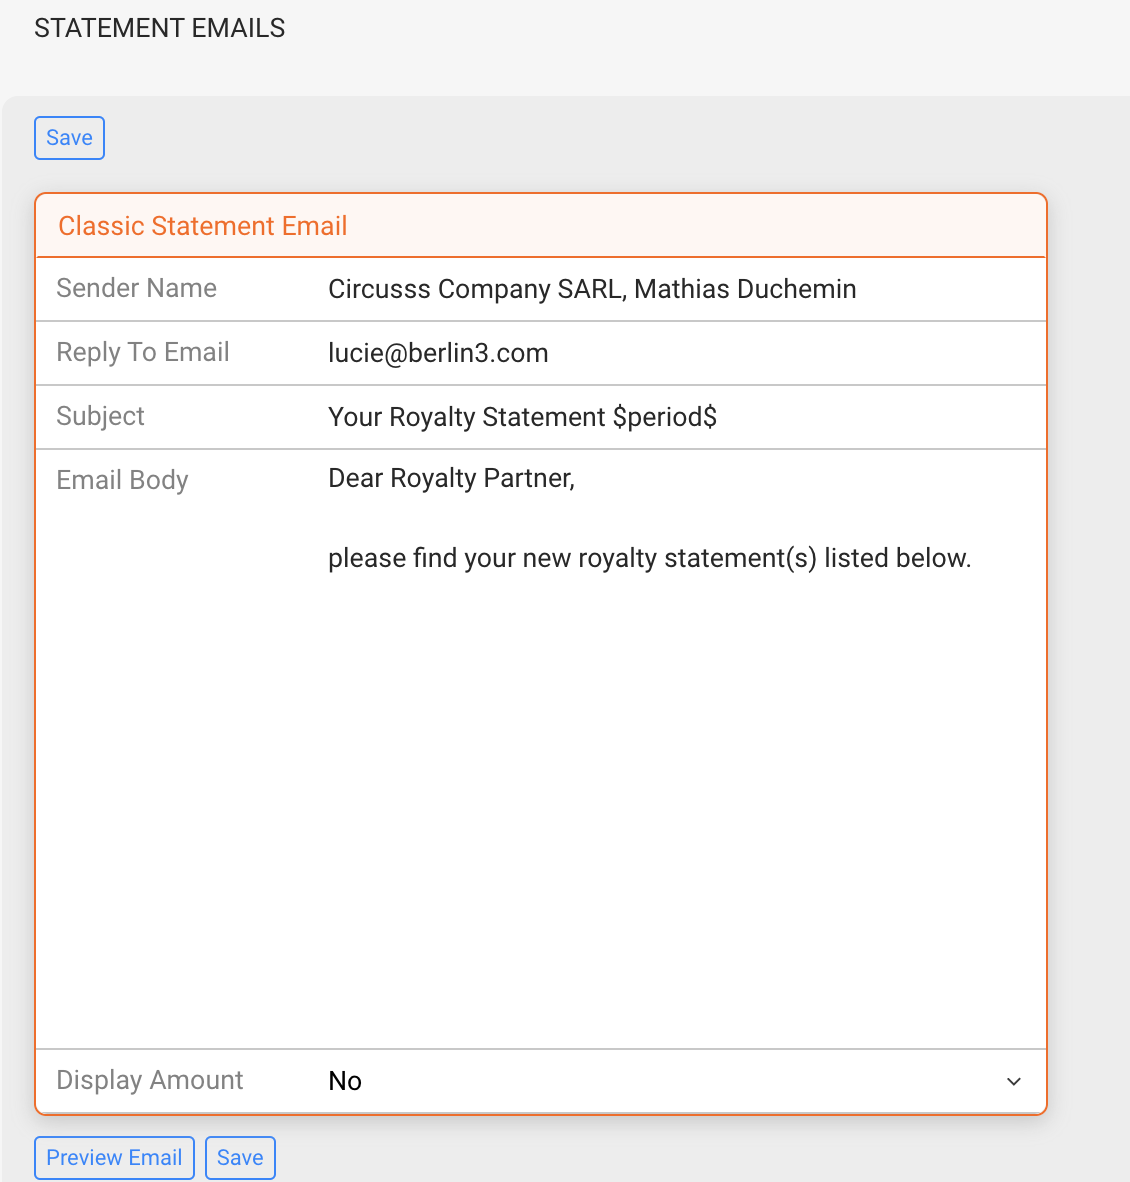
For existing clients we have set up a standard template, which looks something like this :

Standard_Email.png


To customize your own email templates

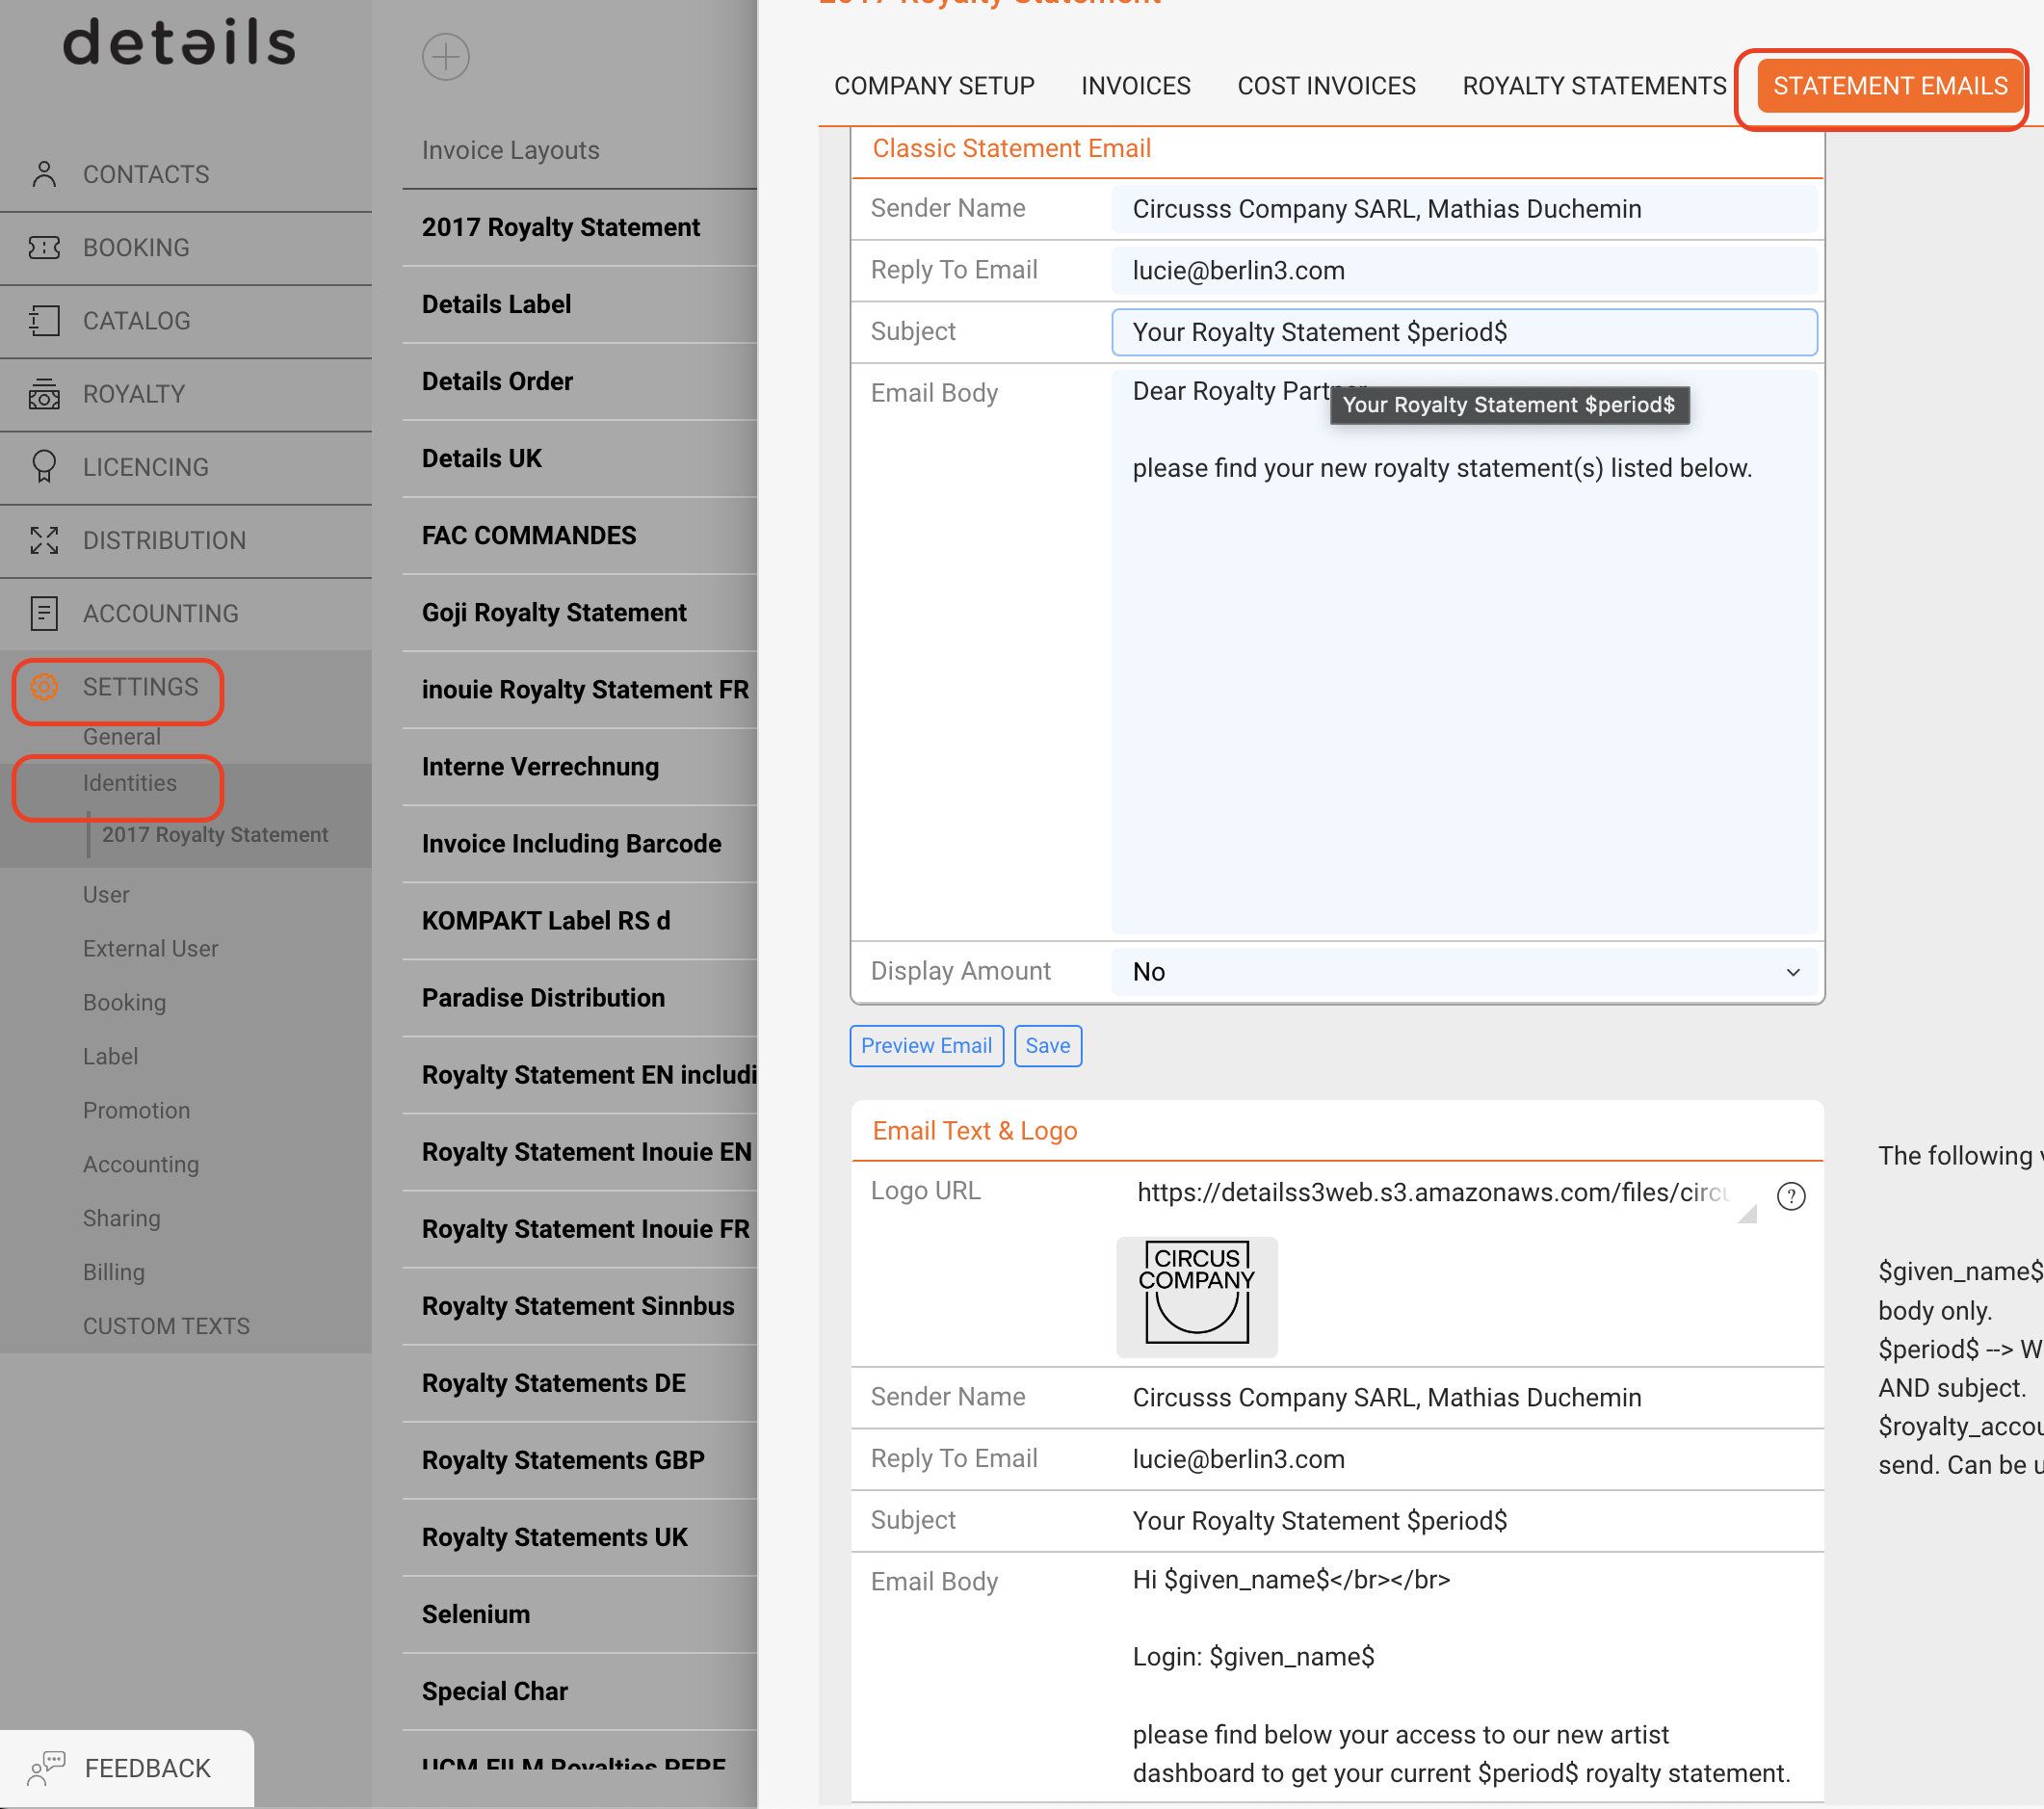
  1. Go to Setting > Identities

  2. Select the royalty project you want to customize and click on the new subtab Statement Email.

  3. Enter the Sender Name that will be displayed in the recipients email inbox

  4. Enter a Reply To email address which recipients will now be able to directly reply to from your statement emails!

    NOTE : Sender Name & Reply To will be used for both Classic Statement Email and Email Text & Logo.


  5. In the Box Classic Statement Email on the upper side of the subtab enter your custom email subject (example: “Your Royalty Statement”) and

  6. Add a text template to be used for future standard batch emails with this statement layout.

NOTE : For both email subject and text you can use the variable $period$ which will automatically be replaced with the period of the statement you are sending out.


Find out how to send a batch email here.

Account Recoupables

How to start with details – manual

Read previous step here how to set up / add Royalty Accounts, Contracts and Recoupables.


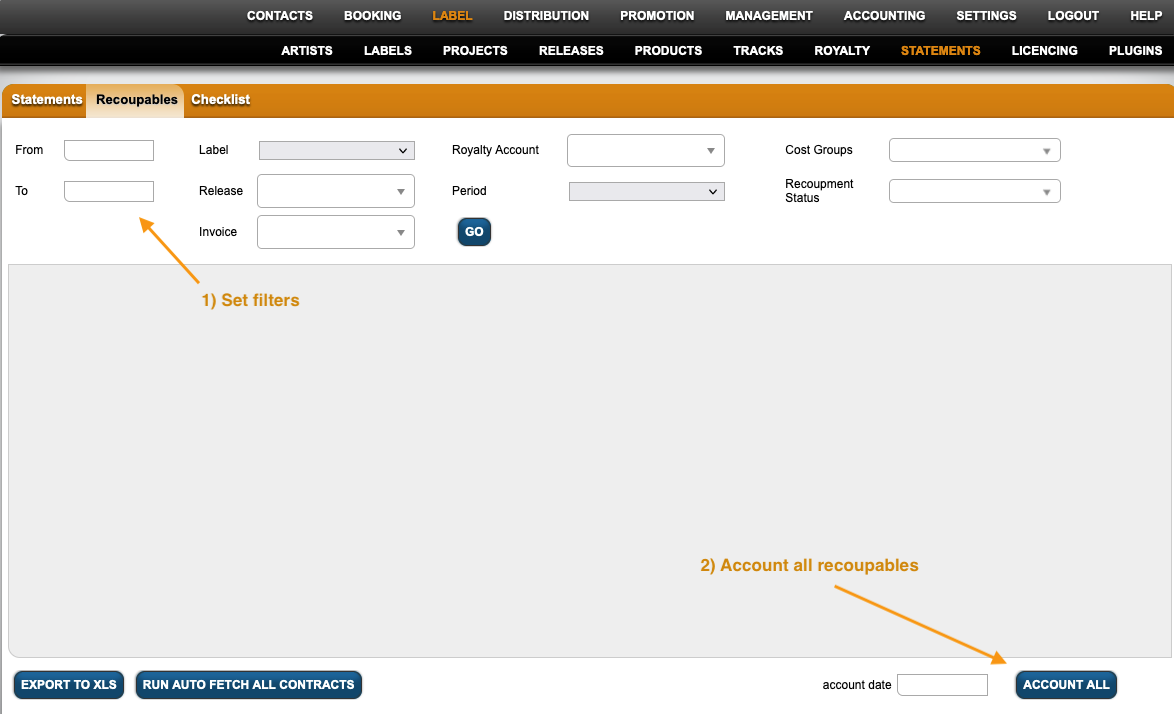
To account Recoupables in a batch across all releases & products go to LABEL / STATEMENTS / RECOUPABLES


Select the start and end date of your current royalty period and add more filters if needed.

To account all, click Account All at the bottom of the page.


Alternatively you can account single recoupable costs by clicking Account Recoupable line by line.

Please note: If it s displayed Not Recoupable instead, the royalty contract has no recoupment option. If this is not correct you need to update your settings at LABEL / ROYALTY / RECOUPABLES


Once you have accounted the recoupables, they will be set off against royalties in the royalty statement.


Read next step here – how to create Royalty Statements

Create Royalty Statements

How to start with details – manual

read previous step here – how to account recoupables


Before you can now run your royalty statements, the last step is to Confirm Royalty Dates. Depending on the account base selected within your royalty accounts, all sales lines are added to the correct accounting period.

Go to LABEL / STATEMENTS / CHECKLIST and check if you can answer all step’s with a ‘yes’. Then click Confirm Royalty Dates at the bottom of the page. Now you can run your royalty statements.

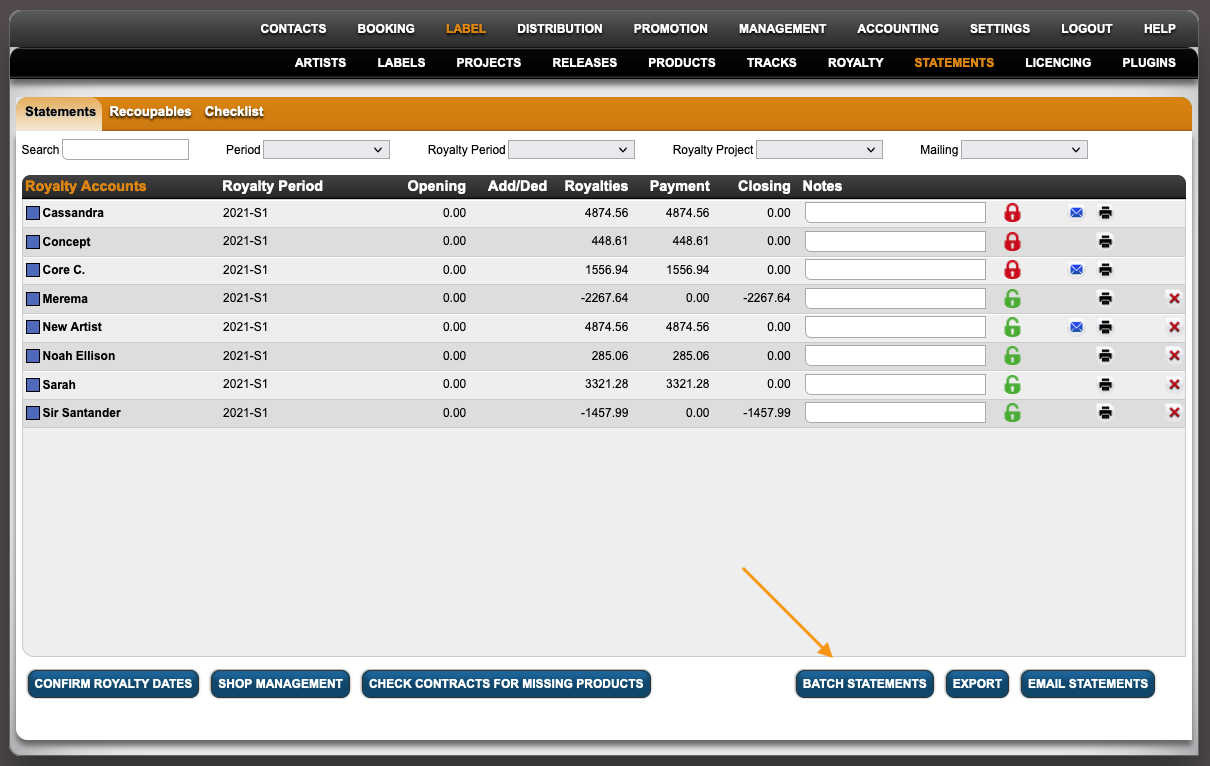
To run your royalty statements in a batch, go to LABEL / PLUGINS and activate the Plugin Batch Statements by clicking twice.


Back on LABEL / STATEMENTS / STATEMENTS you can now find the additional button Batch Statements.


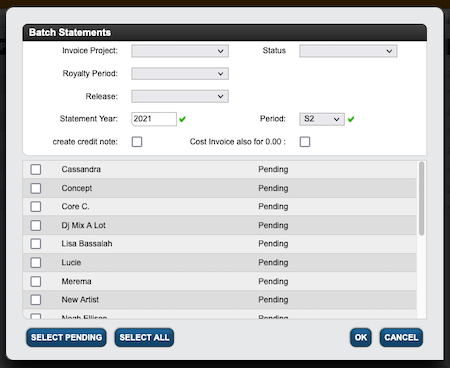
Click Batch Statements and select Statement Year and Statement Period in the module window.


Now select manually which royalty accounts you want to run statements for or click Select Pending / All and click [OK] to proceed.


Congratulations! Your statements are calculated now. Relax! You will be notified by email when the process is complete.

Find all your statements on LABEL / STATEMENTS / STATEMENTS or in the royalty account s subtab STATEMENTS.


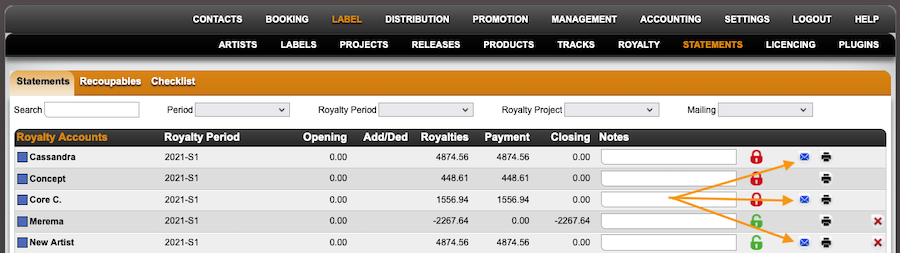
If your royalty account contacts have email addresses assigned, you can send your statements within details by clicking the email symbol.


Booking – Templates

Overview of the BOOKING Tab – TEMPLATES

You can find an INTRODUCTION in how we use templates to create documents in details can be read here.

If you would like to edit your BOOKING TEMPLATES yourself, HERE is how!

Step by Step Guide to variables in a standard Booking Contract

Step by Step Guide to variables in a standard Booking Itinerary

Here is an article about DATE formats in templates

Printer Settings / How to safe templates as pdf

How to save a template that has been manually edited

Code for clickable EMAIL, PHONE and URLs in templates

List of Template Tags

More tips for Html templates