Price Codes, Price Lists, Prices, and Paybacks for physical products


This article explains the relationship between price codes, price lists, prices, and paybacks in details, with a focus on physical product sales. It also covers how these elements are used in royalty accounting when you have a fixed payback price agreed with a royalty owner.

Using price codes and price lists helps you manage product pricing across different customer groups. By categorizing products and linking them to specific price lists, you can ensure each customer type like retailers, wholesalers, or international buyers gets the right price. This makes pricing easier to adjust, more consistent, and better organized for different markets and sales channels.


What are Price Codes and Price Lists?

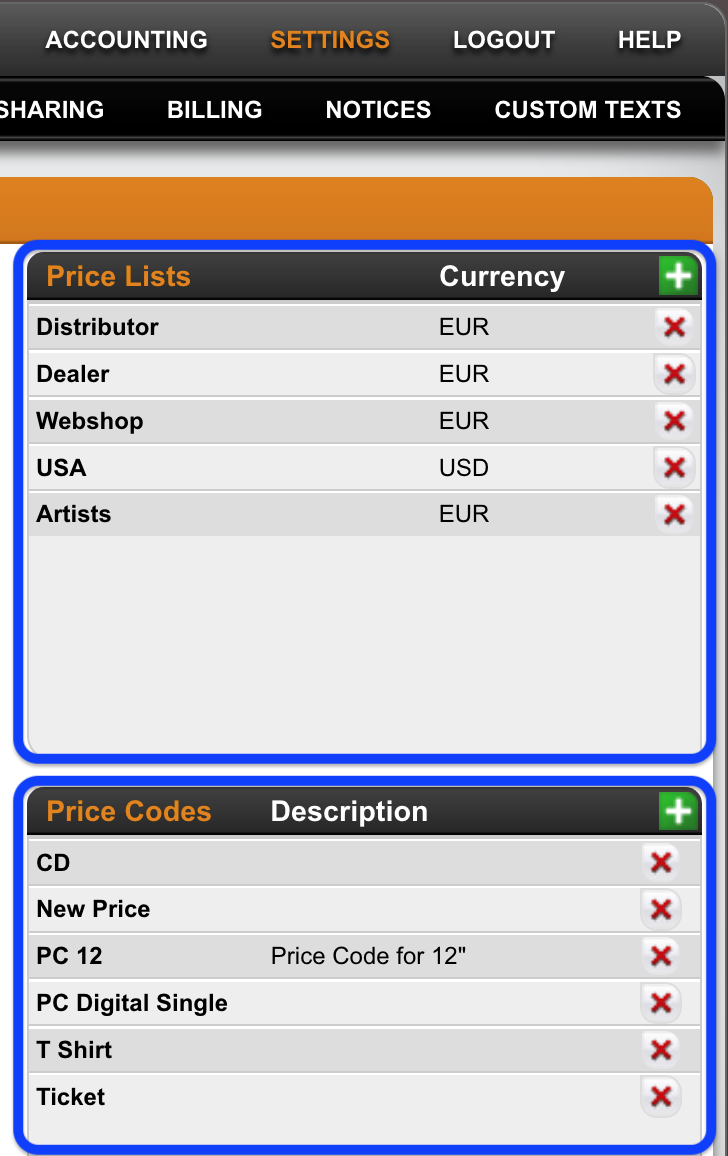
Price Codes are categories or labels that you assign to physical products to define how they should be priced. For example, a price code might indicate whether a product is being sold at a retail price, wholesale price, or export price.

Price Lists are sets of prices that you create for different groups of customers or sales channels. Each price list specifies how much each physical product (tagged with a particular price code) will cost for a specific customer group.

Both are set in SETTINGS / LABEL / PRICING
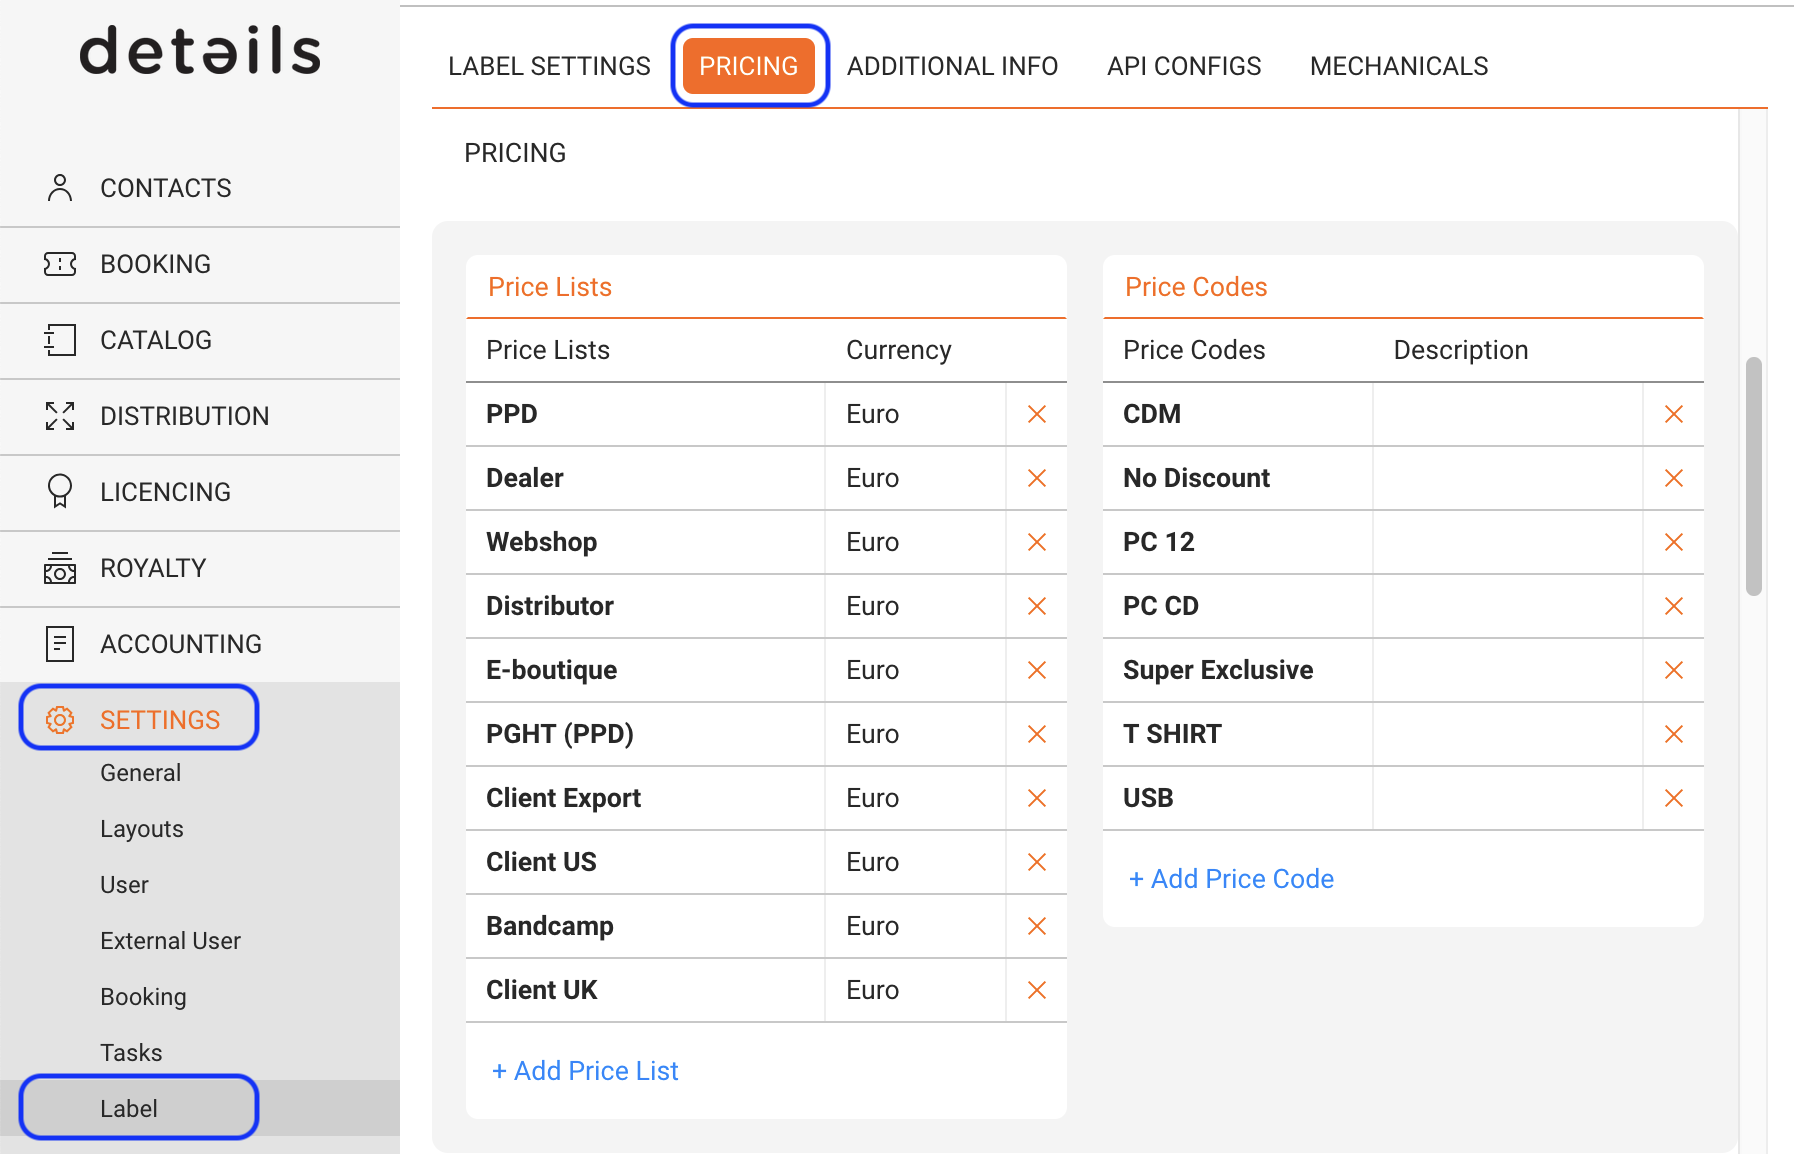


How Price Codes and Price Lists work together

1. Price Codes : You might have price codes like Retail CD, Wholesale Vinyl, Export CD, etc.

2. Price Lists : You could have a Retail Price List for shops, a Wholesale Price List for distributors, and an Export Price List for international markets.

3. Creating a Pricing Matrix :
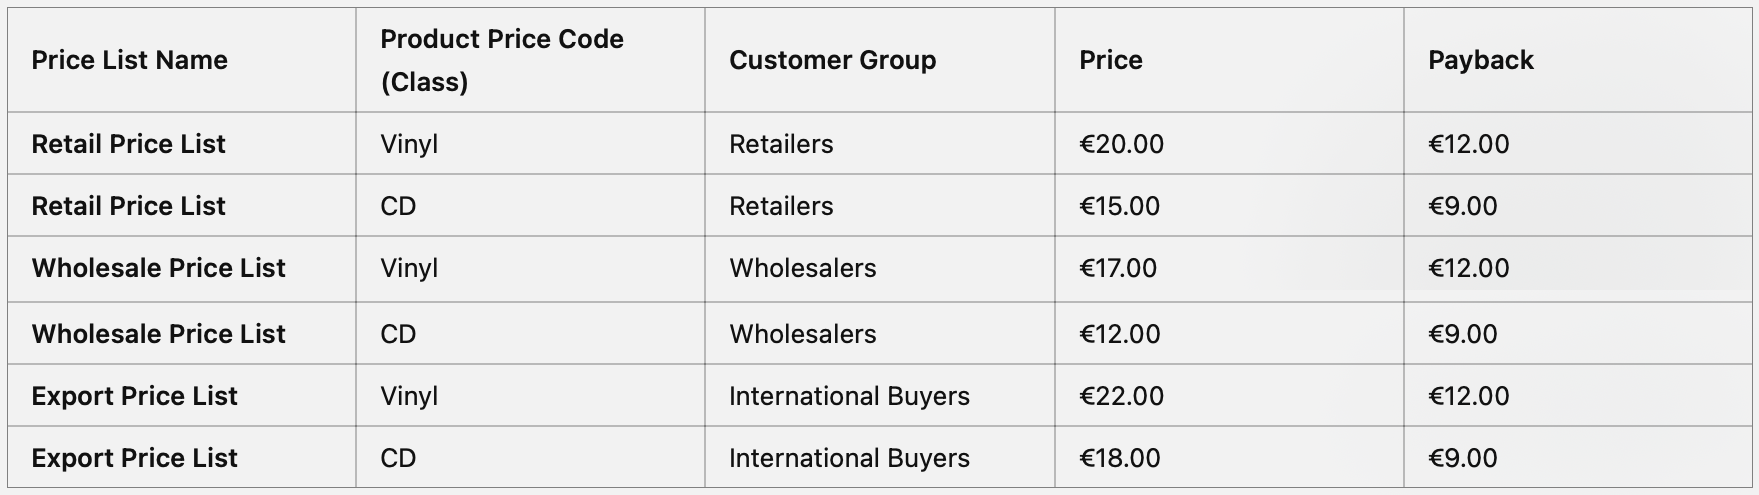
 

Price List Prices and Paybacks

As mentioned, price lists define specific prices and paybacks for products tailored to distinct groups of customers.

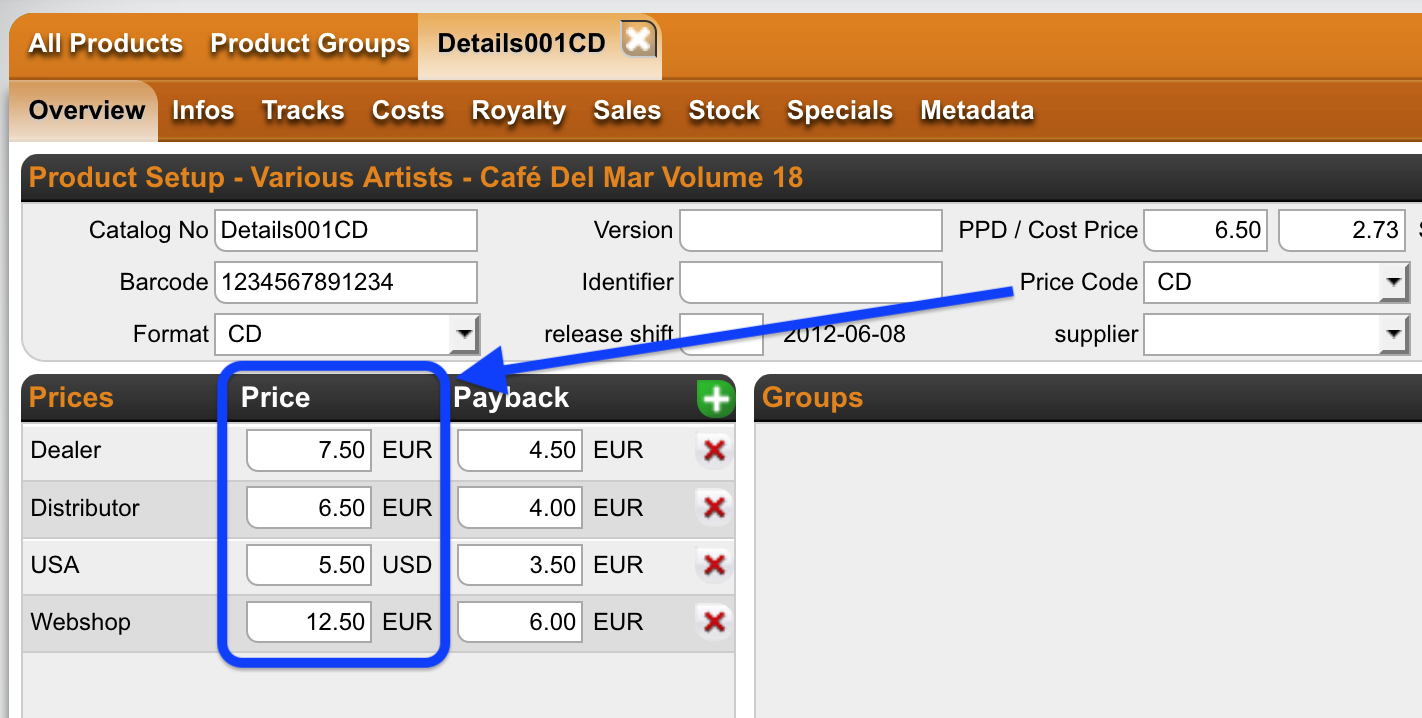
  • Prices : Price List Prices are the amounts at which the selected products are sold to customers. These prices are listed before any discounts that may be applied to orders or invoices.
    For example, when processing orders and generating invoices, the price list price is what your customers will see on the order confirmation or the invoice before discounts of course.

    In Orders, price list prices are used to calculate the turnover for each order line, which is essential for accurate invoicing.
    However, note that price list prices are not applied to sales imports, meaning they don t affect sales data brought into the system from external sources.

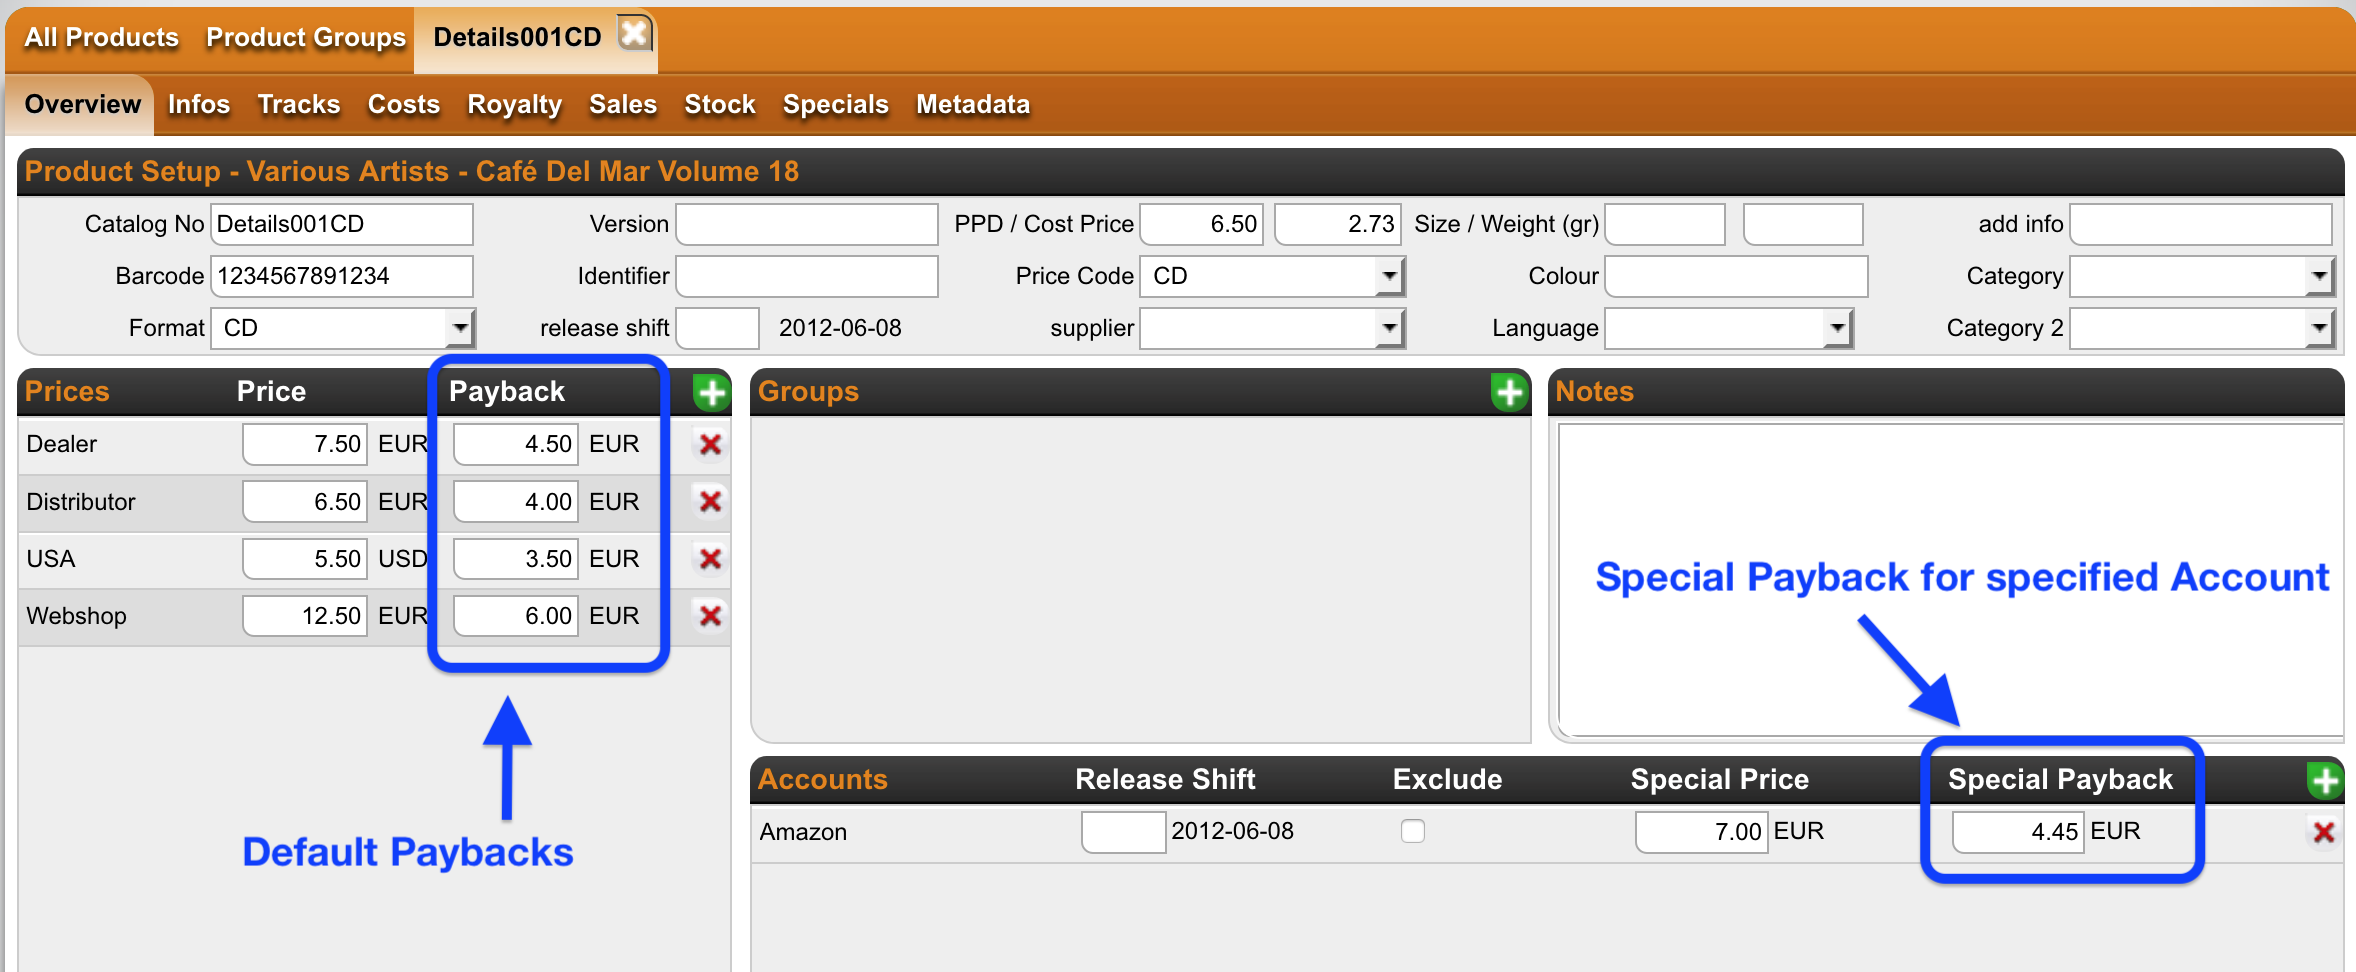
  • Paybacks : Paybacks are the amounts paid to your suppliers or rights holders for each sale made on this price list.
    If you are using the royalty base Payback for physical products in your royalty accounting, this is crucial for accurate accounting. Even if you re not interested in tracking your turnover through the platform or detailing your invoices, setting up paybacks is essential if you account royalties to your rights holders based on those.

Using the Payback Royalty Base for Physical Products

To properly account for royalties on physical products, when a fixed payback price is agreed upon with the royalty owner, you need to set up a couple of things:

1) Settings in Royalty Contract :
In Royalty Contracts where this should be applied, you need to set the BASE of the royalty rate to PAYBACK. Since you agree to a specific payback price you will probably want to account ”100%” of the agreed price.
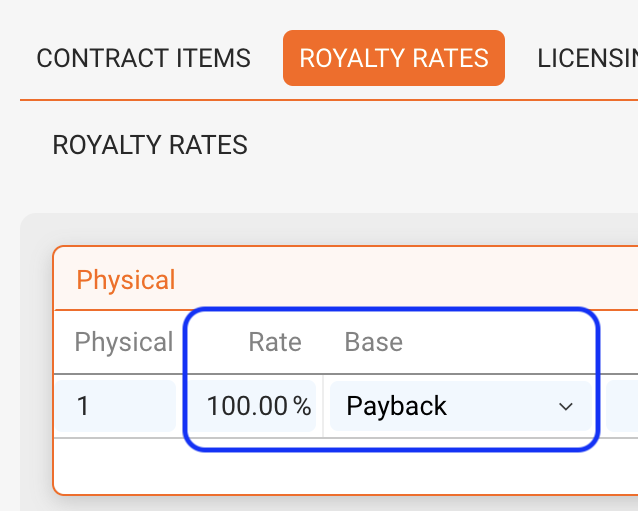
 

2) Setting up and assigning Price Lists :

You need to create PRICE LISTS in SETTINGS and set them for your (physical) Distribution ACCOUNTS ( shops, distributors, direct sales, etc.) to indicate what prices and paybacks will apply to them.

3) Setting up and assigning Price Codes :
You need to create PRICE CODES in SETTINGS / LABEL / PRICING and then specify price codes per physical product which indicate at what prices you will sell your products. To assign PRICE CODES, select a product in LABEL / PRODUCTS and assign a price code from the dropdown on the OVERVIEW.
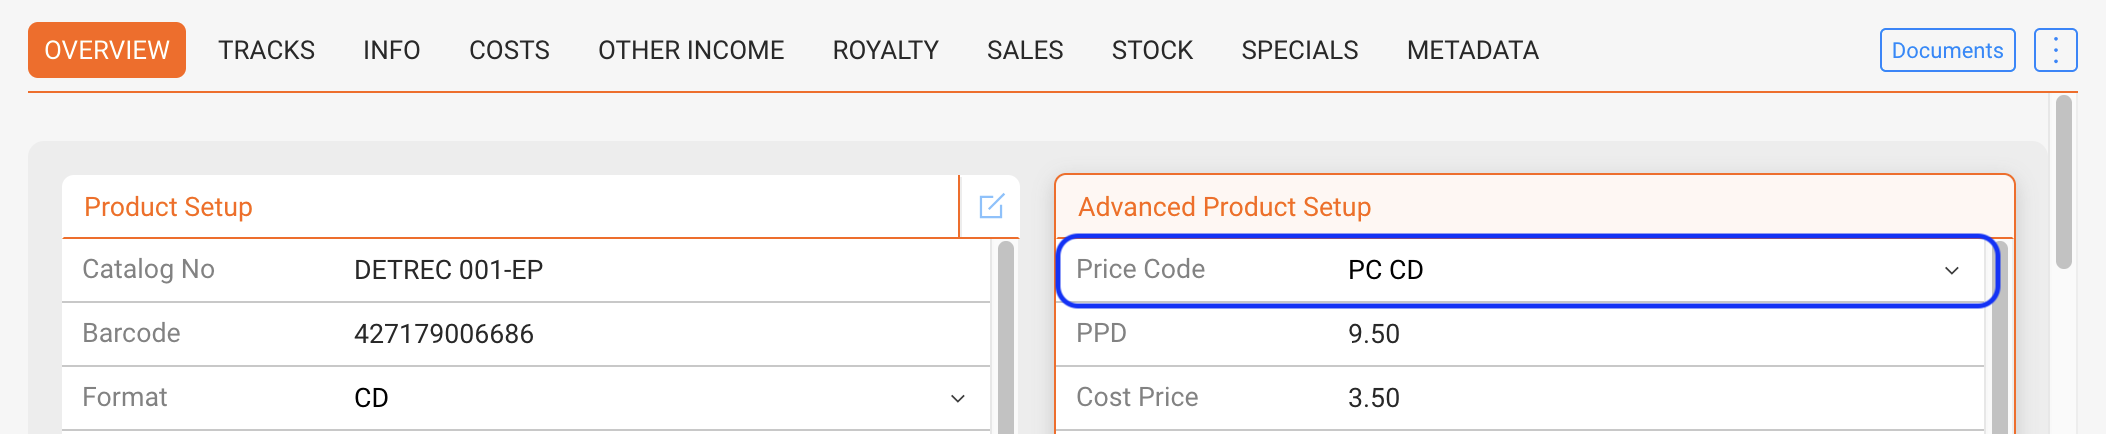


Those are the three basic elements you will need to specify for distinct PRODUCTS when sold by distinct ACCOUNTS.

Once you have specified a PRICE CODE for a selected product, you can load PRICE LISTS with their prices and paybacks and modify at will for this specific product.
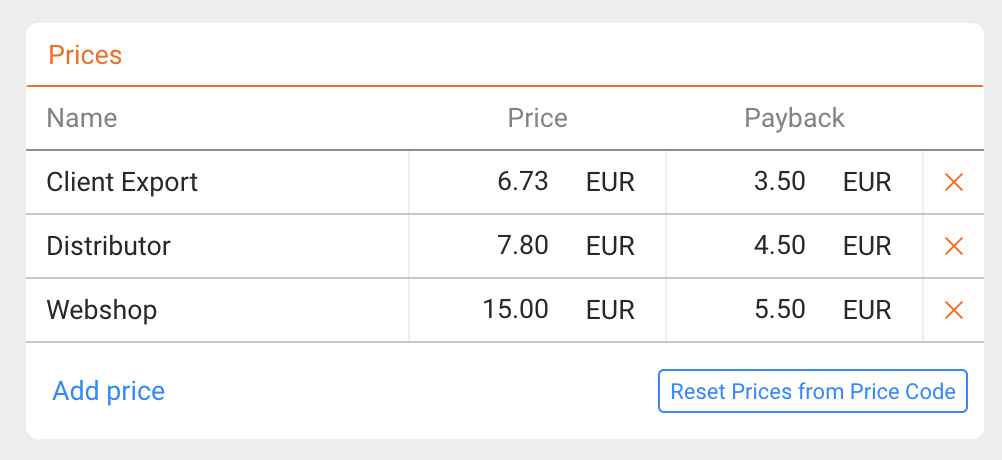


This setup process may be complex in the beginning, but will soon prove it’s worth, when prices and paybacks automatically assign to orders and sales for selected products through selected accounts.

Once set up, you don’t need to keep the information in your head and the machine will run smoothly.

nice!
How to set up a Royalty Contract for a Distributed Label


To create royalty statements for your distributed label, you first need to setup a royalty account and contract.
Here you can add an automatism that ensures that all releases, products & tracks of the label will always be included in the royalty contract.

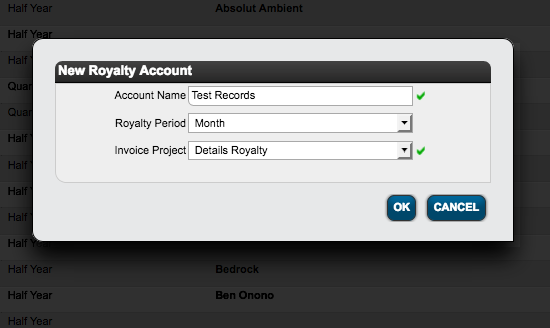
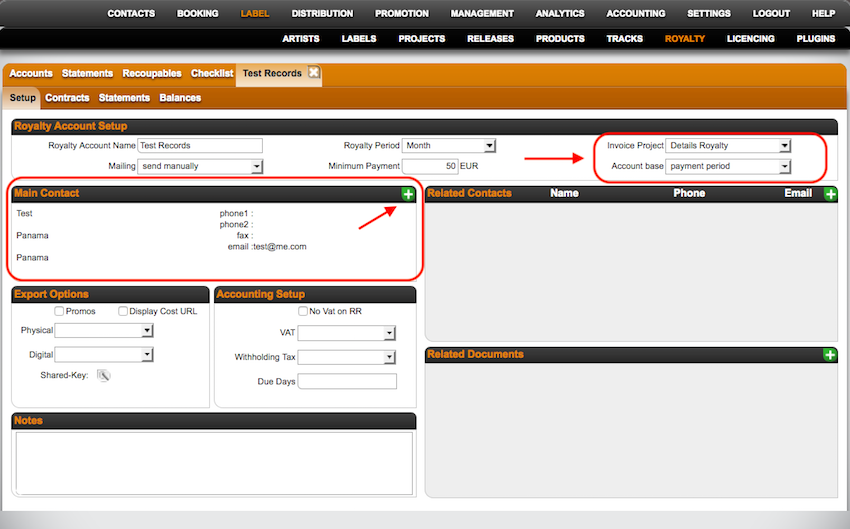
1) Go to LABEL / ROYALTY and create a new royalty account with [+] and enter all info in the module window.


::


2) Once set up you can fill out additional fields, e.g. minimum payment, export options etc
Make sure you add:
*Main Contact
*Invoice Project
*Account base


::::


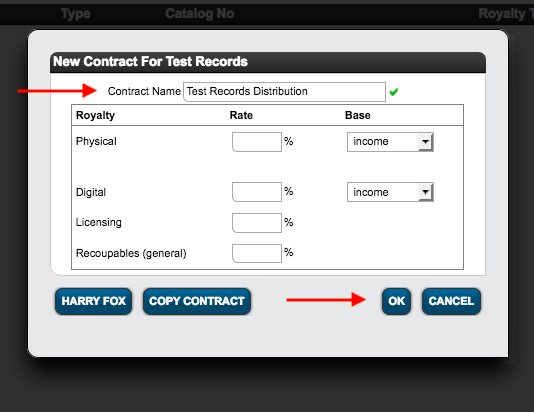
3) Go to subtab CONTRACTS and add a new contract. You can ignore the settings in the module window, just enter a contract name and proceed.


::::


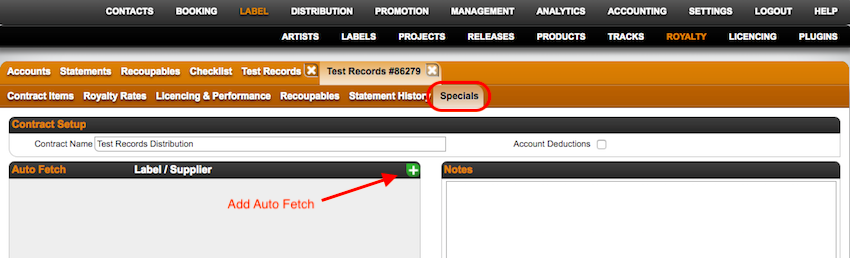
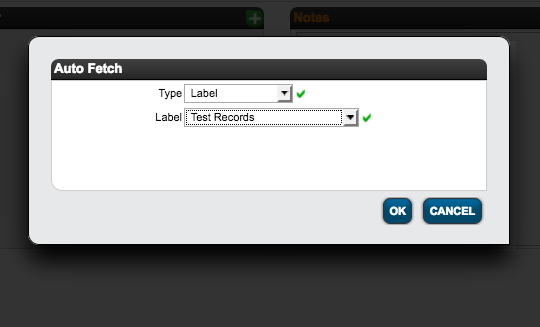
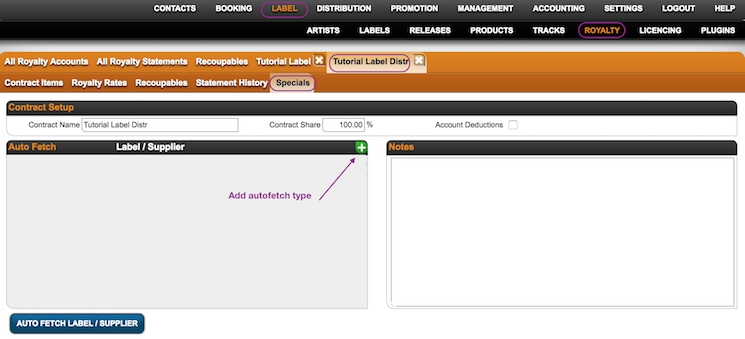
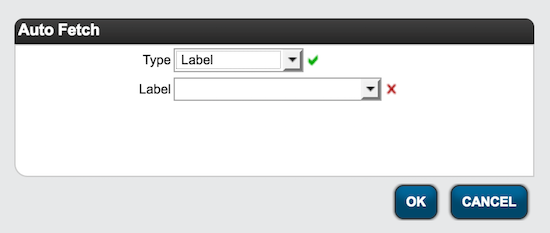
4) To add all label related contract items, go straight to the subtab Specials and add an auto fetch option. Select type: ‘Label’ and the label we just up the contract for.
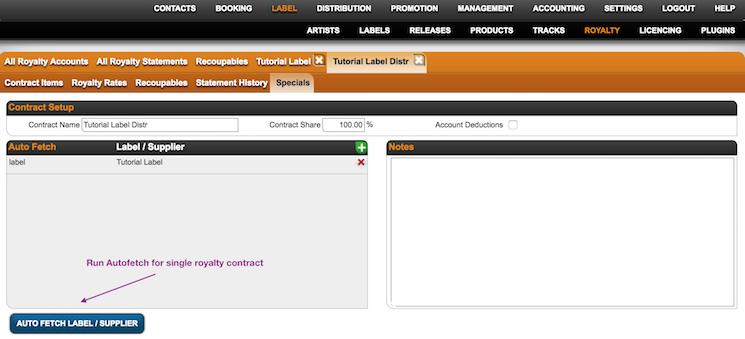
Then click the button Auto fetch.
NOTE: The button does not confirm action, preferably do not click multiple times.


::

::


5) Go to the subtab CONTRACT ITEMS and doublecheck the items that have been added to your contract. If this is all correct, you can add you royalty rates and recoupables.


Make sure you run the ‘Auto Fetch All Contracts’ each time before you start creating statements, to ensure all items will be added to the related contracts.

Related articles:
Run Autofetch All Contracts
How to account physical sales on special payback prices

How to do batch royalty statements

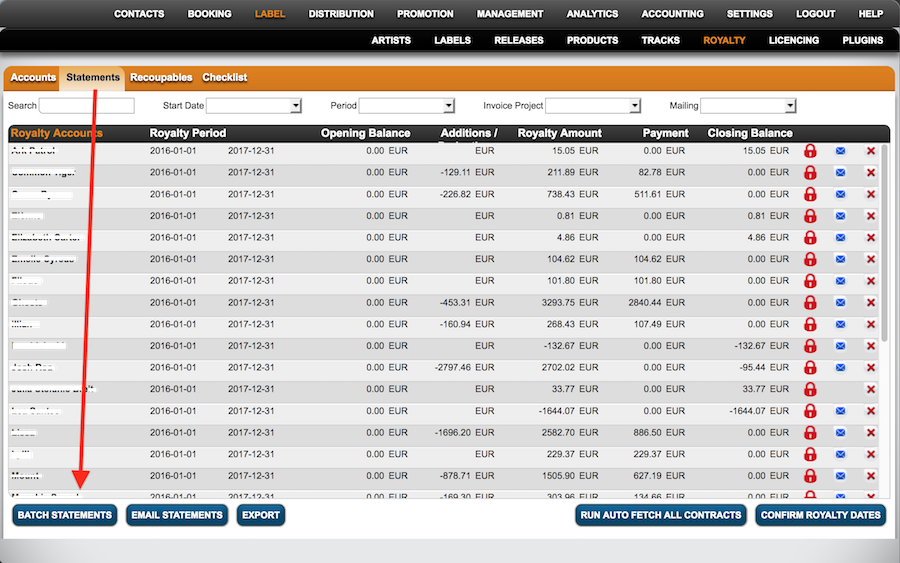
To activate BATCH STATEMENTS go to LABEL / PLUGIN and click BATCH STATEMENTS PROCESSING.

1) Now go to LABEL / ROYALTY and select the subtab ALL ROYALTY STATEMENTS. At the bottom of the list you can now find and click the button BATCH STATEMENTS.

::


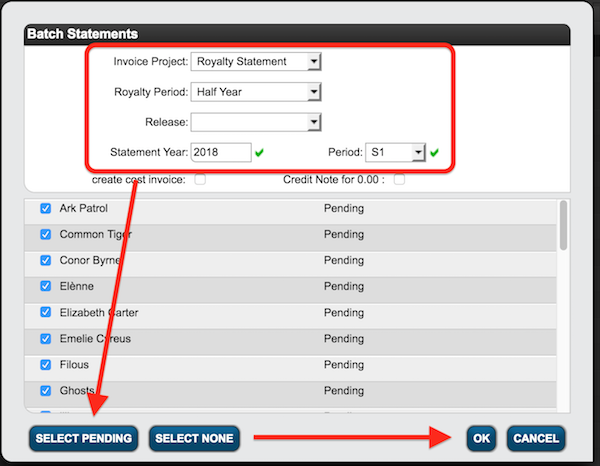
2) Type in the STATEMENT YEAR and PERIOD & filter by Invoice Project and Royalty Period. Select manually or click Select Pending. Click [OK] to proceed.

::


All statements will now be calculated, you will be notified by e-mail when the process is complete.

Read more on royalty statements here.

How to set Return Reserves

Reserves Against Returns
or “Return Reserves” are a certain amount of physical records or percentage of royalties (from physical sales) which are withheld off the top from the artist by the record label to guard against the label paying royalties on physical records that may be returned by retailers in the future.

The reserves are based on clauses you may find in Artist Contracts such as

“Label shall have the right to establish a royalty reserve against anticipated returns and credits, of up to twenty (20%) percent of the royalty earnings associated with the units of each Record reported as distributed to its customers in that period. Each royalty reserve shall be liquidated equally and in full over the four (4) semi-annual accounting periods following the accounting period during which the applicable reserve is originally established.” *see the end of this article for corresponding settings in details


In details you can set up return reserves in your royalty CONTRACT on LABEL / ROYALTY.

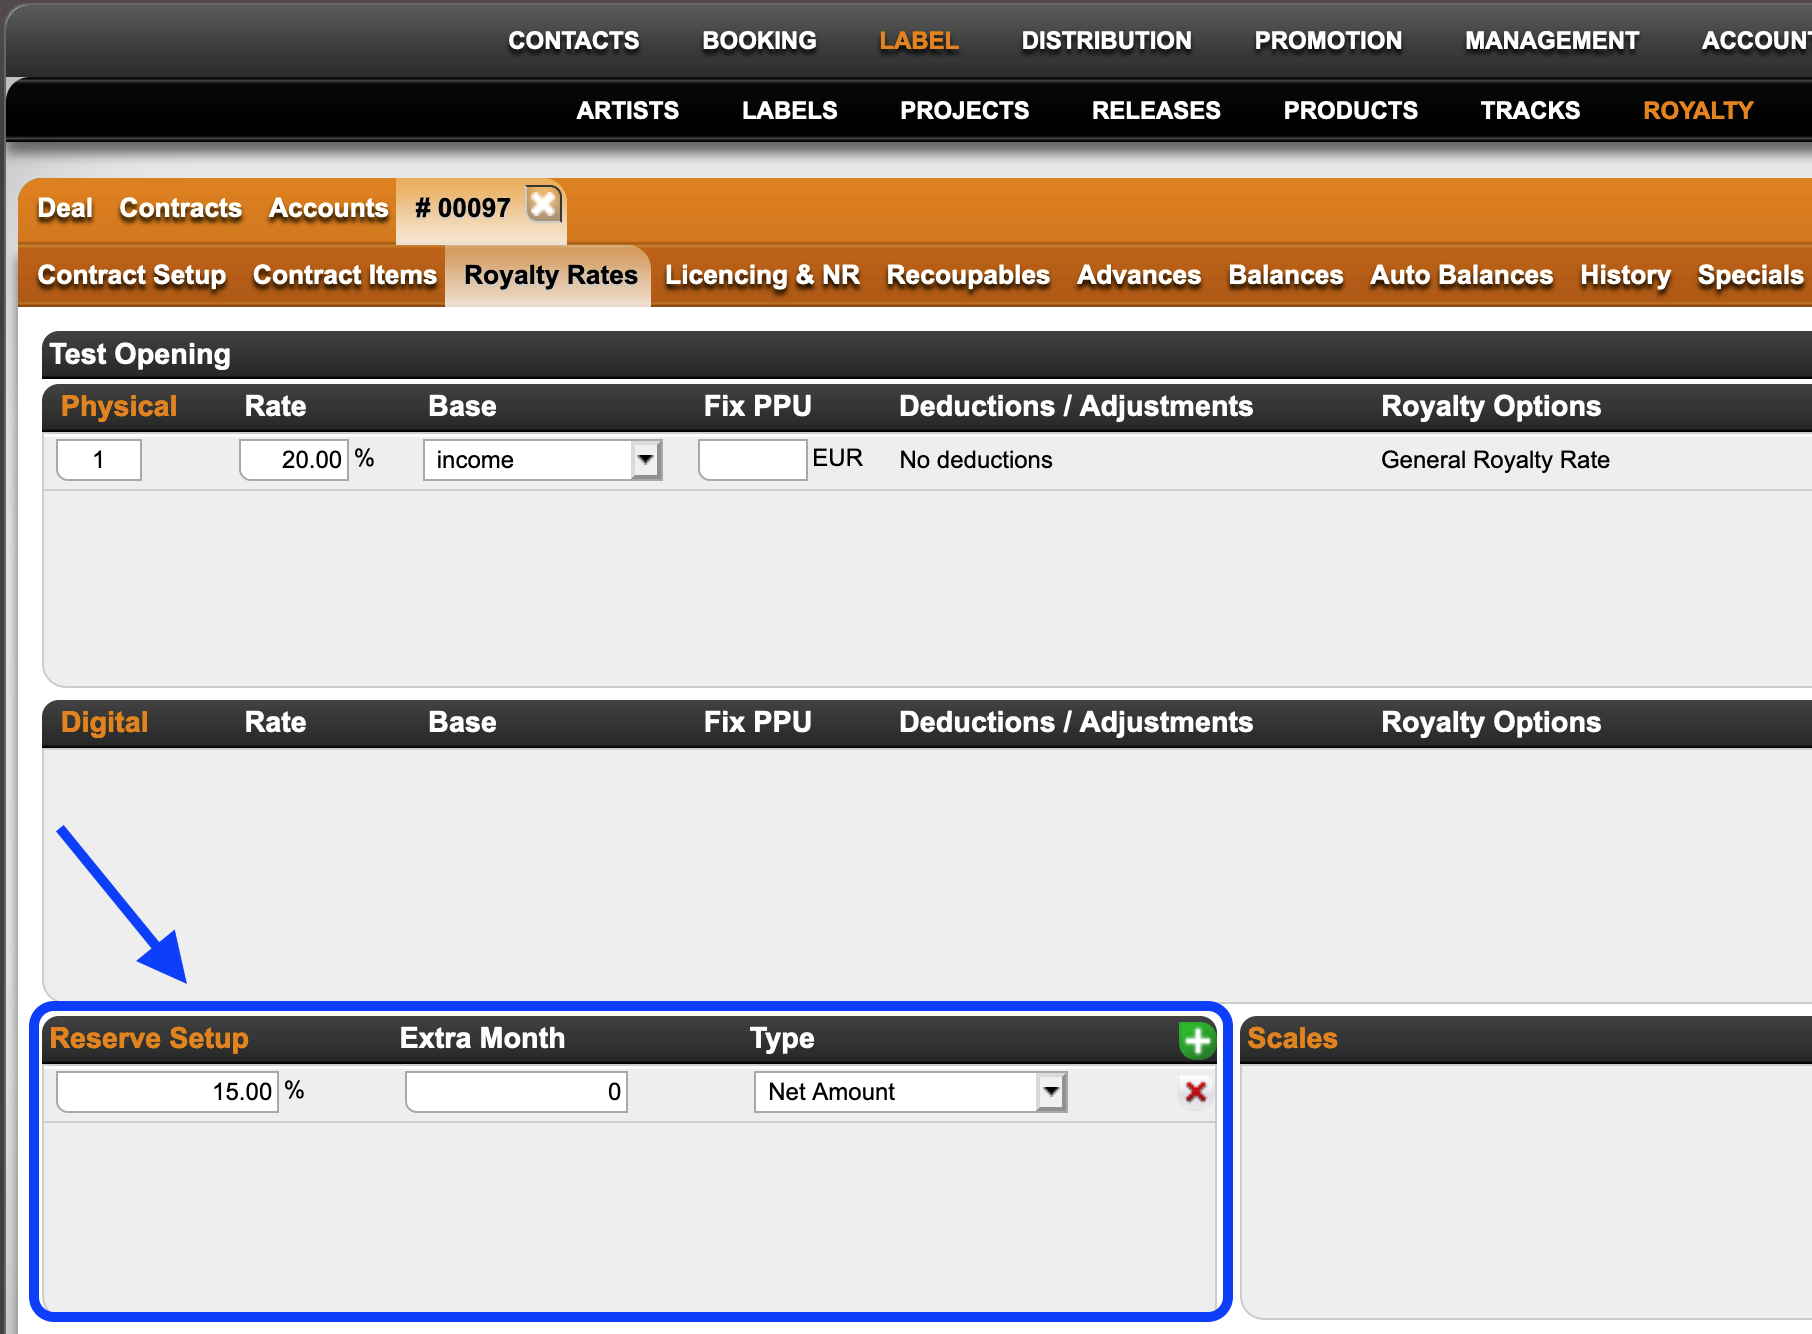
1) Select the royalty contract and go to the subtab Royalty Rates.


2) Click the green [+] icon to add a reserve and add your reserve percentage and type of reserve you want to add it to.

Catalog No will calculate the reserve to selected products only
Net Amount will calculate the reserve to all physical products included in the specific royalty contract

details will create a return reserve in the current royalty period and by default release it in the next.
 
Extra Month will add additional time to this rule.
NOTE : As this is easy to misinterprete, please read the instructions at the end of this article if you want to apply this option.


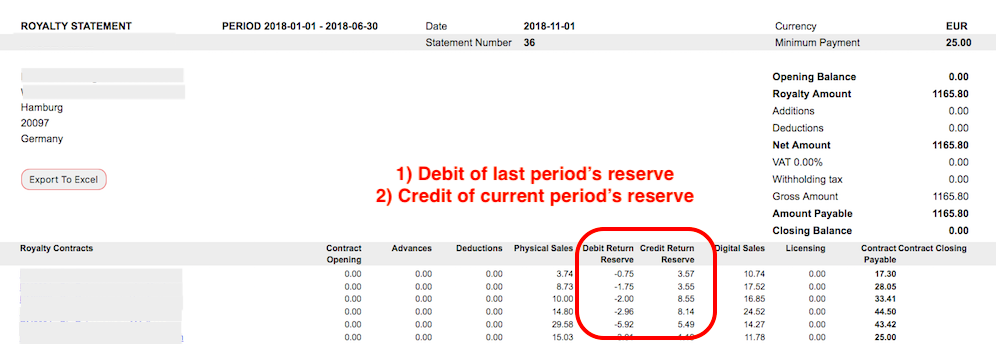
3) The reserves and credits of past reserves will be listed on the royalty statement accordingly.


How to apply the Extra Month option:

Royalty Periods can be
monthly = period of 1x month
quarterly = period of 3x months
semester = period of 6x months

IF X is current royalty period, then next period X+1 is
X + 1 month for monthly
X + 3 months for quarterly
X + 6 months for semester

details will create a Return Reserve in X and by default release it in X+1
=> the setting for the default is EMPTY or 0 Extra Months
so
M1 => M2 for monthly
Q1 => Q2 for quarterly
H1 => H2 for semester


If you are setting Extra Months they will be applied ON TOP of X +1

(1) example “shift”
for use of Extra Month to shift a return release 3 months into the future
M1+ 3 => M4 for monthly
Q1+ 3 => Q3 for quarterly (Q2 plus three additional months on top)
H1+ 3 => H2 + 3 month = effectively next H1 for semester (3 months does not make sense)

(2) example “split”
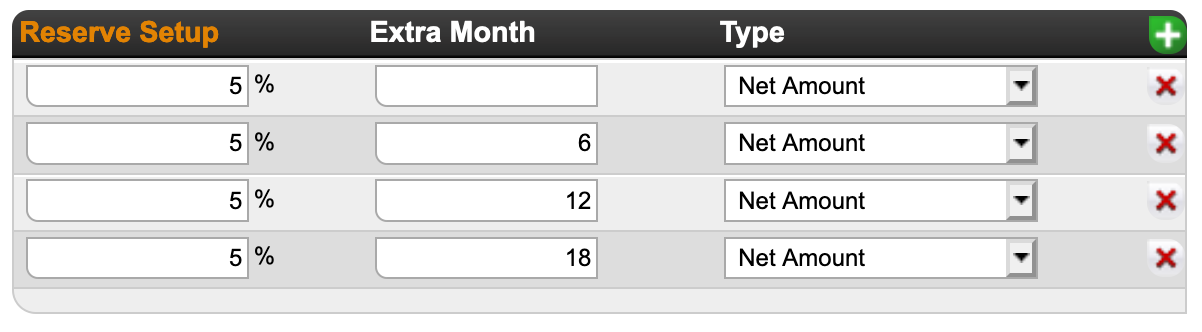
for use of Extra Month to split a 20% return release into 4 parts over 4 periods

The contract clause at the beginning of this article withheld a percentage (20%) of royalty earnings (not income) in the current royalty period and plans to pay it out in 4 equal parts of 5% over a period of the 4 following royalty half-year periods (over 2 years in total). The settings in details would be

(3) example “Distribution scenario”
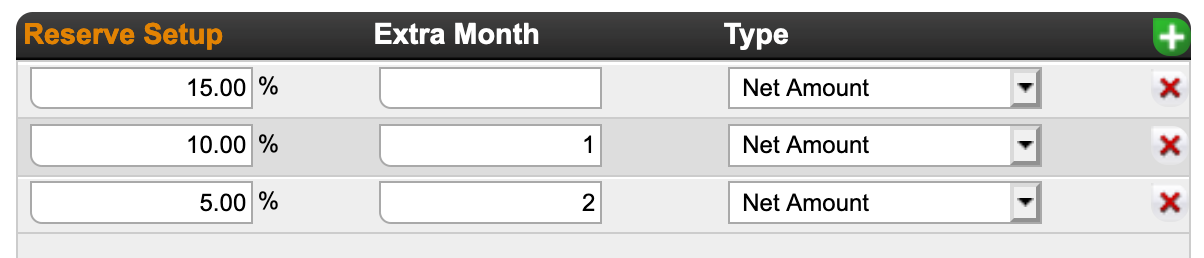
for use of Extra Month set to split a 30% reserve into 3 unequal parts over 3 months :
15% in the next month, 10% the second month and 5% in tthe third month.


If in doubt, contact our Label Team if you need our help!


Royalty Base options

Generally speaking, royalties for sales are calculated by multiplying a royalty share with a certain base price and a sold quantity.

Whilst the quantities sold can be determined without much interpretation from sales less returns, there are various common practices applied in the music industry to determine base prices.

Here is an overview of the base price options currently available in details for royalty calculations:

  • Fix Price (1)
  • income (2)
  • Line PPD (3)
  • Product PPD (10)
  • List Price (4)
  • Max (5)
  • Max Payback (6)
  • Payback (7)
  • Min (8)


    Fix Price
    internal code = 1
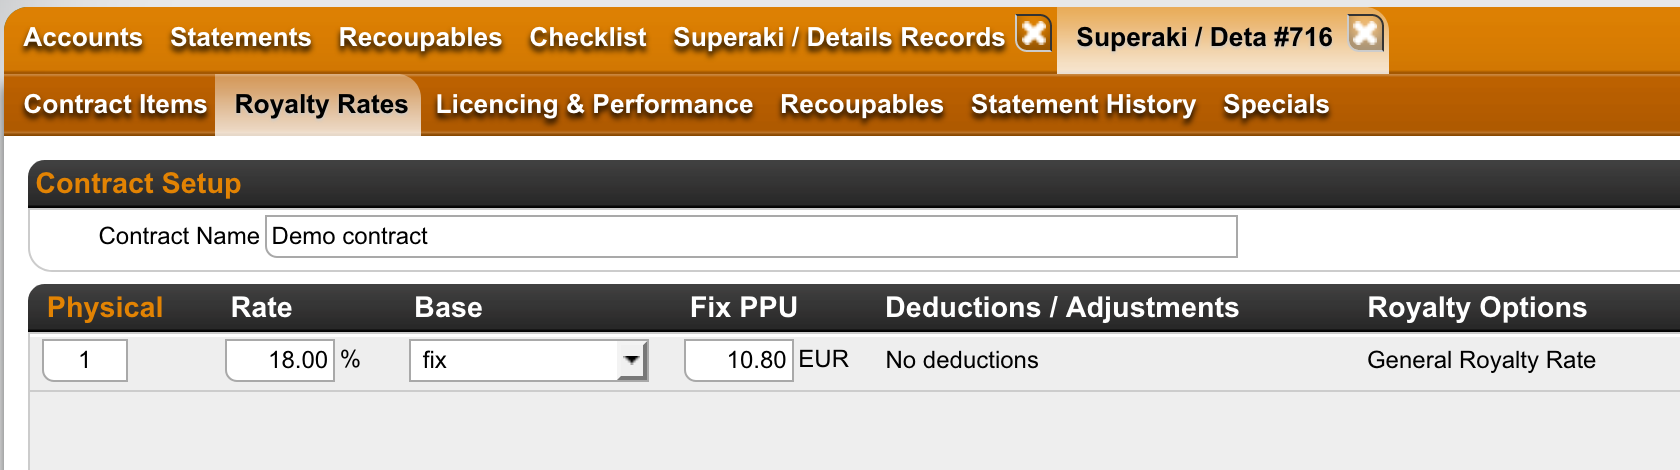
    Royalties may be calculated based on a fixed price determined by contract.
    The fixed price must be specified in the contract in your main accounting currency (system currency).
    The royalty calculation will use this fixed price regardless of the actual income of the sales.

    ”An example would be compilation tracks accounted at royalty rate pro rata at a price of 10.80 for Vinyl.”


    Income / Net Revenue
    internal code = 2
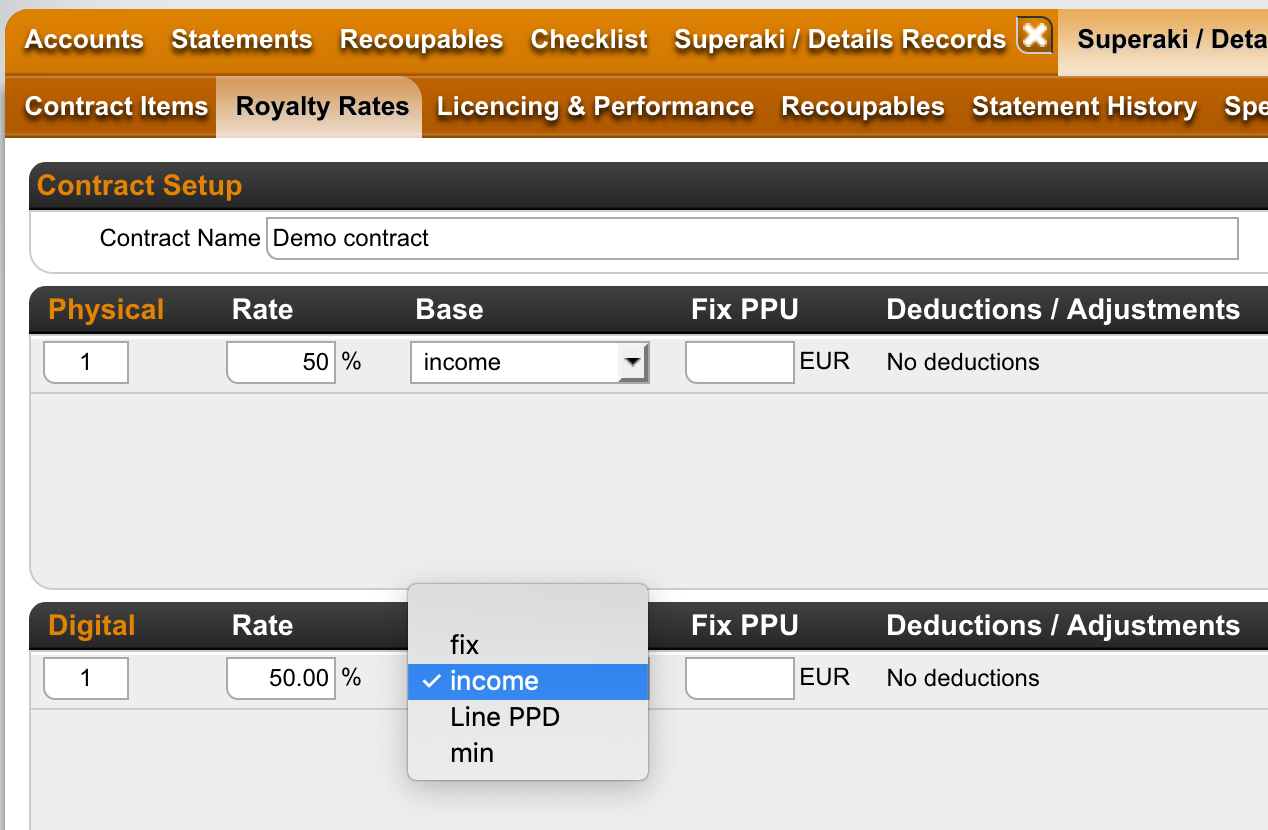
    Royalties may also be calculated based on the actual net income of the label, also referred to as ”PTD (= Price To Distributor)” or ”PPU income (Price Per Unit)”. This is the amount the label is actually paid out from the distribution partner and should end up in the label►s bank account (probably before bank fees).
    The net income is after all discounts and distribution fees from upstream business partners.

    This option should be used for profit split deals.


    Line PPD
    internal code = 3
    The Line PPD is the classic music industry Published Price to Dealer (PPD) as imported from a sales file.
    In other words the Line PPD is the wholesale unit price base reported from your distribution partner before distribution fees. What other discounts or deductions are included in the reported PPD needs to be defined by the distributor.

    Please note that not all distributors provide PPD information per sales line their sales files.
    If your contracts require PPD information, you should make sure that it is delivered by your distributors in a standardized machine-readable form.


    Product PPD
    internal code = 10
    The Product PPD also refers to the Published Price to Dealer (PPD) before Distribution Fees, which in this option is specified however per product in details – and NOT in the distributors’ sales file.

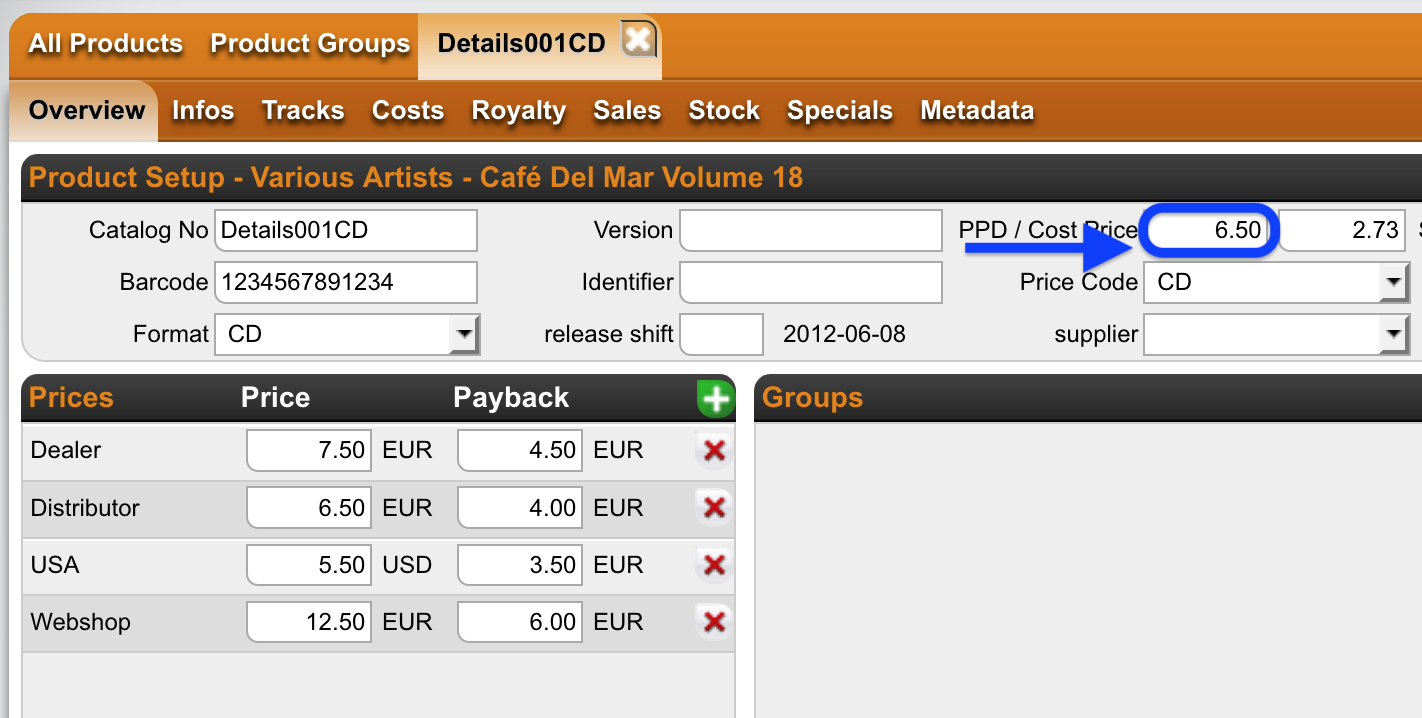
    You can define the PPD at which a product should be accounted in LABEL / PRODUCT / selected product / Overview.

    If your contracts require PPD royalty bases it is important that you understand the difference between these two options: In essence the ”Line PPD” is imported data from an external source and may change from month to month, whereas the ”Product PPD” is set per product in the application and semi-permanent, meaning that the base will only change if you change it manually in the specific product.


    List Price
    internal code = 4
    This option refers to a default sales price fixed for a specific distribution account.


PRICELISTS are used to define specific sales prices to specific customer categories depending on product categories which are defined in our PRICECODES.


Max
internal code = 5
This option contains a price base definition depending on the higher value of two variables, a) the imported PPU Income and b) the price entered as Fix Price.
The Max rule calculates royalties on whichever value is higher.

Max Payback
internal code = 6
This calculation is used to provide a label or distributor with a guaranteed margin regardless of the selling price.
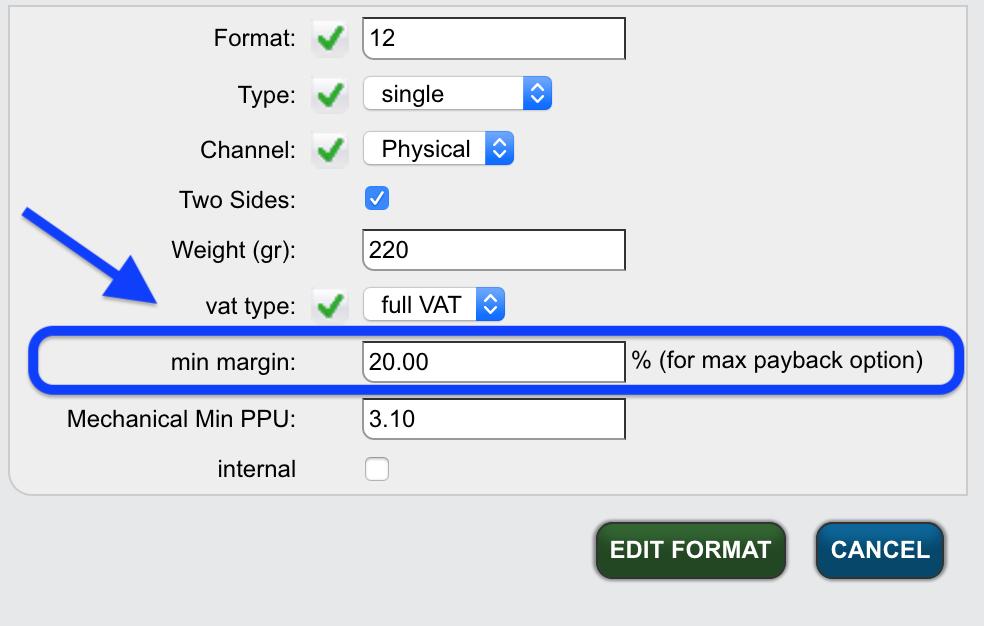
To use this option, clients need to define minimum guaranteed percentage margins per defined product FORMAT.

If the imported PPU Income from sales reports reduced by guaranteed margin for the related format is less than a specified payback for the same format, it uses the payback as royalty base, otherwise the PPU income less the margin.


Payback
internal code = 7
This option refers to an agreed Payback price fixed for a specific product format or specific product.
Paybacks can be set as default for formats like 12″, LPs, CDs, T-Shirts etc.
Specific products however can have ”Special Paybacks” which overrule the default paybacks set for a format.

Find more information on this option HERE


Min
internal code = 8

This option is the reverse case from Max: It compares a) the imported PPU income and b) the entered Fix Price and calculates royalties on whichever value is smaller.


How to create a royalty contract, label receiving a fix price per sold copy

If in your royalty contract it is agreed that the label receives a fix amount per record you can do like that:

– Set up one contract “royalty” where royalty account receives 100% on income on physical.
Add one option entering 100% on income

– Next set up a second contract “fix price”. Add one physical option entering 100% on fix, and add the fix PPU agreed on as negative number, i.e. -1.00 if you agreed on 1  per copy.

The Royalty account will receive all physical income but with a fix deduction per unit that will remain with label.

Label – Royalty

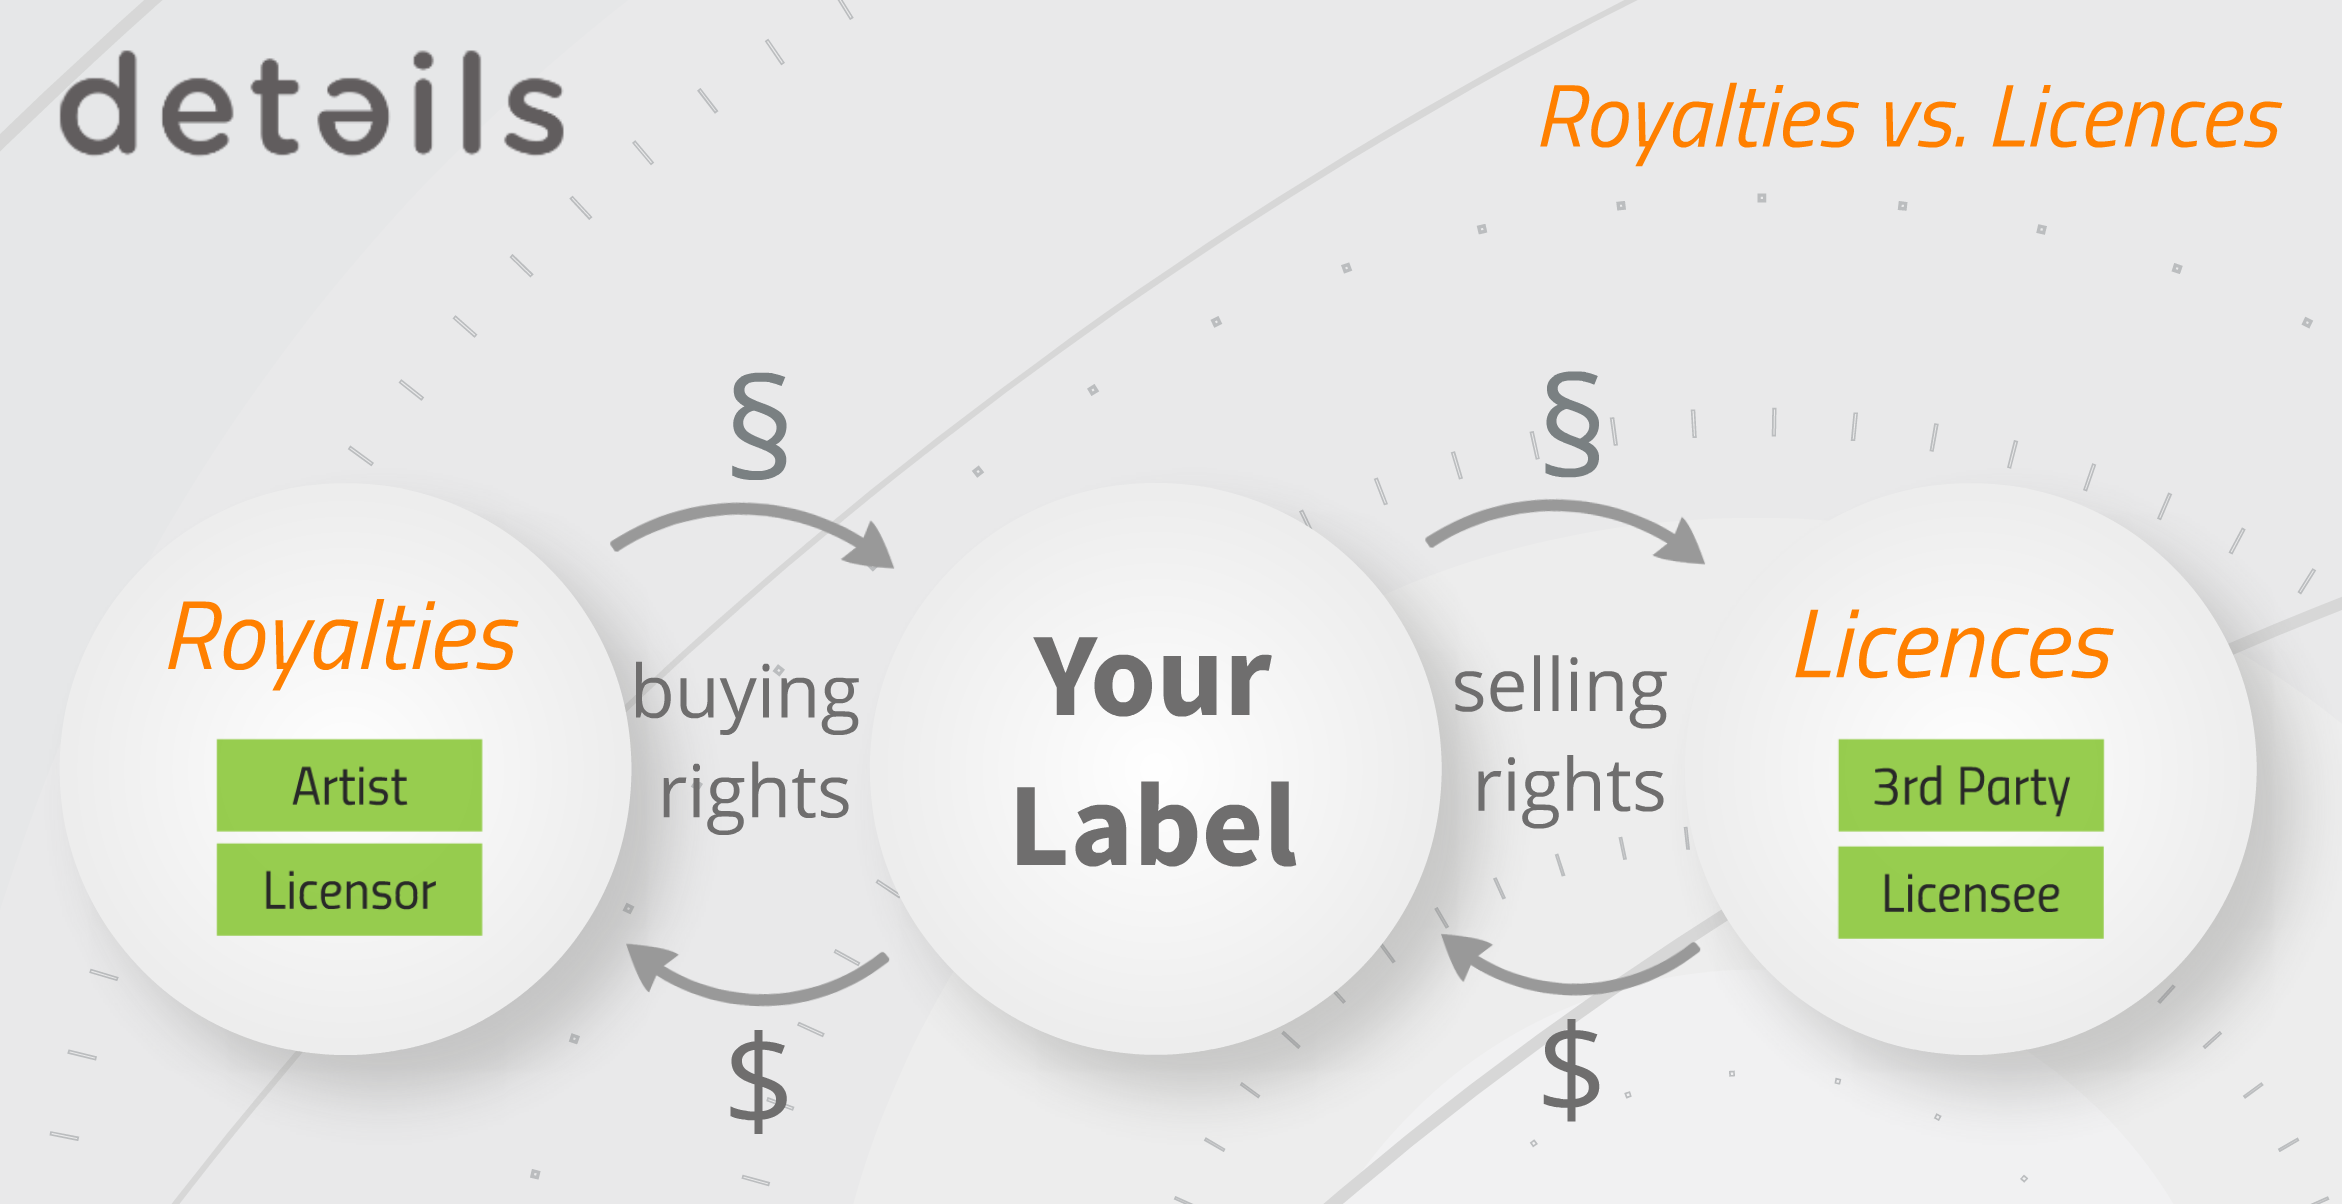
In details we differentiate between business partners which you licence music FROM (i.e. licensors), whom we call ROYALTY ACCOUNTS and – on the other side – partners which we licence tracks TO (i.e. licensees), that we call LICENCE ACCOUNTS.


This section is about ROYALTY ACCOUNTS which you licence TRACKS FROM and to whom you owe royalty statements.

Watch a TUTORIAL video about how to create ROYALTY ACCOUNTS and CONTRACTS for artist releases here.

You can manage your ROYALTY ACCOUNTS and related contracts on LABEL / ROYALTY.
Also your ROYALTY STATEMENTS are created from here.

”Shortcuts”
HOW TO ADD A NEW ROYALTY ACCOUNT
HOW TO SET UP A NEW CONTRACT – ARTIST RELEASE
HOW TO SET UP A NEW CONTRACT – COMPILATION
HOW TO ACCOUNT RECOUPABLES
HOW TO CREATE ROYALTY STATEMENTS
HOW TO ADD NEW CATALOGUE ITEMS TO ROYALTY CONTRACTS AUTOMATICALLY / RUN AUTOFETCH ALL CONTRACTS

###

The subtabs for ROYALTY are All Royalty Accounts, All Royalty Statements and Recoupables.

* All Royalty Accounts:
All your ROYALTY ACCOUNTS are listed here.
You can ADD NEW ROYALTY ACCOUNTS, edit existing accounts and CREATE NEW ROYALTY CONTRACTS.

* All Royalty Statements:
All past ROYALTY STATEMENTS you have created with details are archived here.
You can search, filter and export statements from here as well as send to your accounts separately or in a batch.
The BATCH STATEMENTS option is available here which allows you to create multiple statements in one go. This can be activated on LABEL /PLUGINS.

* Recoupables:
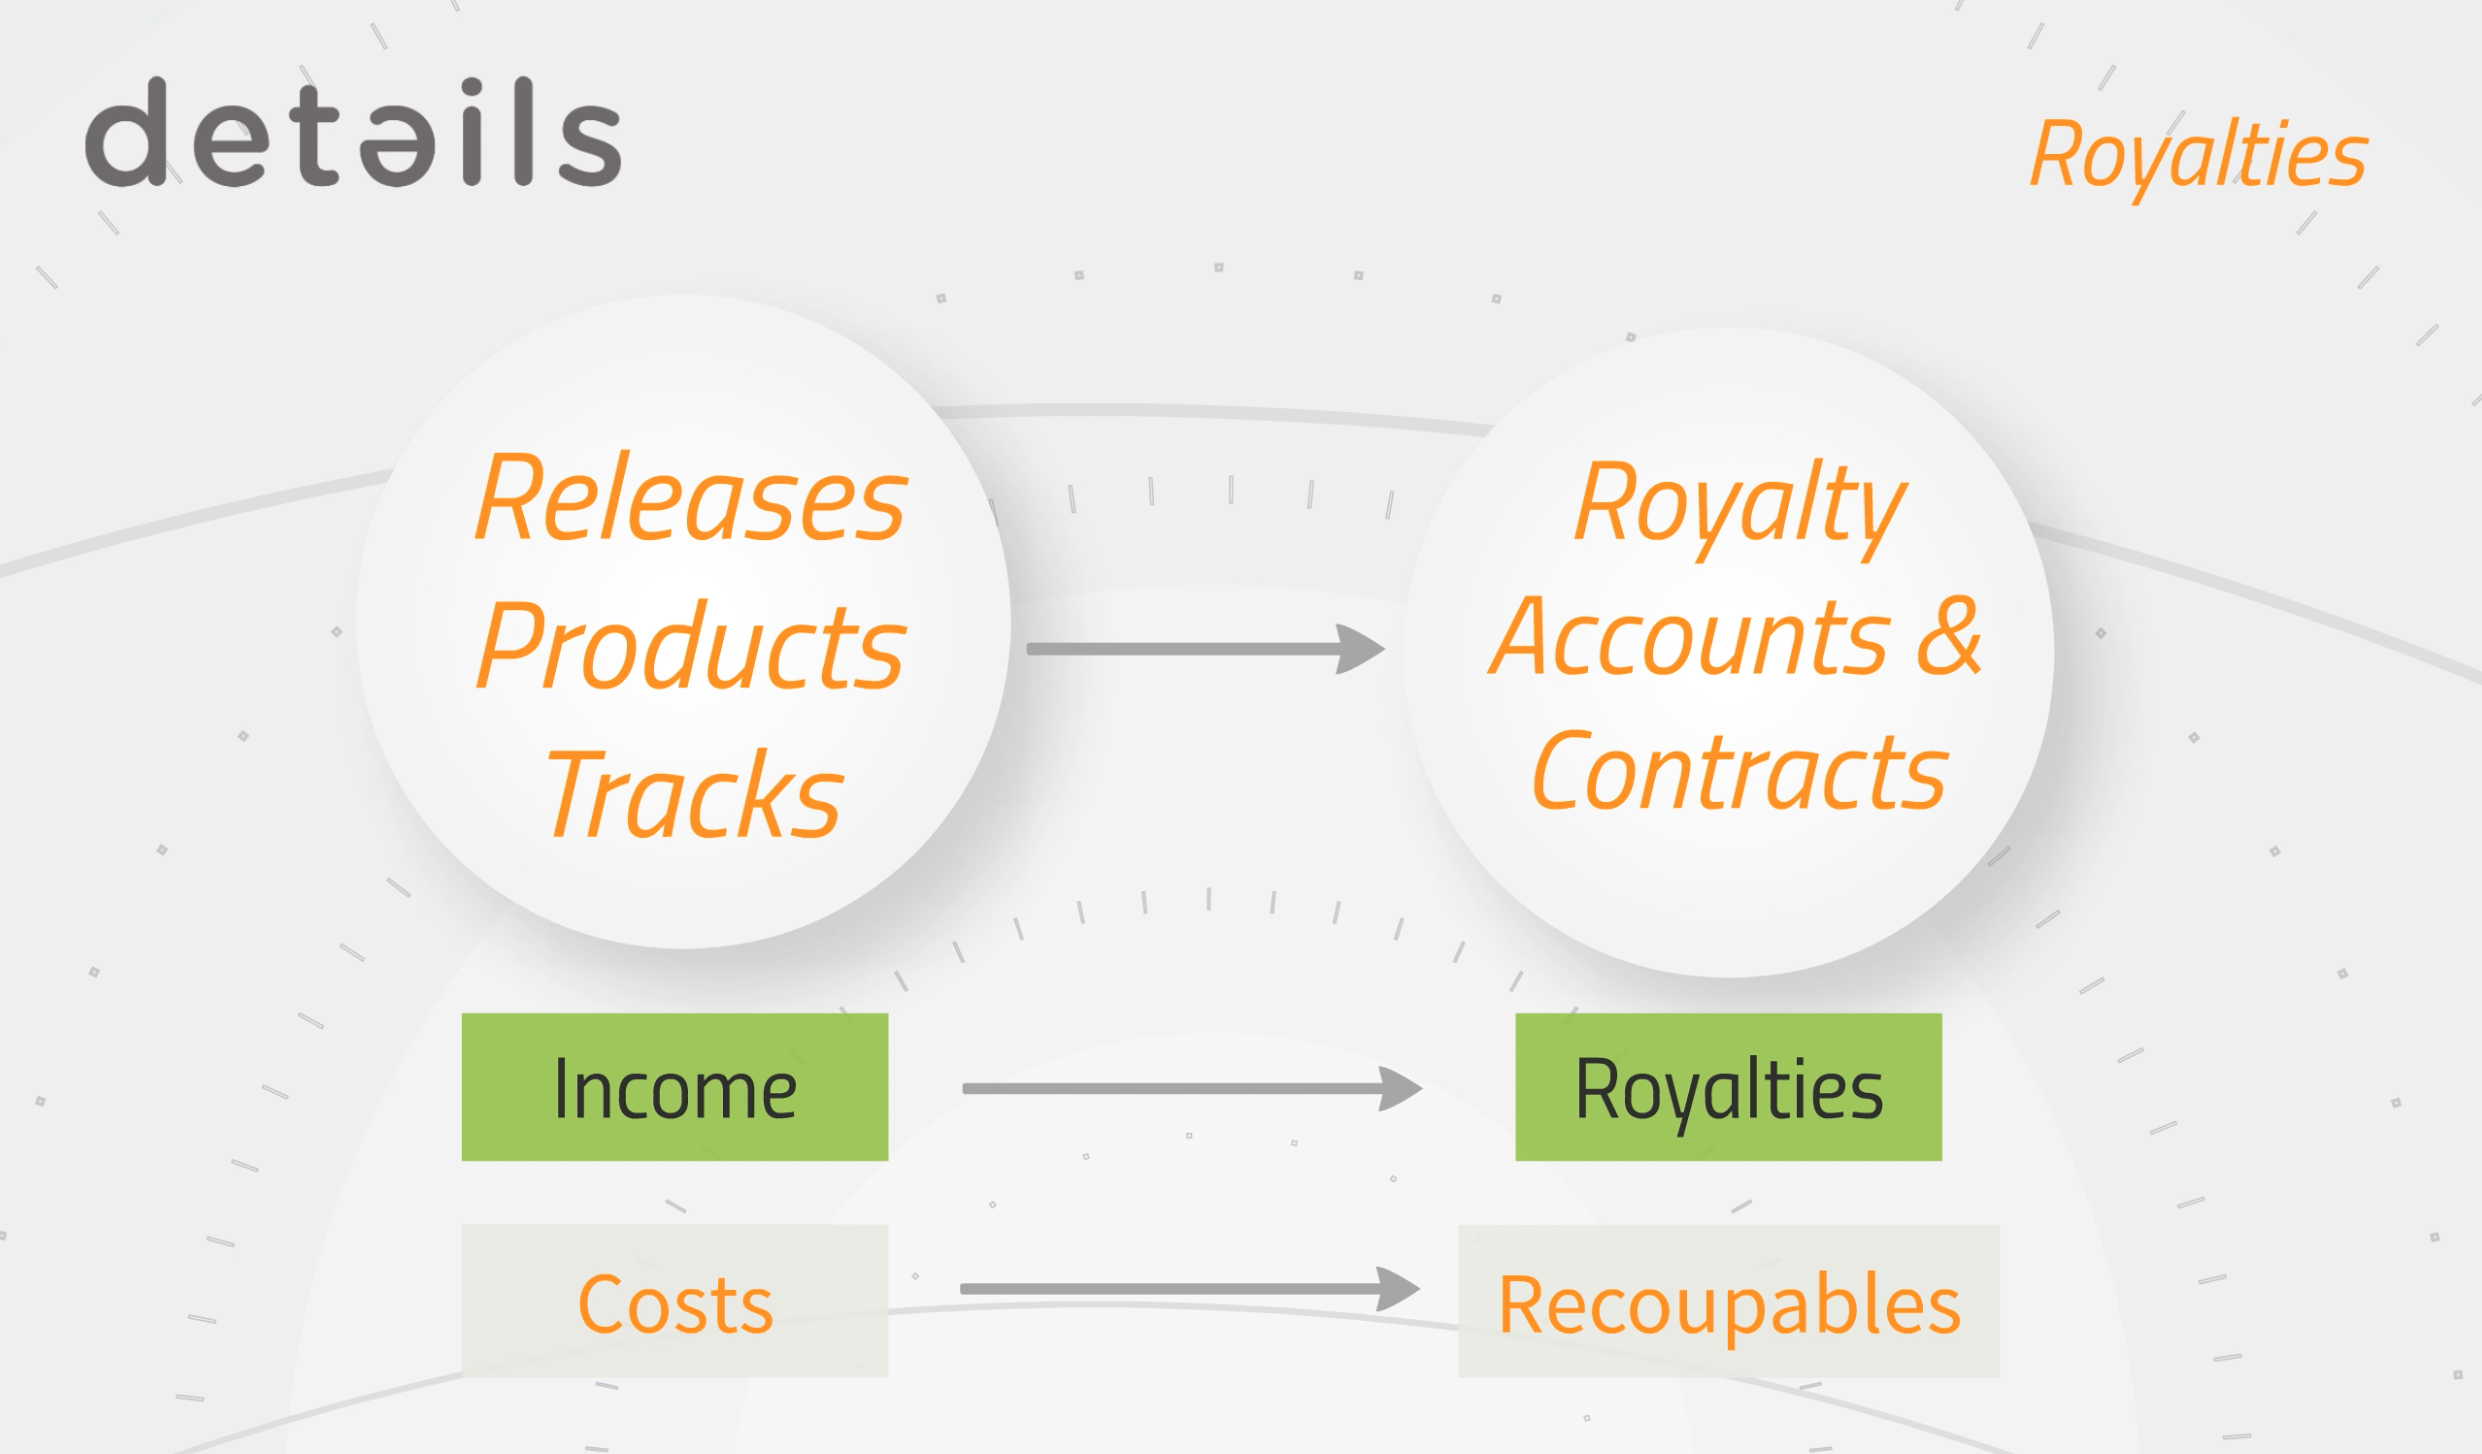
Recoupables are costs which are paid against royalties.

On RECOUPABLES you are able to compile your allover RECOUPABLE COSTS with multiple filter options such as date, periods, royalty accounts, recoupable types etc.
You can export these to an excel file and/or account multiple recoupables in one go.
This option is very helpful especially for clients handling large catalogs.

ROYALTY ACCOUNTS and how to set them up

Royalty Accounts are your business partners from whom you have licensed music etc. and to whom you must send royalty statements.

If you have different contracts with one account, you can just add multiple contracts to one account.

Watch a TUTORIAL videop about how to create ROYALTY ACCOUNTS and CONTRACTS for artist releases here.

Each ROYALTY ACCOUNT has the subtabs Setup, Contracts, Recoupable/Costs, Statements and Balances which are explained step by step below.

”Excursions”
* HOW TO SET UP A NEW CONTRACT – ARTIST RELEASE
* HOW TO SET UP A NEW CONTRACT – COMPILATION
* CREATE ROYALTY STATEMENT

To create a new ROYALTY ACCOUNT, go to LABEL / ROYALTY and click [+] on top right of the list.

Enter the ACCOUNT NAME, ROYALTY PERIOD and choose an INVOICE PROJECT for the statements.
Click OK and you will be directed to the account’s SET UP subtab where you can choose a main contact and add more contacts if wished, add notes and upload related files such as Licence agreements, HOAs etc.

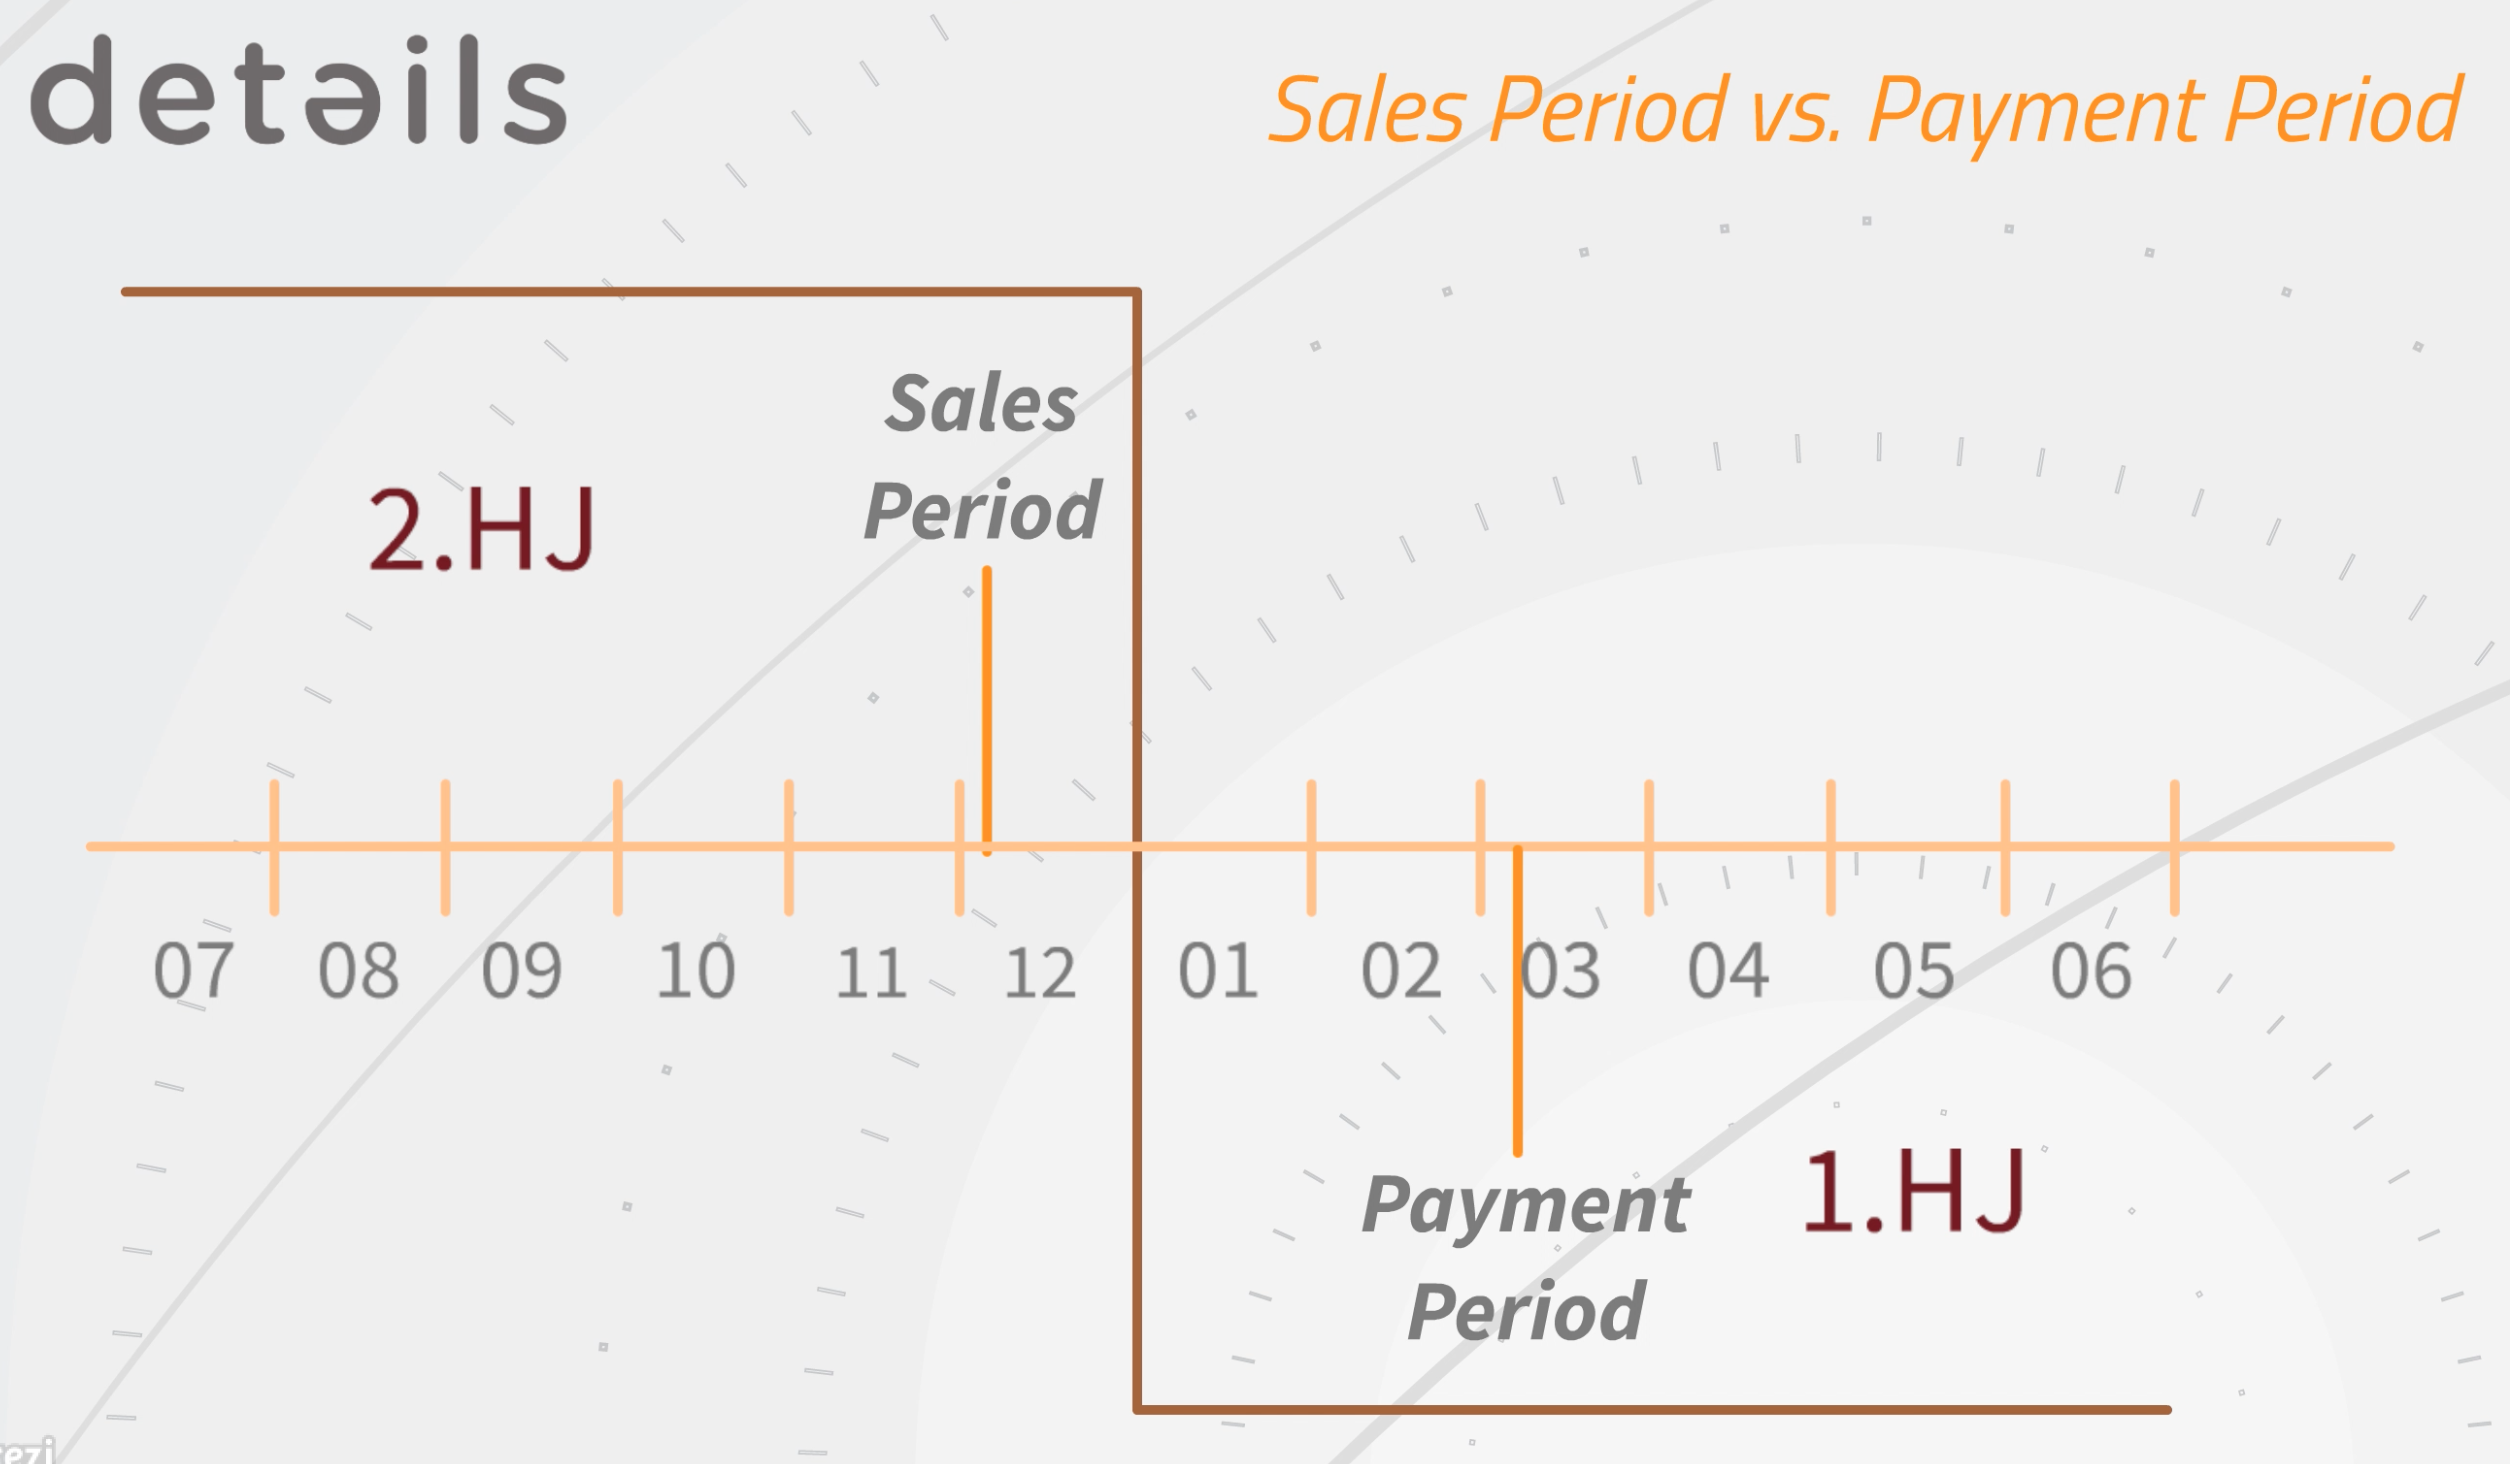
It is essential to choose an ACCOUNT BASE for the statements which defines to which date/period the income of a sale is collected to and hence accounted to your royalty statements.
There are three options:
* Payment Period: All income of sales will be collected to the period in which the invoice for the sales income has been paid by the sales account.
* Sales Period: All income of sales will be collected to the period of the actual sale.
* Invoice Date: All income of sales will be collected to the period in which invoice has been created.


”Example”
Your records have been sold in December 2016. This is the SALES PERIOD.
If you select SALES PERIOD as royalty base, the income will be accounted in the royalty period 2HJ 2016 or Q4 2016 if you account quarterly.

You will probably receive and import the sales statement from your distributor in January 2017 and create an invoice or receive a credit note dated January 30th 2016. This is the INVOICE DATE.
If you select INVOICE DATE as royalty base, the income will be accounted to the period 1HJ 2017 or Q1 if you account per quarter or 01 2016 if you account monthly.

Then you will probably not receive any money and the invoice in ”details” will not be selected as “paid” before March 2016. This is the PAYMENT PERIOD.
If you select PAYMENT PERIOD as royalty base, the income will be accounted in the period 1HJ 2017 or Q1 if you account per quarter.

Please note that you should NEVER change the account base after you have created and send out a royalty statement.
If you change the ACCOUNT BASE after you have already created a sales statement for your royalty account, it will happen that you account particular sales in several periods OR that you do not account particular sales at all.
Contact details support if you need help!

On the subtab CONTRACTS you can ADD A NEW ROYALTY CONTRACT, edit and delete existing contracts.

The subtab RECOUPABLE/COSTS shows you all costs related to the specific ROYALTY ACCOUNT.
The button ACCOUNT ALL RECOUPABLES will account all listed RECOUPABLE COSTS in one go if not accounted yet.
By ticking Ignore you can exclude single COSTS.

On the subtab STATEMENTS you can look up all past ROYALTY STATEMENTS for this ROYALTY ACCOUNT.

The subtab BALANCES shows allover royalty account related costs of the current royalty period
such as return reserves and closing balances of past royalty statements. If you create your first royalty statements with►details these might need to be set up manually. Ongoing, credit return reserves and closing balances are automatically created and carried over.
All contract related RECOUPABLES of the current royalty period are listed here as well.

It is important to know that contract related recoupables will be separately set off against royalties from the particular contract only, whereas balances (general royalty account costs) will be set off against the sum of all contract’s royalties.

To set up balances manually, click [+] on top right of the list.
Here you can add the DATE, DESCRIPTION, TYPE and AMOUNT.
Negative amounts will be accounted as DEDUCTIONS, positive amounts as ADDITIONS.


Set up new ROYALTY CONTRACT – COMPILATION

This tutorial explains how to set up ROYALTY CONTRACTS based on tracks, for example for compilations. If you want to create a royalty account based on artists’ account see SET UP NEW ROYALTY CONTRACT – ARTIST RELEASE.

”Shortcuts:”
* Contract and item share on 50 / 50 deals

On LABEL / RELEASES, you can choose the release which you want to set up contracts for.
Go to the subtab PRODUCTS, where you can see the different tracks by multiple artists on the right. Each artists should be paid royalties for their tracks and additionally for the bundle sales based on their rata.

Select the product you want to set up the royalty contracts for and go to the subtab PRODUCT / TRACKS to find out the shares, e.g.
Artist A contributed 2 out of 3 tracks and therefore gets 2/3 of each product sold and Artist B gets 1/3 in terms of this royalty contract.

In order to set up the contract, go to LABEL / ROYALTY, search for the artist’s ROYALTY ACCOUNT and go to its subtab CONTRACTS.
If you haven’t set this up yet, see here how to add a new ROYALTY ACCOUNT first.

Now to create a new ROYALTY CONTRACT, click [+] and type in the NAME OF THE CONTRACT, the percentages of physical, digital and licensing incomes and confirm with OK.
You will be directed to the contract’s subtab CONTRACT ITEMS.

To select the tracks that are part of this contract, click [+] again and choose from the list. Make sure to adjust the share percentage accordingly if the track is part of several ROYALTY CONTRACTS (e.g. two separate artists are rights holders and have contracts with you).

The AUTO FILL FROM TRACKS (COMPILATION) button adds all the products with their specific rata. Select products for the activation of the cost split.

The RELEASE needs to be added manually, just click on [+] on the Release box and select from the list.

Now you can define and enter the share of the RELEASE that belongs to this ROYALTY ACCOUNT.
Normally, you would choose the product promising the most income e.g. the digital release, and calculate:

Product Share x rata1 : rata2 = Release Share

On the next subtab ROYALTY RATES you can see the rates you have previously entered, adjust or complete these by clicking edit in the particular lines.

You can enter detailed royalty settings like territories, accounts, deductions, adjustments etc. and add multiple royalty rates, e.g. different royalty rates on downloads and streaming.
To do so click on the edit button of the first option and change the usage type to download.
Then add a new option by clicking the green PLUS icon on top right of the digital section and add a royalty rate and choose the usage type stream.
Every recorded sale is now checked whether it fits under rule 1: download and if not it will be accounted according to rule 2.

The next step is to set up the contract’s RECOUPABLES. On the subtab RECOUPABLES you can manage all these settings as well as reserves.

Choose a RECOUPABLE TYPE from the drop down menu.
There are three options:

1) If advance payments and / or other particular recoupable costs are agreed on in your royalty contract, choose RECOUPABLE BY GROUPS.

Now click [+] on top right of the Costgroup Setup box and choose the cost group and the split e.g your contract includes an advance pament which is paid against royalties 100% you add the costgroup advance and give it a split of 100.
If your contract also includes a recoupable split of 50% on remix costs, just add the cost group Remix and enter 50.
100% of the advance payment and 50% of the remix costs will now be paid against royalties.

It is essential that your costs have the correct COST GROUP. details automatically identifies the costs by its cost group so that these will be
accounted according to the above settings.

2) If all RELEASE RELATED COSTS and all PRODUCT RELATED COSTS are recoupable costs (e.g. 50/50 deal), choose GENERAL RECOUPABLES and type in the split.

Please note that advance payments have a default split of 100%. You can adjust the amount if necessary once it’s been accounted in the Recoupables Box right next to the Setup box or while you account the advance payment separately on RELEASE / COSTS.

3) If you do not have any RECOUPABLES included in your contract, choose NO RECOUPMENT.

To set up a reserve, just click on the green PLUS icon on top right of the Reserve Setup box and type in the percentage, the extra months amount as stated in your contract and choose a type wether accounted on net amount or by catalog number.

At last you will find an overview of past ROYALTY STATEMENTS created in details for this royalty contract on the subtab STATEMENT HISTORY.


Now you have successfully set up your contract. Next steps will be:
IMPORT SALES
CREATE ROYALTY STATEMENT


Run Autofetch All Contracts

Run Autofetch All Contracts is an additional feature within details for distribution companies. It adds all new RELEASES, PRODUCTS & TRACKS of a LABEL to the corresponding royalty contract in one click.

Before creating royalty statements for your distribution labels, all new catalogue items set up after the last statement need to be added to the existing royalty contract.

You can either add them manually in the royalty contract one by one.
Or you can use the ‘Run Auto fetch All Contracts’ feature.
This loads all catalogue items (RELEASES, PRODUCTS, TRACKS) into existing royalty contracts.

First you need to set up the autofetch type within the royalty contract.

To do so, go to ROYALTY and select the royalty account & go to the royalty contract’s subtab SPECIAL.
Click [+] on top right of the Autofetch box.


Here you can select the label.

::::

All new releases, products and tracks of that label will be assigned to the existing royalty contract automatically each time you run autofetch.

You can run autofetch for a single royalty contract here by clicking the button Autofetch Label / Supplier at the bottom of the page.


Once you have set up autofetch types for the concerning royalty contracts, you may run the autofetch for all royalty contracts in one go.

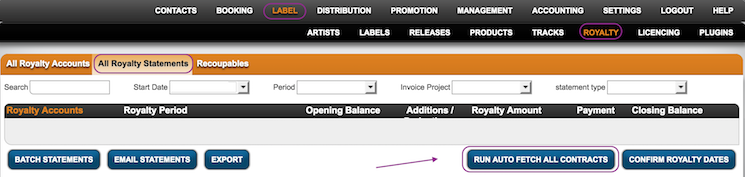
Go to Royalty / All Royalty Statements and click the button Run Autofetch All Contracts at the bottom of the page.


All catalogue items will be loaded into the royalty contracts according to your autofetch setup.

If you add an autofetch for the relevant royalty contracts once & run autofetch all contracts each time before you start creating royalty statements, you ensure all catalogue items will be added to the correct royalty contracts and accounted to your label accounts accordingly.