Order Types Explained

Every order you create in details carries an Order Type — and it’s the single most important setting on the order. This article explains what an Order Type actually does, so you can pick the right one with confidence.

► Overview

The Order Type controls one business event: what happens to stock, and whether an invoice gets created. Two roles matter here — the Account, who’s receiving the goods (a shop, a distributor, or one of your own warehouses), and the Stock Account, where the goods are coming from (usually your own warehouse). Every Order Type answers two questions at once: does stock move, and if so from where to where — and does it produce an invoice?

► Where to Find This

You choose the Order Type in the “Type” dropdown when creating an order (see our article on creating a new order), under Distribution → Orders. You can see it afterwards in the order’s header, alongside the account and stock account.

[Screenshot: Type dropdown in the New Order pop-up]

► How It Works

Order types fall into two broad groups:

  • On account — Invoice Order, Return Credit Note, Defects Note, and Price Adjustment. These handle both the money and the stock quantity together: once goods move under one of these types, they’re sold to and owned by the recipient.
  • Commission — Consignment, Consignment Return, Defects Consignment, and Invoice Consignment. These track quantity only, until a later invoice settles it. The stock has physically moved, but it isn’t owned or billed to the recipient yet — think of it as being on loan.

Two types sit outside both groups: Promo Order (stock goes out for promotional use — press, in-store — with no invoice) and Return to Vendor (returning goods to your own supplier, e.g. in case of overstock — moves stock, but isn’t invoiced or tracked as consignment).

[Image: “On Account” vs “Commission” diagram — see attached on-account-vs-commission.png]

► Step-by-Step

A quick way to land on the right type:

  1. Selling goods that change ownership right away and need an invoice? Use Invoice Order.
  2. Crediting a return? Use Return Credit Note if the goods physically come back, or Defects Note if you’re crediting defective goods with no return.
  3. Sending goods to a shop or distributor to sell on your behalf, without invoicing yet? Use Consignment.
  4. Getting unsold consignment stock back? Use Consignment Return. Once it’s actually sold and you invoice for it, use Invoice Consignment.
  5. Sending stock out for promotional use (press, in-store)? Use Promo Order.
  6. Writing off faulty consignment goods that won’t be returned or credited? Use Defects Consignment.
  7. Correcting a price without moving any stock? Use Price Adjustment.
  8. Returning goods to your own supplier, e.g. overstock? Use Return to Vendor.

► Tips / Notes

  • Invoice Order – a standard sale: stock goes out, an invoice is created.
  • Consignment – a consignment delivery: stock goes out, no invoice yet.
  • Return Credit Note – a credit note after a physical return: stock comes back in.
  • Consignment Return – unsold consignment stock coming back: no invoice.
  • Promo Order – a promotional shipment (in-store, press): no invoice.
  • Defects Note – a credit note for defective goods, no return needed.
  • Defects Consignment – defective consignment goods, written off with no credit note.
  • Price Adjustment – a price correction: no stock movement.
  • Invoice Consignment – invoicing consignment goods once they’ve sold.
  • Return to Vendor – returning stock to your supplier: no invoice.

Not sure which type fits your situation? Get in touch with support and we’ll help you pick the right one.

How to Create a New Order

There are two ways to manage sales or returns in details. Digital sales, streaming and performance income, and licences are handled by importing files under Distribution → Imports (or, for licences, in the Licencing module). Physical products and merchandise can be imported this way too — but when you’re taking an order yourself rather than importing a sales file, that’s handled by creating an order under Distribution → Orders, which is what this article is about.

Use Orders whenever you’re actually taking an order for something with a price, usually stock, and a place to ship from and to. Services work the same way, just without the shipping part.

Note that Orders covers sales to your customers. If you’re the one ordering physical products or merchandise — for example from a manufacturer or supplier — that’s handled separately, under Distribution → Supplier Orders.

► Overview

An order links an account (who it’s going to) with a stock account (where the goods come from), and carries everything needed to get products packed, shipped, and — if needed — invoiced. Most of the setup happens automatically once you’ve picked the right account and order type, since pricing, currency and address details are pulled in for you.

► Where to Find This

There are two equally valid ways to start an order:

  • Go to Distribution → Orders and click the (+) icon.
  • Or open the account directly under Distribution → Accounts, go to its “ALL ORDERS” tab, and click “+ Add New Order”.

Both open the same “New Order” pop-up — starting from the account page just pre-fills the account for you.

[Screenshot: Distribution → Orders overview with the (+) icon highlighted]

► How It Works

In the pop-up, you fill in:

  • Account – who the order is going to (not needed if you started from the account page).
  • Stock Account – where the stock comes from, usually your own warehouse.
  • Customer ref – an optional reference, for example a PO number.
  • Type – the order type. Choose “Invoice Order” for a standard sale that needs to be invoiced. See our separate article on order types for the full picture.

[Screenshot: New Order pop-up with Account, Stock Account, customer ref and Type fields]

Once you click “Add Orders”, the order opens up with the account’s pricing, currency and address details already filled in. Before adding products, it’s worth setting VAT handling, payment method, shipping date, and — if needed — a whole-order discount percentage.

Context: Prices fill in automatically when a product is linked to a price code and the account has a matching price list. This keeps pricing consistent without a manual lookup on every order.

► Step-by-Step

  1. Start the order — either via Distribution → Orders → (+), or from the account’s “ALL ORDERS” tab.
  2. Fill in Account (if applicable), Stock Account, customer ref, and Type, then confirm.
  3. Set VAT handling, payment method and shipping date, and add a whole-order discount if needed.
  4. Check the Backorders tab for any outstanding items for this account, and pull them into the order if relevant.
  5. Go to the Order Lines tab and click “+ Add New Order Lines” to search for and add products — including promo or free-of-charge quantities if needed. For long lists, use “XLS Import” instead.
  6. Prices fill in automatically where possible; enter them manually if not. Add per-line discounts if needed.
  7. On the Packaging/Shipping tab, run “Auto Backorder” for anything short, set the Pack Status (reserved, then packed), and fill in weight, shipping method and costs.
  8. Generate any documents you need (order confirmation, proforma invoice, etc.) via the “Documents” button.
  9. Review the Summary tab, tick “Ready to ship” if applicable, and click “Account” to complete the order.

[Screenshot: Order Lines tab with the “+ Add New Order Lines” search pop-up]

► Tips / Notes

  • What happens when you click “Account” depends on the order Type you picked at the start — it can automatically create an invoice, a credit note, or neither.
  • Once an order is completed, you can only edit it again if its invoice is cancelled first — then use “Reopen”.
  • Double-check the account and its products beforehand: order details are pulled in automatically at creation and can’t be moved to a different account afterwards.

Add a QR Code to Your Invoice Layout (for SEPA Payment)

Add a QR Code to Your Invoice Layout (for SEPA Payments)

You can add a SEPA payment QR code to your invoice PDFs. Your customers can scan the QR code with a compatible banking app and automatically import the payment information.

The QR code includes the beneficiary, IBAN, invoice amount and payment reference. It is generated dynamically for each invoice.

Requirements

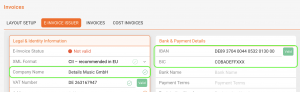
The SEPA QR code uses the payment information already entered in the E-Invoice Issuer section of your Invoice Project.

Open your Invoice Project and make sure that the highlighted E-Invoice Issuer fields contain at least the following information:

  • Beneficiary or account holder name
  • Valid IBAN
  • BIC, where applicable

No separate bank account configuration is required. The same payment details are used for both electronic invoices and SEPA QR codes.

When is the QR code available?

A SEPA payment QR code can be generated when all of the following requirements are met:

  • A beneficiary name is available.
  • A valid IBAN is available.
  • The invoice currency is EUR.
  • The total amount due is greater than zero.
  • The invoice contains a payment reference.

The overall E-Invoice validation status does not determine whether the QR code is generated. Missing information unrelated to the payment, such as a VAT number or company registration number, does not prevent QR code generation.

Add the QR code to your invoice layout

Open the HTML template of your invoice layout and insert the following code where you want the QR code to appear:

<!-- SEPA payment QR code -->
<img
    src="https://YOUR-DETAILS-DOMAIN/accounting.pl?section=invoices&action=generate_sepa_qr_code&invoice_id=[% invoice.DATA.invoice_id %]"
    alt="EPC SEPA payment QR code"
    style="
        display:block;
        width:135px;
        height:135px;
        margin:0 auto;
    "
/>

Replace https://YOUR-DETAILS-DOMAIN with the URL of your details database.

For example:

https://app.details.eu/YOURDATABASE/accounting.pl?section=invoices&action=generate_sepa_qr_code&invoice_id=[% invoice.DATA.invoice_id %]

Example inside an invoice table

The following example places the QR code inside a centered table cell:

<!-- QR code -->
<td style="
    vertical-align:top;
    text-align:center;
    padding:12px 8px;
    border-right:1px solid #000000;
">
    <img
        src="https://YOUR-DETAILS-DOMAIN/accounting.pl?section=invoices&action=generate_sepa_qr_code&invoice_id=[% invoice.DATA.invoice_id %]"
        alt="EPC SEPA payment QR code"
        style="
            display:block;
            width:135px;
            height:135px;
            margin:0 auto;
        "
    />
</td>

You can adjust the width, height, padding and border styles to match your existing invoice design.

Result on the invoice

When the invoice is generated, details creates an individual QR code using the payment information and total amount due from that invoice.

Invoice with SEPA payment QR code

The customer can scan the code with a banking app that supports EPC or SEPA payment QR codes. The following information is then filled in automatically:

  • Beneficiary
  • IBAN
  • BIC, where required
  • Total amount due
  • Invoice reference or remittance information

Important information

SEPA payment QR codes are available for invoices in EUR and bank accounts that support SEPA Credit Transfers.

The feature is not limited to companies located in the European Union. It can also be used by clients in other SEPA countries, provided that the bank account supports SEPA payments.

When the required payment information is missing or invalid, no usable SEPA payment QR code is generated.

Configurer les prélèvements sociaux dans details

Configure social security contributions (CSG, CRDS, Solidarity Levy) in details

In France, royalties paid to artists and rights holders may be subject to social security contributions: the CSG , the CRDS , and the Solidarity Levy . This article explains, simply, how to configure these in the details section and how they are applied to statements.

The key takeaway is that these deductions are calculated on royalties generated during the period, even if the artist receives nothing on their statement (for example, due to an outstanding advance). This is the main difference with VAT or standard withholding tax, which only apply to what is actually paid.

► Step 1: Create the tax group

Go to SETTINGSAccounting in the left menu → TAXES tab . Create a new tax group (for example “French social security contributions”) and add the three relevant taxes to it: CSG, CRDS and Solidarity Levy.

► Step 2: Define the calculation basis

Still in the tax group’s record, open the Tax Base Royalty tab (calculation basis).

This is where you specify: on what basis should these levies be calculated?

For social security contributions, keep it simple:

  • Check Royalties (Fee) in “Contract Elements”, or
  • Check Royalty Amount in “Statement Items”

Both amount to the same thing: the calculation is based on the royalties generated during the period, before deduction of advances.

Do not select: “Statement Net Amount”. This option calculates based on what is actually paid to the artist — this is not the correct choice for social security contributions, which must be applied even if the statement shows zero.

► Step 3: Leave the “previous period” option unchecked

In the Options section , leave Negative Tax Base from Prior Period unchecked .

Why: social security contributions are due on royalties for the current period, regardless of any deficits from previous periods. Each period is treated independently.

► Step 4: Link the tax group to the relevant contracts

Once the group is configured, link it to the contracts of the artists or rights holders subject to French social security contributions. The contributions will then be automatically calculated and deducted from each statement generated for these contracts.

Concrete example: An artist generated €1,000 in royalties this month, but still owes €5,000 in advance payments. Their statement therefore shows €0 to pay. However, social security contributions (CSG, CRDS, Solidarity Levy) will still be calculated on the €1,000 in royalties generated—even though the artist receives nothing this month.

In summary

  • Create a tax group dedicated to social security contributions
  • Base the calculation on the royalties generated (“Royalties” or “Royalty Amount”), not on the amount paid
  • Do not reactivate the carryover of previous periods
  • Link the group to the relevant contracts

Once configured, you don’t need to do anything else: each new statement will automatically calculate social security contributions according to these rules. For any questions, please contact our support team.