How to re-open an accounted sales statement

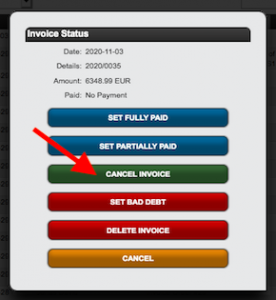
If you want to delete a sales import that has already been accounted, you need to cancel the invoice first (but make sure before, the invoice hasn’t been forwarded in the accounting process!)


1. ACCOUNTING / INVOICES

  • find the invoice connected to the sales import and cancel it via the Pen Symbol on the right.


2. DISTRIBUTION / ACCOUNTS

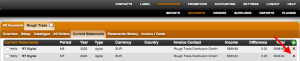
  • Once the invoice is cancelled, the sales import shows up again in the CURRENT STATEMENTS tab of the distribution account.
  • You can delete the sales import by clicking the red X.


TRY TO AVOID DELETING AND ALWAYS CONSIDER IF THERE IS ANYTHING CONNECTED TO THE DELETED ITEM.

How to set up the automated sales import from IDOL Labelcamp


Importing sales files manually can be a tedious and time-consuming process. We’re happy to partner with IDOLs Labelcamp to offer a fully automated sales ingestion solution.
This integration eliminates the need for manual uploads and automatically loads your monthly sales reports into details once set up. How convenient is that?

Setting up a sales import automation from Labelcamp is a straightforward process.
Follow the steps below to automate your sales statement delivery.

  1. Login to Your Labelcamp Account

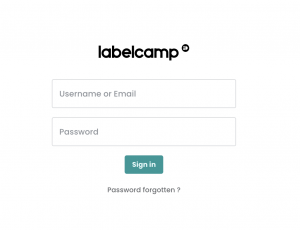
    • Open your browser and navigate to the Labelcamp login page.
    • Enter your username or email and password.
    • Click on the “Sign in” button.

  2. Navigate to Royalties

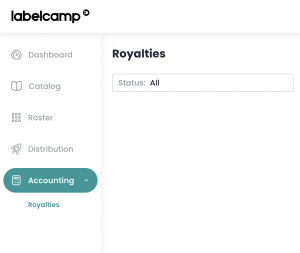
    • On the main menu on the left side of the screen, select “Accounting.”
    • Then, select “Royalties” from the submenu.li

  3. Create a New Automation

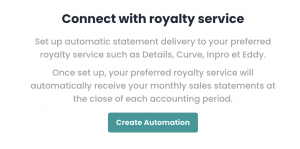
    • In the middle of the screen, click on “Create Automation.”
    • If you already have created other automations, select “New Automation.”

  4. Fill in the Automation Details
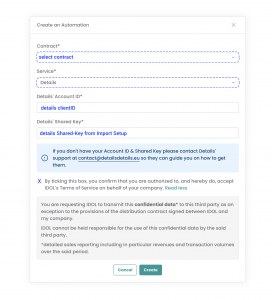
    • A modal window will appear to create your automation.
    • In the Contract dropdown, select your Labelcamp contract.
    • From the Service dropdown, select “Details.”
    • In the “Details’ Account ID” field, enter your Details client ID.
      This is what follows https://app.details.eu/ in your details login URL.
      For example, in https://app.details.eu/MyLabel/, the client ID is MyLabel.
    • In the “Details’ Shared Key” field, enter the shared key you ll find in your IDOL Import Setup in details under Distribution / Accounts / => Idol / Import Setup / open selected Import Setup => Shared-Key.

Note

  • You can create multiple import automations from Labelcamp to Details if you have multiple contracts in Labelcamp.

  • Each contract will have a dedicated import setup in Details and hence its unique shared key.

  • Sometimes, the automatic sales import transfer from LABELCAMP to details can be interrupted due to a disruption in the data flow. When this happens, the automatic sales ingestion may fail, leaving you with incomplete data. In that case read this article.


If you encounter any issues, please contact our label_team for assistance.

Step by Step Guide to variables in a standard Booking Itinerary

(work in progress)

* To make sure linebreaks are respected in any textfield-variable, add this code to the variable:
[% ph….| html | html_line_break %]

examples:
[% ph.notes | html | html_line_break %]
[% ph.line_up | html | html_line_break %]

If you want to add the name of who created this Itinerary, you can add one or more of the following variables:

[% ph.staff %]

[% ph.staff_fullname %]
[% ph.staff_phone1 %]
[% ph.staff_phone2 %]
[% ph.staff_email %]

[%- FOREACH contact = travel.contacts -%]

[% contact.name %] /
Booking Ref: [% contact.code %]

[%- END -%]

format UPPER case and lower case
to display ph.tags all in upper case: [% ph.artist | upper %] : SUPERAKI
to display ph.tags all in lower case: [% ph.artist | lower %] : superaki

Deactivate Contracts

details now has a feature to deactivate royalty contracts.
This can be useful if your contract has ended or has been amended and you no longer wish to include that contract in the royalty statements.

The deactivation of a contract results in a contract being archived, but not deleted!

A deactivated contract stops processing any income or recoupables and will not be displayed in royalty statements.
In most cases, especially if there is a contract history, this is a much better option than removing contracts, which results in previous reporting periods being deleted from your database.

A deactivated contract will no longer

– not process any new royalties for sales, returns or licences

– not recoup any new advances, other incomes or costs

– not load any new repertoire via the autofetch function


A deactivated contract will however still

– forward previous closing balance of the previous period

– account contract balances if added manually

– account previously imported recoupables

– credit previous return reserves when due


NOTE : If previous balances, return reserve credits or closing balances are still existing, the deactivated contract will still be visible on the statement.


To deactivate a contract, you need a contract status set to inactive.

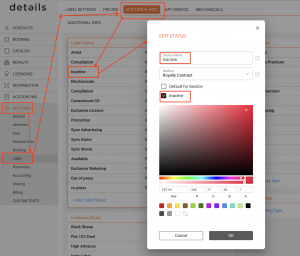
Go to SETTINGS / LABEL / ADDITIONAL INFO, add or edit a new status on the Label Status box and set section = Royalty Contract. For contract deactivation status check the [x] inactive checkbox!
Note : The deactivating contract function will only apply if also the inactive flag is selected!


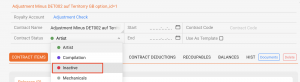
Now, go to LABEL / ROYLATY / CONTRACTS, select a contract you want to deactivate and choose the inactive status from the dropdown menu.


Please note, the deactivation will start as you select an inactive status.
The contract start date and end date do not affect the deactivation!


How to Trigger Automated Sales Ingestions


details supports automated ingestion of sales statements from various digital service providers (DSPs), including all DSPs covered by MERLIN and Amazon.

By default, these ingestions are scheduled to run automatically twice per week. However, if an import is missing, outdated, or shows incorrect amounts, you can manually trigger a new ingestion any time.


Step-by-step: Manually Trigger a Sales Ingestion

1. Go to Distribution / Imports

Navigate to Distribution / Imports in the left menu. Find the row corresponding to the account and importer you want to re-trigger.

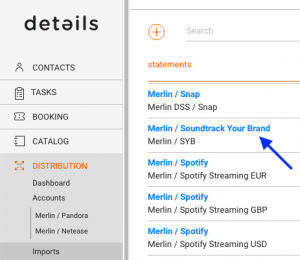
2. Click on the Account Name

Click on the blue account name in the left-hand column. This will take you directly to the selected Distribution Account.

Example: Clicking “Merlin / Soundtrack Your Brand” will take you to that specific account.

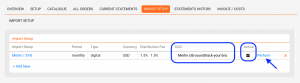
3. Go to the Import Setup tab

Once you’re in the account view, open the Import Setup tab.

Look for the active importer you want to trigger. Make sure it has a DSS value this indicates that the importer is connected to an automated ingestion service.

4. Click “Perform”

On the right side of the Import Setup box, click the Perform link.


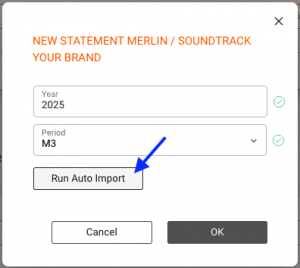
5. Select the Year and Period

In the modal that opens, select the Year and Period (e.g. M3 for March) for the statement you want to re-import.

6. Click “Run Auto Import”

Click the Run Auto Import button. This will trigger our system to connect to the distributor and request the latest available version of the file for that period.

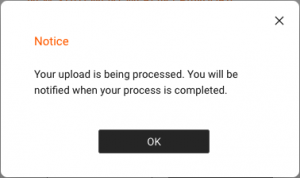
7. Confirmation

You ll see a confirmation message:

“Your upload is being processed. You will be notified when your process is completed.”


What Happens Next

  • If the request is successful, the updated file will be processed and matched automatically.
  • Once matching is complete, the correct statement amount will be displayed in the Imports overview.

Please Note

Depending on the size of the file and the statement contents, the process can take a few minutes.

During this time:

  • You may initially see a 0.00 amount in the tile.
  • The actual amount will appear once the file has finished processing.
  • Let the system work in the background and check back later.


If you encounter persistent issues with automated ingestion, feel free to contact label_team@details.eu.

Step by Step Guide to variables in a standard Booking Contract

This Article will help you understand what variables to use in a Standard Booking Contract.

Obviously every contract is different, so this can only be a general guideline.

In ”details” you can fully customize your contracts via HTML, but this article should catch 80% of the placeholders you will need:


*Many contracts start a contract number and a contract date


Use the following variables:


Contract Nr.: [% ph.deal_id %]

Date of Contract (2016-12-31): [% ph.print_date %]
Date of Contract (31.12.2016): [% ph.printdate_dd %].[% ph.printdate_mm %].[% ph.printdate_yyyy %]


*Also important for contracts are the contract partners / parties of the agreement:


Use the following variables here:


[% ph.person_name %]
[% ph.person_address1 %]
[% ph.person_postalcode %] [% ph.person_city %]
[% ph.person_country %]
VAT ID: [% ph.person_vat_id %]


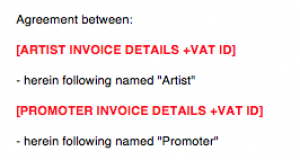
[% ph.promoter_company %]
[% ph.promoter_legalname %]
[% ph.promoter_address1 %]
[% ph.promoter_postalcode %] [% ph.promoter_city %]
[% ph.promoter_country %]
VAT ID: [% ph.promoter_vat_id %]


Here is a variation to make sure that there are no extra spaces before or after the promoters name:


[% ph.promoter_name | trim %]
[% ph.promoter_legalname | trim %]


If you like, you can also add a conditional clause that will display the specified variables only if there is data available, for example:

[% IF ph.promoter_company != “” %][% ph.promoter_name %], [% END %]
[% IF ph.promoter_legalname != “” %][% ph.promoter_legalname %], [% END %]

If you’d like the combine both variations above, try this:

[% promoter_company = ph.promoter_company | trim; IF promoter_company != ” %][% promoter_company %], [% END %]
[% promoter_legalname = ph.promoter_legalname | trim; IF promoter_legalname != ” %][% promoter_legalname %], [% END %]


This alternative code will check if there is data available for the Promoter Company’s legalname.
If not, it will add the Promoter’s contact instead:


[% IF ph.promoter_legalname == “” %]
[% ph.promoter_contact %]
[% ELSE %]
[% ph.promoter_legalname | trim %]
[% END %]


Combining all of the above here’s what we would probably use as a standard code for the contractual partners

AGREEMENT

BETWEEN
[% IF ph.person_company == “” %][% ph.person_name %][% ELSE %][% ph.person_company %][% END %]
[% ph.person_address1 %]
[% ph.person_postalcode %] [% ph.person_city %]
[% ph.person_country %]
[% IF ph.person_vat_id != “” %]VAT ID: [% ph.person_vat_id %][% END %]

AND
[% ph.promoter_company %]
[% IF ph.promoter_legalname != “” %][% ph.promoter_legalname %], [% END %]
[% ph.promoter_address1 %]
[% ph.promoter_postalcode %] [% ph.promoter_city %]
[% ph.promoter_country %]
[% IF ph.promoter_vat_id != “” %]VAT ID: [% ph.promoter_vat_id %][% END %]


* Next are the basic infos on the name, time and place of the event:


Use the following variables here:


Date : [% ph.date_start %]
Event Name: [% ph.date_name %]
Event Location: [% ph.location_name %]
Street, House Number: [% ph.location_address1 %]
Postcode, Town/City: [% ph.location_postalcode %] [% ph.location_city %]
Location Capacity: [% ph.location_capacity %]


There are more options for our completely customizable date format, for example:
31.12.2016

[% ph.startdate_dd %].[% ph.startdate_mm %].[% ph.startdate_yyyy %]

31. December 2016

[% ph.startdate_dd %]. [% ph.startdate_month(“en”) %] [% ph.startdate_yyyy %]

Monday, December 31. 2016

[% ph.startdate_day(“en”) %], [% ph.startdate_month(“en”) %] [% ph.startdate_dd %].[% ph.startdate_yyyy %]

Lundi, 31. Decembre 2016

[% ph.startdate_day(“fr”) %], [% ph.startdate_dd %].[% ph.startdate_month(“fr”) %] [% ph.startdate_yyyy %]


* Next might be some info about what kind of performance is negotiated and what the duration and set times are:


Performance type (Live/ DJ): [% ph.performance_type %]
Playtime / Set time: [% ph.performance_time %]
Duration / Length of Set: [% ph.performance_time_contract %]
Stage / Floor: [% ph.stage_name %]


* Sooner or later each contract will also include some info about the Artist Fees, Booking Fees, etc.
In ”details” we call this the MONEY DETAILS:

Now this might get a little complicated because there are so many different ways to say the same things. We have seen all kinds of special formats here.

Plus ”details” is able to include calculations and formating in variables and conditional IF ELSE clauses into the HTML templates, which makes it more complex.

Also ”details” allows you to customize all INVOICE ITEMS individually per agency.
That’s where it gets tricky.

Here is a WIKI Article specificly about variables for “Money Sections”, i.e. the deal memos in your templates.

And HERE is an article with an example for a perfect money section.

If in doubt, don’t hesitate to contact us!

Here is an example for a simple Artist Fee:


If you like it simple, this might work:

Artist Fee [% guarantee_fee %] [% ph.currency %]
[% ph.guarantee_vat_rate %]% VAT [% ph.guarantee_vat_amount %] [% ph.currency %]

Total Artist Fee incl. VAT: [% ph.guarantee_gross_amount %] [% ph.currency %]


A more elegant way to produce the same result but include more options is to FIRST define a new variable on the top of the contract and use various aspects of that new variable.
This will pre-load all related data and provide it where needed.


[% artist_fee = ph.invoice(‘Artist Fee’) %]

(…)

Artist Fee [% artist_fee.price %] [% ph.currency %]
[% artist_fee.tax_rate_percent %]% VAT [% artist_fee.price * artist_fee.tax_rate_percent / 100 %] [% ph.currency %]

Total Artist Fee incl. VAT: [% artist_fee.price * (1 + artist_fee.tax_rate_percent / 100) %] [% ph.currency %]


If you want the result to be formatted with two decimals, add the format to the calculations:


[% artist_fee = ph.invoice(‘Artist Fee’) %]

(…)

Artist Fee [% artist_fee.price %] [% ph.currency %]
[% artist_fee.tax_rate_percent %]% VAT [% artist_fee.price * artist_fee.tax_rate_percent / 100 | format(‘%.2f’)%] [% ph.currency %]

Total Artist Fee incl. VAT: [% artist_fee.price * (1 + artist_fee.tax_rate_percent / 100) | format(‘%.2f’)%] [% ph.currency %]


Ok, this will get you a little table with Artist Fee, VAT and a gross amount.
However you will allways get the VAT displayed, even if it’s not applicable.

This is where conditional formating joins the game: this will display the VAT only if a positve VAT rate is selected by the user in the MONEY DETAILS:


[% artist_fee = ph.invoice(‘Artist Fee’) %]

(…)

Artist Fee [% artist_fee.price %] [% ph.currency %]

[% IF artist_fee.tax_rate_percent > 0) %]

[% artist_fee.tax_rate_percent %]% VAT [% artist_fee.price * artist_fee.tax_rate_percent / 100 | format(‘%.2f’)%] [% ph.currency %]

Total Artist Fee incl. VAT: [% artist_fee.price * (1 + artist_fee.tax_rate_percent / 100) | format(‘%.2f’)%] [% ph.currency %]

[% END %]


The above conditional clause adds the VAT line whenever a VAT rate is selected by the user.

Probably however you’d like to NOT leave the choice of VAT on your contract to the user?

Try this then … it will add the VAT to a UK Booking Agency contract automatically if the promoter is also a tax resident of the UK OR a tax resident of another EU country and did NOT provide a valid VAT ID.

Now is this enough customizability for you ?


[% artist_fee = ph.invoice(‘Artist Fee’) %]

(…)

Artist Fee [% artist_fee.price %] [% ph.currency %]

[% IF ph.promoter_country == “United Kingdom” OR (ph.isEU(ph.promoter_country) AND ph.promoter_vat_id == “”) %]

[% artist_fee.tax_rate_percent %]% VAT [% artist_fee.price * artist_fee.tax_rate_percent / 100 | format(‘%.2f’)%] [% ph.currency %]

Total Artist Fee incl. VAT: [% artist_fee.price * (1 + artist_fee.tax_rate_percent / 100) | format(‘%.2f’)%] [% ph.currency %]

[% END %]


*The same will work for the Booking Fee / agency Fee:


Here’s the simple and static version:

Booking Fee [% booking_fee %] [% ph.currency %]
19% VAT [% booking_fee * 0.19 | format(‘%.2f’) %] [% ph.currency %]

Total Booking Fee incl. VAT: [% booking_fee * 1.19 | format(‘%.2f’) %] [% ph.currency %]


… and the flexible, conditinal and customizable version:


[% booking_fee = ph.invoice(‘Booking Fee’) %]

(…)

Booking Fee [% booking_fee.price %] [% ph.currency %]

[% IF ph.promoter_country == “Germany” OR (ph.isEU(ph.promoter_country) AND ph.promoter_vat_id == “”) %]

[% booking_fee.tax_rate_percent %]% VAT [% booking_fee.price * booking_fee.tax_rate_percent / 100 | format(‘%.2f’)%] [% ph.currency %]

Total Booking Fee incl. VAT: [% booking_fee.price * (1 + booking_fee.tax_rate_percent / 100) | format(‘%.2f’)%] [% ph.currency %]

[% END %]


* In addition to the MONEY DETAILS, some contracts mention the artists’s and agency’s bank details for payments. While the Agency’s bank details will most often bee static text, the artists’s bank account will use the following variables:


Account holder: [% ph.artist_account_holder %]
Bank( SWIFT No.: [% ph.artist_swift %]
IBAN: [% ph.artist_iban %]


For more specific information about how to relate Artist’s bank details to templates, click HERE.


For the due dates, again, we have a simple static and a flexible, but somewhat terrifying version:

Here are some options for the Booking Fee due dates:

2016-12-31

[% ph.booking_fee_duedate %]


31.12.2016

[% booking_fee.due_date.split(‘-‘).2 %].[% booking_fee.due_date.split(‘-‘).1 %].[% booking_fee.due_date.split(‘-‘).0 %]


… and some options for the Artist Fee due date:

31.12.2016

[% ph.guarantee_fee_duedate_dd %].[% ph.guarantee_fee_duedate_mm %].[% ph.guarantee_fee_duedate_yyyy %]


31.12.2016

[% artist_fee.due_date.split(‘-‘).2 %].[% artist_fee.due_date.split(‘-‘).1 %].[% artist_fee.due_date.split(‘-‘).0 %]


Maybe in your contract you want to have the due dates automatically calculated in reference to the print date (today) or the event date.

In that case put this definition on top of your contract:
[% USE date %]
[% calc = date.calc %]
… and then calculate flexible due days:


example 1: printdate plus 14 days

[% $printdateplus14days = calc.Add_Delta_Days(ph.printdate_yyyy,ph.printdate_mm,ph.printdate_dd,14) %]
[% $printdateplus14days.2 _’.’_ $printdateplus14days.1 _’.’_ $printdateplus14days.0 %]
or
example 2: 30 days before event date

[% $thirtydaysbeforedate = calc.Add_Delta_Days(ph.startdate_yyyy,ph.startdate_mm,ph.startdate_dd,-30) %]
[% $thirtydaysbeforedate.2 _’.’_ $thirtydaysbeforedate.1 _’.’_ $thirtydaysbeforedate.0 %]


*Now that we are done with the money section, there are some interesting options for the requirements of the artists in regards to travels, accomodation, hospitality and tech-riders:

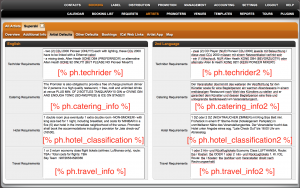
For large amounts of text, use our variables for the BOOKING / ARTISTS / Artist Defaults


Travel / Flights en: [% ph.travel_info %]
Travel / Flights 2nd : [% ph.travel_info2 %]

Accomotation / Hotel en: [% ph.hotel_classification %]
Accomotation / Hotel 2nd : [% ph.hotel_classification2 %]

Catering / Hospitality en: [% ph.catering_info %]
Catering / Hospitality 2nd : [% ph.catering_info2 %]

Techrider en: [% ph.techrider %]
Techrider 2nd : [% ph.techrider2 %]


For smaller units, you can either use variables from the BOOKING / ARTISTS / Other Defaults section or even create custom variables.


Also here is useful tip if you want to automate the selection of one variable or another depending on the performance type (DJ or LIVE): Here is a variable and conditional clause to display variable ”ph.techrider2” whenever the performance type is “Live”, otherwise it will be the standard techrider:

[% pt = ph.performance_type %]

[% IF pt.search(‘Live’) OR pt.search(‘live’) %]
[% ph.techrider2 %]
[% ELSE %]
[% ph.techrider %]
[% END %]

Here are more useful placeholders:


Travel Party (Names): [% ph.artist_names %]
Travel Party (Amount of People): [% ph.travel_qty %]

Artist link: [% ph.artist_url1 %]
Artist 2nd link: [% ph.artist_url2 %]

Artist guestlist / free tickets: [% ph.guestlist_tickets %]

Artist Hotel Star-Rate: [% ph.hotel_stars %]
Amount of Rooms: [% ph.double_rooms %]
Amount of Suites: [% ph.suites %]


*When it comes to Hotel dates and the amount of nights in the Hotel, there’s also some variables and calculations available:

this is the Check-in day for the Hotel, in the format: 31.12.2016
[% ph.date_hotel_start_dd %].[% ph.date_hotel_start_mm %].[% ph.date_hotel_start_yyyy %]

this is the Check-out day for the Hotel, in the format: 31.12.2016
[% ph.date_hotel_end_dd %].[% ph.date_hotel_end_mm %].[% ph.date_hotel_end_yyyy %]

to display “Rooms for x nights” in a document, add this calculation to the template:

a) put on top of template:

[% USE date %]
[% calc = date.calc %]

b) and in your template put for Sx

[% calc.Delta_Days(
ph.date_hotel_start_yyyy,ph.date_hotel_start_mm,ph.date_hotel_start_dd,ph.date_hotel_end_yyyy,ph.date_hotel_end_mm,ph.date_hotel_end_dd) %]

Example: 1 double room for 2 nights


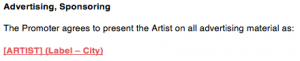
*Another common placeholder in a Booking contract is the Artist Name to be printed on posters, i.e. the billing:


[% ph.artist %] ([% ph.announce_as %])


*Last but not least, you might want to add the date of contract, or a signature at the bottom of the contract:


Date of Contract (2016-12-31): [% ph.print_date %]
Date of Contract (31.12.2016): [% ph.printdate_dd %].[% ph.printdate_mm %].[% ph.printdate_yyyy %]

Artist Signature: [% ph.signature %]
(needs to be uploaded and included)


new template tag connected to the CHECKLIST feature.

[% ph.checklist(‘Artwork approved’) ? ‘Yes’ : ‘No’ %]

ph.checklist()

Returns a TRUE or FALSE value if the item is checked or not.

details Sales Ingestion API


The Sales Ingestion API allows you to directly import sales data into the Details client databases via JSON/JSONL file transfer. This guide provides detailed instructions on using the API.

API Endpoint https://api.berlin3.com/api/clientID/


Required Parameters

When making API requests, include the following parameters:

  • clientID: Unique Client ID
  • file: JSON/JSONL file location to upload
  • action: The type of action (e.g., add_sales)
  • year: Sales Year (yyyy)
  • month: Sales Month (mm)
  • currency: ISO currency code
  • shared_key: Key to identify the statement source
  • api_key: Unique Client API Key

Your clientID is in the clients login link.
To find your api_key, log into your Details account and go to Settings > Sharing.
The shared_key(s) can be found in the Import Setups for any Distribution Account and are generated automatically. If you create a new Account, close and re-open it to find the Shared Key.


Data Format

The JSON file should be an array of objects, and the JSONL file should be a list of objects separated by a new line.

Field Descriptions

API Field Name Data Type Expected Value Description
identifier Text ISRC, UPC, SKU, VIDEO ID, etc. Main Identifier
identifier_product Text UPC, SKU, GRiD, etc. Secondary Identifier
artist Text   Artist Name
title Text   Title of Item
catalog_no Text   Catalog Number
country Text ISO2 Country Code Country
shop Text Name of DSP (Platform) Shop Name
usage_type Text “DL” for Audio Download, “DV” for Video Download, “STR” for Audio Stream, “STV” for Video Stream, “PROMO” for Platform Promotion Digital Sales Type
usage_type_description Text “Music Video”, “Music Compilation”, “Ringtone”, etc. Description of Digital Sales
qty INT Signed Quantity
ppd DECIMAL 25,15 Published Price to Dealers
ppu DECIMAL 25,15 Net revenue per unit
sales_date Date yyyy-mm-dd Sales Date (alternatively: End of Sales Month)
import_format Text “Bundle”, “Track”, “CD”, “LP”, “T-Shirt”, “Video”, “Box” Item Format
channel Text “d” for digital, “p” for physical, “n” for neighboring rights/performance Sales Channel
mechanical_pu DECIMAL 25,15 Cost per unit for mechanicals


Import Frequency

Sales Imports are usually performed monthly. However, weekly or daily imports are also possible depending on your needs. For example, one use case involves daily sales imports plus additional credit notes as needed.


Overwriting Previous Imports

New imports do not overwrite previous imports for the same month. Instead, each new import adds to the existing data for that month.


Handling Foreign Currency Sales

Imports are usually for one account (shop, company).
For each account, you can set up multiple import settings for different currencies.
It is important that each import setting (=shared_key) must be in one currency.


Importing Physical Sales

  • Quantity: Returns should be represented as negative numbers. A signed INT can include negative values for returns.
  • Usage Type: For physical sales, usage_type can be left empty or marked as ‘physical’. The documentation mainly mentions Promo, Downloads, and Streams.
  • Import Format: Use appropriate format descriptions like “LP,” “Box,” or “12”. Ideally, use the same format names as those in the details. If an unrecognized format is imported, the user will need to assign a format.
  • Channel: For physical sales, the value for the channel field should be “p”.


Test Environment Setup

If you need to test imports, we can set up a test shop (DSP/Platform) for you. Please contact us!

Note that unknown stores are not automatically set up and will be ignored.


Making API Requests

Important Notes

  1. POST Requests: Ensure that the POST requests are made with multipart/form-data content type. This is crucial for file uploads.

  2. Trailing Slash: The API endpoint should not have a trailing slash.
    In other words, use https://api.berlin3.com/api/clientID instead of
    https://api.berlin3.com/api/clientID/.

Example Usage with cURL

To make a POST request with file upload, use the following cURL command:

curl -X POST "https://api.berlin3.com/api/<client_id>/" 
-F "api_key=<api_key>"
-F "shared_key=<shared_key>"
-F "action=add_sales"
-F "year=2024"
-F "month=03"
-F "currency=EUR"
-F "description=TestImport"
-F "file=@path/to/detailsSampleData.json"


Sample JSON File

[
{
"identifier": "DEAK123456",
"identifier_product": "0123454712872",
"artist": "Superaki",
"title": "Paris Moskau (Strom Mix)",
"catalog_no": "Det Rec 002",
"country": "FR",
"shop": "iTunes",
"usage_type": "DL",
"usage_type_description": "Full Price Download",
"qty": 112,
"ppu": 0.53,
"ppd": 0.70,
"sales_date": "2018-11-30",
"import_format": "Track",
"channel": "d",
"mechanical_pu": 0.12345
}
]


API Response

The API returns an object with the following fields:

  • success: Always 1 when the call succeeds.
  • error: Contains a value if there is an error (e.g., period_already_id, shared_key_unknown, Invalid Request, Auth Failed).


Sample Response

{"success":"1","error":""}

Deleting Contracts in the ROYALTY Section

Deleting Contracts in the ROYALTY Section

In the ROYALTY section of our system, contracts can be deleted directly from within the contract itself. However, certain conditions must be met before deletion is permitted. This guide will walk you through the process and highlight important considerations.

When Can Contracts Be Deleted?

Contracts can only be deleted if there are no existing records or history associated with them. Essentially, if there are no linked royalty statements or other relevant data, deletion is permissible.

How to Delete a Contract

  1. Navigate to the ROYALTY section and locate the CONTRACTS.
  2. Select and open the contract you wish to delete.
  3. In the top-right corner, you’ll find a red button labeled “DELETE.” Click on this button.
  4. A confirmation dialog will appear, asking you to confirm the deletion. Ensure you understand that this action is irreversible and will permanently remove the contract from the system.
  5. Confirm the deletion, and the contract will be removed, provided there is no associated history.

When Deletion Isn’t Advisable

If the contract has a history associated with it, such as previous royalty statements or other related data, deletion is not advisable. Instead, we recommend setting the contract to “INACTIVE.” This option ensures that the contract is no longer processed but preserves its historical data.

Additional Help

For further assistance on setting contracts to “INACTIVE” or managing contracts in general, additional help is available in THIS ARTICLE.

How to manually add advances and costs

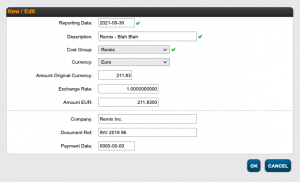
To add advances and costs to your releases go to Label > Releases, search the corresponding release and click to open. Go to subtab Costs.


To add new costs, click the green Plus on top right. On the modal fill in mandatory fields:

Cost Date

Description

Cost Group (managed on Settings > Accounting)

Currency

Amount Original Currency

The Amount System Currency will be calculated by details according to your current exchange rates (managed on Settings > General)

Company, Document Ref and Payment Date are optional fields and can always be blank.


To add an Advance, just select cost group Advance. These are automatically set to 100% recoupable.


On Account Recoupable in the right column Recoupment you can now account costs / advances to the related royalty accounts and the accounted amount will be displayed. On click you can see all details of the Recoupables.


If the Recoupment status shows No Recoupable the related contract is set to Do Not Recoup.


If you want to add costs / advances to a specific product of a release, you can follow the above steps on the corresponding Product subtab Label > Product > Costs.


HERE is a tutorial video about how to add Advances and Costs.
Find out HERE how to upload proof for costs to your documentation.

If you feel, you have too many costs to enter manually, details also allows to import costs from an excel sheet.

Download a sample sheet HERE.
Check this tutorial on how to import Costs from an excel sheet