How to set up custom templates for batch statement emails

There are different ways to send out royalty statements to rights holders in details.

If you want to send a batch email out to a selection of royalty accounts including links to access statements, you need to set up a template for the email that will be send.

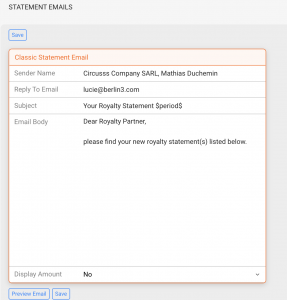
  • You can set custom texts per statement layout, i.e. for different statement business identities or languages you can define different default texts.
  • You can add default reply-to email address as well as a sender name, i.e. which email replies should go to and how the email sender appear in your right holders’ inbox.
  • You can choose whether or not you want the email to contain royalty amounts.

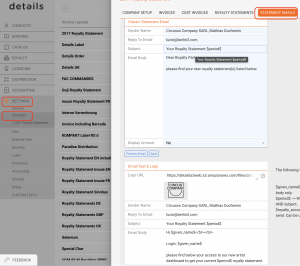
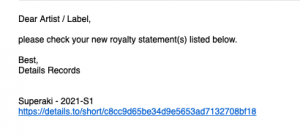
For existing clients we have set up a standard template, which looks something like this :


To customize your own email templates

  1. Go to Setting > Identities

  2. Select the royalty project you want to customize and click on the new subtab Statement Email.

  3. Enter the Sender Name that will be displayed in the recipients email inbox

  4. Enter a Reply To email address which recipients will now be able to directly reply to from your statement emails!

    NOTE : Sender Name & Reply To will be used for both Classic Statement Email and Email Text & Logo.


  5. In the Box Classic Statement Email on the upper side of the subtab enter your custom email subject (example: “Your Royalty Statement”) and

  6. Add a text template to be used for future standard batch emails with this statement layout.

NOTE : For both email subject and text you can use the variable $period$ which will automatically be replaced with the period of the statement you are sending out.


Find out how to send a batch email here.

Royalties, Contracts and Recoupables

How to start with details – manual

read previous step here – how to Import Costs


Set up Royalty Accounts


Business partners (artists, labels, etc) which you licence music FROM (i.e. licensors) we call Royalty Accounts. To account royalties to these business partners, you will will need to add them as royalty accounts.

You can just add multiple contracts Bto one royalty account. All Royalty Accounts and related contracts are on LABEL / ROYALTY.


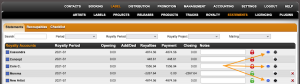
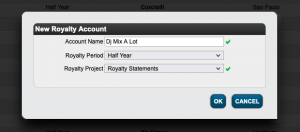
To create a new Royalty Accounts go to LABEL / ROYALTY and click the green PLUS icon on top right of the list. Enter the Account Name, Royalty Period and select royalty statements as invoice project.

Click [OK] and you will be directed to the account’s Set Up tab.
 

On the Royalty Accounts setup tab add a main contact & minimum payment and select the Account Base.

The Account Base defines the period the income of a sale is collected to and hence accounted to your royalty statements. Attention: The Account Base cannot be changed after the first statement has been sent.

There are three Royalty base options,


  • Sales Period: All income of sales will be collected to the period of the actual sale.
  • Payment Period: All income of sales will be collected to the period in which the invoice related to sales income has been paid.
  • Invoice Date: All income of sales will be collected to the period in which invoice has been created.

Set up Contracts


Now you can start adding artist album contracts.

First go to Royalty Account s subtab Contracts and click [+] to add a new contract.

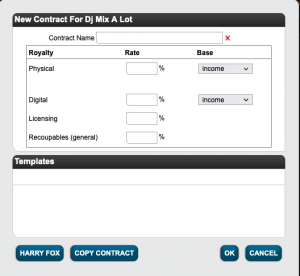
In the module window, enter your Contract Name and main royalty rates. You can always add additional / change existing royalty options later on.


Read here how to set up a compilation contract.
You will be directed to the Contract s subtab Contract Items where you add the contract s releases, products & tracks.


We distinguish royalty contracts based on artists, for example for artist albums & royalty contracts based on tracks, for example as compilation contracts.


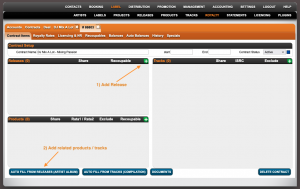
For Album Artist Contracts select the release that is part of this contract in the Release box by clicking the green PLUS and searching for release title/artist or release code.

Then click Auto Fill From Release (Artist Album) which will fill in all related products and tracks with their specific rata to the contract.
 

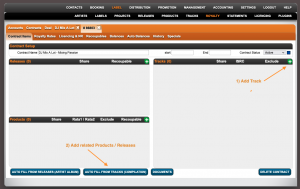
For Compilation Contracts select the tracks that are part of this contract in the Track Box by clicking [+] and searching for track title/artist.

Then click Auto Fill From Tracks (Compilation) which will automatically fill in all related products and releases with their specific ratas and shares to the contract.
 

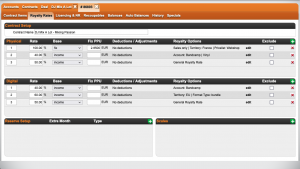
On the subtabs Royalty Rates & Performance & Licencing you find the royalty rates you have previously entered. If necessary you are able to adjust or extend these by clicking Edit in the particular line or adding additional options by clicking [+].


Attention: If you have more than one royalty option on one channel (physical / digital / licencing / etc), make sure to go from the particular as royalty option 1,2,…. to the general option as last option.
 

Add Recoupables


The last step is to set up the contract’s Recoupable settings.

Go to the Recoupables tab and select the Recoupable Status General Recoupables and add your percentage.

Please Note: Cost Group Advance are always accounted with 100%.
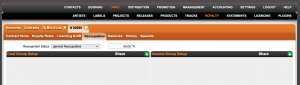
If your contract does not include any cost recoupments, select No Recoupment.

For more recoupable setting options check here.


read next step here – how to Account Recoupables
Account Recoupables

How to start with details – manual

Read previous step here how to set up / add Royalty Accounts, Contracts and Recoupables.

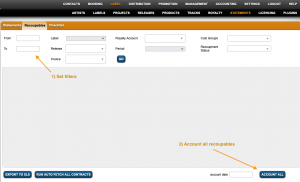
To account Recoupables in a batch across all releases & products go to LABEL / STATEMENTS / RECOUPABLES

Select the start and end date of your current royalty period and add more filters if needed.

To account all, click Account All at the bottom of the page.


Alternatively you can account single recoupable costs by clicking Account Recoupable line by line.

Please note: If it s displayed Not Recoupable instead, the royalty contract has no recoupment option. If this is not correct you need to update your settings at LABEL / ROYALTY / RECOUPABLES

Once you have accounted the recoupables, they will be set off against royalties in the royalty statement.


Read next step here – how to create Royalty Statements

Create Royalty Statements

How to start with details – manual

read previous step here – how to account recoupables

Before you can now run your royalty statements, the last step is to Confirm Royalty Dates. Depending on the account base selected within your royalty accounts, all sales lines are added to the correct accounting period.

Go to LABEL / STATEMENTS / CHECKLIST and check if you can answer all step’s with a ‘yes’. Then click Confirm Royalty Dates at the bottom of the page. Now you can run your royalty statements.

To run your royalty statements in a batch, go to LABEL / PLUGINS and activate the Plugin Batch Statements by clicking twice.


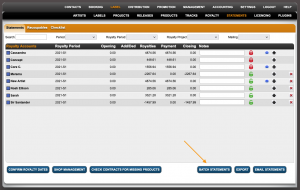
Back on LABEL / STATEMENTS / STATEMENTS you can now find the additional button Batch Statements.


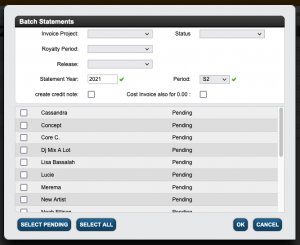
Click Batch Statements and select Statement Year and Statement Period in the module window.


Now select manually which royalty accounts you want to run statements for or click Select Pending / All and click [OK] to proceed.


Congratulations! Your statements are calculated now. Relax! You will be notified by email when the process is complete.

Find all your statements on  LABEL / STATEMENTS / STATEMENTS or in the royalty account s subtab STATEMENTS.


If your royalty account contacts have email addresses assigned, you can send your statements within details by clicking the email symbol.


Booking – Templates

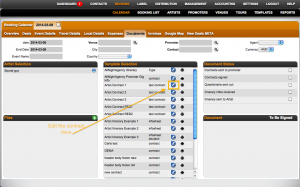
Overview of the BOOKING Tab – TEMPLATES

You can find an INTRODUCTION in how we use templates to create documents in details can be read here.


If you would like to edit your BOOKING TEMPLATES yourself, HERE is how!

Step by Step Guide to variables in a standard Booking Contract

Step by Step Guide to variables in a standard Booking Itinerary

Here is an article about DATE formats in templates

Printer Settings / How to safe templates as pdf

How to save a template that has been manually edited

Code for clickable EMAIL, PHONE and URLs in templates

List of Template Tags

More tips for Html templates

Contract Templates


Updating Contract Templates and Setting Up a Dedicated Royalty Account

Details offers a feature to set up contract templates, which is especially useful for complex contracts as it saves time and ensures consistency.


Step-by-Step Guide

1. Set Up a Dedicated Royalty Account

Go to the LABEL / ROYALTY section.

Create a new royalty account specifically for your contract templates. We recommend naming this account something easily identifiable, such as “AAA Contract Templates.”

2. Create a New Contract Template

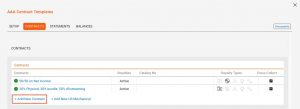
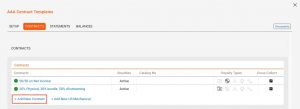
Within your dedicated royalty account, open the Contracts subtab.

Click the green PLUS icon to add a new contract.


3. Configure Contract Details

    • Enter the necessary information such as royalty rates, recoupable settings, and any other relevant details.

4. Save the Contract as a Template

Check the Use As Template checkbox.

Provide a unique name for your contract template.


5 Accessing Your Templates

All your template contracts will be available in the New Contract modal for easy access and use.

By following these steps and setting up a dedicated royalty account, managing and utilizing contract templates becomes more efficient and organized.


For additional guidance, read here how to copy an existing contract.

Setting up details-2-details auto-ingestion sales imports

At DETAILS we try to avoid inefficiencies and work duplication wherever possible.
One of these workflows that saves a lot of time and energy for our clients is that we allow a direct data transfer from one details-client to another – for example for sales, costs or licence information.


To comply with data safety and privacy regulations as per the EU GDPR regulations the automatic exchange of data between two details clients will only work when both parties agree on doing so.
For this reason a secret shared-key needs to be activly and deliberatly exchanged between both parties.
For your safety we log of the process.


To set up the data exchange we need to differentiate between a SENDER and a RECEIVER.

The SENDER is the client which will provide sales, costs or other information (typically the Label-Service or Distributor).

The RECEIVER is the client that will ingest the SENDER’s data into their own database (typically the distributed Label).


For the auto-ingestion to work, the SENDER and RECEIVER need to proceed with the following steps:


(1) SENDER details client :

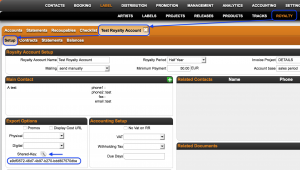
The SENDER needs to log into their details application, create a secret Shared-Key and transmit it together with it’s own client name to the RECEIVER in a secure way.

The Shared-Key is created in the ROYALTY ACCOUNT / SETUP which is designated to be shared:


The details-client name can be found the SENDER’s login link:
https://app.detailsdetails.eu/CLIENTNAME/


(2) RECEIVER details client :

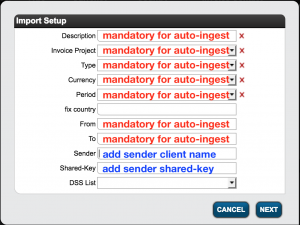
The Shared-Key and the SENDER’s details-client name now need to be included into the Import-Setting of the RECEIVER, designated to receive the respective data.


NOTE: Exchanged data may be sales OR costs and third party licences.
Each data type needs to be set up in SEPERATE Import setup!


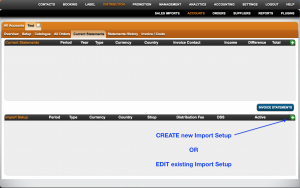
You can find the Import Settings in the DISTRIBUTION ACCOUNTS] / CURRENT STATEMENTS / IMPORT SETUP.


Template Tags / Variables

In Booking / Templates, details uses HTML templates to create contracts, itineraries, tourbooks, and other documents.

Inside these templates, you can use variables called template tags. These tags automatically insert information from bookings, artists, promoters, travel details, financial details, and other related records into your documents.

This article lists the most commonly used template tags for standard booking templates in the Booking section.

Note: Additional, less commonly used tags are available. For advanced template logic such as IF / ELSE clauses, conditions, or custom definitions, please contact support.

Event Date Details

Template tag Example / description
[% ph.date_start %]Event start date
[% ph.date_start_plus_one %]Event start date plus one day
[% ph.date_end %]Event end date
[% ph.startdate_dd %]Start date day
[% ph.startdate_mm %]Start date month
[% ph.startdate_yyyy %]Start date year

Localized Weekdays

[% ph.startdate_day("en") %]Monday
[% ph.startdate_day("de") %]Montag
[% ph.startdate_day("fr") %]Lundi
[% ph.startdate_day("es") %]Lunes
[% ph.startdate_day("pt") %]Segunda-Feira

Localized Month Names

[% ph.startdate_month("en") %]November
[% ph.startdate_month("de") %]November
[% ph.startdate_month("fr") %]Novembre
[% ph.startdate_month("es") %]Noviembre
[% ph.startdate_month("pt") %]Novembro

Event Details

[% ph.date_name %]Date or event name
[% ph.doors_open %]Doors open time
[% ph.get_in %]Get-in time
[% ph.line_up %]Line-up information
[% ph.curfew %]Curfew time
[% ph.notes %]Booking notes
[% ph.local_info %]Local information
[% ph.event_url %]Event URL

Artist General Details

[% ph.artist %] [% ph.artist_short_name %] [% ph.artist_url1 %] [% ph.artist_url2 %] [% ph.artist_url3 %] [% ph.announce_as %] [% ph.artist_names %] [% ph.person_name %] [% ph.person_address1 %] [% ph.person_birthday %] [% ph.person_city %] [% ph.person_company %] [% ph.person_country %] [% ph.person_email1 %] [% ph.person_mobile1 %] [% ph.person_phone1 %] [% ph.person_postalcode %] [% ph.person_vat_id %] [% ph.signature %]

Artist Event Details

[% ph.artist_qty %] [% ph.artist_before %] [% ph.artist_after %] [% ph.date_hotel_start_dd %] [% ph.date_hotel_start_mm %] [% ph.date_hotel_start_yyyy %] [% ph.date_hotel_start_day("en") %] [% ph.date_hotel_start_month("en") %] [% ph.date_hotel_end_dd %] [% ph.date_hotel_end_mm %] [% ph.date_hotel_end_yyyy %] [% ph.date_hotel_end_day("en") %] [% ph.date_hotel_end_month("en") %]

Localized hotel date tags are also available for de, fr, es, and pt.

Artist Bank Account Details

[% ph.artist_account_holder %] [% ph.artist_bankaccount_no %] [% ph.artist_bankaddress %] [% ph.artist_bankname %] [% ph.artist_iban %] [% ph.artist_invoice_address %] [% ph.artist_money_account %] [% ph.artist_sortcode %] [% ph.artist_swift %] [% ph.artist_tax_id %] [% ph.artist_vat_id %]

Artist Default Information

[% ph.artist_notes %] [% ph.catering_info %] [% ph.catering_info2 %] [% ph.guestlist %] [% ph.hotel_info %] [% ph.hotel_rooms %] [% ph.single_rooms %] [% ph.double_rooms %] [% ph.suites %] [% ph.performance_time %] [% ph.performance_type %] [% ph.stage_name %] [% ph.schedule_notes %] [% ph.setup_time %] [% ph.soundcheck %] [% ph.techrider %] [% ph.techrider_url %] [% ph.travel_info %] [% ph.travel_option %] [% ph.travel_qty %] [% ph.travel_qty_all_artists %]

Promoter Details

[% ph.expenses_promoter %] [% ph.payment_method %] [% ph.promoter_address %] [% ph.promoter_address_line %] [% ph.promoter_city %] [% ph.promoter_region %] [% ph.promoter_contact %] [% ph.promoter_contact_phone %] [% ph.promoter_contact_mobile %] [% ph.promoter_contact_email %] [% ph.promoter_company %] [% ph.promoter_legalname %] [% ph.promoter_country %] [% ph.promoter_email1 %] [% ph.promoter_emails %] [% ph.promoter_mobile %] [% ph.promoter_phone1 %] [% ph.promoter_postalcode %] [% ph.promoter_tax_id %] [% ph.promoter_vat_id %] [% ph.promoter_url1 %]

Money Details

[% ph.deal_id %] [% ph.deal_type %] [% ph.first_offer %] [% ph.cash_on_night %] [% ph.deposit1 %] [% ph.deposit1_all_artists %] [% ph.deposit1_duedate_dd %] [% ph.guarantee_fee %] [% ph.guarantee_fee_all_artists %] [% ph.guarantee_gross_amount %] [% ph.guarantee_vat_amount %] [% ph.guarantee_vat_rate %] [% ph.booking_fee %] [% ph.booking_fee_all_artists %] [% ph.booking_fee_duedate %]

Invoice Template Tags

[% ph.invoice('AgencyCommission(fromArtist)') %]
[% ph.invoice('BalanceFee') %]
[% ph.invoice('Expenses') %]
[% ph.invoice('Deposit') %]
[% ph.invoice('Deposit2') %]
[% ph.invoice('AllInBudget') %]
[% ph.invoice('BookingFee(ontop)') %]
[% ph.invoice('EventCommission') %]
[% ph.invoice('CashOnNight') %]
[% ph.invoice('ArtistFee') %]

Travel Details

[% ph.travel_artist %] [% ph.travel_complete %] [% ph.travel_before %] [% ph.travel_after %] [% ph.travel_costs %]

Local Details

Local details can be inserted by specifying the local type and the field name.

[% ph.locals('PickupDriver','name') %]
[% ph.locals('PickupDriver','mobile') %]
[% ph.locals('PickupDriver','notes') %]

[% ph.locals('Hotel','name') %]
[% ph.locals('Hotel','address1') %]
[% ph.locals('Hotel','city') %]
[% ph.locals('Hotel','postalcode') %]
[% ph.locals('Hotel','country') %]
[% ph.locals('Hotel','phone') %]
[% ph.locals('Hotel','url') %]

This list covers common booking template tags only. If you need a specific tag that is not listed here, please contact support with the template and the field you want to display.