How to Remove a Confirmed Sales Import


If you need to remove a confirmed sales import (displayed in green), follow these steps:

Step 1: Navigate to the Sales Import

  1. Go to DISTRIBUTION > Imports.
  2. Locate and click on the green tile representing the sales import you want to remove.
  3. In the side window that opens, click on the statement.

Step 2: Open the Related Invoice

  1. In V2.0, at the top right of the side window, click on the button labeled Open Related Invoice.
  2. In V1, the button can be found at the bottom.

Step 3: Change Invoice Status

  1. If the invoice is still unlocked, click on Change Status. Otherwise make sure to unlock the Invoice first.
  2. Set the invoice status to Delete Invoice.

Note on deleting invoices:
Before you proceed, verify with your accounting department that you have permission to delete the related invoice. They may have already accounted the invoice!

Also , if a payment has already been made for this invoice, you must remove the payment before deleting the invoice.

In both cases, consider setting the invoice to Cancelled instead of deleting it. This keeps a trace of the transaction as a cancelled invoice, which can be more beneficial for record-keeping.

Note on deleting Digital Sales Statement Invoices

If the invoice is part of a digital sales statement, the deletion process might take longer due to the need to remove multiple data relations.

Step 4: Return to Distribution Imports

  1. After deleting the invoice, go back to DISTRIBUTION > IMPORTS.
  2. You will now see your import displayed in orange with the status matching complete.

Step 5: Delete the Sales Import

  • In V2.0: Click the x icon at the bottom left of the orange tile.
  • In V1.0: Navigate through the statement list, select the statement, and delete it from the list.

  • A prompt will appear asking, “Are you sure you want to delete the Statement?” Confirm by selecting Yes.
How to manage STORES


In details, the term Store refers to any place or source where income is generated and reported. This concept goes beyond the common understanding of online shops or streaming platforms it covers all relevant revenue sources that appear in your statements.

Typical examples include:

  • Digital Service Providers (DSPs) such as Spotify, Apple Music, Deezer, Amazon Music, or YouTube
  • Collecting Societies such as GVL, SENA, PPL, SABAM
  • User Generated Content (UGC) Platforms such as YouTube, SoundCloud, TikTok, or Instagram
  • Physical Sales Sources such as distributors or retail partners

Remember: In details, a Store is not limited to digital platforms. Any channel through which income flows into your system physical, digital, or rights-based is considered a Store. This broader definition ensures that your royalty data remains transparent and comparable across different sources.

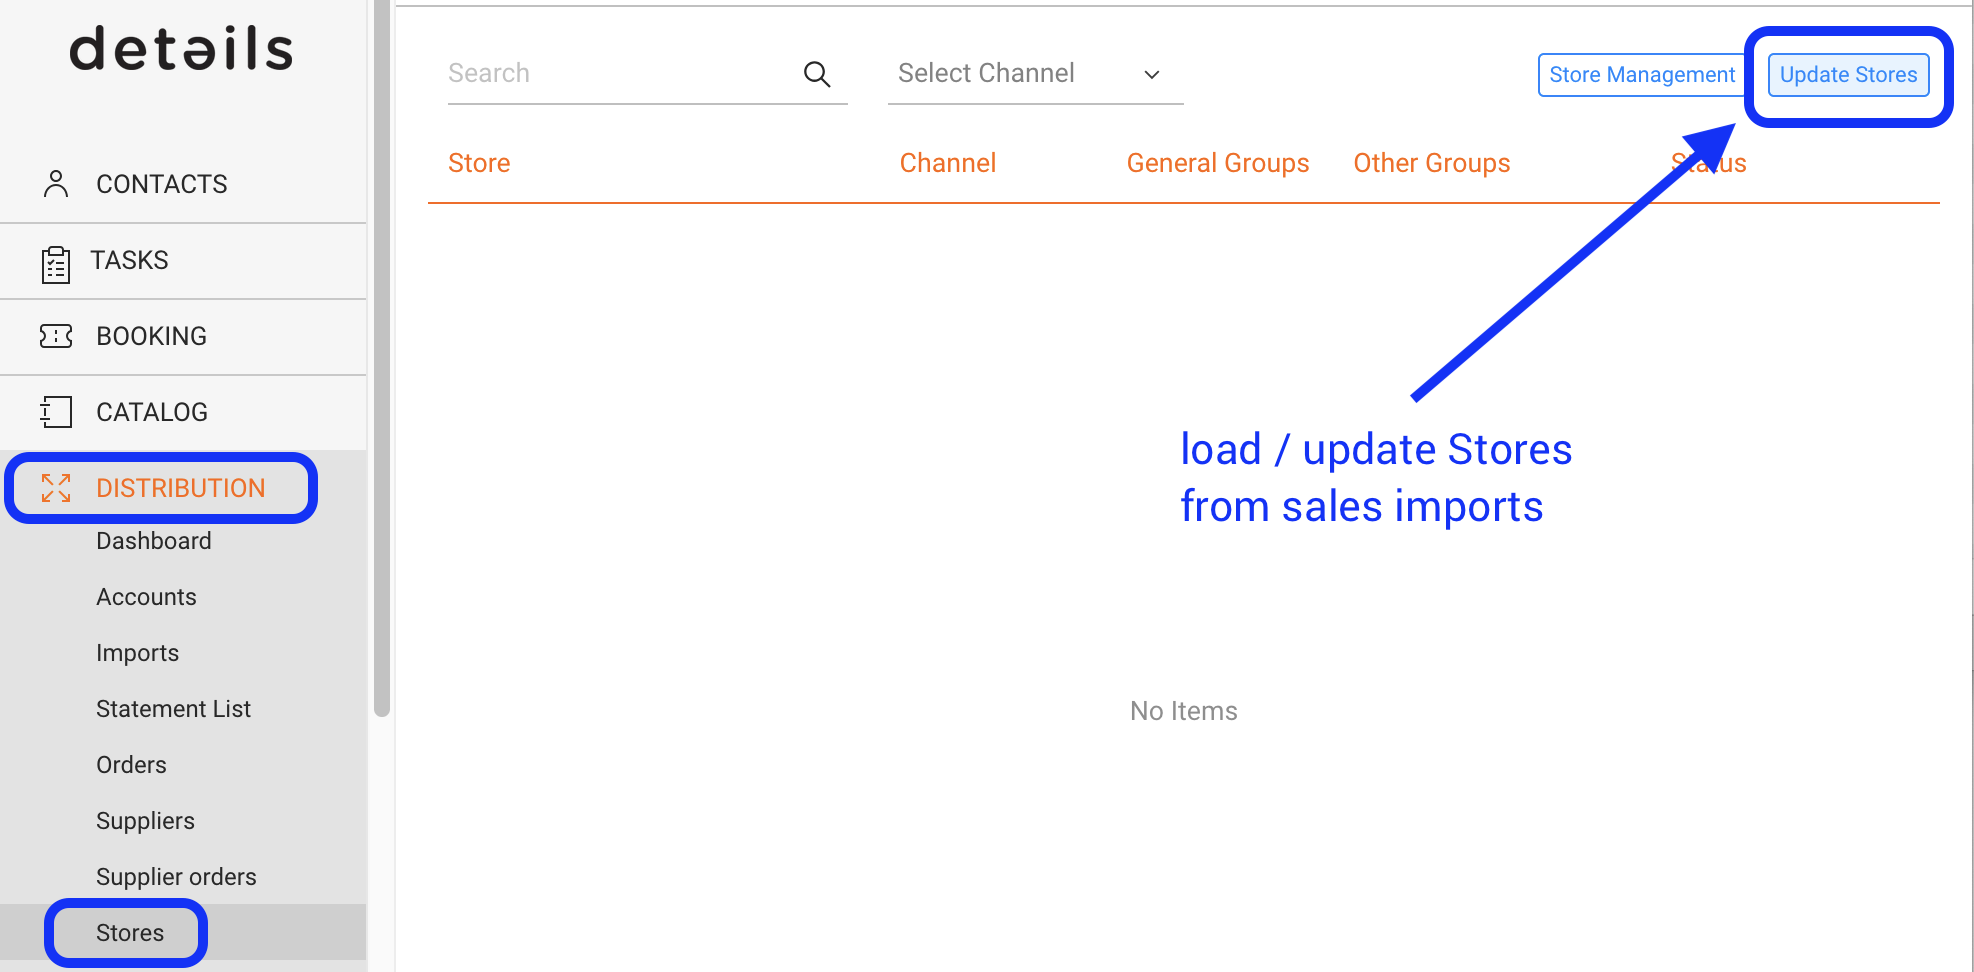
You can access all Stores via DISTRIBUTION / STORES. From there, you can manage naming consistency, merge duplicates, or create store groups to keep your income data structured and accurate.

Note: Stores are created automatically from imported sales and royalty data. After importing new files, update your list with [Update Stores] in the top right corner.


► STORE MANAGEMENT

The Store list helps you keep names consistent and reporting accurate. You can:

  • Rename Stores to fix misspellings or align naming.
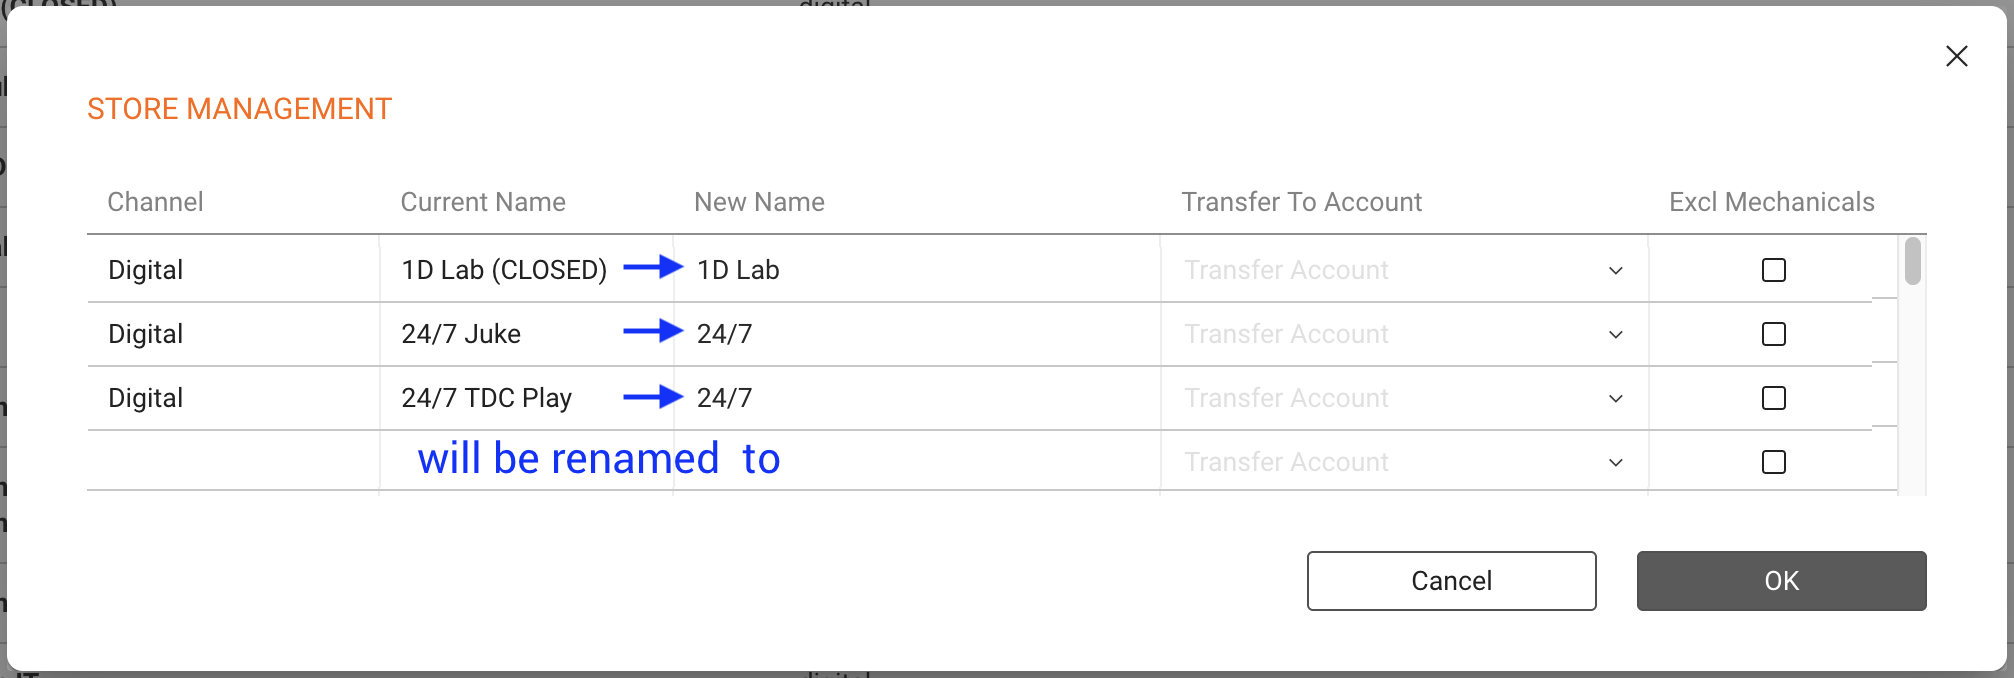
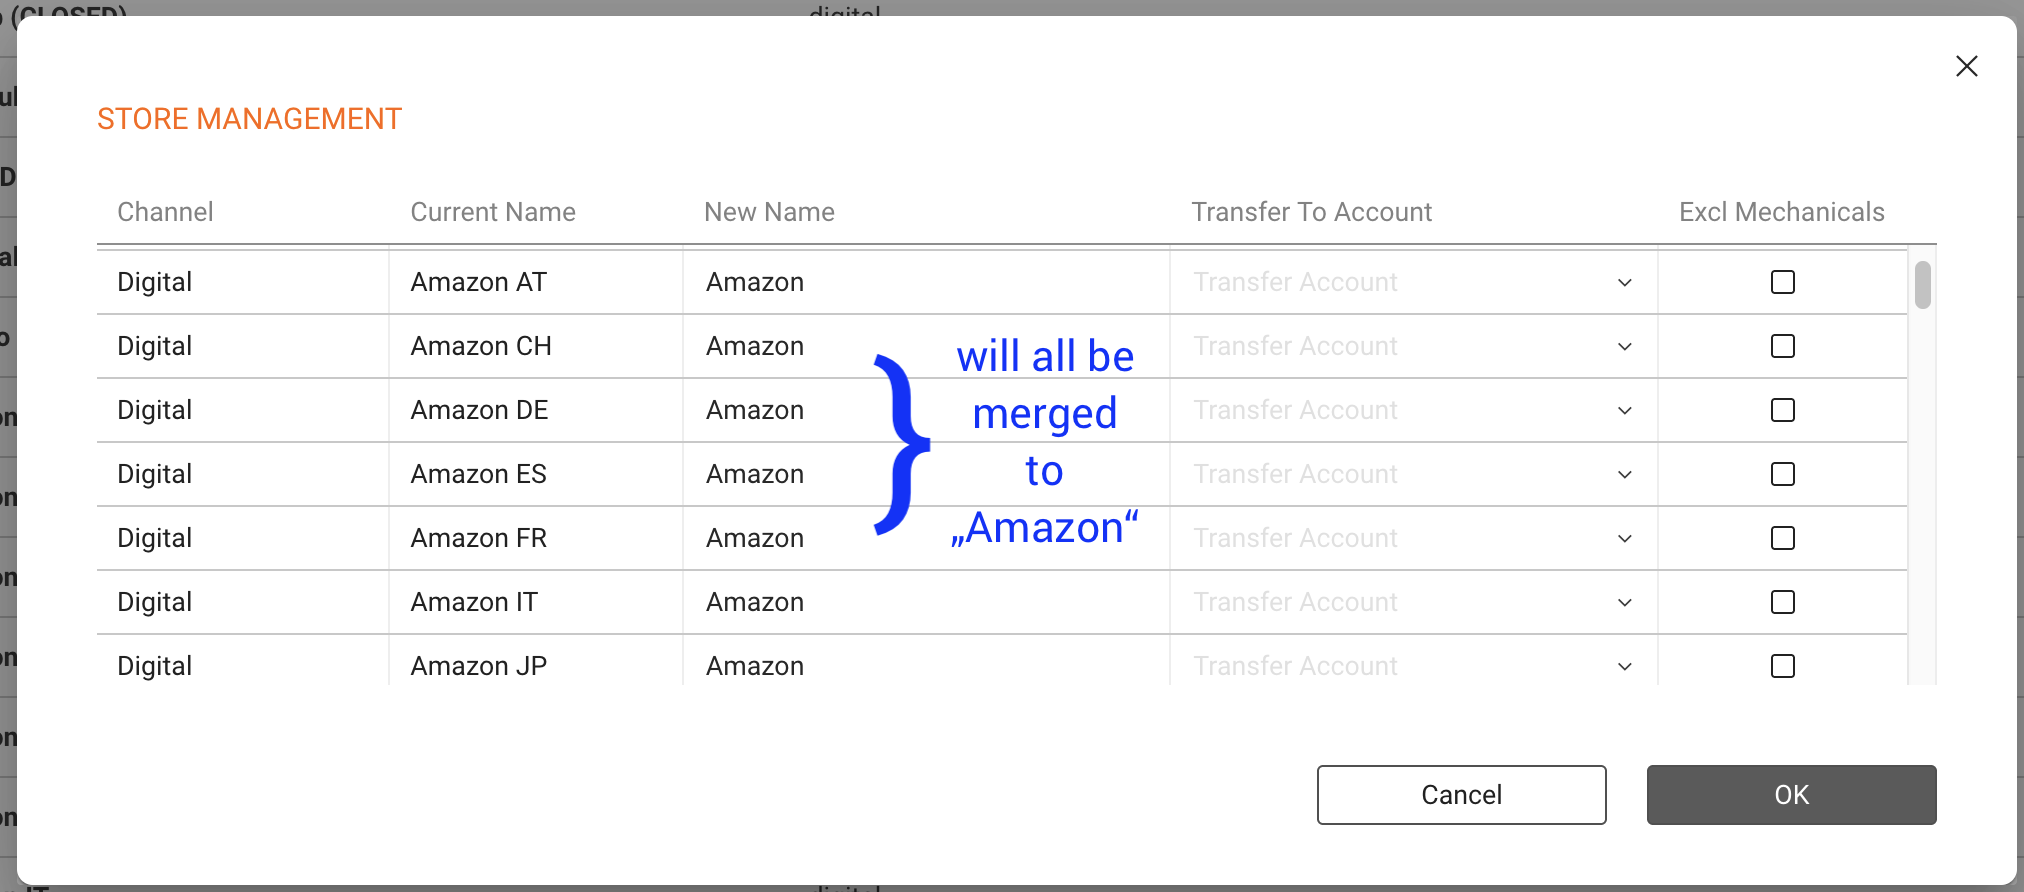
  • Merge Stores by renaming multiple entries to a single unified name.
  • Transfer to Account to reassign sales from selected Stores to a different distribution account (use only when necessary).
  • Exclude Mechanicals to remove selected Stores from mechanical calculations.

► RENAME & MERGE STORES

Open Store Management

Click [Store Management] (top right). Loading may take time if there are many millions of rows.

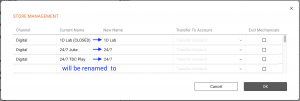
Rename a Store

  1. Select the Store you want to change.
  2. Enter New Name.
  3. Confirm with [OK].

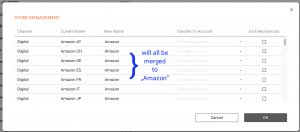
Merge multiple Stores

  1. Select each duplicate or variant Store name.
  2. Rename all of them to the same New Name.
  3. Confirm with [OK]; entries will consolidate under the unified name.

► TROUBLESHOOTING

  • Misnamed Stores (e.g., Credit Card , AAAA ): Likely caused by an import mapping issue. Review the source file and mapping, correct the import, and then standardize the Store names via [Store Management]. Contact support if you need help tracing the source.

How to Remove a Confirmed Sales Import


If you need to remove a confirmed sales import (displayed in green), follow these steps:

Step 1: Navigate to the Sales Import

  1. Go to DISTRIBUTION > Imports.
  2. Locate and click on the green tile representing the sales import you want to remove.
  3. In the side window that opens, click on the statement.

Step 2: Open the Related Invoice

  1. In V2.0, at the top right of the side window, click on the button labeled Open Related Invoice.
  2. In V1, the button can be found at the bottom.

Step 3: Change Invoice Status

  1. If the invoice is still unlocked, click on Change Status. Otherwise make sure to unlock the Invoice first.
  2. Set the invoice status to Delete Invoice.

Note on deleting invoices:
Before you proceed, verify with your accounting department that you have permission to delete the related invoice. They may have already accounted the invoice!

Also , if a payment has already been made for this invoice, you must remove the payment before deleting the invoice.

In both cases, consider setting the invoice to Cancelled instead of deleting it. This keeps a trace of the transaction as a cancelled invoice, which can be more beneficial for record-keeping.

Note on deleting Digital Sales Statement Invoices

If the invoice is part of a digital sales statement, the deletion process might take longer due to the need to remove multiple data relations.

Step 4: Return to Distribution Imports

  1. After deleting the invoice, go back to DISTRIBUTION > IMPORTS.
  2. You will now see your import displayed in orange with the status matching complete.

Step 5: Delete the Sales Import

  • In V2.0: Click the x icon at the bottom left of the orange tile.
  • In V1.0: Navigate through the statement list, select the statement, and delete it from the list.

  • A prompt will appear asking, “Are you sure you want to delete the Statement?” Confirm by selecting Yes.
How to manage STORES


In details, the term Store refers to any place or source where income is generated and reported. This concept goes beyond the common understanding of online shops or streaming platforms it covers all relevant revenue sources that appear in your statements.

Typical examples include:

  • Digital Service Providers (DSPs) such as Spotify, Apple Music, Deezer, Amazon Music, or YouTube
  • Collecting Societies such as GVL, SENA, PPL, SABAM
  • User Generated Content (UGC) Platforms such as YouTube, SoundCloud, TikTok, or Instagram
  • Physical Sales Sources such as distributors or retail partners

Remember: In details, a Store is not limited to digital platforms. Any channel through which income flows into your system physical, digital, or rights-based is considered a Store. This broader definition ensures that your royalty data remains transparent and comparable across different sources.

You can access all Stores via DISTRIBUTION / STORES. From there, you can manage naming consistency, merge duplicates, or create store groups to keep your income data structured and accurate.

Note: Stores are created automatically from imported sales and royalty data. After importing new files, update your list with [Update Stores] in the top right corner.


► STORE MANAGEMENT

The Store list helps you keep names consistent and reporting accurate. You can:

  • Rename Stores to fix misspellings or align naming.
  • Merge Stores by renaming multiple entries to a single unified name.
  • Transfer to Account to reassign sales from selected Stores to a different distribution account (use only when necessary).
  • Exclude Mechanicals to remove selected Stores from mechanical calculations.

► RENAME & MERGE STORES

Open Store Management

Click [Store Management] (top right). Loading may take time if there are many millions of rows.

Rename a Store

  1. Select the Store you want to change.
  2. Enter New Name.
  3. Confirm with [OK].

Merge multiple Stores

  1. Select each duplicate or variant Store name.
  2. Rename all of them to the same New Name.
  3. Confirm with [OK]; entries will consolidate under the unified name.

► TROUBLESHOOTING

  • Misnamed Stores (e.g., Credit Card , AAAA ): Likely caused by an import mapping issue. Review the source file and mapping, correct the import, and then standardize the Store names via [Store Management]. Contact support if you need help tracing the source.