In this article, you ll find the everyday actions you need to manage products quickly and safely. Each action is grouped by function and expands for simple, step-by-step guidance. If you re just getting started, make sure you know the basics from the PRODUCTS Interface article first.
► Add a Product
In details, every product must belong to a Release. Products cannot exist independently. A release may represent a musical project, a merch drop, or even a container for services.
Option A: From a Release (recommended)
- Open the release the product should belong to.
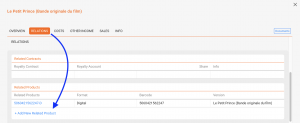
- Go to RELATIONS ► PRODUCTS.
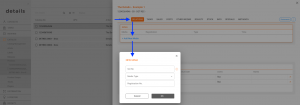
- Click [ADD NEW RELATED PRODUCT].
- Enter Catalog No (required), Format (required), and Barcode (optional).
- If the format is missing, create it in LABEL / SETTINGS.
- You can also copy the tracklist from another product in the release using the radio button in the modal.
- Confirm with [ADD RELATED PRODUCT].
For guidance on how to handle services and non-musical products, see How to Manage Non-Musical Products and Services.
Option B: Import via CATALOG MANAGEMENT
Best for adding several products at once.
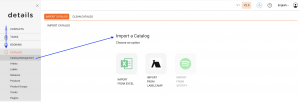
To add Products in bulk you can use serveral Import tools you can find in CATALOG/CATALOG MANAGEMENT:
- via Excel Templates
- via IDOL Labelcamp API
- soon there will be a Sportify API and a AudioSalad API as well
► Edit a Product
- Go to CATALOG / PRODUCTS.
- Click the bold Catalog No or Title to open the product.
- Edit fields on the relevant tabs (Overview, Relations, Info, etc.).
- Save your changes.
► Delete a Product
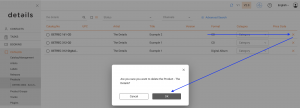
Deletion works only if there are no blocking links. You can delete from the list with the [x] icon.
Deletion is blocked if linked to:
- Sales statements
- Cost imports
- Royalty contracts
If blocked, do this:
- Remove or reassign the linked sales/costs, or unlink relevant contracts.
- If you cannot, contact support to reassign sales/cost data to another product.
If no links exist, deletion is instant and irreversible.
► Fix a Product in the Wrong Release
You can t move a product to a different release directly. Use this workaround:
- Open the correct release and [ADD NEW RELATED PRODUCT].
- Copy the tracklist from the old product if needed.
- Verify data and links on all tabs.
- Delete the wrongly assigned product (see Deleting rules above).
► Manage Tracks (Add, Select, Copy)
Go to PRODUCTS / TRACKS to manage the tracklist.
- [+ ADD NEW TRACK(S)] ► create new tracks ► fill Artist, Title, Version ► [NEW TRACK].
- To add existing tracks, search or scroll, tick the box, then [OK].
- [COPY TRACKS FROM CATALOG NO] to duplicate a tracklist from another product.
- [UPDATE PLAYTIME] after bulk changes to sync durations.
- Bonus tracks & prorata: If a track is marked as bonus, it is excluded from prorata pools. Unflag it to include it again.
Note on Track Lists
Tracklists are product-specific. Changing a tracklist in one product does not affect others. Removing a track only unlinks it from the product the track remains in your catalog. A Step-by-Step Guide on Moving A Track to a different Product you can find here.
► Upload Files & Artwork
Go to PRODUCTS / INFO to manage files and descriptions.
- Upload files (as required by your workflow). If you choose Internal Use Only the file will be inaccessible for people without access to details.
- Add images or artwork (cover, packshot, banners).
- Enter product descriptions in multiple languages.
► Enter Prices
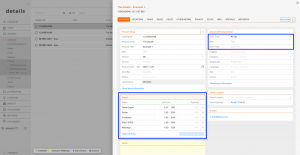
Open the product s OVERVIEW tab.
Actions in ADVANCED PRODUCT SETUP section:
- PPD (physical only): Your dealer price (basis for many royalty rules).
- Cost Price (physical only): Your buying/manufacturing price.
- Price Code: Apply predefined price logic for auto-filled prices.
Actions in PRICE section:
- [ADD UNIT PRICE] ► insert prices from the selected Price Code.
- [RESET PRICES FROM PRICE CODE] ► overwrite manual changes with code defaults.
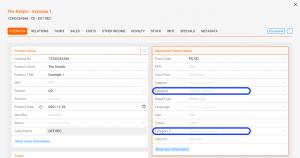
► Assign Categories
Use categories for filtering, reporting, and (for physical products) royalty conditions.
- Edit CATEGORY and CATEGORY 2 in the product s OVERVIEW.
- Manage the global lists under SETTINGS / LABEL ► Label Setting : Categories (tick the 2nd checkbox to enable Category 2).
- In the product list, CATEGORY is editable in place; CATEGORY 2 is hidden (use it for static/internal grouping).
► GEMA Registrations (physical only)
For physical products, you can manage GEMA registrations directly in the product s RELATIONS tab.
- Register products with GEMA where required by law.
- Provide accurate format, tracklist, and playtime data to ensure proper reporting.
- Keep GEMA registrations updated when product versions change.
► Set Country Restrictions
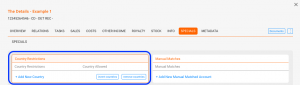
Open the product s SPECIALS tab.
- Click [+ ADD NEW COUNTRY] and select entries.
- Use [INVERT COUNTRIES] to switch restricted ► allowed.
- [REMOVE COUNTRIES] clears the list.
Manage country groups under SETTINGS / GENERAL SETTINGS.
► Export Product Sales
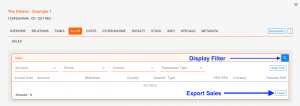
Go to PRODUCTS / SALES, set filters, then click [EXPORT] at the bottom of the page.
- Filter by period, account, format, country, or channel to target the data you need.
- Use exports for statements, stock planning, and price reviews.
► Basic Stock Tasks (physical)
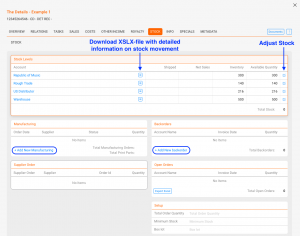
Open the STOCK tab to review availability and orders.
- Stock Levels: See Inventory (physical units) and Available (unreserved).
- Manufacturing: Add new batches with [ADD NEW MANUFACTURING].
- Supplier Orders: Open orders are shown until accounted (then they become inventory).
- Backorders & Open Orders: Track pending customer demand; export as needed.
► Create a Document
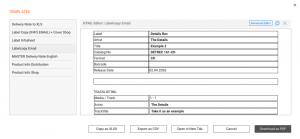
Click [DOCUMENTS] in the top bar to generate an HTML document from condivd templates (e.g., one-sheets, product info sheets, manufacturing orders).
- Select the appropriate template condivd by details.
- Preview the result, then Export (PDF/CSV/Excel) or Copy it.
► Generate Label Copy
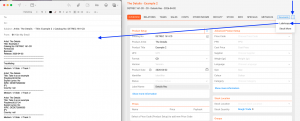
Use the top bar and select Label Copy. This opens a new email in your local mail client with a static label copy: product metadata plus the complete track list.
- Prerequisite: A condivd desktop email program.
- Scope: Fast, standardized email output (not customizable; no Excel export).
- Tip: For brandable or changeable documents, use [DOCUMENTS] instead.
► Make a Stock Move
Use Stock Move to reallocate on-hand units between stock accounts/warehouses for a physical product.
Steps
-
- Open the product page and choose Stock Move.

-
- Select From [Source Account] and To [Destination Account] stock accounts.
- Enter the Quantity and confirm.
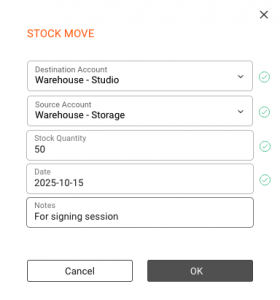
The quantity decreases in the source and increases in the destination no order, shipping documents, prices, or invoice. Use a Distribution Order instead if you need shipping paperwork or an auditable transfer.