On SETTINGS / LABEL different settings concerning the label modul on ”details” can be added and customized. There are the subtabs Label Settings & Licencing Settings.
On the first tab Label Settings you can add, edit and remove:
* Formats: such as CD, 12″, t-shirt etc.
* Categories: product types such as Current, Back Catalog, iTunes Exclusive, etc.
* Price Lists: list of multiple price codes, that can be selected for distribution accounts
* Price Codes: prices for single products or a product groups (based on formats, labels etc)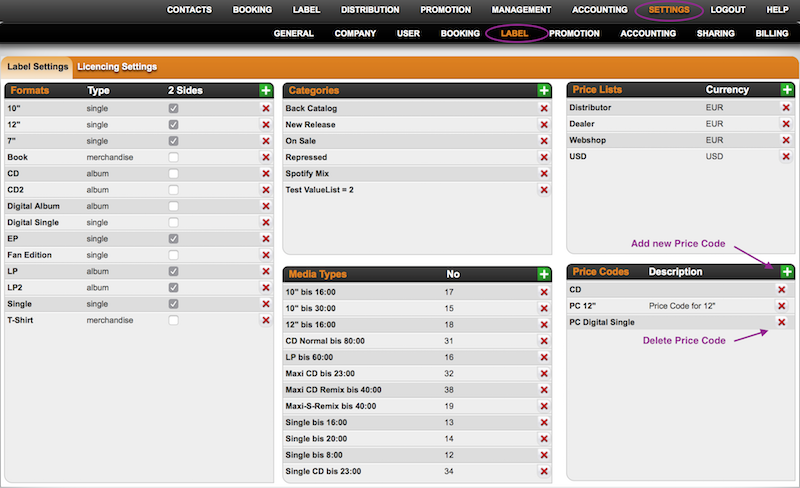
To add a new format, click on the green PLUS icon top right of the Format box.
You can now enter format name, weight, vat type etc. and click ADD NEW FORMAT to confirm.
By clicking on the BOLD format title in the list, you can EDIT an existing format.
To DELETE a format you need to click a red x icon in the list.
Product formats can now be set on PRODUCTS / OVERVIEW.
To add a new category, click on the green PLUS icon top right of the Category box, enter the name and click ADD NEW PRODUCT TYPE to confirm.
By clicking on the BOLD category title in the list, you can EDIT an existing category.
To DELETE a category you need to click a red x icon in the list.
Categories can now be chosen for your product on PRODUCTS / OVERVIEW.
To add a new price list, click on the green PLUS icon top right of the Price List box, enter name and currency and click OK to confirm.
If price codes have been assigned to the price list already, you can load them by clicking ALL PRICE CODES.
To edit an existing price list click on the BOLD price list title.
Click the red x icon to DELETE a price list.
You can assign price lists to distribution accounts on DISTRIBUTION / ACCOUNTS.
To add a new price code, click on the green PLUS icon on top right of the Price Code box, enter name & description, and add the price code and price list. Click OK to confirm.
All price codes related to a price list will be loaded in your price lists.
To edit an existing price list click on the BOLD price list title.
Click the red x icon to DELETE a price list.
You can assign price codes to products here.
On the second tab Licencing Settings you can add, edit and remove Licencing Statuses which can be customized as whished, e.g. the status of the company such as ‘Black Sheep’ or the status of the Licence deal such as ‘High Advance’, ‘No Advance’ etc
To add a new Licence Status, click on the green PLUS icon on top right of the box, enter name & click OK to confirm.
To edit an licence status click on the BOLD title in the list.
Click the red x icon to DELETE a licence status.
You can now choose a status for your LICENCE ACCOUNTS on the list to be found on ”details”/LICENCING.
Author: detailsadmin
How to create Ical links (Calendar links)
This article will show you how to create iCal subscription links for your artists, tour-managers or yourself.
details iCal links are validated in a standardized iCal format.
This file standard is used by other IT companies to create calendar events (for example Apple Calendar or Google Calendar).
In details you can create as many subscription links as you need.
There is no additional cost involved for anyone.
Subscription links are created “on the fly“, meaning that they are NOT SAVED anywhere in the system.
Everytime you create a link with a certain set of options it creates a new link.
Whatever link you create and send out, will work permanently (unless you change the username and passwords – then the existing links will not update anymore)!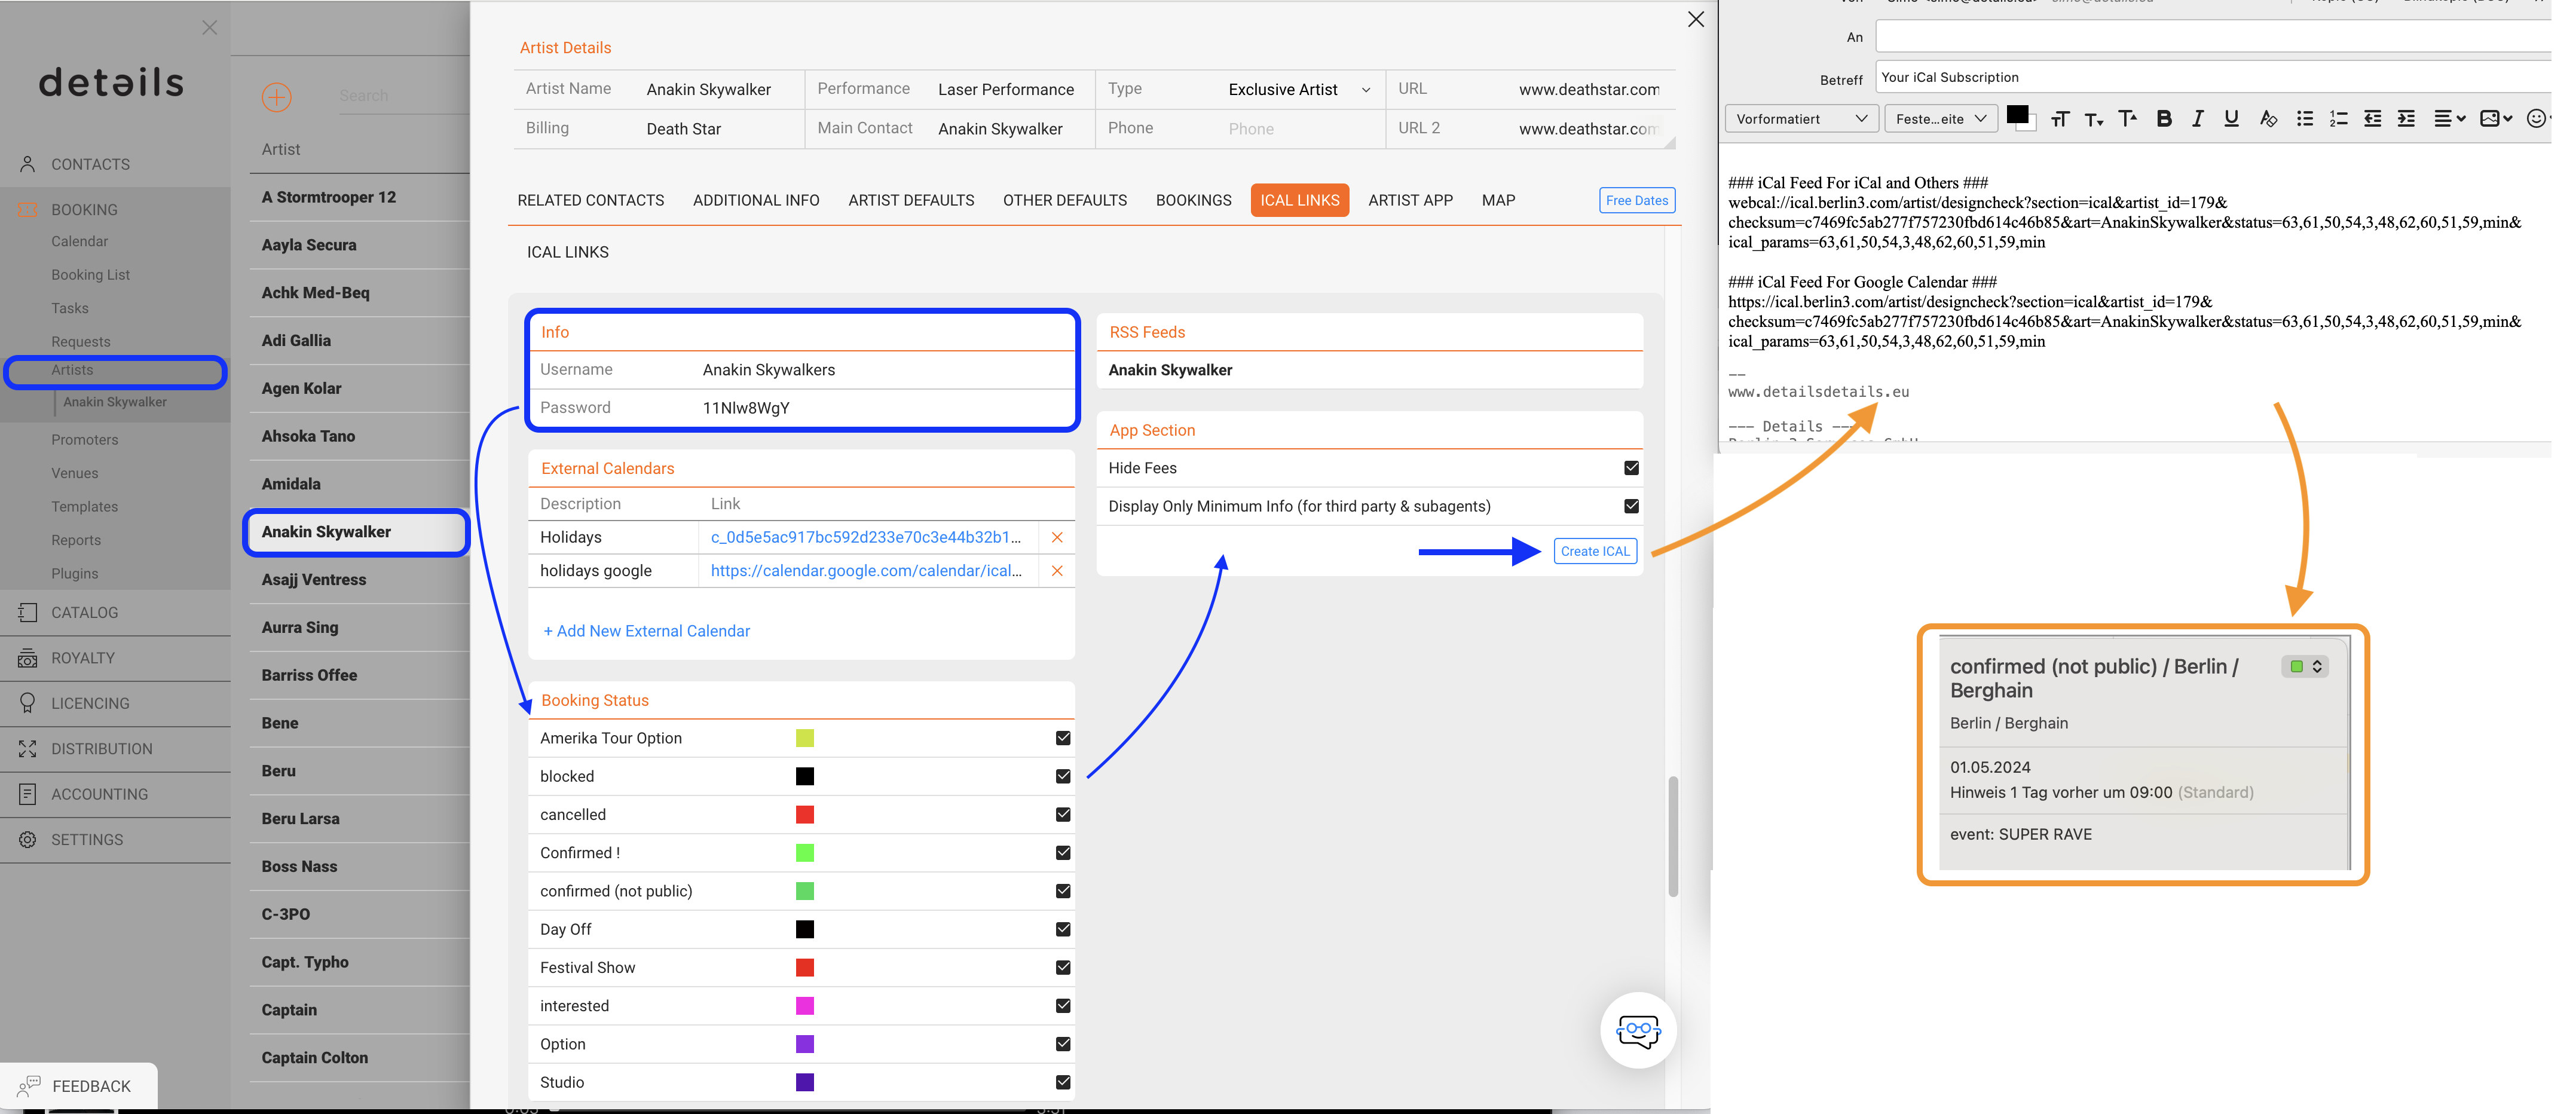
This is how you create iCal links:
Go to BOOKING – ARTISTS, select an artist and go to the ICAL LINKS tab
1) For NEW artists details will automatically set a username and password.
NOTE: You won’t need to give them to anybody, but it will be encrypted in app link.
Whenever you need to block the access to people who are subscribed to a link, just change the password!
2) Choose what Booking Status you want the other person to see (confirmed, cancelled..etc)
3) Select wheter or not you want fee information to be shared in the calendar.
NOTE: “Hide Fees” is checked by default which means that by default NO money information will be shared in the link.
If you do want the money details to appear in the link, de-select the checkbox.
4) Select wheter or not you want the iCal to display limited infos only.
NOTE: if this box is checked, the iCal will display DATE / ARTIST / VENUE / CITY / COUNTRY and STATUS only.
Any other logistics will only be displayed this checkbox is unchecked.
5) click on Create iCal to open an email automatically including the iCal-link. Send it to the recepient.
6) The recepient of the link should be able to subscribe to the iCal with any standard Calendar software.
You can find additional Infos about this here
* Calendar for Mac: Subscribe to calendars
* Google Calendar: Subscribe to other calendars
* Calendar in Details: Subscribe to other agencies iCal
NOTE: Here is an article why are past dates are removed from the iCal.
Setting Tax Types
This article explains how to configure Tax Types and Tax Groups in details. You can define your own VAT, withholding, or deduction rates and apply them to invoices, cost invoices, and royalty accounts.
Tip: Go to SETTINGS / ACCOUNTING / TAXES to manage all tax types and groups. Rates can be positive (VAT) or negative (deductions).
► CREATE TAX TYPE
Overview
Tax Types define single tax rates used throughout details. These can be standard VAT, reduced VAT, or withholding rates.
Steps
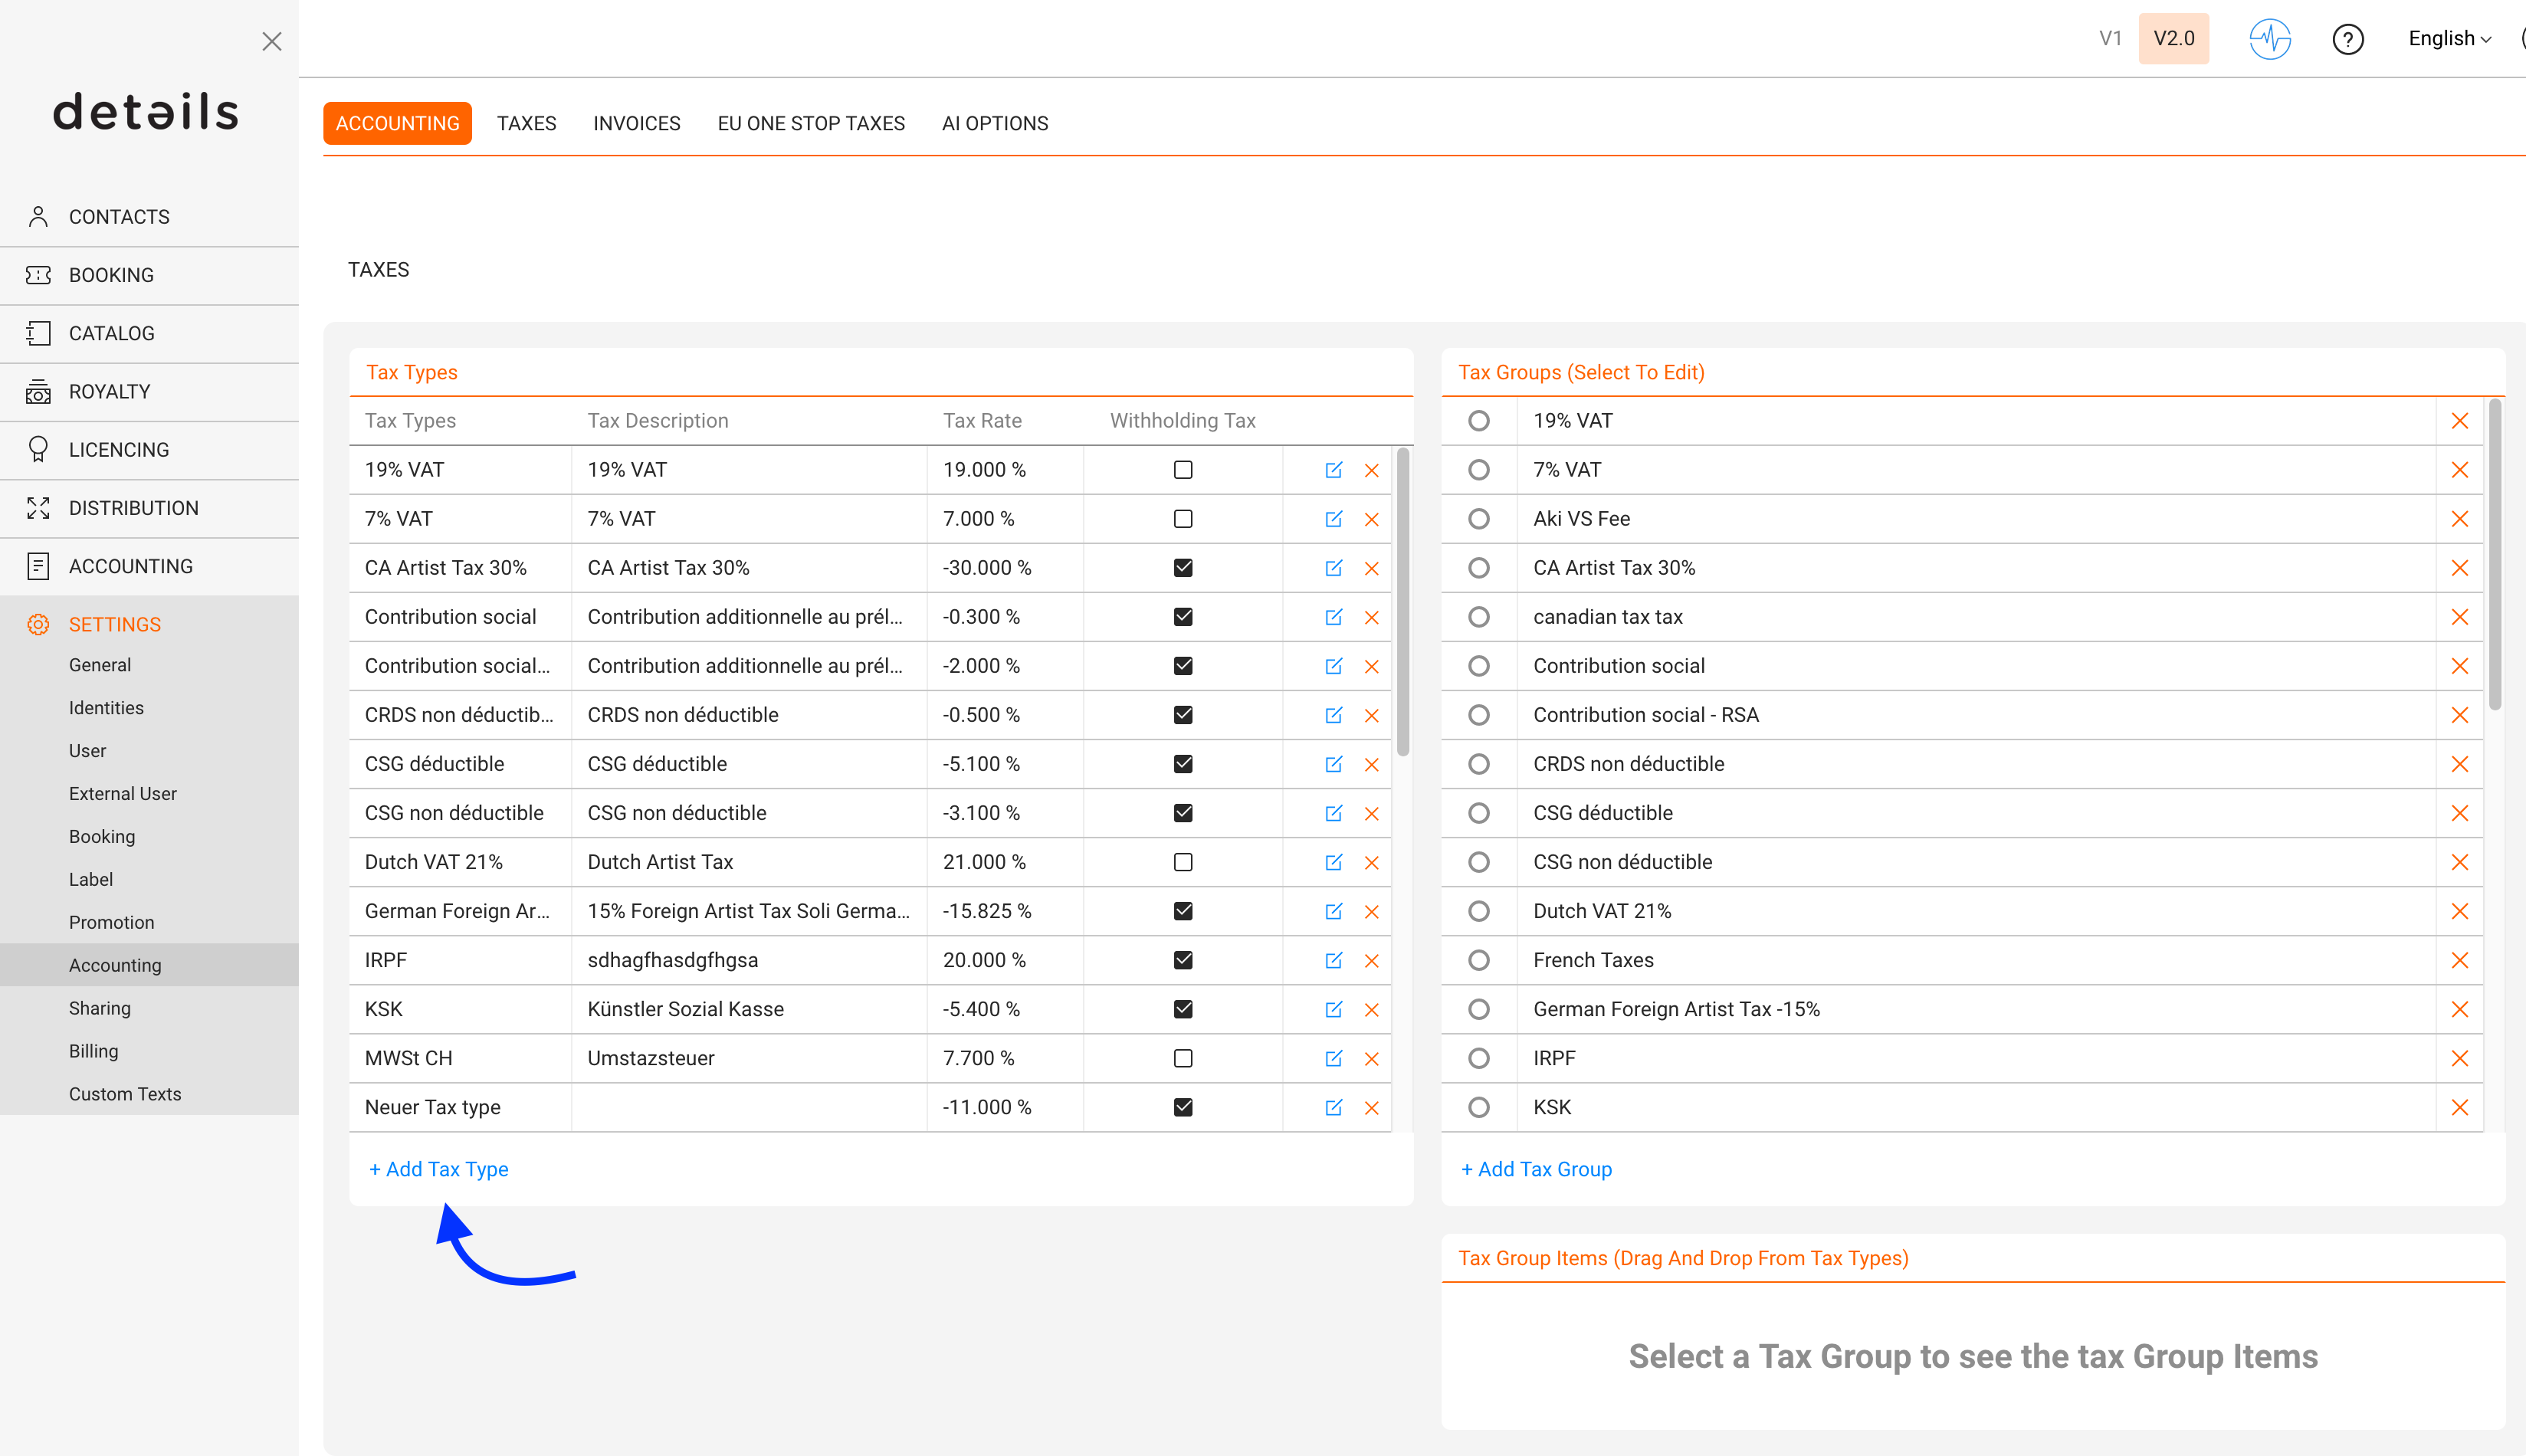
- Go to SETTINGS / ACCOUNTING / TAXES.
- Click [+] to add a new Tax Type.
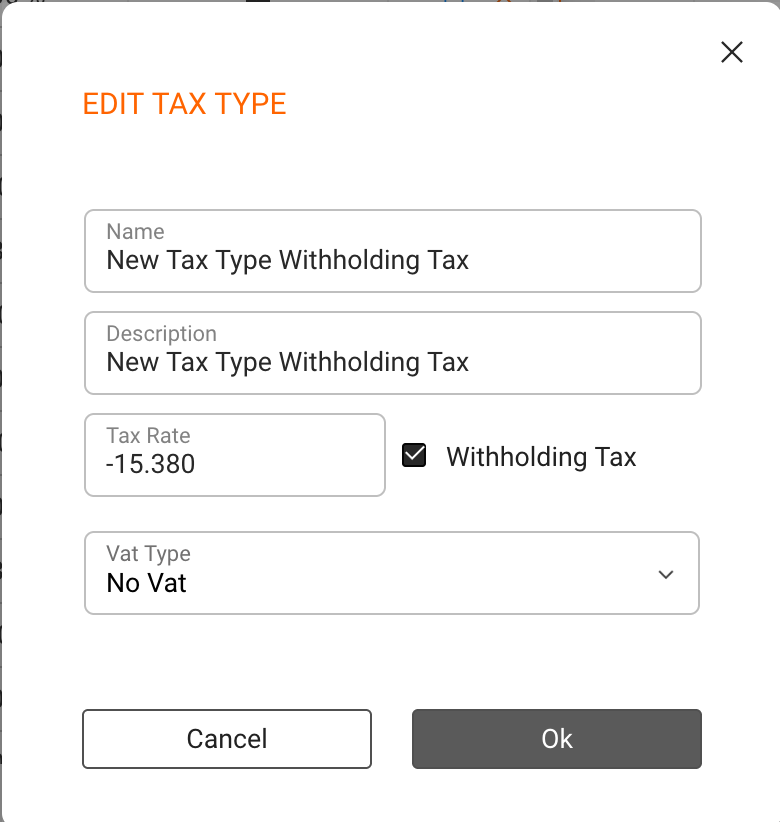
- Enter a clear name, such as VAT 20% or Withholding 15%.
- Set the Rate:
- Use positive values for added taxes (e.g. 20).
- Use negative values for deductions (e.g. -15).
- Select a VAT Type if relevant:
- VAT1 = full VAT rate
- VAT2 = reduced VAT rate
- no VAT = not applicable
Note: The VAT Type field is only used in countries with multiple VAT levels. Once created, Tax Types are available for all accounting modules.
► CREATE TAX GROUP
Overview
Tax Groups combine multiple Tax Types into one logical unit. This is useful for complex deductions (e.g. withholding + solidarity) or bundled tax rules.
Steps
- Go to SETTINGS / ACCOUNTING / TAXES.
- Click [+] to add a new Tax Group.
- Name the group. If it contains only one Tax Type, you can reuse the same name.
- Drag and drop existing Tax Types into the Tax Group Items box.
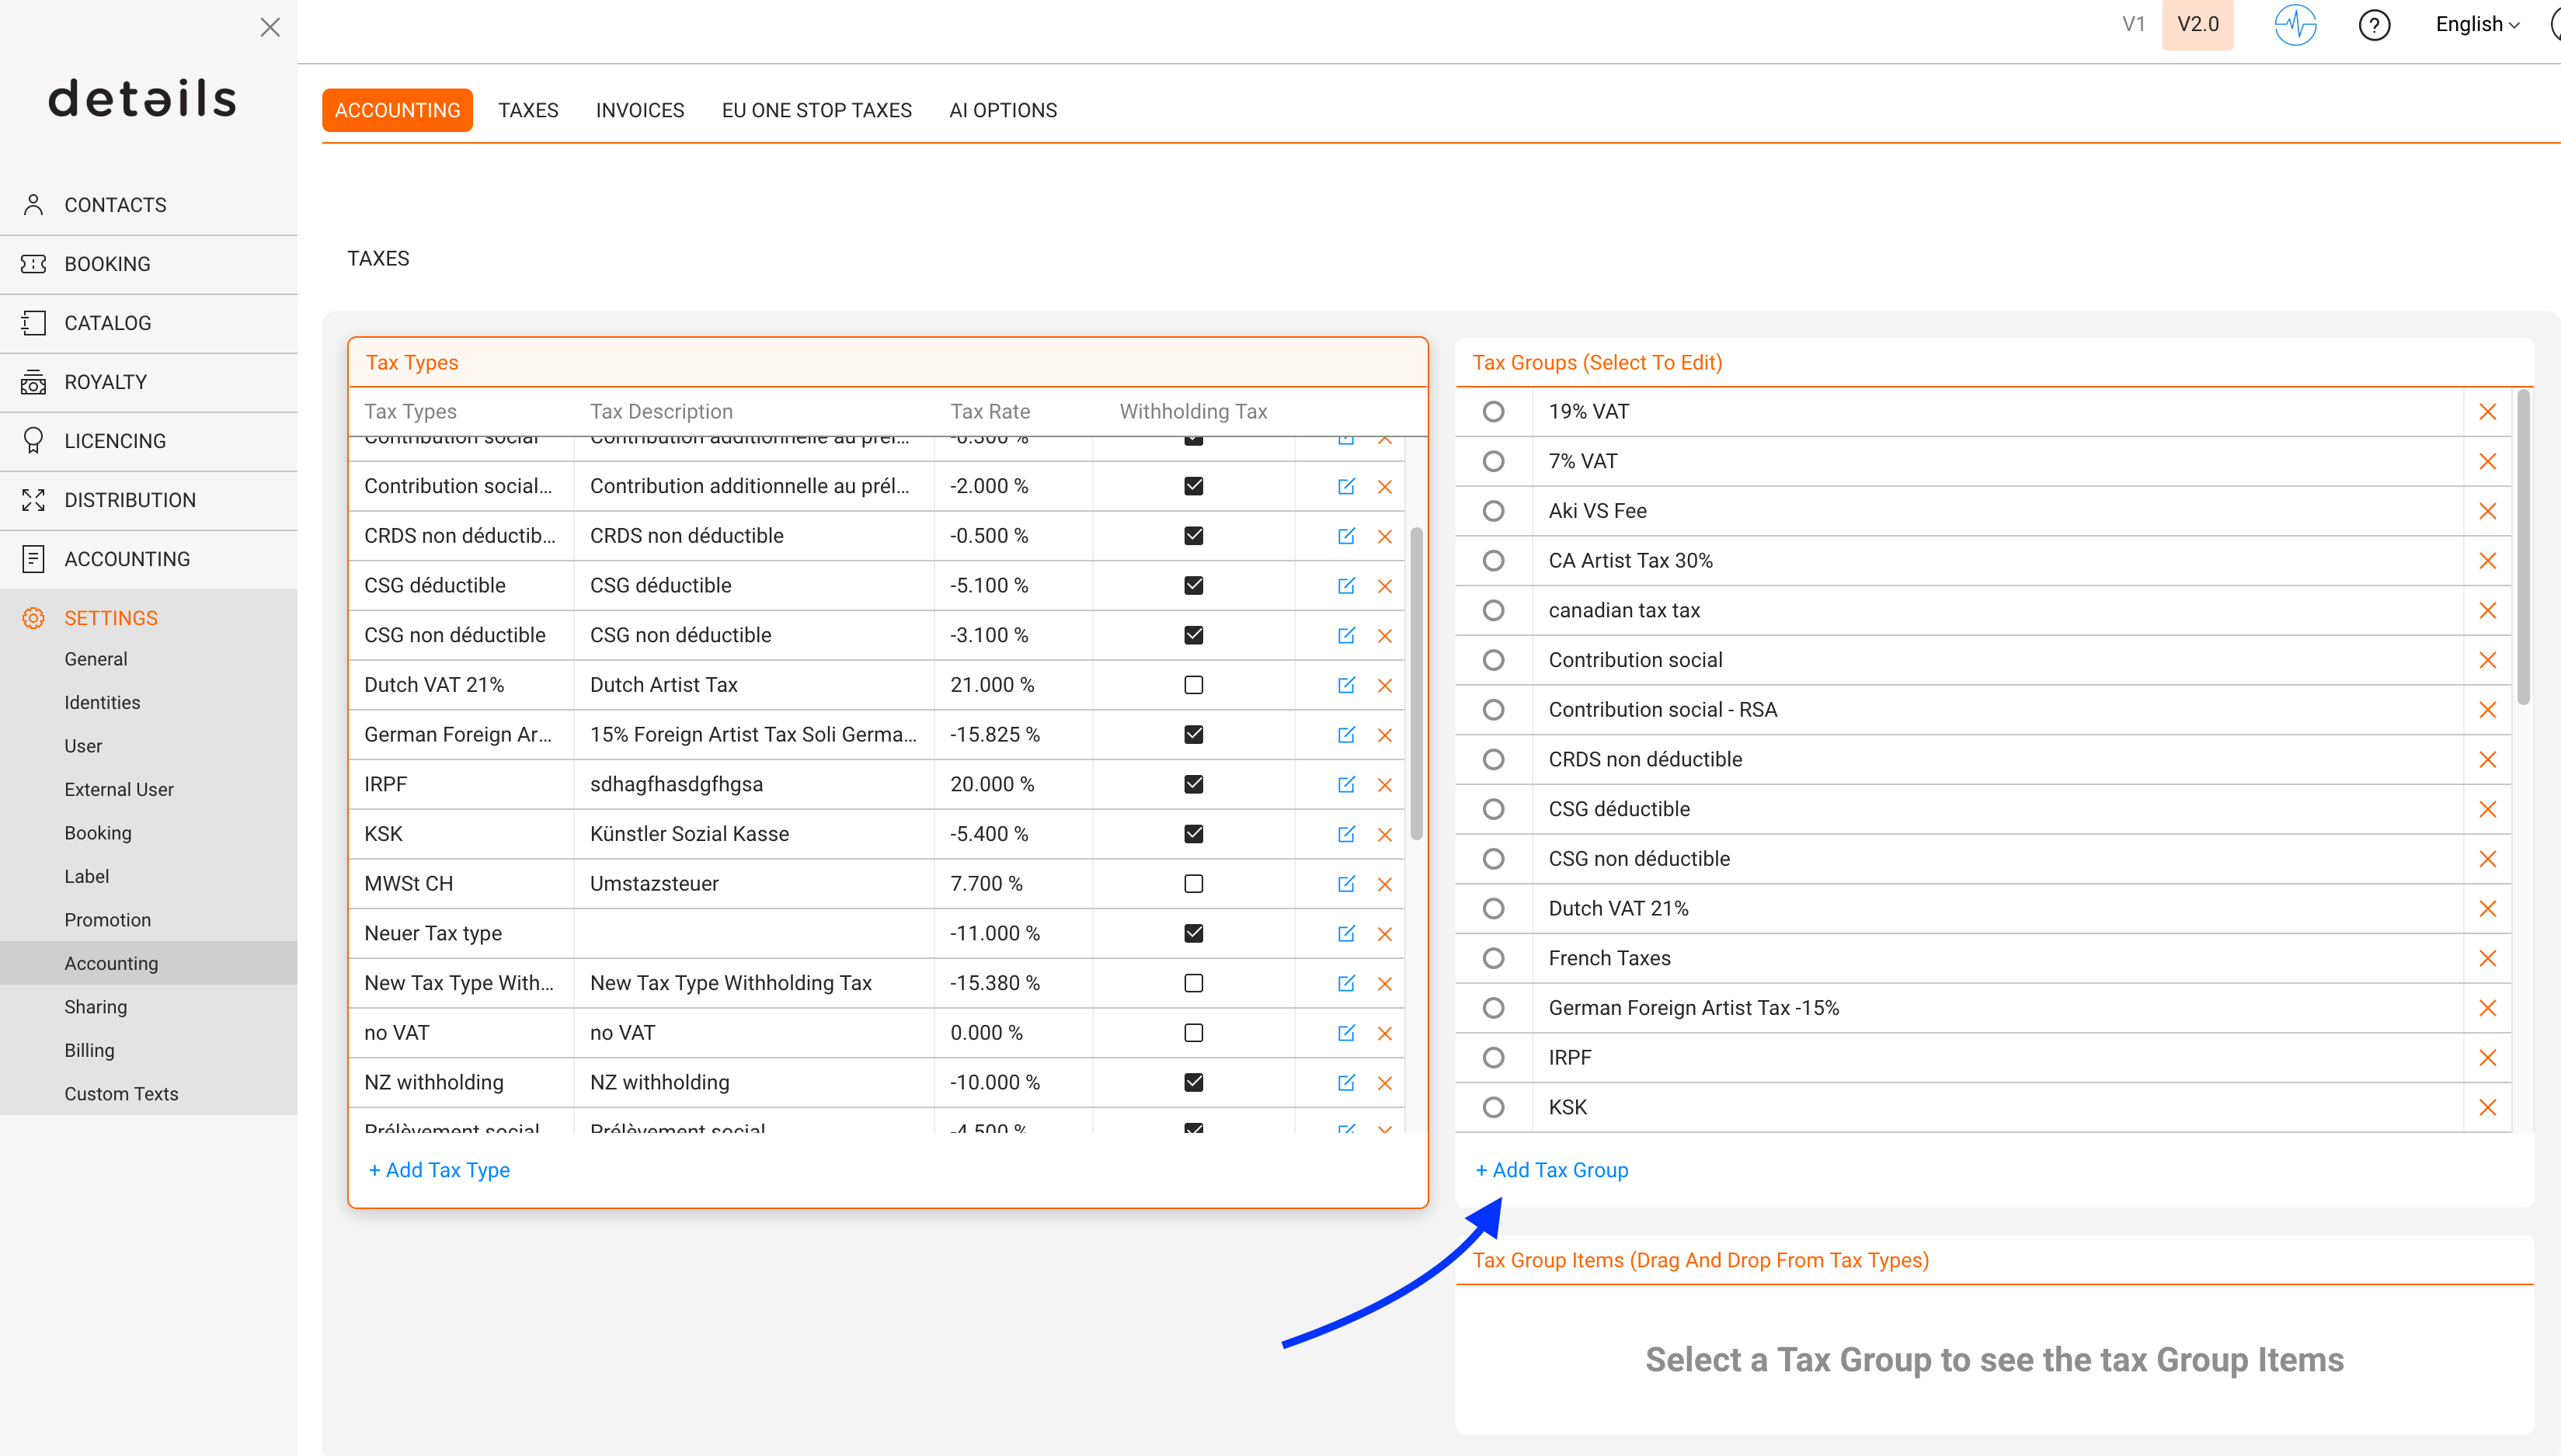
Tip: You can group positive and negative taxes together to show combined totals in invoices.
► USE TAX GROUPS IN DETAILS
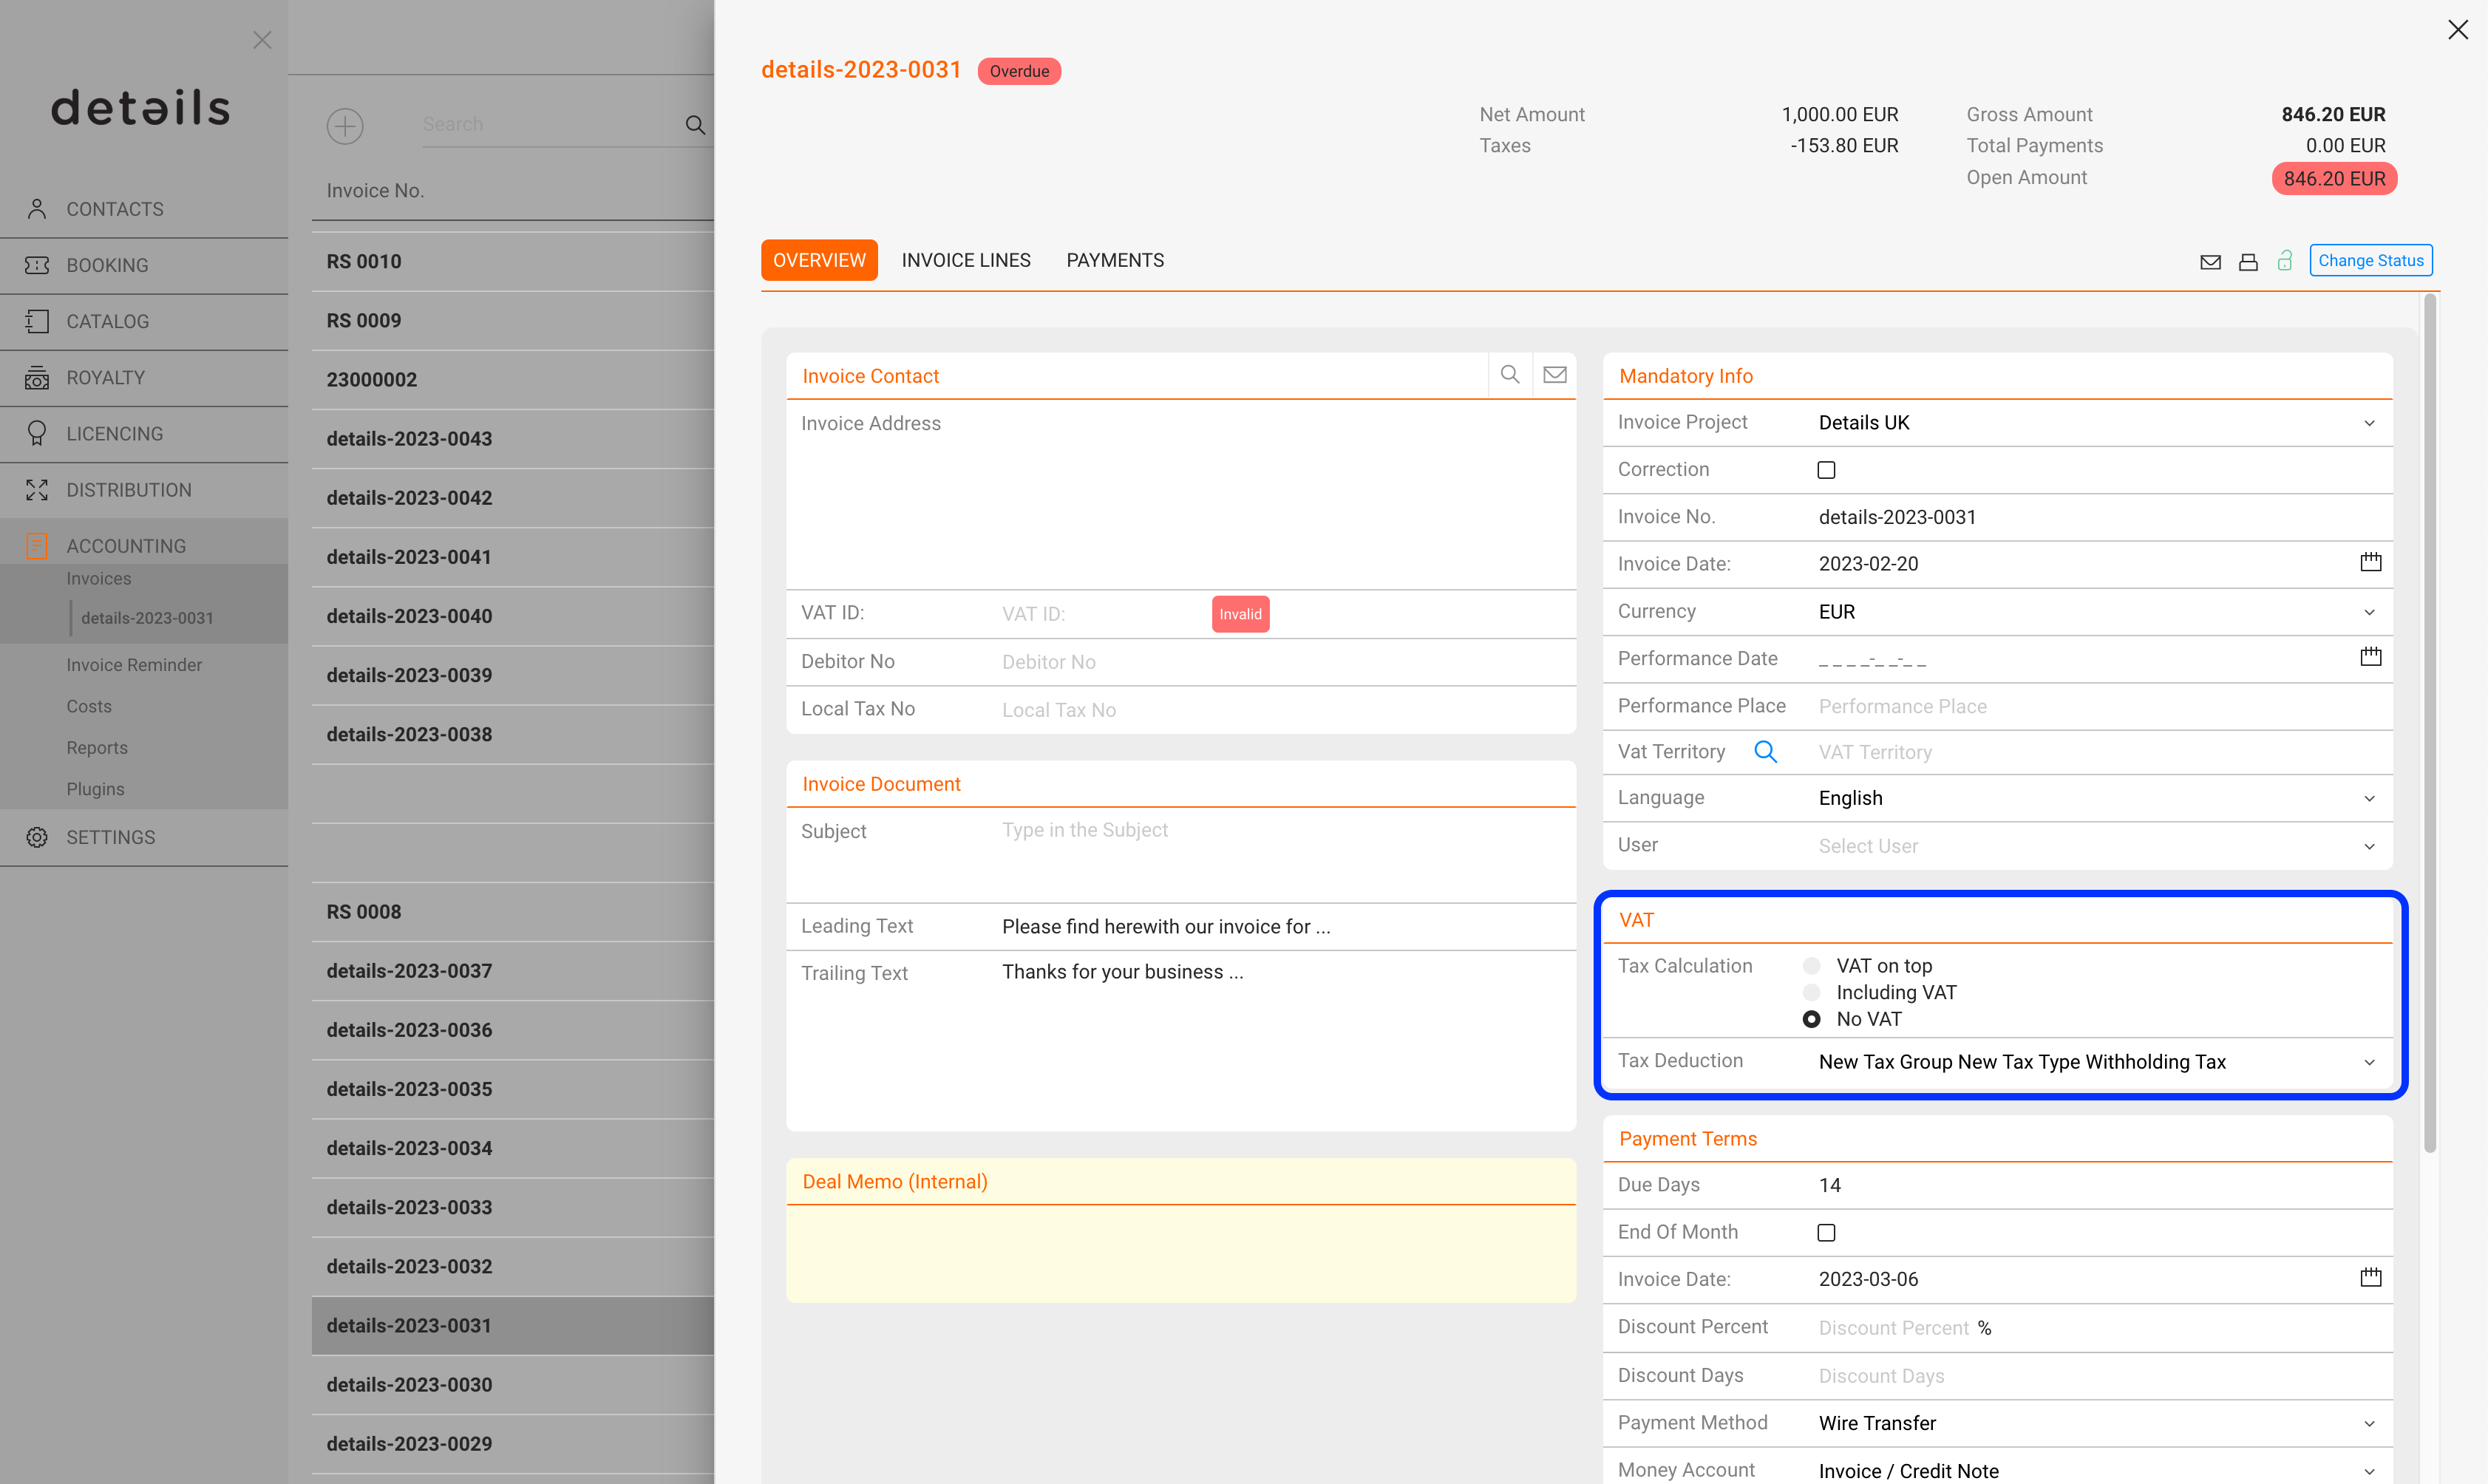
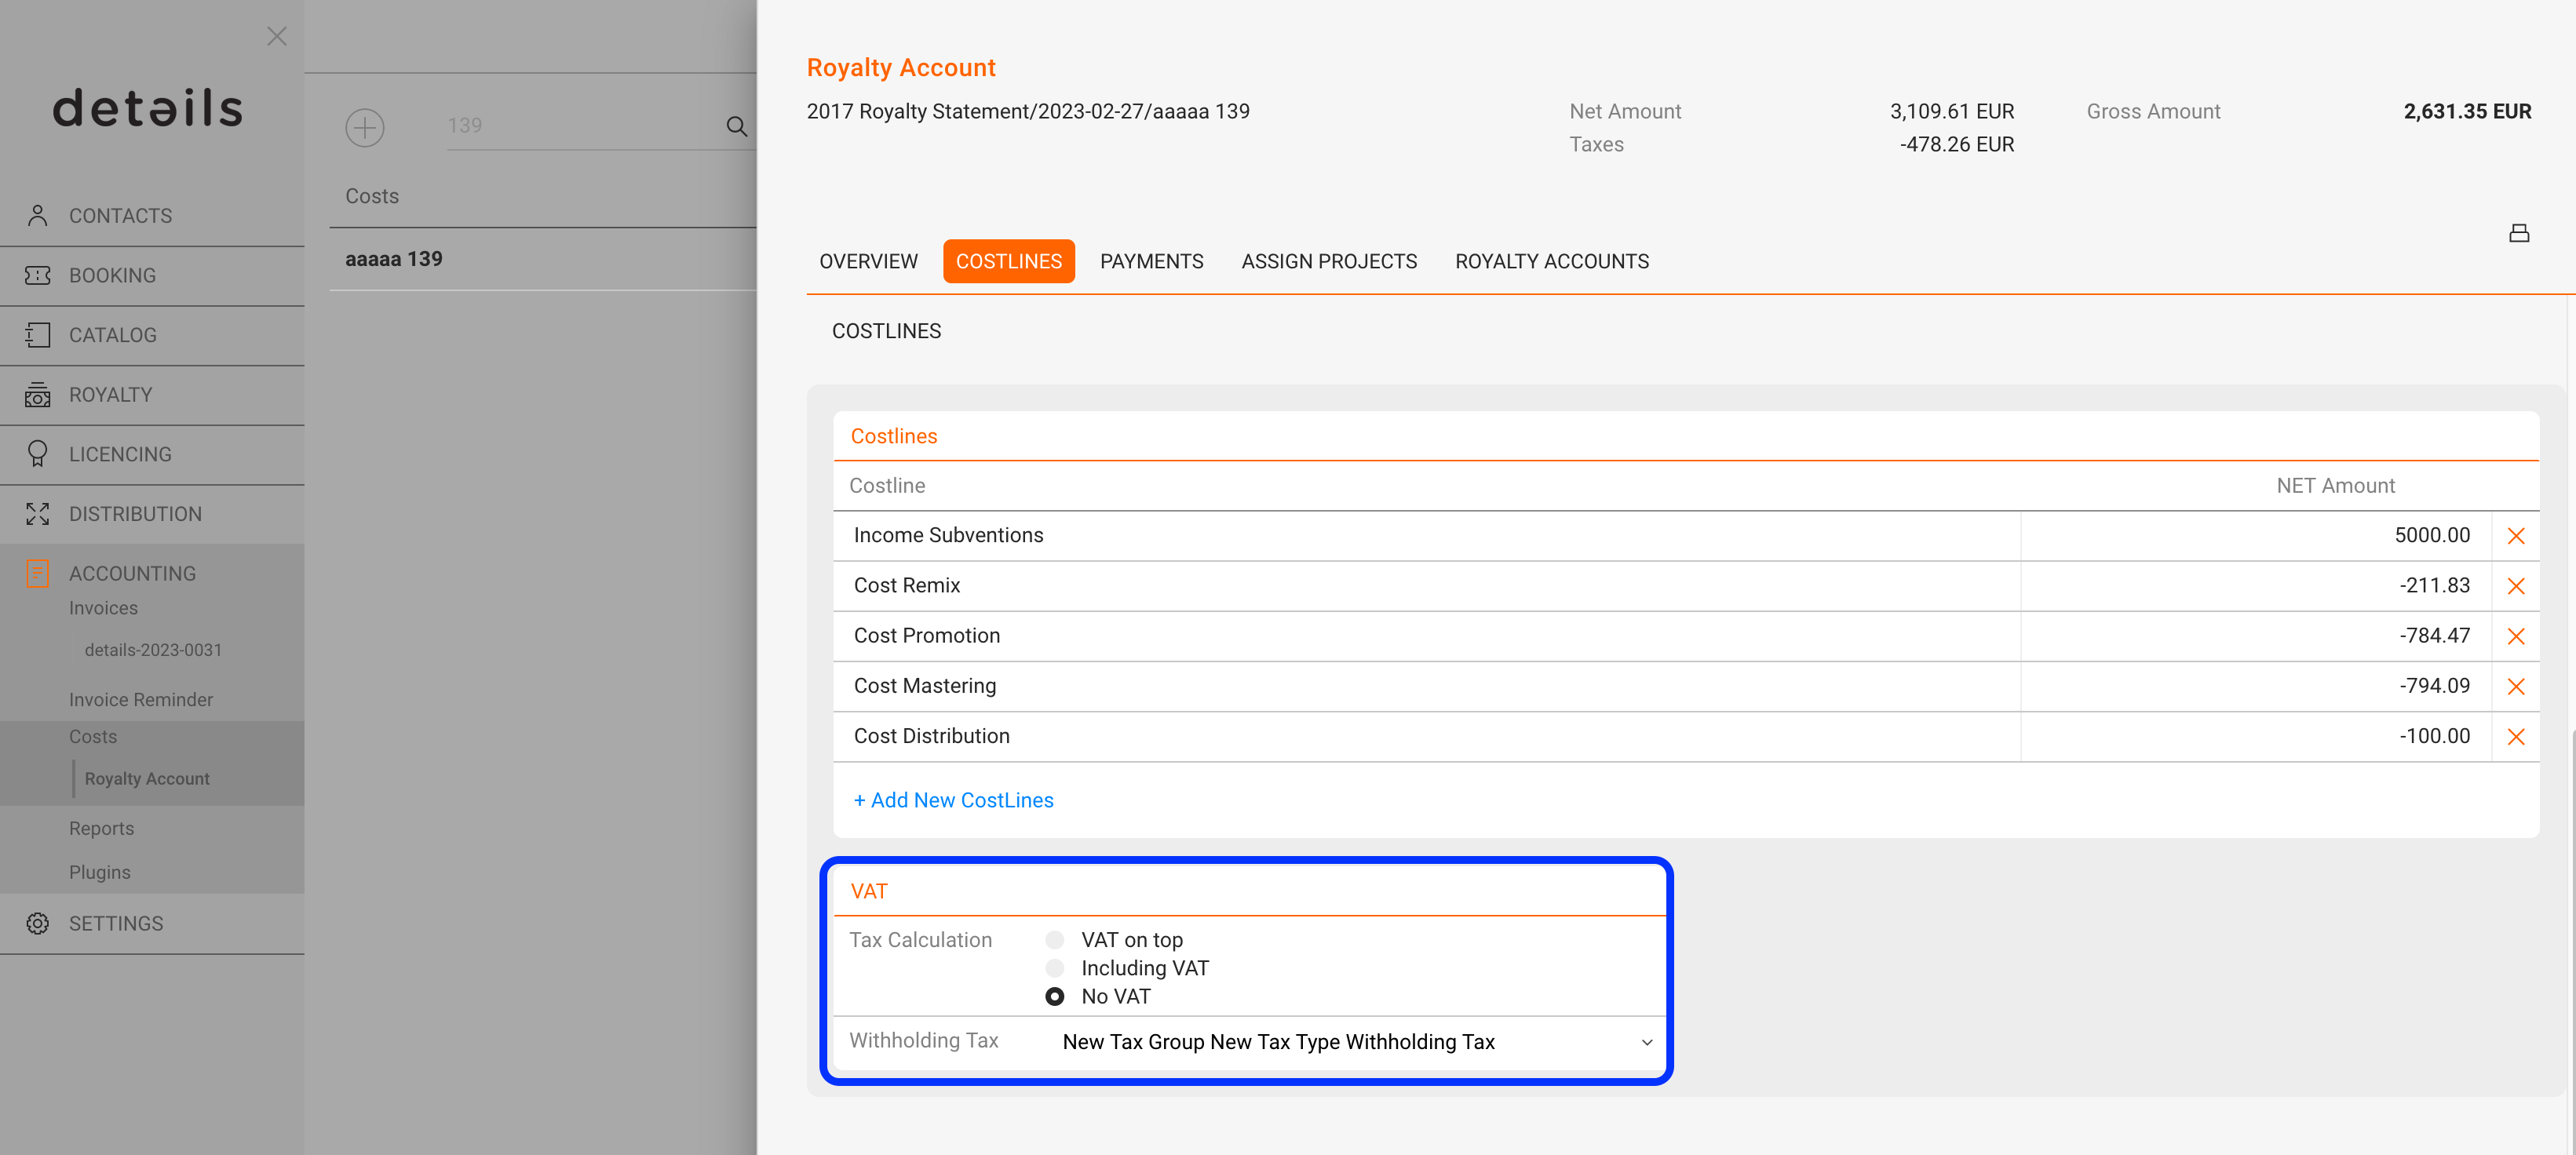
Once created, Tax Groups appear in multiple areas of details:
- Invoices to apply VAT or combined taxes.
- Cost Invoices to record incoming invoice deductions.
- Royalty Accounts to set up automatic withholding tax calculations.
► CONFIGURATION DES PRLVEMENTS SOCIAUX (FR)
Contexte
En France, certains revenus (notamment droits voisins ou assimil’s) peuventre soumis des prlvements sociaux prcompter sur les royalties etreverser l URSSAF.
La composition et le taux global applicables dpendent de la situation fiscale de l ayant droit et des rgles en vigueur pour l anne concerne. Vrifiez toujours les taux auprs de votre expert-comptable.
Exemple de ventilation applicable en 2025 (total 18,6 %) :
- CRDS non dductible : -0,500 %
- CSG dductible : -6,800 %
- CSG non dductible : -3,800 %
- Prlvement de solidarit : -7,500 %
Important : Chaque taux doittre cr comme Tax Type distinct avec une valeur negative et avec no VAT.
►tape 1 Crer les Tax Types
- Aller dans SETTINGS / ACCOUNTING / TAXES.
- Crer un Tax Type pour chaque ligne de prlvement.
- Entrer le taux en valeur ngative (ex. -6.800).
►tape 2 Crer le Tax Group
- Crer un nouveau groupe (ex. 2025 Prlvements Sociaux).
- Ajouter tous les Tax Types correspondants dans le groupe.
►tape 3 Appliquer l ayant droit
- Ouvrir la fiche de l ayant droit.
- Aller dans l onglet CONFIGURATION.
- Dans Paramtres fiscaux, slectionner le groupe dans Autres Charges.
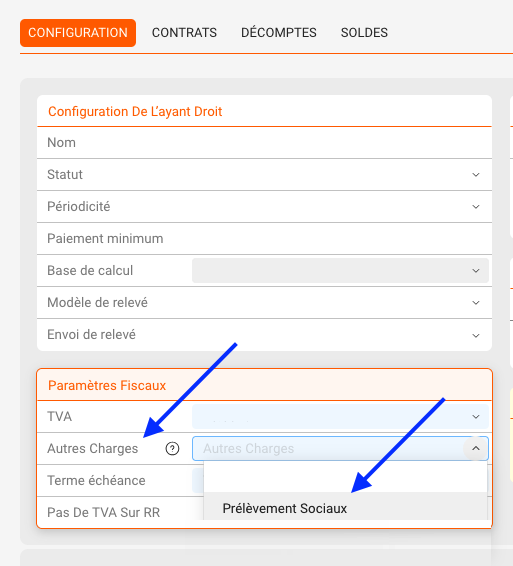
Resultat : Lors du calcul des royalties, les prlvements sociaux seront automatiquement dduits du montant brut et affichs distinctement sur le relev.
► EDIT OR REMOVE TAX TYPES
You can edit existing Tax Types and Tax Groups at any time in SETTINGS / ACCOUNTING / TAXES.
- Editing updates all future calculations.
- Deleting a Tax Type or Group removes it from selection menus but keeps existing invoice data intact.
Tip: Regularly review your tax setup when tax laws or VAT rates change.
► SUMMARY TABLE
| Element | Description |
|---|---|
| Tax Type | Defines one rate (positive = VAT, negative = deduction). |
| Tax Group | Combines one or more Tax Types for complex rules. |
| VAT Type | Defines the national VAT category (VAT1 / VAT2 / no VAT). |
| Location | SETTINGS / ACCOUNTING / TAXES |
Contacts / Files
On Contacts / Files you are able to upload different files such as images, audio files & documents.
To upload a new file click [+] on top right of the list.
These can then be related within the details modules later such as tracks, accounts, etc.
The workflow is the same in all cases, read here how to relate picture files such as Cover artwork, logos or artist pictures to Artists, Labels, Releases or Products.
1) go to the INFO subtab of LABEL Artists, Labels, Releases or Products
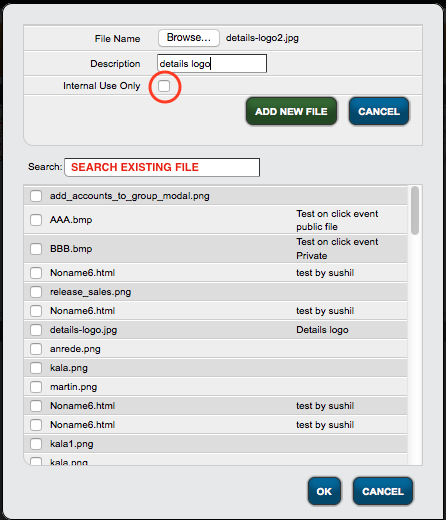
2) In the Related Files Box at the bottom left, either upload a file or add a previously uploaded file to this section by clicking [+] on top right.
3a) Select a previously uploaded file via the SEARCH field and relate it to the current section OR
3b) Upload a new file by browsing your computer or network and uploading the file to your details database.
If you are aiming to upload images, make sure pictures are uploaded in a format that can be displayed by Firefox. JPEG or PNG files will work fine.
Also note that files must NOT be uploaded as Internal, if you want to share them with people outside of details. Internal files will be inaccessible for anybody without access to your database.
:: ::
::
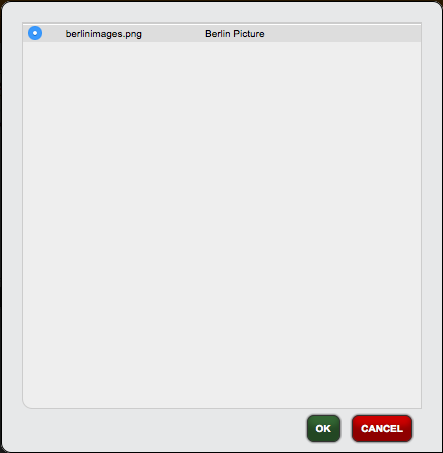
4) On the right side next to the Related Files Box, you will see two squares to display image files. To display your uploaded image files, click on one of the fields and select which one of your previously uploaded image files you want to display.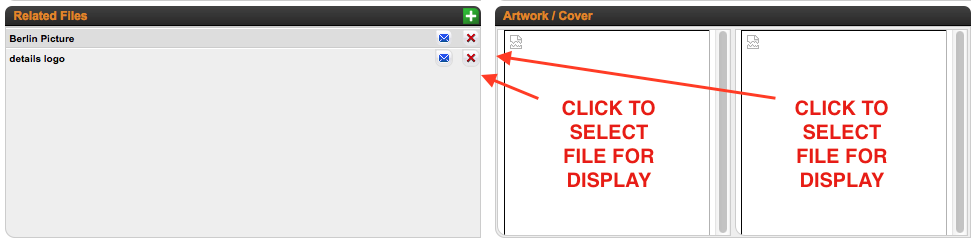
:: ::
::
NOTE: Once uploaded, files will be available for this Artists, Labels, Releases or Products regardless of the display in the Artwork / Cover Box. The display will give you a visual context, but no additional functionality.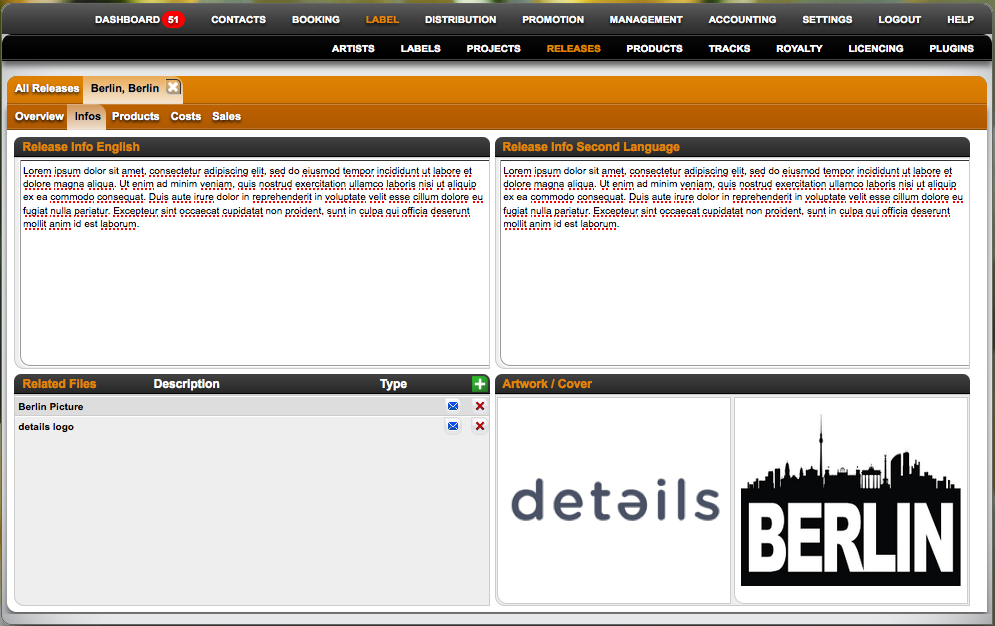
Currency And Exchange Rate Settings
Your detYils account comes with a standard set of currencies and exchange rates.
Perhaps Booking clients may need very few currencies only, while other Label clients will need to manage a currency for each country they receive digital sales from etc.
You are able to add currencies and update exchange rates on Settings / General.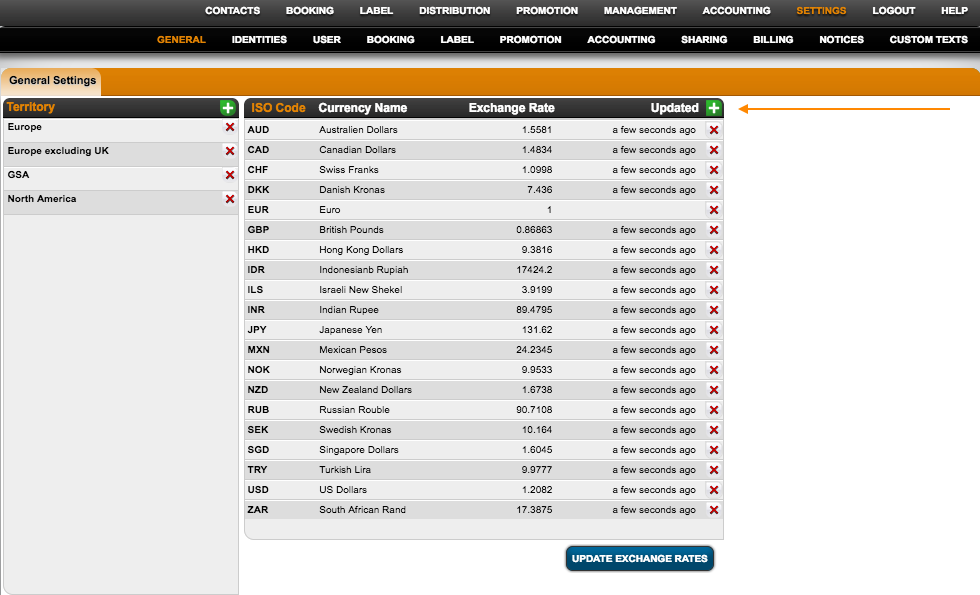
To update single exchange rates, click on the currency name and enter the current exchange rate. To update all your currencies, just hit the Update Exchange Rates Button.
If you want to update exchange rates on a regular basis, activate the Plugin Automatically update currencies on Accounting / Plugins. Exchange rates will be updated every Sunday.
NOTE: Please click once to activate the plugin and a second time to start it. Please check back regularly if currencies were updated.
How to show Local Details Field in Artist APP & Itinerary
Table of contents
If any value needs to be displayed in the Artist App, it must be added in Local Details.
– Local Details values are public and can be shared with the artist.
– Event Details values are private and will not be shown in the Artist App.
So, here’s how to configure and display a value:
First, create a field like “Get In” and activate the “Start-Time” checkbox in: SETTINGS → BOOKING → Local Details Settings.
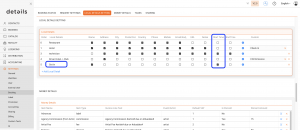
This “Start-Time” value will be used as the Get In time and will appear in both the itinerary and the Artist App.
Then add the “Get In” value in the event date’s Local Details:
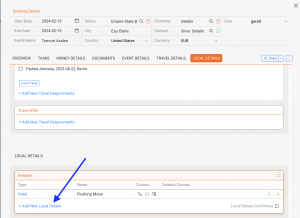
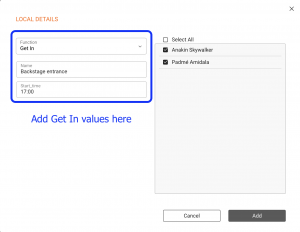
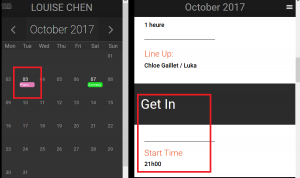
“Get In” value in Artist App
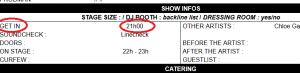
“Get In” value in itinerary
For Agents: Where to upload files to the Artist App
Details allows you to upload files which can be displayed via the Artist App.
To display a file in the Artist App, the file needs to be available in one of two places:
a) ARTIST / related files OR
b) Booking / related files
Booking Request Form
Details includes an online Request Form that allows external promoters to request your artists for future dates.
You can send out the link from BOOKING / CALENDAR: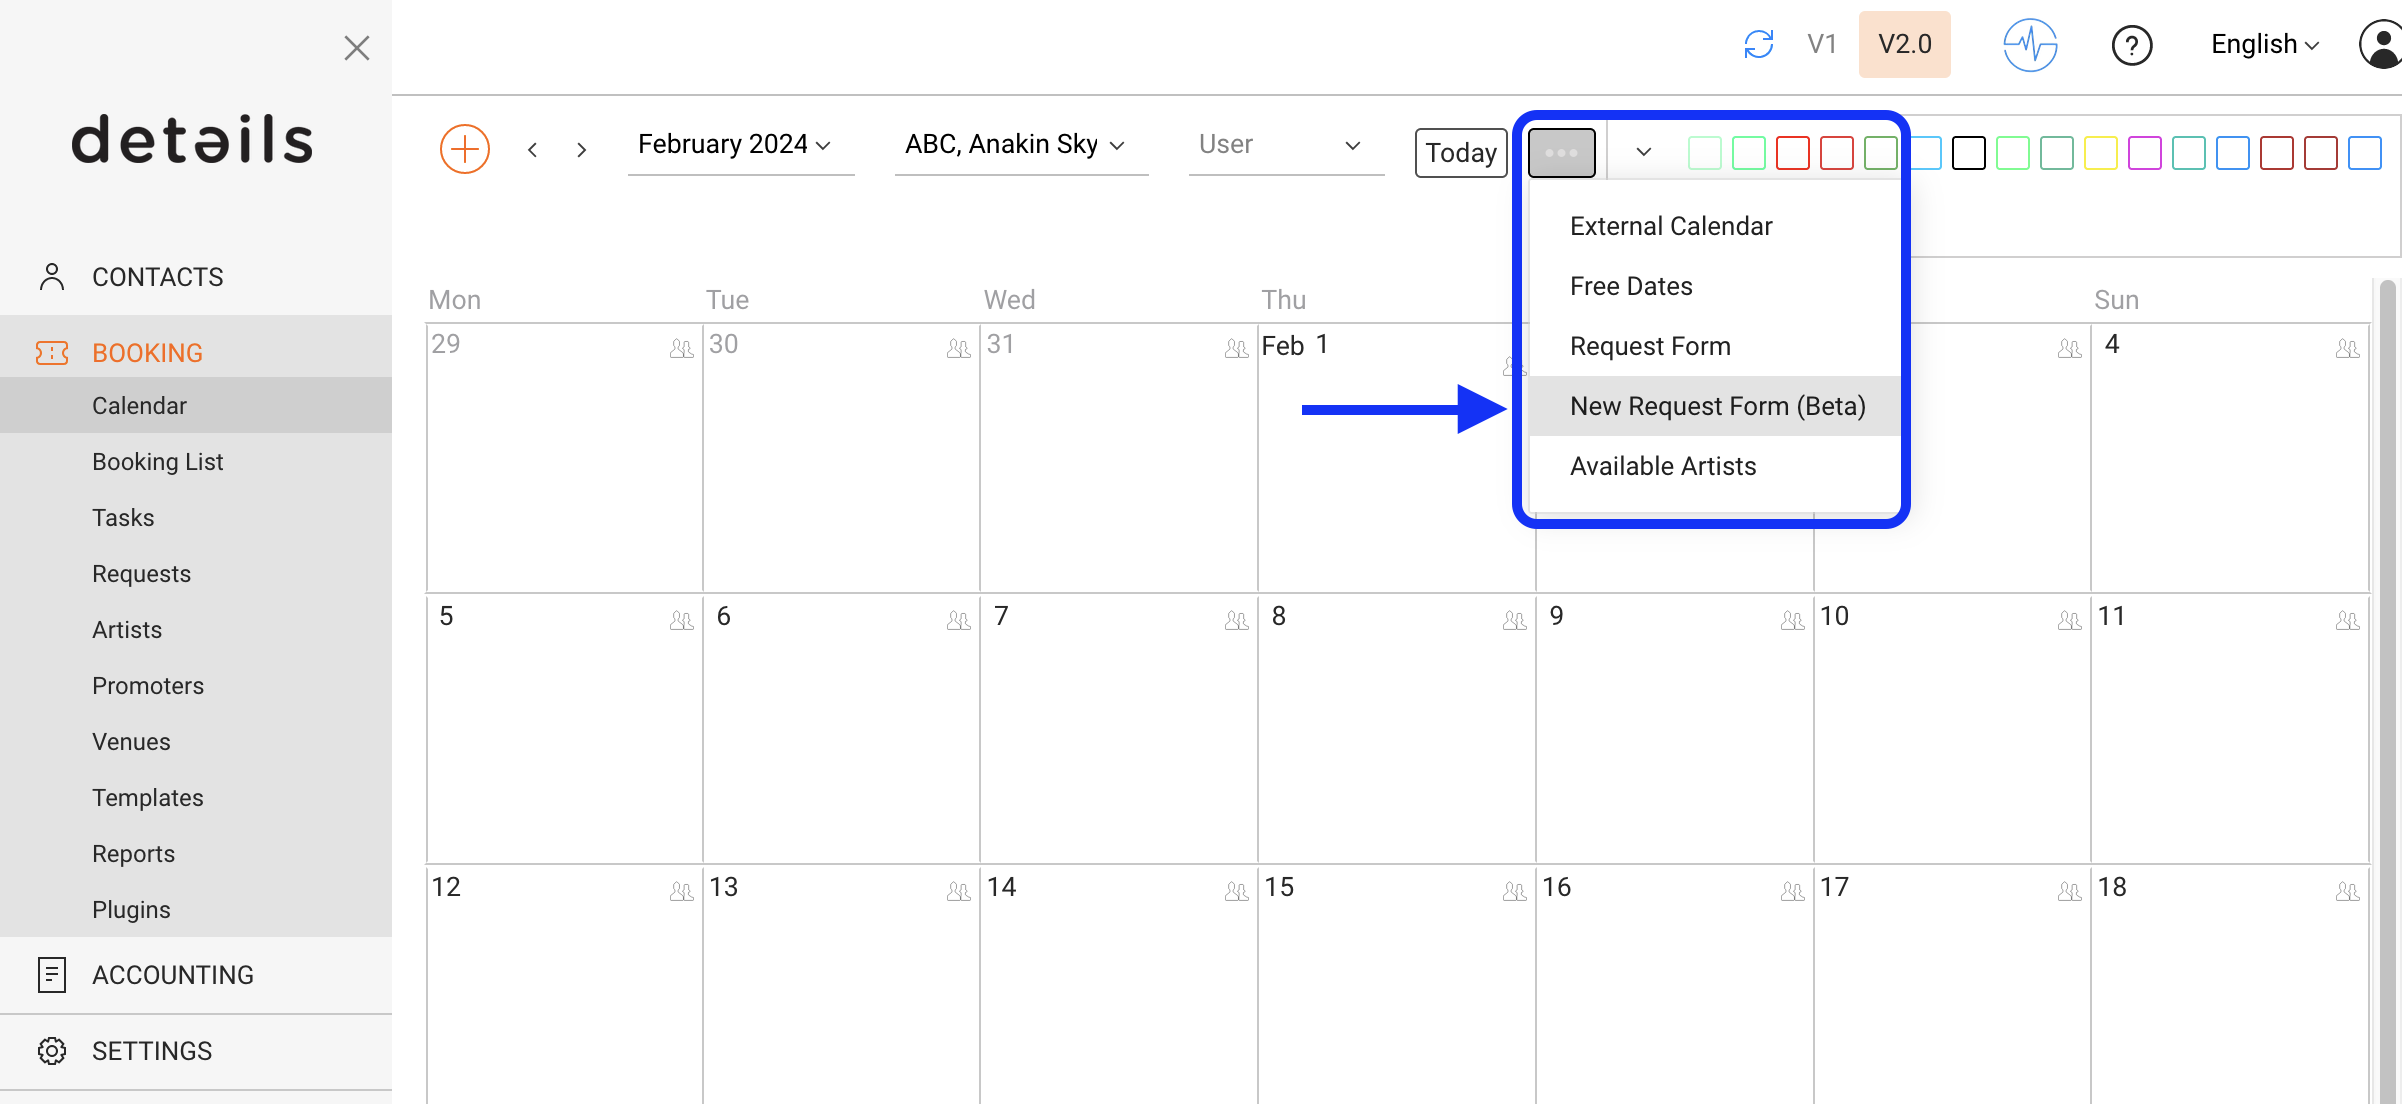
The Form will look something like this, only including your own logo: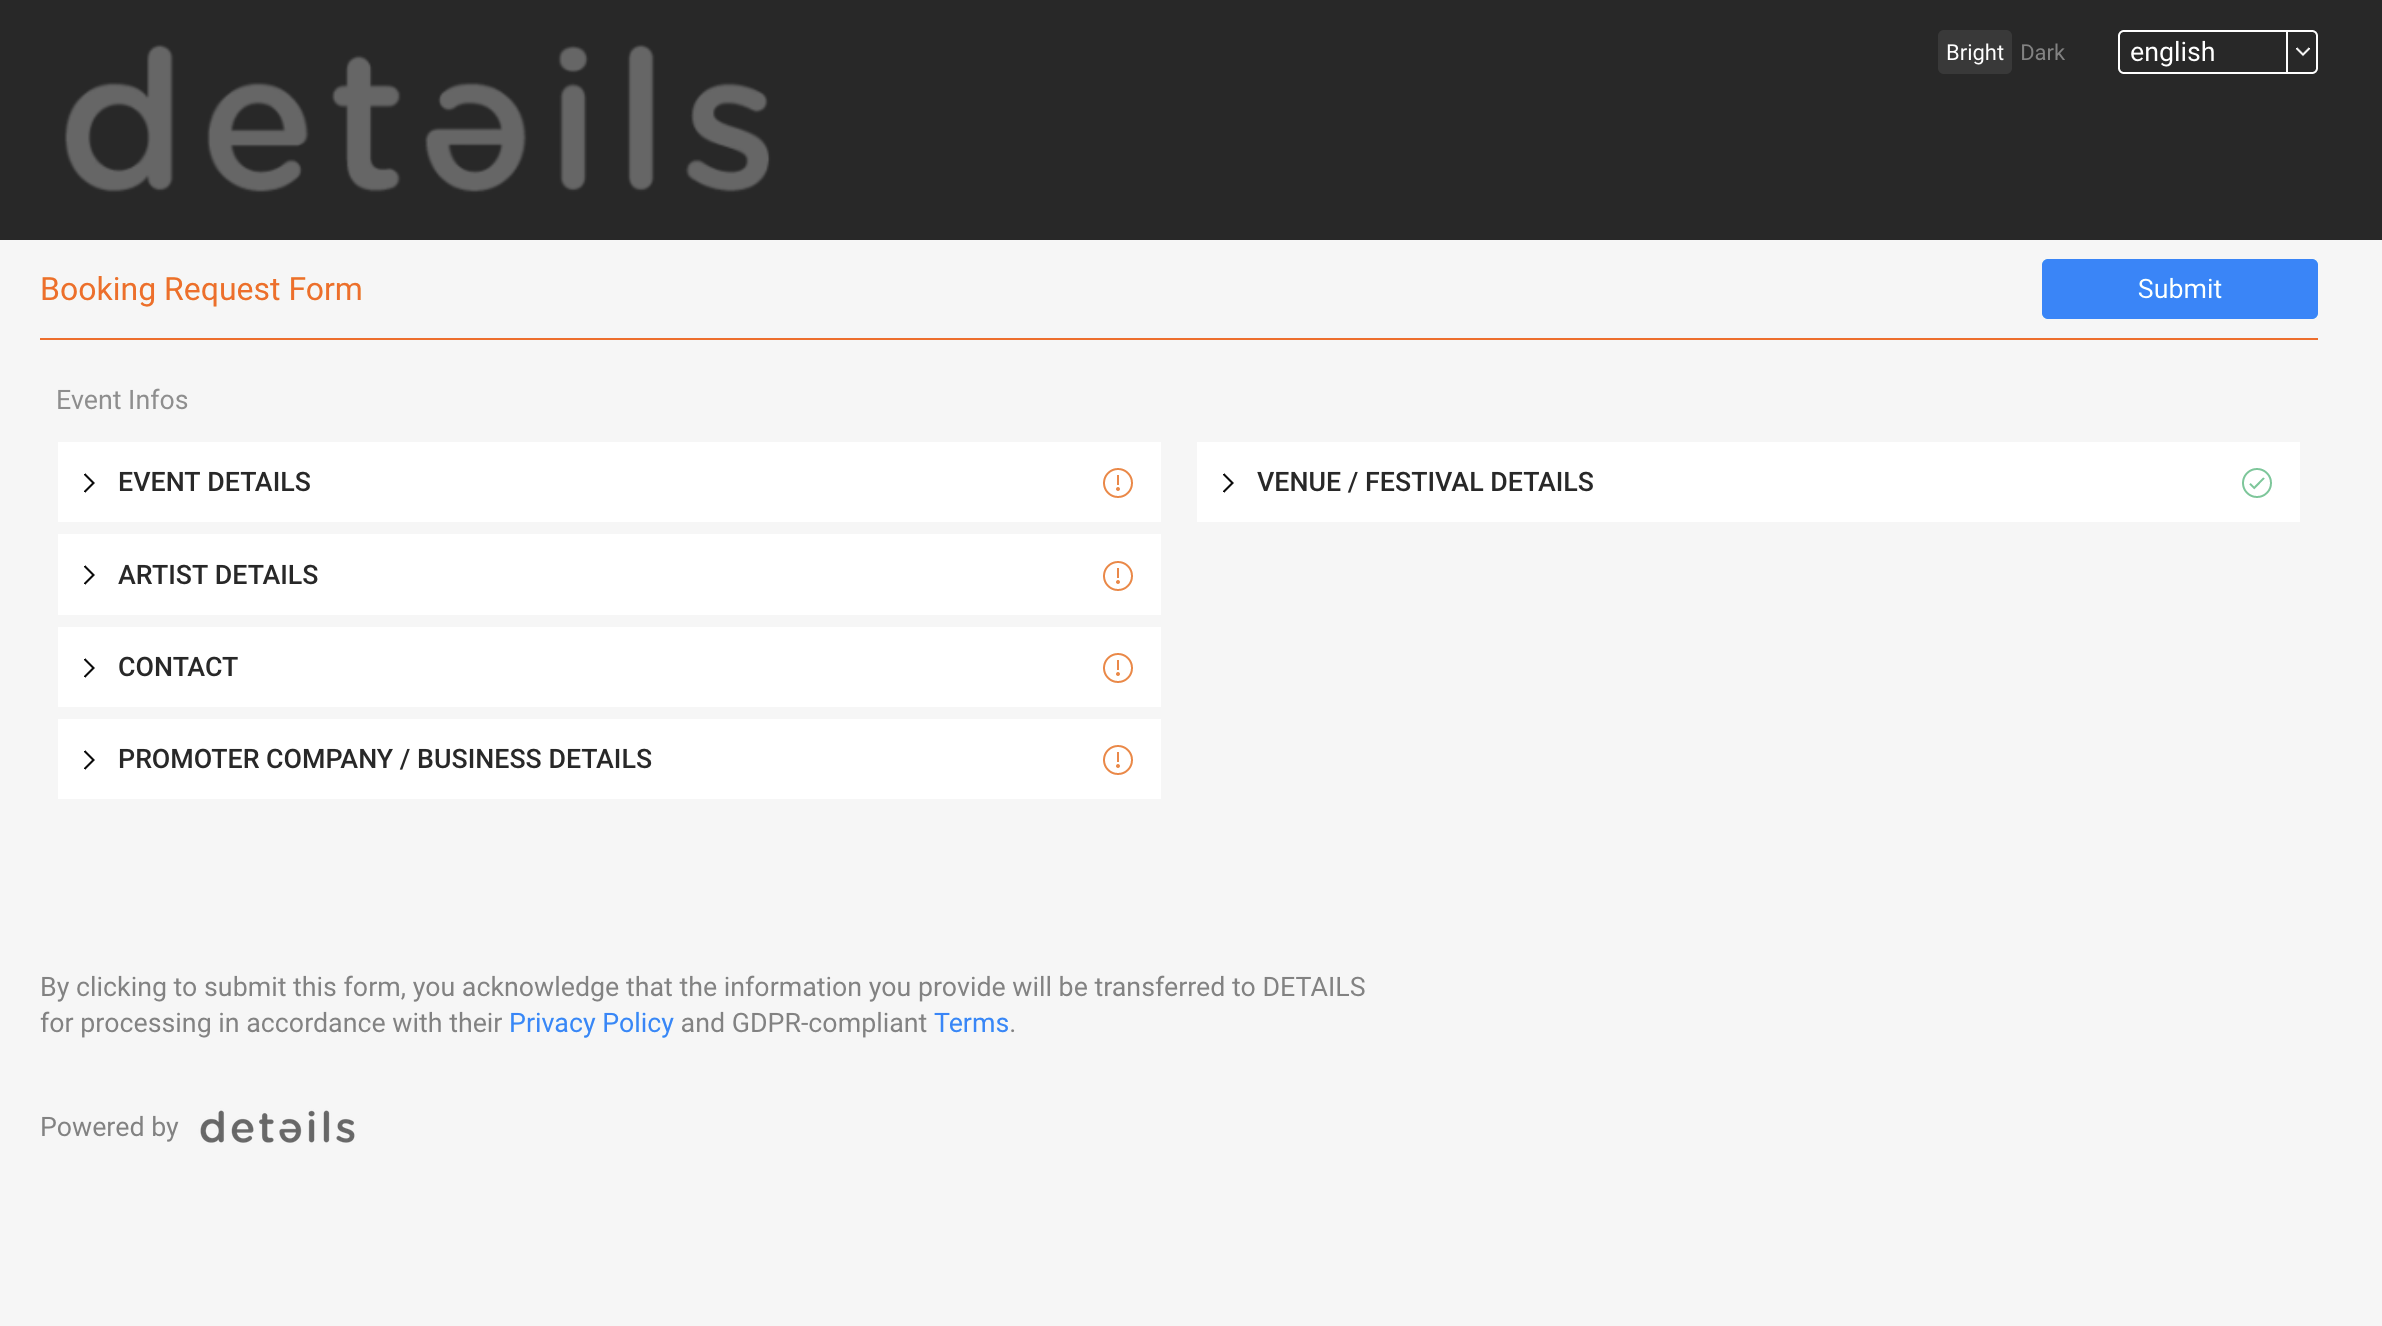
Please note that you can customize which fields will appear in the Request Form in SETTINGS/ BOOKING / REQUEST SETTINGS.
YOu can find all about customization options for Request Forms and Questionaires HERE
The old Request Form is also available as embed code for websites.
Check here for options to customize the CSS of the Request Form on your website.
Please note that your artists need to be set to Type = “Exclusive Artist” to appear on the Request Form.
In other words if you an artist is not displayed in the Request Form, go to BOOKING / ARTIST, select the artist and set Type = “Exclusive Artist”.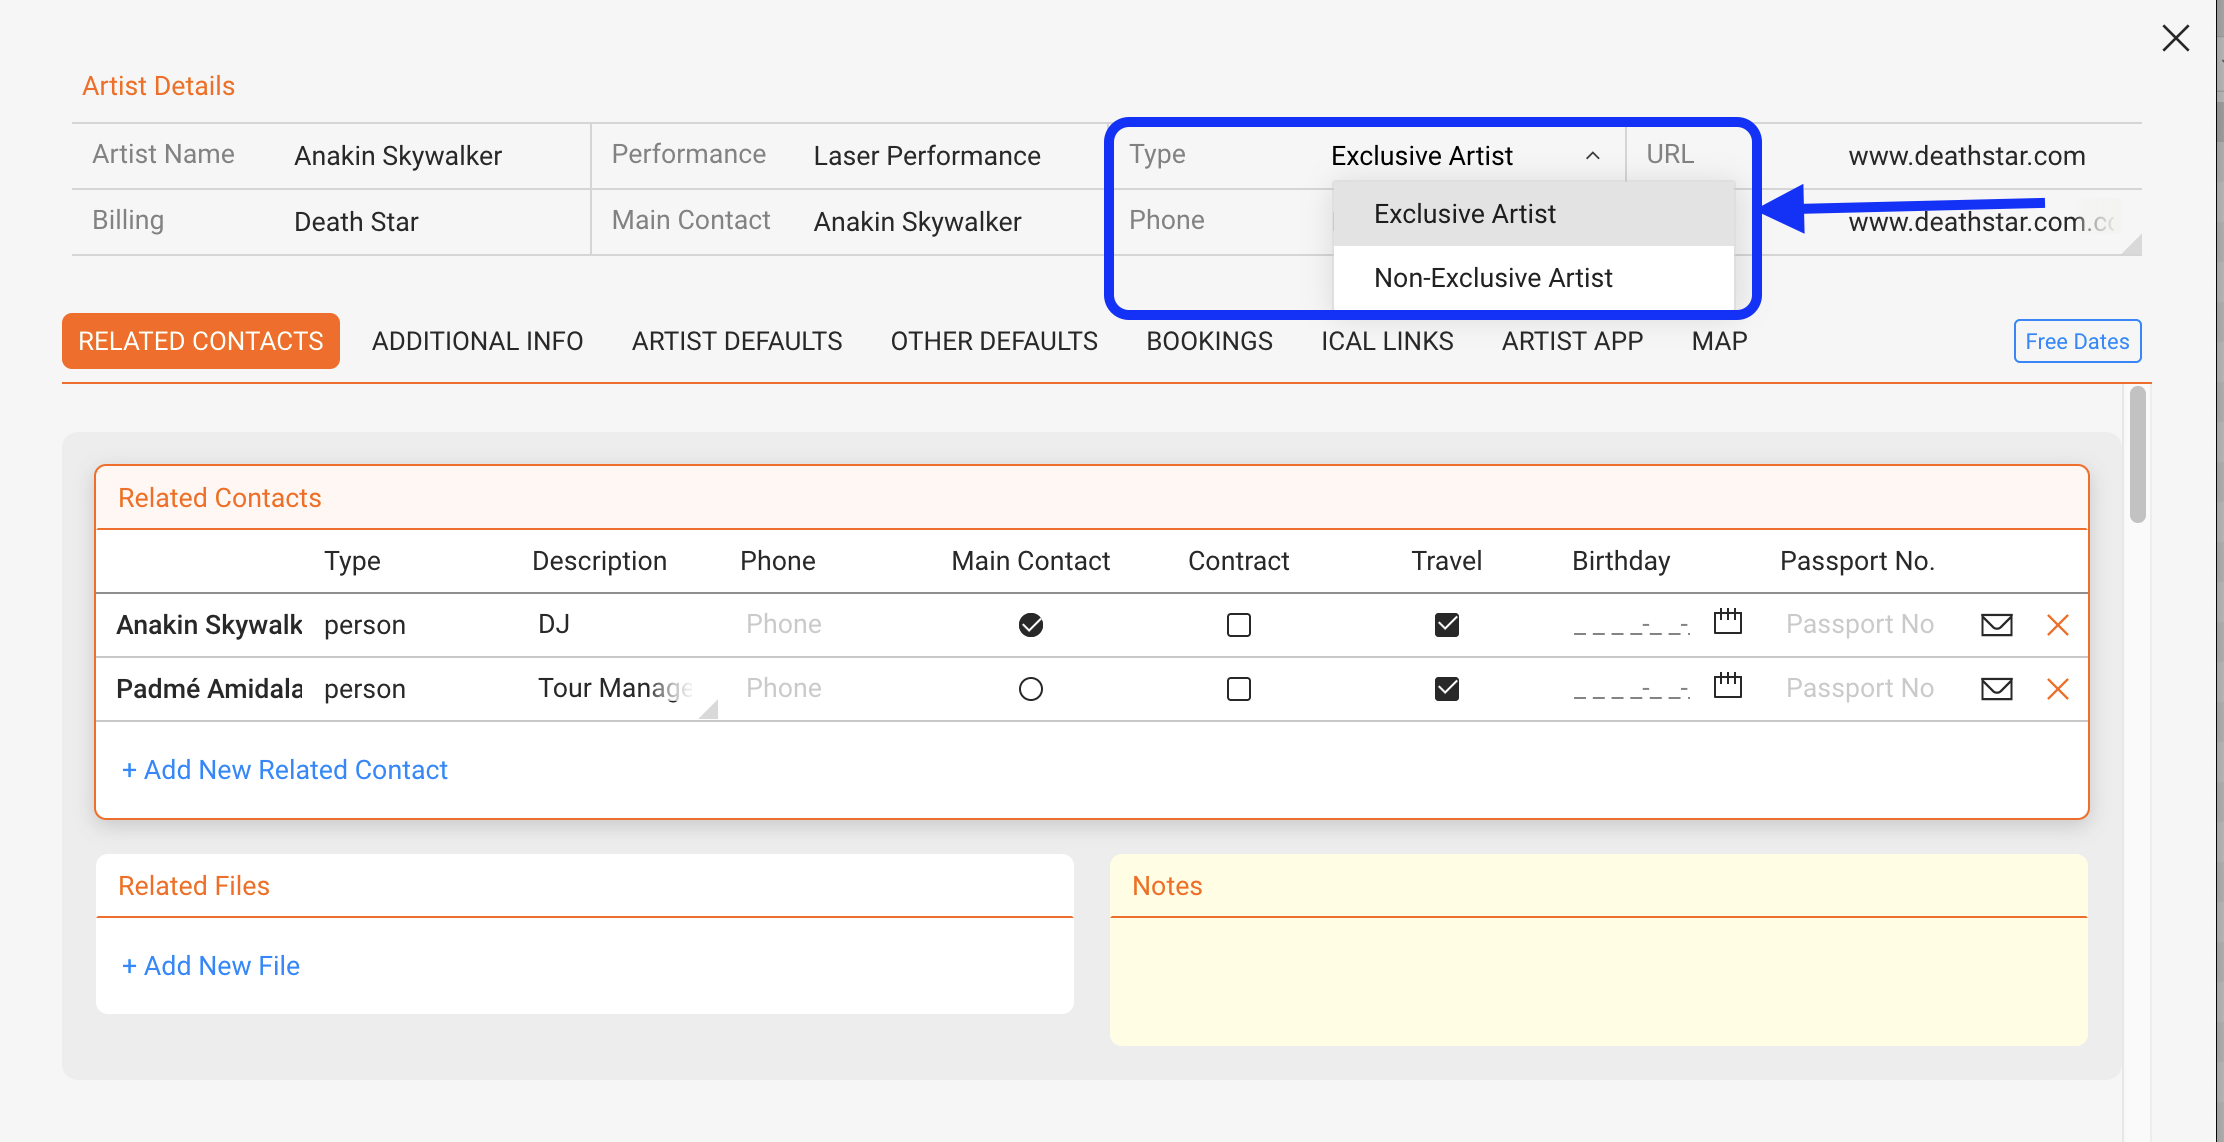
Documents (Contracts & Itineraries)
A core functionality of our BOOKING module is to pull data from your bookings into TEMPLATES for contracts, itineraries etc.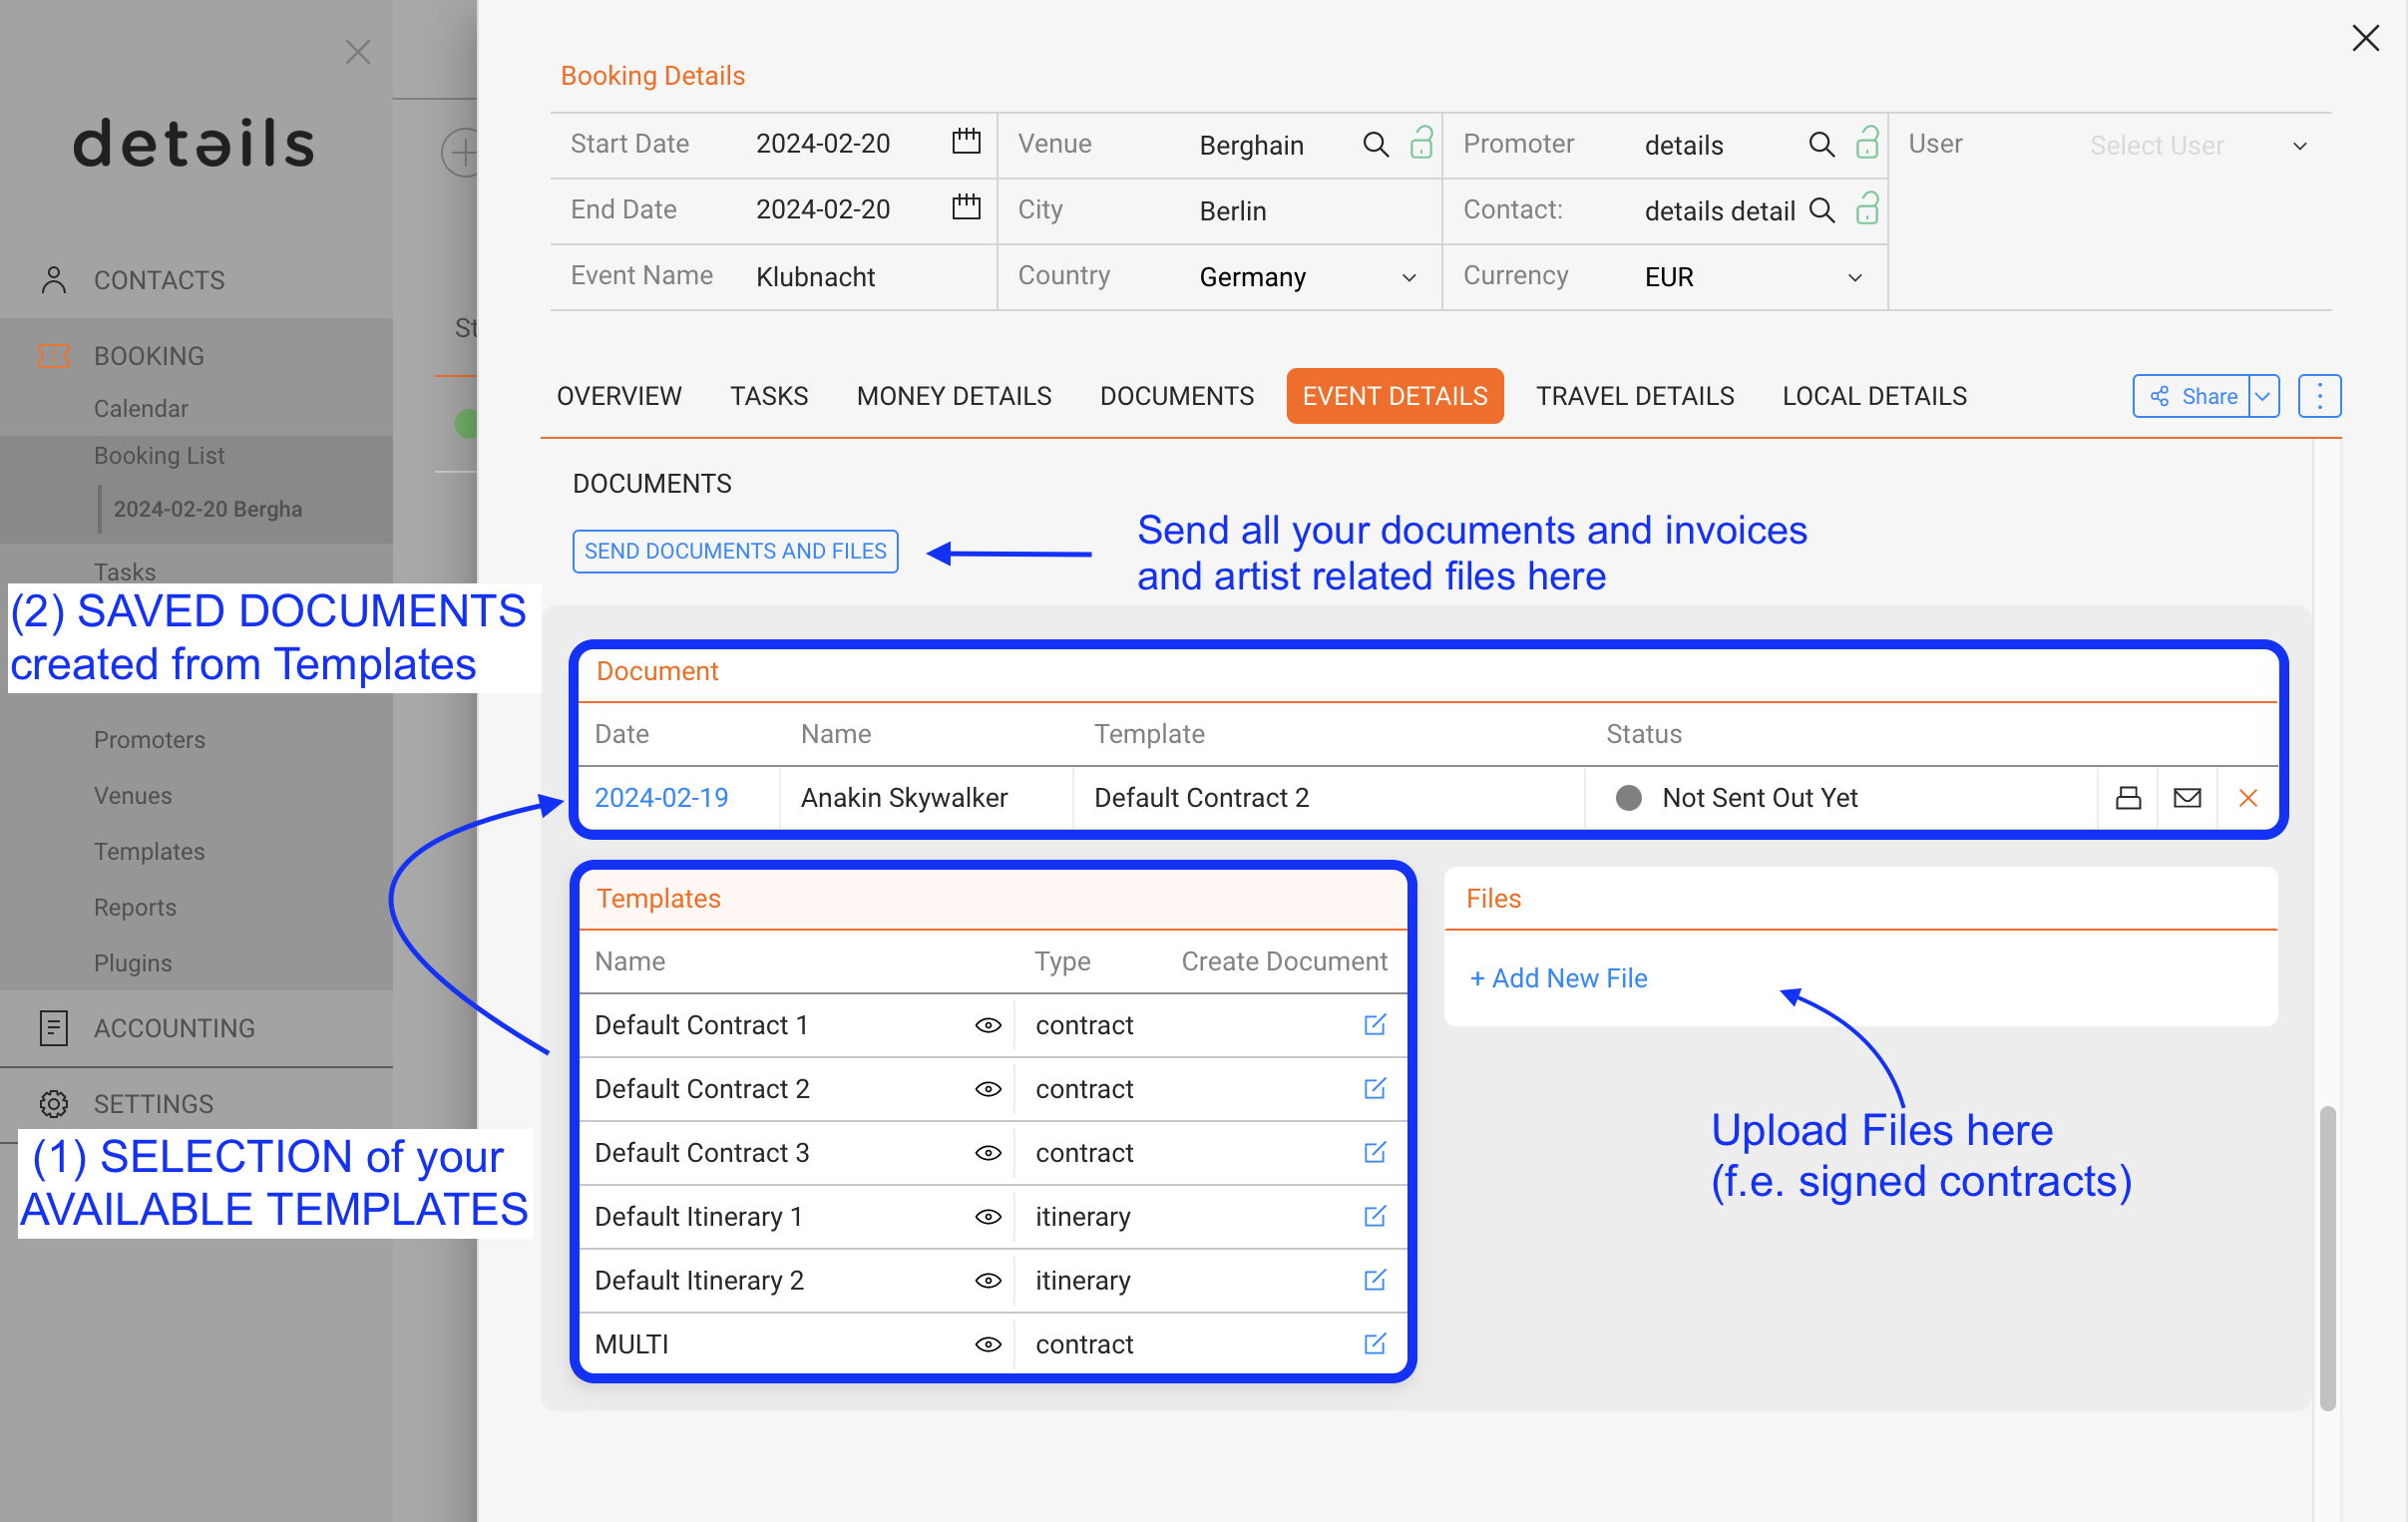
This article will explain the workflow how to pull data into any selected TEMPLATES on the DOCUMENTS subtab of your booking.
On the bottom you will find your available TEMPLATES.
Those templates are 100% fully customizable. For more information on how to create a fully featured contract template please click HERE.
There are two options to use the templates:
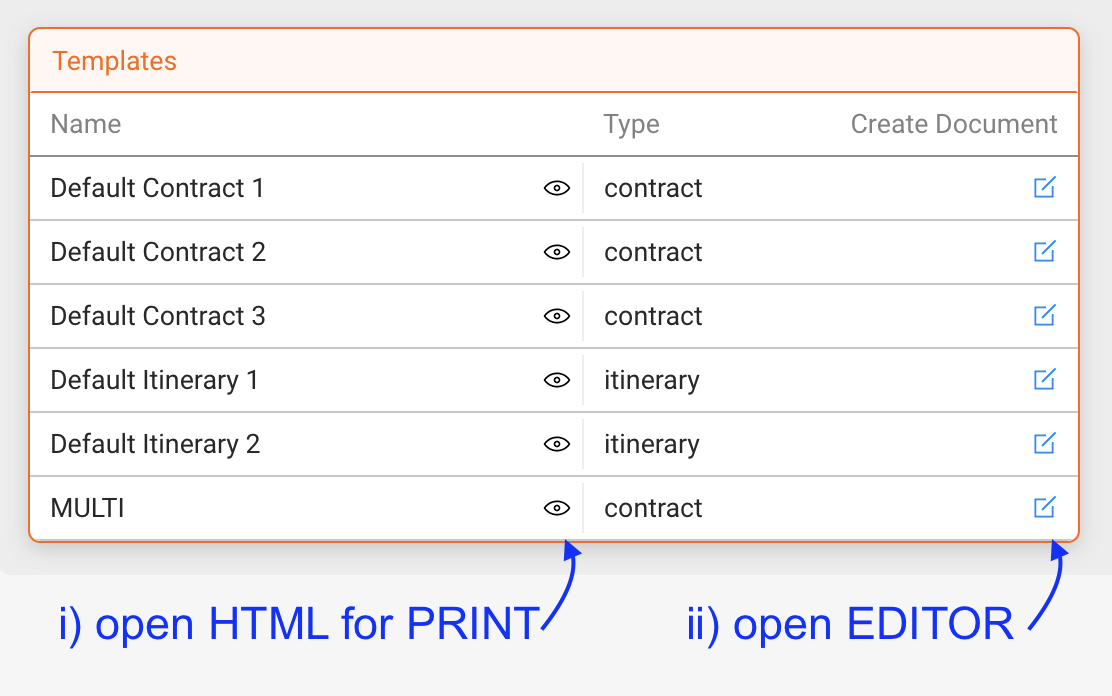
i) You can either see & print directly from the template with a click on the black EYE icon.
This will open your template and include all datapoints from variables as is.
You can now print the document on paper or as PDF.
ii) If you need to change something to the document for this specific booking, you can alternatively open the template in the HTML EDITOR included in details.
If you choose to use the Editor, there is a specific workflow you need to do in order to edit, save and print or send out the final documents.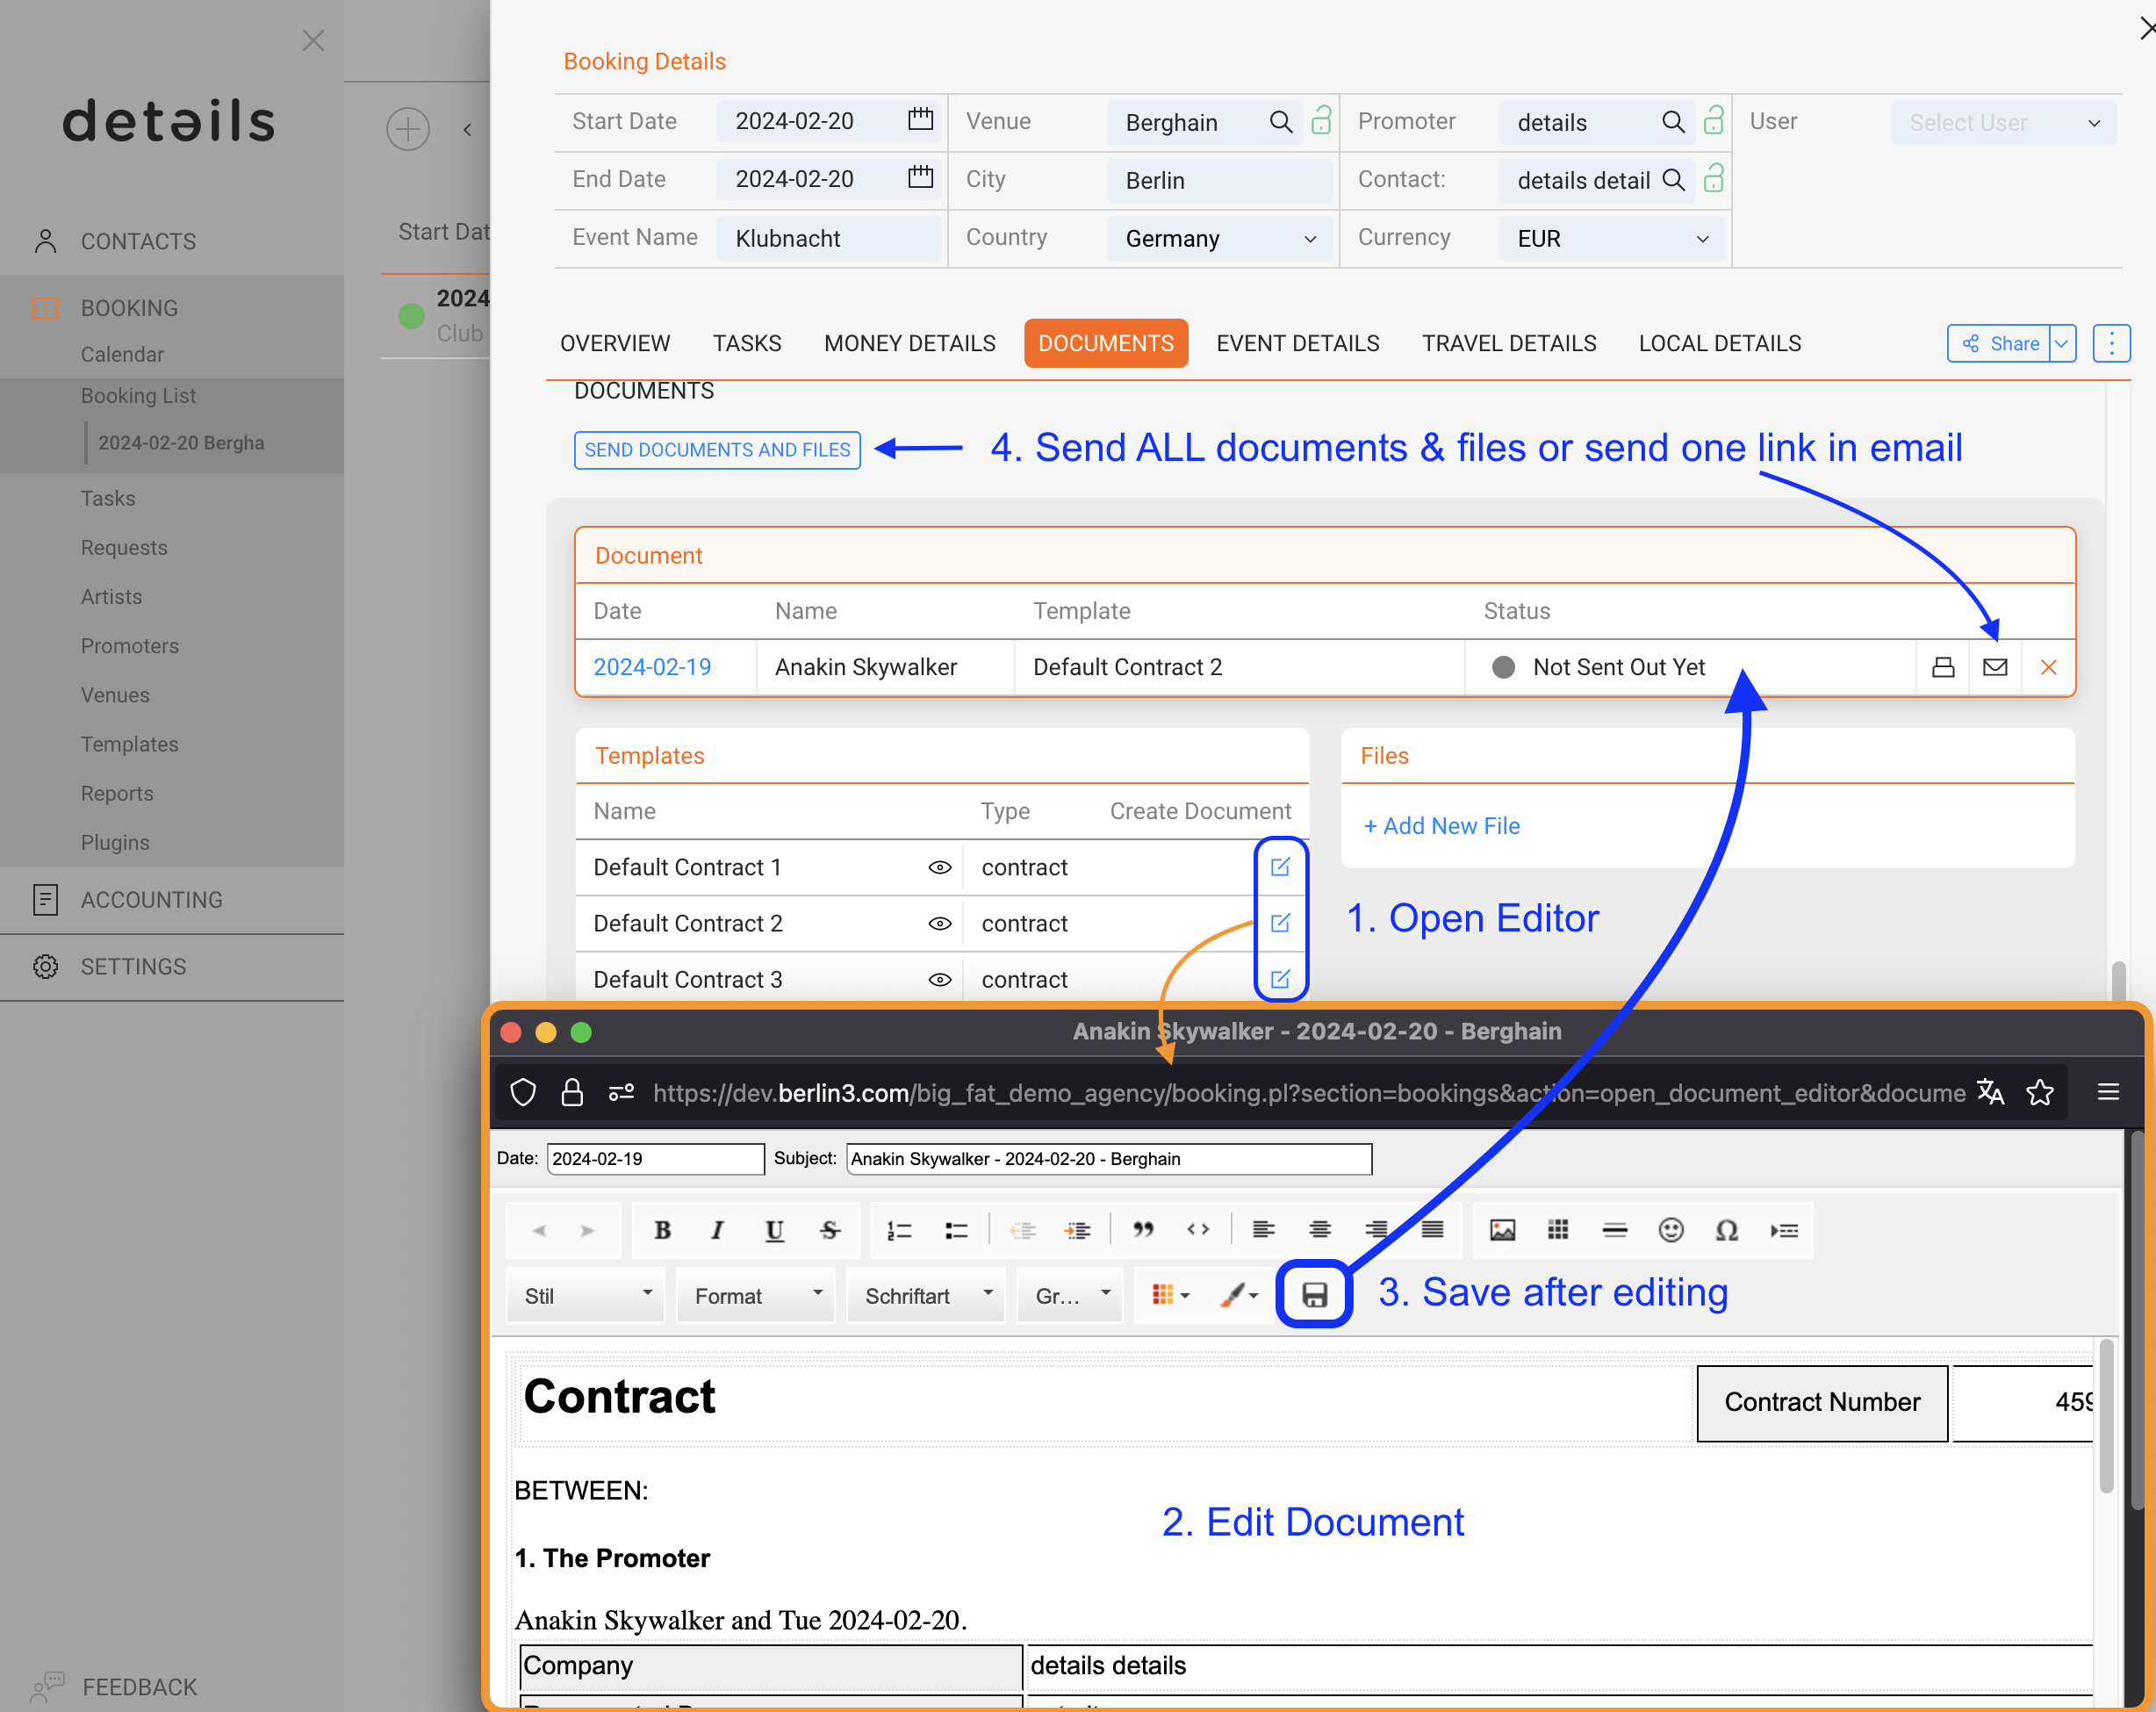
When you opened the HTML EDITOR you will find your template filled out with the data from this specific booking.
Here you can edit all text with the available Editor menu.
The available options in the Editor menu are adaptable and may change over time as we add more options.
One feature our clients use a lot is to add, edit or remove rows and columns from tables.
This feature can be found when you right-click on the respective table.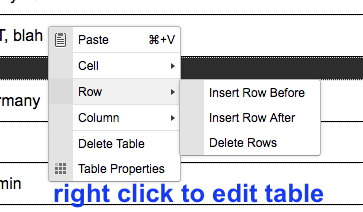
Once you completed editing your document, you need to SAVE the document.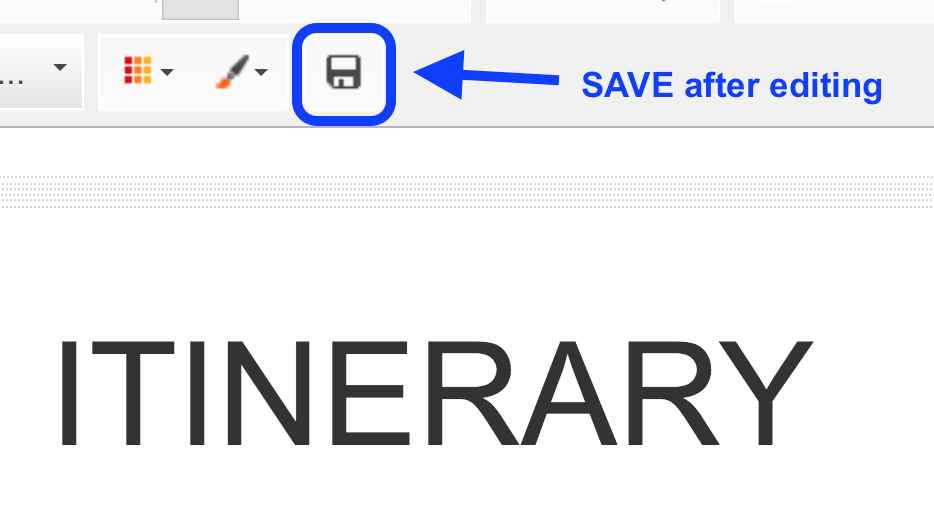
Your document will now appear in the Box in the middle of the screen.
You now have multiple optional actions to choose from:
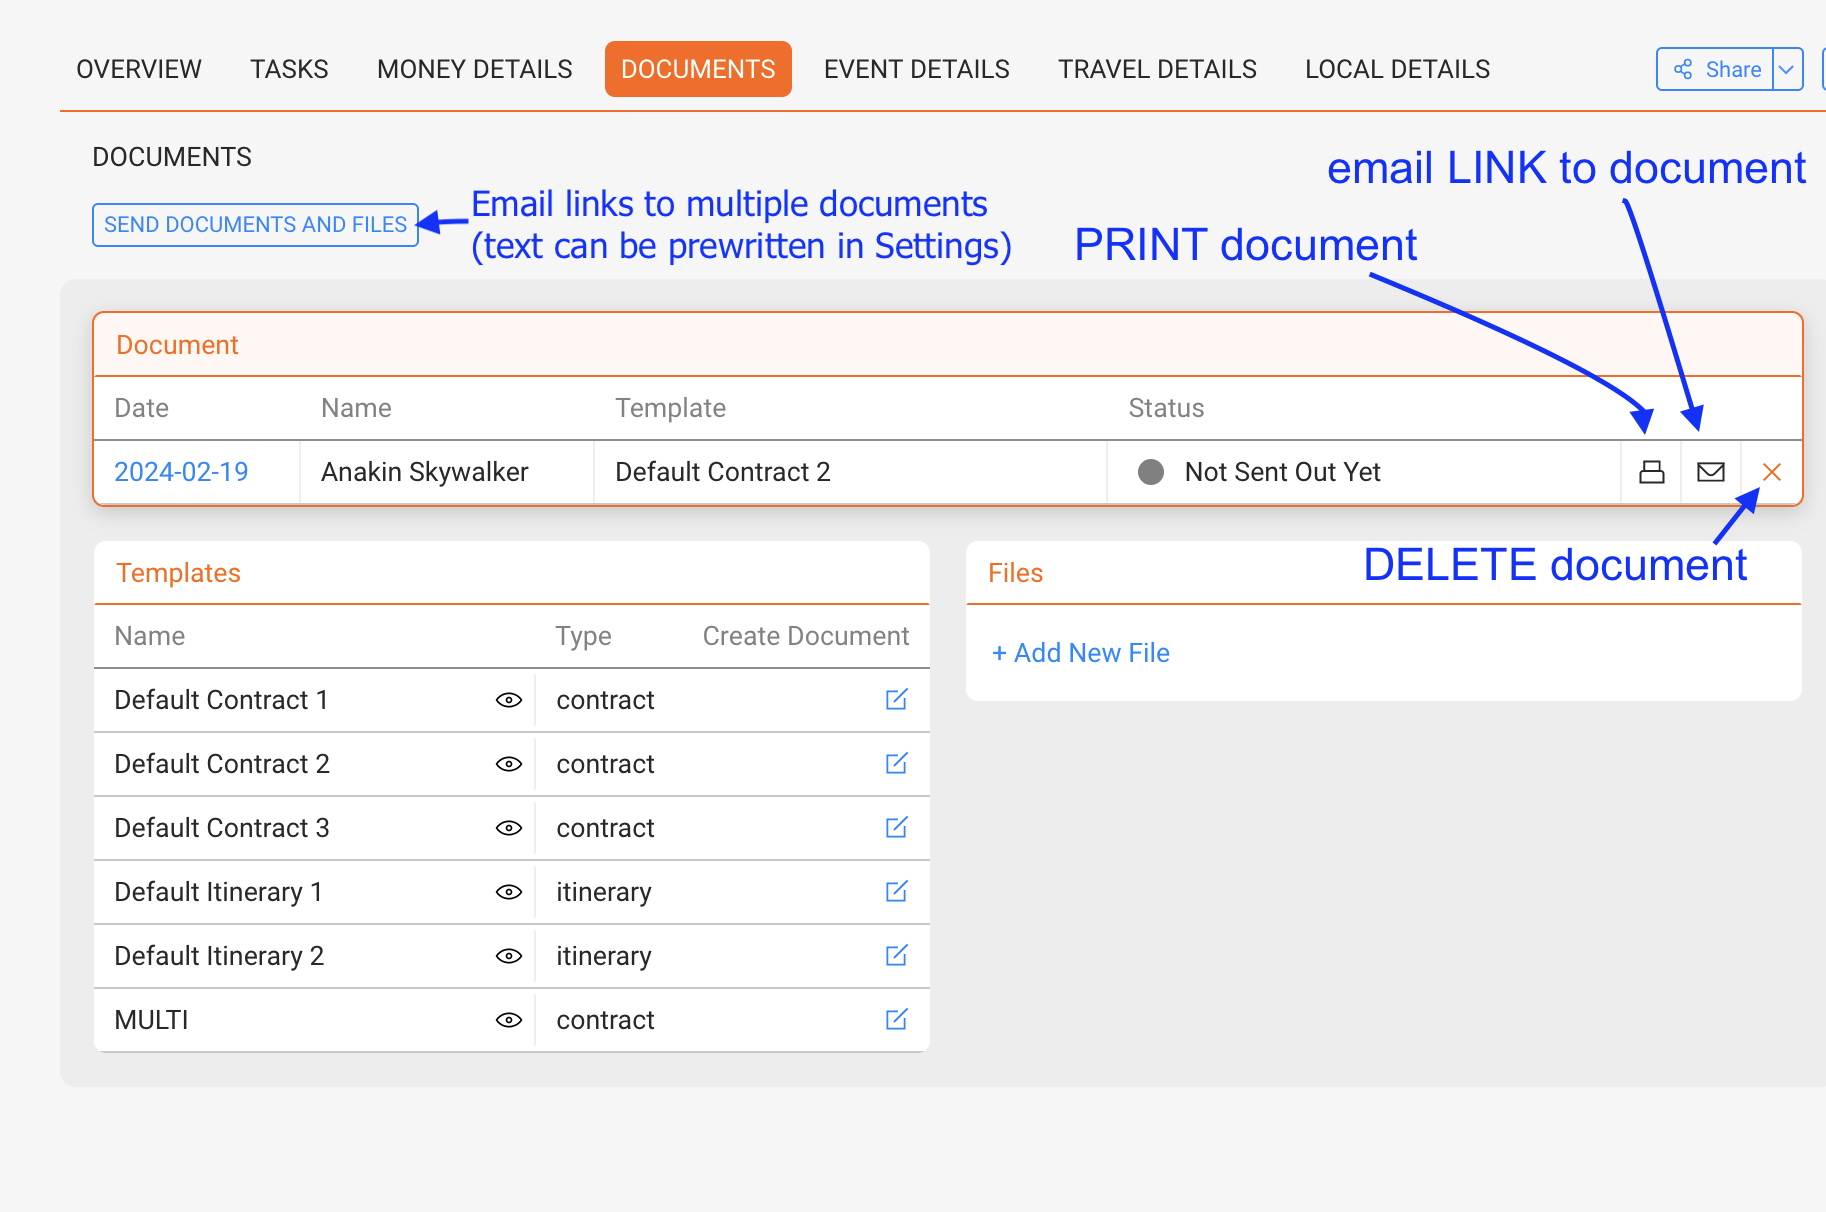
* Click on the date to EDIT the document again.
New changes will be saved when you exit the document on the SAVE icon (see above).
* Click on the black PRINT icon to print the document on paper or as PDF.
* Click on the EMAIL icon to send out a link to this document. When doing this you may enable the ONLINE AGREEMENT option.
* Click the X icon to delete this document. The icon will dissappear once this contract has been agreed to with our ONLINE AGREEMENT option.
* Click the button SEND DOCUMENTS AND FILES to send out links to multiple documents and files at the same time. Please note that these emails can be prewritten in Settings -> Custom Texts
Enable the PayPal direct payment option for invoices
This article will show you how to use the PayPal direct payment option for your invoices.
This feature will allow you to have payments go directly to YOUR PayPal account.
It will also notify you once the transfer was successful and automatically set invoices as paid in details.
The feature works for invoices of all modules, but will be particularly useful for BOOKING agencies.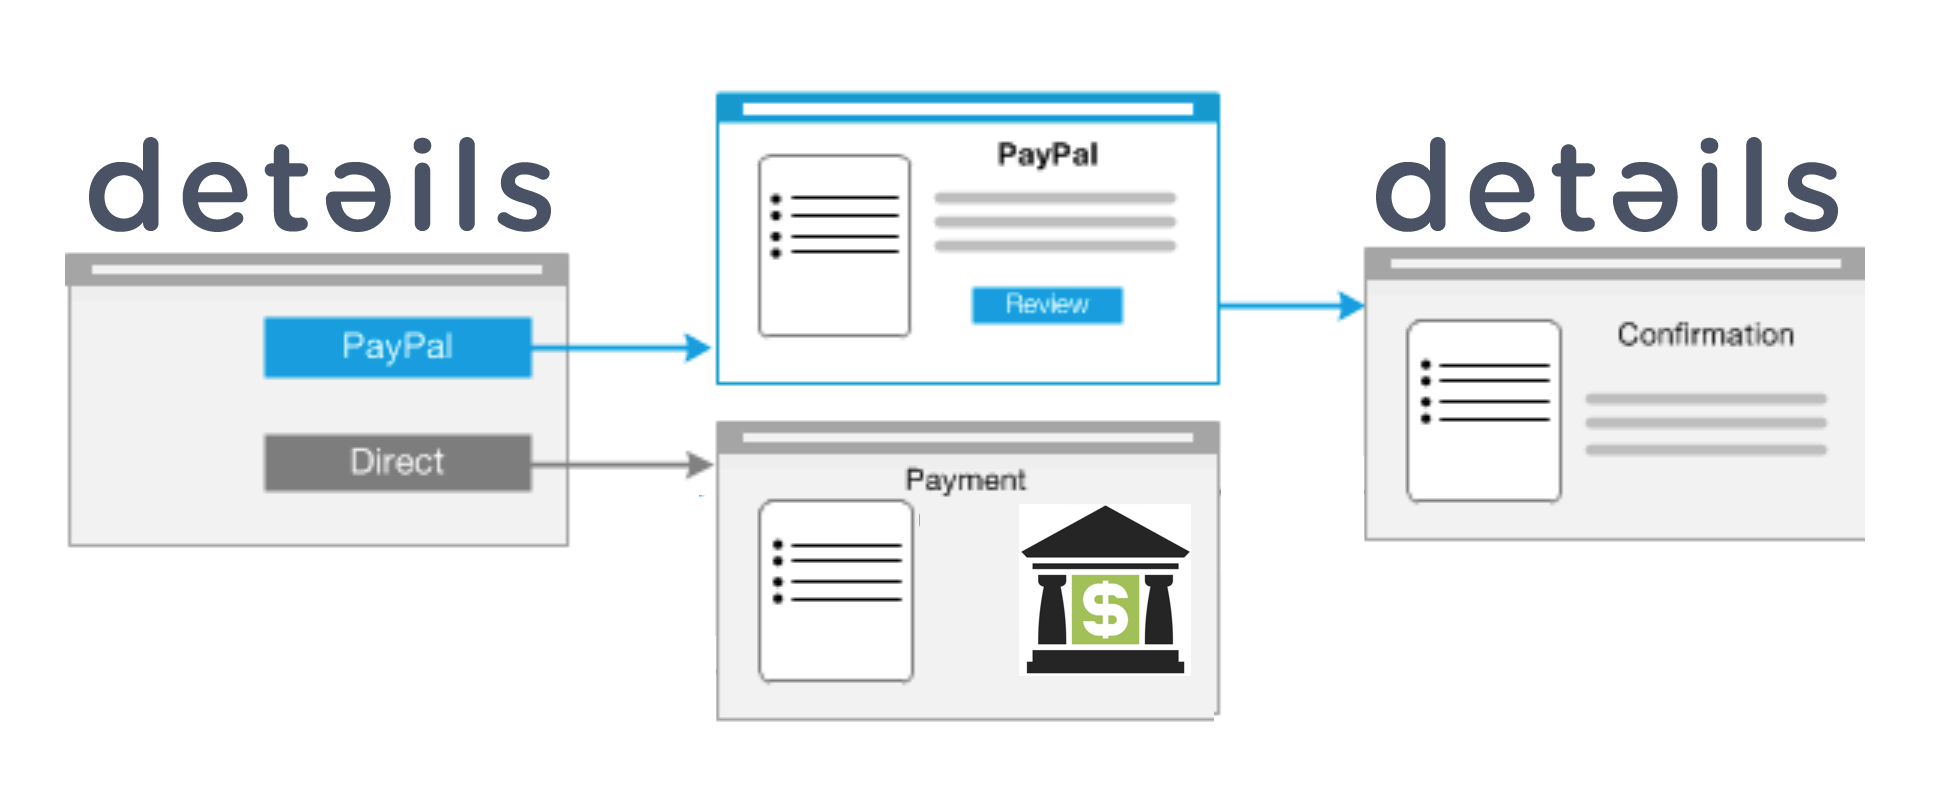
===1) Setup===
To make this option available, first go to SETTINGS > COMPANY and log in.
Note: You may need the permission to do so.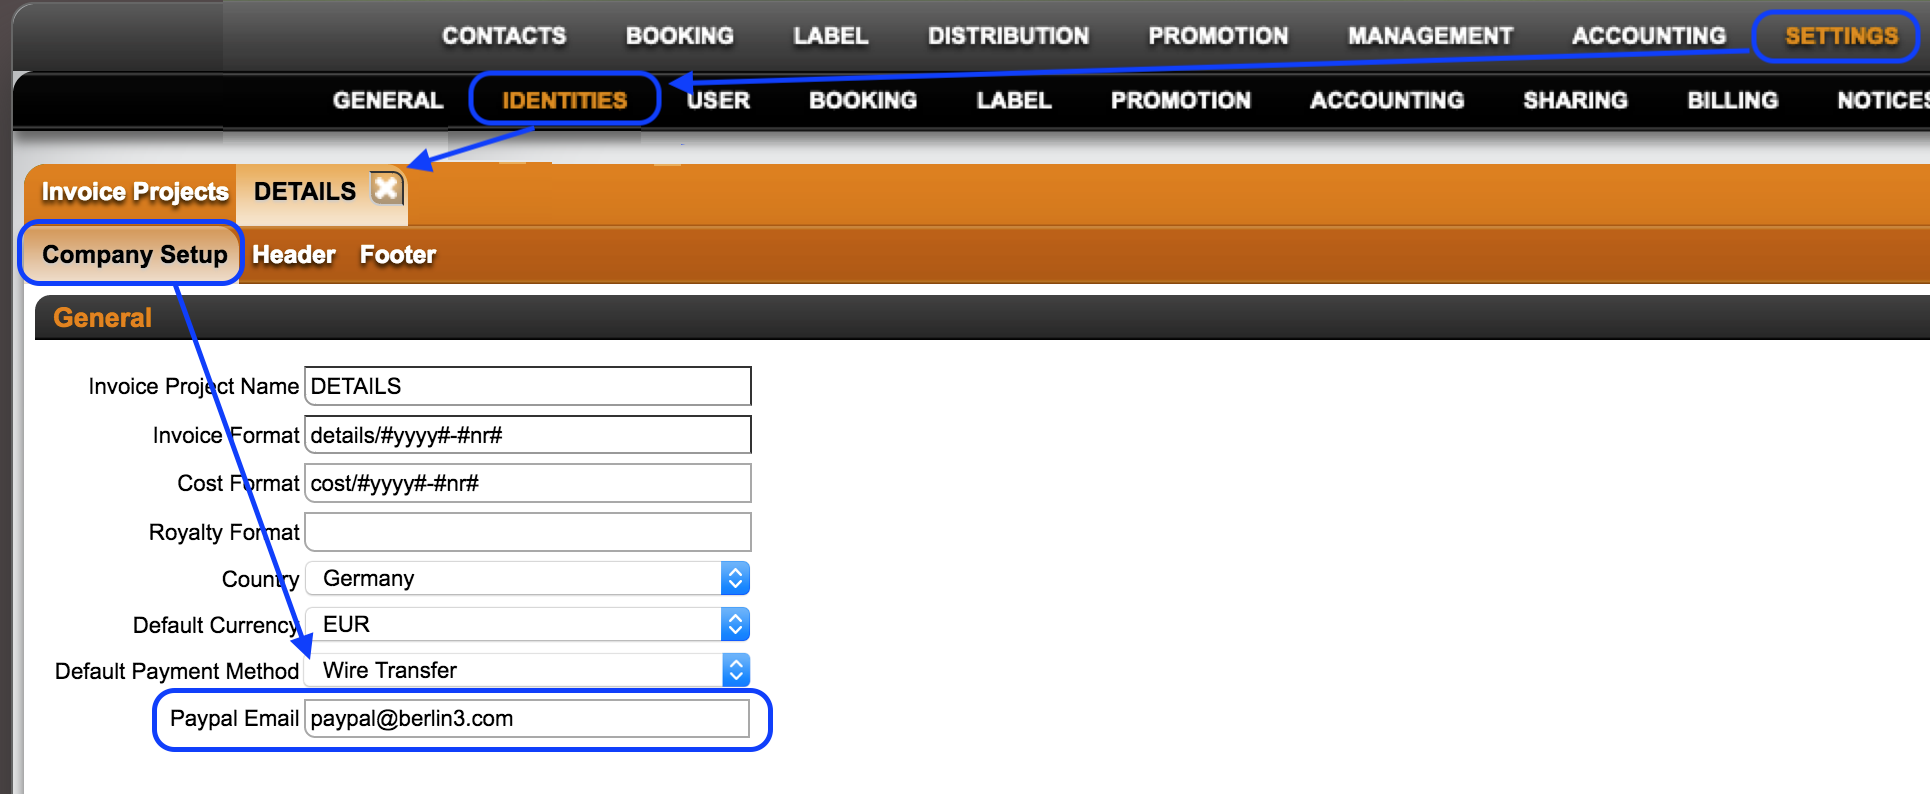
Select the INVOICE PROJECT that should include the Direct-to-PayPal option.
On the left side of the subtab COMPANY SETUP you will see a field for the PAYPAL EMAIL.
Here is where you want to specify your company’s PayPal Account, meaning the Paypal account a payment should go to.
This is the only setting you need, but it is necessary to specify the payment recipient.
===2) SEND AN EMAIL===
details allows you to forward any invoice to the recipient via email.
You can find the blue MAIL icon to send invoices both in the list of ALL INVOICES and on the OVERVIEW tab of any invoice.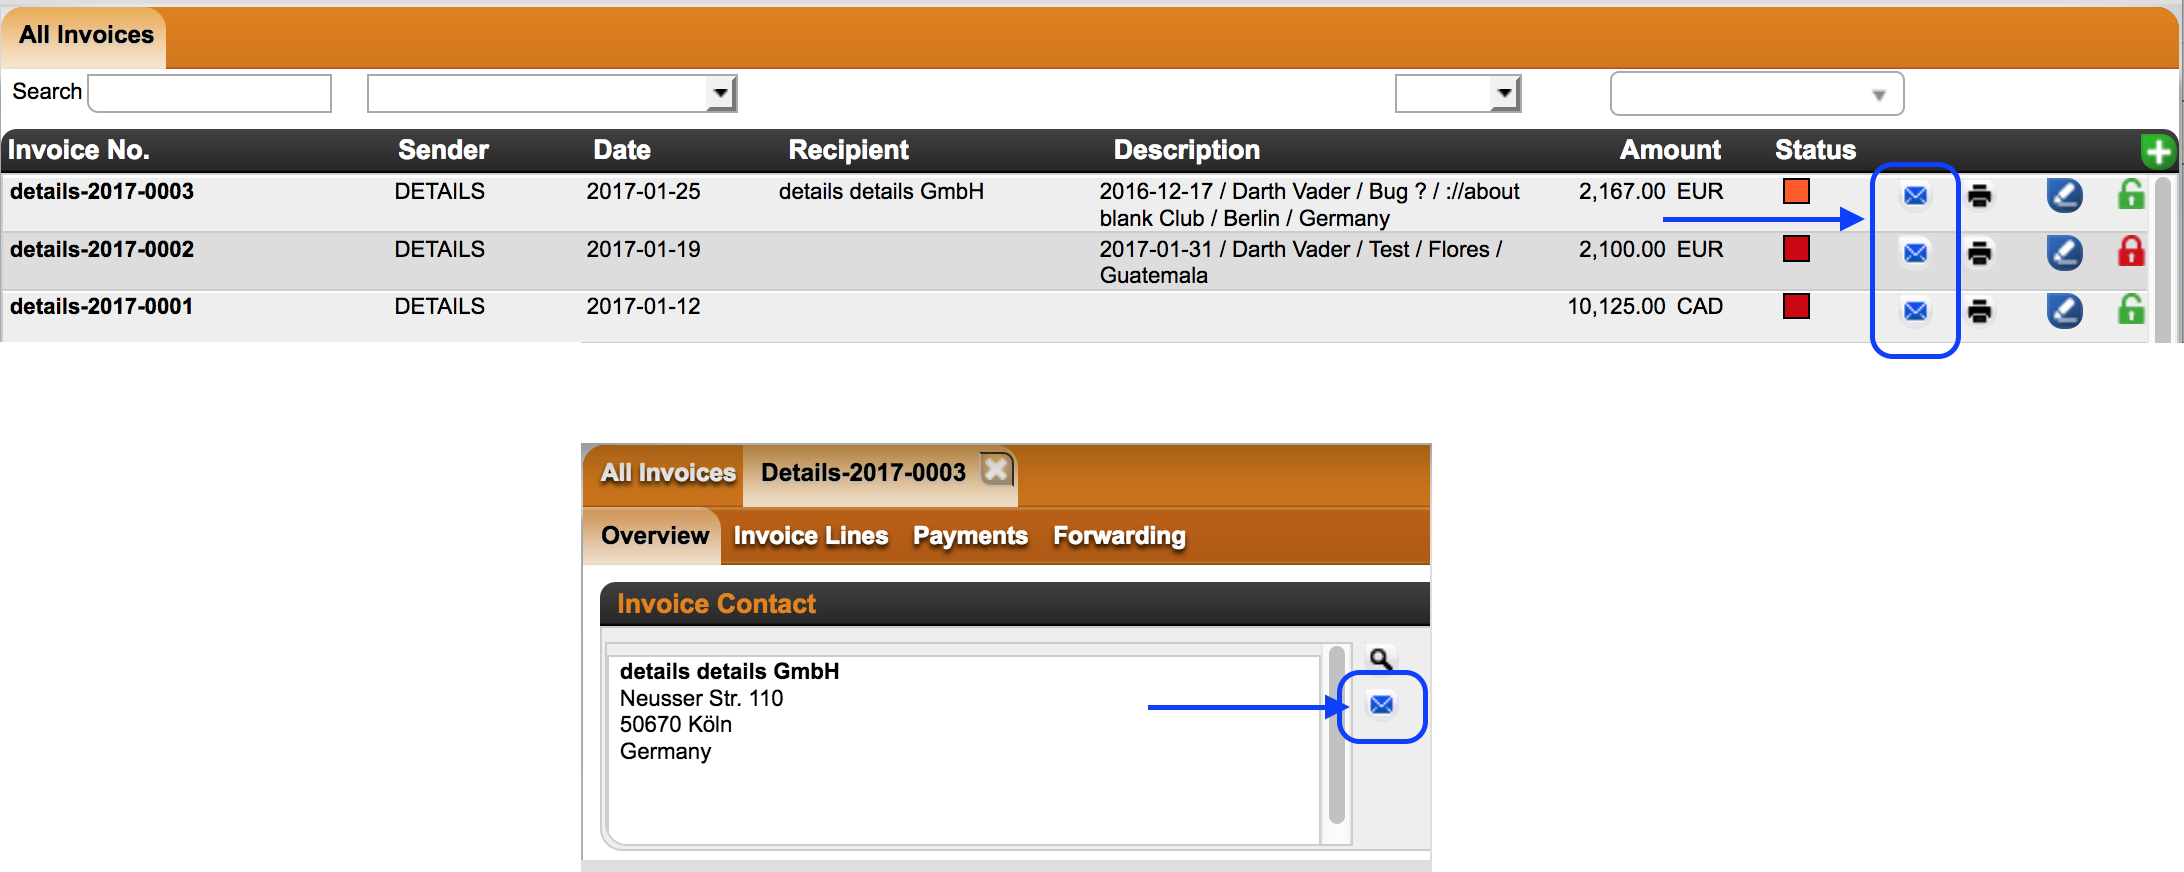
Included in the email is a LINK which will take the recepient directly to your invoice. 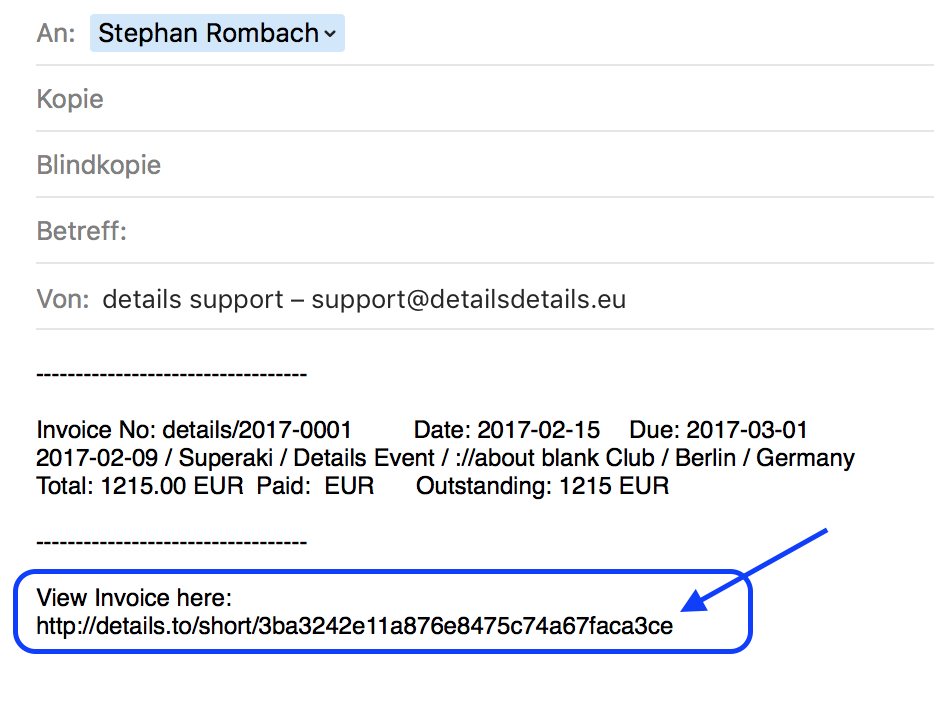
Note: This part is available regardless of whether or not you want to enable the PayPal direct payment option.
===3) ENABLE PAYPAL PAYMENT===
Once you click the blue MAIL icon to send an invoice, a message will ask you whether or not you want to enable the PayPal payment option.
Note: For this to happen you need to have the COMPANY (Invoice Project) to be connected to a PayPal account (see 1) above).
If you agree, the LINK generated with the email will display a PayPal icon once clicked.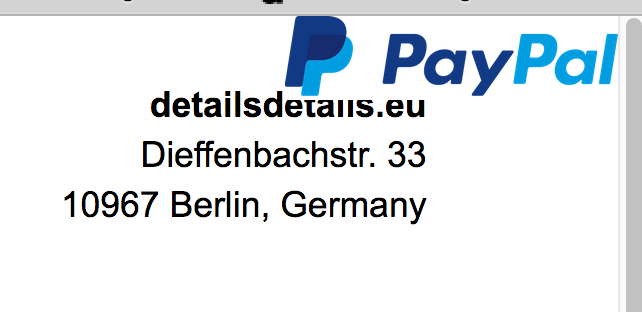
When clicking the LINK, the recipients of the invoice will find an animated PayPal logo on the invoice.
Clicking on the logo will automatically redirect them to the the PayPal page, where they can login with their own account and complete the transfer.
Once the payment went through, the responsible details user (accountant or booking agent) will be notified that the invoice was paid.
DETAILS will also display the invoice as paid in the BOOKING and ACCOUNTING.