User based ICAL & Artist App access (Permissions)

Managing Permissions for iCal and Artist App Information

details feature allows you to customize permissions for accessing iCal information and Artist App data. This ensures that different roles, such as tour managers, artists, or management teams, can view only the information relevant to them.

For example, financial details or specific booking statuses can be hidden from certain users while remaining visible to others.


Flexible Permission Management
With this system, you can easily modify existing permissions, add or remove information, or adjust statuses. Importantly, there s no need to recreate and resend iCal or Artist App links when permissions change the updates are applied seamlessly.


Transitioning to the New System
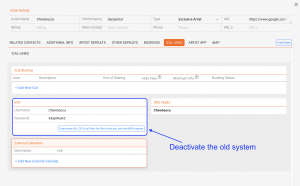
To use the new permission-based sharing system, you must first deactivate the old system.


Please note:

  • Once the old system is deactivated, existing links will no longer be updated.
  • This step is necessary because we have built a completely new architecture to support the advanced permission-sharing capabilities.


By switching to this system, you ll gain greater control and flexibility in managing access to your data.


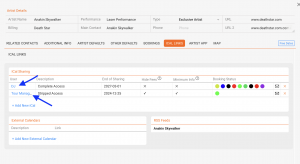
Once the old system is deactivated a new user based sharing can be created.

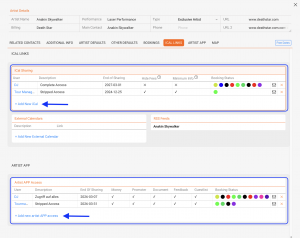
Click on either +Add new Ical or +Add new Artist app Access


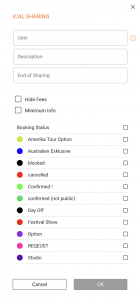
+Add new Ical gives you the following options:

  • User: Username, f.e. “Artist”
  • Description: f.e. “full access”
  • End of Sharing: a date can be set, after which the link will not be updated anymore. This is handy if a person will stop to work on a specific date.


  • Hide Fees: No money relevant data is being shared
  • Minimum Info: Only minimum info is contained in the ical (Artist, Date, City, Booking Status). This is perfect to be shared with 3rd parties such as subagencies.


  • Booking Status: Which status whould be shared


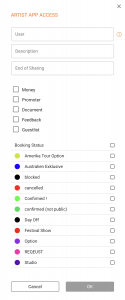
+Add new Artist app Access gives you the following options:


  • User: Username, f.e. “Artist”
  • Description: f.e. “full access”
  • End of Sharing: a date can be set, after which the link will not be updated anymore. This is handy if a person will stop to work on a specific date.


  • Money: money relevant data is being shared or not
  • Promoter: Promoter infos are shared or not
  • Document: The document section is shared or not
  • Feedback: The Feedback section is shared or not
  • Guestlist: The gustlist section is shared or not


  • Booking Status: Which status whould be shared


Once the permission / user is added, the informations can easily be modified.
To access it just click on the user name to open the modal.

Booking Update 02 2025

New Features:

Improvements:

  • Added [% ph.techrider_url %] to Custom Text
  • Extended Ical Display Duration (now +2 years into the future)
  • Calendar: Keep filters active when reloading page
  • Calendar: Artist Dropdown search by typing instead of scrolling
  • Contact Relations Update using Bookings
  • Style adjustments in ARTIST APP (Notes will be displayed in the same format as entered in details)

Bug Fixes:

  • Negative amount in money details gets changed to positive
  • Default language in Request Form is now browser language

Update Contact Relations from linked Bookings

In details, you have the option to manage the relationships between contacts.

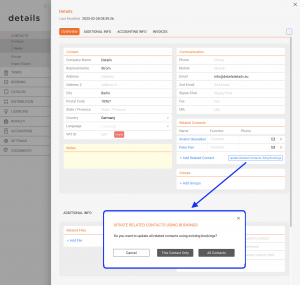
You can either manually add contacts related to another contact or automate the process by using the Update Related Contacts Using Bookings feature.

Adding Related Contacts Manually

1. Go to the Contact / Overview page.
2. In the Related Contacts section, click the + Add Contact Relation button.
3. Search for and select the contact you want to associate with the contact.

This option is useful when you want to link specific contacts to another contact without reviewing all existing bookings.

Automating Contact Updates with Bookings

If you prefer to automatically update contacts based on past bookings, you can use the Update Related Contacts Using Bookings button. This feature allows details to analyze all your previous bookings and pull relevant contact information, saving you time and ensuring that contact associations are up-to-date.

1. Go to the Contact / Overview page.

2. In the Related Contacts section, click the Update Related Contacts Using Bookings button.

3. A Modal window will appear, allowing you to choose between two options:
This Contact: Updates contacts based on bookings associated with the selected contact only.
All Contacts: Updates contacts across all contacts, based on bookings with any of those contact.

4. After making your selection, details will process the bookings and add all associated contacts to the Related Contacts section for the selected contact(s).

The contacts that can be pulled from bookings include:
” Promoters
” Contacts linked to the booking (such as agents or partners involved in the event).

This feature is particularly helpful for large databases with numerous contacts and bookings, ensuring that all relationships are accurately represented without manual entry.


How to Export Invoices as PDFs


You can easily download multiple invoices as a batch PDF export from the Accounting > Invoice List section. Just follow the steps below:

1. Navigate to the Invoice List

Log in to details and go to Accounting > Invoices


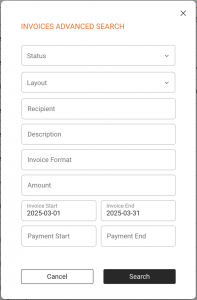
2. Use the Advanced Search to Filter Invoices

Click the Advanced Search option on top of the list.

Use the filters to narrow your results by

  • Invoice Status
  • Layout
  • Recipient
  • Description
  • Format
  • Amount
  • Invoice Date Range
  • Payment Date Range

Once your filters are set, click Search to load the results.


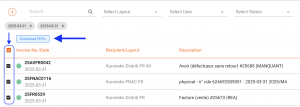
3. Select Invoices

Click the orange checkbox icon in the top-left corner above the invoice list to select all results, or manually tick the boxes next to specific invoices.

Once more than one invoice is selected, a blue Download PDFs button will appear above the list.


4. Download the PDFs

Click the Download PDFs button. A notification will confirm that your request is being processed.

Note: The platform will render the selected PDFs in the background and send a download link to your user email address once ready.


What Happens Next?

You will receive an email with a download link as soon as the batch is complete. Just click the link to download your ZIP file containing all selected invoice PDFs.


Need Help?

If your PDF batch doesn’t arrive or seems incomplete, please contact label_team@details.eu or booking_team@details.eu respectivly with the list of invoice numbers or a screenshot of your filter settings.

Catalog Management Interface

Introducing the Catalog Management Section

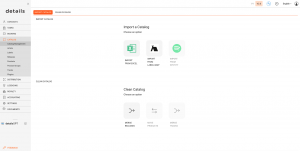
The Catalog Management section will become a central workspace to import, manage, clean, and export your catalog data efficiently.


Catalog Import Tools

We are starting by relocating our import tools that were previously available through plugins.
They re now easier to access and highlighted as core features:

  • Excel Template Import Use our standardized templates to import digital and physical catalog data quickly.
  • Labelcamp Import Connect your Labelcamp account to automatically ingest releases into your Details database. 

Both import options include instructions, accessible by clicking the icons.

Next up is an import function for Spotify, allowing you to pull new catalog entries directly from your artist profiles.

We are also preparing an import function for AudioSalad, enabling catalog ingestion through a dedicated API.


Catalog Cleaning Tools

This section will offer tools to help you keep your catalog structured and tidy, including:

  • Merge Releases Our first release in this area to help you avoid duplicates and consolidate catalog entries.

coming soon are

  • Move Products Reassign products from one release to another with a few clicks.
  • Merge Tracks Identify and combine duplicate tracks to maintain a clean metadata structure.

Stay tuned for further updates and new features in the Catalog Management section!

Distribution Reports


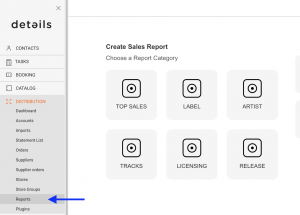
The DISTRIBUTION / REPORTS section in V2 is a dedicated space to generate customized reports on your digital and physical distribution activity.

To keep things fast and stable, each report has a clear structure and limited flexibility. Instead of making one report cover every possible case, details provides focused reports tailored for real-world use in distribution, licensing, and reporting to artists or partners.

You can find this feature under DISTRIBUTION / REPORTS.

How It Works

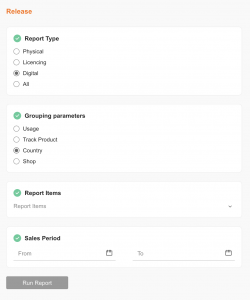
In details, reports are created using a simple step-by-step assistant. You ll be guided through five stages to configure your report:

  1. Select a Report Class (e.g. Artist, Label, Licensing, Release)
  2. Choose a Report Type based on what kind of data you need
  3. Choose a Grouping for example by release, track, shop, or usage
  4. Enter Filters and Period such as artist name or a sales date range
  5. Select Output Format your download will be a CSV formatted by your country settings

Each step unlocks the next, depending on your previous selection. You ll only see valid options for your chosen report path.

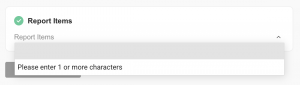
What s a Report Item?

In Step 4, you ll be asked to enter a Report Item this is the key filter your report will be based on. What exactly counts as a report item depends on the report type:

  • Artist Reports: enter an artist name
  • Release Reports: enter a release title or code
  • Label Reports: enter the name of the label
  • Licensing Reports: may not require a filter, or ask for a deal or usage type

If you re not sure what to enter, start typing the field will suggest matching entries from your catalog.

Where Do the Reports Come From?

Each report is generated from a pre-configured SQL query in the system, automatically matched based on your selections. This means you don t have to handle report logic yourself simply choose what you want to see, and details generates the correct results in the background.

Most reports will be sent to you by email as a downloadable file. If the result is small, it may be shown on screen in the future (feature coming soon).

Tips Before You Start

  • You can always go back and change your selections before generating a report.
  • Make sure you enter a valid period (start and end date) when prompted.
  • Some reports require a specific filter (e.g. artist name or release ID).
  • If your report takes a while, check your inbox you ll receive it as a download link via email.


details continuously improves this section to make reporting more powerful, more flexible, and easier to use. If you have suggestions or feedback, feel free to contact our label team.

Booking Update 08 2025

detailsdetails.eu -> details.eu

We ve discontinued the old domain detailsdetails.eu

This change was communicated two years ago and may affect existing artist apps or iCals.
If you (or your artists) are still using links with detailsdetails.eu, you will encounter an error.

You have two options:

  1. Quick fix: Replace detailsdetails.eu in your existing links with details.eu.

  2. Recommended: Switch to our new system, which makes it easy to manage permissions for different users: Read more here.

New Features

  • Setting Default Exclusivities per Artist: Link

Improvements

  • “Lazy Loading” in Booking list (faster loading times)
  • “Lazy Loading” in Venue list (faster loading times)
  • Airport Code added next to airport
  • Size of notes box in local details enhanced
  • Artist App: Documents are opened straight away, not asking where to save them
  • Artist App: Travel Notes are being displayed like in details
  • Display and Save Custom Fields in Booking Wizard from Incoming Request (Request Form)


Bug Fixes

  • fixed a display issue with double entries from external calendars
  • fixed random freezing in the booking creation process for artists with special characters in their name
  • fixed a date offest bug in the booking wizard modal (american timezone)


Setting Default Exclusivities per Artist

Booking ► Artists ► Other Defaults

Overview:

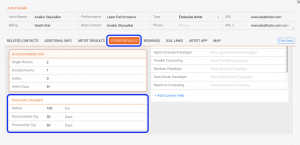
You can define default exclusivity settings for each artist. These settings will be automatically applied whenever a new show is created, helping to prevent scheduling conflicts and streamline the booking process.


What can be configured?

For each artist, you can set the following default exclusivity rules:

  • Radius: The geographical range within which no other shows can be booked.

  • Period Before Gig: Number of days prior to a show during which no other gigs can be scheduled.

  • Period After Gig: Number of days after a show during which no other gigs can be scheduled.


How does it work?

  1. Go to Booking ► Artists ► Other Defaults.

  2. Select the artist you want to configure.

  3. Enter values for Radius, Period Before, and Period After the gig.

These values will be automatically applied when a new show is created for the artist.
You can still manually adjust them on a per-show basis if needed.

What is the TRAVEL AI (OTIS)?

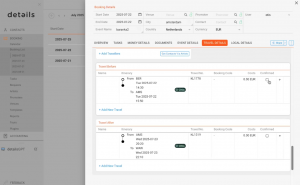
The Travel AI is a smart booking assistant integrated directly into details, working in cooperation with OTIS a travel platform built specifically for the music industry. This tool helps simplify the booking process for complex travel needs, such as multi-stop tours, multiple passengers, or changing travel parties.►

With the Travel AI, users no longer need to manually transfer flight information between platforms the process becomes faster, easier, and more reliable.

How does it work?

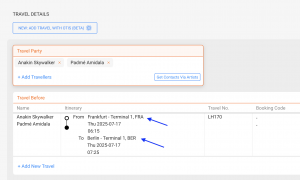
When planning travel for one or more gigs, you can now initiate the process directly from within details. After selecting the gigs you want to connect, the system launches the OTIS interface inside details you don t have to switch between tabs anymore.

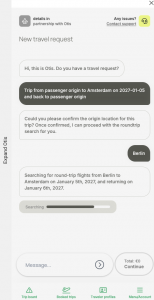
Inside OTIS, you ll see a chat-based flight search where you simply enter the relevant information (e.g. departure city). The AI then finds suitable connections based on the selected gigs. You can browse results, add options to a cart, and save or send selections for approval or payment just like you would when shopping online.

Once a flight or train is booked, the confirmation including booking codes and costs is automatically synced back to details. All relevant information appears in the TRAVEL BEFORE or TRAVEL AFTER sections of the connected gigs.

This ensures all travel-related data stays in one place and remains visible to everyone involved artists, bookers, managers, and payers.

What are the benefits?

  • No more switching between tabs or copy-pasting travel info.
  • Automatic transfer of booking data into details.
  • Faster and easier flight selection through OTIS s music-specific travel logic.
  • Transparency for all parties: you always see current travel status in one place.
  • Multiple payment flows supported flights can be sent to different payers or approved by artists/managers.

What should I keep in mind?

Not all flights are immediately confirmed. Bookings go through various stages (e.g. saved, selected, payment requested, confirmed). While confirmed bookings are marked with a checkmark in details, earlier stages may require checking OTIS for status updates.

If something doesn t appear as expected, it might still be in progress or awaiting action (e.g. missing artist data or pending payment). You can always open OTIS from within details to verify the current status.


The Travel AI integration is brand new and actively evolving. If anything feels unclear or doesn’t work as expected, feel free to reach out to us and share your feedback.

Release Interface

What is a Release in details?
In the music business, a Release is what people talk about when an artist “drops a new album” or “puts out a new single.” It marks the start of a commercial campaign combining music, visuals, marketing, and distribution across platforms and formats.

In details, a Release represents that full project: it s the central container for everything tied to the launch from the recordings to the metadata to the marketing context. Whether you’re managing a debut EP, a deluxe reissue, or a compilation series, this is where the project comes together.

Think of a Release as the umbrella under which you organize:
Products (CD, vinyl, digital editions)
Original tracks plus Remixes (with licensing, ISRCs, metadata etc.)
Artwork, an overall Release Date vs specific product street dates
” Optional assets like merchandise (e.g. T-shirts) or concert tickets linked to the campaign

A Release groups all project components and defines the top-level structure in details.
Hierarchy in details: Release > Product > Track

Important: A Product can only belong to one Release.


► OVERVIEW

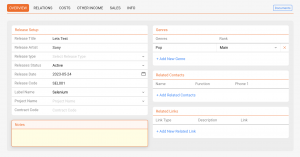
Use this tab to edit the core setup of a Release.

  • Release Title
  • Release Artist(s)
  • Release Type (e.g. Album, EP, Single, Compilation, Promo, Merchandise, Audiobook, Book, Movie)
  • Status (custom: e.g. Active, Back Catalogue, Promo)
  • Release Date (plus optional street dates per product)
  • Release Code (e.g. DET010, often root of product codes)
  • Label (A Release always belongs to exactly one label)

Additional options:

  • Add genres using [+ Add New Genre]
  • Add related contacts (e.g. artist, manager, designer) using [+ Add Related Contacts]
  • Add external links (e.g. Spotify, Dropbox, Apple) via [+ Add New Related Link] with title and description
  • Write notes in the [Notes] field

► RELATIONS

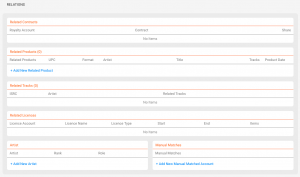
This tab shows all linked elements of a Release:

  • Contracts & Royalty Accounts including shares & contracts
  • Products each product belongs to only one Release
  • Tracks can appear in multiple Releases (e.g. compilations)
  • Licenses sync & third-party licenses are also included in reporting
  • Artists connections help track collaborations
  • Manual Matches store external naming (e.g. Bandcamp variant codes)

Clicking a blue-colored content opens the related entry.

► TASKS

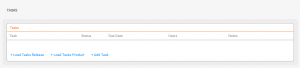
Each Release has its own TASKS tab. You can create tasks manually or load a predefined task template group.

To learn more, check out:

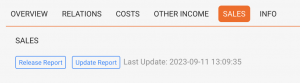
► SALES

Use this tab to analyze income and costs related to your Release.

  • Release Report: Overview of all revenue streams (physical, digital, licenses, subsidies), costs, and break-even point
  • Update Report: Generates charts and sales insights (e.g. per shop or channel)

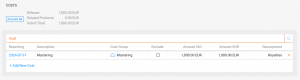
► COSTS

Use this tab to log and manage project costs not covered elsewhere. This may include:

  • Studio rentals
  • Mixing & mastering costs
  • Marketing & promo campaigns
  • Artwork or video production costs

These costs feed into the break-even analysis shown in the SALES tab.

You can upload proof documents using the small cloud icon next to each entry this helps keep all relevant files connected to your reporting. A blue cloud means a file is stored.

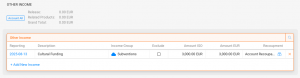
► OTHER INCOME

Use this tab to add alternative income streams not directly linked to sales, for example:

  • Grants or public funding (e.g. Initiative Musik)
  • Sponsorship income (e.g. brand collaborations)
  • Merchandise or ticket bundles

Entries here can be factored into your financial reports.

You can upload proof documents using the small cloud icon next to each entry this helps keep all relevant files connected to your reporting. A blue cloud means a file is stored.

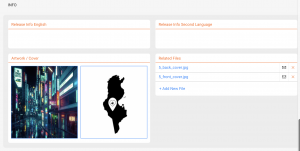
► INFO

Use this tab to manage descriptive and visual material related to the Release:

  • Add info texts (in English and one other language)
  • Upload artwork and cover images
  • Attach files like MP3s, WAVs, contracts or infosheets via [+ Add New File]

Files can be reused for automated sheet generation.